Storz AUTOCON II 200 Gebrauchsanweisung

Verwandte Anleitungen für Storz AUTOCON II 200


Inhaltszusammenfassung für Storz AUTOCON II 200
- Seite 1 GEBRAUCHSANWEISUNG 5322 20-xxx AUTOCON ® II 200 INSTRUCTION MANUAL 5322 20-xxx AUTOCON ® II 200 5322 20-xxx AUTOCON ® II 200...
-
Seite 3: Allgemeiner Warnhinweis
Vielen Dank für Ihr Vertrauen in den Namen Thank you for your expression of con dence in the KARL|STORZ. Auch in diesem Produkt steckt un- KARL|STORZ brand name. Like all of our other KARL|STORZ. sere ganze Erfahrung und Sorgfalt. Sie und Ihr Haus products, this product is the result of years of expe- haben sich damit für ein modernes und hochwerti-... -
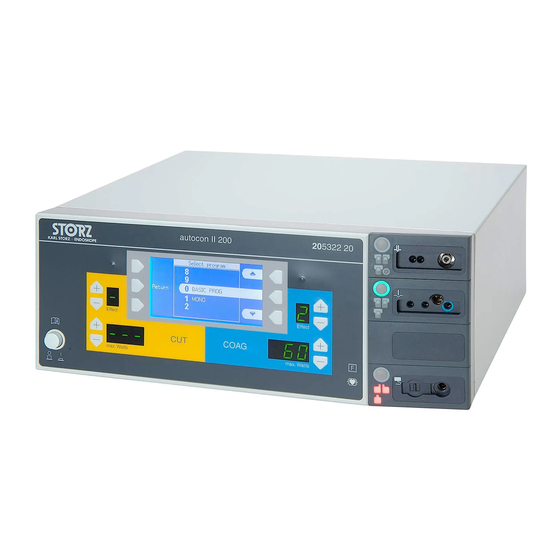
Seite 4: Geräteabbildungen
Geräteabbildungen Images of the equipment... -
Seite 5: Bedienungselemente, Anzeigen, Anschlüsse Und Ihre Funktion
Bedienungselemente, Controls, displays, Anzeigen, Anschlüsse connectors, and und ihre Funktion their uses Q Netzschalter – Schaltet das Gerät ein oder aus Power switch – Turns the unit on and off – W CUT-Einstellbereich – Bereich für CUT settings area – Area for CUT-Einstellungen CUT settings CUT –... - Seite 6 Bedienungselemente, Controls, displays, Anzeigen, Anschlüsse connectors, and und ihre Funktion their uses e AUTO START-Kontrollleuchte – die AUTO e AUTO START indicator – The AUTO START AUTO START– AUTO START START-Kontrollleuchte leuchtet, wenn die indicator lights up when the AUTO START AUTO START.
-
Seite 7: Symbolerläuterungen
Symbolerläuterungen Symbols employed Vor Inbetriebnahme des Gerätes Read the instructions carefully before operating the Gebrauchsanweisung beachten! equipment Netzschalter Power switch (Taste mit Raststellung gedrückt/nicht gedrückt) (key with indexed position pressed/not pressed) « ») +/– Tasten zum Einstellen der Schnitt- und +/- key for setting the cutting and coagulation +/–... - Seite 8 Symbolerläuterungen Symbols employed Service Service Potenzialausgleichsanschluss Potential equalization connector Bildschirm-Symbole (menüabhängig) Screen symbols (dependent on menu) Einpedalfußschalter Single-pedal footswitch Dual-pedal footswitch – Cutting only – Doppelpedalfußschalter – nur Schneiden – Doppelpedalfußschalter – nur Koagulation Dual-pedal footswitch – Coagulation only Dual-pedal footswitch – Cutting and coagulation –...
-
Seite 9: Inhaltsverzeichnis
Inhalt Contents Allgemeiner Warnhinweis ........III General warning ..........III ........ III Geräteabbildungen ..........IV Images of the equipment ........IV ....IV Bedienungselemente, Anzeigen, Controls, displays, connectors Anschlüsse und ihre Funktion ......V and their uses ............V ........V Symbolerläuterungen ..........VII Symbols employed ..........VII ........VII General information ......3... - Seite 10 Inhalt Contents Buchse selektieren ........65 Selecting a socket ........65 ............65 CUT-Modus einstellen ........65 Setting the CUT mode .......65 CUT ......65 COAG-Modus einstellen ......66 Setting the COAG mode......66 COAG .......66 CUT-Effekt/COAG-Effekt einstellen ....66 Setting the CUT effect / COAG effect ..66 CUT/ COAG ..66 Leistungsbegrenzung einstellen ....67...
-
Seite 11: Allgemeines
Allgemeines General information Das Prinzip der The principle of high Hochfrequenzchirurgie frequency surgery Biologisches Gewebe enthält eine mehr oder weni- Biological tissue contains a more or less high con- ger hohe Konzentration an Elektrolyten. Dadurch ist centration of electrolytes, making it suf ciently con- das Gewebe genügend leitfähig, um elektrochirur- ductive to be treated electrosurgically. -
Seite 12: Gewebetrennung
Allgemeines General information Gewebetrennung Separation of tissue Bei der Gewebetrennung – Schneiden – wird die When separating tissue (cutting), the cell sap of the – – Zell üssigkeit des Gewebes zum Verdampfen tissue is vaporized. Due to the resulting vapor pres- gebracht. - Seite 13 Allgemeines General information Gewebekoagulation Tissue coagulation Um biologisches Gewebe zu koagulieren ist es To coagulate biological tissue, it must be heated to notwendig, dieses auf ca. 70 °C zu erhitzen. approx. 70°C. 70 °C. Um eine gewebetrennende Wirkung des Stromes To prevent the current from causing tissue zu vermeiden, muss die Stromzufuhr und damit die separation, the power supply, and consequently...
- Seite 14 Allgemeines General information Aufgrund der Inhomogenität der elektrischen und Due to the inhomogeneity of the electrical and ther- thermischen Eigenschaften im Gewebe und der mal properties of tissue and the resulting uneven daraus ableitbaren ungleichmäßigen Stromdichte- current density distribution within the tissue, the verteilung des Gewebes steigt die Temperatur bei temperature rises with an irregular distribution when Stromzufuhr unregelmäßig verteilt an.
- Seite 15 Allgemeines General information Standard-Koagulation Standard coagulation Bei der Standard-Koagulation wird die Genera tor - With standard coagulation, the generator volt- spannung so gering gehalten, dass es während des age is kept so low that no arcing is able to take Koagulationsvorgangs zu keiner Licht bo gen bildung place between the electrode and tissue during zwischen Elektrode und Gewebe kommen kann.
- Seite 16 Allgemeines General information Die vom Anwender feststellbare Eigenschaft einer The operator bases his assessment of the quality of guten Gewebetrennung (Schneiden) ist von einer the tissue cutting on the various parameters of the Vielzahl von verschiedenen Parametern des Ge- entire system. samtsystems abhängig.
-
Seite 17: Das Gerät Autocon ® Ii 200
Allgemeines General information Das Gerät AUTOCON II|200 The AUTOCON II|200 unit AUTOCON II 200 ® ® ® ® Das Hochfrequenz-Chirurgiegerät AUTOCON The AUTOCON ® II 200 HF surgical unit is a uni- 200 ist ein universell einsetzbares Gerät, das die prä- versally applicable unit which permits the precise AUTOCON ®... -
Seite 18: Sicherheitshinweise
Sicherheitshinweise Safety instructions Warn- und Vorsichtshinweise Warnings and cautions Bitte lesen Sie diese Gebrauchsanweisung sorg- Please read this manual and follow the instructions fältig durch und beachten Sie die Anwei sungen carefully. Knowledge of the instruction manual is genau. Die Kenntnis der Gebrauchsanweisung ist indispensable for the correct operation of the unit. - Seite 19 ❏ Die Einweisung darf nur von Personen ❏ In cases of uncertainty and questions, durchgeführt werden, die aufgrund ihrer please contact KARL STORZ. The ad- Kenntnisse und praktischen Erfahrung dazu dresses can be found in the address list at geeignet sind.
- Seite 20 Sicherheitshinweise Safety instructions Warn- und Vorsichtshinweise Warnings and cautions ❏ Bitte beachten Sie dazu den Hinweis ❏ Please refer to the Note on page 106 in the ❏ auf Seite 106 im Abschnitt »Elektromagne- Section ‘Electromagnetic compatibility’ at « tische Verträglichkeit« am Ende dieser the end of this instruction manual.
-
Seite 21: Elektrischer Schlag Warnung: Defekte Schutzkontakt
Sicherheitshinweise Safety instructions Warn- und Vorsichtshinweise Warnings and cautions VORSICHT: Überhitzung des Gerätes CAUTION: Overheating of unit in cases bei schlechter Ventilation of poor ventilation Bei schlechter Ventilation kann das Gerät In cases of poor ventilation, the unit may überhitzen, beschädigt werden und overheat, be damaged, or fail. - Seite 22 Gerät zu verwenden, wenden WARNING: Connection of unit / equip- Sie sich bitte an KARL|STORZ. Die Adres- ment trolley and mains during cleaning sen nden Sie in der Adressliste am Ende and disinfection dieser Gebrauchsanweisung.
- Seite 23 Sicherheitshinweise Safety instructions Warn- und Vorsichtshinweise Warnings and cautions WARNUNG: Zündfähige endogene WARNING: Flammable endogenic Gase im Magen-Darm-Trakt gases in the gastrointestinal tract Explosionsgefahr für den Patienten! Risk of explosion for the patient! ❏ Saugen Sie die Gase vor Anwendung der ❏...
-
Seite 24: Verbrennung
Any such alteration will ❏ Zu Ihrer Sicherheit und der des Patienten: result in an exclusion of liability for Versuchen Sie niemals selbst zu reparie- KARL STORZ. ❏ ren oder zu verändern. Jede Veränderung führt zum Ausschluss der Haftung durch KARL|STORZ. - Seite 25 Sicherheitshinweise Safety instructions Warn- und Vorsichtshinweise Warnings and cautions WARNUNG: HF-Leckstrom fließt über WARNING: HF leakage current flows Metallteile over metal parts Der Patient darf keinen Kontakt zu elek- There must be no contact between the trisch leitfähigen Gegenständen haben. patient and electrically conductive objects.
- Seite 26 Sicherheitshinweise Safety instructions Warn- und Vorsichtshinweise Warnings and cautions WARNUNG: Unbeabsichtigte WARNING: Unintentional activation of Aktivierung des Instrumentes the instrument Verbrennungsgefahr für Patient und Risk of burns for the patient and medical medizinisches Personal! personnel! ❏ Legen Sie Instrumente an einen sicheren ❏...
- Seite 27 Sicherheitshinweise Safety instructions Warn- und Vorsichtshinweise Warnings and cautions ❏ Schalten Sie sofort den Netzschalter des ❏ Turn the power switch of the HF surgical ❏ HF-Chirurgiegerätes aus. Entfernen Sie das unit off immediately. Only then should you Instrument erst dann aus dem Körper. remove the instrument from the body.
- Seite 28 Sicherheitshinweise Safety instructions Warn- und Vorsichtshinweise Warnings and cautions ❏ Wenn lang dauernde Aktivierungen dicht ❏ If long activation periods follow each other ❏ aufeinander folgen, steigt die Tempera- closely, the temperature of the neutral elec- tur unter der Neutralelektrode. Sorgen trode increases.
-
Seite 29: Gefahren Durch Falsche Anwendung Der Neutralelektrode
Sicherheitshinweise Safety instructions Warn- und Vorsichtshinweise Warnings and cautions WARNUNG: Gewebestrukturen/ Gefäße WARNING: Tissue structures/vessels mit kleinem oder kleiner werdendem with small or narrowing cross sections Querschnitt When unipolar HF current ows through Wenn unipolarer HF-Strom durch Körper- body parts with a relatively small cross teile mit relativ kleinem Querschnitt ießt, section, there is a risk that undesirable besteht die Gefahr ungewollter Koagulatio-... - Seite 30 Sicherheitshinweise Safety instructions Warn- und Vorsichtshinweise Warnings and cautions der Neutralelektrode und der Haut nicht The unit does not produce an optical or überwacht. Bei unzureichendem Kon- acoustic warning signal when there is takt zwischen Neutralelektrode und Haut insuf cient contact between the neutral erzeugt das Gerät kein optisches und kein electrode and the skin.
- Seite 31 « », . 41.) HINWEIS: KARL|STORZ emp ehlt die : KARL STORZ NOTE: KARL|STORZ recommends the use of Verwendung einer zwei ächigen Neutralelek- a two-faced neutral electrode with the ‘Neutral trode mit der Einstellung »Neutralelektrode electrode dynamic’ or ‘Neutral electrode «...
-
Seite 32: Defektes Gerät Warnung: Unerwünschter Anstieg
Sicherheitshinweise Safety instructions Warn- und Vorsichtshinweise Warnings and cautions Defektes Gerät Defective unit WARNUNG: Unerwünschter Anstieg WARNING: Undesirable increase in der Ausgangsleistung durch Versagen power output caused by HF surgical des HF-Chirurgiegerätes unit failure Gefahr ungewollter Gewebeschäden für Risk of undesirable tissue damage for den Patienten! patient! ❏... - Seite 33 Sicherheitshinweise Safety instructions Warn- und Vorsichtshinweise Warnings and cautions VORSICHT: Störung von elektronischen CAUTION: Interference of electronic Geräten durch das HF-Chirurgiegerät units by HF surgical unit Das aktivierte HF-Chirurgiegerät kann The activated HF surgical unit can in uence elektronische Geräte durch Störungen in electronic units by interfering with their der Funktion beeinträchtigen.
-
Seite 34: Beschädigung Des Gerätes Und Des Zubehörs Vorsicht: Zu Hohe Elektrische
Sicherheitshinweise Safety instructions Warn- und Vorsichtshinweise Warnings and cautions VORSICHT: Gestapelte Geräte CAUTION: Stacked units Wenn Sie das Gerät neben anderen Stacking the unit next to or on top of other Geräten oder mit anderen Geräten stapeln, units can affect all the units involved. können sich die Geräte gegenseitig The units may fail or function incorrectly. - Seite 35 Sicherheitshinweise Safety instructions Warn- und Vorsichtshinweise Warnings and cautions VORSICHT: Sehr lange Aktivierungs- CAUTION: Very long activation cycles zyklen ohne Abkühlungsphasen without cooling phases Das HF-Chirurgiegerät ist für eine relative The HF surgical unit is designed and tested Einschaltdauer von 25 % (entsprechend for a relative activation period of 25% IEC 60601-2-2) konstruiert und getestet.
-
Seite 36: Bestimmungsgemäße Verwendung
II 200 verwendet werden, das von KARL|STORZ als für accessories which have been designated by das Gerät geeignet bezeichnet wird oder dessen KARL|STORZ as suitable for the unit or the safe use KARL|STORZ sicherheitstechnisch unbedenkliche Verwendungs- of which is proven. -
Seite 37: Betroffener Körperteil Oder Gewebetyp
Sicherheitshinweise Safety instructions Betroffener Körperteil oder Affected body part or tissue type Gewebetyp Das Einsatzgebiet ist nicht auf bestimmte Körpertei- The eld of application is not con ned to certain le oder Gewebetypen eingeschränkt. parts of the body or types of tissue. Benutzerpro l User pro le •... -
Seite 38: Sicherheitsmaßnahmen Am Aufstellort
Sicherheitshinweise Safety instructions Sicherheitsmaßnahmen am Safety precautions at the site Aufstellort of installation Das Gerät darf nur in medizinisch genutzten Räu- The unit may only be used in medical rooms in men benutzt werden, deren elektrische Anlagen which the electrical equipment has been installed in nach den national gültigen Vorschriften installiert accordance with applicable national regulations. -
Seite 39: Wichtige Hinweise Zur Unipolaren Anwendung
Sicherheitshinweise Safety instructions Wichtige Hinweise zur Important notes on the use of unipolaren Anwendung the unipolar technique Verbrennungsgefahren Risk of burns Die HF-Chirurgie ist prinzipiell mit gewissen Risiken HF surgery always entails certain risks for both user für Anwender und Patient verbunden. Gefahren and patient. -
Seite 40: Verbrennungen Infolge Fehlerhafter Applikation Der Neutralelektrode
Sicherheitshinweise Safety instructions Verbrennungen infolge fehlerhafter Burns due to incorrect application of Applikation der Neutralelektrode the neutral electrode Bei falscher oder fehlender Applikation der With incorrect or no application of the neutral Neutralelektrode besteht ein hohes Risiko einer electrode, there is a high risk of thermal tissue dam- thermischen Gewebeschädigung sowohl an der age both at the point of application of the neutral Applikationsstelle der Neutralelektrode wie auch an... - Seite 41 Sicherheitshinweise Safety instructions Die Neutralelektrode wird am jeweils dem Opera- The neutral electrode is secured to either the upper tionsfeld nächstgelegenen Oberarm/ Oberschen- arm or thigh, depending on which is nearest the kel befestigt. Um die ganz ächige Au age der operating eld.
- Seite 42 Sicherheitshinweise Safety instructions Da bei einer derartigen Berührung die Kontakt- Since contact areas will generally be small in ächen in der Regel relativ klein sind, könnten such cases, burn-necroses could arise from high hochfrequente Leckströme durch lokal hohe frequency leakage currents due to high local current Stromdichten Verbrennungs nekrosen verursachen.
- Seite 43 Sicherheitshinweise Safety instructions Verbrennungen durch unbeabsichtigtes Burns due to unintentional activation of the HF Aktivieren des HF-Gerätes generator Verbrennungen können dem Patienten auch durch Patients can also suffer burns due to unintentional unbeabsichtigtes Aktivieren des HF-Gerätes zuge- activation of the HF generator. Unintentional activa- fügt werden.
- Seite 44 Sicherheitshinweise Safety instructions Verbrennungen durch nicht angepasste Burns due to improper setting of HF power HF-Leistungsabgabe output Die optimale HF-Leistungsabgabe zeichnet sich The optimal HF power level setting is that which dadurch aus, dass der erwünschte Effekt (Schnei- yields the best results in terms of the desired effect den/Koagulieren) am besten erreicht und die (cutting/coagulation) with minimal incidence of unerwünschten Effekte (z.
- Seite 45 Sicherheitshinweise Safety instructions Verbrennungen durch ungeeignete Burns due to unsuitable application Anwendung If, during unipolar application, HF current has Muss der hochfrequente Strom bei der unipolaren to ow through tissue constrictions, it must be Anwendung durch Gewebe ver en g ung en ießen, remembered that a coagulation effect can occur at so ist zu berücksichtigen, dass ein Koagulations- the constricted point.
-
Seite 46: Sicherheitseinrichtungen
Sicherheitshinweise Safety instructions Implantate Implants Bei Patienten mit eingesetzten elektrisch-leitfähigen In the case of patients with electrically conduc- Metallimplantaten, ist darauf zu achten, dass bei tive metal implants it must be ensured that with all allen Anwendungen mit HF-Chirurgie der Strom uss applications involving HF surgery the current ow oder Stromweg des hochfrequenten elektrischen or current path of the HF electric current does not... - Seite 47 Sicherheitshinweise Safety instructions Sicherheitseinrichtungen Safety Devices Überwachung der Neutralelektrode Monitoring the neutral electrode ® Das AUTOCON ® II 200 verfügt über eine Sicher- The AUTOCON |II|200 has a safety circuit which AUTOCON ® II 200 heitsschaltung, welche die elektrische Verbin dung monitors the electrical connection between the zwischen Gerät und Neutralelektrode über wacht.
- Seite 48 Sicherheitshinweise Safety instructions Sicherheitseinrichtungen Safety Devices Setup Einstellung Neutralelektrode: beliebig: Neutral electrode setup setting: any: Es lassen sich sowohl einflächige oder zweiflächige Both single-faced and double-faced neutral elec- Neutralelektroden anschließen. Bei der einflächigen trodes can be connected up. In the case of the entfallen die Überwachungsmaßnahmen wie oben single-faced electrodes, there are no monitoring beschrieben.
- Seite 49 Sicherheitshinweise Safety instructions Sicherheitseinrichtungen Safety Devices « — » « — » • • • • « » • • • « » • « » • « » • « » Eine Prüfung des Anschlusskabels der Neutralelek- Check the connection cable of the neutral electrode trode kann vor Einsatz des HF-Chirurgiegerätes wie before application as follows: folgt vorgenommen werden:...
-
Seite 50: Begriffsbestimmungen Und Erläute- Rungen Zum Autocon Ii 200
• FORCED Coag • FORCED Coag • FORCED Coag Unipolar 3-pin socket and KARL|STORZ / ERBE Buchse Unipolar 3 Pin und KARL|STORZ / ERBE KARL|STORZ / ERBE Wahlweise kann einer der folgenden Stecker Optionally, one of the following connectors can be... - Seite 51 • International bipolar connector with 2 pins • (Abstand der Pins 28,5 mm); (Distance between pins 28.5 mm); 28,5| • Bipolarstecker nach KARL|STORZ / ERBE- • Bipolar connector in acc. with KARL|STORZ / Standard ERBE standard • KARL STORZ / ERBE Buchse für Neutralelektrode...
-
Seite 52: Leistungsbegrenzung
Begriffsbestimmungen Definitions and explanations AUTOCON II 200 und Erläuterungen zum for AUTOCON ® II 200 ® AUTOCON ® II 200 Leistungsbegrenzung Power limitation Die Grenze der abgegebenen mittleren HF-Leistung The HF power output limit is 220 W ±20%. liegt bei 220 Watt ± 20%. Diese maximale Grenze However, this maximum limit is not available in ±20%. - Seite 53 Begriffsbestimmungen Definitions and explanations AUTOCON II 200 und Erläuterungen zum for AUTOCON ® II 200 ® AUTOCON ® II 200 Buchse Schneid-Modi Coag-Modi Socket Cutting modes Coag modes BIPOLAR STANDARD BIPOLAR BIPOLAR Coag STANDARD Coag Bipolar STANDARD Coag Bipolar Coag aus Coag off Coag POWER Cut...
-
Seite 54: Werkseinstellungen
Begriffsbestimmungen Definitions and explanations AUTOCON II 200 und Erläuterungen zum for AUTOCON ® II 200 ® AUTOCON ® II 200 Werkseinstellungen der HF-Modi Grundprogramm WARNUNG: Modus und Leistungsein- Standardeinstellungen für freie Programmspeicher stellung sollten an den Eingriff ange passt UNIPOLAR Effekt Leistung [Watt] Dauer... -
Seite 55: Factory Settings
Begriffsbestimmungen Definitions and explanations AUTOCON II 200 und Erläuterungen zum for AUTOCON ® II 200 ® AUTOCON ® II 200 Factory settings for HF modes Basic program WARNING: The mode and power set- Standard settings for free program memory slots ting should be adapted to the interventi- UNIPOLAR Effect... - Seite 56 Begriffsbestimmungen Definitions and explanations AUTOCON II 200 und Erläuterungen zum for AUTOCON ® II 200 ® AUTOCON ® II 200 POWER Cut – – STANDARD COAG – – FORCED Coag – – GASTRO CUT ( STANDARD Coag AUTO STOP – –...
-
Seite 57: Schneidemodi
Begriffsbestimmungen Definitions and explanations AUTOCON II 200 und Erläuterungen zum for AUTOCON ® II 200 ® AUTOCON ® II 200 Schneidemodi Cutting modes POWER Cut POWER Cut POWER Cut Eigenschaften Properties Reproduzierbare, spannungsgeregelte schonende Reproducible voltage-controlled atraumatic cutting, Schnitte, maximale Gewebeschonung, geringe bis minimizing trauma to tissue, low to medium level of mittlere Hämostase. -
Seite 58: Koagulationsmodi
Begriffsbestimmungen Definitions and explanations AUTOCON II 200 und Erläuterungen zum for AUTOCON ® II 200 ® AUTOCON ® II 200 GASTRO Cut (optional) GASTRO Cut (optional) GASTRO Cut ( HINWEIS: Dieser Modus steht nur NOTE: This mode is only available for the bei den Modellen 20 5322 20-010 und models 20 5322 20-010 and 20 5322 20C010. - Seite 59 Begriffsbestimmungen Definitions and explanations AUTOCON II 200 und Erläuterungen zum for AUTOCON ® II 200 ® AUTOCON ® II 200 FORCED Coag FORCED Coag FORCED Coag Eigenschaften Properties Effektive, schnelle »Standard«-Koagulation mit Efficacious fast ‘standard’ coagulation with , « » erhöhter Spannung.
-
Seite 60: Aufstellen Und Bedienungshinweise
Aufstellen und Installation and Bedienungshinweise operating instructions Auspacken des Gerätes Unpacking the equipment Entnehmen Sie das AUTOCON ® II 200 und das Carefully remove the AUTOCON ® II 200 and its AUTOCON ® II 200 Zubehör vorsichtig der Verpackung. accessories from their packaging. Überprüfen Sie die Lieferung auf Vollständigkeit und Check for missing items and evidence of shipping auf eventuelle Beschädigungen. -
Seite 61: Prüfen Der Eingestellten Netzspannung
Aufstellen und Installation and Bedienungshinweise operating instructions Das Gerät ist mit einer Steckvorrichtung für The instrument is equipped with a connector den Potenzialausgleich ausgerüstet. Lassen Sie potential equilization. The instrument’s ground line die Erdung ggf. durch sachkundiges Personal should be installed by a quali ed electrician. durchführen. - Seite 62 Aufstellen und Installation and Bedienungshinweise operating instructions Netzkabel bei ausgeschaltetem Gerät anschlie- Connect power cord when the unit is switched off. Insert power cord into power cord receptacle A as ßen; dazu Netzstecker bis zum Anschlag in Netzbuchse|A einschieben. far as it will go. WARNUNG: Achten Sie immer auf die WARNING: Make sure to use the correct richtige Netzspannung und den richtigen...
-
Seite 63: Inbetriebnahme
Aufstellen und Installation and Bedienungshinweise operating instructions Inbetriebnahme Operating the unit Erstmalige Inbetriebnahme Operating the unit for the rst time Den Auslieferungszustand des AUTOCON II 200 The following tables describe the delivery state of ® beschreiben die folgenden Tabellen: the AUTOCON II 200: AUTOCON II 200... -
Seite 64: Gerät Einschalten
Aufstellen und Installation and Bedienungshinweise operating instructions Gerät einschalten Switching on the unit Schalten Sie das Gerät mit dem Netzschalter ein Switch the unit on with the power switch and ob- und beobachten Sie die Anzeigeelemente. Das serve the display elements. The unit performs a test Gerät führt einen Funktionstest durch und prüft for proper functioning and checks all the sockets. -
Seite 65: Programm Wählen/Wechseln
Aufstellen und Installation and Bedienungshinweise operating instructions Programm wählen/wechseln Selecting/changing a program Variante 1: Startbildschirm = Programmwahl- Version 1: Start screen = program selection Bildschirm (direkt nach Einschalten) screen (directly after switching on) Mit der Auswahl-Taste R1 oder R3 durch die Pro- Use the selection key R1 or R3 to scroll through the R3 «... -
Seite 66: Sprache Einstellen
Aufstellen und Installation and Bedienungshinweise operating instructions Sprache einstellen Setting the language Beim Auslieferungszustand des AUTOCON II 200 When delivered, English is set as the screen lan- ® ist als Bildschirmsprache Englisch eingestellt. guage of the AUTOCON II 200. ® AUTOCON II 200 ®... - Seite 67 Aufstellen und Installation and Bedienungshinweise operating instructions Wiederholen Sie die beiden letzten Schritte so Repeat the last two steps as often as required until lange, bis Sie das Passwort vollständig eingegeben you have completely entered the password. haben. Then press the selection key L1. Drücken Sie dann auf die Auswahl-Taste L1.
-
Seite 68: Fußschalter Anschließen
Aufstellen und Installation and Bedienungshinweise operating instructions Fußschalter anschließen Connecting the footswitch Das Gerät kann mit einem Zweipedalfußschalter The unit can be operated with a dual-pedal foot- und/oder einen Einpedal-Fußschalter betrieben switch and/or a single-pedal footswitch. werden. Connect the footswitches to the corresponding Die Fußschalter an die entsprechenden Buchsen sockets on the rear of the unit. -
Seite 69: Neutralelektrode Anschließen
Aufstellen und Installation and Bedienungshinweise operating instructions Neutralelektrode anschließen Connecting the neutral electrode HINWEIS: Beachten Sie unbedingt die NOTE: Please observe the information on the Informationen zur Neutralelektrode im neutral electrode in the section about safety Abschnitt über Sicherheitshinweise auf Seite information on pages 21 and 31 at all times. -
Seite 70: Gerät Anwenden (Schneiden/Koagulieren)
Aufstellen und Installation and Bedienungshinweise operating instructions * Wenn der Widerstand nicht im zugelassenen * If the resistance is not in the permitted range (as in Bereich liegt (wie in der Abbildung), entfernen Sie the image), remove the neutral electrode and check die Neutralelektrode und prüfen Sie den Zustand the condition of the skin (skin must be shaved and der Haut (Haut muss rasiert und trocken sein). -
Seite 71: Gerät (Hf-Strom) Aktivieren
Aufstellen und Installation and Bedienungshinweise operating instructions Gerät (HF-Strom) aktivieren Activating the unit (HF current) VORSICHT: Sehr lange Aktivierungs- CAUTION: Very long activation cycles zyklen ohne Abkühlungsphasen without cooling phases Das HF-Chirurgiegerät ist für eine relative The HF surgical unit is designed and tested Einschaltdauer von 25 % (entsprechend for a relative activation period of 25% IEC 60601-2-2) konstruiert und getestet. -
Seite 72: Effekt/Leistungsbegrenzung Ändern
Aufstellen und Installation and Bedienungshinweise operating instructions Automatisch über die AUTO START-Funktion Automatically via the AUTO START function AUTO START HINWEIS: In manchen Ländern ist die NOTE: Activation via the AUTO START func- Aktivierung der AUTO START-Funktion nicht tion is not possible in some countries. AUTO START möglich. -
Seite 73: Einstellungen
Aufstellen und Installation and Bedienungshinweise operating instructions Einstellungen Settings Programmeinstellungen ändern Changing program settings Programmeinstellungen sind nur von fachkundigem Program settings must only be performed by Personal durchzuführen, das die Funktionen des trained personnel who are well versed in the unit’s Geräts genauestens kennt und die Auswirkungen functions and can judge the consequences of the der vorgenommenen Einstellungen beurteilen kann. -
Seite 74: Coag-Modus Einstellen
Aufstellen und Installation and Bedienungshinweise operating instructions COAG-Modus einstellen Setting the COAG mode COAG Eine Beschreibung der CUT- und COAG-Modi A description of the CUT and COAG modes can be COAG nden Sie ab Seite 49 bzw. 50. found as of page 49 and 50 respectively. Taste R2 drücken. -
Seite 75: Leistungsbegrenzung Einstellen
Aufstellen und Installation and Bedienungshinweise operating instructions Leistungsbegrenzung einstellen Setting the power limitation Voraussetzung: Die einzustellende Buchse ist se- Prerequisite: The socket to be set is selected and lektiert und der gewünschte Modus ist eingestellt. the required mode set. Die Leistungsbegrenzung legt die maximale Leis- The power limitation speci es the maximum output tung fest, die das Gerät im gewählten CUT- bzw. - Seite 76 Aufstellen und Installation and Bedienungshinweise operating instructions Die Pedale der beiden Fußschalter können Sie den The pedals of both footswitches can be assigned to verschiedenen Buchsen des Geräts zuordnen. the different sockets on the unit. Beispiel: Das blaue und gelbe Pedal des Zweipedal- Example: The blue and yellow pedals of the Fußschalters wird der Unipolaren Buchse zugeord- dual-pedal footswitch are assigned to the unipolar...
- Seite 77 Aufstellen und Installation and Bedienungshinweise operating instructions Die erste Seite des »Aktivierungsart«-Bildschirms The rst page of the ‘Activation type’ screen is wird angezeigt. displayed. Zwischen den beiden Seiten des »Aktivierungsart«- You can toggle between the two pages of the ‘Acti- Bildschirms können Sie mit der Auswahl-Taste R2 vation type’...
-
Seite 78: Programmeinstellungen Speichern
Aufstellen und Installation and Bedienungshinweise operating instructions Der Status der AUTO START-Funktion (aktiviert* The status of the AUTO START function (activated* AUTO START ( oder nicht aktiviert) ist sowohl an der AUTO START- or not activated) is visible both via the AUTO START Kontrollleuchte neben der Buchse als auch im indicator next to the socket and also in the CUT- AUTO START... -
Seite 79: Neues Programm Anlegen
Aufstellen und Installation and Bedienungshinweise operating instructions Der Speicher-/Programmnamen-Bildschirm wird The memory/program name screen is displayed. angezeigt. To save the changes made in the displayed Zur Speicherung der geänderten Einstellungen im program, press the selection key L3 for at least 3 angezeigten Programm für mindestens 3|Sekunden seconds. -
Seite 80: Neues Programm Erstellen
Aufstellen und Installation and Bedienungshinweise operating instructions Um ein weiteres Zeichen einzugeben, Auswahl- To enter an additional character, press the selection key L2. The position of the next character is marked Taste L2 drücken. Die Position des nächsten Zeichens wird mit einem hellen Kästchen markiert. with a light box. -
Seite 81: Programm Löschen
Aufstellen und Installation and Bedienungshinweise operating instructions Der Speicher-/Programmnamen-Bildschirm wird The memory/program name screen is displayed. angezeigt. Use the selection key L2 or R2 to select the rst Mit der Auswahl-Taste L2 oder R2 das erste character of the program name that you wish to Zeichen des Programmnamens anwählen, das Sie change. -
Seite 82: Setup-Einstellungen Ändern
Aufstellen und Installation and Bedienungshinweise operating instructions Am unteren Rand des Displays erscheint ein Balken A bar with an advancing time display appears at the mit fortschreitender Zeitanzeige. Nach 3|Sekunden bottom of the display. After 3 seconds, a message wird über dem Balken die Meldung eingeblendet, appears over the bar stating that the program has dass das Programm gelöscht wurde. -
Seite 83: Service-Einstellungen Ändern
Aufstellen und Installation and Bedienungshinweise operating instructions Service-Einstellungen ändern Changing service settings HINWEIS: Die Service-Einstellungen NOTE: The service settings should only be sollten nur von einem autorisierten Service- created/changed by an authorized service Techniker eingestellt/geändert werden technician (exception:|Language setting, see ( Ausnahme:| Einstellung Sprache, siehe S. -
Seite 84: Meldungen Auf Dem Display Des Autocon ® Ii 200
Aufstellen und Installation and Bedienungshinweise operating instructions Meldungen auf dem Display Messages on the des AUTOCON |II|200 AUTOCON |II|200 display AUTOCON |II|200 ® ® ® ® ® ® Das AUTOCON II 200 kann während des Betriebs The AUTOCON II 200 can display a range of AUTOCON II 200 eine Reihe von Status- und Fehlermeldungen auf... -
Seite 85: Instandhaltung
Instandhaltung Maintenance Sicherungswechsel Fuse replacement Gerät ausschalten und Netzverbindung trennen. Switch off the unit and remove the power cord from Es sind ausschließlich die für den auf dem Typen- the electrical outlet. schild genannten Spannungsbereich geeignete Only use fuses suitable for the voltage range stated Sicherungen zu wählen. -
Seite 86: Reinigung, Desinfektion Und Sterilisation
II 200 HINWEIS: Die Anleitung »Reinigung, Desinfektion, NOTE: The instructions for “Cleaning, Disinfection, « P ege und Sterilisation von KARL|STORZ Instru- Care and Sterilization of KARL|STORZ Instruments” KARL STORZ». menten« muss beachtet werden. Dort sind die Ver- must be followed. There the procedures for clean-... - Seite 87 Produktes: Die in der Gebrauchsanweisung angegebenen Manual cleaning/ Washer/disinfector Gas sterilization Steam sterilization at up Verfahren wurden von KARL|STORZ disinfection in solution (thermal disinfection at 93°C) to|134°C (+3°C)/3 bar validiert. Verwenden Sie nur diese Verfahren. Der Aufbereitungsprozess 93°C) 134°...
- Seite 88 Parts are hot after steam sterilization. Abkühlen lassen! Allow them to cool down! Validated steam sterilization methods Validierte Dampfsterilisationsverfahren Das folgende Dampf-Sterilisationsverfahren wurde KARL|STORZ has validated the following steam KARL|STORZ von KARL|STORZ validiert: sterilization method: • Fraktioniertes Vorvakuumverfahren • Fractionated prevacuum •...
-
Seite 89: Fraktioniertes Vorvakuumverfahren
Instandhaltung Maintenance Reinigung, Desinfektion und Sterilisation Cleaning, disinfection and sterilization Fraktioniertes Vorvakuumverfahren Fractionated prevacuum procedure Das fraktionierte Vorvakuumverfahren besteht aus The fractionated prevacuum procedure also con- vier Phasen. sists of the four phases mentioned previously. • Konditionierphase • Conditioning phase In der Konditionierphase wird in der Sterilisier- A vacuum is created up to four times in the •... - Seite 90 Vacuum: 1.3 psia 70 % ( Vakuum: 1.3 psia : 1,3 psia 2. KARL|STORZ has validated EtO sterilization KARL STORZ 2. KARL|STORZ hat die Sterilisation mit EtO für using the following parameters: folgende Werte validiert: Gas mixture: 100% EtO : 100 %...
-
Seite 91: Wartung
Ländern vorgeschriebenen applicable in the various countries. Unfallverhütungsvorschriften oder Prü ntervalle. WARNUNG: Der Service darf nur durch WARNING: Servicing may only be eine von KARL|STORZ autorisierte Fach- performed by specialists authorized by KARL|STORZ kraft durchgeführt werden. KARL|STORZ. -
Seite 92: Instandsetzung
Defective items of equipment must be serviced and Die Instandsetzung von defekten Geräten darf nur repaired exclusively by persons authorized by durch von KARL|STORZ autorisierte Personen und KARL STORZ; all repair work must employ original unter Ver wendung von Originalteilen erfolgen. parts only. KARL STORZ. -
Seite 93: Reparaturprogramm
To bridge the repair period, you will, as a rule, re- der Regel ein Leihgerät, das unmittelbar nach Erhalt ceive a unit on loan which must then be returned to des reparierten Gerätes wieder an KARL|STORZ KARL|STORZ as soon as you receive the repaired KARL|STORZ zurückzugeben ist. unit. -
Seite 94: Verantwortlichkeit
Maintenance Verantwortlichkeit Limitation of liability Als Hersteller dieses Gerätes betrachten wir uns KARL|STORZ shall be liable for the safe opera- für die Sicherheit, Zuverlässigkeit und Leistung des tion, operational reliability, and performance of this Gerätes nur dann als verantwortlich, wenn: equipment only subject to the following conditions: •... -
Seite 95: Technische Beschreibung
Technische Beschreibung Technical description Fehlersuche Troubleshooting AUTOCON ® II 200 Hinweise und Fehlermeldungen Statusmeldungen Meldungstext Beschreibung Maßnahme B-84 Der Fußschalter ist betriebsbereit. Ein angeschlossener Fußschalter wurde vom System – erkannt. B-85 Der Fußschalter wurde getrennt. Der Fußschalter wurde vom System getrennt. –... - Seite 96 Technische Beschreibung Technical description Fehlersuche Troubleshooting Bedienfehlermeldungen Meldung Beschreibung Maßnahme B-0B »NESSY« Fehler. Die Verbindung zwischen Neutralelektrode und Verbindung zum Gerät prüfen. Gerät ist unterbrochen oder die zwei ächige Wenn Fehler trotz korrekter Neutralelektrode hat keinen ausreichenden Verbindung auftritt, Hautkontakt Kontakt zur Haut.
- Seite 97 Technische Beschreibung Technical description Fehlersuche Troubleshooting Operating error messages Message Description Action B-0B 'NESSY' error. The connection between the neutral electrode Check the connection to the unit. and unit has been interrupted or the two-faced If errors occur despite the correct neutral electrode does not have suf cient connection, check the skin contact to the skin.
- Seite 98 Technische Beschreibung Technical description Fehlersuche Troubleshooting B-0B «NESSY». B-10 B-17 B-1C B-1E B-1E B-1F «NESSY». B-B0 «NESSY». B-A3 B-A4 B-AA COAG. COAG. B-B1 «NESSY» : « ».
-
Seite 99: Technische Daten
Technische Beschreibung Technical description Technische Daten POWER Cut Form der HF-Spannung unmodulierte sinusförmige Wechselspannung Nennfrequenz 350 kHz (an RL = 500 Ohm) ± 10 % Crestfaktor 1,4 (an RL = 500 Ohm) Bemessungslastwiderstand 500 Ohm Max. HF-Spitzenspannung 740 Vp Anzahl der Effekte Konstanz der Effekte automatische Regelung der HF-Spitzenspannung HF-Leistungsbegrenzung... - Seite 100 Technische Beschreibung Technical description Technische Daten STANDARD Coag Form der HF-Spannung unmodulierte sinusförmige Wechselspannung Nennfrequenz 350 kHz (an RL = 500 Ohm) ± 10 % Crestfaktor 1,4 (an RL = 500 Ohm) Bemessungslastwiderstand 50 Ohm Max. HF-Spitzenspannung 190 Vp Anzahl der Effekte Konstanz der Effekte automatische Regelung der HF-Spitzenspannung HF-Leistungsbegrenzung...
-
Seite 101: Technical Data
Technische Beschreibung Technical description Technical data POWER Cut HF voltage form unmodulated sinusoidal AC voltage Rated frequency 350 kHz (at RL = 500 ohms) ± 10% Crest factor 1.4 (at RL = 500 ohms) Rated load resistance 500 ohms Max. HF peak voltage 740 Vp Number of effects Constancy of effects... - Seite 102 Technische Beschreibung Technical description Technical data STANDARD Coag HF voltage form unmodulated sinusoidal AC voltage Rated frequency 350 kHz (at RL = 500 ohms) ± 10% Crest factor 1.4 (at RL = 500 ohms) Rated load resistance 50 ohms Max. HF peak voltage 190 Vp Number of effects Constancy of effects...
- Seite 103 Technische Beschreibung Technical description POWER Cut RL = 500 O ) ± 10% 1,4 ( RL = 500 O ) 500 O 740 Vp – 220 ± 20% GASTRO Cut ( . 50) ± 10% 75 O 880 Vp ± 20% 10 –...
- Seite 104 Technische Beschreibung Technical description STANDARD Coag RL = 500 O ) ± 10% 1,4 ( RL = 500 O ) 50 O 190 Vp – 120 ± 20% FORCED Coag RL = 500 O ) ± 10% 5,0 ( RL = 500 O ) 500 O 1800 Vp –...
- Seite 105 Technische Beschreibung Technical description Technische Daten Technical data Netzanschluss / Power supply / Netzspannung / Line voltage / 100 – 120 V , 50/60 Hz [20 5322 20C / 20 5322 20C010] 220 – 240 V , 50/60 Hz [20 5322 20 / 20 5322 20-010] (US/CAN only: if connected to 240 V center-tapped installation required) Leistungsaufnahme bei max.
-
Seite 106: Technische Daten
Technische Beschreibung Technical description Technische Daten Technical data POWER Cut FORCED Coag = 500 Ohm = 500 Ohm Effect6-8 Effect5 Effect3-4 Effect4 Effect2 Effect3 Effect1 Effect2 Effect1 Power HF max. (W) Power HF max. (W) Effect8 Effect7 Effect6 Effect4 Effect5 Effect3 Effect4 Effect2... - Seite 107 Technische Beschreibung Technical description Technische Daten Technical data STANDARD Coag BIPOLAR STANDARD Coag / BIPOLAR STANDARD mit / with / AUTO STOP = 50 Ohm = 75 Ohm Effect8 Effect7 Effect 6-8 Effect6 Effect5 Effect5 Effect4 Effect4 Effect3 Effect3 Effect2 Effect2 Effect1 Effect1...
- Seite 108 Technische Beschreibung Technical description Technische Daten Technical data GASTRO CUT GASTRO CUT GASTRO CUT (nur bei bestimmten (only available for certain unit Geräteversionen verfügbar, siehe Hinweis S. 50) versions, see Note on p. 50) . 50) Initial incision stage Initial incision stage. Cutting stage ..max.
-
Seite 109: Technische Unterlagen
Technische Beschreibung Technical description Technische Daten Technical data Normenkonformität Standard compliance (für 20 5322 20-xxx) (for 20 5322 20-xxx) 20 5322 20-xxx) Nach IEC 60601-1; 60601-2-2, UL 60601-1 und According to IEC 60601-1; 60601-2-2, 60601-1; 60601-2-2, CAN/CSA C22.2 No. 601.1-M90: UL 60601-1 and CAN/CSA C22.2 No. -
Seite 110: Ersatzteile, Empfohlenes Zubehör
Ersatzteile, Spare parts, empfohlenes Zubehör recommended accessories Ersatzteilliste Spare parts list Artikel Bestell-Nr. Item Cat. no. Netzsicherung T4 A 250V (230 V) 2027690 Power fuse T4 A 250V (230 V) 2027690 T4 A 250V (230 ) 2027690 Netzsicherung T8 A 250V (115 V) 2028090 Power fuse T8 A 250V (115 V) 2028090... -
Seite 111: Empfohlenes Zubehör
Ersatzteile, Spare parts, empfohlenes Zubehör recommended accessories Empfohlenes Zubehör Recommended accessories Artikel Bestell-Nr. Item Cat. no. Doppelpedal-Fußschalter, zur Aktivierung 20 0178 30 Dual-pedal footswitch, for activation of 20 0178 30 20 0178 30 der Koagulations- und Schneidefunktion, coagulation and cutting function, for use zur Verwendung mit 20 5322 20-xxx with 20 5322 20-xxx 20 5322 20-xxx... -
Seite 112: Anhang
Motoren und deren Handstücken sind die Angaben in der jeweiligen appropriate manual provides detailed information. HINWEIS: Die aktuelle Freigabeliste Gebrauchsanweisung zu beachten. The following instruments produced by KARL|STORZ must not be nden|Sie auch im Internet unter KARL STORZ Folgende von KARL|STORZ hergestellte Instrumente sind nicht placed in an ultrasound cleaning bath: rigid telescopes, exible www.karlstorz.com. - Seite 113 Folgende von KARL|STORZ hergestellte Instrumente The following instruments and telescopes produ ced by 1 = Reiniger KARL STORZ und Optiken sind nicht für eine komplette maschinelle KARL|STORZ must not be prepared in a cleaning and disin- 2 = Desinfektionsmittel HAMOU ® ®...
-
Seite 114: Hinweise Zur Elektromagnetischen Verträglichkeit (Emv)
Anhang Appendix Hinweise zur elektromagnetischen Electromagnetic Compatibility Verträglichkeit (EMV) (EMC) Information WARNUNG: Medizinische elektrische WARNING: Medical electrical equipment Geräte unterliegen besonderen Vorsichts- needs special precautions regarding Elec- maßnahmen hinsichtlich der Elektromag- tromagnetic Compatibility (EMC). Observe netischen Verträglichkeit (EMV). Beachten the EMC instructions in this appendix dur- Sie die in diesem|Anhang angegebenen ing installation and operation. - Seite 115 WARNING: The use of accessories and elektrische Geräte beein ussen. cables other than those speci ed in the KARL|STORZ instruction manual may WARNUNG: Werden Zubehör oder result in increased emissions or de- Leitungen verwendet, die nicht in der ®...
- Seite 116 Anhang Appendix Hinweise zur elektromagnetischen Electromagnetic Compatibility Verträglichkeit (EMV) (EMC) Information Tabelle 200 Zubehör und Leitungen mit der die Übereinstimmung mit der EN/IEC 60601-1-2 nachgewiesen wurde: Schirm Länge [m] Ferrite Verwendung 010103-01 Nein Nein Anschlusskabel Handgriff für Einmalgebrauch 20194-058 Nein Nein Anschlusskabel Neutralelektrode (NE Kabel) 847000E...
- Seite 117 Anhang Appendix Hinweise zur elektromagnetischen Electromagnetic Compatibility Verträglichkeit (EMV) (EMC) Information 60601-1-2: 010103-01 20194-058 847000E 20 0178 31 20 0178 32 PE (POAG)
- Seite 118 Anhang Appendix Hinweise zur elektromagnetischen Electromagnetic Compatibility Verträglichkeit (EMV) (EMC) Information Tabelle 201 Leitlinien und Herstellererklärung – Elektromagnetische Aussendungen ® AUTOCON ll 200 Modell 20 5322 20 ist für den Betrieb in einer wie unten angegebenen Umgebung bestimmt. Der Anwender des Gerätes sollte sicherstellen, dass das AUTOCON ®...
- Seite 119 Anhang Appendix Hinweise zur elektromagnetischen Electromagnetic Compatibility Verträglichkeit (EMV) (EMC) Information – ® AUTOCON ll 200 20 5322 20 ® AUTOCON ll 200 20 5322 20 – CISPR 11 CISPR 11 AUTOCON ® II 200 20 5322 20 61000-3-2 61000-3-3...
- Seite 120 Anhang Appendix Hinweise zur elektromagnetischen Electromagnetic Compatibility Verträglichkeit (EMV) (EMC) Information Tabelle 202 Leitlinien und Herstellererklärung – Elektromagnetische Störfestigkeit ® AUTOCON ll 200 Modell 20 5322 20 ist für den Betrieb in der unten angegebenen elektromagnetischen Umgebung bestimmt. Der Anwender des ®...
- Seite 121 Anhang Appendix Hinweise zur elektromagnetischen Electromagnetic Compatibility Verträglichkeit (EMV) (EMC) Information Table 202 Guidance and manufacturer’s declaration – electromagnetic immunity ® AUTOCON ll 200 model 20 5322 20 is intended for use in the electromagnetic environment speci ed below. The customer or user of the AUTOCON ®...
- Seite 122 Anhang Appendix Hinweise zur elektromagnetischen Electromagnetic Compatibility Verträglichkeit (EMV) (EMC) Information – ® AUTOCON ll 200 20 5322 20 ® AUTOCON ll 200 20 5322 20 – 60601 ± 4 ± 4 61000-4-2 ± 8 ± 8 30 %. ±2 ±2 61000-4-4 ±1...
- Seite 123 Anhang Appendix Hinweise zur elektromagnetischen Electromagnetic Compatibility Verträglichkeit (EMV) (EMC) Information Tabelle 204 Leitlinien und Herstellererklärung – Elektromagnetische Störfestigkeit – Für medizinische elektrische Geräte, die nicht lebenserhaltend sind AUTOCON ® ll 200 Modell 20 5322 20 ist für den Betrieb in der unten angegebenen elektromagnetischen Umgebung bestimmt. Der Anwender des Gerätes sollte sicherstellen, dass das Gerät in einer solchen Umgebung benutzt wird.
- Seite 124 Anhang Appendix Hinweise zur elektromagnetischen Electromagnetic Compatibility Verträglichkeit (EMV) (EMC) Information Table 204 Guidance and manufacturer’s declaration – electromagnetic immunity – for equipment and systems that are not life-supporting AUTOCON ® ll 200 model 20 5322 20 is intended for use in the electromagnetic environment speci ed below. The customer or user of the AUTOCON ®...
- Seite 125 Anhang Appendix Hinweise zur elektromagnetischen Electromagnetic Compatibility Verträglichkeit (EMV) (EMC) Information – – AUTOCON ® ll 200 20 5322 20 AUTOCON ® ll 200 20 5322 20 – 60601 ® AUTOCON II 200 20 5322 20, < 80 < 80 61000-4-6 <...
- Seite 126 Anhang Appendix Hinweise zur elektromagnetischen Electromagnetic Compatibility Verträglichkeit (EMV) (EMC) Information Tabelle 206 Empfohlene Schutzabstände zwischen tragbaren und mobilen HF-Telekommunikationsgeräten und der AUTOCON ® ll 200 Modell 20 5322 20 ® AUTOCON ll 200 Modell 20 5322 20 ist für den Betrieb in einer elektromagnetischen Umgebung bestimmt, in der die HF-Störgrößen kontrolliert sind. Der Anwender des Gerätes kann dadurch helfen, elektromagnetische Störungen zu vermeiden, indem er den Mindestabstand zwischen tragbaren und mobilen HF-Telekommunikationsgeräten (Sendern) und dem Gerät –...
- Seite 127 Anhang Appendix Hinweise zur elektromagnetischen Electromagnetic Compatibility Verträglichkeit (EMV) (EMC) Information Table 206 Recommended separation distances between portable and mobile RF communications equipment and the AUTOCON ® ll 200 model 20 5322 20 ® The AUTOCON ll 200 model 20 5322 20 is intended for use in an electromagnetic environment in which radiated RF disturbances are controlled. The customer or user of the unit can help prevent electromagnetic interference by maintaining a minimum distance between portable and mobile RF communications equipment (transmitters) and the unit as recommended below, according to the maximum output power of the communications equipment.
- Seite 128 Anhang Appendix Hinweise zur elektromagnetischen Electromagnetic Compatibility Verträglichkeit (EMV) (EMC) Information AUTOCON ® ll 200 20 5322 20 AUTOCON ® ll 200 20 5322 20 d [ ] < 800 0,01 0,12 0,12 0,23 0,38 0,38 0,73...
- Seite 129 Complete warranty card upon purchase/ Ü aus füllen lassen und möglichst bald delivery and return immediately to: zurücksenden an: KARL STORZ GmbH & Co. KG KARL STORZ GmbH & Co. KG Postfach 230 Postfach 230 78503 Tuttlingen, Germany 78503 Tuttlingen...
-
Seite 132: Niederlassungen
KARL STORZ Endoskopija d.o.o. Web: www.karlstorz.com E-Mail: info@karlstorz.com.cn Storsätragränd 14, Verovškova c. 60A KARL STORZ Endoscopy – Gulf & Near East KARL STORZ Endoskope Berlin GmbH 12739 Skärholmen, Sweden 1000 Ljubljana, Slovenia Villa # 7, Mushrif Business Park KARL STORZ Endoscopy (Shanghai) Ltd, Ohlauer Straße 43... - Seite 134 KARL STORZ GmbH & Co. KG Mittelstraße 8 78532 Tuttlingen Postfach 230 78503 Tuttlingen Germany Telefon: +49 7461 708-0 Telefax: +49 7461 708-105 E-Mail: info@karlstorz.de Web: www.karlstorz.com...