Ducati Performance 96680572A Montageanleitung
Kit beheizte lenkergriffe
Quicklinks
ISTR - 856/ 04
Kit manopole riscaldate - 96680572A
Heated handgrip kit - 96680572A
Simbologia
Per una lettura rapida e razionale sono stati impiegati simboli che
evidenziano situazioni di massima attenzione, consigli pratici o
semplici informazioni. Prestare molta attenzione al significato dei
simboli, in quanto la loro funzione è quella di non dovere ripete-
re concetti tecnici o avvertenze di sicurezza. Sono da considerare,
quindi, dei veri e propri "promemoria". Consultare questa pagina
ogni volta che sorgeranno dubbi sul loro significato.
Attenzione
La non osservanza delle istruzioni riportate può creare una situa-
zione di pericolo e causare gravi lesioni personali e anche la morte.
Importante
Indica la possibilità di arrecare danno al veicolo e/o ai suoi compo-
nenti se le istruzioni riportate non vengono eseguite.
Note
Fornisce utili informazioni sull'operazione in corso.
Riferimenti
I particolari evidenziati in grigio e riferimento numerico (Es.
rappresentano l'accessorio da installare e gli eventuali componenti
di montaggio forniti a kit.
I particolari con riferimento alfabetico (Es.
componenti originali presenti sul motoveicolo.
Tutte le indicazioni destro o sinistro si riferiscono al senso di marcia
del motociclo.
Avvertenze generali
Attenzione
Le operazioni riportate nelle pagine seguenti devono essere ese-
guite da un tecnico specializzato o da un'officina autorizzata Du-
cati.
Attenzione
Le operazioni riportate nelle pagine seguenti se non eseguite a re-
gola d'arte possono pregiudicare la sicurezza del pilota.
Note
Documentazione necessaria per eseguire il montaggio del Kit è il
Manuale Officina, relativo al modello di moto in vostro possesso.
Note
Nel caso fosse necessaria la sostituzione di un componente del kit
consultare la tavola ricambi allegata.
1
Symbols
To allow quick and easy consultation, this manual uses graphic
symbols to highlight situations in which maximum care is required,
as well as practical advice or information. Pay attention to the
meaning of the symbols since they serve to avoid repeating tech-
nical concepts or safety warnings throughout the text. The sym-
bols should therefore be seen as real reminders. Please refer to
this page whenever in doubt as to their meaning.
Failure to follow these instructions might give raise to a dangerous
situation and provoke severe personal injuries or even death.
Failure to follow these instructions might cause damages to the
vehicle and/or its components.
Useful information on the procedure being described.
References
1
)
Parts highlighted in grey and with a numeric reference (Example
1
nents supplied with the kit.
A
) rappresentano i
Parts with an alphabetic reference (Example
components fitted on the vehicle.
Any right- or left-hand indication refers to the vehicle direction of
travel.
General notes
Carefully perform the operations on the following pages since they
might negatively affect rider safety.
Carefully perform the operations on the following pages since they
might negatively affect rider safety.
The following documents are necessary for assembling the Kit:
Workshop Manual of your bike model.
Should it be necessary to change any kit parts, please refer to the
attached spare part table.
Operating, servicing and maintaining a passenger vehicle or off-
highway motor vehicle can expose you to chemicals including en-
gine exhaust, carbon monoxide, phthalates, and lead, which are
known to the State of California to cause cancer and birth defects
or other reproductive harm. To minimize exposure, avoid breath-
ing exhaust, do not idle the engine except as necessary, service
your vehicle in a well-ventilated area and wear gloves or wash your
hands frequently when servicing your vehicle. For more informa-
tion go to www.P65Warnings.ca.gov/passenger-vehicle.
Warning
Caution
Notes
) are the accessory to be installed and any assembly compo-
Warning
Warning
Notes
Notes
Warning
A
) are the original

Verwandte Anleitungen für Ducati Performance 96680572A


Inhaltszusammenfassung für Ducati Performance 96680572A
- Seite 1 ISTR - 856/ 04 Kit manopole riscaldate - 96680572A Heated handgrip kit - 96680572A Simbologia Symbols Per una lettura rapida e razionale sono stati impiegati simboli che To allow quick and easy consultation, this manual uses graphic evidenziano situazioni di massima attenzione, consigli pratici o symbols to highlight situations in which maximum care is required, semplici informazioni.
- Seite 2 ISTR 856 / 04 Attenzione Warning Effettuare il serraggio delle n.2 viti autofilettanti (3) esclusivamen- Tighten the 2 self-threading screws (3) only by hand, do not use te a mano, non utilizzare avvitatore automatico. Per evitare la de- electric screwdrivers. To prevent the 2 self-threading screws (3) formazione o il danneggiamento delle n.2 viti autofilettanti (3) av- from being deformed or damaged, screw them until fully home vitare fino a battuta senza eccedere e senza forzare, attenendosi...
- Seite 3 ISTR 856 / 04 Smontaggio componenti originali Removing original components (versioni Multistrada 950) (Multistrada 950 versions) Smontaggio comando acceleratore Throttle control disassembly Per riuscire ad accedere ai cablaggi manopole riscaldate e del co- To reach the heated handgrip and throttle cables it is necessary mando gas, è...
- Seite 4 ISTR 856 / 04 Divincolare la parte esterna del paramani destro (D) dal manubrio Free the outer side of RH hand guard (D) from handlebar (E), pay- (E), prestando attenzione che la boccola ad espansione (D2) resti ing attention to keep the expansion bushing (D2) fixed to the screw fissata alla vite (D1).
- Seite 5 ISTR 856 / 04 Smontaggio manopola sinistra LH handgrip disassembly Operando sul lato sinistro del motoveicolo, rimuovere il tappo (C1) Working on motorcycle LH side, remove plug (C1) from connector dal connettore (F). Allentare la vite (G1) di fissaggio paramani sini- (F).
- Seite 6 ISTR 856 / 04 Divincolare la parte esterna del paramani sinistro (G) dal manubrio Free the outer side of LH hand guard (G) from handlebar (E), pay- (E), prestando attenzione che la boccola ad espansione (G2) resti ing attention to keep the expansion bushing (G2) fixed to the screw fissata alla vite (G1).
- Seite 7 ISTR 856 / 04 Smontaggio componenti originali Removing original components (versioni XDiavel) (XDiavel versions) Smontaggio manopola sinistra LH handgrip disassembly Operando sul lato sinistro del motoveicolo, allentare la vite (R1) e Working on motorcycle LH side, loosen screw (R1) and remove the rimuovere il gruppo contrappeso (R), prestando attenzione che la balancing weight assembly (R), taking care that expansion bush- boccola ad espansione (R2) resti fissata alla vite (R1).
- Seite 8 ISTR 856 / 04 A B2...
- Seite 9 ISTR 856 / 04 Smontaggio comando acceleratore Throttle control disassembly Operando sul lato destro del motoveicolo, rimuovere le n.5 fascet- Working on RH side of the motorcycle, remove the no. 5 ties (T) te (T) e liberare il cavo comando gas (A3). Scalzare il connettore and release the throttle cable (A3).
- Seite 10 ISTR 856 / 04...
- Seite 11 ISTR 856 / 04 Smontaggio componenti originali Removing original components (versioni Monster 1200) (Monster 1200 versions) Smontaggio gruppo fanale anteriore Headlight assembly removal Operando sulla parte anteriore del motoveicolo, scollegare il con- Working on motorcycle front side, disconnect headlight connector nettore fanale anteriore (L1) dalla presa ramo cablaggio principale (L1) from the main wiring branch socket (N), as shown in the box (N), come mostrato nel riquadro (X).
- Seite 12 ISTR 856 / 04...
- Seite 13 ISTR 856 / 04 Smontaggio manopola sinistra LH handgrip disassembly Operando sul lato sinistro del motoveicolo, allentare la vite (R1) e Working on motorcycle LH side, loosen screw (R1) and remove the rimuovere il gruppo contrappeso (R), prestando attenzione che la balancing weight assembly (R), taking care that expansion bushing boccola ad espansione (R2) resti fissata alla vite (R1).
- Seite 14 ISTR 856 / 04...
- Seite 15 ISTR 856 / 04 Smontaggio componenti originali Removing original components (versioni Supersport) (Supersport versions) Per riuscire ad accedere ai cablaggi manopole riscaldate e del co- To reach the heated handgrip and throttle cables it is necessary mando gas, è necessario rimuovere la carena destra, facendo riferi- to remove the right fairing by referring to the instructions on the mento a quanto riportato sul manuale officina alla sezione “Smon- workshop manual under section “Removing the fairings”.
- Seite 16 ISTR 856 / 04...
- Seite 17 ISTR 856 / 04 Smontaggio componenti originali Removing original components (versioni Scrambler 1100) (Scrambler 1100 versions) Per riuscire ad accedere ai cablaggi manopole riscaldate e del co- To reach the heated handgrip and throttle cables it is necessary mando gas, è necessario rimuovere i fissaggi serbatoio carburante to remove the fuel tank retainers (C) and shift it backwards by re- (C) ed arretrarlo, facendo riferimento a quanto riportato sul ma- ferring to the instructions on the workshop manual under section...
- Seite 18 ISTR 856 / 04...
- Seite 19 ISTR 856 / 04 Smontaggio manopola sinistra LH handgrip disassembly Operando sul lato sinistro del motoveicolo, allentare la vite (R1) e Working on motorcycle LH side, loosen screw (R1) and remove the rimuovere il gruppo contrappeso (R), prestando attenzione che la balancing weight assembly (R), taking care that expansion bushing boccola ad espansione (R2) resti fissata alla vite (R1).
- Seite 20 ISTR 856 / 04 Smontaggio componenti originali Removing original components (versioni Diavel 1260) (Diavel 1260 versions) Smontaggio sella Removing the seat Per effettuare lo smontaggio della sella (A) fare riferimento a quan- To remove the seat (A) refer to the instructions on the workshop to riportato sul manuale officina alla sezione “Smontaggio sella”.
- Seite 21 ISTR 856 / 04 Smontaggio comando acceleratore Throttle control disassembly Allentare la vite (D1) e rimuovere il gruppo contrappeso (D), pre- Loosen screw (D1) and remove the balancing weight assembly (D), stando attenzione che la boccola ad espansione (D2) resti fissata taking care that expansion bushing (D2) remains secured to screw alla vite (D1).
- Seite 22 ISTR 856 / 04 Smontaggio manopola sinistra LH handgrip disassembly Operando sul lato sinistro del motoveicolo, allentare la vite (R1) e Working on motorcycle LH side, loosen screw (R1) and remove the rimuovere il gruppo contrappeso (R), prestando attenzione che la balancing weight assembly (R), taking care that expansion bushing boccola ad espansione (R2) resti fissata alla vite (R1).
- Seite 23 ISTR 856 / 04 Smontaggio componenti originali Removing original components (versioni Hypermotard 950) (Hypermotard 950 versions) Smontaggio cupolino Removing the headlight fairing Svitare e rimuovere le n.2 viti (A). Rimuovere il cupolino (B). Loosen and remove the no.2 screws (A). Remove the headlight fair- ing (B).
- Seite 24 ISTR 856 / 04...
- Seite 25 ISTR 856 / 04 Smontaggio manopola sinistra LH handgrip disassembly Operando sul lato sinistro del motoveicolo, divincolare la parte Working on the motorcycle’s left side, release the outer side of LH esterna del paramani sinistro (H) dal manubrio (F), prestando at- hand guard (H) from handlebar (F), paying attention to keep the tenzione che la boccola ad espansione (H2) resti fissata alla vite expansion bushing (H2) fixed to the screw (H1).
- Seite 26 ISTR 856 / 04 10 Nm ± 10% 1,5 Nm ± 10%...
- Seite 27 ISTR 856 / 04 Montaggio componenti kit Kit component assembly (versioni Multistrada 950) (Multistrada 950 versions) Importante Important Verificare, prima del montaggio, che tutti i componenti risultino Before assembling, check that all parts are clean and in good con- puliti e in perfetto stato. Adottare tutte le precauzioni necessarie ditions.
- Seite 28 ISTR 856 / 04 2,8 Nm ± 5% 10 Nm ± 10%...
- Seite 29 ISTR 856 / 04 Montaggio manopola riscaldata sinistra LH heated handgrip assembly Verificare che il cavo (2A) sia correttamente inserito nell’apposita Check that the cable (2A) is correctly inserted in the specific front sede anteriore della manopola riscaldata sinistra (2), come mostra- seat of the LH heated handgrip (2), as shown in the figure.
- Seite 30 ISTR 856 / 04 10 Nm ± 10% 2,8 Nm ± 5% (V*): Usare le viti del “kit montaggio manopole riscaldate” / Use the screws supplied with the “heated handgrip assembly kit” / Utiliser les vis du « kit montage poignées chauffantes »/ Die Schrauben aus dem „Kit Montage beheizte Lenkerg- riffe"...
- Seite 31 ISTR 856 / 04 Montaggio componenti kit Kit component assembly (versioni XDiavel) (XDiavel versions) Importante Important Verificare, prima del montaggio, che tutti i componenti risultino Before assembling, check that all parts are clean and in good con- puliti e in perfetto stato. Adottare tutte le precauzioni necessarie ditions.
- Seite 32 ISTR 856 / 04 10 Nm ± 10% 1,5 Nm ± 10%...
- Seite 33 ISTR 856 / 04 Montaggio comando acceleratore Throttle control assembly Allentare le n.2 viti (1B) di fissaggio del comando acceleratore (1) Loosen no. 2 screws (1B) fastening throttle control (1) as much as dello stretto necessario per permetterne l'inserimento sul lato de- necessary to allow its insertion on handlebar (E) RH side.
- Seite 34 ISTR 856 / 04 2,8 Nm ± 5% 10 Nm ± 10% 1,5 Nm ± 10% 10 Nm ± 10%...
- Seite 35 ISTR 856 / 04 Montaggio componenti kit Kit component assembly (versioni Monster 1200) (Monster 1200 versions) Importante Important Verificare, prima del montaggio, che tutti i componenti risultino Before assembling, check that all parts are clean and in good con- puliti e in perfetto stato. Adottare tutte le precauzioni necessarie ditions.
- Seite 36 ISTR 856 / 04 10 Nm ± 10% 10 Nm ± 10%...
- Seite 37 ISTR 856 / 04 Rimontaggio gruppo fanale anteriore Headlight assembly refitting Disporre i cablaggi manopole riscaldate seguendo i cablaggi origi- Lay down heated handgrip wirings by following the original wirings nali già presenti sul manubrio. Collegare lo spinotto riscaldamen- already present on handlebar. Connect the LH handgrip heating to manopola sinistra (2B) al connettore (F).
- Seite 38 ISTR 856 / 04 2,3 Nm ± 5% 10 Nm ± 10% 1,5 Nm ± 10% 10 Nm ± 10%...
- Seite 39 ISTR 856 / 04 Montaggio componenti kit Kit component assembly (versioni Supersport) (Supersport versions) Importante Important Verificare, prima del montaggio, che tutti i componenti risultino Before assembling, check that all parts are clean and in good con- puliti e in perfetto stato. Adottare tutte le precauzioni necessarie ditions.
- Seite 40 ISTR 856 / 04 2,3 Nm ± 5%...
- Seite 41 ISTR 856 / 04 Montaggio componenti kit Kit component assembly (versioni Scrambler 1100) (Scrambler 1100 versions) Importante Important Verificare, prima del montaggio, che tutti i componenti risultino Before assembling, check that all parts are clean and in good con- puliti e in perfetto stato. Adottare tutte le precauzioni necessarie ditions.
- Seite 42 ISTR 856 / 04 1,5 Nm ± 10% 10 Nm ± 10%...
- Seite 43 ISTR 856 / 04 Montaggio comando acceleratore Throttle control assembly Allentare le n.2 viti (1B) di fissaggio del comando acceleratore (1) Loosen no. 2 screws (1B) fastening throttle control (1) as much as dello stretto necessario per permetterne l’inserimento sul lato de- necessary to allow its insertion on handlebar (E) RH side.
- Seite 44 ISTR 856 / 04 2,3 Nm ± 5%...
- Seite 45 ISTR 856 / 04 Montaggio componenti kit Kit component assembly (versioni Diavel 1260) (Diavel 1260 versions) Importante Important Verificare, prima del montaggio, che tutti i componenti risultino Before assembling, check that all parts are clean and in good con- puliti e in perfetto stato. Adottare tutte le precauzioni necessarie ditions.
- Seite 46 ISTR 856 / 04 10 Nm ± 10% 1,5 Nm ± 10%...
- Seite 47 ISTR 856 / 04 Montaggio comando acceleratore Throttle control assembly Allentare le n.2 viti (1B) di fissaggio del comando acceleratore (1) Loosen no. 2 screws (1B) fastening throttle control (1) as much as dello stretto necessario per permetterne l’inserimento sul lato de- necessary to allow its insertion on handlebar (G) RH side.
- Seite 48 ISTR 856 / 04 2,8 Nm ± 5% 10 Nm ± 10%...
- Seite 49 ISTR 856 / 04 Montaggio componenti kit Kit component assembly (versioni Hypermotard 950) (Hypermotard 950 versions) Importante Important Verificare, prima del montaggio, che tutti i componenti risultino Before assembling, check that all parts are clean and in good con- puliti e in perfetto stato. Adottare tutte le precauzioni necessarie ditions.
- Seite 50 ISTR 856 / 04 1,5 Nm ± 10% 10 Nm ± 10% 1C 1E...
- Seite 51 ISTR 856 / 04 Montaggio comando acceleratore Throttle control assembly Allentare le n.2 viti (1B) di fissaggio del comando acceleratore (1) Loosen no. 2 screws (1B) fastening throttle control (1) as much as dello stretto necessario per permetterne l’inserimento sul lato de- necessary to allow its insertion on handlebar (F) RH side.
- Seite 52 ISTR 856 / 04 3 Nm ± 10% 3 Nm ± 10% 3 Nm ± 10% Rimontaggio fanale anteriore Headlight refitting Posizionare il fanale inserendo i n.2 perni (D1) nei rispettivi gommi- Position the headlight inserting the no.2 pins (D1) in the corre- ni antivibranti (E).
- Seite 53 ISTR 856 / 04 Attivazione\disattivazione manopole riscaldate Heated handgrip activation/deactivation (versioni XDiavel) (XDiavel versions) Accendere il cruscotto (Z) e utilizzando i pulsanti (K6) e (K7) è pos- Turn on the instrument panel (Z) and use buttons (K6) and (K7) to sibile scorrere le funzioni del Menù...
- Seite 54 ISTR 856 / 04 T5 T3...
- Seite 55 ISTR 856 / 04 Attivazione\disattivazione manopole riscaldate Heated handgrip enabling/disabling (versioni Diavel 1260) (Diavel 1260 versions) Collegare lo strumento di diagnosi al connettore acquisizione dati. Connect the diagnostic tool to the data acquisition socket. Select Selezionare il modello corretto di motoveicolo. Selezionare l’am- the correct motorcycle model.
- Seite 56 ISTR 856 / 04 Note / Notes...
-
Seite 57: Avertissements Généraux
ISTR - 856/ 04 Kit poignées chauffantes - 96680572A Kit beheizte Lenkergriffe - 96680572A Symboles Symbole Pour faciliter la consultation de ce manuel, des symboles signalent Zum schnellen und übersichtlichen Lesen werden Symbole verwendet, des situations exigeant le maximum d'attention, des conseils pra- die außerordentlich wichtige Situationen, praktische Ratschläge oder tiques ou de simples informations. - Seite 58 ISTR 856 / 04 Attention Achtung Effectuer le serrage des 2 vis auto-taraudeuses (3) exclusivement Die 2 selbstschneidenden Schrauben (3) ausschließlich von Hand à la main, sans utiliser de visseuse automatique. Pour éviter toute anziehen, keinen automatischen Handschrauber verwenden. Um déformation ou endommagement des 2 vis auto-taraudeuses (3) einen Verzug oder eine Beschädigung der 2 selbstschneidenden visser jusqu’en butée, sans excéder ni forcer, en respectant scrupu-...
- Seite 59 ISTR 856 / 04 Dépose des composants d’origine Ausbau der Original-Bauteile (Versions Multistrada 950) (Versionen Multistrada 950) Dépose commande des gaz Abnahme der Gassteuerung Pour pouvoir accéder aux câblages des poignées chauffantes et Um auf die Verkabelungen der beheizten Lenkergriffe und der pour la commande des gaz, il faut déposer les carénages du réser- Gassteuerung zugreifen zu können, muss die Tankverkleidung ent- voir, en se référant aux indications du manuel d’atelier à...
- Seite 60 ISTR 856 / 04 Dégager la partie extérieure de la protection mains droite (D) du Den Außenteil des rechten Handschutzes (D) vom Lenker (E) ab- guidon (E), en veillant à ce que la bague d’expansion (D2) reste drücken und dabei darauf achten, dass die Spreizbuchse (D2) an fixée à...
- Seite 61 ISTR 856 / 04 Dépose poignée gauche Abnahme des linken Lenkergriffs En agissant du côté gauche du motocycle, déposer le bouchon (C1) An der linken Seite des Motorrads die Verschlusskappe (C1) vom du connecteur (F). Desserrer la vis (G1) de fixation protection mains Verbinder (F) entfernen.
- Seite 62 ISTR 856 / 04 Dégager la partie extérieure de la protection mains gauche (G) du Den Außenteil des linken Handschutzes (G) vom Lenker (E) abdrü- guidon (E), en veillant à ce que la bague d’expansion (G2) reste cken und dabei darauf achten, dass die Spreizbuchse (G2) an der fixée à...
- Seite 63 ISTR 856 / 04 Dépose des composants d’origine Abnahme der Original-Bestandteile (Versions XDiavel) (Versionen XDiavel) Dépose poignée gauche Abnahme des linken Lenkergriffs En agissant du côté gauche du motocycle, desserrer la vis (R1) et An der linken Seite des Motorrads arbeitend die Schraube (R1) lo- déposer l’ensemble contre-poids (R), en veillant à...
- Seite 64 ISTR 856 / 04 A B2...
- Seite 65 ISTR 856 / 04 Dépose commande des gaz Abnahme der Gassteuerung En agissant du côté droit du motocycle, déposer les 5 colliers serre- An der rechten Seite des Motorrads arbeitend die 5 Schellen (T) flex (T) et libérer le câble de la commande des gaz (A3). Dégager le entfernen und den Bowdenzugs der Gassteuerung (A3) trennen.
- Seite 66 ISTR 856 / 04...
- Seite 67 ISTR 856 / 04 Dépose des composants d’origine Abnahme der Kit-Bestandteile (Versions Monster 1200) (Versionen Monster 1200) Dépose de l’ensemble phare avant Abnahme der Scheinwerfereinheit En agissant sur la partie avant du motocycle, débrancher le connec- An der Motorradfront den Verbinder (L1) des Scheinwerfers, wie teur du phare avant (L1) de la prise du brin de câblage principal (N), in Detailausschnitt (X) gezeigt, vom Anschluss des Zweigs des comme l’encadré...
- Seite 68 ISTR 856 / 04...
- Seite 69 ISTR 856 / 04 Dépose poignée gauche Abnahme des linken Lenkergriffs En agissant du côté gauche du motocycle, desserrer la vis (R1) et An der linken Seite des Motorrads arbeitend die Schraube (R1) lo- déposer l’ensemble contre-poids (R), en veillant à ce que la bague ckern und die Gegengewichteinheit (R) entfernen.
- Seite 70 ISTR 856 / 04...
- Seite 71 ISTR 856 / 04 Dépose des composants d’origine Abnahme der Kit-Bestandteile (Versions Supersport) (Versionen Supersport) Pour pouvoir accéder aux câblages des poignées chauffantes et Um auf die Verkabelungen der beheizten Lenkergriffe und der Gas- pour la commande des gaz, il faut déposer le carénage droit, en se steuerung zugreifen zu können, muss die rechte Verkleidungshälf- référant aux indications du manuel d’atelier à...
- Seite 72 ISTR 856 / 04...
- Seite 73 ISTR 856 / 04 Dépose des composants d’origine Abnahme der Original-Bestandteile (Versions Scrambler 1100) (Versionen Scrambler 1100) Pour pouvoir accéder aux câblages des poignées chauffantes et Um auf die Verkabelungen der beheizten Lenkergriffe und der pour la commande des gaz, il faut déposer les fixations du réser- Gassteuerung zugreifen zu können, müssen die Befestigungen des voir carburant (C) et le faire reculer, en se référant aux indications Kraftstofftanks (C) entfernt und dieser nach hinten gezogen wer-...
- Seite 74 ISTR 856 / 04...
- Seite 75 ISTR 856 / 04 Dépose poignée gauche Abnahme des linken Lenkergriffs En agissant du côté gauche du motocycle, desserrer la vis (R1) et An der linken Seite des Motorrads arbeitend die Schraube (R1) lo- déposer l’ensemble contre-poids (R), en veillant à ce que la bague ckern und die Gegengewichteinheit (R) entfernen.
- Seite 76 ISTR 856 / 04 Dépose des composants d’origine Abnahme der Original-Bestandteile (versions Diavel 1260) (Versionen Diavel 1260) Dépose de la selle Abnahme der Sitzbank Pour effectuer la dépose de la selle (A), se référer aux indications Für die Abnahme der Sitzbank (A) ist Bezug auf die Angaben im du manuel d’atelier à...
- Seite 77 ISTR 856 / 04 Dépose commande des gaz Abnahme der Gassteuerung Desserrer la vis (D1) et déposer l’ensemble contre-poids (D), en Die Schraube (D1) lockern und die Gegengewichteinheit (D) ent- veillant à ce que la bague d’expansion (D2) reste fixée à la vis (D1). fernen.
- Seite 78 ISTR 856 / 04 Dépose poignée gauche Abnahme des linken Lenkergriffs En agissant du côté gauche du motocycle, desserrer la vis (R1) et An der linken Seite des Motorrads arbeitend die Schraube (R1) lo- déposer l’ensemble contre-poids (R), en veillant à ce que la bague ckern und die Gegengewichteinheit (R) entfernen.
- Seite 79 ISTR 856 / 04 Dépose des composants d’origine Abnahme der Original-Bestandteile (versions Hypermotard 950) (Versionen Hypermotard 950) Dépose de la bulle Abnahme der Cockpitverkleidung Desserrer et déposer les 2 vis (A). Déposer la bulle (B). Die 2 Schrauben (A) lösen und entfernen. Die Cockpitverkleidung (B) entfernen.
- Seite 80 ISTR 856 / 04...
- Seite 81 ISTR 856 / 04 Dépose poignée gauche Abnahme des linken Lenkergriffs En agissant du côté gauche du motocycle, dégager la partie exté- An der linken Seite des Motorrads arbeitend den Außenteil (H) des rieure de la protection mains gauche (H) du guidon (F), en veillant linken Handschutzes vom Lenker (F) abdrücken und dabei darauf à...
- Seite 82 ISTR 856 / 04 10 Nm ± 10% 1,5 Nm ± 10%...
- Seite 83 ISTR 856 / 04 Pose des composants kit Montage der Kit-Bestandteile (Versions Multistrada 950) (Versionen Multistrada 950) Important Wichtig Avant la pose, vérifier que tous les composants sont propres et en Vor der Montage überprüfen, dass alle Bestandteile sauber sind bon état.
- Seite 84 ISTR 856 / 04 2,8 Nm ± 5% 10 Nm ± 10%...
- Seite 85 ISTR 856 / 04 Pose poignée chauffante gauche Montage des linken beheizten Lenkergriffs Vérifier que le câble (2A) est correctement introduit dans le loge- Überprüfen, dass das Kabel (2A) korrekt in den entsprechenden ment avant spécifique de la poignée chauffante gauche (2), comme vorderen Sitz des linken beheizten Lenkergriffs (2), wie auf der Ab- la figure le montre.
- Seite 86 ISTR 856 / 04 10 Nm ± 10% 2,8 Nm ± 5% (V*): Usare le viti del “kit montaggio manopole riscaldate” / Use the screws supplied with the “heated handgrip assembly kit” / Utiliser les vis du « kit montage poignées chauffantes »/ Die Schrauben aus dem „Kit Montage beheizte Lenkerg- riffe"...
- Seite 87 ISTR 856 / 04 Pose des composants du kit Montage der Kit-Bestandteile (versions XDiavel) (Versionen XDiavel) Important Wichtig Avant la pose, vérifier que tous les composants sont propres et en Vor der Montage überprüfen, dass alle Bestandteile sauber sind bon état. Prendre toutes les précautions nécessaires pour éviter und sich im perfekten Zustand befinden.
- Seite 88 ISTR 856 / 04 10 Nm ± 10% 1,5 Nm ± 10%...
- Seite 89 ISTR 856 / 04 Pose commande des gaz Montage der Gassteuerung Desserrer les 2 vis (1B) de fixation de la commande des gaz (1) au Die 2 Befestigungsschrauben (1B) der Gassteuerung (1) nur so weit juste nécessaire pour en permettre l’introduction du côté droit du lockern, dass deren Anfügen an der rechten Seite des Lenkers (E) guidon (E).
- Seite 90 ISTR 856 / 04 2,8 Nm ± 5% 10 Nm ± 10% 1,5 Nm ± 10% 10 Nm ± 10%...
- Seite 91 ISTR 856 / 04 Pose des composants kit Montage der Kit-Bestandteile (versions Monster 1200) (Versionen Monster 1200) Important Wichtig Avant la pose, vérifier que tous les composants sont propres et en Vor der Montage überprüfen, dass alle Bestandteile sauber sind bon état.
- Seite 92 ISTR 856 / 04 10 Nm ± 10% 10 Nm ± 10%...
- Seite 93 ISTR 856 / 04 Repose de l’ensemble phare avant Montage der Scheinwerfereinheit Disposer les câblages poignées chauffantes selon les câblages Die Verkabelungen der beheizten Lenkergriffe so wie die bereits d’origine déjà présents sur le guidon. Brancher la broche chauf- am Lenker vorhandene Original-Verkabelung verlegen. Den Ste- fage poignée gauche (2B) au connecteur (F).
- Seite 94 ISTR 856 / 04 2,3 Nm ± 5% 10 Nm ± 10% 1,5 Nm ± 10% 10 Nm ± 10%...
- Seite 95 ISTR 856 / 04 Pose des composants du kit Montage der Kit-Bestandteile (versions Supersport) (Versionen Supersport) Wichtig Important Vor der Montage überprüfen, dass alle Bestandteile sauber sind Avant la pose, vérifier que tous les composants sont propres et en und sich im perfekten Zustand befinden. Alle erforderlichen Vor- bon état.
- Seite 96 ISTR 856 / 04 2,3 Nm ± 5%...
- Seite 97 ISTR 856 / 04 Pose des composants du kit Montage der Kit-Bestandteile (versions Scrambler 1100) (Versionen Scrambler 1100) Important Wichtig Avant la pose, vérifier que tous les composants sont propres et en Vor der Montage überprüfen, dass alle Bestandteile sauber sind bon état.
- Seite 98 ISTR 856 / 04 1,5 Nm ± 10% 10 Nm ± 10%...
- Seite 99 ISTR 856 / 04 Pose commande des gaz Montage der Gassteuerung Desserrer les 2 vis (1B) de fixation de la commande des gaz (1) au Die 2 Befestigungsschrauben (1B) der Gassteuerung (1) nur so weit juste nécessaire pour en permettre l’introduction du côté droit du lockern, dass ihr Anfügen an der rechten Seite des Lenkers (E) guidon (E).
- Seite 100 ISTR 856 / 04 2,3 Nm ± 5%...
- Seite 101 ISTR 856 / 04 Pose des composants du kit Montage der Kit-Bestandteile (versions Diavel 1260) (Versionen Diavel 1260) Important Wichtig Avant la pose, vérifier que tous les composants sont propres et en Vor der Montage überprüfen, dass alle Bestandteile sauber sind bon état.
- Seite 102 ISTR 856 / 04 10 Nm ± 10% 1,5 Nm ± 10%...
- Seite 103 ISTR 856 / 04 Pose commande des gaz Montage der Gassteuerung Desserrer les 2 vis (1B) de fixation de la commande des gaz (1) au Die 2 Befestigungsschrauben (1B) der Gassteuerung (1) nur so weit juste nécessaire pour en permettre l’introduction du côté droit du lockern, dass ihr Anfügen an der rechten Seite des Lenkers (G) guidon (G).
- Seite 104 ISTR 856 / 04 2,8 Nm ± 5% 10 Nm ± 10%...
- Seite 105 ISTR 856 / 04 Pose des composants du kit Montage der Kit- Bestandteile (versions Hypermotard 950) (Versionen Hypermotard 950) Important Wichtig Avant la pose, vérifier que tous les composants sont propres et en Vor der Montage überprüfen, dass alle Bestandteile sauber sind bon état.
- Seite 106 ISTR 856 / 04 1,5 Nm ± 10% 10 Nm ± 10% 1C 1E...
- Seite 107 ISTR 856 / 04 Pose commande des gaz Montage der Gassteuerung Desserrer les 2 vis (1B) de fixation de la commande des gaz (1) au Die 2 Befestigungsschrauben (1B) der Gassteuerung (1) nur so weit juste nécessaire pour en permettre l’introduction du côté droit du lockern, dass ihr Anfügen an der rechten Seite des Lenkers (F) guidon (F).
- Seite 108 ISTR 856 / 04 3 Nm ± 10% 3 Nm ± 10% 3 Nm ± 10% Repose phare avant Montage des Scheinwerfers Positionner le phare en insérant les 2 pivots (D1) dans les plots Den Scheinwerfer anordnen, dazu die 2 Bolzen (D1) in die entspre- antivibratoires respectifs (E).
- Seite 109 ISTR 856 / 04 Activation/désactivation poignées chauffantes Aktivierung/Deaktivierung der beheizten (versions XDiavel) Lenkergriffe (Versionen XDiavel) Allumer le tableau de bord (Z) et à l’aide des boutons (K6) et (K7) Das Cockpit (Z) einschalten, dann können die Funktionen des Me- il est possible de faire défiler les fonctions du menu 1 (Z1) jusqu’à nüs 1 (Z1) mit den Tasten (K6) und (K7) so lange durchgescrollt wer- afficher la fonction d’activation/désactivation des poignées chauf- den, bis die Funktion der Aktivierung/Deaktivierung der beheizten...
- Seite 110 ISTR 856 / 04 T5 T3...
- Seite 111 ISTR 856 / 04 Activation\désactivation poignées chauffantes Aktivieren/Deaktivieren der beheizten Lenkergriffe (versions Diavel 1260) (Versionen Diavel 1260) Relier l’instrument de diagnostic au connecteur de saisie de don- Das Diagnoseinstrument an den Datenerfassungsanschluss nées. Sélectionner le modèle correct du motocycle. Sélectionner schließen.
- Seite 112 ISTR 856 / 04 Note / Notes...
- Seite 113 ISTR - 856/ 04 Conjunto de manípulos aquecidos - 96680572A Heated handgrip kit - 96680572A Símbolos Symbols Para uma leitura rápida e racional, foram utilizados símbolos que To allow quick and easy consultation, this manual uses graphic evidenciam situações de máxima atenção, conselhos práticos ou symbols to highlight situations in which maximum care is required, simples informações.
- Seite 114 ISTR 856 / 04 Atenção Warning Efetue o aperto dos 2 parafusos autorroscantes (3) exclusivamente Tighten the 2 self-threading screws (3) only by hand, do not use à mão, não utilize aparafusador automático. Para evitar a deforma- electric screwdrivers. To prevent the 2 self-threading screws (3) ção ou a danificação dos 2 parafusos autorroscantes (3), atarraxe from being deformed or damaged, screw them until fully home até...
- Seite 115 ISTR 856 / 04 Desmontagem dos componentes originais Removing original components (versões Multistrada 950) (Multistrada 950 versions) Desmontagem do comando do acelerador Throttle control disassembly Para conseguir aceder às cablagens dos manípulos aquecidos e do To reach the heated handgrip and throttle cables it is necessary comando de gás, é...
- Seite 116 ISTR 856 / 04 Liberte a parte externa do protetor de mãos direito (D) do guia- Free the outer side of RH hand guard (D) from handlebar (E), pay- dor (E), prestando atenção para que o casquilho de expansão (D2) ing attention to keep the expansion bushing (D2) fixed to the screw fique fixado no parafuso (D1).
- Seite 117 ISTR 856 / 04 Desmontagem do manípulo esquerdo LH handgrip disassembly Atuando no lado esquerdo da moto, remova a tampa (C1) do co- Working on motorcycle LH side, remove plug (C1) from connector nector (F). Alivie o parafuso (G1) de fixação do protetor de mãos (F).
- Seite 118 ISTR 856 / 04 Liberte a parte externa do protetor de mãos esquerdo (G) do guia- Free the outer side of LH hand guard (G) from handlebar (E), pay- dor (E), prestando atenção para que o casquilho de expansão (G2) ing attention to keep the expansion bushing (G2) fixed to the screw fique fixado no parafuso (G1).
- Seite 119 ISTR 856 / 04 Desmontagem dos componentes originais Removing original components (versões XDiavel) (XDiavel versions) Desmontagem do manípulo esquerdo LH handgrip disassembly Atuando no lado esquerdo da moto, alivie o parafuso (R1) e remova Working on motorcycle LH side, loosen screw (R1) and remove the o grupo do contrapeso (R), prestando atenção para que o casquilho balancing weight assembly (R), taking care that expansion bush- de expansão (R2) fique fixado no parafuso (R1).
- Seite 120 ISTR 856 / 04 A B2...
- Seite 121 ISTR 856 / 04 Desmontagem do comando do acelerador Throttle control disassembly Atuando pelo lado direito da moto, remova as 5 braçadeiras (T) e Working on RH side of the motorcycle, remove the no. 5 ties (T) liberte o cabo do comando de gás (A3). Desmonte o conector do and release the throttle cable (A3).
- Seite 122 ISTR 856 / 04...
- Seite 123 ISTR 856 / 04 Desmontagem dos componentes originais Removing original components (versões Monster 1200) (Monster 1200 versions) Desmontagem do grupo do farol dianteiro Headlight assembly removal Atuando na parte dianteira da moto, desligue o conector do farol Working on motorcycle front side, disconnect headlight connector dianteiro (L1) da saída da ramificação da cablagem principal (N), (L1) from the main wiring branch socket (N), as shown in the box como mostrado no quadro (X).
- Seite 124 ISTR 856 / 04...
- Seite 125 ISTR 856 / 04 Desmontagem do manípulo esquerdo LH handgrip disassembly Atuando no lado esquerdo da moto, alivie o parafuso (R1) e remova Working on motorcycle LH side, loosen screw (R1) and remove the o grupo do contrapeso (R), prestando atenção para que o casquilho balancing weight assembly (R), taking care that expansion bushing de expansão (R2) fique fixado no parafuso (R1).
- Seite 126 ISTR 856 / 04...
- Seite 127 ISTR 856 / 04 Desmontagem dos componentes originais Removing original components (versões Supersport) (Supersport versions) Para conseguir aceder às cablagens dos manípulos aquecidos e do To reach the heated handgrip and throttle cables it is necessary comando de gás, é necessário remover a carenagem direita, con- to remove the right fairing by referring to the instructions on the sultando o manual de oficinal na secção “Desmontagem das care- workshop manual under section “Removing the fairings”.
- Seite 128 ISTR 856 / 04...
- Seite 129 ISTR 856 / 04 Desmontagem dos componentes originais Removing original components (versões Scrambler 1100) (Scrambler 1100 versions) Para conseguir aceder às cablagens dos manípulos aquecidos e do To reach the heated handgrip and throttle cables it is necessary comando de gás, é necessário remover as fixações do depósito de to remove the fuel tank retainers (C) and shift it backwards by re- combustível (C) e retraí-lo, consultando o manual de oficinal na ferring to the instructions on the workshop manual under section...
- Seite 130 ISTR 856 / 04...
- Seite 131 ISTR 856 / 04 Desmontagem do manípulo esquerdo LH handgrip disassembly Atuando no lado esquerdo da moto, alivie o parafuso (R1) e remova Working on motorcycle LH side, loosen screw (R1) and remove the o grupo do contrapeso (R), prestando atenção para que o casquilho balancing weight assembly (R), taking care that expansion bushing de expansão (R2) fique fixado no parafuso (R1).
- Seite 132 ISTR 856 / 04 Desmontagem dos componentes originais Removing original components (versões Diavel 1260) (Diavel 1260 versions) Desmontagem do assento Removing the seat Para efetuar a desmontagem do assento (A) consulte o quanto in- To remove the seat (A) refer to the instructions on the workshop dicado no manual de oficina na secção “Desmontagem do assen- manual under section “Removing the seat”.
- Seite 133 ISTR 856 / 04 Desmontagem do comando do acelerador Throttle control disassembly Alivie o parafuso (D1) e remova o grupo do contrapeso (D), pres- Loosen screw (D1) and remove the balancing weight assembly (D), tando atenção para que o casquilho de expansão (D2) fique fixado taking care that expansion bushing (D2) remains secured to screw no parafuso (D1).
- Seite 134 ISTR 856 / 04 Desmontagem do manípulo esquerdo LH handgrip disassembly Atuando no lado esquerdo da moto, alivie o parafuso (R1) e remova Working on motorcycle LH side, loosen screw (R1) and remove the o grupo do contrapeso (R), prestando atenção para que o casquilho balancing weight assembly (R), taking care that expansion bushing de expansão (R2) fique fixado no parafuso (R1).
- Seite 135 ISTR 856 / 04 Desmontagem dos componentes originais Removing original components (versões Hypermotard 950) (Hypermotard 950 versions) Desmontagem da cúpula Removing the headlight fairing Desatarraxe e remova os 2 parafusos (A). Remova a cúpula (B). Loosen and remove the no.2 screws (A). Remove the headlight fair- ing (B).
- Seite 136 ISTR 856 / 04...
- Seite 137 ISTR 856 / 04 Desmontagem do manípulo esquerdo LH handgrip disassembly Operando no lado esquerdo da moto, liberte a parte externa do Working on the motorcycle’s left side, release the outer side of LH protetor de mãos esquerdo (H) do guiador (F), prestando atenção hand guard (H) from handlebar (F), paying attention to keep the para que o casquilho de expansão (H2) fique fixado no parafuso expansion bushing (H2) fixed to the screw (H1).
- Seite 138 ISTR 856 / 04 10 Nm ± 10% 1,5 Nm ± 10%...
- Seite 139 ISTR 856 / 04 Montagem dos componentes do conjunto Kit component assembly (versões Multistrada 950) (Multistrada 950 versions) Importante Important Verifique, antes da montagem, se todos os componentes estão Before assembling, check that all parts are clean and in good con- limpos e em perfeito estado.
- Seite 140 ISTR 856 / 04 2,8 Nm ± 5% 10 Nm ± 10%...
- Seite 141 ISTR 856 / 04 Montagem do manípulo aquecido lado esquerdo LH heated handgrip assembly Verifique que o cabo (2A) esteja corretamente inserido na espe- Check that the cable (2A) is correctly inserted in the specific front cífica sede anterior do manípulo aquecido lado esquerdo (2), con- seat of the LH heated handgrip (2), as shown in the figure.
- Seite 142 ISTR 856 / 04 10 Nm ± 10% 2,8 Nm ± 5% (V*): Usare le viti del “kit montaggio manopole riscaldate” / Use the screws supplied with the “heated handgrip assembly kit” / Utiliser les vis du « kit montage poignées chauffantes »/ Die Schrauben aus dem „Kit Montage beheizte Lenkerg- riffe"...
- Seite 143 ISTR 856 / 04 Montagem dos componentes do conjunto Kit component assembly (versões XDiavel) (XDiavel versions) Importante Important Verifique, antes da montagem, se todos os componentes estão Before assembling, check that all parts are clean and in good con- limpos e em perfeito estado. Adote todas as precauções necessá- ditions.
- Seite 144 ISTR 856 / 04 10 Nm ± 10% 1,5 Nm ± 10%...
- Seite 145 ISTR 856 / 04 Montagem do comando do acelerador Throttle control assembly Alivie os 2 parafusos (1B) de fixação do comando acelerador (1) o Loosen no. 2 screws (1B) fastening throttle control (1) as much as mínimo necessário para permitir a sua inserção no lado direito do necessary to allow its insertion on handlebar (E) RH side.
- Seite 146 ISTR 856 / 04 2,8 Nm ± 5% 10 Nm ± 10% 1,5 Nm ± 10% 10 Nm ± 10%...
- Seite 147 ISTR 856 / 04 Montagem dos componentes do conjunto Kit component assembly (versões Monster 1200) (Monster 1200 versions) Importante Important Verifique, antes da montagem, se todos os componentes estão Before assembling, check that all parts are clean and in good con- limpos e em perfeito estado.
- Seite 148 ISTR 856 / 04 10 Nm ± 10% 10 Nm ± 10%...
- Seite 149 ISTR 856 / 04 Remontagem do grupo do farol dianteiro Headlight assembly refitting Coloque as cablagens dos manípulos aquecidos seguindo as ca- Lay down heated handgrip wirings by following the original wirings blagens originais já presentes no guiador. Ligue o pino do aque- already present on handlebar.
- Seite 150 ISTR 856 / 04 2,3 Nm ± 5% 10 Nm ± 10% 1,5 Nm ± 10% 10 Nm ± 10%...
- Seite 151 ISTR 856 / 04 Montagem dos componentes do conjunto Kit component assembly (versões Supersport) (Supersport versions) Importante Important Verifique, antes da montagem, se todos os componentes estão Before assembling, check that all parts are clean and in good con- limpos e em perfeito estado. Adote todas as precauções necessá- ditions.
- Seite 152 ISTR 856 / 04 2,3 Nm ± 5%...
- Seite 153 ISTR 856 / 04 Montagem dos componentes do conjunto Kit component assembly (versões Scrambler 1100) (Scrambler 1100 versions) Importante Important Verifique, antes da montagem, se todos os componentes estão Before assembling, check that all parts are clean and in good con- limpos e em perfeito estado.
- Seite 154 ISTR 856 / 04 1,5 Nm ± 10% 10 Nm ± 10%...
- Seite 155 ISTR 856 / 04 Montagem do comando do acelerador Throttle control assembly Alivie os 2 parafusos (1B) de fixação do comando acelerador (1) o Loosen no. 2 screws (1B) fastening throttle control (1) as much as mínimo necessário para permitir a sua inserção no lado direito do necessary to allow its insertion on handlebar (E) RH side.
- Seite 156 ISTR 856 / 04 2,3 Nm ± 5%...
- Seite 157 ISTR 856 / 04 Montagem dos componentes do conjunto Kit component assembly (versões Diavel 1260) (Diavel 1260 versions) Importante Important Verifique, antes da montagem, se todos os componentes estão Before assembling, check that all parts are clean and in good con- limpos e em perfeito estado.
- Seite 158 ISTR 856 / 04 10 Nm ± 10% 1,5 Nm ± 10%...
- Seite 159 ISTR 856 / 04 Montagem do comando do acelerador Throttle control assembly Alivie os 2 parafusos (1B) de fixação do comando acelerador (1) o Loosen no. 2 screws (1B) fastening throttle control (1) as much as mínimo necessário para permitir a sua inserção no lado direito do necessary to allow its insertion on handlebar (G) RH side.
- Seite 160 ISTR 856 / 04 2,8 Nm ± 5% 10 Nm ± 10%...
- Seite 161 ISTR 856 / 04 ontagem dos componentes do conjunto Kit component assembly (versões Hypermotard 950) (Hypermotard 950 versions) Importante Important Verifique, antes da montagem, se todos os componentes estão Before assembling, check that all parts are clean and in good con- limpos e em perfeito estado.
- Seite 162 ISTR 856 / 04 1,5 Nm ± 10% 10 Nm ± 10% 1C 1E...
- Seite 163 ISTR 856 / 04 Montagem do comando do acelerador Throttle control assembly Alivie os 2 parafusos (1B) de fixação do comando acelerador (1) o Loosen no. 2 screws (1B) fastening throttle control (1) as much as mínimo necessário para permitir a sua inserção no lado direito do necessary to allow its insertion on handlebar (F) RH side.
- Seite 164 ISTR 856 / 04 3 Nm ± 10% 3 Nm ± 10% 3 Nm ± 10% Remontagem do farol dianteiro Headlight refitting Posicione o farol inserindo os 2 pernos (D1) nas respetivas borra- Position the headlight inserting the no.2 pins (D1) in the corre- chas antivibrações (E).
- Seite 165 ISTR 856 / 04 Ativação\desativação dos manípulos aquecidos Heated handgrip activation/deactivation (versões XDiavel) (XDiavel versions) Ligue o painel de instrumentos (Z) e utilizando s botões (K6) e Turn on the instrument panel (Z) and use buttons (K6) and (K7) to (K7), é...
- Seite 166 ISTR 856 / 04 T5 T3...
- Seite 167 ISTR 856 / 04 Ativação\desativação dos manípulos aquecidos Heated handgrip enabling/disabling (versões Diavel 1260) (Diavel 1260 versions) Ligue o instrumento de diagnóstico ao conector de aquisição de Connect the diagnostic tool to the data acquisition socket. Select dados. Selecione o modelo correto do veículo motor. Selecione o the correct motorcycle model.
- Seite 168 ISTR 856 / 04 Note / Notes...
- Seite 169 ISTR - 856/ 04 Kit puños calefactados - 96680572A ヒーテッドグリップキット - 96680572A Símbolos シンボル Para una lectura rápida y racional se han empleado símbolos que 素早くかつ合理的に読み進めることができるように、本マニュア evidencian situaciones de máxima atención, consejos prácticos o ルではいくつかのシンボルを導入し、最大限の注意を払う必要 simples informaciones. Prestar mucha atención al significado de がある状況や、推奨事項、または一般情報を明確にしてありま...
- Seite 170 ISTR 856 / 04 Atención 警告 Realizar el ajuste de los 2 tornillos autorroscantes (3) exclusiva- 2 本のセルフタッピングスクリュー (3) を締め付けます。この mente a mano, no utilizar un atornillador automático. Para evitar 時、自動締め付け器具などは使用せず、必ず手で締め付けてくだ deformaciones o daños de los 2 tornillos autorroscantes (3) atorni- さい。2 本のセルフタッピングスクリュー...
- Seite 171 ISTR 856 / 04 Desmontaje componentes originales オリジナル部品の取り外し (Multistrada 950 バージョン) (versiones Multistrada 950) Desmontaje mando acelerador スロットルコントロールの取り外し Para poder acceder a los cableados de los puños calefactados y ヒーテッドグリップ配線とスロットルコントロール配線で作業を del mando acelerador, es necesario quitar los carenados depósito, 行うには、タンクフェアリングを取り外す必要があります。取り consultando las indicaciones en el capítulo “Desmontaje carenados 外し手順については、ワークショップマニュアルの「タンクフェ...
- Seite 172 ISTR 856 / 04 Liberar la parte exterior del protector de manos derecho (D) del 膨張ブッシュ (D2) がスクリュー (D1) に固定された状態にある manillar (E), prestando atención a que el casquillo de expansión よう注意しながら、ハンドルバー (E) から右ハンドガード (D) (D2) quede sujeto al tornillo (D1). Extraer el mando acelerador (A) の外側を外します。スロットルコントロール...
- Seite 173 ISTR 856 / 04 Desmontaje puño izquierdo 左グリップの取り外し Operando en el lado izquierdo de la motocicleta, quitar el tapón 車両の左側で作業し、コネクター (F) からキャップ (C1) を取り (C1) del conector (F). Aflojar el tornillo (G1) de fijación protector de 外します。左ハンドガード (G) を固定しているスクリュー (G1) manos izquierdo (G).
- Seite 174 ISTR 856 / 04 Liberar la parte exterior del protector de manos izquierdo (G) del 膨張ブッシュ (G2) がスクリュー (G1) に固定された状態にある manillar (E), prestando atención a que el casquillo de expansión よう注意しながら、ハンドルバー (E) から左ハンドガード (G) (G2) quede sujeto al tornillo (G1). Quitar el puño izquierdo (H) del の外側を外します。左グリップ...
- Seite 175 ISTR 856 / 04 Desmontaje componentes originales (ver- オリジナル部品の取り外し siones XDiavel) (XDiavel バージョン) Desmontaje puño izquierdo 左グリップの取り外し Operando del lado izquierdo de la motocicleta, aflojar el tornillo 車両の左側で作業します。スクリュー (R1) を緩め、カウンター (R1) y quitar el grupo contrapeso (R), prestando atención para que ウェイトユニット...
- Seite 176 ISTR 856 / 04 A B2...
- Seite 177 ISTR 856 / 04 Desmontaje mando acelerador スロットルコントロールの取り外し Operando en el lado derecho de la motocicleta, quitar las 5 abraza- 車両の右側で作業します。5 つのクランプ (T) を取り外し、スロ deras (T) y liberar el cable mando acelerador (A3). Liberar el conec- ットルコントロールケーブル (A3) を解放します。スロットルコ tor mando acelerador (A2) del sostén de fijación (Z) y desconectarlo ントロールコネクター...
- Seite 178 ISTR 856 / 04...
- Seite 179 ISTR 856 / 04 Desmontaje componentes originales オリジナル部品の取り外し (Monster 1200 バージョン) (versiones Monster 1200) Desmontaje grupo faro delantero ヘッドライトユニットの取り外し Operando de la parte delantera de la motocicleta, desconectar el 車両の前方で作業します。枠内 (X) に示すようにヘッドライトコ conector faro delantero (L1) de la toma tramo cableado principal ネクター...
- Seite 180 ISTR 856 / 04...
- Seite 181 ISTR 856 / 04 Desmontaje puño izquierdo 左グリップの取り外し Operando del lado izquierdo de la motocicleta, aflojar el tornillo 車両の左側で作業します。スクリュー (R1) を緩め、カウンター (R1) y quitar el grupo contrapeso (R), prestando atención para que ウェイトユニット (R) を取り外します。この時、膨張ブッシュ el casquillo de expansión (R2) quede sujeto al tornillo (R1). Extraer (R2) がスクリュー...
- Seite 182 ISTR 856 / 04...
- Seite 183 ISTR 856 / 04 Desmontaje componentes originales (ver- オリジナル部品の取り外し siones Supersport) (Supersport バージョン) Para poder acceder a los cableados de los puños calefactados y del ヒーテッドグリップ配線とスロットルコントロール配線で作業を mando acelerador, es necesario quitar el carenado derecho, con- 行うには、右フェアリングを取り外す必要があります。取り外し sultando las indicaciones en el capítulo “Desmontaje carenados” 手順については、ワークショップマニュアルの「フェアリングの...
- Seite 184 ISTR 856 / 04...
- Seite 185 ISTR 856 / 04 Desmontaje componentes originales オリジナル部品の取り外し (Scrambler 1100 バージョン) (versiones Scrambler 1100) Para poder acceder a los cableados de los puños calefactados y del ヒーテッドグリップ配線とスロットルコントロール配線で作業を mando acelerador, es necesario quitar las fijaciones depósito com- 行うには、フューエルタンク (C) の固定具を取り外し、タンクを bustible (C) y desplazarlo hacia atrás, consultando las indicaciones 後方に動かす必要があります。取り外し手順については、ワーク...
- Seite 186 ISTR 856 / 04...
- Seite 187 ISTR 856 / 04 Desmontaje puño izquierdo 左グリップの取り外し Operando del lado izquierdo de la motocicleta, aflojar el tornillo 車両の左側で作業します。スクリュー (R1) を緩め、カウンター (R1) y quitar el grupo contrapeso (R), prestando atención para que ウェイトユニット (R) を取り外します。この時、膨張ブッシュ el casquillo de expansión (R2) quede sujeto al tornillo (R1). Extraer (R2) がスクリュー...
- Seite 188 ISTR 856 / 04 Desmontaje componentes originales (ver- オリジナル部品の取り外し (Diavel 1260 バージョン) siones Diavel 1260) Desmontaje asiento シートの取り外し Para realizar el desmontaje del asiento (A), consultar las indicacio- シート (A) の取り外しについては、ワークショップマニュアルの nes en el capítulo “Desmontaje asiento” del manual de taller. 「シートの取り外し」セクションの記載を参照してください。...
- Seite 189 ISTR 856 / 04 Desmontaje mando acelerador スロットルコントロールの取り外し Aflojar el tornillo (D1) y quitar el grupo contrapeso (D), prestando スクリュー (D1) を緩め、カウンターウェイトユニット (D) を取 atención para que el casquillo de expansión (D2) quede sujeto al り外します。このとき、膨張ブッシュ (D2) がスクリュー (D1) tornillo (D1). Aflojar los 2 tornillos (E1) y extraer el mando acelera- から外れないように注意してください。2 本のスクリュー...
- Seite 190 ISTR 856 / 04 Desmontaje puño izquierdo 左グリップの取り外し Operando del lado izquierdo de la motocicleta, aflojar el tornillo 車両の左側で作業します。スクリュー (R1) を緩め、カウンター (R1) y quitar el grupo contrapeso (R), prestando atención para que ウェイトユニット (R) を取り外します。この時、膨張ブッシュ el casquillo de expansión (R2) quede sujeto al tornillo (R1). Extraer (R2) がスクリュー...
- Seite 191 ISTR 856 / 04 Desmontaje componentes originales オリジナル部品の取り外し (Hypermotard 950 バージョン) (versiones Hypermotard 950) Desmontaje cúpula ヘッドライトフェアリングの取り外し 2 本のスクリュー (A) を緩めて外します。ヘッドライトフェアリ Desatornillar y quitar los 2 tornillos (A). Quitar la cúpula (B). ング (B) を取り外します。 Desmontaje faro delantero ヘッドライトの取り外し Desatornillar los 2 tornillos (C) que fijan el faro (D) al bastidor de la cúpula.
- Seite 192 ISTR 856 / 04...
- Seite 193 ISTR 856 / 04 Desmontaje puño izquierdo 左グリップの取り外し Operando en el lado izquierdo de la motocicleta, liberar la parte 車両の左側で作業します。左ハンドガード (H) の外側部分をハン exterior del protector de manos izquierdo (H) del manillar (F), pres- ドルバー (F) から外します。このとき、膨張ブッシュ (H2) がス tando atención para que el casquillo de expansión (H2) quede su- クリュー...
- Seite 194 ISTR 856 / 04 10 Nm ± 10% 1,5 Nm ± 10%...
- Seite 195 ISTR 856 / 04 Montaje componentes kit キット構成部品の取り付け (Monster 950 バージョン) (versiones Multistrada 950) Importante 重要 Antes del montaje, comprobar que todos los componentes se en- 取り付けの前に全ての部品に汚れがなく、完璧な状態であること cuentren limpios y en perfecto estado. Adoptar todas las precau- を確認してください。作業する部分が破損しないように、必要な ciones necesarias para evitar dañar cualquier parte en la que se すべての予防措置を講じてください。...
- Seite 196 ISTR 856 / 04 2,8 Nm ± 5% 10 Nm ± 10%...
- Seite 197 ISTR 856 / 04 Montaje puño calefactado izquierdo 左ヒーテッドグリップの取り付け Comprobar que el cable (2A) sea insertado correctamente en el ケーブル (2A) が図のように左ヒーテッドグリップ (2) 前部の所 alojamiento delantero específico del puño calefactado izquierdo 定位置に正しく挿入されていることを確認します。グリップ (2), como ilustra la figura. Montar el puño (2) insertándolo en el をハンドルバー...
- Seite 198 ISTR 856 / 04 10 Nm ± 10% 2,8 Nm ± 5% (V*): Usare le viti del “kit montaggio manopole riscaldate” / Use the screws supplied with the “heated handgrip assembly kit” / Utiliser les vis du « kit montage poignées chauffantes »/ Die Schrauben aus dem „Kit Montage beheizte Lenkerg- riffe"...
- Seite 199 ISTR 856 / 04 Montaje componentes kit キット構成部品の取り付け (versiones XDiavel) (XDiavel バージョン) Importante 重要 Antes del montaje, comprobar que todos los componentes se en- 取り付けの前に全ての部品に汚れがなく、完璧な状態であること cuentren limpios y en perfecto estado. Adoptar todas las precau- を確認してください。作業する部分が破損しないように、必要な ciones necesarias para evitar dañar cualquier parte en la que se すべての予防措置を講じてください。...
- Seite 200 ISTR 856 / 04 10 Nm ± 10% 1,5 Nm ± 10%...
- Seite 201 ISTR 856 / 04 Montaje mando acelerador スロットルコントロールの取り付け スロットルコントロール (1) の 2 本の固定スクリュー (1B) を、 Aflojar los 2 tornillos (1B) de fijación del mando acelerador (1) lo suficiente para permitir la introducción del manillar (V) en el lado ハンドルバー (E) の右側に挿入するのに必要な分だけ緩めます。 derecho.
- Seite 202 ISTR 856 / 04 2,8 Nm ± 5% 10 Nm ± 10% 1,5 Nm ± 10% 10 Nm ± 10%...
- Seite 203 ISTR 856 / 04 Montaje componentes kit キット構成部品の取り付け (Monster 1200 バージョン) (versiones Monster 1200) Importante 重要 Antes del montaje, comprobar que todos los componentes se en- 取り付けの前に全ての部品に汚れがなく、完璧な状態であること cuentren limpios y en perfecto estado. Adoptar todas las precau- を確認してください。作業する部分が破損しないように、必要な ciones necesarias para evitar dañar cualquier parte en la que se すべての予防措置を講じてください。...
- Seite 204 ISTR 856 / 04 10 Nm ± 10% 10 Nm ± 10%...
- Seite 205 ISTR 856 / 04 Montaje grupo faro delantero ヘッドライトユニットの取り付け Disponer los cableados puños calefactados siguiendo los cablea- ハンドルバーにすでにあるオリジナルの配線に沿って、ヒーテッ dos originales ya presentes en el manillar. Introducir el conector ドグリップ配線を取り回します。コネクター (F) に左ヒーテッド calefacción puño izquierdo (2B) en el conector (F). Introducir el co- グリップピン...
- Seite 206 ISTR 856 / 04 2,3 Nm ± 5% 10 Nm ± 10% 1,5 Nm ± 10% 10 Nm ± 10%...
- Seite 207 ISTR 856 / 04 Montaje componentes kit キット構成部品の取り付け (versiones Supersport) (Supersport バージョン) Importante 重要 Antes del montaje, comprobar que todos los componentes se en- 取り付けの前に全ての部品に汚れがなく、完璧な状態であること を確認してください。作業する部分が破損しないように、必要な cuentren limpios y en perfecto estado. Adoptar todas las precau- すべての予防措置を講じてください。 ciones necesarias para evitar dañar cualquier parte en la que se debe operar.
- Seite 208 ISTR 856 / 04 2,3 Nm ± 5%...
- Seite 209 ISTR 856 / 04 Montaje componentes kit キット構成部品の取り付け (Scrambler 1100 バージョン) (versiones Scrambler 1100) Importante 重要 Antes del montaje, comprobar que todos los componentes se en- 取り付けの前に全ての部品に汚れがなく、完璧な状態であること cuentren limpios y en perfecto estado. Adoptar todas las precau- を確認してください。作業する部分が破損しないように、必要な ciones necesarias para evitar dañar cualquier parte en la que se すべての予防措置を講じてください。...
- Seite 210 ISTR 856 / 04 1,5 Nm ± 10% 10 Nm ± 10%...
- Seite 211 ISTR 856 / 04 Montaje mando acelerador スロットルコントロールの取り付け スロットルグリップ (1) の 2 本の固定スクリュー (1B) を、ハ Aflojar los 2 tornillos (1B) de fijación del mando acelerador (1) lo suficiente para permitir la introducción del manillar (E) en el lado ンドルバー (E) の右側に挿入するために必要な分だけ緩めます。 derecho.
- Seite 212 ISTR 856 / 04 2,3 Nm ± 5%...
- Seite 213 ISTR 856 / 04 Montaje componentes kit キット構成部品の取り付け (Diavel 1260 バージョン) (versiones Diavel 1260) Importante 重要 Antes del montaje, comprobar que todos los componentes se en- 取り付けの前に全ての部品に汚れがなく、完璧な状態であること cuentren limpios y en perfecto estado. Adoptar todas las precau- を確認してください。作業する部分が破損しないように、必要な ciones necesarias para evitar dañar cualquier parte en la que se すべての予防措置を講じてください。...
- Seite 214 ISTR 856 / 04 10 Nm ± 10% 1,5 Nm ± 10%...
- Seite 215 ISTR 856 / 04 Montaje mando acelerador スロットルコントロールの取り付け スロットルグリップ (1) の 2 本の固定スクリュー (1B) を、ハ Aflojar los 2 tornillos (1B) de fijación del mando acelerador (1) lo suficiente para permitir la introducción del manillar (G) en el lado ンドルバー (G) の右側に挿入するために必要な分だけ緩めます。 derecho.
- Seite 216 ISTR 856 / 04 2,8 Nm ± 5% 10 Nm ± 10%...
- Seite 217 ISTR 856 / 04 Montaje componentes kit キット構成部品の取り付け (Hypermotard 950 バージョン) (versiones Hypermotard 950) Importante 重要 Antes del montaje, comprobar que todos los componentes se en- 取り付けの前に全ての部品に汚れがなく、完璧な状態であること cuentren limpios y en perfecto estado. Adoptar todas las precau- を確認してください。作業する部分が破損しないように、必要な ciones necesarias para evitar dañar cualquier parte en la que se すべての予防措置を講じてください。...
- Seite 218 ISTR 856 / 04 1,5 Nm ± 10% 10 Nm ± 10% 1C 1E...
- Seite 219 ISTR 856 / 04 Montaje mando acelerador スロットルコントロールの取り付け スロットルグリップ (1) の 2 本の固定スクリュー (1B) を、ハ Aflojar los 2 tornillos (1B) de fijación del mando acelerador (1) lo suficiente para permitir la introducción del manillar (F) en el lado ンドルバー (F) の右側に挿入するために必要な分だけ緩めます。 derecho.
- Seite 220 ISTR 856 / 04 3 Nm ± 10% 3 Nm ± 10% 3 Nm ± 10% Montaje faro delantero ヘッドライトの取り付け それぞれの耐震ラバー (E) の 2 本のピン (D1) を挿入して、 Posicionar el faro introduciendo los 2 pernos (D1) en las juntas an- tivibrantes correspondientes (E). Introducir los 2 tornillos (C) que ヘッドライトを配置します。ヘッドライト...
- Seite 221 ISTR 856 / 04 Activación/desactivación puños calefactados ヒーテッドグリップの起動/解除 (XDiavel バージョン) (versiones XDiavel) インストルメントパネル (Z) を起動し、ボタン (K6) および Encender el salpicadero (Z), utilizando los pulsadores (K6) y (K7) (K7) を使用して、ヒーテッドグリップ (H.GRIPS) の起動/解除 es posible desplazarse entre las funciones del Menú 1 (Z1) hasta の機能が表示されるまでメニュー...
- Seite 222 ISTR 856 / 04 T5 T3...
- Seite 223 ISTR 856 / 04 Activación/desactivación puños calefactados ヒーテッドグリップの起動/停止 (Diavel 1260 バージョン) (versiones Diavel 1260) Conectar el instrumento de diagnosis al conector de adquisición de 診断テスターをデータロガーコネクターに接続します。正しい車 datos. Seleccionar el modelo correcto de motocicleta. Seleccionar 両モデルを選択します。枠図 (X1) に示すように、左側メニュ el área “Autodiagnosis” (T1) en el menú a la izquierda y sucesiva- ーから「自己診断」環境...
- Seite 224 ISTR 856 / 04 Note / Notes...
- Seite 225 レース専用部品 ご注文書 ご注文商品 商品名 P/N 商品名 P/N 商品名 P/N 商品名 P/N 商品名 P/N お客様ご記入欄 私は上記レース専用部品を下記車両に装着し、サーキット走行のみに 利用し、一般公道には利用しません。 車台番号 ZDM モデル名 お客様署名 ご注文日 ドゥカティ正規ネットワーク店記入欄 お客様に上記レース専用部品を販売し、レース専用部品のご利用方法を 説明いたしました。 販売店署名 販売日 年 月 日 販売店様へお願い 1. 上記ご記入の上、弊社アフターセールス 部までFAX してください 。FAX : 03 - 6692 - 1317 1. 上記ご記入の上、弊社アフターセールス 部までFAX してください 。FAX : 03 - 6692 - 1317 2.
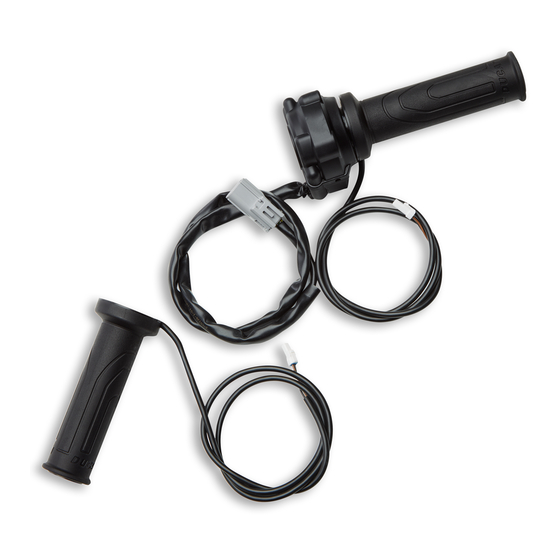
- Seite 226 ISTR - 856 / 04 Kit manopole riscaldate Heated handgrips kit Kit poignées chauffantes / Kit beheizte Lenkergriffe / Kit de manípulos aquecidos / Kit puños calefactados / ヒートグリップキット - 96680572A...
- Seite 227 ISTR 856 / 04 Pos. Art.-Nr. Denominazione Description Designation Bezeichnung Descrição Denominación Q.ty 説明 Comando Commande des Mando acelerador RH heated throttle Beheizter Gassteuerungsgriff Comando do acelerador 右ヒーテッドスロッ 66040092B acceleratore gaz chauffante calefactado control rechts aquecido lado direito トルコントロール riscaldato destro droite derecho Poignée...