Ducati Performance 96680841B Montageanleitung
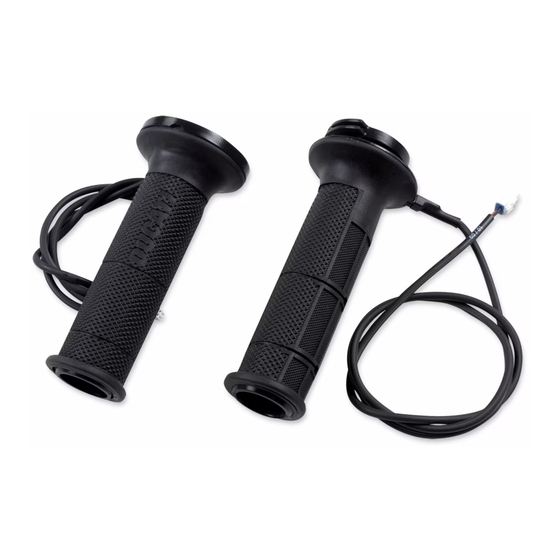
Kit beheizte lenkergriffe
Inhaltsverzeichnis
ISTR - 628 / 01
Kit manopole riscaldate
Heated handgrip kit
Simbologia
Per una lettura rapida e razionale sono stati impiegati simboli che
evidenziano situazioni di massima attenzione, consigli pratici o
semplici informazioni. Prestare molta attenzione al significato dei
simboli, in quanto la loro funzione è quella di non dovere ripete-
re concetti tecnici o avvertenze di sicurezza. Sono da considerare,
quindi, dei veri e propri "promemoria". Consultare questa pagina
ogni volta che sorgeranno dubbi sul loro significato.
Attenzione
La non osservanza delle istruzioni riportate può creare una situa-
zione di pericolo e causare gravi lesioni personali e anche la morte.
Importante
Indica la possibilità di arrecare danno al veicolo e/o ai suoi compo-
nenti se le istruzioni riportate non vengono eseguite.
Note
Fornisce utili informazioni sull'operazione in corso.
Riferimenti
I particolari evidenziati in grigio e riferimento numerico (Es.
rappresentano l'accessorio da installare e gli eventuali componenti
di montaggio forniti a kit.
I particolari con riferimento alfabetico (Es.
componenti originali presenti sul motoveicolo.
Tutte le indicazioni destro o sinistro si riferiscono al senso di marcia
del motociclo.
Avvertenze generali
Attenzione
Le operazioni riportate nelle pagine seguenti devono essere ese-
guite da un tecnico specializzato o da un'officina autorizzata Du-
cati.
Attenzione
Le operazioni riportate nelle pagine seguenti se non eseguite a re-
gola d'arte possono pregiudicare la sicurezza del pilota.
Note
Documentazione necessaria per eseguire il montaggio del Kit è il
Manuale Officina, relativo al modello di moto in vostro possesso.
Note
Nel caso fosse necessaria la sostituzione di un componente del kit
consultare la tavola ricambi allegata.
1
- 96680841B
- 96680841B
A
) rappresentano i
Symbols
To allow quick and easy consultation, this manual uses graphic
symbols to highlight situations in which maximum care is required,
as well as practical advice or information. Pay attention to the
meaning of the symbols since they serve to avoid repeating tech-
nical concepts or safety warnings throughout the text. The sym-
bols should therefore be seen as real reminders. Please refer to
this page whenever in doubt as to their meaning.
Warning
Failure to follow these instructions might give raise to a dangerous
situation and provoke severe personal injuries or even death.
Caution
Failure to follow these instructions might cause damages to the
vehicle and/or its components.
Notes
Useful information on the procedure being described.
References
1
)
Parts highlighted in grey and with a numeric reference (Example
1
) are the accessory to be installed and any assembly compo-
nents supplied with the kit.
Parts with an alphabetic reference (Example
components fitted on the vehicle.
Any right- or left-hand indication refers to the vehicle direction of
travel.
General notes
Warning
Carefully perform the operations on the following pages since they
might negatively affect rider safety.
Warning
Carefully perform the operations on the following pages since they
might negatively affect rider safety.
Notes
The following documents are necessary for assembling the Kit:
Workshop Manual of your bike model.
Notes
Should it be necessary to change any kit parts, please refer to the
attached spare part table.
Warning
Operating, servicing and maintaining a passenger vehicle or off-
highway motor vehicle can expose you to chemicals including en-
gine exhaust, carbon monoxide, phthalates, and lead, which are
known to the State of California to cause cancer and birth defects
or other reproductive harm. To minimize exposure, avoid breath-
ing exhaust, do not idle the engine except as necessary, service
your vehicle in a well-ventilated area and wear gloves or wash your
hands frequently when servicing your vehicle. For more informa-
tion go to www.P65Warnings.ca.gov/passenger-vehicle.
A
) are the original
Inhaltsverzeichnis

Verwandte Anleitungen für Ducati Performance 96680841B


Inhaltszusammenfassung für Ducati Performance 96680841B
- Seite 1 ISTR - 628 / 01 Kit manopole riscaldate - 96680841B Heated handgrip kit - 96680841B Simbologia Symbols Per una lettura rapida e razionale sono stati impiegati simboli che To allow quick and easy consultation, this manual uses graphic evidenziano situazioni di massima attenzione, consigli pratici o symbols to highlight situations in which maximum care is required, semplici informazioni.
- Seite 2 ISTR 628 / 01 Monster 797 Importante Important I componenti del kit possono essere soggetti ad aggiornamenti; The parts of the kit can be updated; for information always up to consultare il DCS (Dealer Communication System) per avere infor- date, please refer to DCS (Dealer Communication System). mazioni sempre aggiornate.
- Seite 3 ISTR 628 / 01 Smontaggio componenti originali Removing the original components (versione Scrambler 800) (Scrambler 800 versions) Smontaggio sella Removing the seat Introdurre la chiave nella serratura (A), ruotarla in senso orario e Insert the key in the lock (A), turn the key clockwise and simultane- contemporaneamente premere verso il basso in prossimità...
- Seite 4 ISTR 628 / 01...
- Seite 5 ISTR 628 / 01 Smontaggio serbatoio carburante Removing the fuel tank Svitare le n.2 viti (C1) di fissaggio del serbatoio (C) al telaio. Ope- Loosen no.2 screws (C1) fastening tank (C) to frame. Working on rando su entrambi i lati del motoveicolo, svitare le n.2 viti (C2). Sol- both sides of the motorcycle, loosen the no.2 screws (C2).
- Seite 6 ISTR 628 / 01 Smontaggio manopola sinistra LH handgrip disassembly Operando sul lato sinistro del motoveicolo, allentare la vite (G) e By working on LH side of the motorcycle, loosen screw (G) and re- rimuovere il tappo manubrio (H). Sfilare la manopola sinistra (F) move handlebar plug (H).
- Seite 7 ISTR 628 / 01 Smontaggio comando gas Throttle control disassembly Operando sul lato destro del motoveicolo, allentare la vite (M) e ri- By working on RH side of the motorcycle, loosen screw (M) and re- muovere il tappo manubrio (Q). Svitare le n.2 viti (P2) e smontare il move handlebar plug (Q).
- Seite 8 ISTR 628 / 01 Smontaggio componenti originali Removing the original components (versione Monster 797) (Monster 797 versions) Smontaggio componenti lato sinistro manubrio LH side handlebar component disassembly Operando sul lato sinistro del motoveicolo, rimuovere il tappo (H). Working on LH side of the motorcycle, remove plug (H). Slide LH Rimuovere la manopola sinistra (F) sfilandola dal manubrio (N).
- Seite 9 ISTR 628 / 01 Smontaggio comando gas Throttle control disassembly Operando sul lato destro del motoveicolo, rimuovere il tappo (Q). Working on LH side of the motorcycle, remove plug (Q). Loosen Svitare le n.2 viti (P2) e smontare il cavallotto (P3) dal supporto co- the no.2 screws (P2) and remove U-bolt (P3) from throttle control mando gas (P4).
- Seite 10 ISTR 628 / 01 2,8 Nm ± 5% 3,5 Nm ± 10%...
- Seite 11 ISTR 628 / 01 Montaggio componenti kit Assembling the kit components (Versioni Scrambler 800) (Scrambler 800 versions) Importante Important Verificare, prima del montaggio, che tutti i componenti risultino Before assembling, check that all parts are clean and in good con- puliti e in perfetto stato.
- Seite 12 ISTR 628 / 01 3,5 Nm ± 10% 6 Nm ± 10%...
- Seite 13 ISTR 628 / 01 Montaggio manopola riscaldata destra Assembling the RH heated handgrip Montare la manopola riscaldata destra (2) inserendola sul manu- Install the RH heated handgrip (2) fitting it on the handlebar (N) brio (N), con il cavo cablaggio rivolto verso il basso. Posizionare il with wiring cable facing down.
-
Seite 14: Wiring Connection
ISTR 628 / 01 Collegamento dei cablaggi Wiring connection Operando sul lato destro del motoveicolo, sfilare il ramo cablaggio Working on vehicle RH side, slide out the LH heated handgrip wir- manopola riscaldata sinistro (T1) e destro (T2) dal tampone porta- ing (T1) and RH heated handgrip wiring (T2) from lower connector connettori inferiore (S). - Seite 15 ISTR 628 / 01 5 Nm ± 10% 5 Nm ± 10% 10 Nm ± 10% Rimontaggio serbatoio Refitting the tank Assicurarsi che da entrambi i lati del telaio siano presenti i n.2 Ensure that the no.2 rubber blocks (U) are in place on both sides gommini (U).
- Seite 16 ISTR 628 / 01 Montaggio componenti kit Assembling the kit components (Versioni Monster 797) (Monster 797 versions) Importante Important Verificare, prima del montaggio, che tutti i componenti risultino Before assembling, check that all parts are clean and in good con- puliti e in perfetto stato.
- Seite 17 ISTR 628 / 01 1,5 Nm ± 10% Rimontaggio commutatore sinistro Refitting the LH switch Rimontare il commutatore sinistro (K) sul manubrio (N), orientan- Refit LH switch (K) on handlebar (N), aiming it as shown in the dolo come mostrato in figura, inserendo il perno (K2) del commu- figure, inserting LH switch (K) pin (K2) in handlebar (N) hole (J).
- Seite 18 ISTR 628 / 01 2,8 Nm ± 5%...
- Seite 19 ISTR 628 / 01 Montaggio manopola riscaldata sinistra LH heated handgrip assembly Verificare che il cavo (1B) sia correttamente inserito nell’apposita Check that the cable (1B) is correctly inserted in the specific front sede anteriore della manopola riscaldata sinistra (1), come mostra- seat of the LH heated handgrip (1), as shown in the figure.
- Seite 20 ISTR 628 / 01 6 Nm ± 10%...
- Seite 21 ISTR 628 / 01 Montaggio manopola riscaldata destra Assembling the RH heated handgrip Montare la manopola riscaldata destra (2) inserendola sul manu- Install the RH heated handgrip (2) fitting it on the handlebar (N) brio (N) con il cavo del cablaggio rivolto verso il basso. Posizionare with wiring facing down.
- Seite 22 ISTR 628 / 01 Collegamento dei cablaggi Wiring connection Operando sul lato destro del motoveicolo, sfilare il ramo cablaggio Working on RH side of the motorcycle, slide out LH heated hand- manopola riscaldata sinistro (T1) e destro (T2) dal tampone portaco grip wiring branch (T1) and RH heated handgrip wiring branch (T2) nnettori inferiore (S).
- Seite 23 ISTR 628 / 01 Attivazione\disattivazione manopole riscaldate Enabling/disabling the heated handgrips (H.GRIPS) (Versioni Scrambler 800) (H.GRIPS) (Scrambler 800 versions) Questa funzione è disponibile solo se le manopole riscaldate sono This function is available only if heated handgrips have been in- state installate e permette l’attivazione, disattivazione e regolazio- stalled and allows enabling, disabling and adjusting them.
- Seite 24 ISTR 628 / 01 Attivazione\disattivazione manopole riscaldate Enabling/disabling the heated handgrips (H.GRIPS) (Versioni Monster 797) (H.GRIPS) (Monster 797 versions) Collegare lo strumento di diagnosi al connettore acquisizione dati Connect the diagnostic tool to the data acquisition socket and e abilitare le manopole riscaldate. Questa funzione permette di at- enable the heated handgrips.
- Seite 25 ISTR - 628 / 01 Kit poignées chauffantes - 96680841B Kit beheizte Lenkergriffe - 96680841B Symboles Symbole Pour faciliter la consultation de ce manuel, des symboles signalent Zum schnellen und übersichtlichen Lesen werden Symbole verwendet, des situations exigeant le maximum d'attention, des conseils pra- die außerordentlich wichtige Situationen, praktische Ratschläge oder tiques ou de simples informations.
- Seite 26 ISTR 628 / 01 Monster 797 Important Wichtig Les composants du kit peuvent être soumis à des mises à jour ; Die Bestandteile des Kits können Aktualisierungen unterliegen. veuillez consulter le DCS (Dealer Communication System) pour des Lesen Sie stets die Angaben im DCS (Dealer Communication Sys- informations toujours actualisées.
-
Seite 27: Abnahme Der Sitzbank
ISTR 628 / 01 Dépose des composants d’origine Ausbau der Original-Bestandteile (version Scrambler 800) (Version Scrambler 800) Dépose de la selle Abnahme der Sitzbank Insérer la clé dans la serrure (A), la tourner dans le sens des aiguilles Den Schlüssel in das Schloss (A) einstecken, im Uhrzeigersinn dre- d’une montre et, en même temps, exercer une pression vers le bas hen und dabei gleichzeitig am Riegel nach unten drücken, um das à... - Seite 28 ISTR 628 / 01...
- Seite 29 ISTR 628 / 01 Dépose du réservoir carburant Abnahme des Kraftstofftanks Desserrer les 2 vis (C1) de fixation du réservoir (C) au cadre. En agis- Die 2 Schrauben (C1) der Befestigung des Tanks (C) am Rahmen sant des deux côtés du motocycle, desserrer les 2 vis (C2). Soule- lösen.
- Seite 30 ISTR 628 / 01 Dépose poignée gauche Abnahme des linken Lenkergriffs En agissant du côté gauche du motocycle, desserrer la vis (G) et An der linken Motorradseite arbeitend, die Schraube (G) lockern déposer le bouchon guidon (H). Sortir la poignée gauche (F) du und den Lenkerverschluss (H) entfernen.
-
Seite 31: Ausbau Der Gassteuerung
ISTR 628 / 01 Dépose de la commande des gaz Ausbau der Gassteuerung En agissant du côté droit du motocycle, desserrer la vis (M) et dé- An der rechten Motorradseite arbeitend, die Schraube (M) lockern poser le bouchon guidon (Q). Desserrer les 2 vis (P2) et déposer und den Lenkerverschluss (Q) entfernen. -
Seite 32: Abnahme Der Komponenten An Der Linken Lenker- Seite
ISTR 628 / 01 Dépose des composants d’origine Ausbau der Original-Bestandteile (version Monster 797) (Version Monster 797) Dépose composants côté gauche du guidon Abnahme der Komponenten an der linken Lenker- seite En agissant du côté gauche du motocycle, déposer le bouchon (H). Déposer la poignée gauche (F) en la sortant du guidon (N). - Seite 33 ISTR 628 / 01 Dépose de la commande des gaz Ausbau der Gassteuerung En agissant du côté droit du motocycle, déposer le bouchon (Q). An der rechten Seite des Motorrads arbeitend, den Verschluss (Q) Desserrer les 2 vis (P2) et déposer l’étrier de jonction (P3) du sup- entfernen.
- Seite 34 ISTR 628 / 01 2,8 Nm ± 5% 3,5 Nm ± 10%...
- Seite 35 ISTR 628 / 01 Pose des composants du kit Montage der Kit--Bestandteile (Versions Scrambler 800) (Versionen Scrambler 800) Important Wichtig Avant la pose, vérifier que tous les composants sont propres et en Vor der Montage überprüfen, dass alle Bestandteile sauber sind bon état.
- Seite 36 ISTR 628 / 01 3,5 Nm ± 10% 6 Nm ± 10%...
-
Seite 37: Montage Des Rechten Beheizten Lenkergriffs
ISTR 628 / 01 Pose de la poignée chauffante droite Montage des rechten beheizten Lenkergriffs Poser la poignée chauffante droite (2) en l’insérant sur le guidon Den rechten beheizten Lenkergriff (2) montieren, ihn dazu mit (N) avec le câble câblage tourné vers le bas. Positionner le support dem Kabel der Verkabelungseinheit nach unten gerichtet am Len- de la commande des gaz (P4) sur la poignée chauffante droite (2) ker (N) einfügen. -
Seite 38: Anschluss Der Verkabelungen
ISTR 628 / 01 Connexion des câblages Anschluss der Verkabelungen En intervenant du côté droit du motocycle, sortir le brin du câblage An der rechten Seite des Motorrads den Verkabelungszweig des poignée chauffante gauche (T1) et droit (T2) du porte-connecteurs linken (T1) und des rechten beheizten Lenkergriffs (T2) aus dem inférieur (S). - Seite 39 ISTR 628 / 01 5 Nm ± 10% 5 Nm ± 10% 10 Nm ± 10% Repose du réservoir Montage des Tanks Vérifier que les 2 plots en caoutchouc (U) soient présents des deux Sicherstellen, dass an beiden Rahmenseiten die 2 Gummielemente côtés du cadre.
- Seite 40 ISTR 628 / 01 Pose des composants du kit Montage der Kit--Bestandteile (Versions Monster 797) (Versionen Monster 797) Important Wichtig Vor der Montage überprüfen, dass alle Bestandteile sauber sind Avant la pose, vérifier que tous les composants sont propres et en und sich im perfekten Zustand befinden.
-
Seite 41: Montage Der Linken Umschaltereinheit
ISTR 628 / 01 1,5 Nm ± 10% Repose du commutateur gauche Montage der linken Umschaltereinheit Reposer le commutateur gauche (K) sur le guidon (N), en l’orien- Die linke Umschaltereinheit (K) erneut am Lenker (N) montieren tant comme la figure le montre, en insérant le pivot (K2) du com- und dabei wie abgebildet ausrichten, indem der Bolzen (K2) der mutateur gauche (K) dans le trou (J) du guidon (N). - Seite 42 ISTR 628 / 01 2,8 Nm ± 5%...
- Seite 43 ISTR 628 / 01 Pose poignée chauffante gauche Montage des linken beheizten Lenkergriffs Vérifier que le câble (1B) est correctement introduit dans le loge- Überprüfen, dass das Kabel (1B) korrekt in den entsprechenden ment avant spécifique de la poignée chauffante gauche (1), comme vorderen Sitz des linken beheizten Lenkergriffs (1), wie auf der Ab- la figure le montre.
- Seite 44 ISTR 628 / 01 6 Nm ± 10%...
- Seite 45 ISTR 628 / 01 Pose de la poignée chauffante droite Montage des rechten beheizten Lenkergriffs Poser la poignée chauffante droite (2) en l’insérant sur le guidon Dem rechten beheizten Lenkergriff (2) montieren, ihn dazu mit (N) avec le câble du câblage vers le bas. Positionner le support de dem Kabel der Verkabelungseinheit nach unten gerichtet am la commande des gaz (P4) sur la poignée droite (2) et insérer le Lenker (N) einfügen.
- Seite 46 ISTR 628 / 01 Connexion des câblages Anschluss der Verkabelungen En agissant du côté droit du motocycle, sortir le brin câblage poi- An der rechten Seite des Motorrads arbeitend, den Verkabelungs- gnée chauffante gauche (T1) et droit (T2) du porte-connecteurs zweig des linken (T1) und des rechten beheizten Lenkergriffs (T2) inférieur (S).
-
Seite 47: Aktivieren/Deaktivieren Der Beheizten Lenkergriffe (H.grips) (Versionen Scrambler 800)
ISTR 628 / 01 Activation\désactivation poignées chauffantes Aktivieren/Deaktivieren der beheizten Lenkergriffe (H.GRIPS) (Versions Scrambler 800) (H.GRIPS) (Versionen Scrambler 800) Cette fonction est disponible uniquement en cas de poignées Diese Funktion, die nur bei installierten beheizten Lenkergriffen chauffantes installées et permet l’activation, la désactivation et le verfügbar ist, ermöglicht die Aktivierung, Deaktivierung und Ein- réglage des poignées chauffantes. -
Seite 48: Aktivieren/Deaktivieren Der Beheizten Lenkergriffe (H.grips) (Versionen Monster 797)
ISTR 628 / 01 Activation\désactivation poignées chauffantes Aktivieren/Deaktivieren der beheizten Lenkergriffe (H.GRIPS) (Versions Monster 797) (H.GRIPS) (Versionen Monster 797) Brancher l’instrument de diagnostic au connecteur de saisie des Das Diagnoseinstrument an den Datenerfassungsanschluss schlie- données et activer les poignées chauffantes. Cette fonction per- ßen, dann die Funktion der beheizten Lenkergriffe freischalten. -
Seite 49: Advertências Gerais
ISTR - 628 / 01 Conjunto punhos aquecidos - 96680841B Heated handgrip kit - 96680841B Símbolos Symbols Para uma leitura rápida e racional, foram utilizados símbolos que To allow quick and easy consultation, this manual uses graphic evidenciam situações de máxima atenção, conselhos práticos ou symbols to highlight situations in which maximum care is required, simples informações. - Seite 50 ISTR 628 / 01 Monster 797 Importante Important Os componentes do conjunto podem sofrer atualizações; consulte The parts of the kit can be updated; for information always up to o DCS (Dealer Communication System) a fim de obter informações date, please refer to DCS (Dealer Communication System). sempre atualizadas.
- Seite 51 ISTR 628 / 01 Desmontagem dos componentes originais Removing the original components (versão Scrambler 800) (Scrambler 800 versions) Desmontagem do assento Removing the seat Introduza a chave na fechadura (A), gire-a no sentido horário e si- Insert the key in the lock (A), turn the key clockwise and simultane- multaneamente pressione para baixo perto do ferrolho para facili- ously press downward in the area of the latch to release the pin.
- Seite 52 ISTR 628 / 01...
- Seite 53 ISTR 628 / 01 Desmontagem do depósito de combustível Removing the fuel tank Desatarraxe os 2 parafusos (C1) de fixação do depósito (C) no chas- Loosen no.2 screws (C1) fastening tank (C) to frame. Working on si. Actuando em ambos os lados da moto, desatarraxe os 2 para- both sides of the motorcycle, loosen the no.2 screws (C2).
- Seite 54 ISTR 628 / 01 Desmontagem do punho esquerdo LH handgrip disassembly Atuando no lado esquerdo da moto, alivie o parafuso (G) e remova By working on LH side of the motorcycle, loosen screw (G) and re- a tampa do guiador (H). Retire o punho esquerdo (F) do guiador move handlebar plug (H).
- Seite 55 ISTR 628 / 01 Desmontagem do comando do gás Throttle control disassembly Atuando no lado direito da moto, alivie o parafuso (M) e remova a By working on RH side of the motorcycle, loosen screw (M) and re- tampa do guiador (Q). Desatarraxe os 2 parafusos (P2) e desmonte move handlebar plug (Q).
- Seite 56 ISTR 628 / 01 Desmontagem dos componentes originais Removing the original components (versão Monster 797) (Monster 797 versions) Desmontagem dos componentes do lado esquerdo LH side handlebar component disassembly do guiador Working on LH side of the motorcycle, remove plug (H). Slide LH Atuando no lado esquerdo da moto, remova a tampa (H).
- Seite 57 ISTR 628 / 01 Desmontagem do comando do gás Throttle control disassembly Operando no lado direito da moto, remova a tampa (Q). Desatarra- Working on LH side of the motorcycle, remove plug (Q). Loosen xe os 2 parafusos (P2) e desmonte a braçadeira (P3) do suporte do the no.2 screws (P2) and remove U-bolt (P3) from throttle control comando do acelerador (P4).
- Seite 58 ISTR 628 / 01 2,8 Nm ± 5% 3,5 Nm ± 10%...
- Seite 59 ISTR 628 / 01 Montagem dos componentes do conjunto Assembling the kit components (Versões Scrambler 800) (Scrambler 800 versions) Importante Important Verifique, antes da montagem, se todos os componentes estão Before assembling, check that all parts are clean and in good con- limpos e em perfeito estado.
- Seite 60 ISTR 628 / 01 3,5 Nm ± 10% 6 Nm ± 10%...
- Seite 61 ISTR 628 / 01 Montagem do punho aquecido direito Assembling the RH heated handgrip Monte o punho aquecido direito (2), inserindo-o no guiador (N) Install the RH heated handgrip (2) fitting it on the handlebar (N) com o cabo virado para baixo. Posicione o suporte do comando with wiring cable facing down.
-
Seite 62: Wiring Connection
ISTR 628 / 01 Ligação das cablagens Wiring connection Atuando no lado direito da moto, retire a secção da cablagem do Working on vehicle RH side, slide out the LH heated handgrip wir- punho aquecido esquerdo (T1) e direito (T2) do tampão porta-co- ing (T1) and RH heated handgrip wiring (T2) from lower connector nectores inferior (S). - Seite 63 ISTR 628 / 01 5 Nm ± 10% 5 Nm ± 10% 10 Nm ± 10% Remontagem do depósito Refitting the tank Certifique-se de que em ambos os lados do chassi existam as 2 Ensure that the no.2 rubber blocks (U) are in place on both sides borrachas (U).
- Seite 64 ISTR 628 / 01 Montagem dos componentes do conjunto Assembling the kit components (Versões Monster 797) (Monster 797 versions) Importante Important Verifique, antes da montagem, se todos os componentes estão Before assembling, check that all parts are clean and in good con- limpos e em perfeito estado.
- Seite 65 ISTR 628 / 01 1,5 Nm ± 10% Remontagem do interruptor esquerdo Refitting the LH switch Volte a montar o interruptor esquerdo (K) no guiador (N), posi- Refit LH switch (K) on handlebar (N), aiming it as shown in the cionando-o como mostrado na figura, inserindo o perno (K2) do figure, inserting LH switch (K) pin (K2) in handlebar (N) hole (J).
- Seite 66 ISTR 628 / 01 2,8 Nm ± 5%...
- Seite 67 ISTR 628 / 01 Montagem do punho aquecido esquerdo LH heated handgrip assembly Verifique que o cabo (1B) esteja corretamente inserido na especí- Check that the cable (1B) is correctly inserted in the specific front fica sede anterior do punho aquecido lado esquerdo (1), conforme seat of the LH heated handgrip (1), as shown in the figure.
- Seite 68 ISTR 628 / 01 6 Nm ± 10%...
- Seite 69 ISTR 628 / 01 Montagem do punho aquecido direito Assembling the RH heated handgrip Monte o punho aquecido direito (2), inserindo-o no guiador (N) Install the RH heated handgrip (2) fitting it on the handlebar (N) com o cabo da cablagem virado para baixo. Posicione o suporte do with wiring facing down.
- Seite 70 ISTR 628 / 01 Ligação das cablagens Wiring connection Atuando no lado direito da moto, retire a secção da cablagem do Working on RH side of the motorcycle, slide out LH heated hand- punho aquecido esquerdo (T1) e direito (T2) do tampão porta-co- grip wiring branch (T1) and RH heated handgrip wiring branch (T2) nectores inferior (S).
- Seite 71 ISTR 628 / 01 Ativação\desativação dos punhos aquecidos Enabling/disabling the heated handgrips (H.GRIPS) (Versões Scrambler 800) (H.GRIPS) (Scrambler 800 versions) Esta função só está disponível se os punhos aquecidos foram ins- This function is available only if heated handgrips have been in- talados e permite a ativação, desativação e regulação dos mesmos.
- Seite 72 ISTR 628 / 01 Ativação\desativação dos punhos aquecidos Enabling/disabling the heated handgrips (H.GRIPS) (Versões Monster 797) (H.GRIPS) (Monster 797 versions) Ligue o instrumento de diagnóstico ao conector de aquisição dos Connect the diagnostic tool to the data acquisition socket and dados e habilite os punhos aquecidos.
-
Seite 73: Advertencias Generales
ISTR - 628 / 01 Kit puños calefactados - 96680841B - 96680841B ヒーテッドグリップキット Símbolos シンボル Para una lectura rápida y racional se han empleado símbolos que 素早くかつ合理的に読み進めることができるように、本マニュア evidencian situaciones de máxima atención, consejos prácticos o ルではいくつかのシンボルを導入し、最大限の注意を払う必要 simples informaciones. Prestar mucha atención al significado de がある状況や、推奨事項、または一般情報を明確にしてありま... - Seite 74 ISTR 628 / 01 Monster 797 Importante 重要 Es posible que los componentes del kit sean actualizados; consul- キットの構成部品は更新されることがあります。DCS (Dealer tar el DCS (Dealer Communication System) para tener información Communication System) から常に最新の情報をチェックするよ siempre al día. うにしてください。 Notas 参考 La plantilla (3) y el pasador elástico (4) se deben utilizar para la ins- テンプレート...
-
Seite 75: Desmontaje Asiento
ISTR 628 / 01 Desmontaje componentes originales オリジナル部品の取り外し (versión Scrambler 800) (Scrambler 800 バージョン) Desmontaje asiento シートの取り外し Introducir la llave en la cerradura (A), girarla en el sentido de las キーを鍵穴 (A) に差し込み、時計周りに回します。同時に、ピン agujas del reloj y contemporáneamente presionar hacia abajo cer- を外しやすくするために掛け金の近くを下に押し下げます。フロ... - Seite 76 ISTR 628 / 01...
- Seite 77 ISTR 628 / 01 Desmontaje depósito combustible フューエルタンクの取り外し Desatornillar los 2 tornillos (C1) de fijación del depósito (C) en el フューエルタンク (C) をフレームに固定している 2 本のスクリ bastidor. En ambos lados de la motocicleta, desatornillar los 2 tor- ュー (C1) を緩めて外します。車両の両側から、2 本のスクリュ nillos (C2).
- Seite 78 ISTR 628 / 01 Desmontaje puño izquierdo 左グリップの取り外し Operando en el lado izquierdo de la motocicleta, aflojar el tornillo 車両の左側で作業します。スクリュー (G) を緩めて外し、ハンド (G) y quitar el tapón manillar (H). Extraer el puño izquierdo (F) del ルバープラグ (H) を取り外します。左グリップ (F) をハンドル manillar (N).
- Seite 79 ISTR 628 / 01 Desmontaje mando acelerador スロットルコントロールの取り外し Operando en el lado derecho de la motocicleta, aflojar el tornillo 車両の右側で作業します。スクリュー (M) を緩めて外し、ハンド (M) y quitar el tapón manillar (Q). Desatornillar los 2 tornillos (P2) ルバープラグ (Q) を取り外します。2 本のスクリュー (P2) を y desmontar el perno en U (P3) del soporte mando acelerador (P4).
- Seite 80 ISTR 628 / 01 Desmontaje componentes originales オリジナル部品の取り外し (versión Monster 797) (Monster 797 バージョン) Desmontaje componentes lado izquierdo manillar ハンドルバー左側部品の取り外し Operando en el lado izquierdo de la motocicleta, quitar el tapón 車両の左側で作業し、プラグ (H) を取り外します。左グリップ (H). Extraer el puño izquierdo (F) del manillar (N). Aflojar los 2 tor- (F) をハンドルバー...
- Seite 81 ISTR 628 / 01 Desmontaje mando acelerador スロットルコントロールの取り外し Operando en el lado derecho de la motocicleta, quitar el tapón (Q). 車両の右側から、プラグ (Q) を取り外します。2 本のスクリュー Desatornillar los 2 tornillos (P2) y desmontar el perno en U (P3) del (P2) を緩めて外し、クランプ (P3) をスロットルコントロールマ soporte mando acelerador (P4).
- Seite 82 ISTR 628 / 01 2,8 Nm ± 5% 3,5 Nm ± 10%...
- Seite 83 ISTR 628 / 01 Montaje componentes kit キット構成部品の取り付け (versiones Scrambler 800) (Scrambler 800 バージョン) Importante 重要 Antes del montaje, comprobar que todos los componentes se en- 取り付けの前に全ての部品に汚れがなく、完璧な状態であること cuentren limpios y en perfecto estado. Adoptar todas las precau- を確認してください。作業する部分が破損しないように、必要な ciones necesarias para evitar dañar cualquier parte en la que se すべての予防措置を講じてください。...
- Seite 84 ISTR 628 / 01 3,5 Nm ± 10% 6 Nm ± 10%...
- Seite 85 ISTR 628 / 01 Montaje puño calefactado derecho 右ヒーテッドグリップの取り付け Montar el puño calefactado derecho (2) introduciéndolo en el ma- 配線ケーブルを下側に向け、右ヒーテッドグリップ をハン nillar (N), con el cable cableado dirigido hacia abajo. Posicionar el ドルバー (N) に挿入します。スロットルコントロールマウント soporte mando acelerador (P4) en el puño calefactado derecho (2) (P4) を右ヒーテッドグリップ...
- Seite 86 ISTR 628 / 01 Conexión de los cableados 配線の接続 Operando en el lado derecho de la motocicleta, quitar el tramo ca- 車両の左側で作業をおこないます。左ヒーテッドグリップ分岐配 bleado puño calefactado izquierdo (T1) y derecho (T2) del tapón 線 (T1) と右ヒーテッドグリップ分岐配線 (T2) を下側コネクタ portaconectores inferior (S). Quitar los 2 tapones (R). ーホルダーパッド...
- Seite 87 ISTR 628 / 01 5 Nm ± 10% 5 Nm ± 10% 10 Nm ± 10% Montaje depósito フューエルタンクの取り付け Asegurarse de que en ambos lados del bastidor estén presentes フレームの両側に 2 個のラバー (U) が取り付けられていること las 2 gomas (U). Volver a colocar el depósito (C) en el bastidor en を確認します。燃料ポンプ...
- Seite 88 ISTR 628 / 01 Montaje componentes kit キット構成部品の取り付け (versiones Monster 797) (Monster 797 バージョン) Importante 重要 Antes del montaje, comprobar que todos los componentes se en- 取り付けの前に全ての部品に汚れがなく、完璧な状態であること cuentren limpios y en perfecto estado. Adoptar todas las precau- を確認してください。作業する部分が破損しないように、必要な ciones necesarias para evitar dañar cualquier parte en la que se すべての予防措置を講じてください。...
- Seite 89 ISTR 628 / 01 1,5 Nm ± 10% Montaje del conmutador izquierdo 左側スイッチの取り付け Montar nuevamente el conmutador izquierdo (K) en el manillar (N), 左側スイッチ (K) のピン (K2) をハンドルバー (N) の穴 (J) に orientándolo como ilustra la figura e introduciendo el perno (K2) 挿入し、左側スイッチ...
- Seite 90 ISTR 628 / 01 2,8 Nm ± 5%...
- Seite 91 ISTR 628 / 01 Montaje puño calefactado izquierdo 左ヒーテッドグリップの取り付け Comprobar que el cable (1B) sea insertado correctamente en el alo- ケーブル (1B) が図のように左ヒーテッドグリップ (1) 前部の所 jamiento delantero específico del puño calefactado izquierdo (1), 定位置に正しく挿入されていることを確認します。グリップ como ilustra la figura. Montar el puño (1) insertándolo en el mani- をハンドルバー...
- Seite 92 ISTR 628 / 01 6 Nm ± 10%...
- Seite 93 ISTR 628 / 01 Montaje puño calefactado derecho 右ヒーテッドグリップの取り付け Montar el puño calefactado derecho (2) introduciéndolo en el ma- 配線ケーブルを下側に向け、右ヒーテッドグリップ (2) をハンド nillar (N) con el cable del cableado dirigido hacia abajo. Posicionar ルバー (N) に挿入します。スロットルコマンドマウント (P4) を el soporte mando acelerador (P4) en el puño derecho (2) e intro- 右グリップ...
- Seite 94 ISTR 628 / 01 Conexión de los cableados 配線の接続 Operando en el lado derecho de la motocicleta, extraer el tramo 車両の右側で作業します。左ヒーテッドグリップ分岐配線 (T1) cableado puño calefactado izquierdo (T1) y derecho (T2) del tapón と右ヒーテッドグリップ分岐配線 (T2) を下側コネクターホルダ portaconectores inferior (S). Quitar los 2 tapones (R). ーパッド...
- Seite 95 ISTR 628 / 01 Activación/desactivación puños calefactados ヒーテッドグリップの起動/停止 (H.GRIPS)(versiones Scrambler 800) (H.GRIPS) (Scrambler 800 バージョン) Esta función está disponible solo si están instalados los puños ca- この機能はヒーテッドグリップを搭載している車両でのみ利用で lefactados y permite activarlos, desactivarlos y regularlos. Con los き、ヒーテッドグリップの起動、停止、調節を行います。左側ス pulsadores (T3) y (T4) presentes en el conmutador izquierdo (T), イッチ...
- Seite 96 ISTR 628 / 01 Activación/desactivación puños calefactados ヒーテッドグリップの起動/停止 (H.GRIPS)(versiones Monster 797) (H.GRIPS) (Monster 797 バージョン) Conectar el instrumento de diagnóstico al conector de adquisición 診断テスターをデータ取得用コネクターに接続し、ヒーテッドグ de datos y habilitar los puños calefactados. Esta función permite リップの使用を可能にします。この機能でグリップヒーターの起 activar y regular los puños calefactados. Si los puños calefactados 動と調整を行います。ヒーテッドグリップが搭載されている場合...
- Seite 97 レース専用部品 ご注文書 ご注文商品 商品名 P/N 商品名 P/N 商品名 P/N 商品名 P/N 商品名 P/N お客様ご記入欄 私は上記レース専用部品を下記車両に装着し、サーキット走行のみに 利用し、一般公道には利用しません。 車台番号 ZDM モデル名 お客様署名 ご注文日 ドゥカティ正規ネットワーク店記入欄 お客様に上記レース専用部品を販売し、レース専用部品のご利用方法を 説明いたしました。 販売店署名 販売日 年 月 日 販売店様へお願い 1. 上記ご記入の上、弊社アフターセールス 部までFAX してください 。FAX : 03 - 6692 - 1317 1. 上記ご記入の上、弊社アフターセールス 部までFAX してください 。FAX : 03 - 6692 - 1317 2.