Stryker FlowGate 2 Gebrauchsanweisung
Ballonführungskatheter
Verfügbare Sprachen
Verfügbare Sprachen
ENGLISH
Instructions for Use
FlowGate
2™
Balloon Guide Catheter
ONLY
Caution: Federal Law (USA) restricts this device to sale by or on the order of a physician.
warNING
Contents supplied STERILE using an ethylene oxide (EO) process. Do not use if sterile barrier is
damaged. If damage is found, call your Stryker Neurovascular representative.
For single use only. Do not reuse, reprocess or resterilize. Reuse, reprocessing or resterilization may
compromise the structural integrity of the device and/or lead to device failure which, in turn, may
result in patient injury, illness or death. Reuse, reprocessing or resterilization may also create a risk
of contamination of the device and/or cause patient infection or cross-infection, including, but not
limited to, the transmission of infectious disease(s) from one patient to another. Contamination of the
device may lead to injury, illness or death of the patient.
After use, dispose of product and packaging in accordance with hospital, administrative and/or local
government policy.
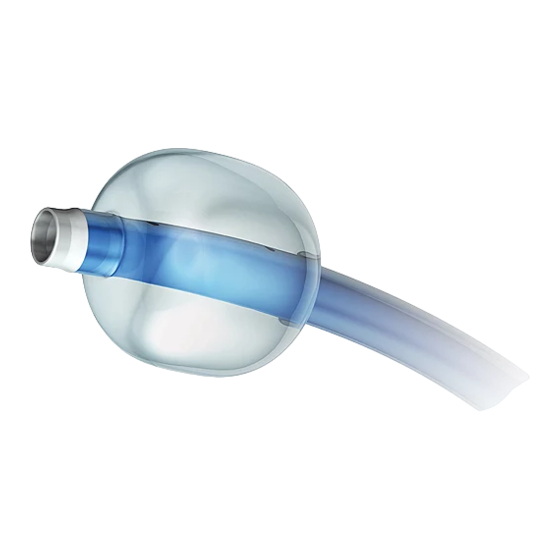
dEvICE dESCrIptIoN
FlowGate
Balloon Guide Catheters are coaxial-lumen, braid-reinforced, variable stiffness
®
catheters with a radiopaque marker on the distal end and a bifurcated luer hub on the proximal
end. A compliant balloon is flush mounted on the distal end. Balloon Guide Catheter dimensions are
indicated on product label. If indicated on product label, a dilator is provided.
Maximum Balloon Volume
0.6 mL
If indicated on product label, the following accessories may be provided:
a. Dilator
CONT
CONT
1X
CONT
b. Extension Tubing
a.
1X
c. Peel-Away Sheath
d. Rotating Hemostatic Valve
b.
1X
e. Tuohy Borst Valve with Sideport
c.
2X
f. Luer-Activated Valve
INdICatIoNS for USE
FlowGate Balloon Guide Catheters are indicated for use in facilitating the insertion and guidance
of an intravascular catheter into a selected blood vessel in the peripheral and neuro vascular
systems. The balloon provides temporary vascular occlusion during these and other angiographic
procedures. The Balloon Guide Catheter is also indicated for use as a conduit for Retrieval devices.
CompLICatIoNS
Procedures requiring percutaneous catheter introduction should not be attempted by physicians
unfamiliar with the possible complications. Possible complications include, but are not limited
to, the following: infection, hematoma, distal embolization, vessel thrombosis, dissection, false
aneurysm formation, acute occlusion, clot formation, hemorrhage at the puncture site, intracranial
hemorrhage, arterial rupture, stroke and death.
CompatIbILIty
Introducer sheath French size must be greater than or equal to balloon guide catheter French size.
warNINGS
• Do not reuse. Discard after one procedure. Structural integrity and/or function may be impaired
through reuse or cleaning.
• Never advance or torque catheter against resistance without careful assessment of cause of
resistance using fluoroscopy. If cause cannot be determined, withdraw catheter. Movement
against resistance may result in damage to vessel or catheter.
• To reduce risk of complications due to slow balloon deflation, adhere to the following
recommendations:
• Wet distal shaft with saline before advancing peel-away sheath over balloon.
• Use peel-away sheath to advance catheter into introducer sheath.
• Minimize pushing forces on shaft during advancement. These forces can cause wrinkles in
shaft that can slow balloon deflation.
• Do not use device if shaft is damaged during use.
• Prepare balloon according to Recommended Procedure.
• To reduce risk of complications due to air emboli, remove air from balloon according to
Recommended Procedure.
• Withdrawing balloon through introducer sheath may damage balloon. Do not use catheter again
after withdrawing balloon through introducer sheath.
• To avoid balloon leakage, do not allow balloon to contact calcified or stented arteries and do
not allow balloon to move during inflation.
1X
1X
d.
1X
1X
1X
1X
1X
e.
1X
1X
1X
1X
1X
f.
2X
1X
1X
2X
1X
• Do not use a device that has been damaged. Use of damaged devices may result in complications.
• Do not exceed maximum recommended balloon inflation volume. Excess inflation volume may
rupture balloon.
• For through-lumen, do not exceed 2068 kPa (300 psi) maximum recommended infusion pressure.
Excess pressure may result in catheter rupture or tip detachment.
• If flow through catheter becomes restricted, do not attempt to clear catheter lumen by infusion.
Doing so may cause catheter to rupture, resulting in vessel trauma. Remove and replace
catheter.
• Do not steam shape guide catheter.
prECaUtIoNS
• Store in a cool, dry, dark place.
• Do not use open or damaged packages.
• Use by "Use By" date.
• Exposure to temperatures above 54°C (130°F) may damage device and accessories. Do not
autoclave.
• Upon removal from package, inspect device to ensure it is not damaged.
• Do not expose device to solvents.
• Use device in conjunction with fluoroscopic visualization and proper anti-coagulation agents.
• Torquing guide catheter while kinked may cause damage that could result in separation of
catheter shaft.
• If a device becomes lodged in guide catheter, or if guide catheter becomes severely kinked,
withdraw entire system (guide catheter, guidewire and catheter sheath introducer).
• To prevent thrombus formation and contrast media crystal formation, maintain a constant
infusion of appropriate flush solution through guide catheter lumen.
recommended procedure
1. Gently remove catheter from pouch by grasping hub and slowly pulling catheter straight out of
protective tubing without bending shaft. Inspect catheter before use to verify that its size, shape
and condition are suitable for specific procedure.
2. Flush through lumen of catheter with heparinized saline.
3. Dilator Instructions (if applicable):
• Remove dilator from protective tube.
• Gently insert dilator into guide catheter lumen.
• Flush dilator with heparinized saline.
4. Prepare balloon inflation media by mixing contrast with saline (50% by volume).
5. Prepare balloon using one of the following methods (refer to Figure 1):
Balloon Preparation with 3-Way Stopcock
• Fill 20 mL syringe with about 5 mL of balloon inflation media. Attach 3-way stopcock to
balloon hub. Attach 20 mL syringe to stopcock.
• With 20 mL syringe pointing downward, repeat the following steps twice to remove air from
the system:
• Turn stopcock off towards open lumen of 3-way stopcock.
• Pull back on syringe plunger to aspirate balloon lumen. Maintain negative pressure until
air bubbles stop forming in syringe.
• Release syringe plunger to allow media to be drawn into balloon lumen. Do not infuse
media.
• Attach 1 mL syringe to balloon 3-way stopcock. Turn stopcock off towards balloon hub.
• Transfer maximum volume of recommended balloon inflation media from 20 mL syringe to
1 mL syringe.
• Turn stopcock off towards 20 mL syringe. Inflate balloon with maximum volume of
recommended balloon inflation media. Turn stopcock off towards balloon hub.
Balloon Preparation with Luer-Activated Valve
• Fill 20 mL syringe with about 5 mL of balloon inflation media. Attach luer-activated valve to
balloon hub. Attach 20 mL syringe to luer-activated valve.
• With 20 mL syringe pointing downward, repeat the following steps twice to remove air from
the system:
• Pull back on syringe plunger to aspirate balloon lumen. Maintain negative pressure until
air bubbles stop forming in syringe.
• Release syringe plunger to allow media to be drawn into balloon lumen. Do not infuse
media.
• Remove 20 mL syringe.
• Fill 1 mL syringe with maximum volume of recommended balloon inflation media. Attach 1 mL
syringe to luer-activated valve and transfer recommended balloon inflation volume.
• Remove 1 mL syringe so that balloon inflation is maintained.
6. Inspect balloon for leakage. Keep balloon inflated until air bubbles diffuse from balloon.
7. Deflate balloon by aspirating with 20 mL syringe.
8. After ensuring that balloon is fully deflated, wet distal shaft with saline and advance peel-away
sheath over balloon.
9. Insert the guidewire/dilator/guide catheter assembly into the introducer sheath using the peel-
away sheath. Insert peel-away sheath into introducer sheath until it meets resistance.
10. Place guide catheter in selected vessel using fluoroscopy.
11. Retract peel-away sheath from introducer hub and peel off of Guide Catheter shaft.
12. Remove dilator (if applicable) and guidewire.
1
Black (K) ∆E ≤5.0
Inhaltsverzeichnis

Verwandte Anleitungen für Stryker FlowGate 2


Inhaltszusammenfassung für Stryker FlowGate 2
- Seite 5 Stryker Neurovascular hverken forpligter sig til eller autoriserer nogen anden person til på dets vegne falschen Aneurysmas, akuter Verschluss, Gerinnselbildung, Blutung an der Punktionsstelle, at forpligte sig til noget som helst andet eller yderligere ansvar i forbindelse med instrumentet. Stryker intrakranielle Blutung, Arterienruptur, Schlaganfall und Tod.
-
Seite 6: Vorsichtsmassnahmen
Umstände beziehen, die außerhalb der Kontrolle von Stryker Neurovascular liegen, haben direkten Ballonansatz anbringen. Die 20-ml-Spritze am Luer-aktivierten Ventil anbringen. Einfluss auf das Instrument und die Resultate aus seinem Einsatz. Die Verpflichtung von Stryker • Die 20-ml-Spritze nach unten halten und die folgenden Schritte zweimal wiederholen, um Neurovascular im Rahmen dieser Garantie beschränkt sich auf die Reparatur oder den Ersatz des das System zu entlüften:... - Seite 33 Black (K) ∆E ≤5.0...
- Seite 34 Black (K) ∆E ≤5.0...
- Seite 35 Black (K) ∆E ≤5.0...
- Seite 36 Black (K) ∆E ≤5.0...
- Seite 37 Black (K) ∆E ≤5.0...
- Seite 38 Black (K) ∆E ≤5.0...
- Seite 39 Catalog Number Date of Manufacture For single use only. Do not reuse. Sterilized using ethylene oxide. STERILE EO Katalogové číslo Datum výroby Pouze pro jednorázové použití. Sterilizováno etylénoxidem. Katalognummer Fremstillingsdato Nepoužívat opakovaně. Steriliseret vha. ethylenoxid. Bestell-Nr. Herstellungsdatum Kun til engangsbrug. Må ikke Mit Ethylenoxid sterilisiert.