Herunterladen Inhalt Inhalt Diese Seite drucken
Inhaltsverzeichnis

Werbung

Verfügbare Sprachen

Verfügbare Sprachen

AV Amplifier
Amplificateur Audio-Vidéo
PURE DIRECT
REC OUT/ZONE 2
SOURCE/REMOTE
DTV/LD
DVD
SPEAKERS
CABLE
MD/TAPE
2CH/MULTI CH
INPUT MODE
A
B
SAT
CD-R
INPUT SELECTOR
CD
VCR 1
VCR 2
TUNER
DVR
PHONO
VIDEO AUX
STANDBY
/ON
SILENT
OPTIMIZER
MIC
PHONES
OWNER'S MANUAL
MODE D'EMPLOI
BEDIENUNGSANLEITUNG
GB
VOLUME
MULTI JOG
BALANCE
MULTI CH
DSP
INPUT
STRAIGHT
PROGRAM
TONE
CONTROL
EFFECT
VIDEO AUX
S VIDEO
VIDEO
L
AUDIO
R
OPTICAL

Werbung

Inhaltsverzeichnis
loading

Inhaltszusammenfassung für Yamaha DSP-Z9

  • Seite 1 PURE DIRECT REC OUT/ZONE 2 VOLUME MULTI JOG BALANCE SOURCE/REMOTE DTV/LD SPEAKERS CABLE MD/TAPE MULTI CH 2CH/MULTI CH INPUT MODE INPUT STRAIGHT PROGRAM CD-R INPUT SELECTOR VCR 1 TONE CONTROL VCR 2 TUNER EFFECT PHONO VIDEO AUX STANDBY SILENT OPTIMIZER VIDEO AUX PHONES S VIDEO...
  • Seite 2 YAMAHA will not be proceed as follows: held responsible for any damage resulting from use The wire which is coloured BLUE must be connected of this unit with a voltage other than specified.
  • Seite 3: Inhaltsverzeichnis

    CONTENTS INTRODUCTION SOUND FIELD PROGRAMS FEATURES ............. 2 SOUND FIELD PROGRAM GETTING STARTED..........3 DESCRIPTIONS ..........48 Supplied accessories ..........3 For movie/video sources.......... 48 Installing batteries in the remote controls....4 For music sources ............ 51 CONTROLS AND FUNCTIONS......5 Front panel ..............
  • Seite 4: Built-In 9-Channel Power Amplifier

    (compatible with DSP) ◆ PURE DIRECT for pure fidelity sound with multi or Sound field features 2-channel sources ◆ Proprietary YAMAHA technology for the creation of ◆ On-screen display function with dedicated GUI remote sound fields control for performing all operations ◆...
  • Seite 5: Getting Started

    GETTING STARTED GETTING STARTED Supplied accessories Please check that you received all of the following parts. Remote control Remote control MACRO TRANSMIT RE-NAME CLEAR LEARN MACRO SYSTEM POWER STANDBY SYSTEM POWER STANDBY V-AUX TUNER PHONO CABLE MD/TAPE CD-R DTV/LD VCR 1 VCR 2 Batteries (3) Batteries (2)
  • Seite 6: Installing Batteries In The Remote Controls

    GETTING STARTED Installing batteries in the remote controls Notes on batteries • Change all of the batteries if you notice the following conditions: the operation range of the remote control decreases, the indicator does not flash or its light becomes dim. •...
  • Seite 7: Controls And Functions

    CONTROLS AND FUNCTIONS CONTROLS AND FUNCTIONS Front panel 7 8 9 PURE DIRECT VOLUME REC OUT/ZONE 2 SOURCE/REMOTE MULTI JOG BALANCE DTV/LD CABLE MD/TAPE SPEAKERS MULTI CH 2CH/MULTI CH INPUT MODE INPUT STRAIGHT PROGRAM CD-R INPUT SELECTOR VCR 1 TONE CONTROL VCR 2 TUNER...
  • Seite 8 CONTROLS AND FUNCTIONS 0 MULTI JOG H VIDEO AUX jacks Rotate to select or adjust items when used with the DSP Inputs audio and video signals from a portable external PROGRAM, BALANCE or TONE CONTROL buttons. source such as a game console. To reproduce source signals from these jacks, select V-AUX as the input A BALANCE source.
  • Seite 9: Remote Control

    CONTROLS AND FUNCTIONS Remote control 3 TRANSMIT indicator This section describes the functions of each control on the remote control. See “REMOTE CONTROL FEATURES” Flashes while the remote control is sending signals. on page 80 to operate other components with this remote 4 STANDBY control.
  • Seite 10: Gui Remote Control

    CONTROLS AND FUNCTIONS G LEARN GUI remote control Used for setting up the manufacturer code or for programming the functions of other remote controls (see This section describes the controls and functions of the pages 81 and 82). GUI remote control. See “USING THE GUI REMOTE H MACRO CONTROL”...
  • Seite 11: Using The Remote Controls

    CONTROLS AND FUNCTIONS Using the remote controls PURE DIRECT REC OUT/ZONE 2 VOLUME SOURCE/REMOTE MULTI JOG BALANCE DTV/LD SPEAKERS CABLE MD/TAPE MULTI CH 2CH/MULTI CH CD-R INPUT MODE INPUT STRAIGHT PROGRAM INPUT SELECTOR VCR 1 TONE VCR 2 TUNER CONTROL EFFECT PHONO VIDEO AUX...
  • Seite 12: Front Panel Display

    CONTROLS AND FUNCTIONS Front panel display MULTI CH V–AUX VCR 2 VCR 1 CABLE DTV/LD MD/TAPE CD–R TUNER PHONO MUTE MATRIX DISCRETE HiFi DSP VOLUME VIRTUAL NIGHT SILENT DIGITAL OPTIMIZER SLEEP ZONE2 1 i.LINK indicator D THX indicators Lights up when this unit is playing back i.LINK signals. Lights up when a THX program is selected.
  • Seite 13: Rear Panel

    CONTROLS AND FUNCTIONS Rear panel AC IN – – – – PRESENCE SURROUND SURROUND CENTER FRONT FRONT FRONT FRONT SURROUND SURROUND PRESENCE /ZONE 2 BACK BACK /ZONE 2 (SINGLE) SPEAKERS AC OUTLETS SPEAKERS AUDIO (FRONT) (SINGLE) (SINGLE) CENTER POWER AMP IN (REAR) PHONO SURROUND...
  • Seite 14: Speaker Setup

    Subwoofer more than 30 cm (12 in.) The use of a subwoofer, such as the YAMAHA Active Servo Processing Subwoofer System, is effective not only The speaker layout above shows the standard ITU-R speaker for reinforcing bass frequencies from any or all channels, setup.
  • Seite 15: Speaker Connections

    SPEAKER SETUP ■ Di-pole speaker layout A speaker cord is actually a pair of insulated cables running side by side. One cable is colored or shaped Either di-pole or direct radiating speaker types can be used differently, perhaps with a stripe, groove or ridges. for THX surround.
  • Seite 16 SPEAKER SETUP Left Right Presence Presence Front right Front left right left subwoofer subwoofer speaker (A) speaker (A) speaker speaker system system Center speaker Front speakers (B) – – – – PRESENCE SURROUND SURROUND CENTER FRONT FRONT FRONT FRONT SURROUND SURROUND PRESENCE /ZONE 2...
  • Seite 17 Connect a surround speaker system to these terminals. ■ SUBWOOFER jacks Connect one or two subwoofer(s) with built-in amplifier, such as the YAMAHA Active Servo Processing Subwoofer System, to the jack(s). ■ SURROUND BACK terminals Connect a surround back speaker system to these terminals.
  • Seite 18: Connections

    CONNECTIONS CONNECTIONS ■ i.LINK jacks Connecting components This unit can be connected with i.LINK equipped components using 4-pin, S400 i.LINK cables. This connection enables you to send and receive digital audio at CAUTION high speed and with high fidelity. Do not connect this unit or other components to the mains ■...
  • Seite 19: Connecting Video Components

    CONNECTIONS Connecting video components ■ Connections for DVD playback AC I Video monitor Video in – – PRESENCE SURROUND SURROUND CENTER FRONT FRONT /ZONE 2 BACK SPEAKERS (SINGLE) CENTER PHONO SURROUND SURROUND SUBWOOFER FRONT PURE DIRECT IN(PLAY) OUT(REC) IN(PLAY) OUT(REC) BACK TUNER MD/TAPE...
  • Seite 20: Connecting To The 2Ch In Jacks

    CONNECTIONS ■ Connecting to the MULTI CH INPUT jacks This unit is equipped with 8 additional input jacks (left and right FRONT, CENTER, left and right SURROUND, left and right SURROUND BACK and SUBWOOFER) for discrete multi-channel input from a universal disc player, external decoder, sound processor or pre-amplifier.
  • Seite 21 CONNECTIONS ■ Connections for digital TV broadcasts or LD playback AC IN – – PRESENCE SURROUND SURROUND CENTER FRONT FRONT /ZONE 2 BACK SPEAKERS AC OUTLETS AUDIO (SINGLE) CENTER PHONO IN(PLAY) OUT(REC) IN(PLAY) OUT(REC) IN(PLAY) OUT(REC) IN(PLAY) SURROUND SURROUND SUBWOOFER FRONT PURE DIRECT BACK...
  • Seite 22 CONNECTIONS ■ Connections for cable TV broadcasts AC IN – – PRESENCE SURROUND SURROUND CENTER FRONT FRONT /ZONE 2 BACK SPEAKERS AC OUTLETS AUDIO (SINGLE) CENTER PHONO IN(PLAY) OUT(REC) IN(PLAY) OUT(REC) IN(PLAY) OUT(REC) IN(PLAY) SURROUND SURROUND SUBWOOFER FRONT PURE DIRECT BACK MD/TAPE CD-R...
  • Seite 23 CONNECTIONS ■ Connections for satellite broadcasts AC IN – – PRESENCE SURROUND SURROUND CENTER FRONT FRONT /ZONE 2 BACK SPEAKERS AC OUTLETS AUDIO (SINGLE) CENTER PHONO SURROUND SURROUND SUBWOOFER FRONT PURE DIRECT IN(PLAY) OUT(REC) IN(PLAY) OUT(REC) IN(PLAY) OUT(REC) IN(PLAY) BACK MD/TAPE CD-R DTV/LD...
  • Seite 24 CONNECTIONS ■ Connections for VCR playback and recording AC IN – – PRESENCE SURROUND SURROUND CENTER FRONT FRONT /ZONE 2 BACK SPEAKERS AC OUTLETS AUDIO (SINGLE) CENTER PHONO IN(PLAY) OUT(REC) IN(PLAY) OUT(REC) IN(PLAY) OUT(REC) IN(PLAY) SURROUND SURROUND SUBWOOFER FRONT PURE DIRECT BACK TUNER MD/TAPE...
  • Seite 25 CONNECTIONS ■ Connections for DVD recorder playback and recording AC IN – – SURROUND CENTER FRONT FRONT FRONT SPEAKERS AC OUTLETS AUDIO CENTER UBWOOFER FRONT PURE DIRECT IN(PLAY) OUT(REC) IN(PLAY) OUT(REC) IN(PLAY) OUT(REC) IN(PLAY) OUT(REC) IN(PLAY) OUT(REC) TUNER MD/TAPE CD-R DTV/LD VCR 1 VCR 2...
  • Seite 26: Connecting Audio Components

    CONNECTIONS Connecting audio components ■ Connections for audio playback CD player Audio out Turntable Audio out Coaxial out Optical out AC IN – – PRESENCE SURROUND SURROUND CENTER FRONT FRONT /ZONE 2 BACK SPEAKERS AUDIO (SINGLE) CENTER PHONO SURROUND SURROUND SUBWOOFER FRONT PURE DIRECT...
  • Seite 27 CONNECTIONS ■ Connections for audio playback and recording Optical in MD/tape Audio out Audio in AC IN – – PRESENCE SURROUND SURROUND CENTER FRONT FRONT /ZONE 2 BACK SPEAKERS AUDIO (SINGLE) CENTER PHONO SURROUND SURROUND SUBWOOFER FRONT PURE DIRECT IN(PLAY) OUT(REC) IN(PLAY) OUT(REC)
  • Seite 28 Presence channel line output jacks. i.LINK component 6 SUBWOOFER jacks Connect one or two subwoofer(s) with built-in amplifier, such as the YAMAHA Active Servo Processing Subwoofer System, to these jacks. Notes • Adjust the volume level of the subwoofer with the control on the subwoofer.
  • Seite 29: Connecting The Power Supply Cord

    CONNECTIONS Connecting the power supply cord ■ Connecting the AC power cord Plug the power cord into the AC inlet after all other AC IN connections are complete, then plug the power cord into an AC wall outlet. CAUTION Do not use an AC power cord other than the one provided. Use of other power cords may result in fire or electrical AC OUTLETS AUDIO...
  • Seite 30: Speaker Impedance Setting

    CONNECTIONS Speaker impedance setting Turning on the power When all connections are complete, turn on this unit’s CAUTION power. If you are using 6-ohm speakers, set the impedance to 6 ohms as follows before turning on the power. Be sure this unit is in the standby mode. On the front panel, while holding down SPEAKERS A, press STANDBY/ON.
  • Seite 31: Using The Gui Remote Control

    USING THE GUI REMOTE CONTROL USING THE GUI REMOTE CONTROL Press k/n repeatedly to select a category GUI remote control operations (i.e., Manual Setup), then press h to enter The GUI (graphical user interface) remote control the selected category (i.e., Basic). provides a simple and convenient way to control this unit while viewing a GUI display on your video monitor.
  • Seite 32 USING THE GUI REMOTE CONTROL Use k/n/l / h to navigate through the categories, menus and parameters. To select the parameter you want to adjust press ENTER. Use k/n/l / h to adjust the parameters. For details about each parameter see page 55. When finished, press EXIT to exit.
  • Seite 33: Auto Setup

    AUTO SETUP AUTO SETUP Introduction Optimizer microphone setup This unit employs YAMAHA Parametric Room Acoustic Connect the supplied optimizer microphone Optimizer (YPAO) technology which lets you avoid to the OPTIMIZER MIC jack on the front troublesome listening-based speaker setup and achieves panel.
  • Seite 34: Starting The Setup

    AUTO SETUP Press k/n repeatedly to select Setup Menu, Starting the setup then press h. For best results, make sure the room is as quiet as possible during the auto setup procedure. If there is too much ambient noise, the results may not be satisfactory. If your subwoofer can adjust the output volume and crossover frequency, set the volume to about half way (or slightly less), and set the crossover frequency to the maximum.
  • Seite 35 AUTO SETUP For Equalizing, select: Press n to select Start, then press ENTER. Skip To skip the selected item and perform no Loud test tones are output from each speaker and adjustments. “Measuring” appears during the auto setup Flat To average the frequency response of all procedure.
  • Seite 36: Confirming The Results

    AUTO SETUP If you set Setup Type to Step. Confirming the results The results are displayed individually after each analysis. You can confirm the results of each analysis. If you set Setup Type to Auto. The results are displayed after all items have been analysed.
  • Seite 37 AUTO SETUP ■ Troubleshooting for the auto setup procedure Before auto setup Error message Cause Remedy Connect MIC! Optimizer microphone is not connected. • Connect the supplied optimizer microphone to the OPTIMIZER MIC jack on the front panel. Unplug Phones! Headphones are connected.
  • Seite 38: Warning Message

    AUTO SETUP After auto setup The following warning messages are displayed after analysis is complete to inform you of possible problems. We recommend that you check the contents of each message, then select Retry to try the auto setup procedure again. Warning message Cause Remedy...
  • Seite 39: Playback

    PLAYBACK PLAYBACK Select the input source. Basic operations Rotate INPUT SELECTOR (or press one of the input selector buttons on the remote control) to select the input you desire. V-AUX TUNER PHONO INPUT SELECTOR CABLE MD/TAPE CD-R DTV/LD VCR 1 VCR 2 PURE DIRECT VOLUME...
  • Seite 40 PLAYBACK To adjust the tone Select a sound field program if desired. You can adjust the bass/treble MULTI JOG Press DSP PROGRAM then rotate MULTI JOG (or balance for the front left/right, on the remote control, set 10KEY/AMP to AMP, then center and subwoofer channels.
  • Seite 41: Selecting Sound Field Programs

    PLAYBACK ■ Selecting MULTI CH INPUT Selecting sound field programs Press MULTI CH INPUT so that “Input MULTI CH” appears in the front panel display and “MULTI CH ON/ ■ Front panel operation OFF” appears on the video monitor. MULTI CH MULTI CH IN INPUT PURE DIRECT...
  • Seite 42: Remote Control Operation

    PLAYBACK ■ Remote control operation ■ Enjoying multi-channel software If you connected a surround back speaker, use this feature to enjoy 6.1/7.1-channel playback for multi-channel 10KEY/AMP 10KEY STEREO HALL#1 HALL#2 CHURCH Sound field JAZZ ROCK MUSIC ENTERTAIN sources using the Dolby Pro Logic IIx, Dolby Digital EX/ES MOVIE /DTS...
  • Seite 43 PLAYBACK ■ Enjoying 2-channel software Notes Signals input from 2-channel sources can also be played • 6.1/7.1-channel playback is not possible even if EX/ES is back on multiple channels using the Dolby Pro Logic, pressed in the following cases: Dolby Pro Logic II, Dolby Pro Logic IIx, or DTS Neo:6 –...
  • Seite 44 PLAYBACK ■ Listening at night ■ Downmixing to 2 channels This mode reproduces dialog clearly while reducing the You can enjoy 2-channel stereo playback even from multi- volume of loud sound effects for easier listening at low channel sources. volumes or at night. Press DSP PROGRAM, then rotate MULTI JOG (or Press NIGHT on the remote control.
  • Seite 45: Listening To Uncompromising Pure Audio

    PLAYBACK ■ Listening to high fidelity sources Listening to uncompromising pure (Analog/DSD/PCM) audio To enjoy high quality sound, select the STEREO Direct --- sound field program. The program works with analog, PURE DIRECT allows you to enjoy the highest possible PCM and DSD sources.
  • Seite 46: Selecting Input Modes

    PLAYBACK Auto Automatically selects input signals in the Selecting input modes following order: 1) i.LINK This unit comes with a variety of input jacks. Do the 2) Dolby Digital RF following to select the type of input signals you want to 3) Digital signals* use.
  • Seite 47 PLAYBACK ■ Displaying information about the input Video signal information source You can display signal information for the audio or video signal currently being input. Remote control operation Press TOP on the GUI remote control. Press n repeatedly to select Signal Info. The signal information appears on the GUI display.
  • Seite 48: Recording

    RUNNING H/F 1 RECORDING You can use the REC OUT/ZONE 2 control to record one Start playback (or select a broadcast station) source while watching and/or listening to another source. on the source component. Recording adjustments and other operations are Start recording on the recording component.
  • Seite 49 PLAYBACK ■ Special considerations when recording DTS software The DTS signal is a digital bitstream. Attempting to digitally record the DTS bitstream will result in noise being recorded. Therefore, if you want to use this unit to record sources that have DTS signals recorded on them, the following considerations and adjustments need to be made.
  • Seite 50: Sound Field Program Descriptions

    The YAMAHA CINEMA DSP modes are compatible with all Dolby Digital, DTS, and Dolby Surround sources. Set the input mode to Auto (see page 44) to enable this unit to automatically switch to the appropriate digital decoder according to the signal being input.
  • Seite 51 SOUND FIELD PROGRAM DESCRIPTIONS Program Features Sources THX processing for non EX/ES encoded 5.1 channel sources. This program outputs sound from the surround back L/R speakers using ASA (advanced speaker array) processing. This mode is Ultra2 Cinema only available when you have set up a 7.1 speaker system (i.e. two surround back speakers), and the input signal has surround left and surround right contents.
  • Seite 52 SOUND FIELD PROGRAM DESCRIPTIONS Program Features Sources SUR. STANDARD Indicates that signals are being input through the MULTI CH INPUT jacks. Multi In SUR. STANDARD Dolby Digital processing for signals input through the MULTI CH INPUT jacks. MultiIn+DolbyD SUR. STANDARD Dolby Pro Logic IIx Movie processing for signals input through the MULTI CH INPUT jacks.
  • Seite 53: For Music Sources

    SOUND FIELD PROGRAM DESCRIPTIONS For music sources You can select from the following sound fields when playing music sources. Program Features Sources SUR. STANDARD Dolby Pro Logic II processing for music software. PLII Music SUR. STANDARD Dolby Pro Logic IIx processing for music software. 2-CH PLIIx Music SUR.
  • Seite 54 SOUND FIELD PROGRAM DESCRIPTIONS Program Features Sources CHURCH HiFi DSP processing. The acoustic environment of an ordinary church with moderate reverberations. The reverberation lasts 2.5 seconds. This is ideal for reproducing church organ Tokyo and choral music. CHURCH HiFi DSP processing. This program recreates the acoustic environment of a big church located in south Germany.
  • Seite 55: Advanced Operation

    ADVANCED OPERATIONS ADVANCED OPERATIONS Selecting the OSD mode Press SLEEP repeatedly to SLEEP set the amount of time. You can also display simple text information about this Each time you press SLEEP, the front unit’s operation status on your video monitor. panel display changes as shown below.
  • Seite 56: Using The Test Tone

    ADVANCED OPERATIONS Using the test tone Notes • If a speaker is not connected, the corresponding adjustment(s) You can use the test tone feature to manually balance your will not be displayed. speaker levels. Please note that this operation will override •...
  • Seite 57: System Options

    SYSTEM OPTIONS SYSTEM OPTIONS You can use the following parameters to adjust a variety of system settings and customize the way this unit operates. Change the initial settings (indicated in bold under each parameter) to reflect the needs of your listening environment. ■...
  • Seite 58 SYSTEM OPTIONS Video (Video) Use to manually adjust the video parameters. Item Features Page Processor Turns on/off the digital video processor. Picture Mode Selects and adjusts the video picture mode suitable for the video picture. Resolution Selects the video resolution. Aspect Selects the aspect ratio.
  • Seite 59: Changing Parameter Settings

    SYSTEM OPTIONS Changing parameter settings Press k/n repeatedly to select the parameter you want to adjust. Use the GUI remote control to access and adjust each parameter. ENTER 80Hz ( THX ) EXIT You can also perform this operation using the remote control (see page 29).
  • Seite 60: Memory Back-Up

    SYSTEM OPTIONS Notes Input Select • The available parameters may be displayed on more than one Use this feature to reassign digital input/outputs, select the page of the on-screen display. To scroll through pages, press k/n. input signal, rename the inputs, or adjust the level of the •...
  • Seite 61 SYSTEM OPTIONS ■ Volume Trim (Volume trim) ■ Rename (Rename) Use this feature to adjust the level of the signal input to Use this feature to change the name of the inputs on the each jack. This is useful if you want to balance the level of GUI and front panel display.
  • Seite 62 SYSTEM OPTIONS ■ Analog Level (Analog level) ■ Input Channels (Input channels) Use this feature to select the analog input signal. Use this feature to specify the number of audio channels Input Select > input source (DVD, etc.) > Analog Level input through the MULTI CH INPUT jacks.
  • Seite 63: Manual Setup: Sound

    SYSTEM OPTIONS ■ Cinema EQ (Cinema equalizer) Manual setup: Sound Use this feature to adjust PEQ and high frequency levels for any speaker. Use this menu to adjust the sound parameters. Manual Setup > Sound > Cinema EQ Choices: Off, On, PEQ*, HIGH* Press TOP on the GUI remote control.
  • Seite 64 SYSTEM OPTIONS ■ Tone Control (Tone control) EQ Select (Equalizer select) Choices: Auto Setup PEQ, Manual GEQ, EQ Defeat Use to adjust the amount of bass and treble output to your speakers and headphones. Manual Setup > Sound > Tone Control > Control (Tone control) Choices: Defeat, Speaker, Headphone •...
  • Seite 65 SYSTEM OPTIONS ■ Dynamic Range (Dynamic range) Treble (Treble control) Use this feature to adjust high-frequencies output to your Use to select the amount of dynamic range compression to speakers or headphones. be applied to your speakers and headphones. This setting Choices: –6 to +6 (dB), Initial: 0 dB is effective only when the unit is decoding Dolby Digital You can adjust three frequency bands: 2.5kHz, 3.5kHz,...
  • Seite 66: Manual Setup: Basic

    SYSTEM OPTIONS Muting Type (Muting type) Manual setup: Basic Use to adjust how much the mute function reduces the output volume. Use this menu to set up basic system parameters. Choices: Full, –20dB Press TOP on the GUI remote control. Select Manual Setup, then press h.
  • Seite 67 SYSTEM OPTIONS ■ THX Set (THX settings) SB Speaker Dist. (Surround back speaker distance) Use to manually adjust the THX settings. Manual Setup > Basic > THX Set > Use this feature to optimize the surround sound field when you have to place the surround back speakers apart. THX Ultra2 SWFR (THX Ultra2 subwoofer) Choices: Use this feature to select the THX Ultra2-compatible...
  • Seite 68 SYSTEM OPTIONS ■ Subwoofer Set (Subwoofer set) Phase (Phase) Use to manually adjust any setting for your subwoofer. If bass sounds are lacking or unclear, use this feature to Manual Setup > Basic > Subwoofer Set > adjust the frequency phase characteristics of your subwoofer(s).
  • Seite 69 SYSTEM OPTIONS ■ Speaker Set (Speaker set) Bass Out (Bass out) LFE signals carry low-frequency effects when this unit Use to manually adjust any speaker setting. decodes Dolby Digital or DTS signals. These low- Manual Setup > Basic > Speaker Set > frequency signals can be directed to both front left and Note right speakers, and to the subwoofer (which can be used...
  • Seite 70 SYSTEM OPTIONS Surround (Surround left/right speakers) Surround Back Choices: Large, Small, None (Surround back left/right speakers) Choices: Large x1, Small x1, Small x2, Large x2, None • Select Large if you have large surround left and right speakers or if a rear subwoofer is connected to the surround speakers.
  • Seite 71 SYSTEM OPTIONS ■ Speaker Level (Speaker level) Presence (Presence speakers) Choices: None, Yes Use these settings to manually balance the speaker levels between the front left speakers and each speaker selected in Speaker Set (see page 67). Manual Setup > Basic > Speaker Level •...
  • Seite 72 SYSTEM OPTIONS ■ Speaker Distance (Speaker distance) Choices: 0.3 to 24.00 m (1 to 80 ft) Initial setting for all speakers: Use this feature to manually input the distance of each U.S.A. and Canada models: 10.0 feet speaker and adjust the delay applied to the respective Other models: 3.0 meters channel.
  • Seite 73: Manual Setup: Video

    SYSTEM OPTIONS ■ Processor (Processor) Manual setup: Video Use this feature to turn on/off the digital video processors. Manual Setup > Video > Processor Use this menu to adjust the video parameters. Choices: Off, On If output to the monitor fails while you are performing the parameter setup procedure, the setting of this unit’s video parameters could be incompatible with your video monitor.
  • Seite 74 SYSTEM OPTIONS ■ Picture Mode (Picture mode) ■ Resolution (Resolution) Use this feature to select the video picture mode and Use this feature to select the video resolution. This is the adjust each mode to suit the video picture. resolution of the output image when Processor is set to Manual Setup >...
  • Seite 75 SYSTEM OPTIONS ■ Aspect (Aspect) Use this feature to select the aspect ratio for the output image converted using the video processing circuit. Manual Setup > Video > Aspect Choices: Through, Auto, 16:9 Normal, 16:9 Zoom • Through: Does not change the aspect ratio of the input video signal in any way.
  • Seite 76 SYSTEM OPTIONS ■ Aspect conversion examples The images with bold outlines indicate the most suitable setting for each input signal/TV combination. Setting Input signal aspect TV type ratio Through 16:9 Normal 16:9 Zoom 16:9 (Letter box) 16:9 16:9 16:9 Note If you want to watch 16:9 software on a 4:3 TV, you need to change the aspect ratio on your TV.
  • Seite 77: Manual Setup: Option

    SYSTEM OPTIONS ■ S Video (S Video) Manual setup: Option Use this feature to match the video output to the input on your monitor. S1 allows you to automatically resize wide This menu adjusts the optional system settings. screen software compressed at 4:3 so that it is displayed at 16:9.
  • Seite 78 SYSTEM OPTIONS ■ Surr.Initialize (Surround initialize) ■ Input Mode (Input mode) Use this feature to initialize the parameters for each sound Use this feature to designate the input mode for sources field program within sound field program groups. When connected to the DIGITAL INPUT jacks when you turn on you initialize a sound field program group, all of the this unit.
  • Seite 79 SPEAKERS B terminals. display the background, select None. Choices: Zone1, ZoneB Choices: None, 1(DSP-Z9), 2(Horn), 3(Piano), 4(Gray) • Select Zone1 to turn on/off SPEAKERS A and B when the speakers connected to the SPEAKERS B terminals Note are set in the main room.
  • Seite 80: Memory Guard

    SYSTEM OPTIONS Zone2 Amplifier (Zone 2 Amplifier) Memory Guard Use to select how the ZONE 2 speakers are amplified. Choices: Internal, External, None Use this feature to prevent accidental changes to • Select External if you connect your Zone 2 speakers individual parameter settings.
  • Seite 81 SYSTEM OPTIONS ■ Manual Setup (Manual setup) Choices: Free, Guard • Select Guard to prevent changes to the manual setup parameters. When Guard is set, you can select the Picture Mode (Cinema, Standard or Dynamic), but cannot adjust the settings of each mode.
  • Seite 82: Control Area

    REMOTE CONTROL FEATURES REMOTE CONTROL FEATURES In addition to controlling this unit, the remote control can also operate other A/V components made by YAMAHA and other manufacturers. To control other components, you must set up the remote control with the appropriate manufacturer code(s).
  • Seite 83: Setting Manufacturer Codes

    – YAMAHA 1 Note You may not be able to operate your YAMAHA component even if a YAMAHA manufacturer code is initially set as listed above. Press one of the buttons shaded below to In this case, try to set another YAMAHA manufacturer code(s).
  • Seite 84: Programming Codes From Other Remote Controls

    • The supplied remote control does not contain all possible manufacturer codes for commercially available AV components (including YAMAHA AV components). If operation is not possible with any of the manufacturer codes, program the new remote control function with the Learn feature (see below) or use the remote control supplied with the component.
  • Seite 85: Changing Source Names In The Display Window

    REMOTE CONTROL FEATURES Press and hold the button you want to Changing source names in the program on the remote control for your display window component until “OK” appears in the display window. You can change the name that appears in the display window on the remote control if you want to use a different name to the one that is factory preset.
  • Seite 86: Using The Macro Feature

    When using macros to operate other components, you will need to program the PLAY button on the control area of that component (see pages 82 and 83) or set a manufacturer code (see page 81). When TUNER is selected as the input source, YAMAHA tuners will play the last station received before the unit was set to the standby mode.
  • Seite 87 REMOTE CONTROL FEATURES ■ Macro operations Press the macro button you want to use to operate the macro. MACRO MACRO The macro button name and the selected component TRANSMIT RE-NAME CLEAR LEARN MACRO MACRO ON/OFF SYSTEM name appear alternately in the display window. POWER STANDBY V-AUX...
  • Seite 88: Clearing Function Sets

    REMOTE CONTROL FEATURES Press MACRO again when the operation Press and hold CLEAR again for about 3 sequence you want to program is complete. seconds. “C:OK” appears in the display window. Memory back-up If the remote control is without batteries for more than 3 minutes, or if exhausted batteries remain in the CLEAR remote control, the contents of the memory may be...
  • Seite 89: Clearing Individual Functions

    REMOTE CONTROL FEATURES Repeat step 3 if you want to clear other Clearing individual functions learned functions. ■ Clearing a learned function Press LEARN to exit the clear mode. You can clear the functions learned in programmed buttons for each area. ■...
  • Seite 90: Controlling Components

    REMOTE CONTROL FEATURES Controlling components Once you set the appropriate manufacturer codes, you can use this remote to control your other components. Note that some buttons may not correctly operate the selected component. You can use the input selector buttons to select the component you want to operate and automatically switch the remote control to the appropriate control mode for that component.
  • Seite 91: Operating An Ld Player

    REMOTE CONTROL FEATURES ■ Operating a digital TV (DTV/LD area) or cable/satellite TV (CABLE or SAT areas) SYSTEM POWER STANDBY V-AUX TUNER PHONO CABLE MD/TAPE CD-R DTV/LD VCR 2 VCR 1 MULTI CH IN PURE DIRECT TITLE MENU, ENTER Menu cursor/Select SOURCE INPUT MODE EXIT...
  • Seite 92 REMOTE CONTROL FEATURES ■ Operating a CD player (CD area) SYSTEM STANDBY POWER V-AUX TUNER PHONO CABLE MD/TAPE CD-R DTV/LD VCR 1 VCR 2 MULTI CH IN PURE DIRECT TITLE ENTER SOURCE INPUT MODE EXIT DISPLAY DISPLAY MENU SOUND SELECT –...
  • Seite 93 REMOTE CONTROL FEATURES ■ Operating a tape deck (MD/TAPE area) You need to set the manufacturer code for your tape deck following the setting procedure described on page 81 because MD/TAPE is factory-set to operate MD decks. SYSTEM POWER STANDBY V-AUX TUNER PHONO...
  • Seite 94 REMOTE CONTROL FEATURES ■ Operating optional components (OPTN area) OPTN is an additional component control area that can be programmed with remote control functions independently from any input source. Notes • You cannot set a manufacturer code for this area. See page 82 to program buttons operated within this component control area. •...
  • Seite 95: Zone 2

    Zone 2 connections that best meet your This unit requirements. • Some YAMAHA models are able to connect directly to this unit’s REMOTE CONTROL OUT jack. If you own these types of products, you may not need to use an infrared emitter. Up to 6 YAMAHA components can be connected as shown here.
  • Seite 96: Remote Controlling Zone 2

    ZONE 2 Using this unit’s internal amplifier To use this unit’s internal amplifier, select ON in ZONE2 AMP. – – PRESENCE PRESENCE /ZONE 2 /ZONE 2 Second room This unit Press k/n to select “Zone”. Remote controlling Zone 2 The supplied remote control can be used to control Zone 2.
  • Seite 97 ZONE 2 ■ Turning this unit to either on or standby Press an input selector button to select the SYSTEM POWER and STANDBY work differently input source you want to listen to in the depending on the selected mode that appears on the second room.
  • Seite 98: Using I.link

    USING I.LINK USING i.LINK This unit is fitted with two i.LINK (AUDIO) connectors. Connecting i.LINK components By connecting components that support i.LINK (AUDIO) connections, in addition to digital transmission of 2-ch You can connect i.LINK-compatible devices to this unit linear PCM signals and audio signals that have been using either the daisy chain or tree connections.
  • Seite 99: Assigning I.link Components

    USING i.LINK Rotate INPUT SELECTOR to select the input Assigning i.LINK components to which you want to assign the i.LINK When an i.LINK component is connected, this unit component. automatically recognizes the connection and registers the After selecting, press PURE DIRECT to connected component.
  • Seite 100: Changing I.link Select Parameters

    USING i.LINK ■ i.LINK indicator If MULTI CH INPUT is assigned for the i.LINK component Lights This unit plays back signals input via i.LINK. Press MULTI CH INPUT. Press INPUT MODE repeatedly to set “Auto” Flashes An i.LINK component is connected, but this unit or “i.LINK”...
  • Seite 101: Information (Information)

    USING i.LINK ■ Information (Information) ■ Plug & Play (Plug and play) Use this feature to display the following information: Use this feature to select whether you want the unit to operation status of registered i.LINK devices, registered automatically switch to the input assign mode when a new i.LINK devices that have been deleted, and i.LINK signals i.LINK component is connected.
  • Seite 102: I.link Display Messages

    USING i.LINK i.LINK display messages Status display messages The following messages may appear on the front panel display depending on the status of this unit. Message Contents Link Check Appears while the i.LINK component connection is being checked. No Name Appears if the model name of the connected i.LINK component cannot be acquired.
  • Seite 103: Sound Field Options

    The acoustics in your room could be changed to those of a concert hall, a dance floor, or virtually any size room at all. This ability to create sound fields at will is exactly what YAMAHA has done with the digital sound field processor.
  • Seite 104 SOUND FIELD OPTIONS Item Features Page SB Room Size Adjusts the apparent size of the surround back sound field. SB Liveness Adjusts the apparent reflectivity of the virtual wall in the surround back sound field. Panorama Extends the front stereo image to include the surround speakers for wraparound effect. Center Width Adjusts the center image from all three front speakers to varying degrees.
  • Seite 105: Stereo/Surround Menu

    SOUND FIELD OPTIONS ■ Init. Delay (Initial delay) Stereo/Surround menu This parameter changes the apparent distance from the source sound by adjusting the delay between the direct You can adjust the values of certain digital sound field sound and the first reflection heard by the listener. The parameters so that the sound fields are recreated smaller the value, the closer the sound source seems to the accurately in your listening room.
  • Seite 106 SOUND FIELD OPTIONS ■ Liveness (Liveness) ■ Rev. Time (Reverberation time) This parameter adjusts the reflectivity of the virtual walls This parameter adjusts the amount of time it takes for the in the hall by changing the rate at which the early dense, subsequent reverberation sound to decay by 60 dB reflections decay.
  • Seite 107 SOUND FIELD OPTIONS ■ Rev. Delay (Reverberation delay) ■ Sur. Delay (Surround delay) This parameter adjusts the time difference between the This parameter adjusts the delay for surround signals and beginning of the direct sound and the beginning of the surround sound fields.
  • Seite 108 SOUND FIELD OPTIONS For PRO LOGIC II Music For 9ch Stereo ■ Panorama (Panorama) ■ Center Level (Center level) This parameter extends the front stereo image to include This parameter adjusts the volume level for the center the surround speakers for wraparound effect. channel in 9-channel stereo mode.
  • Seite 109 SOUND FIELD OPTIONS ■ Decode Type (Decoder type) For THX Cinema Function: Selects the decoder used to playback 2- channel sources using THX Cinema. Choices: Pro Logic / Pro Logic II / Pro Logic IIx / Neo:6 For Surround Enhanced Function: Selects the decoder used to playback 2- channel sources using Surround...
  • Seite 110: Troubleshooting

    Refer to the chart below when this unit does not function properly. If the problem you are experiencing is not listed below, or if the remedy explanation does not help, set this unit to the standby mode, disconnect the power cord, and contact your nearest authorized YAMAHA dealer or service center. ■ General...
  • Seite 111 TROUBLESHOOTING Refer to Problem Cause Remedy page The sound suddenly The protection circuitry has been activated Check that the correct impedance is set. goes off. due to a short circuit, etc. Check that the speaker wires are not touching each —...
  • Seite 112 TROUBLESHOOTING Refer to Problem Cause Remedy page Dolby Digital or DTS The connected component is not set to Make an appropriate setting following the operating — sources cannot be output Dolby Digital or DTS digital instructions for your component. played. (The Dolby signals.
  • Seite 113 TROUBLESHOOTING Refer to Problem Cause Remedy page There is noise This unit is too close to digital or high- Move this unit further away from such equipment. — interference from frequency equipment. digital or high- frequency equipment, or this unit. The picture is The video source uses scrambled or Playing back video software that has an anti-copy...
  • Seite 114: Parametric Equalizer Information

    PARAMETRIC EQUALIZER INFORMATION PARAMETRIC EQUALIZER INFORMATION ■ Q factor This unit employs YAMAHA Parametric Room Acoustic Optimizer (YPAO) technology to optimize the frequency The width of the specified frequency band is referred to as characteristics of its parametric equalizer to match your the Q factor.
  • Seite 115: Dolby Surround

    GLOSSARY GLOSSARY ■ Dolby Surround ■ Dolby Pro Logic II Dolby Surround uses a 4 channel analog recording system Dolby Pro Logic II is an improved technique used to to reproduce realistic and dynamic sound effects: 2 front decode vast numbers of existing Dolby Surround software. left and right channels (stereo), a center channel for dialog This new technology enables a discrete 5-channel (monaural), and a surround channel for special sound...
  • Seite 116 ■ SILENT CINEMA DSP ■ Sampling frequency and number of quantized bits YAMAHA has developed a natural, realistic sound effect DSP algorithm for headphones. When digitizing an analog audio signal, the number of Parameters for headphones have been set for each sound...
  • Seite 117 GLOSSARY ■ THX Cinema processing ■ Adaptive Decorrelation THX is an exclusive set of standards and technologies In a movie theatre, a large number of surround speakers established by the world-renowned film production help create an enveloping surround sound experience, but company, Lucasfilm Ltd.
  • Seite 118: Thx Ultra2

    GLOSSARY ■ THX MUSIC MODE ■ THX Surround EX For the replay of multi-channel music the THX Music THX Surround EX - Dolby Digital Surround EX is a joint Mode should be selected. In this mode THX ASA development of Dolby Laboratories and the THX Ltd. processing is applied to the surround channels of all 5.1 In a movie theater, film soundtracks that have been encoded music sources such as DTS, and Dolby Digital to...
  • Seite 119: Block Diagrams

    BLOCK DIAGRAMS BLOCK DIAGRAMS ■ Block diagram COAX/RF Demodulator PCM 2ch DIRECT SOURCE COAX INPUT Selector PCM1792 compliant Rec OUT Selector SL/SR PCM1792 YPAO compliant REC OUT RXOUT PCM1792 DATA DECODER compliant STREAM(Multi) SBL/ SBL+ ZONE2 PCM1792 DD-EX COAX SBL- SBR+ compliant SBR-...
  • Seite 120: Video Matrix

    BLOCK DIAGRAMS ■ Video matrix SOURCE INPUT DVD etc Selector REC OUT Selector DVD etc REC/Source REC OUT Zone2 S1/S2 INPUT DVD etc SOURCE Selector DVD etc REC OUT Selector REC/Source REC OUT Zone2 DVD etc DVD etc SOURCE INPUT Selector DVD etc ■...
  • Seite 121: Specifications

    SPECIFICATIONS SPECIFICATIONS AUDIO SECTION VIDEO SECTION • Minimum RMS Output Power • TV Format 20 Hz to 20 kHz, 0.015% THD, 8 Ω [U.S.A., Canada and Korea models] ......NTSC/PAL Front, Center, Surround, Surround back......170 W [Other models] ............. PAL/NTSC 1 kHz, 0.05% THD •...
  • Seite 122 à l’appareil ou de blessure corporelle. YAMAHA ne saurait être tenue Ménagez un espace libre d’au moins 30 cm au- dessus et 20 cm sur chaque côté et à l’arrière, pour responsable des dommages résultant de...
  • Seite 123 TABLE DES MATIÉRES INTRODUCTION CORRECTIONS DE CHAMP SONORE PARTICULARITÉS ..........2 DESCRIPTION DES CORRECTIONS DE POUR COMMENCER .......... 3 CHAMP SONORE..........48 Accessoires fournis............ 3 Cas des films et des sources vidéo......48 Mise en place des piles dans les boîtiers de Sources musicales............
  • Seite 124: Particularités

    (compatible avec DSP) Particularités du champ sonore ◆ Fonction PURE DIRECT garantissant la pureté des ◆ Technologie originale YAMAHA pour la création de sonorités fournies par les sources à 2 voies ou plus champs sonores ◆...
  • Seite 125: Pour Commencer

    POUR COMMENCER POUR COMMENCER Accessoires fournis Veuillez vous assurer que vous possédez bien les postes suivants. Boîtier de télécommande Boîtier de télécommande MACRO TRANSMIT RE-NAME CLEAR LEARN MACRO SYSTEM POWER STANDBY V-AUX TUNER PHONO SYSTEM POWER STANDBY CABLE MD/TAPE CD-R DTV/LD VCR 1 VCR 2...
  • Seite 126: Mise En Place Des Piles Dans Les Boîtiers De Télécommande

    POUR COMMENCER Mise en place des piles dans les boîtiers de télécommande Remarques concernant les piles • Changez toutes les piles dès que vous notez une des conditions suivantes: la portée du boîtier de télécommande a diminué, le témoin ne clignote plus ou sa luminosité est faible. •...
  • Seite 127: Commandes Et Fonctions

    COMMANDES ET FONCTIONS COMMANDES ET FONCTIONS Face avant 7 8 9 PURE DIRECT VOLUME REC OUT/ZONE 2 SOURCE/REMOTE MULTI JOG BALANCE DTV/LD CABLE MD/TAPE SPEAKERS MULTI CH 2CH/MULTI CH INPUT MODE INPUT STRAIGHT PROGRAM CD-R INPUT SELECTOR VCR 1 TONE CONTROL VCR 2 TUNER...
  • Seite 128 COMMANDES ET FONCTIONS 0 MULTI JOG H Prises VIDEO AUX Tournez cette commande pour sélectionner ou régler un Ces prises sont destinées à recevoir les signaux audio et élément en association avec les touches DSP PROGRAM, vidéo provenant d’une source externe telle qu’une console BALANCE et TONE CONTROL.
  • Seite 129: Boîtier De Télécommande

    COMMANDES ET FONCTIONS Boîtier de télécommande 3 Témoin TRANSMIT Cette section traite du rôle des commandes que porte ce boîtier. Reportez-vous à “PARTICULARITÉS DE LA Il clignote tandis que le boîtier de télécommande émet des signaux. TÉLÉCOMMANDE”, page 80 pour agir sur d’autres 4 STANDBY appareils à...
  • Seite 130: Boîtier De Télécommande Igu

    COMMANDES ET FONCTIONS G LEARN Boîtier de télécommande IGU Cette touche intervient dans la définition du code du fabricant et l’enregistrement des fonctions propres à d’autres boîtiers de Cette section décrit les commandes et les fonctions du télécommande (reportez-vous aux pages 81 et 82). boîtier de télécommande IGU.
  • Seite 131: Utilisation Des Boîtiers De Télécommande

    COMMANDES ET FONCTIONS Utilisation des boîtiers de télécommande PURE DIRECT REC OUT/ZONE 2 VOLUME SOURCE/REMOTE MULTI JOG BALANCE DTV/LD SPEAKERS CABLE MD/TAPE 2CH/MULTI CH MULTI CH CD-R INPUT MODE INPUT STRAIGHT PROGRAM INPUT SELECTOR VCR 1 TONE VCR 2 TUNER CONTROL EFFECT PHONO...
  • Seite 132: Afficheur De La Face Avant

    COMMANDES ET FONCTIONS Afficheur de la face avant MULTI CH V–AUX VCR 2 VCR 1 CABLE DTV/LD MD/TAPE CD–R TUNER PHONO MUTE MATRIX DISCRETE HiFi DSP VOLUME VIRTUAL NIGHT SILENT DIGITAL OPTIMIZER SLEEP ZONE2 1 Témoin i.LINK C Témoin LFE Il s’éclaire lorsque l’appareil reproduit des signaux Ce témoin s’éclaire lorsque le signal d’entrée contient des i.LINK.
  • Seite 133: Panneau Arrière

    COMMANDES ET FONCTIONS Panneau arrière AC IN – – – – PRESENCE SURROUND SURROUND CENTER FRONT FRONT FRONT FRONT SURROUND SURROUND PRESENCE /ZONE 2 BACK BACK /ZONE 2 (SINGLE) SPEAKERS AC OUTLETS SPEAKERS AUDIO (FRONT) (SINGLE) (SINGLE) CENTER POWER AMP IN (REAR) PHONO SURROUND...
  • Seite 134: Mise En Œuvre Des Enceintes

    Caisson de graves L’utilisation d’un caisson de graves tel que le modèle au moins 30 cm YAMAHA Active Servo Processing Subwoofer System, assure un renforcement des basses fréquences présentes dans toutes les voies et améliore la reproduction des effets La disposition des enceintes illustrée ci-dessus est conforme à la transmis sur la voie LFE (effets basses fréquences) que...
  • Seite 135: Raccordements Des Enceintes

    MISE EN ŒUVRE DES ENCEINTES ■ Disposition des enceintes dipôles Un câble d’enceinte comporte deux conducteurs isolés placés côte à côte. Un des conducteurs a une couleur ou un Des enceintes dipôles ou des enceintes à rayonnement marquage (ruban, rainure, dentelure) qui le distingue de direct peuvent être utilisées pour restituer l’ambiance l’autre.
  • Seite 136 MISE EN ŒUVRE DES ENCEINTES Enceinte de Enceinte Enceinte Enceinte de Caisson de Caisson de présence avant droite avant gauche présence graves graves droite gauche gauche droit Enceinte centrale Enceintes avant – – – – PRESENCE SURROUND SURROUND CENTER FRONT FRONT FRONT FRONT...
  • Seite 137 Ces prises sont destinées à une enceinte d’ambiance. ■ Prises SUBWOOFER Reliez à cette prise (ces prises) un caisson de graves (ou deux caissons de graves) tel que YAMAHA Active Servo Processing Subwoofer System. ■ Prises SURROUND BACK Ces prises sont destinées à une enceinte arrière d’ambiance.
  • Seite 138: Raccordements

    RACCORDEMENTS RACCORDEMENTS ■ Prises i.LINK Raccordements des appareils Cet appareil peut être relié à d’autres appareils équipés i.LINK en utilisant pour cela des câbles S400 i.LINK terminés par des connecteurs à 4 broches. Une liaison de AVERTISSEMENT ce type permet d’échanger les signaux audionumériques Ne reliez aucun appareil à...
  • Seite 139: Raccordements Des Appareils Vidéo

    RACCORDEMENTS Raccordements des appareils vidéo ■ Raccordements d’un lecteur de DVD AC I Moniteur vidéo Entrée vidéo – – PRESENCE SURROUND SURROUND CENTER FRONT FRONT /ZONE 2 BACK SPEAKERS (SINGLE) CENTER PHONO SURROUND SURROUND SUBWOOFER FRONT PURE DIRECT IN(PLAY) OUT(REC) IN(PLAY) OUT(REC) BACK...
  • Seite 140 RACCORDEMENTS ■ Raccordements aux prises MULTI CH INPUT Cet appareil est équipé de 8 prises d’entrée complémentaires (FRONT gauche et droite, CENTER, SURROUND gauche et droite, SURROUND BACK gauche et droite et SUBWOOFER); ces prises permettent le raccordement multivoie d’un lecteur polyvalent, d’un décodeur extérieur, d’un processeur acoustique ou d’un préamplificateur.
  • Seite 141 RACCORDEMENTS ■ Raccordements d’un téléviseur numérique ou d’un lecteur de LaserDisc AC IN – – PRESENCE SURROUND SURROUND CENTER FRONT FRONT /ZONE 2 BACK SPEAKERS AC OUTLETS AUDIO (SINGLE) CENTER PHONO IN(PLAY) OUT(REC) IN(PLAY) OUT(REC) IN(PLAY) OUT(REC) IN(PLAY) SURROUND SURROUND SUBWOOFER FRONT PURE DIRECT...
  • Seite 142 RACCORDEMENTS ■ Raccordements pour la télévision câblée AC IN – – PRESENCE SURROUND SURROUND CENTER FRONT FRONT /ZONE 2 BACK SPEAKERS AC OUTLETS AUDIO (SINGLE) CENTER PHONO IN(PLAY) OUT(REC) IN(PLAY) OUT(REC) IN(PLAY) OUT(REC) IN(PLAY) SURROUND SURROUND SUBWOOFER FRONT PURE DIRECT BACK MD/TAPE CD-R...
  • Seite 143 RACCORDEMENTS ■ Raccordements pour la télévision par satellite AC IN – – PRESENCE SURROUND SURROUND CENTER FRONT FRONT /ZONE 2 BACK SPEAKERS AC OUTLETS AUDIO (SINGLE) CENTER PHONO SURROUND SURROUND SUBWOOFER FRONT PURE DIRECT IN(PLAY) OUT(REC) IN(PLAY) OUT(REC) IN(PLAY) OUT(REC) IN(PLAY) BACK MD/TAPE...
  • Seite 144 RACCORDEMENTS ■ Raccordements pour un magnétoscope (lecture et enregistrement) AC IN – – PRESENCE SURROUND SURROUND CENTER FRONT FRONT /ZONE 2 BACK SPEAKERS AC OUTLETS AUDIO (SINGLE) CENTER PHONO IN(PLAY) OUT(REC) IN(PLAY) OUT(REC) IN(PLAY) OUT(REC) IN(PLAY) SURROUND SURROUND SUBWOOFER FRONT PURE DIRECT BACK TUNER...
  • Seite 145 RACCORDEMENTS ■ Raccordements pour un lecteur-graveur de DVD AC IN – – SURROUND CENTER FRONT FRONT FRONT SPEAKERS AC OUTLETS AUDIO CENTER UBWOOFER FRONT PURE DIRECT IN(PLAY) OUT(REC) IN(PLAY) OUT(REC) IN(PLAY) OUT(REC) IN(PLAY) OUT(REC) IN(PLAY) OUT(REC) TUNER MD/TAPE CD-R DTV/LD VCR 1 VCR 2 ZONE 2...
  • Seite 146: Raccordements Des Appareils Audio

    RACCORDEMENTS Raccordements des appareils audio ■ Raccordements pour la reproduction audio Lecteur de CD Sortie audio Table de lecture Sortie audio Sortie coaxiale Sortie optique AC IN – – PRESENCE SURROUND SURROUND CENTER FRONT FRONT /ZONE 2 BACK SPEAKERS AUDIO (SINGLE) CENTER PHONO...
  • Seite 147 RACCORDEMENTS ■ Raccordements pour la lecture et l’enregistrement audio Entrée optique Platine MD, platine à cassette Sortie audio Entrée audio AC IN – – PRESENCE SURROUND SURROUND CENTER FRONT FRONT /ZONE 2 BACK SPEAKERS AUDIO (SINGLE) CENTER PHONO SURROUND SURROUND SUBWOOFER FRONT PURE DIRECT...
  • Seite 148 6 Prises SUBWOOFER Reliez à cette prise (ces prises) un caisson de graves (ou deux caissons de graves) tel que YAMAHA Active Servo Processing Subwoofer System. Remarques • Réglez le niveau de sortie du caisson de graves au moyen de la commande prévue à...
  • Seite 149: Raccordement Du Cordon D'alimentation

    RACCORDEMENTS Raccordement du cordon d’alimentation ■ Raccordement du cordon d’alimentation secteur AC IN Lorsque tous les raccordements sont terminés, branchez une extrémité du cordon d’alimentation dans la prise d’entrée secteur et l’autre extrémité dans une prise secteur. AVERTISSEMENT AC OUTLETS N’utilisez pas de cordon d’alimentation secteur autre que AUDIO celui fourni.
  • Seite 150: Réglage D'impédance Des Enceintes

    RACCORDEMENTS Réglage d’impédance des Mise en service enceintes Tous les raccordements étant réalisés, mettez l’appareil en service. AVERTISSEMENT Si les enceintes utilisées ont une impédance de 6 Ohms, réglez l’impédance sur 6 Ohms avant de mettre l’appareil en service. Assurez-vous que l’appareil est en veille. PURE DIRECT VOLUME REC OUT/ZONE 2...
  • Seite 151: Emploi Du Boîtier De Télécommande Igu

    EMPLOI DU BOÎTIER DE TÉLÉCOMMANDE IGU EMPLOI DU BOÎTIER DE TÉLÉCOMMANDE IGU Appuyez de manière répétée sur k/n pour Fonctionnement du boîtier de sélectionner une catégorie (par exemple, télécommande IGU Manual Setup), puis appuyez sur h pour accéder à la catégorie choisie (par exemple, Le boîtier de télécommande IGU (Interface Graphique Basic).
  • Seite 152 EMPLOI DU BOÎTIER DE TÉLÉCOMMANDE IGU Utilisez les touches k/n/l / h pour naviguer dans les catégories, les menus et les paramètres. Pour sélectionner le paramètre à régler, appuyez sur ENTER. Utilisez les touches k/n/l / h pour donner une valeur aux paramètres. Pour de plus amples détails concernant chaque paramètre, reportez-vous à...
  • Seite 153: Mise En Œuvre Automatique

    MISE EN ŒUVRE AUTOMATIQUE Introduction Mise en place du microphone d’optimisation Cet appareil est doté de la technologie YAMAHA Parametric Room Acoustic Optimizer (YPAO) qui permet Branchez le microphone fourni sur la prise d’éviter les opérations habituellement fastidieuses de OPTIMIZER MIC située sur la face avant.
  • Seite 154: Début Des Opérations

    MISE EN ŒUVRE AUTOMATIQUE Appuyez de manière répétée sur k/n pour Début des opérations accéder à Setup Menu puis appuyez sur h. Pour que les résultats soient les meilleurs possible, veillez à ce que le plus grand silence règne dans la pièce tout au long de ces opérations automatiques.
  • Seite 155 MISE EN ŒUVRE AUTOMATIQUE Dans le cas de Equalizing, sélectionnez: Appuyez sur n pour accéder à Start, puis sur Skip Afin de ne pas tenir compte de ce paramètre et de ENTER. n’effectuer aucun réglage. Un signal d’essai puissant est émis par chaque Flat Afin de déterminer une réponse en fréquence enceinte et la mention “Measuring”...
  • Seite 156: Confirmation Des Résultats

    MISE EN ŒUVRE AUTOMATIQUE Si la valeur de Setup Type est Step. Confirmation des résultats Les résultats sont affichés l’un après l’autre, à la fin de chaque opération. Vous pouvez confirmez les résultats de chaque opération. Si la valeur de Setup Type est Auto. Les résultats s’affichent lorsque toutes les opérations ont été...
  • Seite 157 MISE EN ŒUVRE AUTOMATIQUE ■ En cas d’anomalie dans la mise en œuvre automatique Avant le début des opérations Message d’erreur Causes possibles Actions correctives Connect MIC! Le microphone d’optimisation n’est pas • Branchez le microphone fourni sur la prise branché.
  • Seite 158: Message D'avertissement

    MISE EN ŒUVRE AUTOMATIQUE Après les opérations Les messages d’avertissement suivants peuvent s’afficher à la fin des opérations d’analyse pour vous signaler une anomalie. Nous vous conseillons de tenir compte du contenu de chaque message puis de sélectionner Retry pour reprendre les opérations de mise en œuvre automatique.
  • Seite 159: Lecture

    PLAYBACK LECTURE Sélectionnez la source. Opérations de base Tournez la commande INPUT SELECTOR (ou appuyez sur une des touches de sélection d’entrée du boîtier de télécommande) pour choisir l’entrée désirée. V-AUX TUNER PHONO INPUT SELECTOR CABLE MD/TAPE CD-R DTV/LD VCR 1 VCR 2 PURE DIRECT VOLUME...
  • Seite 160 LECTURE Pour régler la tonalité Le cas échéant, sélectionnez une correction Utilisez cette commande pour MULTI JOG de champ sonore. corriger les graves et les aigus Appuyez sur DSP PROGRAM puis tournez la émis par les enceintes avant commande MULTI JOG (sur le boîtier de TONE CONTROL gauche, droite et centrale et par...
  • Seite 161: Choix D'une Correction De Champ Sonore

    LECTURE ■ Sélection de MULTI CH INPUT Choix d’une correction de champ Appuyez sur MULTI CH INPUT de manière que “Input sonore MULTI CH” apparaisse sur l’afficheur de la face avant et “MULTI CH ON/OFF” sur le moniteur vidéo. ■ Utilisation des commandes de la face MULTI CH MULTI CH IN avant...
  • Seite 162: Utilisation Du Boîtier De Télécommande

    LECTURE ■ Utilisation du boîtier de télécommande ■ Cas des gravures multivoies Si votre installation possède une enceinte arrière d’ambiance, utilisez cette possibilité pour restituer sous 10KEY/AMP 10KEY STEREO HALL#1 HALL#2 CHURCH Touches de JAZZ ROCK MUSIC ENTERTAIN forme de 6.1/7.1 voies les sources multivoies qui ont été EX/ES MOVIE /DTS...
  • Seite 163 LECTURE ■ Cas des gravures 2 voies Remarques Les signaux provenant de sources 2 voies peuvent • La lecture avec 6.1/7.1 voies n’est pas possible dans les cas également être restitués sous forme multivoie grâce aux suivants, même si vous appuyez sur EX/ES: décodeurs Dolby Pro Logic, Dolby Pro Logic II, Dolby –...
  • Seite 164 LECTURE ■ Écoute tardive ■ Réduction à 2 voies Ce mode assure une restitution claire des dialogues tout en Vous pouvez écouter en stéréophonie à 2 voies les sources réduisant le niveau des effets sonores puissants de manière multivoies. à faciliter l’écoute à bas niveau, ou l’écoute tardive. Appuyez sur DSP PROGRAM, puis tournez la Appuyez sur NIGHT, sur le boîtier de commande MULTI JOG (ou bien placez le...
  • Seite 165: Écoute Des Sons Dans Les Meilleures Conditions De Pureté

    LECTURE ■ Écoute de sources haute fidélité Écoute des sons dans les (Analog, DSD, PCM) meilleures conditions de pureté Pour profiter d’une grande qualité sonore, sélectionnez la correction de champ STEREO Direct ---. Cette correction La fonction PURE DIRECT vous offre le moyen peut s’appliquer aux sources analogiques, PCM et DSD.
  • Seite 166: Sélection Du Mode D'entrée

    LECTURE Auto Ce mode sélectionne automatiquement les Sélection du mode d’entrée signaux d’entrée dans l’ordre suivant: 1) Signaux i.LINK Cet appareil possède diverses prises d’entrée. Procédez 2) Signaux radiofréquences Dolby Digital comme suit pour sélectionner le type des signaux d’entrée 3) Signaux numériques* à...
  • Seite 167 LECTURE ■ Affichage des informations relatives à la Informations relatives aux signaux vidéo source Vous pouvez afficher des informations concernant les signaux audio et vidéo appliqués à l’entrée. Utilisation du boîtier de télécommande Appuyez sur TOP, sur le boîtier de télécommande IGU.
  • Seite 168: Enregistrement

    RUNNING H/F 1 ENREGISTREMENT Vous pouvez utiliser la commande REC OUT/ZONE 2 Commandez la lecture (ou choisissez une pour enregistrer le signal d’une source tandis que vous station de radio) sur la source. écoutez, ou regardez, le signal d’une autre source. Commandez l’enregistrement sur l’appareil Les réglages d’enregistrement et autres opérations sont à...
  • Seite 169 ENREGISTREMENT ■ Considérations spéciales pour l’enregistrement des gravures DTS Le signal DTS est un train binaire. Toute tentative d’enregistrement numérique d’un train binaire DTS se traduit par l’enregistrement de signaux de bruit. En conséquence, si vous désirez utiliser cet appareil pour enregistrer une source DTS vous devez prendre en compte les considérations suivantes et effectuer les réglages indiqués.
  • Seite 170: Description Des Corrections De Champ Sonore

    Les modes YAMAHA CINEMA DSP sont compatibles avec toutes les sources Dolby Digital, DTS et Dolby Surround. Réglez le mode d’entrée sur Auto (reportez-vous à la page 44) de manière que l’appareil puisse sélectionner automatiquement le décodeur qui convient en fonction du signal d’entrée.
  • Seite 171 DESCRIPTION DES CORRECTIONS DE CHAMP SONORE Correction Description Sources Traitement THX pour les sources à 5.1 voies qui ne sont pas codées EX/ES. Cette correction assure l’émission de sons par les enceintes arrière gauche et droite d’ambiance en utilisant le Ultra2 Cinema traitement ASA (Advanced Speaker Array).
  • Seite 172 DESCRIPTION DES CORRECTIONS DE CHAMP SONORE Correction Description Sources SUR. STANDARD Indique que des signaux sont appliqués sur les prises d’entrée MULTI CH INPUT. Multi In SUR. STANDARD Traitement Dolby Digital pour les signaux appliqués sur les prises d’entrée MULTI CH INPUT. MultiIn+DolbyD SUR.
  • Seite 173: Sources Musicales

    DESCRIPTION DES CORRECTIONS DE CHAMP SONORE Sources musicales Lors de la reproduction des sources musicales, vous avez le choix entre les champs sonores suivants. Correction Description Sources SUR. STANDARD Traitement Dolby Pro Logic II pour la musique. PLII Music SUR. STANDARD Traitement Dolby Pro Logic IIx pour la musique.
  • Seite 174 DESCRIPTION DES CORRECTIONS DE CHAMP SONORE Correction Description Sources CHURCH Traitement HiFi DSP. Il s’agit de l’environnement acoustique d’une église où les réverbérations sont modérées. Les réverbérations durent 2,5 secondes. Cette correction est idéale pour la Tokyo musique d’église, orgue ou chant choral. CHURCH Traitement HiFi DSP.
  • Seite 175: Opérations Détaillées

    OPÉRATIONS DÉTAILLÉES OPÉRATIONS DÉTAILLÉES Choix du mode OSD Appuyez de manière répétée sur SLEEP SLEEP pour préciser le temps. Vous avez aussi la possibilité d’afficher sur le moniteur À chaque pression sur SLEEP, les vidéo des informations simples concernant le indications de l’afficheur de la face fonctionnement de cet appareil.
  • Seite 176: Utilisation Du Signal D'essai

    OPÉRATIONS DÉTAILLÉES Utilisation du signal d’essai Remarques • Si une enceinte n’est pas reliée, les réglages qui lui Vous pouvez utiliser le signal d’essai pour effectuer correspondent ne sont pas affichés. manuellement l’équilibrage des niveaux de sortie des • Si vous avez l’intention d’utiliser une seule enceinte arrière enceintes.
  • Seite 177: Options Générales

    OPTIONS GÉNÉRALES OPTIONS GÉNÉRALES Utilisez les paramètres suivants pour régler divers éléments de la chaîne et personnaliser la manière de fonctionner de cet appareil. Modifiez le réglage initial (indiqué en caractères gras sous chaque paramètre) pour tenir compte des besoins de votre environnement d’écoute.
  • Seite 178 OPTIONS GÉNÉRALES Video (Vidéo) Pour le réglage manuel des paramètres vidéo. Paramètre Description Page Processor Mise en service ou hors service du processeur numérique de la vidéo. Picture Mode Sélection et réglage du mode d’image vidéo convenant à l’image vidéo. Resolution Sélection de la définition vidéo.
  • Seite 179: Modification Des Valeurs Des Paramètres

    OPTIONS GÉNÉRALES Modification des valeurs des Appuyez de manière répétée sur k/n pour paramètres sélectionner le paramètre que vous désirez régler. Utilisez le boîtier de télécommande IGU pour accéder à chaque paramètre et définir sa valeur. ENTER 80Hz ( THX ) EXIT Vous avez également la possibilité...
  • Seite 180: Input Select

    OPTIONS GÉNÉRALES Remarques Input Select • Les paramètres disponibles peuvent occuper plus d’une page de Pour modifier l’attribution des entrées et sorties l’affichage sur l’écran. Pour faire défiler les pages, appuyez sur k/n. numériques, pour choisir le signal d’entrée, pour •...
  • Seite 181 OPTIONS GÉNÉRALES ■ Volume Trim (Réglage de niveau) ■ Rename (Renommer) Pour régler le niveau appliqué sur chaque prise d’entrée. Ce Pour changer le nom des entrées tel qu’il apparaît sur réglage est utile pour équilibrer les niveaux de différentes l’IGU et sur l’afficheur de la face avant.
  • Seite 182 OPTIONS GÉNÉRALES ■ Analog Level (Niveau analogique) ■ Input Channels (Voies d’entrée) Pour sélectionner le signal d’entrée analogique. Pour préciser le nombre de voies audio appliquées à Input Select > source (DVD, etc.) > Analog Level l’entrée sur les prises MULTI CH INPUT. Choix: STD, HIGH Input Select >...
  • Seite 183: Mise En Œuvre Manuelle: Sound

    OPTIONS GÉNÉRALES ■ Cinema EQ (Égalisation pour les films) Mise en œuvre manuelle: Sound Pour régler l’égalisation paramétrique et le niveau des fréquences aiguës émises par chaque enceinte. Pour le réglage manuel des paramètres audio. Manual Setup > Sound > Cinema EQ Choix: Off, On, PEQ*, HIGH* Appuyez sur TOP, sur le boîtier de Après avoir sélectionné...
  • Seite 184 OPTIONS GÉNÉRALES ■ Tone Control (Commande de tonalité) EQ Select (Sélection de l’égaliseur) Choix: Auto Setup PEQ, Manual GEQ, EQ Defeat Utilisez ce menu pour régler la quantité de graves et d’aigus qui sont appliqués aux enceintes et au casque. Manual Setup >...
  • Seite 185 OPTIONS GÉNÉRALES ■ Dynamic Range (Dynamique) Treble (Commande des aigus) Pour régler la quantité d’aigus émis par les enceintes ou le Utilisez ce menu pour définir la compression de casque. dynamique à appliquer aux signaux destinés aux enceintes Choix: –6 à +6 (dB), Valeur initiale: 0 dB et au casque.
  • Seite 186: Mise En Œuvre Manuelle: Basic

    OPTIONS GÉNÉRALES Muting Type (Action du silencieux) Mise en œuvre manuelle: Basic Pour définir l’amplitude de l’atténuation apportée par le silencieux. Pour définir les paramètres de base de l’ensemble. Choix: Full, –20dB Appuyez sur TOP, sur le boîtier de télécommande IGU. Sélectionnez Manual Setup, puis appuyez sur h.
  • Seite 187 OPTIONS GÉNÉRALES ■ THX Set (Valeur adoptée pour THX) SB Speaker Dist. (Distance aux enceintes d’ambiance) Pour le réglage manuel des paramètres THX. Manual Setup > Basic > THX Set > Pour optimiser le champ sonore d’ambiance lorsque les enceintes arrière d’ambiance sont éloignées l’une de THX Ultra2 SWFR (Caisson de graves THX Ultra2) l’autre.
  • Seite 188 OPTIONS GÉNÉRALES ■ Subwoofer Set Phase (Phase) (Réglage du caisson de graves) Pour modifier la phase des fréquences appliquées au(x) caisson(s) de graves si les fréquences graves sont absentes Pour régler manuellement le caisson de graves. ou manquent de clarté. Tout d’abord, inversez la phase des Manual Setup >...
  • Seite 189 OPTIONS GÉNÉRALES ■ Speaker Set (Réglage des enceintes) Bass Out (Sortie des signaux graves) Les signaux LFE portent les effets aux fréquences graves Pour régler manuellement les paramètres des enceintes. que cet appareil détecte dans les gravures Dolby Digital ou Manual Setup >...
  • Seite 190 OPTIONS GÉNÉRALES Surround Surround Back (Enceintes d’ambiance gauche et droite) (Enceintes arrière d’ambiance gauche et droite) Choix: Large, Small, None Choix: Large x1, Small x1, Small x2, Large x2, None • Choisissez Large si la chaîne comporte des enceintes • Sélectionnez Large x1 si la chaîne comporte une d’ambiance gauche et droite de grande taille, ou bien si enceinte arrière d’ambiance de grande taille.
  • Seite 191 OPTIONS GÉNÉRALES ■ Speaker Level Presence (Enceintes de présence) Choix: None, Yes (Niveau de sortie des enceintes) Pour équilibrer manuellement les niveaux de sortie des enceintes avant et des enceintes sélectionnées grâce à Speaker Set (reportez-vous à la page 67). Manual Setup >...
  • Seite 192: Speaker Distance

    OPTIONS GÉNÉRALES ■ Speaker Distance Choix: 0,3 à 24,00 m Réglage initial pour toutes les enceintes: (Distance aux enceintes) Modèles pour le Canada et les États-Unis: 10,0 pieds Pour préciser manuellement la distance à chaque enceinte Autres modèles: 3,0 mètres et le retard qui doit être appliqué...
  • Seite 193: Mise En Œuvre Manuelle: Video

    OPTIONS GÉNÉRALES ■ Processor (Processeur) Mise en œuvre manuelle: Video Pour mettre en service ou hors service les processeurs vidéo. Pour le réglage manuel des paramètres vidéo. Manual Setup > Video > Processor Choix: Off, On Si la sortie vers le moniteur ne s’effectue pas comme il convient alors que vous êtes en train de régler les paramètres, ceux de ces paramètres qui concernent la vidéo peuvent être incompatibles avec le moniteur vidéo.
  • Seite 194 OPTIONS GÉNÉRALES ■ Picture Mode (Mode image) ■ Resolution (Définition) Pour sélectionner le mode image vidéo et le régler en Pour sélectionner la définition du signal d’entrée. Il s’agit fonction de l’image vidéo. de la définition de l’image de sortie lorsque Processor a Manual Setup >...
  • Seite 195 OPTIONS GÉNÉRALES ■ Aspect (Format de l’image) Pour sélectionner le format de l’image de sortie après son traitement vidéo. Manual Setup > Video > Aspect Choix: Through, Auto, 16:9 Normal, 16:9 Zoom • Through: Le format de l’image correspondant au signal d’entrée vidéo, n’est en rien modifié.
  • Seite 196 OPTIONS GÉNÉRALES ■ Exemples de conversion de format Les images entourées d’un cadre gras illustrent le réglage souhaitable pour chaque association de signal et de téléviseur. Réglage adopté Format de l’image de Type de la source téléviseur Through 16:9 Normal 16:9 Zoom 16:9 (Format allongé)
  • Seite 197: Mise En Œuvre Manuelle: Option

    OPTIONS GÉNÉRALES ■ S Video (S-vidéo) Mise en œuvre manuelle: Option Pour associer la sortie vidéo et l’entrée vidéo du moniteur. S1 permet de redéfinir automatiquement le format d’une Pour définir les valeurs des paramètres optionnels. gravure pour écran large comprimée au format 4/3 de façon qu’elle soit affichée en 16/9.
  • Seite 198: Input Mode (Mode D'entrée)

    OPTIONS GÉNÉRALES ■ Surr.Initialize ■ Input Mode (Mode d’entrée) (Initialisation des corrections Pour préciser le mode d’entrée, à la mise en service de l’appareil, des sources reliées aux prises DIGITAL d’ambiance) INPUT. Pour initialiser les paramètres de chaque champ sonore Manual Setup >...
  • Seite 199: Multi Zone

    Si vous ne désirez pas Pour définir l’emplacement des enceintes avant reliées aux d’image de fond, sélectionnez None. prises SPEAKERS B. Choix: None, 1(DSP-Z9), 2(Horn), 3(Piano), 4(Gray) Choix: Zone1, ZoneB • Sélectionnez Zone1 pour mettre en service ou hors Remarque service SPEAKERS A et B lorsque les enceintes Si la valeur que vous avez donnée à...
  • Seite 200: Protection De La Mémoire

    OPTIONS GÉNÉRALES Zone2 Amplifier (Amplificateur de Zone 2) Protection de la mémoire Pour sélectionner comment les signaux destinés aux enceintes ZONE 2 sont amplifiés. Pour éviter toute modification accidentelle des réglages Choix: Internal, External, None des paramètres. • Sélectionnez External si les enceintes Zone 2 sont reliées à...
  • Seite 201: Auto Setup

    OPTIONS GÉNÉRALES ■ Manual Setup (Mise en œuvre manuelle) Choix: Free, Guard • Sélectionnez Guard pour empêcher que les paramètres de la mise en œuvre manuelle ne soient modifiés. Lorsque la Guard est en service, vous pouvez sélectionner Picture Mode (Cinema, Standard ou Dynamic), mais vous ne pouvez pas agir sur les paramètres de chaque mode.
  • Seite 202: Particularités De La Télécommande

    Le boîtier de télécommande est conçu pour agir sur cet appareil mais aussi sur d’autres appareils fabriqués par YAMAHA et d’autres sociétés. Pour régler d’autres appareils, vous devez introduire dans le boîtier de télécommande les codes de commande qui conviennent.
  • Seite 203: Enregistrement Des Codes De Fabricant

    Remarque Il se peut que vous ne soyez pas capable d’agir sur un appareil YAMAHA bien que le code de fabricant YAMAHA soit par défaut dans la liste ci-dessus. En ce cas, tentez d’enregistrer un autre code de fabricant YAMAHA.
  • Seite 204: Apprentissage Des Codes Des Autres Boîtiers De Télécommande

    (y compris dans le cas des appareils audiovisuels YAMAHA). Si la commande de l’appareil n’est pas possible, quel que soit le code de fabricant choisi, programmez le boîtier de télécommande au moyen de la fonction d’apprentissage 5 à...
  • Seite 205: Changement Du Nom D'une Source Apparaissant Dans La Fenêtre D'affichage

    PARTICULARITÉS DE LA TÉLÉCOMMANDE Maintenez la pression d’un doigt sur la Changement du nom d’une source touche, du boîtier de télécommande de apparaissant dans la fenêtre l’appareil concerné, que vous désirez d’affichage programmer jusqu’à ce que “OK” apparaisse dans la fenêtre d’affichage. Vous pouvez changer le nom apparaissant dans la fenêtre d’affichage du boîtier de télécommande si celui défini en usine ne vous convient pas.
  • Seite 206: Utilisation De La Fonction De Macro

    — Vous pouvez mettre en service certains appareils (y compris des appareils YAMAHA) reliés à celui-ci en les branchant sur une des prises AC OUTLET(S) placées sur le panneau arrière. (L’alimentation ne se fait pas nécessairement en même temps que pour cet appareil;...
  • Seite 207 PARTICULARITÉS DE LA TÉLÉCOMMANDE ■ Utilisation des macros Appuyez sur la touche de macro qui doit recevoir la macro. MACRO MACRO Le nom de la touche de macro et celui de l’appareil TRANSMIT RE-NAME CLEAR LEARN MACRO MACRO ON/OFF SYSTEM sélectionné...
  • Seite 208: Effacement Des Modifications

    PARTICULARITÉS DE LA TÉLÉCOMMANDE Appuyez une nouvelle fois sur MACRO Appuyez, pendant au moins 3 secondes, sur lorsque la suite d’ordres composant la macro CLEAR. est complète. “C:OK” apparaît sur la fenêtre d’affichage. Secours de la mémoire Si les piles sont retirées pendant plus de 3 minutes, ou CLEAR si elles sont complètement usagées, le contenu de la mémoire est effacé.
  • Seite 209: Effacement Individuel Des Fonctions

    PARTICULARITÉS DE LA TÉLÉCOMMANDE Répétez l’opération 3 pour effacer d’autres Effacement individuel des fonctions apprises. fonctions Appuyez sur LEARN pour quitter le mode ■ Effacement d’une fonction apprise permettant l’effacement. Vous pouvez effacer les fonctions conservées par les touches de chaque section. ■...
  • Seite 210: Commande Des Appareils

    PARTICULARITÉS DE LA TÉLÉCOMMANDE Commande des appareils Après avoir enregistré les codes de fabricant qui conviennent, vous pouvez utiliser ce boîtier de télécommande pour régler d’autres appareils. Sachez toutefois que certaines touches peuvent ne pas agir parfaitement sur l’appareil sélectionné. Vous pouvez utiliser les touches de sélection d’entrée pour choisir l’appareil à commander, ce qui place automatiquement le boîtier de télécommande dans les conditions convenables pour agir sur cet appareil.
  • Seite 211 PARTICULARITÉS DE LA TÉLÉCOMMANDE ■ Commande d’un téléviseur numérique (section DTV/LD) ou d’un syntoniseur pour télévision câblée ou par satellite (sections CABLE ou SAT) SYSTEM POWER STANDBY V-AUX TUNER PHONO CABLE MD/TAPE CD-R DTV/LD VCR 1 VCR 2 MULTI CH IN PURE DIRECT TITLE MENU, Touches de déplacement du...
  • Seite 212 PARTICULARITÉS DE LA TÉLÉCOMMANDE ■ Commande d’un lecteur de CD (section CD) SYSTEM STANDBY POWER V-AUX TUNER PHONO CABLE MD/TAPE CD-R DTV/LD VCR 1 VCR 2 MULTI CH IN PURE DIRECT TITLE ENTER SOURCE INPUT MODE EXIT DISPLAY DISPLAY MENU SOUND SELECT –...
  • Seite 213 PARTICULARITÉS DE LA TÉLÉCOMMANDE ■ Commande d’une platine à cassette (section MD/TAPE) Enregistrez le code de fabricant de la platine à cassette comme il a été dit, page 81 parce que MD/TAPE est prévu en usine pour la commande des platines MD. SYSTEM POWER STANDBY...
  • Seite 214 PARTICULARITÉS DE LA TÉLÉCOMMANDE ■ Commande d’un appareil en option (section OPTN) OPTN est une section de commande d’appareil qui peut recevoir des fonctions de réglage à distance indépendamment de toute source. Remarques • Vous ne pouvez pas enregistrer un code de fabricant pour cette section. Reportez-vous à la page 82 pour ce qui concerne la programmation des touches de cette section de commande d’appareil.
  • Seite 215: Zone 2

    YAMAHA pour appareil toute question concernant les connexions Zone 2. • Certains appareils YAMAHA peuvent être reliés directement à la prise REMOTE CONTROL OUT de cet appareil-ci. Si vous possédez un appareil de ce type, vous n’aurez peut-être pas besoin d’un émetteur infrarouge.
  • Seite 216: Commande À Distance Zone 2

    ZONE 2 Utilisation de l’amplificateur interne de cet appareil Pour utiliser l’amplificateur de cet appareil, choisissez la valeur ON pour ZONE2 AMP. – – PRESENCE PRESENCE /ZONE 2 /ZONE 2 Seconde pièce Cet appareil Appuyez sur k/n pour sélectionner “Zone”. Commande à...
  • Seite 217 ZONE 2 ■ Pour mettre cet appareil en service ou Appuyez sur une touche de sélection en veille d’entrée pour sélectionner la source à SYSTEM POWER et STANDBY jouent un rôle différent écouter dans la seconde pièce. selon le mode sélectionné, lequel est indiqué dans la La fenêtre d’affichage indique “2: nom de l’entrée fenêtre d’affichage.
  • Seite 218: Utilisation De I.link

    UTILISATION DE I.LINK UTILISATION DE i.LINK Cet appareil est doté de 2 connecteurs i.LINK (AUDIO). Raccordements des appareils Après avoir relié des appareils qui sont en mesure de prendre en compte les liaisons i.LINK (AUDIO), outre la i.LINK transmission des signaux PCM linéaire à 2 voies et des signaux audio multivoie qui ont fait l’objet d’une Vous pouvez relier à...
  • Seite 219: Association D'une Entrée À Un Appareil I.link

    UTILISATION DE i.LINK Tournez la commande INPUT SELECTOR Association d’une entrée à un pour sélectionner l’entrée à laquelle vous appareil i.LINK désirez que soit associé l’appareil i.LINK. Lorsqu’un appareil i.LINK est connecté, cet appareil-ci Cela fait, appuyez sur PURE DIRECT pour détecte automatiquement la connexion et reconnaît valider l’association.
  • Seite 220: Lecture Automatique

    UTILISATION DE i.LINK ■ Témoin i.LINK Si l’entrée MULTI CH INPUT a été associée à l’appareil i.LINK S’éclaire Lorsque l’appareil reproduit des signaux i.LINK. Appuyez sur MULTI CH INPUT. Appuyez de manière répétée sur INPUT Clignote Lorsqu’un appareil i.LINK est connecté, mais cet appareil-ci MODE pour sélectionner “Auto”...
  • Seite 221: Information (Information)

    UTILISATION DE i.LINK ■ Information (Information) ■ Plug & Play (Prêt à l’emploi) Pour afficher les informations suivantes: condition de Pour décider si cet appareil-ci doit automatiquement fonctionnement des appareils i.LINK reconnus, appareils adopter le mode d’association d’entrée lorsqu’un nouvel i.LINK Select reconnus et qui ont été...
  • Seite 222: Messages Affichés Par I.link

    UTILISATION DE i.LINK Messages affichés par i.LINK Messages d’état Les messages suivants peuvent apparaître sur l’afficheur de la face avant en fonction de l’état de cet appareil. Message Signification Link Check La connexion à l’appareil i.LINK est en cours de vérification. No Name Le modèle de l’appareil i.LINK connecté...
  • Seite 223: Éléments Des Champs Sonores

    La possibilité de créer un champ sonore souhaité, c’est exactement ce que YAMAHA a réalisé en mettant au point le processeur numérique de champ sonore.
  • Seite 224 ÉLÉMENTS DES CHAMPS SONORES Paramètre Description Page SB Room Size Agit sur le volume apparent du champ sonore arrière d’ambiance. Règle la réflectivité apparente des murs virtuels de la pièce vis-à-vis du champ sonore arrière SB Liveness d’ambiance. Étend l’image stéréo avant de façon à y inclure les enceintes d’ambiance et à produire des sons Panorama enveloppants.
  • Seite 225: Menu Stereo/Surround

    ÉLÉMENTS DES CHAMPS SONORES ■ Init. Delay (Retard initial) Menu Stereo/Surround Ce paramètre change la distance apparente de la source sonore; cela est obtenu par modification du retard entre les Vous pouvez modifier la valeur de certains paramètres de sons directs et les premières réflexions. Plus la valeur est façon que le champ créé...
  • Seite 226 ÉLÉMENTS DES CHAMPS SONORES ■ Liveness (Vivacité) ■ Rev. Time (Temps de réverbération) Ce paramètre règle la réflectivité des murs virtuels de la Ce paramètre règle le temps requis pour diminuer de pièce, en modifiant la vitesse d’évanouissement des 60 dB (à 1 kHz) les réverbérations denses. Cela change la premières réflexions.
  • Seite 227 ÉLÉMENTS DES CHAMPS SONORES ■ Rev. Delay (Retard des réverbérations) ■ Sur. Delay (Retard des sons d’ambiance) Ce paramètre règle la différence de temps entre le début Ce paramètre règle le retard des sons d’ambiance et des des sons directs et le début des réverbérations. Plus la champs sonores d’ambiance.
  • Seite 228 ÉLÉMENTS DES CHAMPS SONORES Pour PRO LOGIC II Music Pour 9ch Stereo ■ Panorama (Panorama) ■ Center Level (Niveau dans la voie centrale) Ce paramètre étend l’image stéréo avant de façon à y inclure les enceintes d’ambiance et à produire des sons Ce paramètre règle le niveau de sortie de la voie centrale enveloppants.
  • Seite 229 ÉLÉMENTS DES CHAMPS SONORES ■ Decode Type (Type de décodeur) Pour THX Cinema Rôle: Ce paramètre sélectionne le décodeur utilisé pour la lecture des sources à 2 voies ayant le format THX Cinema. Choix: Pro Logic / Pro Logic II / Pro Logic IIx / Neo:6 Pour Surround Enhanced Rôle:...
  • Seite 230: Généralités

    YAMAHA. ■ Généralités...
  • Seite 231 GUIDE DE DÉPANNAGE Reportez- Anomalies Causes possibles Actions correctives vous à la page Les sons Le circuit de protection a été actionné du Assurez-vous que l’impédance correcte a été disparaissent fait de la présence d’un court-circuit, etc. sélectionnée. brusquement. Assurez-vous que les câbles d’enceintes ne sont en —...
  • Seite 232 GUIDE DE DÉPANNAGE Reportez- Anomalies Causes possibles Actions correctives vous à la page La lecture des L’appareil relié n’est pas réglé pour Effectuez le réglage qui convient après avoir consulté — sources au format fournir en sortie des signaux numériques le mode d’emploi de l’appareil concerné.
  • Seite 233 GUIDE DE DÉPANNAGE Reportez- Anomalies Causes possibles Actions correctives vous à la page Un appareil Cet appareil est trop proche de l’appareil Éloignez cet appareil de celui qui en perturbe le — numérique, un numérique ou de l’appareil haute fonctionnement. appareil haute fréquence.
  • Seite 234: Informations Sur L'égalisation Paramétrique

    INFORMATIONS SUR L’ÉGALISATION PARAMÉTRIQUE INFORMATIONS SUR L’ÉGALISATION PARAMÉTRIQUE ■ Q factor Cet appareil emploie la technique YAMAHA Parametric Room Acoustic Optimizer (YPAO) pour réaliser La largeur de la bande de fréquence est liée au facteur de l’optimisation des caractéristiques en fréquence de surtension (Q).
  • Seite 235: Dolby Surround

    GLOSSAIRE GLOSSAIRE ■ Dolby Surround ■ Dolby Pro Logic II Dolby Surround fait usage d’un système analogique Dolby Pro Logic II est une technique améliorée pour d’enregistrement à 4 voies pour reproduire des effets décoder un grand nombre d’enregistrements Dolby sonores réalistes et dynamiques: 2 voies avant gauche et Surround.
  • Seite 236 ■ SILENT CINEMA DSP ■ Fréquence d’échantillonnage et nombre YAMAHA a mis au point, pour le casque, un champ de bits de quantification sonore DSP naturel et réaliste. Lors de la numérisation d’un signal audio analogique, le Les valeurs des paramètres ont été...
  • Seite 237 GLOSSAIRE ■ Traitement THX Cinema ■ Suppression adaptative de la corrélation THX est un ensemble de techniques mises au point par Dans une salle de cinéma, les sonorités d’ambiance sont Lucasfilm Ltd., société réputée de production de films. généralement reproduites par un grand nombre THX est né...
  • Seite 238: Thx Ultra2

    GLOSSAIRE ■ MODE THX MUSIC ■ THX Surround EX Il convient de sélectionner THX Music pour la restitution THX Surround EX - Dolby Digital Surround EX est une d’une gravure musicale multivoie. Avec ce mode, le technologie développée conjointement par Dolby traitement THX ASA est appliqué...
  • Seite 239: Blocs-Diagrammes

    BLOCS-DIAGRAMMES BLOCS-DIAGRAMMES ■ Bloc-diagramme COAX/RF Demodulator PCM 2ch DIRECT SOURCE COAX INPUT Selector PCM1792 compliant Rec OUT Selector SL/SR PCM1792 YPAO compliant REC OUT RXOUT PCM1792 DATA DECODER compliant STREAM(Multi) SBL/ SBL+ ZONE2 PCM1792 DD-EX COAX SBL- SBR+ compliant SBR- DTS-ES PCM1792 UNBAL/BAL...
  • Seite 240 BLOCS-DIAGRAMMES ■ Matrice vidéo SOURCE INPUT DVD etc Selector REC OUT Selector DVD etc REC/Source REC OUT Zone2 S1/S2 INPUT DVD etc SOURCE Selector DVD etc REC OUT Selector REC/Source REC OUT Zone2 DVD etc DVD etc SOURCE INPUT Selector DVD etc ■...
  • Seite 241: Caractéristiques Techniques

    CARACTÉRISTIQUES TECHNIQUES CARACTÉRISTIQUES TECHNIQUES SECTION AUDIO SECTION VIDÉO • Puissance minimum efficace de sortie • Standard de télévision 20 Hz à 20 kHz, DHT 0,015%, 8 Ω [Modèles pour le Canada, la Corée et les États-Unis] Voies avant, centrale, d’ambiance et arrière d’ambiance ..................
  • Seite 242 Kälte. Halten Sie für die Belüftung einen Beschädigungs- und/oder Verletzungsgefahr Abstand von mindestens 30 cm an der Oberseite, kommen. YAMAHA kann nicht verantwortlich 20 cm an der linken und rechten Seite bzw. 20 cm gemacht werden für Beschädigungen, die auf die an der Rückseite des Gerätes ein.
  • Seite 243 INHALTSVERZEICHNIS EINLEITUNG SOUNDFELDPROGRAMME MERKMALE............2 BESCHREIBUNG DER WOLLEN WIR BEGINNEN ........ 3 SOUNDFELDPROGRAMME......48 Mitgeliefertes Zubehör ..........3 Für Film/Videoquellen ..........48 Einsetzen der Batterien in die Fernbedienung ... 4 Für Musikquellen............. 51 BEDIENUNGSELEMENTE UND IHRE FUNKTIONEN ........... 5 Fronttafel..............5 WEITERFÜHRENDE Fernbedienung ............
  • Seite 244: Eingebauter 9-Kanal-Leistungsverstärker

    Hergestellt unter Lizenz von Dolby Laboratories. „Dolby“, „Pro Logic“, „Surround EX“ und das Doppel-D- Symbol sind Warenzeichen der Dolby Laboratories. SILENT CINEMA ist ein Warenzeichen der YAMAHA CORPORATION. „THX“ und das „THX“-Logo sind eingetragene Warenzeichen der THX Ltd. „Surround EX“ ist eine gemeinsam von THX und Dolby Laboratories, Inc.
  • Seite 245: Wollen Wir Beginnen

    WOLLEN WIR BEGINNEN WOLLEN WIR BEGINNEN Mitgeliefertes Zubehör Bitte überprüfen Sie, dass Sie alle der folgenden Teile erhalten haben. Fernbedienung Fernbedienung MACRO TRANSMIT RE-NAME CLEAR LEARN MACRO SYSTEM POWER STANDBY SYSTEM POWER STANDBY V-AUX TUNER PHONO CABLE MD/TAPE CD-R DTV/LD VCR 1 VCR 2 Batterien (3)
  • Seite 246: Einsetzen Der Batterien In Die Fernbedienung

    WOLLEN WIR BEGINNEN Einsetzen der Batterien in die Fernbedienung Hinweise zu den Batterien • Tauschen Sie alle Batterien aus, wenn Sie die folgenden Bedingungen feststellen: Der Betriebsbereich der Fernbedienung nimmt ab, die Anzeige blinkt nicht oder ihr Licht wird blass. •...
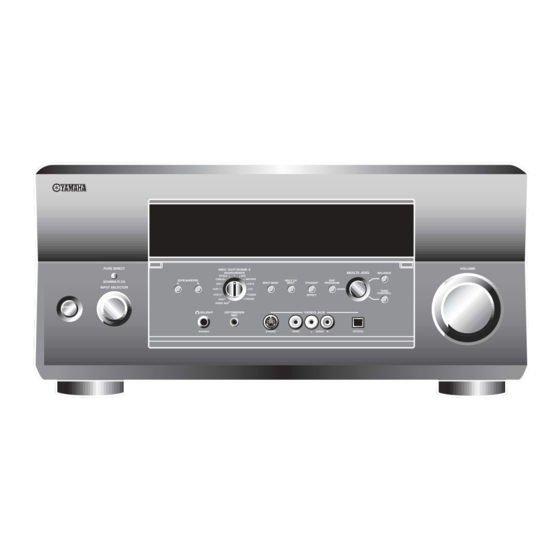
  • Seite 247: Bedienungselemente Und Ihre Funktionen

    BEDIENUNGSELEMENTE UND IHRE FUNKTIONEN BEDIENUNGSELEMENTE UND IHRE FUNKTIONEN Fronttafel 7 8 9 PURE DIRECT VOLUME REC OUT/ZONE 2 SOURCE/REMOTE MULTI JOG BALANCE DTV/LD CABLE MD/TAPE SPEAKERS MULTI CH 2CH/MULTI CH INPUT MODE INPUT STRAIGHT PROGRAM CD-R INPUT SELECTOR VCR 1 TONE CONTROL VCR 2...
  • Seite 248 BEDIENUNGSELEMENTE UND IHRE FUNKTIONEN 0 MULTI JOG H VIDEO AUX-Buchsen Drehen, um Einträge zu wählen oder einzustellen, wenn Hier können die Audio- und Videosignale von einer mit der DSP PROGRAM, BALANCE oder TONE tragbaren Quelle, wie zum Beispiel einer Spielekonsole, CONTROL Taste verwendet.
  • Seite 249: Fernbedienung

    BEDIENUNGSELEMENTE UND IHRE FUNKTIONEN Fernbedienung 3 TRANSMIT Anzeige Dieser Abschnitt beschreibt die Funktionen der einzelnen Bedienungselemente der Fernbedienung. Siehe Blinkt während die Fernbedienung Signale aussendet. „MERKMALE DER FERNBEDIENUNG“ auf Seite 80 4 STANDBY dient für die Bedienung anderer Komponenten mit dieser Schaltet dieses Gerät auf den Bereitschaftsmodus.
  • Seite 250: Gui Fernbedienung

    BEDIENUNGSELEMENTE UND IHRE FUNKTIONEN G LEARN GUI Fernbedienung Wird verwendet, um den Herstellercode einzustellen oder die Programmierfunktionen von der Fernbedienung aus Dieser Abschnitt beschreibt die Bedienungselemente und durchzuführen (siehe Seite 81 und 82). Funktionen der GUI Fernbedienung. Siehe „VERWENDUNG H MACRO DER GUI-FERNBEDIENUNG“...
  • Seite 251: Verwendung Der Fernbedienung

    BEDIENUNGSELEMENTE UND IHRE FUNKTIONEN Verwendung der Fernbedienung PURE DIRECT REC OUT/ZONE 2 VOLUME SOURCE/REMOTE MULTI JOG BALANCE DTV/LD SPEAKERS CABLE MD/TAPE MULTI CH 2CH/MULTI CH CD-R INPUT MODE INPUT STRAIGHT PROGRAM INPUT SELECTOR VCR 1 TONE VCR 2 TUNER CONTROL EFFECT PHONO VIDEO AUX...
  • Seite 252: Fronttafel-Display

    BEDIENUNGSELEMENTE UND IHRE FUNKTIONEN Fronttafel-Display MULTI CH V–AUX VCR 2 VCR 1 CABLE DTV/LD MD/TAPE CD–R TUNER PHONO MUTE MATRIX DISCRETE HiFi DSP VOLUME VIRTUAL NIGHT SILENT DIGITAL OPTIMIZER SLEEP ZONE2 1 i.LINK Anzeige C LFE Anzeige Leuchtet auf, wenn dieses Gerät i.LINK-Signale Leuchtet auf, wenn das Eingangssignal das LFE-Signal wiedergibt.
  • Seite 253: Rückwand

    BEDIENUNGSELEMENTE UND IHRE FUNKTIONEN Rückwand AC IN – – – – PRESENCE SURROUND SURROUND CENTER FRONT FRONT FRONT FRONT SURROUND SURROUND PRESENCE /ZONE 2 BACK BACK /ZONE 2 (SINGLE) SPEAKERS AC OUTLETS SPEAKERS AUDIO (FRONT) (SINGLE) (SINGLE) CENTER POWER AMP IN (REAR) PHONO SURROUND...
  • Seite 254: Lautsprecher-Setup

    CINEMA DSP, Multi-Kanal-Audioquellen und THX zu Die Verwendung eines Subwoofers, wie zum Beispiel des vergnügen. YAMAHA Active Servo Processing Subwoofer Systems, ist nicht nur für die Betonung der Bassfrequenzen von jedem oder allen Kanälen wirksam, sondern auch für die...
  • Seite 255: Lautsprecheranschlüsse

    LAUTSPRECHER-SETUP ■ Di-polares Lautsprecher-Layout Ein Lautsprecherkabel besteht eigenlicht aus einem Paar isolierter Drähte, die nebeneinander verlaufen. Ein Kabel Entweder di-polare oder direkt abstrahlende weist eine unterschiedliche Farbe oder Form auf, d.h. es Lautsprechertypen können für den THX-Surround ist mit einem Streifen, einer Vertiefung oder einem verwendet werden.
  • Seite 256 LAUTSPRECHER-SETUP Linker vorderer Rechter Rechter vorderer Linker Linkes Rechts Lautsprecher Presence- Lautsprecher Presence- Subwoofer- Subwoofer- Lautsprecher Center- Lautsprecher System System Lautsprecher Vordere Lautsprecher (B) – – – – PRESENCE SURROUND SURROUND CENTER FRONT FRONT FRONT FRONT SURROUND SURROUND PRESENCE /ZONE 2 BACK BACK /ZONE 2...
  • Seite 257 Schließen Sie ein Surround-Lautsprechersystem an diese Klemmen an. ■ SUBWOOFER-Buchsen Schließen Sie einen oder zwei Subwoofer mit eingebautem Verstärker, wie zum Beispiel das YAMAHA Active Servo Processing Subwoofer System, an diese Buchse(n) an. ■ SURROUND BACK Klemmen Schließen Sie ein hinteres Surround-Lautsprechersystem an diese Klemmen an.
  • Seite 258: Anschlüsse

    ANSCHLÜSSE ANSCHLÜSSE ■ i.LINK-Buchsen Anschluss von Komponenten An dieses Gerät können mit i.LINK versehene Komponenten unter Verwendung von 4-poligen S400 i.LINK Kabeln angeschlossen werden. Dieser Anschluss VORSICHT gestattet Ihnen das Senden und Empfangen von Digital- Schließen Sie dieses Gerät oder andere Komponenten Audiosignalen mit hoher Geschwindigkeit und HiFi- nicht an das Netz an, bevor nicht alle Anschlüsse zwischen Qualität.
  • Seite 259: Anschluss Der Videokomponenten

    ANSCHLÜSSE Anschluss der Videokomponenten ■ Anschluss für die DVD-Wiedergabe AC I Videomonitor Video- eingang – – PRESENCE SURROUND SURROUND CENTER FRONT FRONT /ZONE 2 BACK SPEAKERS (SINGLE) CENTER PHONO SURROUND SURROUND SUBWOOFER FRONT PURE DIRECT IN(PLAY) OUT(REC) IN(PLAY) OUT(REC) BACK TUNER MD/TAPE CD-R...
  • Seite 260: Anschluss An Die Multi Ch Input-Buchsen

    ANSCHLÜSSE ■ Anschluss an die MULTI CH INPUT-Buchsen Dieses Gerät ist mit 8 zusätzlichen Eingangsbuchsen (linke und rechte FRONT, CENTER, linke und rechte SURROUND, linke und rechte SURROUND BACK und SUBWOOFER) für diskreten Mehrkanaleingang von einem Universal-Disk-Player, einem externen Decoder, Sound-Prozessor oder Vorverstärker ausgerüstet. Schließen Sie die Ausgangsbuchsen Ihres Multi-Disk-Players oder externen Decoders an die MULTI CH INPUT- Buchsen an.
  • Seite 261: Anschlüsse Für Tv-Digitalsendungen Oder Ld-Wiedergabe

    ANSCHLÜSSE ■ Anschlüsse für TV-Digitalsendungen oder LD-Wiedergabe AC IN – – PRESENCE SURROUND SURROUND CENTER FRONT FRONT /ZONE 2 BACK SPEAKERS AC OUTLETS AUDIO (SINGLE) CENTER PHONO IN(PLAY) OUT(REC) IN(PLAY) OUT(REC) IN(PLAY) OUT(REC) IN(PLAY) SURROUND SURROUND SUBWOOFER FRONT PURE DIRECT BACK TUNER MD/TAPE...
  • Seite 262: Anschlüsse Für Tv-Kabelsendungen

    ANSCHLÜSSE ■ Anschlüsse für TV-Kabelsendungen AC IN – – PRESENCE SURROUND SURROUND CENTER FRONT FRONT /ZONE 2 BACK SPEAKERS AC OUTLETS AUDIO (SINGLE) CENTER PHONO IN(PLAY) OUT(REC) IN(PLAY) OUT(REC) IN(PLAY) OUT(REC) IN(PLAY) SURROUND SURROUND SUBWOOFER FRONT PURE DIRECT BACK MD/TAPE CD-R DTV/LD VCR 1...
  • Seite 263: Anschlüsse Für Satellitensendungen

    ANSCHLÜSSE ■ Anschlüsse für Satellitensendungen AC IN – – PRESENCE SURROUND SURROUND CENTER FRONT FRONT /ZONE 2 BACK SPEAKERS AC OUTLETS AUDIO (SINGLE) CENTER PHONO SURROUND SURROUND SUBWOOFER FRONT PURE DIRECT IN(PLAY) OUT(REC) IN(PLAY) OUT(REC) IN(PLAY) OUT(REC) IN(PLAY) BACK MD/TAPE CD-R DTV/LD VCR 1...
  • Seite 264: Anschlüsse Für Vcr Wiedergabe Und Aufnahme

    ANSCHLÜSSE ■ Anschlüsse für VCR Wiedergabe und Aufnahme AC IN – – PRESENCE SURROUND SURROUND CENTER FRONT FRONT /ZONE 2 BACK SPEAKERS AC OUTLETS AUDIO (SINGLE) CENTER PHONO IN(PLAY) OUT(REC) IN(PLAY) OUT(REC) IN(PLAY) OUT(REC) IN(PLAY) SURROUND SURROUND SUBWOOFER FRONT PURE DIRECT BACK TUNER MD/TAPE...
  • Seite 265: Anschlüsse Für Dvd-Recorder-Wiedergabe Und Aufnahme

    ANSCHLÜSSE ■ Anschlüsse für DVD-Recorder-Wiedergabe und Aufnahme AC IN – – SURROUND CENTER FRONT FRONT FRONT SPEAKERS AC OUTLETS AUDIO CENTER UBWOOFER FRONT PURE DIRECT IN(PLAY) OUT(REC) IN(PLAY) OUT(REC) IN(PLAY) OUT(REC) IN(PLAY) OUT(REC) IN(PLAY) OUT(REC) TUNER MD/TAPE CD-R DTV/LD VCR 1 VCR 2 ZONE 2 MULTI CH INPUT...
  • Seite 266: Anschluss Der Audiokomponenten

    ANSCHLÜSSE Anschluss der Audiokomponenten ■ Anschlüsse für Audiowiedergabe CD-Player Audioausgang Plattenspieler Audioausgang Koaxialausgang Lichtleiterausgang AC IN – – PRESENCE SURROUND SURROUND CENTER FRONT FRONT /ZONE 2 BACK SPEAKERS AUDIO (SINGLE) CENTER PHONO SURROUND SURROUND SUBWOOFER FRONT PURE DIRECT IN(PLAY) OUT(REC) IN(PLAY) OUT(REC) BACK...
  • Seite 267: Anschlüsse Für Audiowiedergabe Und Aufnahme

    ANSCHLÜSSE ■ Anschlüsse für Audiowiedergabe und Aufnahme Lichtleitereingang MD/Band Audioausgang Audioeingang AC IN – – PRESENCE SURROUND SURROUND CENTER FRONT FRONT /ZONE 2 BACK SPEAKERS AUDIO (SINGLE) CENTER PHONO SURROUND SURROUND SUBWOOFER FRONT PURE DIRECT IN(PLAY) OUT(REC) IN(PLAY) OUT(REC) BACK TUNER MD/TAPE CD-R...
  • Seite 268 Presence-Kanal-Leitungsausgangsbuchsen i.LINK Komponente 6 SUBWOOFER-Buchsen Schließen Sie einen oder zwei Subwoofer mit eingebautem Verstärker, wie zum Beispiel das YAMAHA Active Servo Processing Subwoofer System, an diese Buchsen an. Hinweise • Stellen Sie die Lautstärke des Subwoofers mit dem an dem Subwoofer angebrachten Regler ein.
  • Seite 269: Anschluss Des Netzkabels

    ANSCHLÜSSE Anschluss des Netzkabels ■ Anschluss des Netzkabels AC IN Stecken Sie den Stromstecker in den Netzeinlass, nachdem alle anderen Anschlüsse beendet wurden, und schließen Sie danach das Netzkabel an eine Netzdose an. VORSICHT Verwenden Sie niemals ein anderes als das mitgelieferte AC OUTLETS AUDIO Netzkabel.
  • Seite 270: Einstellung Der Lautsprecherimpedanz

    ANSCHLÜSSE Einstellung der Einschalten der Stromversorgung Lautsprecherimpedanz Sobald alle Anschlüsse fertig gestellt sind, schalten Sie die Stromversorgung dieses Gerätes ein. VORSICHT Falls Sie Lautsprecher mit einer Impedanz von 6 Ohm verwenden, stellen Sie die Impedanz wie folgt auf 6 Ohm ein, bevor Sie die Stromversorgung einschalten.
  • Seite 271: Verwendung Der Gui-Fernbedienung

    VERWENDUNG DER GUI-FERNBEDIENUNG VERWENDUNG DER GUI-FERNBEDIENUNG Drücken Sie k/n wiederholt, um eine GUI Bedienungsvorgänge auf der Kategorie (z.B. Manual Setup) zu wählen, und Fernbedienung drücken Sie danach h, um die gewählte Kategorie aufzurufen (z.B. Basic). Die GUI- (Graphical User Interface) Fernbedienung bietet eine einfache und bequeme Art der Steuerung dieses Gerätes, während Sie ein GUI-Display auf Ihrem Videomonitor betrachten.
  • Seite 272 VERWENDUNG DER GUI-FERNBEDIENUNG Verwenden Sie k/n/l / h, um durch die Kategorien, Menüs und Parameter zu navigieren. Um den einzustellenden Parameter zu wählen, drücken Sie ENTER. Verwenden Sie k/n/l / h, um die Parameter einzustellen. Für Einzelheiten über jeden Parameter siehe Seite 55. Wenn Sie fertig sind, drücken Sie EXIT, um diese Funktion zu verlassen.
  • Seite 273: Automatisches Setup

    AUTOMATISCHES SETUP AUTOMATISCHES SETUP Einleitung Setup des Optimierermikrofons Dieses Gerät verwendet die YAMAHA Parametric Room Schließen Sie das mitgelieferte Acoustic Optimizer (YPAO) Technologie, die Ihnen das Optimierermikrofon an die OPTIMIZER MIC- zeitraubende Lautsprecher-Setup durch Hörversuche Buchse auf der Fronttafel an.
  • Seite 274: Starten Des Setups

    AUTOMATISCHES SETUP Drücken Sie k/n wiederholt, um Setup Menu Starten des Setups zu wählen, und betätigen Sie danach h. Für beste Ergebnisse, stellen Sie sicher, dass der Raum möglichst ruhig während des automatischen Setup- Vorganges ist. Falls zu starke Umgebungsgeräusche auftreten, könnten die Ergebnisse unzufriedenstellend sein.
  • Seite 275: Sobald Sie Die Gewünschte Einstellung

    AUTOMATISCHES SETUP Für Equalizing wählen Sie: Drücken Sie n, um Start zu wählen, und Skip Überspringen des gewählten Punktes, ohne betätigen Sie danach ENTER. Einstellungen auszuführen. Laute Testtöne werden von jedem Lautsprecher Flat Durchschnittliche Anpassung des Frequenzgangs ausgegeben, und „Measuring“ erscheint während des aller Lautsprecher.
  • Seite 276: Bestätigung Der Ergebnisse

    AUTOMATISCHES SETUP Falls Sie Setup Type auf Step einstellen. Bestätigung der Ergebnisse Die Ergebnisse werden individuell nach jeder Analyse angezeigt. Sie können die Ergebnisse für jede Analyse bestätigen. Falls Sie Setup Type auf Auto einstellen. Die Ergebnisse werden angezeigt, nachdem alle Punkte analysiert wurden.
  • Seite 277: Störungsbeseitigung Für Den Automatischen Setup-Vorgang

    AUTOMATISCHES SETUP ■ Störungsbeseitigung für den automatischen Setup-Vorgang Vor dem automatischen Setup Fehlermeldung Ursache Abhilfe Connect MIC! Optimierermikrofon ist nicht angeschlossen. • Schließen Sie das mitgelieferte Optimierermikrofon an die OPTIMIZER MIC-Buchse auf der Fronttafel Unplug Phones! Kopfhörer sind angeschlossen. • Trennen Sie die Kopfhörer ab. No Setup Menu! Keine Punkte des Setup-Menüs wurden •...
  • Seite 278: Nach Dem Automatischen Setup

    AUTOMATISCHES SETUP Nach dem automatischen Setup Die folgenden Warnmeldungen werden nach Beendigung der Analysen angezeigt, um Sie über mögliche Probleme zu informieren. Wir empfehlen, dass Sie den Inhalt jeder Meldung überprüfen, und danach nochmals [Retry] wählen, um den automatischen Setup-Vorgang erneut zu versuchen. Warnmeldungen Ursache Abhilfe...
  • Seite 279: Grundlegende Bedienungsvorgänge

    PLAYBACK WIEDERGABE Wählen Sie die Eingangsquelle. Grundlegende Drehen Sie INPUT SELECTOR (oder drücken Sie Bedienungsvorgänge eine der Eingangswahltasten auf der Fernbedienung), um den gewünschten Eingang zu wählen. V-AUX TUNER PHONO INPUT SELECTOR CABLE MD/TAPE CD-R oder DTV/LD VCR 1 VCR 2 Fronttafel Fernbedienung PURE DIRECT...
  • Seite 280 WIEDERGABE Einstellen des Klangs Wählen Sie ein Soundfeldprogramm, wenn Sie können die Bass/ MULTI JOG Sie dies wünschen. Höhenbalance der linken/rechten Drücken Sie DSP PROGRAM, und drehen Sie Front-, Center- und Subwoofer- danach MULTI JOG (oder stellen Sie 10KEY/AMP TONE CONTROL Kanäle einstellen.
  • Seite 281: Wahl Von Soundfeldprogrammen

    WIEDERGABE ■ Wählen von MULTI CH INPUT Wahl von Soundfeldprogrammen Drücken Sie MULTI CH INPUT, so dass „Input MULTI CH“ auf dem Fronttafel-Display und „MULTI CH ON/ ■ Bedienungsvorgänge auf der Fronttafel OFF“ auf dem Videomonitor erscheint. MULTI CH MULTI CH IN INPUT oder PURE DIRECT...
  • Seite 282: Genießen Von Multikanal-Software

    WIEDERGABE ■ Bedienungsvorgänge auf der ■ Genießen von Multikanal-Software Fernbedienung Falls Sie einen hinteren Surround-Lautsprecher angeschlossen haben, verwenden Sie diese Funktion, um 6.1/7.1-Kanal-Wiedergabe von Multikanalquellen unter 10KEY/AMP 10KEY STEREO HALL#1 HALL#2 CHURCH Tasten für JAZZ ROCK MUSIC ENTERTAIN Verwendung des Dolby Pro Logic IIx-, Dolby Digital EX/ES MOVIE /DTS...
  • Seite 283: Genießen Von 2-Kanal-Software

    WIEDERGABE ■ Genießen von 2-Kanal-Software Hinweise Von 2-Kanal-Quellen eingegebene Signale können auch • Die 6.1/7.1-Kanal-Wiedergabe ist in den folgenden Fällen nicht auf Multikanälen wiedergegeben werden, indem der möglich, auch wenn Sie EX/ES drücken: Dolby Pro Logic-, Dolby Pro Logic II-, Dolby Pro Logic –...
  • Seite 284: Hören Bei Nacht

    WIEDERGABE ■ Hören bei Nacht ■ Heruntermischen auf 2 Kanäle Dieser Modus reproduziert den Dialog klar und deutlich, Sie können 2-Kanal-Stereo-Wiedergabe auch von wobei jedoch die Lautstärke der lauten Soundeffekte Mehrkanalquellen genießen. reduziert wird, um das Hören mit niedriger Lautstärke zu Drücken Sie DSP PROGRAM, und drehen Sie späten Nachstunden zu erleichtern.
  • Seite 285: Hören Von Uneingeschränkt Reinem Audio

    WIEDERGABE ■ Hören von HiFi-Quellen (Analog/DSD/ Hören von uneingeschränkt reinem PCM) Audio Um hochwertigen Sound zu genießen, wählen Sie das STEREO Direct --- Soundfeldprogramm. Dieses PURE DIRECT gestattet Ihnen die höchstmögliche HiFi- Programm arbeitet mit Analog-, PCM- und DSD-Quellen. Qualität von Audioquellen zu genießen, die an die 2CH IN Drücken Sie Press DSP PROGRAM, drehen Sie PURE DIRECT- oder MULTI CH IN-Buchsen danach den MULTI JOG (oder stellen Sie...
  • Seite 286: Wahl Der Eingabemodi

    WIEDERGABE Auto Wählt automatisch die Eingangssignale in Wahl der Eingabemodi der folgenden Reihenfolge: 1) i.LINK Dieses Gerät ist mit einer Vielzahl von Eingangsbuchsen 2) Dolby Digital RF ausgestattet. Führen Sie den folgenden Vorgang aus, um 3) Digitalsignale* den Typ der zu verwendenden Eingangssignale zu wählen. 4) Analogsignale Wählen Sie die Eingangsquelle.
  • Seite 287: Eingangsquelle

    WIEDERGABE ■ Anzeige der Informationen über die Videosignalinformation Eingangsquelle Sie können die Signalinformationen für die gegenwärtig eingegebenen Audio- oder Videosignale anzeigen. Bedienungsvorgänge auf der Fernbedienung Drücken Sie TOP auf der GUI-Fernbedienung. Drücken Sie wiederholt n, um Signal Info zu wählen. Die Signalinformation erscheint auf dem GUI- Display.
  • Seite 288: Schalten Sie Die Stromversorgung Dieses

    RUNNING H/F 1 AUFNAHME Sie können den REC OUT/ZONE 2-Regler verwenden, Beginnen Sie mit der Wiedergabe (oder um eine Quelle aufzunehmen, während Sie eine andere wählen Sie einen Rundfunksender) auf der Quelle betrachten und/oder hören. Quellenkomponente. Die Einstellungen und anderen Operationen für die Aufnahme werden von den Aufnahmekomponenten aus Beginnen Sie auf der Aufnahmekomponente ausgeführt.
  • Seite 289: Aufnahme Von Dts-Software

    AUFNAHME ■ Besondere Berücksichtigungen bei Aufnahme von DTS-Software Bei dem DTS-Signal handelt es sich um einen digitalen Bitstream. Falls Sie eine digitale Aufnahme des DTS- Bitstroms versuchen, wird nur Rauschen aufgezeichnet. Daher sollten Sie die folgenden Einstellungen berücksichtigen, wenn Sie dieses Gerät für die Aufnahme von Quellen verwenden möchten, auf welchen DTS- Signale aufgezeichnet sind.
  • Seite 290: Beschreibung Der Soundfeldprogramme

    Akustikumfeldern, die in berühmten Konzertsälen, Musikhallen und Filmtheatern anzutreffen sind. Die YAMAHA CINEMA DSP-Modi sind kompatibel mit allen Dolby Digital-, DTS- und Dolby Surround-Quellen. Stellen Sie den Eingangsmodus auf Auto (siehe Seite 44), damit dieses Gerät automatisch auf den geeigneten Digital-Decoder umschalten kann, abhängig vom eingegebenen Signal.
  • Seite 291 BESCHREIBUNG DER SOUNDFELDPROGRAMME Programm Merkmale Quellen THX Verarbeitung für nicht mit EX/ES codierten 5.1-Kanal-Quellen. Dieses Programm gibt den Sound von den hinteren L/R-Lautsprechern unter Verwendung der ASA-Verarbeitung (Advanced Ultra2 Cinema Speaker Array) aus. Dieser Modus steht nur zur Verfügung, wenn Sie ein 7,1-Lautsprechersystem besitzen (d.h.
  • Seite 292 BESCHREIBUNG DER SOUNDFELDPROGRAMME Programm Merkmale Quellen SUR. STANDARD Weist darauf hin, dass diese Signale über die MULTI CH INPUT-Buchsen eingespeist werden. Multi In SUR. STANDARD Dolby Digital-Verarbeitung für Signale, die über die MULTI CH INPUT-Buchsen eingespeist werden. MultiIn+DolbyD SUR. STANDARD Dolby Pro Logic IIx Movie-Verarbeitung für Signale, die über die MULTI CH INPUT-Buchsen eingespeist werden.
  • Seite 293: Für Musikquellen

    BESCHREIBUNG DER SOUNDFELDPROGRAMME Für Musikquellen Sie können aus folgenden Soundfeldern auswählen, wenn Sie Musikquellen wiedergeben. Programm Merkmale Quellen SUR. STANDARD Dolby Pro Logic II Verarbeitung für Musiksoftware. PLII Music SUR. STANDARD Dolby Pro Logic IIx Verarbeitung für Musiksoftware. 2-CH PLIIx Music SUR.
  • Seite 294 BESCHREIBUNG DER SOUNDFELDPROGRAMME Programm Merkmale Quellen CHURCH HiFi DSP Verarbeitung. Das akustische Umfeld einer gewöhnlichen Kirche mit mäßigem Nachhall. Der Nachhall hält für 2,5 Sekunden an. Dies ist ideal für die Reproduktion einer Tokyo Kirchenorgel und von Chormusik. CHURCH HiFi DSP Verarbeitung. Dieses Programm erweckt das akustische Umfeld einer großen Kirche zum Leben, die sich im Süden Deutschlands befindet.
  • Seite 295: Weiterführende Bedienungsvorgänge

    WEITERFÜHRENDE BEDIENUNGSVORGÄNGE WEITERFÜHRENDE BEDIENUNGSVORGÄNGE Wahl des OSD-Modus Drücken Sie wiederholt SLEEP, SLEEP um die Zeitspanne einzustellen. Sie können auch einfache Textinformationen über den Mit jedem Drücken von SLEEP Betriebsstatus dieses Gerätes auf Ihrem Videomonitor anzeigen. ändert die Anzeige auf dem Fronttafel-Display wie nachfolgend Schalten Sie den an dieses Gerät gezeigt.
  • Seite 296: Verwendung Des Testtones

    WEITERFÜHRENDE BEDIENUNGSVORGÄNGE Verwendung des Testtones Hinweise • Falls ein Lautsprecher nicht angeschlossen ist, wird (werden) Sie können die Testtonfunktion verwenden, um die die entspreche(n) Einstellung(en) nicht angezeigt. Balance der Lautsprecherpegel manuell einzustellen. Bitte • Wenn Sie nur einen hinteren Surround-Lautsprecher beachten Sie, dass dieser Vorgang Vorrang über die verwenden, ist der Pegel auf den linken Surround-Lautsprecher Pegeleinstellung hat, die Sie in (Seite 31) und „Speaker...
  • Seite 297: Systemoptionen

    SYSTEMOPTIONEN SYSTEMOPTIONEN Sie können die folgenden Parameter verwenden, um verschiedene Systemeinstellungen auszuführen und den Betrieb des Gerätes auf Ihre Anforderungen anzupassen. Ändern Sie die anfänglichen Einstellungen (angegeben in Fettschrift unter jedem Parameter), um die Anforderungen an Ihr Hörumfeld zu berücksichtigen. ■...
  • Seite 298 SYSTEMOPTIONEN Video (Video) Verwenden, um die Videoparameter manuell einzustellen. Benennung Merkmale Seite Processor Schaltet den Digital-Videoprozessor ein/aus. Picture Mode Wählt und stellt den Video-Bildmodus geeignet für das Videobild ein. Resolution Wählt die Videoauflösung. Aspect Wählt das Seitenverhältnis. Cross Color Eliminiert Rauschstörungen aus der Bildhelligkeit. TV Format Wählt das Videoformat.
  • Seite 299: Änderung Der Parametereinstellungen

    SYSTEMOPTIONEN Änderung der Drücken Sie wiederholt k/n, um den Parametereinstellungen einzustellenden Parameter zu wählen. Verwenden Sie die GUI-Fernbedienung, um Zugriff für die Einstellungen jedes Parameters zu erhalten. ENTER 80Hz ( THX ) EXIT Sie können diese Operation auch unter Verwendung der Fernbedienung ausführen (siehe Seite 29).
  • Seite 300: Eingangswahl

    SYSTEMOPTIONEN Hinweise Eingangswahl • Die verfügbaren Parameter werden vielleicht auf mehr als einer Verwenden, um die Digital-Eingänge/Ausgänge neu Seite des On-Screen-Displays angezeigt. Um durch die Seiten zu scrollen, drücken Sie k/n. zuzuordnen, das Eingangssignal zu wählen, die Eingänge • Sie können die Parameterwerte nicht ändern, wenn Memory neu zu benennen oder die Lautstärke des Signaleingangs Guard auf „Guard“...
  • Seite 301: Volume Trim (Lautstärketrimmung)

    SYSTEMOPTIONEN ■ Volume Trim (Lautstärketrimmung) ■ Rename (Neubenennung) Verwenden Sie dieses Merkmal, um den Pegel des Verwenden Sie diese Funktion, um den Namen der Signaleingangs jeder Buchse einzustellen. Dies ist nützlich, Eingänge auf der GUI-Fernbedienung und dem Fronttafel- wenn Sie den Pegel jeder Eingangsquelle ausgleichen Display zu ändern.
  • Seite 302: Input Channels (Eingangskanäle)

    SYSTEMOPTIONEN ■ Analog Level (Analogpegel) ■ Input Channels (Eingangskanäle) Verwenden Sie dieses Merkmal für die Wahl des Analog- Verwenden Sie diese Funktion, um die Anzahl der Eingangssignals. Audiokanäle zu spezifizieren, die über die MULTI CH Input Select > Eingangsquelle (DVD usw.) > INPUT-Buchsen eingespeist werden sollen.
  • Seite 303: Manuelles Setup: Sound

    SYSTEMOPTIONEN ■ Cinema EQ (Kino-Entzerrer) Manuelles Setup: Sound Verwenden Sie diese Funktion, um PEQ und die Pegel der hohen Frequenzen für jeden Lautsprecher einzustellen. Verwenden Sie dieses Menü, um die Soundparameter Manual Setup > Sound > Cinema EQ einzustellen. Wahlmöglichkeiten: Off, On, PEQ*, HIGH* Wenn PEQ oder HIGH gewählt ist, können Sie die Frequenz Drücken Sie TOP auf der GUI-Fernbedienung.
  • Seite 304 SYSTEMOPTIONEN ■ Tone Control (Klangregler) EQ Select (Equalizer-Wahl) Wahlmöglichkeiten: Auto Setup PEQ, Manual GEQ, Verwenden Sie diesen, um die an Ihre Lautsprecher und EQ Defeat Kopfhörer ausgegebenen Bässe und Höhen einzustellen. Manual Setup > Sound > Tone Control > Control (Klangregler) Wahlmöglichkeiten: Defeat, Speaker, Headphone •...
  • Seite 305: Dynamic Range (Dynamikbereich)

    SYSTEMOPTIONEN ■ Dynamic Range (Dynamikbereich) Treble (Höhenregler) Verwenden Sie diese Funktion, um den Ausgang der hohen Verwenden Sie diese Funktion, um den Umfang der Frequenzen an Ihre Lautsprecher oder Kopfhörer einzustellen. Dynamikbereich-Kompression zu wählen, der für Ihre Wahlmöglichkeiten: –6 bis +6 (dB), Anfänglich: 0 dB Lautsprecher und Kopfhörer gelten soll.
  • Seite 306: Manuelles Setup: Basic

    SYSTEMOPTIONEN Muting Type (Stummschalttyp) Manuelles Setup: Basic Verwenden Sie diese Funktion, um einzustellen, wie stark die Stummschaltung die Ausgangslautstärke reduzieren Verwenden Sie dieses Menü, um die grundlegenden soll. Systemparameter einzustellen. Wahlmöglichkeiten: Full, –20dB Drücken Sie TOP auf der GUI-Fernbedienung. Wählen Sie Manual Setup, und drücken Sie danach h.
  • Seite 307 SYSTEMOPTIONEN ■ THX Set (THX Einstellung) SB Speaker Dist. (Abstand der hinteren Surround-Lautsprecher) Verwenden, um die THX-Einstellungen manuell einzustellen. Verwenden Sie diese Funktion, um das Surround- Manual Setup > Basic > THX Set > Soundfeld zu optimieren, wenn Sie die hinteren Surround- Lautsprecher entfernt von einander aufstellen müssen.
  • Seite 308: Subwoofer Set (Subwoofer-Einstellung)

    SYSTEMOPTIONEN ■ Subwoofer Set (Subwoofer-Einstellung) Phase (Phase) Verwenden, um eine beliebige Einstellung für Ihren Falls die Bassklänge fehlen oder undeutlich sind, Subwoofer manuell auszuführen. verwenden Sie diese Funktion, um die Manual Setup > Basic > Subwoofer Set > Frequenzphaseneigenschaften Ihres(r) Subwoofer einzustellen.
  • Seite 309: Speaker Set (Lautsprecher-Einstellung)

    SYSTEMOPTIONEN ■ Speaker Set (Lautsprecher-Einstellung) Bass Out (Bassausgang) Die LFE-Signale weisen Effekte der niedrigen Frequenzen Wird verwendet, um eine Lautsprechereinstellung manuell auf, wenn dieses Gerät Dolby Digital- oder DTS-Signale auszuführen. decodiert. Die Signale mit niedrigen Frequenzen können Manual Setup > Basic > Speaker Set > an beide linken und rechten Frontlautsprecher und an Hinweis einen Subwoofer (der Subwoofer kann sowohl für die...
  • Seite 310 SYSTEMOPTIONEN Surround (Linke/rechte Surround-Lautsprecher) Surround Back Wahlmöglichkeiten: Large, Small, None (Linke/rechte hintere Surround-Lautsprecher) Wahlmöglichkeiten: Large x1, Small x1, Small x2, Large x2, None • Wählen Sie Large, wenn Sie große linke und rechte Surround-Lautsprecher verwenden oder wenn ein hinterer Subwoofer an die Surround-Lautsprecher •...
  • Seite 311 SYSTEMOPTIONEN ■ Speaker Level (Lautsprecherpegel) Presence (Presence-Lautsprecher) Wahlmöglichkeiten: None, Yes Verwenden Sie diese Einstellungen, um die Lautsprecherpegel zwischen dem linken Frontlautsprecher und jedem der in Speaker Set (siehe Seite 67) gewählten Lautsprechern manuell auszubalancieren. Manual Setup > Basic > Speaker Level •...
  • Seite 312 SYSTEMOPTIONEN ■ Speaker Distance Wahlmöglichkeiten: 0.3 bis 24.00 m Anfängliche Einstellung für alle Lautsprecher: (Lautsprecherabstand) Modelle für U.S.A. und Kanada: 10,0 Zoll Verwenden Sie diese Funktion für die manuelle Eingabe Andere Modelle: 3,0 Meter des Abstandes jedes Lautsprechers und die an den •...
  • Seite 313: Manuelles Setup: Video

    SYSTEMOPTIONEN ■ Processor (Prozessor) Manuelles Setup: Video Verwenden Sie diese Funktion, um den Digital- Videoprozessor ein- oder auszuschalten. Verwenden Sie dieses Menü, um die Videoparameter Manual Setup > Video > Processor manuell einzustellen. Wahlmöglichkeiten: Off, On Falls der Ausgang an den Monitor versagt, während Sie einen Parametereinstellvorgang ausführen, können die Einstellungen der Videoparameter dieses Gerätes nicht kompatibel mit Ihrem Videomonitor sein.
  • Seite 314: Resolution (Auflösung)

    SYSTEMOPTIONEN ■ Picture Mode (Bildmodus) ■ Resolution (Auflösung) Verwenden Sie diese Funktion, um den Videobildmodus Verwenden Sie diese Funktion für die Wahl der zu wählen und jeden Modus passend zu dem Videobild Videoauflösung. Dies ist die Auflösung des einzustellen. Ausgabebildes, wenn Processor auf On gestellt ist. Manual Setup >...
  • Seite 315 SYSTEMOPTIONEN ■ Aspect (Seitenverhältnis) Verwenden Sie diese Funktion, um das Seitenverhältnis für das Ausgabebild zu wählen, das unter Verwendung des Videoverarbeitungsschaltkreises umgewandelt wird. Manual Setup > Video > Aspect Wahlmöglichkeiten: Through, Auto, 16:9 Normal, 16:9 Zoom • Through: Das Seitenverhältnis des eingegebenen Videosignals wird auf keine Weise geändert.
  • Seite 316: Beispiele Für Die Umwandlung Des Seitenverhältnisses

    SYSTEMOPTIONEN ■ Beispiele für die Umwandlung des Seitenverhältnisses Die Bilder mit fetter Umrandung zeigen die am besten geeignete Einstellung für jede Eingangssignal/Fernseher- Kombination an. Einstellung Eingangssignal- TV Typ Seitenverhältnis Through 16:9 Normal 16:9 Zoom 16:9 (Letterbox) 16:9 16:9 16:9 Hinweis Falls Sie 16:9 Software auf einem 4:3 Fernseher betrachten möchten, dann müssen Sie das Seitenverhältnis an Ihrem Fernseher einstellen.
  • Seite 317: Manuelles Setup: Option

    SYSTEMOPTIONEN ■ S Video (S-Video) Manuelles Setup: Option Verwenden Sie diese Funktion, um den Videoausgang an den Eingang Ihres Monitors anzupassen. S1 gestattet Dieses Menü wird verwendet, um optionale Ihnen die automatische Größeneinstellung der auf 4:3 Systemeinstellungen auszuführen. komprimierten Breitbild-Software, so dass diese mit 16:9 angezeigt wird.
  • Seite 318: Input Mode (Eingangsmodus)

    SYSTEMOPTIONEN ■ Surr.Initialize (Surround-Initialisierung) ■ Input Mode (Eingangsmodus) Verwenden Sie diese Funktion, um die Parameter für jedes Verwenden Sie diese Funktion, um den Eingangsmodus Soundfeldprogramm innerhalb einer der an die DIGITAL INPUT-Buchsen angeschlossenen Soundfeldprogrammgruppe zu initialisieren. Wenn Sie Quellen zu bestimmen, wenn Sie dieses Gerät einschalten. eine Soundfeldprogrammgruppe initialisieren, dann Manual Setup >...
  • Seite 319 Quelle eingespeist wird. Falls Sie den Frontlautsprecher zu wählen. Hintergrund nicht anzeigen möchten, wählen Sie None. Wahlmöglichkeiten: Zone1, ZoneB Wahlmöglichkeiten: None, 1(DSP-Z9), 2(Horn), • Wählen Sie Zone1, um SPEAKERS A und B ein/ 3(Piano), 4(Gray) auszuschalten, wenn sich die an die SPEAKERS B-...
  • Seite 320: Speicherschutz

    SYSTEMOPTIONEN Zone2 Amplifier (Zone 2 Verstärker) Speicherschutz Verwenden Sie diese Funktion, um zu wählen, wie die ZONE 2-Lautsprecher verstärkt werden sollen. Verwenden Sie diese Funktion, um versehentliche Wahlmöglichkeiten: Internal, External, None Änderung der individuellen Parametereinstellungen zu • Wählen Sie External, wenn Sie Ihre Zone 2- verhindern.
  • Seite 321 SYSTEMOPTIONEN ■ Manual Setup (Manuelles Setup) Wahlmöglichkeiten: Free, Guard • Wählen Sie Guard, um Änderungen der manuellen Setup-Parameter zu verhindern. Wenn der Guard aktiviert ist, können Sie Picture Mode (Cinema, Standard oder Dynamic) wählen, wobei Sie jedoch die Einstellungen in jedem Modus nicht ändern können.
  • Seite 322: Merkmale Der Fernbedienung

    Zusätzlich zu der Steuerung dieses Gerätes, kann die Fernbedienung auch für die Bedienung anderer A/V-Komponenten verwendet werden, die von YAMAHA oder anderen Herstellern hergestellt wurden. Um andere Komponenten bedienen zu können, müssen Sie die Fernbedienung mit dem (den) entsprechenden Herstellercode(s) programmieren.
  • Seite 323: Einstellung Der Herstellercodes

    YAMAHA 1 ZONE Um dieses Gerät zu bedienen (mit ZONE 2- CD-R CD-R YAMAHA Merkmalen). Um YAMAHA DSP-Verstärker zu bedienen, die YAMAHA 1 mit dem YPC-Code nicht bedient werden können. DTV/LD – Um die Verstärker anderer Hersteller unter VCR 1 –...
  • Seite 324: Programmierung Von Codes Von Anderen Fernbedienungen

    Hinweise • Die mitgelieferte Fernbedienung enthält nicht alle möglichen Herstellercodes für im Fachhandel erhältliche A/V- Komponenten (einschließlich YAMAHA-A/V-Komponenten). Falls die Bedienung mit keinem der Herstellercodes möglich ist, programmieren Sie die neue Fernbedienungsfunktion mit der Lernfunktion (siehe unten), oder verwenden Sie die mit der entsprechenden Komponente mitgelieferte Fernbedienung.
  • Seite 325: Änderung Der Quellennamen In Dem Anzeigefenster

    MERKMALE DER FERNBEDIENUNG Betätigen und halten Sie die zu Änderung der Quellennamen in programmierende Taste auf der dem Anzeigefenster Fernbedienung Ihrer Komponente gedrückt, bis „OK“ in dem Anzeigefenster erscheint. Sie können den Namen ändern, der in dem Anzeigefenster der Fernbedienung erscheint, wenn Sie einen von der werksseitigen Voreinstellung abweichenden Namen verwenden möchten.
  • Seite 326: Verwendung Der Makrofunktion

    Die Wiedergabe kann mit jedem MD-Recorder, CD-Player, CD-Recorder, DVD-Player oder LD-Player begonnen werden, der kompatibel mit der YAMAHA-Fernbedienung ist. Falls Sie Makros für die Bedienung anderer Komponenten verwenden, müssen Sie die PLAY-Taste im Bedienungsbereich der Komponente (siehe Seite 82 und 83) programmieren oder einen Herstellercode einstellen (siehe Seite 81).
  • Seite 327: Programmierung Der Makrooperationen

    MERKMALE DER FERNBEDIENUNG ■ Makrobedienungen Drücken Sie die Makrotaste, die Sie für die Ausführung einer Makro verwenden MACRO MACRO möchten. TRANSMIT RE-NAME CLEAR LEARN MACRO MACRO ON/OFF SYSTEM Der Makrotastenname und der Name der gewählten POWER STANDBY V-AUX TUNER PHONO CABLE MD/TAPE CD-R...
  • Seite 328: Löschung Der Eingestellten Funktionen

    MERKMALE DER FERNBEDIENUNG Drücken Sie erneut MACRO, wenn die Betätigen und halten Sie CLEAR erneut für Bedienungssequenz beendet ist, die Sie etwa 3 Sekunden gedrückt. programmieren möchten. „C:OK“ erscheint in dem Anzeigefenster. Speichersicherung Falls Sie die Fernbedienung für länger als 3 Minuten CLEAR ohne Batterien belassen, oder wenn verbrauchte Batterien in der Fernbedienung verbleiben, dann kann...
  • Seite 329: Löschung Individueller Funktionen

    MERKMALE DER FERNBEDIENUNG Wiederholen Sie den Schritt 3, um andere Löschung individueller Funktionen erlernte Funktionen zu löschen. ■ Löschung einer erlernten Funktion Drücken Sie LEARN, um den Löschmodus zu Sie können die erlernte Funktion für ein programmierte verlassen. Tasten in jedem Bereich löschen. Drücken Sie eine Eingangswahltaste, um die ■...
  • Seite 330: Bedienung Von Komponenten

    MERKMALE DER FERNBEDIENUNG Bedienung von Komponenten Sobald Sie die entsprechenden Herstellercodes eingestellt haben, können Sie diese Fernbedienung für die Bedienung Ihrer anderen Komponenten verwenden. Achten Sie darauf, dass manche Tasten die gewählte Komponente vielleicht nicht richtig steuern. Sie können die Eingangswahltasten verwenden, um die zu bedienenden Komponente zu wählen und die Fernbedienung automatisch auf den Bedienungsmodus für diese Komponente umzuschalten.
  • Seite 331: Bedienung Eines Digital-Tv (Dtv/Ld-Bereich) Oder Eines Kabel/Satelliten-Tv

    MERKMALE DER FERNBEDIENUNG ■ Bedienung eines Digital-TV (DTV/LD-Bereich) oder eines Kabel/Satelliten-TV (CABLE- oder SAT-Bereich) SYSTEM POWER STANDBY V-AUX TUNER PHONO CABLE MD/TAPE CD-R DTV/LD VCR 1 VCR 2 MULTI CH IN PURE DIRECT TITLE MENU, ENTER Menücursor/Wählen SOURCE INPUT MODE EXIT DISPLAY (nur CABLE und SAT)
  • Seite 332: Bedienung Eines Cd-Players (Cd-Bereich)

    MERKMALE DER FERNBEDIENUNG ■ Bedienung eines CD-Players (CD-Bereich) SYSTEM STANDBY POWER V-AUX TUNER PHONO CABLE MD/TAPE CD-R DTV/LD VCR 1 VCR 2 MULTI CH IN PURE DIRECT TITLE ENTER SOURCE INPUT MODE EXIT DISPLAY DISPLAY MENU SOUND SELECT – SEARCH CHAPTER Sprungsuche SEARCH...
  • Seite 333: Bedienung Eines Kassettendecks (Md/Tape-Bereich)

    MERKMALE DER FERNBEDIENUNG ■ Bedienung eines Kassettendecks (MD/TAPE-Bereich) Stellen Sie den Herstellercode Ihres Kassettendecks ein, indem Sie den unter auf Seite 81 beschriebenen Einstellvorgang befolgen, da MD/TAPE werksseitig für die Steuerung des MD-Decks eingestellt wurde. SYSTEM POWER STANDBY V-AUX TUNER PHONO CABLE MD/TAPE...
  • Seite 334: Bedienung Einer Optionalen Komponente (Optn-Bereich)

    MERKMALE DER FERNBEDIENUNG ■ Bedienung einer optionalen Komponente (OPTN-Bereich) OPTN ist ein Bedienungsbereich für eine zusätzliche Komponente, der mit Fernbedienungsfunktionen programmiert werden kann, unabhängig von einer anderen Eingangsquellen. Hinweise • Sie können den Herstellercode in diesem Bereich nicht einstellen. Siehe Seite 82 dient für das Programmieren der Tasten in diesem Komponenten-Bedienungsbereich.
  • Seite 335: Zone 2

    • Da es verschiedene Wege gibt, wie Sie dieses Gerät in einer REMOTE CONTROL OUT Multi-Raum-Aufstellung anschließen und verwenden können, empfehlen wir, dass Sie sich an Ihren autorisierten YAMAHA- Fachhändler oder einen Kundendienst wenden, um die Zone 2- Dieses Gerät Anschlüsse passend für Ihre Anforderungen ausführen zu lassen.
  • Seite 336: Verwendung Des Internen Verstärkers Dieses Gerätes

    ZONE 2 Verwendung des internen Verstärkers dieses Gerätes Um den internen Verstärker dieses Gerätes zu verwenden, wählen Sie ON in ZONE2 AMP. – – PRESENCE PRESENCE /ZONE 2 /ZONE 2 Zweiter Raum Dieses Gerät Drücken Sie k/n, um „Zone“ zu wählen. Fernbedienung Zone 2 Die mitgelieferte Fernbedienung kann für die Bedienung von Zone 2 verwendet werden.
  • Seite 337: Spezielle Berücksichtigung Für Dts

    ZONE 2 ■ Schalten dieses Gerätes auf den Drücken Sie eine Eingangswahltaste, um die Einschalt- oder Bereitschaftsmodus Eingangsquelle zu wählen, die Sie in dem SYSTEM POWER und STANDBY arbeiten zweiten Raum hören möchten. unterschiedlich in Abhängigkeit von dem gewählten Das Anzeigefenster zeigt „2 an: Name des gewählten Modus, der im Anzeigefenster erscheint.
  • Seite 338: Verwendung Von I.link

    VERWENDUNG VON I.LINK VERWENDUNG VON i.LINK Dieses Gerät ist mit zwei i.LINK (AUDIO)-Anschlüssen Anschluss von i.LINK- versehen. Durch das Anschließen von Komponenten, welche die i.LINK (AUDIO)-Anschlüsse unterstützen, Komponenten können Sie auch nicht komprimierte Multikanal- Audiosignale senden und empfangen, wie zum Beispiel Sie können i.LINK-kompatible Komponenten an dieses DVD-Audio- und Super Audio CD-Signale, für welche Gerät anschließen, indem Sie entweder die Daisy-Chain-...
  • Seite 339: Zuordnung Von I.link-Komponenten

    VERWENDUNG VON i.LINK Drehen Sie INPUT SELECTOR, um den Zuordnung von i.LINK-Komponenten Eingang zu wählen, den Sie die i.LINK- Wenn eine i.LINK-Komponente angeschlossen ist, erkennt Komponente zuordnen möchten. dieses Gerät den Anschluss automatisch und registriert die Nach der Wahl, drücken Sie PURE DIRECT, angeschlossene Komponente.
  • Seite 340: Änderung Von I.link Select-Parametern

    VERWENDUNG VON i.LINK ■ i.LINK-Anzeige Falls MULTI CH INPUT der i.LINK-Komponente zugeordnet ist Leuchtet Dieses Gerät gibt Signale wieder, die via i.LINK eingespeist wurden. Drücken Sie MULTI CH INPUT. Drücken Sie wiederholt INPUT MODE, um Blinkt Eine i.LINK-Komponente ist angeschlossen, doch gibt dieses „Auto“...
  • Seite 341: Input Assign (Eingangszuordnung)

    VERWENDUNG VON i.LINK ■ Information (Information) ■ Plug & Play (Plug & Play) Verwenden Sie diese Funktion, um die folgenden Verwenden Sie diese Funktion, um zu wählen, ob das Gerät Informationen anzuzeigen: Betriebsstatus der registrierten automatisch auf den Eingangszuordnungsmodus schalten soll, i.LINK-Geräte, Bezeichnung der registrierten i.LINK- wenn eine neue i.LINK-Komponente angeschlossen wird.
  • Seite 342: I.link-Anzeigemeldungen

    VERWENDUNG VON i.LINK i.LINK-Anzeigemeldungen Statusanzeigemeldungen Die folgenden Meldungen erscheinen in Abhängigkeit von dem Status dieses Gerätes auf dem Fronttafel-Display. Meldung Inhalt Link Check Erscheint, während der Anschluss der i.LINK-Komponente überprüft wird. No Name Erscheint, wenn der Modellname der angeschlossenen i.LINK-Komponente nicht festgestellt werden kann. No Vendor Name Erscheint, wenn der Herstellername der angeschlossenen i.LINK-Komponente nicht festgestellt werden kann.
  • Seite 343: Was Ist Ein Soundfeld

    Sie in der Lage, Ihr eigenes Hörumfeld zu generieren. Die Akustik Ihres Raumes könnte auf die einer Konzerthalle, eines Tanzsaals oder virtuell jede beliebige Größe eines Raumes geändert werden. Diese Fähigkeit zur Erzeugung der gewünschten Soundfelder hat YAMAHA mit dem Digital-Soundfeldprozessor verwirklicht. ■ Soundfeldparameter (Stereo/Surround) Verwenden, um Soundfeldparameter zu wählen und einzustellen.
  • Seite 344: Benennung

    SOUNDFELDOPTIONEN Benennung Merkmale Seite SB Room Size Stellt die wahrgenommen Größe des hinteren Surround-Soundfeldes ein. Stellt das wahrgenommene Reflexionsvermögen der virtuellen Wände in dem hinteren Surround- SB Liveness Soundfeld ein. Erweitert das vordere Stereobild, um die Surround-Lautsprecher für einen Umschlingungseffekt zu Panorama verwenden.
  • Seite 345: Stereo/Surround-Menü

    SOUNDFELDOPTIONEN ■ Init. Delay (Anfängliche Verzögerung) Stereo/Surround-Menü Dieser Parameter ändert den wahrgenommenen Abstand von der Soundquelle, indem die Verzögerung zwischen Sie können die Werte von bestimmten Digital- dem direkten Sound und den ersten von dem Hörer Soundfeldparametern ändern, so dass die Soundfelder wahrgenommenen Reflexionen eingestellt wird.
  • Seite 346: Liveness (Lebendigkeit)

    SOUNDFELDOPTIONEN ■ Liveness (Lebendigkeit) ■ Rev. Time (Nachhallzeit) Dieser Parameter stellt das Reflexionsvermögen der Dieser Parameter stellt die Zeitspann ein, die erforderlich virtuellen Wände in der Halle ein, indem die Rate des ist, damit der nachfolgende Nachhallsound um 60 dB (bei Abklingens der frühen Reflexionen geändert wird.
  • Seite 347: Initialize (Initialisierung)

    SOUNDFELDOPTIONEN ■ Rev. Delay (Nachhallverzögerung) ■ Sur. Delay (Surround-Verzögerung) Dieser Parameter stellt die Zeitdifferenz zwischen dem Dieser Parameter stellt die Verzögerung für Surround- Beginn des direkten Sounds und dem Beginn des Signale und Surround-Soundfelder ein. Nachhallsounds ein. Je größer der Wert, um so später Regelbereich: 0 –...
  • Seite 348 SOUNDFELDOPTIONEN Für PRO LOGIC II Music Für 9ch Stereo ■ Panorama (Panorama) ■ Center Level (Center-Pegel) Dieser Parameter erweitert das vordere Stereobild, um die Dieser Parameter stellt den Lautstärkepegel des Center- Surround-Lautsprecher für einen Umschlingungseffekt zu Kanals in dem 9-Kanal Stereo-Modus ein. verwenden.
  • Seite 349: Für Thx Cinema

    SOUNDFELDOPTIONEN ■ Decode Type (Decoder-Typ) Für THX Cinema Funktion: Wählt den Decoder, der für die Wiedergabe von 2-Kanal-Quellen unter Verwendung von THX Cinema benutzt wird. Wahlmöglichkeiten: Pro Logic / Pro Logic II / Pro Logic IIx / Neo:6 Für Surround Enhanced Funktion: Wählt den Decoder, der für die Wiedergabe von 2-Kanal-Quellen...
  • Seite 350: Allgemeines

    Siehe das nachfolgende Diagramm, wenn dieses Gerät nicht richtig funktionieren sollte. Falls das aufgetretene Problem in der nachfolgenden Tabelle nicht aufgeführt ist oder die nachfolgenden Abhilfe-Instruktionen nicht helfen, schalten Sie dieses Gerät auf den Bereitschaftsmodus, ziehen Sie den Netzstecker, und wenden Sie sich an den nächsten autorisierten YAMAHA Fachhändler oder Kundendienst. ■ Allgemeines Siehe...
  • Seite 351 STÖRUNGSBESEITIGUNG Siehe Problem Ursache Abhilfe Seite Der Sound bleibt Die Schutzschaltung wurde aufgrund Achten Sie darauf, dass die richtige Impedanz plötzlich aus. eines Kurzschlusses usw. aktiviert. eingestellt ist. Überprüfen Sie die Lautsprecherdrähte, damit sich — diese nicht gegenseitig berühren, und schalten Sie danach dieses Gerät wieder ein.
  • Seite 352 STÖRUNGSBESEITIGUNG Siehe Problem Ursache Abhilfe Seite Dolby Digital- oder Die angeschlossene Komponenten ist Führen Sie eine geeignete Einstellung gemäß — DTS-Quellen können nicht für die Ausgabe von Dolby Digital- Bedienungsanleitung Ihrer Komponente aus. nicht wiedergegeben oder DTS-Digitalsignalen eingestellt. werden. (Die Dolby Der Eingangsmodus ist auf Analog Ändern Sie den Eingangsmodus auf Auto oder DTS.
  • Seite 353: Fernbedienung

    STÖRUNGSBESEITIGUNG Siehe Problem Ursache Abhilfe Seite Es treten Dieses Gerät ist zu nah an dem Digital- Stellen Sie dieses Gerät entfernt von solcher — Rauschinterferenzen oder Hochfrequenzgerät angeordnet. Ausrüstung auf. von Digital- oder Hochfrequenzgeräten bzw. diesem Gerät auf. Das Bild ist gestört. Die Videoquelle verwendet verschlüsselte Die Wiedergabe von Videosoftware mit —...
  • Seite 354: Informationen Für Den Parametrischen Equalizer

    INFORMATIONEN FÜR DEN PARAMETRISCHEN EQUALIZER INFORMATIONEN FÜR DEN PARAMETRISCHEN EQUALIZER ■ Q factor Dieses Gerät verwenden YAMAHA Parametric Room Acoustic Optimizer (YPAO) Technologie, um die Die Breite des spezifizierten Frequenzbandes wird als Frequenzeigenschaften seines parametrischen Equalizers Q-Faktor bezeichnet. Dieser Parameter kann zwischen 0,5 an das Hörumfeld anzupassen.
  • Seite 355: Glossar

    GLOSSAR GLOSSAR ■ Dolby Surround ■ Dolby Pro Logic II Dolby Surround verwendet ein 4-Kanal- Dolby Pro Logic II repräsentiert eine wesentlich Analogaufnahmesystem, um realistische und dynamische verbesserte Technik, die zur Dekodierung einer großen Soundeffekte zu reproduzieren: 2 linke und rechte Anzahl von bestehender Dolby Surround-Software Frontkanäle (Stereo), einen Center-Kanal für den Dialog verwendet wird.
  • Seite 356 Der Bereit der Raten, die wiedergegeben werden können, ■ Virtual CINEMA DSP wird anhand der Abtastrate bestimmt, wogegen der die YAMAHA hat einen Virtual CINEMA DSP Algorithmus Soundpegeldifferenz darstellende Dynamikbereich durch entwickelt, der Ihnen das Vergnügen der DSP Soundfeld- die Anzahl der quantisierten Bit bestimmt wird. Im Surround-Effekte auch ohne Surround-Lautsprecher Prinzip wird mit höherer Abtastfrequenz der...
  • Seite 357: Neuentzerrung

    GLOSSAR ■ THX Cinema Verarbeitung ■ Adaptive Dekorrelation THX ist ein exklusiver Satz von Standards und In einem Filmtheater hilft eine große Anzahl von Surround- Technologien, die von der weltberühmten Lautsprechern bei der Kreierung eines umhüllenden Filmproduktionsfirma etabliert wurden. Lucasfilm Ltd. Surround-Sound-Erlebnisses, wogegen in einem Heimtheater THX wuchs aus dem persönlichen Verlangen von George normalerweise nur zwei Lautsprecher verwendet werden.
  • Seite 358 GLOSSAR ■ THX MUSIC-MODUS ■ THX Surround EX Für die Wiedergabe von Multikanalmusik sollten Sie den THX Surround EX - Dolby Digital Surround EX ist eine THX Music-Modus wählen. In diesem Modus wird die Gemeinsamsentwicklung von Dolby Laboratories und THX ASA-Verarbeitung für die Surround-Kanäle aller mit THX Ltd.
  • Seite 359: Blockschaltbilder

    BLOCKSCHALTBILDER BLOCKSCHALTBILDER ■ Blockschaltbild COAX/RF Demodulator PCM 2ch DIRECT SOURCE COAX INPUT Selector PCM1792 compliant Rec OUT Selector SL/SR PCM1792 YPAO compliant REC OUT RXOUT PCM1792 DATA DECODER compliant STREAM(Multi) SBL/ SBL+ ZONE2 PCM1792 DD-EX COAX SBL- SBR+ compliant SBR- DTS-ES PCM1792 UNBAL/BAL...
  • Seite 360 BLOCKSCHALTBILDER ■ Video-Matrix SOURCE INPUT DVD etc Selector REC OUT Selector DVD etc REC/Source REC OUT Zone2 S1/S2 INPUT DVD etc SOURCE Selector DVD etc REC OUT Selector REC/Source REC OUT Zone2 DVD etc DVD etc SOURCE INPUT Selector DVD etc ■...
  • Seite 361: Technische Daten

    TECHNISCHE DATEN TECHNISCHE DATEN AUDIOBEREICH VIDEOBEREICH • Mindestwert der RMS-Ausgangsleistung • Fernsehformat 20 Hz bis 20 kHz, 0,015% Gesamtklirrfaktor, 8 Ω [Modelle für USA, Kanada und Korea] ....... NTSC/PAL Front-, Center-, Surround- und hinteren Surround-Lautsprecher [Andere Modelle] ............PAL/NTSC ..................170 W •...
  • Seite 362 YAMAHA ELECTRONICS (UK) LTD. YAMAHA HOUSE, 200 RICKMANSWORTH ROAD WATFORD, HERTS WD18 7GQ, ENGLAND YAMAHA SCANDINAVIA A.B. J A WETTERGRENS GATA 1, BOX 30053, 400 43 VÄSTRA FRÖLUNDA, SWEDEN YAMAHA MUSIC AUSTRALIA PTY, LTD. 17-33 MARKET ST., SOUTH MELBOURNE, 3205 VIC., AUSTRALIA...

Inhaltsverzeichnis