Inhaltsverzeichnis
Werbung
Verfügbare Sprachen
Verfügbare Sprachen
Quicklinks
INSTRUCTION MANUAL
ISTRUZIONI PER L'USO
Separate Mini Component System
Sistema separato di componenti mini
z/ON
SLEEP
CD/MD REPEAT
MD k
REC MUTE
TAPE m
MD PLAY MODE
MD m
TAPE
MD
TAPE
b
a
a
f
n
e
d
c
DISC SELECT
CD
CD k
a
RANDOM
TUNER/BAND
PRESET
SHIFT
FM MODE
MEMORY
1
2
3
4
SCROLL
AUTO MARKER
REC MODE
5
6
7
8
DISPLAY MODE
9
0
+10
+100
VIDEO
SUPER
MUTE
-
+
BASS
-20dB
VOLUME
REMOTE CONTROLLER RB-007
Tape Deck
Piastra a cassetta
MD Deck
Piastra MD
DC-007C
RD-007
(OPTION)
(OPZIONE)
MDG-007
(OPTION)
(OPZIONE)
9
26
43
60
77
94
112
129
Werbung
Inhaltsverzeichnis

Inhaltszusammenfassung für Sanyo DC-007C
-
Seite 1: Inhaltsverzeichnis
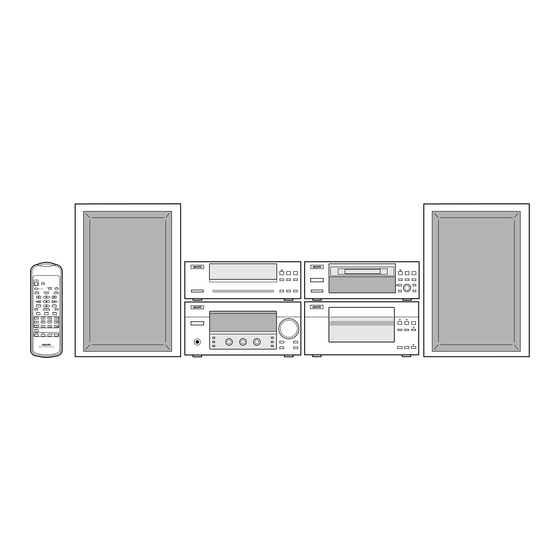
INSTRUCTION MANUAL DC-007C ISTRUZIONI PER L’USO Separate Mini Component System Sistema separato di componenti mini RD-007 Tape Deck Piastra a cassetta (OPTION) (OPZIONE) MDG-007 MD Deck Piastra MD (OPTION) (OPZIONE) z/ON SLEEP CD/MD REPEAT MD k REC MUTE TAPE m... - Seite 2 (CD CHANGER) SYSTEM CONNECTOR CAUTION – INVISIBLE LASER RADIATION WHEN OPEN AND INTERLOCKS DEFEATED. AVOID EXPOSURE TO BEAM. ADVARSEL – USYNLIG LASER STRÅLING VED ÅBNING, NÅR OPTICAL DIGITAL OUT SIKKERHEDSAFBRYDERE ER UDE AF FUNKTION, UNDGÅ UDS ÆTTELSE FOR STRÅLING. VARNING – OSYNLIG LASER STRÅLNING NÄR DENNA DEL ÄR ÖPPNAD OCH SPÄRR ÄR URKOPPLAD.
- Seite 3 z/ON SLEEP MD k CD/MD REPEAT REC MUTE TAPE m MD PLAY MODE MD m TAPE TAPE Fig./Abb./Afb. 1a CD k DISC SELECT RANDOM TUNER/BAND PRESET SHIFT FM MODE MEMORY SCROLL AUTO MARKER REC MODE DISPLAY MODE + 10 + 100 VIDEO SUPER MUTE...
- Seite 4 CD-wisselaar Piastra MD (OPZIONE) CD-växlare Grabador de MD (OPCIONAL) Caricatore CD Leitor de MD (OPÇÃO) Cambiador de CD Carregador de CD (SANYO MDG-007) L ch speaker Tuner/Amplifier (SANYO RD-007) R ch speaker Linker Lautsprecher Tuner/Verstärker Rechter Lautsprecher Tape deck (OPTION)
- Seite 5 SYSTEM SYSTEM CONNECTOR CONNECTOR Optical cable, not supplied Optisches Kabel, kein Lieferumfang Câble optique, non fourni Digital equipment Fig./Abb./Afb. 3a Fig./Abb./Afb. 3b Optische kabel, niet bijgeleverd Digitales Gerät Optisk kabel, medföljer ej Appareil numérique Cavo ottico, venduto separatamente Digitale apparatuur Cable óptico, no incluido Digitalutrustning Cabo óptico, não fornecido...
- Seite 6 CD CHANGER CD CHANGER SYSTEM CONNECTOR Tape Band Fixer OPTICAL DIGITAL OUT Ruban Befestiger Band Fixateur Tejp Bevestiging Nastro Fixering EXT.ANT AM LOOP FM75Ω Cinta SYSTEM Unità di fissaggio CONNECTOR Fita Sujetador Suporte SPEAKERS(6ΩMIN) VIDEO(AUDIO) TUNER/ SUB WOOFER OUT AMPLIFIER Fig./Abb./Afb.
- Seite 7 Screws (not supplied) Schrauben (kein Lieferumfang) Vis (non fournies) Schroeven (niet bijgeleverd) Skruvar (medföljer ej) Viti (vendute separatamente) Tornillos (no incluidos) Parafusos (não fornecidos) Fig./Abb./Afb. 6a Fig./Abb./Afb. 6b Fig./Abb./Afb. 7 Remote sensor TUNER/AMPLIFIER Fernbedienungssensor Détecteur de télécommande Afstandsbedieningssensor RESET Fjärrkontrollsensor Sensore di controllo a distanza Sensor de control remoto Sensor remoto...
- Seite 8 For CrO /Metal tape Break out tab A for side A. Für CrO Metallbänder Brechen Sie die Lasche A für Seite A heraus. Pour bande de type CrO /métal Briser la languette A pour la face A Voor CrO /Metal-band Wispreventielipje A verwijderen voor zijde A Side A A-sidan...
- Seite 9 Track 1 Track 2 Track 3 Track 4 Track 1 Track 2 Track 3 Track 1 Track 2 Track 3 Track 4 Track 1 Track 2 Track 3 Track 4 Track Track Titel Titel Plage Plage Passage Passage Melodi Melodi Brano Brano Pista...
-
Seite 10: English
The speakers are automatically Notes on the flat connection lead disconnected when headphones are connected. When using only the system DC-007C (CD changer and Tuner/ Amplifier) The flat connection lead is provided as shown in Fig. 4a. Connect the CD changer and Tuner/Amplifier with this lead as shown in Fig. -
Seite 11: Remote Control
CONTROLS REMOTE CONTROL CD changer (Fig. 1a) Controls (Fig. 1e) 1. Discs compartment 1. Power button (z/ON) 2. Play button/indicator (PLAY) 2. Sleep timer button (SLEEP) 3. Pause button (PAUSE) 3. CD changer controls 4. Stop button (STOP) CD/MD REPEAT: Repeat button d / f, e / c : Skip/Search buttons 5. -
Seite 12: Adjusting The Clock
GENERAL OPERATION [Tuner/Amplifier] Inserting batteries Install two “R6/AA” batteries (not supplied) as shown in Fig 7. Turning the power on and off Note: Press the z/ON button (Tuner/Amplifier). All the units turn on. The Always remove batteries if the remote control is not to be used for a month displays light and “WELCOME”... - Seite 13 CD PLAY [CD changer] WHAT TO DO IF ... If the operation of the system or display is not normal, 1. Disconnect the mains lead. Note: 2. Press the RESET button (bottom of the Tuner/Amplifier) for at least 30 Do not touch the disc tray while it is moving. seconds (Fig.
-
Seite 14: Programmed Play
5. Press the d / f button to select track 2, then press the MEMORY. Skip play 6. Press the DISC SELECT button to select DISC 3, then press the To skip to track 6 while track 3 is playing, press the e / c button MEMORY. -
Seite 15: Listening To The Radio
LISTENING TO THE RADIO Preset scan tuning (Remote control only) 1. Press the TUNER/BAND button to select FM or AM. [Tuner/Amplifier] 2. Press the PRESET button for at least 1 second. The channel number blinks. Each of the preset stations is tuned in for 5 seconds. To turn the system on and listen to the last received station, press the 3. - Seite 16 LISTENING TO TAPES [Tape deck] To search a preset station by PTY codes A particular programme type broadcast can be located by specifying the PTY codes. If a cassette is loaded, you can turn the system on and begin play immediately by pressing the TAPE a or TAPE b button (Remote 1.
- Seite 17 REPEAT 1: One track repeat mode. Press the z/ON button (MD deck) to turn the power on if necessary. Released: Normal play mode. “SANYO”, then “No Disc” appears on the display. If the system (Tuner/Amplifier) is turned off, the z/ON button (MD Random play deck) will not function.
-
Seite 18: Manual Recording
LISTENING TO VIDEO SOURCES/DVD TAPE RECORDING [Tape deck] [Tuner/Amplifier] CD TO TAPE COMPUTER RECORDING With computer recording, you can record a CD onto a cassette by pressing 1. Press the INPUT button to select “VIDEO:DVD”. just one button. 2. Follow the instructions supplied with the video equipment/DVD player. 1. - Seite 19 MD RECORDING [MD deck] CD to Tape/MD to Tape synchronous recording 1. Load the cassette. 2. Load the CD and select “CD” function, or load the MD and select “MD” CD TO MD COMPUTER RECORDING function. With computer recording, you can record a CD onto a MD by using just one For programmed recording, programme the material in advance.
- Seite 20 MANUAL RECORDING CD to Tape/CD to MD parallel recording Previously recorded contents of the MD remain and the selected source 1. Load the cassette and MD. is recorded on the blank portion of the MD. 2. Load the CD and select “CD” function. Note: 3.
- Seite 21 EDIT THE RECORDED MD [MD deck] Combining tracks (COMBINE) You can combine many tracks into one. This deck is capable of editing a recorded MD. You can modify an MD as Example: To combine track 2 with track 3 (Fig. 24) you wish.
- Seite 22 TIMER OPERATION [Tuner/Amplifier] Before naming the disc or tracks One disc name and a maximum of 254 track names can be entered into one MD. Using the timer (Main unit only) A total of 1700 characters (approx.) can be entered into one MD for the Set the on and off times, function to be used and volume level.
-
Seite 23: Cleaning The Unit
MAINTENANCE To check the timer settings Press the TIMER button repeatedly. The timer settings are displayed in the following order: Cleaning the tape head (Tape deck) On time v Off time v Timer mode/Function v Original display To ensure continued high performance, use cotton swab to clean the returns heads, pinch rollers and capstans after about every 10 hours of use (Fig. -
Seite 24: Remote Control Operation
REMOTE CONTROL OPERATION Note: The buttons on the remote control perform similar functions to similarly buttons on the front panel. General z/ON Power on/off Adjust volume – or + VOLUME Bass boost SUPER BASS Select “Video/DVD” function VIDEO Temporarily mute the sound MUTE –20dB Set/Check sleep time SLEEP... - Seite 25 MD MESSAGES Refer to the following chart if a massage appears on the display. DISPLAY EXPLANATION CORRECTIVE ACTION Blank Disc No signal is recorded on the MD. Cannot Copy Recording was attempted from a copy-protected CD. Use another CD. Disc Error The MD is scratched or damaged.
- Seite 26 MD SYSTEM CAPABILITIES MDs are recorded differently from cassettes. The MD recording system makes it possible to add or change disc and track titles after the recording is done. It is also possible to change the playback order without making a new recording. Because of these special features, the following symptoms may occur while using the MD.
-
Seite 27: Deutsch
Urheberrechtinhabers. Die illegale Benutzung dieses Gerätes wird von Wickeln Sie die Antennendrähte ab und schließen Sie sie an die AM SANYO weder genehmigt noch kann SANYO für eine solche zur LOOP-Anschlußklemmen an. Bringen Sie die Rahmenantenne in einer Verantwortung gezogen werden. -
Seite 28: Bedienungselemente
BEDIENUNGSELEMENTE FERNBEDIENUNG CD-Wechsler (Abb. 1a) Bedienungselemente (Abb. 1e) 1. Disc-Fach 1. Netztaste (z/ON) 2. Wiedergabetaste/Anzeige (PLAY) 2. Schlaftimer-Taste (SLEEP) 3. Pausetaste (PAUSE) 3. CD-Wechsler-Bedienungselemente 4. Stopptaste (STOP) CD/MD REPEAT: Wiederholungstaste d / f, e / c : Sprung-/Suchlauftasten 5. Discmodus-Taste (DISC MODE) 6. -
Seite 29: Einstellen Der Uhr
ALLGEMEINER BETRIEB [Tuner/Verstärker] Einlegen der Batterien Legen Sie zwei “R6/AA”-Batterien (kein Lieferumfang) wie in Abb. 7 gezeigt ein. Ein- und Ausschalten der Spannung Drücken Sie die z/ON-Taste (Tuner/Verstärker). Alle Geräte schalten Hinweis: sich ein. Die Displays leuchten und es erscheint kurz “WELCOME”. Nehmen Sie immer die Batterien aus der Fernbedienung, wenn sie einen (Wenn Sie nach dem Anschließen des Netzkabels das erste Mal die z/ON Monat oder länger nicht benutzt wird. -
Seite 30: Einstellen Der Display-Helligkeit (Sowohl Tuner/Verstärker Als Auch Md-Deck)
Einstellen der Display-Helligkeit (Sowohl Tuner/ Aufnahme-MD (Abb. 12b) Es gibt zwei Typen von aufnehmbaren MDs (60-Minuten-MD und 74- Verstärker als auch MD-Deck) (nur Hauptgerät) Minuten-MD). Ein Verschluß deckt beide Seiten der Disc ab. Drücken Sie die CLOCK/ECO-Taste, während Sie die MEMORY-Taste gedrückt halten. -
Seite 31: Programmierte Wiedergabe
Auswerfen oder austauschen von CDs Wechseln der CD während der Wiedergabe 1. Drücken Sie bei aktiviertem CD-Wiedergabe- oder Stoppmodus die Während der Wiedergabe einer CD auf dem Wechsler können Sie durch DISC SELECT-Taste der CD, die ausgeworfen werden soll. Betätigen Betätigung der DISC SELECT-Tasten zu einer beliebig anderen CD Sie anschließend die q OPEN/CLOSE-Taste. - Seite 32 Einen Titel ändern: Drücken Sie zum direkten Vorwählen von Sendern die 1. Drücken Sie im Stoppmodus mehrmals die MEMORY-Taste, bis die Nummerntaste(n) auf der Fernbedienung. Drücken Sie in diesem Titelnummer, die Sie ersetzen möchten, im Display angezeigt wird. Beispiel die 9, nachdem Sie den oben genannten Schritt 2 2.
-
Seite 33: Cassettendeck-Betrieb
Anwählen des RDS-Anzeigemodus 3. Drücken Sie innerhalb von 10 Sekunden die PTY CHECK-Taste. Drücken Sie die RDS MODE-Taste, während Sie sich eine FM- “PTY CHK” blinkt auf dem Display. Rundfunksendung anhören. Das Gerät sucht nach 24 vorgewählten Sendern. Der Sendersuchlauf Bei jeder Betätigung der Taste ändert sich der Anzeigemodus wie stoppt, wenn ein Sender des von Ihnen angewählten PTY-Codes nachfolgend aufgeführt. - Seite 34 Drücken Sie, falls erforderlich, zum Einschalten des Gerätes die z/ON- Wenn Sie während der Wiedergabe die c oder d Taste drücken, führt Taste (MD-Deck). Auf dem Display erscheint zunächst “SANYO” und das Deck den Vorwärts- oder Rückwärts-Suchlauf mit hoher dann “No Disc”.
-
Seite 35: Vor Der Cassettenband-Aufnahme
VOR DER CASSETTENBAND-AUFNAHME PROGRAMMIERTE MD-WIEDERGABE [Cassettendeck] (nur Fernbedienung) Es können bis zu 30 Titel für die Wiedergabe in jeder beliebigen Reihenfolge 1. Drücken Sie den Cassettenhalter (q EJECT-Teil), um ihn zu öffnen programmiert werden. und legen Sie eine Cassette für die Aufnahme ein. Wählen Sie zunächst die “MD”-Funktion an, um das 2. -
Seite 36: Aufnahme Auf Cassettenbändern
AUFNAHME AUF CASSETTENBÄNDERN 4. Drücken Sie die FWD PLAY- oder REV PLAY-Taste. Die Aufnahme beginnt. [Cassettendeck] 5. Drücken Sie die STOP-Taste, um die Aufnahme zu beenden. (Die CD- oder MD-Wiedergabe wird fortgesetzt.) COMPUTERAUFNAHME VON EINER CD AUF EIN CASSETTENBAND Synchronisierte Aufnahme von einer CD auf ein Cassettenband/ Mit Hilfe der Computeraufnahme können Sie mit nur einem Tastendruck einer MD auf ein Cassettenband eine CD auf ein Cassettenband aufnehmen. -
Seite 37: Computeraufnahme Von Einer Cd Auf Eine Md
MD-AUFNAHME [MD-Deck] MANUELLE AUFNAHME Auf der MD bereits vorhandene Aufnahmen bleiben erhalten und die angewählte Tonquelle wird auf den unbespielten Abschnitt der MD COMPUTERAUFNAHME VON EINER CD AUF EINE aufgenommen. Hinweis: Mit Hilfe der Computeraufnahme können Sie mit nur einem Tastendruck Wählen Sie nicht die “MD”-Funktion an. -
Seite 38: Aufnahme Auf Eine Bereits Bespielte Md
EDITIEREN DER AUFGENOMMENEN MD Zeitweilige Unterbrechung der Aufnahme Drücken Sie die PAUSE-Taste. Die PLAY-Anzeige blinkt. Drücken Sie [MD-Deck] zum Fortsetzen der Aufnahme die PLAY- oder PAUSE-Taste. Zu diesem Zeitpunkt wird die Titelnummer automatisch eingefügt. Mit diesem Deck können aufgenommene MDs editiert werden. Sie Während der Aufnahmepausemodus aktiviert ist, wird die CD- oder können jede MD wunschgemäß... - Seite 39 5. Drücken Sie die ENTER-Taste. Der Titel wird in zwei Titel unterteilt. Vor der Benennung von Discs oder Titeln Die Wiedergabe beginnt am Anfang des letzten getrennten Titels. In eine MD können ein Discname und bis zu 254 Titelnamen eingegeben Wenn ein Teilen des Titels nicht möglich ist, erscheint auf dem Display werden.
-
Seite 40: Timer-Betrieb [Tuner/Verstärker]
TIMER-BETRIEB [Tuner/Verstärker] Überprüfen der Timer-Einstellungen Drücken Sie mehrmals die TIMER-Taste. Die Timer-Einstellungen werden in nachfolgend aufgeführter Reihenfolge angezeigt: Benutzung des Timers (nur Hauptgerät) Einschaltzeit v Ausschaltzeit v Timer-Modus/Funktion v Es Stellen Sie die Ein- und Ausschaltzeiten, die gewünschte Funktion und erscheint wieder das Original-Display den Lautstärkepegel ein. -
Seite 41: Fernbedienungsbetrieb
FERNBEDIENUNGSBETRIEB Hinweis: Mit den Tasten auf der Fernbedienung werden dieselben Funktionen wie mit den gleich gekennzeichneten Tasten am Gerät ausgeführt. Allgemeines z/ON Ein-/Ausschalten des Gerätes Einstellen der Lautstärke – oder + VOLUME Verstärkung der Tiefen SUPER BASS Anwählen der “Video/DVD”-Funktion VIDEO Zeitweilige Stummschaltung des Tons MUTE –20 dB... - Seite 42 MD-MELDUNGEN Beziehen Sie sich auf die nachfolgend aufgeführte Tabelle, wenn auf dem Display eine Meldung erscheint. DISPLAY ERKLÄRUNG ABHILFEMASSNAHME Blank Disc Auf die MD wurde kein Signal aufgenommen. Cannot Copy Es wurde versucht auf eine aufnahmegeschützte CD Benutzen Sie eine andere CD. aufzunehmen.
- Seite 43 FÄHIGKEITEN DES MD-SYSTEMS Die MD-Aufnahme unterscheidet sich von der Cassettenband-Aufnahme. Das MD-Aufnahmesystem ermöglicht das Ergänzen und Ändern von Disc- und Titelnamen nach der Aufnahme. Darüber hinaus kann auch die Wiedergabe-Reihenfolge geändert werden, ohne daß dafür eine neue Aufnahme durchgeführt werden muß. Aufgrund dieser speziellen Merkmale treten bei der Benutzung von MDs möglicherweise die nachfolgend aufgeführten Symptome auf.
-
Seite 44: Français
Fig. 6b. morceau protégé par des droits d'auteur, il faut l'autorisation du détenteur de ces droits. SANYO ne saurait être responsable de toute duplication non Remarque: autorisée, utilisation ou autres actes contraires à la loi relative aux droits Afin de minimiser le bruit, éloigner les fils d'enceinte, le cordon d'alimentation... - Seite 45 COMMANDES TELECOMMANDE Changeur de CD (Fig. 1a) Commandes (Fig. 1e) 1. Compartiment à disques 1. Touche d’alimentation (z/ON) 2. Touche/indicateur de lecture (PLAY) 2. Touche de minuterie de sommeil (SLEEP) 3. Touche de pause (PAUSE) 3. Commandes de changeur de CD 4.
-
Seite 46: Reglage De L'horloge
FONCTIONNEMENT GENERAL Insertion des piles Insérer deux piles de format “R6/AA” (non fournies) comme indiqué sur la [Tuner/Amplificateur] Fig. 7. Mise sous et hors tension Remarque: Appuyer sur la touche z/ON (Tuner/Amplificateur). Les affichages Toujours retirer les piles si la télécommande n'est pas utilisée pendant un s'allument et “WELCOME”... - Seite 47 Réglage de la luminosité de l'affichage (Tuner/ Apposer une étiquette sur un MD Suivre les instructions suivantes. Amplificateur et lecteur MD) (unité principale uniquement) S'assurer de placer l'étiquette sur l'emplacement approprié (dans la Tout en appuyant sur la touche MEMORY, appuyer sur la touche CLOCK/ zone creuse prévue pour l'étiquette).
-
Seite 48: Lecture Programmee
Pour commencer la lecture à partir de la plage LECTURE PROGRAMMEE (avec la télécommande désirée uniquement) 1. Appuyer sur la touche DISC SELECT, puis appuyer sur la touche STOP. Jusqu'à 32 plages de 3 CD peuvent être programmées pour la lecture 2. -
Seite 49: Ecoute De La Radio
ECOUTE DE LA RADIO Ecoute des stations préréglées 1. Appuyer sur la touche BAND pour sélectionner FM ou AM. [Tuner/Amplificateur] 2. Appuyer sur la touche TUNING MODE pour sélectionner “PRESET”, puis tourner la commande UP/DOWN pour sélectionner le canal désiré. Pour allumer l'appareil et écouter la dernière station reçue, appuyer sur Ou appuyer un instant sur la touche PRESET de la télécommande. - Seite 50 ECOUTE DE CASSETTES [Platine cassette] PTY (type d'émission) “PTY” apparaît sur l'affichage, puis le type de programme diffusé est affiché. Si aucun signal PTY n'est reçu, “NO PTY” apparaît sur Si une cassette est chargée, le système peut être allumé et la lecture l'affichage, puis le nom ou la fréquence de la station est affichée.
- Seite 51 Appuyer sur la touche z/ON (lecteur MD) pour allumer l'appareil, si sélectionner le mode de répétition désiré. Chaque fois que la touche est nécessaire. “SANYO”, puis “No Disc” apparaît sur l'affichage. enfoncée, le mode de répétition change comme suit. Si le système (Tuner/Amplificateur) est éteint, la touche z/ON (lecteur REPEAT: Mode de répétition de toutes les plages.
-
Seite 52: Enregistrement Manuel
ENREGISTREMENT DE CASSETTE Les détails du programme ne peuvent pas être modifiés. Le programme est effacé lorsque la touche MD PLAY MODE est [Platine cassette] enfoncée en mode d'arrêt. ENREGISTREMENT DE CD GERE PAR Remarque: MICROPROCESSEUR Lorsque l'appareil est éteint en mode d'attente/écologique, les modes de lecture aléatoire et de lecture programmée sont annulés. - Seite 53 ENREGISTREMENT DE MD [Lecteur MD] Enregistrement synchronisé de CD/MD sur cassette 1. Charger la cassette. 2. Charger le CD et sélectionner la fonction “CD”, ou charger le MD et ENREGISTREMENT DE CD SUR MD GERE PAR sélectionner la fonction “MD”. MICROPROCESSEUR Pour l'enregistrement programmé, programmer le morceau à...
- Seite 54 ENREGISTREMENT MANUEL Enregistrement parallèle de CD/cassette/CD/MD Le contenu du MD enregistré précédemment est conservé, et la source 1. Charger la cassette et le MD. sélectionnée est enregistrée sur la partie vierge du MD. 2. Charger le CD et sélectionner la fonction “CD”. Remarque: 3.
- Seite 55 MONTAGE DU MD ENREGISTRE Combinaison de plages (COMBINE) Plusieurs plages peuvent être combinées en une plage. [Lecteur MD] Exemple: Pour combiner la plage 2 avec la plage 3 (Fig. 24) Cet appareil est doté de fonctions de montage de MD enregistrés. Ces 1.
-
Seite 56: Fonctionnement De La Minuterie
FONCTIONNEMENT DE LA MINUTERIE Avant d'attribuer des noms de disque ou de plage Un nom de disque et au maximum 254 noms de plage peuvent être entrés [Tuner/Amplificateur] dans un MD. 1700 (environ) Caractères au total peuvent être entrés sur un MD pour Utilisation de la minuterie (unité... -
Seite 57: Nettoyage De L'appareil
ENTRETIEN Pour vérifier les réglages de la minuterie Appuyer de manière répétée sur la touche TIMER. Les réglages de la minuterie sont affichés dans l'ordre suivant: Nettoyage de la section cassette (Platine cassette) Heure d'enclenchement v Heure d'arrêt v Mode minuterie/ Pour conserver une haute performance continue de la section cassette, Fonction v Retour de l'affichage original nettoyer les têtes, galets presseurs, et cabestans avec un coton-tige... -
Seite 58: Fonctionnement De La Telecommande
FONCTIONNEMENT DE LA TELECOMMANDE Remarque: Les touches de la télécommande effectuent les mêmes fonctions que les touches marquées de façon similaire sur le panneau avant. Section générale z/ON Marche/Arrêt Régler le volume – ou + VOLUME Accentuer les graves SUPER BASS Sélectionner la fonction “Vidéo/DVD”... - Seite 59 MESSAGES MD Se référer au tableau suivant si un message apparaît sur l'affichage. AFFICHAGE EXPLICATION ACTION CORRECTIVE Blank Disc Aucun signal n'est enregistré sur le MD. Cannot copy Tentative d'enregistrement d'un CD protégé. Utiliser un autre CD. Disc Error Le MD est rayé ou endommagé. Remplacer le MD.
- Seite 60 LIMITATION DU SYSTEME DE MD Les MD sont enregistrés différemment des cassettes. Le système d'enregistrement de MD permet d'ajouter ou de changer les titres du disque et de plages après l'enregistrement. Il est également possible de changer l'ordre de lecture sans faire un nouvel enregistrement. A cause des fonctions spéciales, les symptômes suivants peuvent se présenter pendant l'utilisation du MD.
-
Seite 61: Nederlands
De luidsprekers worden automatisch uitgeschakeld als zoals afgebeeld op Fig. 4. hoofdtelefoons worden aangesloten. De bevestiging en beschermtape niet verwijderen. Als het systeem DC-007C (CD-wisselaar en tuner/versterker) en het optioneel tapedeck en/of MD-deck worden gebruikt Verwijder de bevestiging en beschermtape alvorens de verbinding te maken. - Seite 62 BEDIENINGSORGANEN AFSTANDSBEDIENING CD-wisselaar (Fig. 1a) Controls (Fig. 1e) 1. CD-vak 1. Bedieningstoetsen (z/ON) 2. Weergavetoets/indicator (PLAY) 2. Spanningstoets (SLEEP) 3. Pauzetoets (PAUSE) 3. CD-wisselaarstoetsen 4. Stoptoets (STOP) CD/MD REPEAT: herhaaltoets d / f, e / c : spring/zoektoetsen 5. CD-modustoets (DISC MODE) 6.
-
Seite 63: Instellen Van De Klok
ALGEMENE BEDIENING [tuner/versterker] Batterijen aanbrengen Installeer twee “R6/AA”-batterijen (niet bijgeleverd) zoals afgebeeld op Fig. 7. In- en uitschakelen van de stroom Druk op de z/ON-toets (tuner/versterker). Alle toestellen worden Opmerking: ingeschakeld. De displays zijn verlicht en even verschijnt de begroeting De batterijen altijd verwijderen als de afstandsbediening gedurende een “WELCOME”. - Seite 64 CD-WEERGAVE [CD-wisselaar] WAT ALS ... Als het systeem of het display niet normaal werkt, 1. Trek het netsnoer uit. Opmerking: 2. Houd de RESET-toets (onderaan de tuner/versterker) gedurende ten Raak de CD-lade niet aan terwijl ze beweegt. minste 30 seconden ingedrukt (Fig. 9). Plaats nooit iets anders dan een CD op de CD-lade.
-
Seite 65: Geprogrammeerde Weergave
Overslaan van weergave 4. Druk op de MEMORY-toets. “PROG.” blijft branden. 5. Druk op de d / f -toets om passage 2 te selecteren en druk dan Om naar passage 6 te springen terwijl passage 3 wordt weergegeven, op MEMORY. drukt u herhaaldelijk op de e / c-toets totdat “6”... -
Seite 66: Luisteren Naar De Radio
LUISTEREN NAAR DE RADIO Luisteren naar voorkeuzezenders [tuner/versterker] 1. Druk op de BAND-toets om FM of AM te selecteren. 2. Druk op de TUNING MODE-toets om “PRESET” te selecteren en draai dan de UP/DOWN-knop om het gewenste kanaal te selecteren. Om het systeem in te schakelen en naar de laatst ontvangen zender Of druk kortstondig op de PRESET-toets op de afstandsbediening. - Seite 67 BELUISTEREN VAN BANDEN (tapedeck) PTY (programmatype) “PTY” verschijnt, daarna wordt het uitgezonden programmatype weergegeven. Indien geen PTY-signaal wordt ontvangen, Als een cassette in het toestel is gelegd, kunt u het systeem inschakelen verschijnt “NO PTY”, daarna wordt de zendernaam of en onmiddellijk beginnen weergeven door een druk op de TAPE a of zenderfrequentie weergegeven.
- Seite 68 Druk op de z/ON-toets (MD-deck) om zo nodig de stroom in te schakelen. Druk op de CD/MD REPEAT-toets vóór of tijdens de weergave om de Eerst verschijnt “SANYO”, dan “No Disc” op het display. gewenste herhaalmodus te selecteren. Bij iedere druk op de toets Als het systeem (tuner/versterker) is uitgeschakeld, werkt de z/ON- verandert de herhaalmodus als volgt.
- Seite 69 BANDOPNAMEN [tapedeck] De geprogrammeerde details kunnen niet worden gewijzigd. Het programma wordt gewist als de MD PLAY MODE-toets in stopmodus wordt ingedrukt. COMPUTEROPNAMEN VAN CD NAAR BAND Met computeropnamen kunt u een CD op een cassette opnemen door Opmerking: slechts één toets in te drukken. Wanneer de stroom wordt uitgeschakeld in spaar-standby-modus, worden 1.
- Seite 70 MD-OPNAMEN [MD-deck] Synchrone opnamen van CD naar band/MD naar band 1. Leg de cassette in het toestel. 2. Leg de CD in het toestel en selecteer de functie “CD”, of leg de MD in COMPUTEROPNAMEN VAN CD NAAR MD het toestel en selecteer de functie “MD”. Met computeropnamen kunt u een CD op een MD opnemen door slechts Voor geprogrammeerde opnamen moet u het materiaal vooraf één toets in te drukken.
- Seite 71 MANUELE OPNAMEN Parallelle opnamen van CD naar band/CD naar MD Vroegere opnamen op de MD blijven bestaan en de geselecteerde bron 1. Leg de cassette en MD in het toestel. wordt opgenomen op het blanco gedeelte van de MD. 2. Leg de CD in het toestel en selecteer de functie “CD”. Opmerking: 3.
- Seite 72 EDITEREN VAN DE OPGENOMEN MD [MD- Combineren van passages (COMBINE) deck] U kunt vele passages tot één enkele combineren. Voorbeeld: Passage 2 combineren met passage 3 (Fig. 24) Met dit deck kan een opgenomen MD worden geëditeerd. Bijgevolg kunt 1. Druk op de PAUSE-toets terwijl u passage 3 weergeeft. u een MD wijzigen zoals u wil.
- Seite 73 WERKING VAN DE TIMER [tuner/ Alvorens de MD of passages te benoemen Op één MD kunnen één MD-naam en maximum 254 passagenamen versterker] worden ingevoerd. In totaal kunnen (ongeveer) 1700 tekens op één MD worden ingevoerd Gebruik van de timer (alleen hoofdtoestel) voor de MD-naam en de passagenamen.
-
Seite 74: Reinigen Van Het Toestel
ONDERHOUD Controleren van de timerinstellingen Druk herhaaldelijk op de TIMER-toets. De timerinstellingen worden afgebeeld in onderstaande volgorde: Reinigen van de bandkop (tapedeck) inschakeltijd v uitschakeltijd v timermodus/functie v Om hoge prestaties te blijven waarborgen, moeten de koppen, oorspronkelijke display keert terug aandrukrollen en bandtransportassen ongeveer om de 10 gebruiksuren worden gereinigd (Fig. - Seite 75 AFSTANDSBEDIENING Opmerking: De toetsen op de afstandsbediening hebben dezelfde functies als gelijkaardige toetsen op het voorpaneel. Algemeen z/ON Stroom in/uit Geluidsregeling – of + VOLUME Lagetonenversterking SUPER BASS Selecteren “Video/DVD”-functie VIDEO Tijdelijke geluidsonderdrukking MUTE –20dB Instellen/controleren van slaaptijd SLEEP “CD” wordt automatisch geselecteerd als de CD a, DISC SELECT-toets wordt ingedrukt. “TUNER”...
- Seite 76 MD-BERICHTEN Raadpleeg de volgende tabel als een bericht op het display verschijnt. DISPLAY VERKLARING REMEDIE Blank Disc Geen signaal op de MD opgenomen. Cannot Copy Poging tot opnemen vanaf een kopieerbeveiligde CD. Gebruik een andere CD. Disc Error MD is gekrast of beschadigd. Vervang de MD.
- Seite 77 MOGELIJKHEDEN VAN MD-SYSTEMEN Het opnemen van MD's verloopt anders dan van cassettes. Het opnamesysteem van MD's maakt het mogelijk MD- en passagetitels na de opname toe te voegen of te veranderen. Men kan ook de weergavevolgorde veranderen zonder daarom een nieuwe opname te maken. Door deze speciale mogelijkheden, kunnen bij het gebruik van MD's de volgende symptomen optreden.
-
Seite 78: Svenska
Det är olagligt att spela in copyrightskyddat material utan tillstånd av Lägg inte heller antennkablarna för nära anläggningen. copyrightinnehavaren. Begär tillstånd av copyrightinnehavaren innan du spelar in sådant material. SANYO avråder från, och tar inget ansvar för Videoutrustning/DVD-spelare olagligt bruk av utrustningen. - Seite 79 REGLAGE FJÄRRKONTROLL CD-växlare (Fig. 1a) Reglage (Fig. 1e) 1. CD-fack 1. Strömbrytare (z/ON) 2. Avspelningstangent med indikator (PLAY) 2. Insomningstangent (SLEEP) 3. Paustangent (PAUSE) 3. CD-växlarkontroller 4. Stopptangent (STOP) CD/MD REPEAT: Repetitionstangent d / f, e / c : Söktangenter 5.
-
Seite 80: Ställa Klockan
VANLIGA FUNKTIONER [Receiver] Iläggning av batterier Lägg i två “R6/AA”-batterier (medföljer ej) så som Fig. 7. visar. Sätta på och stänga av strömmen Observera: Tryck på z/ON-tangenten (på receivern). Hela anläggningen slås på. Ta alltid ur batterierna om du inte räknar med att använda fjärrkontrollen Displayen tänds och meddelandet “WELCOME”... - Seite 81 SPELA CD-SKIVOR [CD-växlaren] VAD GÖR MAN OM ... Om anläggningen eller displayen inte fungerar normalt, 1. Dra ur nätsladden. Observera: 2. Tryck på RESET-tangenten (undertill på receiver) och håll in den i Rör inte skivsläden medan den rör sig. drygt 30 sekunder (Fig. 9). Lägg inga andra föremål än CD-skivor på...
- Seite 82 5. Tryck på d / f-tangenten för att välja melodinummer 2, och tryck Melodisökning sedan på MEMORY. Tryck flera gånger på e / c-tangenten tills “6” visas på TR-delen för 6. Tryck på DISC SELECT-tangenten och välj DISC 3, och tryck sedan att hoppa till melodi nummer 6 från melodi nummer 3.
- Seite 83 LYSSNA PÅ RADIO [Receivern] Snabbvalsavsökning (fungerar endast med fjärrkontrollen) 1. Tryck på TUNER/BAND-tangenten och välj FM eller AM. 2. Håll in PRESET-tangenten i minst en sekund. Kanalnumret blinkar. Tryck på TUNER/BAND-tangenten för att sätta på radion med den Alla snabbval tas in i fem sekunder var. station du senast lyssnade på...
- Seite 84 LYSSNA PÅ KASSETTER [Kassettdäcket] Vilka tecken kan visas? När PS-, PTY-, eller RT-information visas: Displayen visar bara stora bokstäver. Om en kassett är ilagd kan du sätta på anläggningen och börja spela Displayen kan inte visa accenttecken, “prickar” e d. “A” kan alltså direkt genom att trycka på...
- Seite 85 REPEAT 1: En melodi repeteras. Tangenten återställd: Normal avspelning. Tryck på z/ON-tangenten (på MD-spelaren) för att sätta på strömmen om det behövs. “SANYO” och “No Disc” visas på displayen. Slumpvalsavspelning Om anläggningen (receivern) är avstängd fungerar inte z/ON- (kän bara göras från fjärrkontrollen) tangenten (på...
-
Seite 86: Förberedelser För Att Spela In Kassetter [Kassettdäcket]
LYSSNA PÅ LJUDET FRÅN EN SPELA IN KASSETTER [Kassettdäcket] VIDEOKÄLLA/DVD [Receivern] DATORSTYRD INSPELNING FRÅN CD TILL KASSETT Om du använder datorstyrd inspelning kan du spela in en CD på en kassett 1. Tryck på INPUT-tangenten och välj “VIDEO:DVD”. bara genom att trycka på en enda tangent. 2. - Seite 87 INSPELNING PÅ MD-SKIVOR [MD-spelaren] Synkroninspelning från CD eller MD på kassett 1. Lägg i kassetten. 2. Lägg i CD-skivan och välj “CD”-läget, eller lägg i MD-skivan och välj DATORSTYRD INSPELNING FRÅN CD PÅ MD “MD”-läget. Om du använder datorstyrd inspelning kan du spela in en CD på en MD- Om du vill spela in programmerade melodier måste du skiva genom att trycka på...
- Seite 88 MANUELL INSPELNING Parallellinspelning från en CD-skiva på kassett och Gamla inspelningar på MD-skivan behålls och den valda programkällan spelas in på en ledig del av MD-skivan. 1. Lägg i kassetten och MD-skivan. Observera: 2. Lägg i CD-skivan och välj “CD”-läget. Välj inte “MD”-läget.
- Seite 89 REDIGERA EN INSPELAD MD-SKIVA Kombinera melodier (COMBINE) Du kan kombinera flera melodier till en. [MD-spelaren] Exempel: Om du vill kombinera melodi nummer 2 med melodi nummer 3 Du kan använda spelaren för att redigera dina inspelade MD-skivor. Du (Fig. 24) kan ändra innehållet på...
- Seite 90 TIMERN [receivern] Innan du döper MD-skivor och melodier På varje MD-skiva kan du lägga in en skivtitel och upp till 254 melodititlar. Totalt kan cirka 1700 tecken användas för skiv- och melodititlarna på Använda timern (måste göras direkt på apparaten) en och samma MD-skiva.
-
Seite 91: Underhåll
UNDERHÅLL Kontrollera timerinställningarna Tryck flera gånger på TIMER-tangenten. Timerns inställningar visas i följande ordning: Rengöring av tonhuvudena (Kassettdäcket) Starttid v Stopptid v Timerinställning/funktion v Den För att försäkra dig om hög ljudkvalitet under lång tid bör du rengöra ursprungliga displayen återkommer tonhuvuden, tryckrullar och kapstaner med en bomullspinne ungefär var tionde användningstimme (Fig. -
Seite 92: Använda Fjärrkontrollen
ANVÄNDA FJÄRRKONTROLLEN Observera: Tangenterna på fjärrkontrollen fungerar likadant som motsvarande tangenter på frontpanelen. Allmänt z/ON Strömmen på av Justera ljudstyrkan – eller + VOLUME Basförstärkning SUPER BASS Val av “Video/DVD”-läge VIDEO Stänga av ljudet tillfälligt MUTE –20dB Ställa/kontrollera insomningstiden SLEEP “CD”... - Seite 93 MEDDELANDEN PÅ MD-SPELARENS DISPLAY Se följande tabell om ett meddelande visas på displayen. MEDDELANDE ORSAK ÅTGÄRD Blank Disc Det finns ingenting inspelat på MD-skivan. Cannot Copy Du försöker spela in från en kopieringsskyddad CD-skiva. Använd en annan CD. Disc Error MD-skivan är repig eller skadad.
- Seite 94 EGENSKAPER HOS MD-SYSTEM MD-skivor spelas inte in på samma sätt som kassetter. Inspelningstekniken gör att du kan lägga till eller ändra skiv- och melodititlar efter att inspelningen är klar. Dessutom kan du byta plats på melodierna utan att du behöver göra en ny inspelning. På...
-
Seite 95: Italiano
Componente video/lettore DVD desiderate copiare del materiale protetto dal diritto d'autore, dovete prima ottenere il permesso dal proprietario. La SANYO non approva e non sarà Collegate i cavi audio (venduti separatamente) dalle prese di uscita audio ritenuta responsabile per qualunque utilizzo illegale di questo apparecchio. - Seite 96 CONTROLLI TELECOMANDO Caricatore CD (Fig. 1a) Controlli (Fig. 1e) 1. Comparto del disco 1. Tasto di accensione (z/ON) 2. Tasto/indicatore di riproduzione (PLAY) 2. Tasto dello sleep timer (SLEEP) 3. Tasto di pausa (PAUSE) 3. Controlli del caricatore CD 4. Tasto di arresto (STOP) CD/MD REPEAT: Tasto di ripetizione d / f, e / c : Tasti di salto/ricerca 5.
-
Seite 97: Impostazione Dell'orologio
FUNZIONAMENTO GENERALE Installazione delle batterie Installate due batterie “R6/AA” (vendute separatamente) come è mostrato [Sintonizzatore/Amplificatore] nella Fig. 7. Accensione e spegnimento della corrente Nota: Premete il tasto z/ON (Sintonizzatore/Amplificatore). Tutte le unità si Rimovete sempre le batterie se avete intenzione di non usare il telecomando accendono. - Seite 98 Regolazione della luminosità del display Fissando un'etichetta sull' MD Seguite le istruzioni fornite qui sotto. (Sia Sintonizzatore/Amplificatore che Piastra MD) Assicuratevi di posizionare l'etichetta nella posizione giusta (all'interno (solo con l'unità principale) dell'apposita area). Mantenendo premuto il tasto MEMORY, premete il tasto CLOCK/ECO. Non mettete le etichette a strati.
-
Seite 99: Riproduzione Programmata
Inizio della riproduzione dal brano desiderato RIPRODUZIONE PROGRAMMATA (solo con il 1. Premete il tasto DISC SELECT desiderato, poi premete il tasto STOP. telecomando) 2. Selezionate il brano desiderato usando il tasto e / c o quello d / f, poi premete il tasto PLAY. Potete programmare fino a 32 brani da un massimo di 3 CD per riprodurli in una qualsiasi ordine. -
Seite 100: Ascolto Della Radio
ASCOLTO DELLA RADIO Ascolto delle stazioni preselezionate [Sintonizzatore/Amplificatore] 1. Premete il tasto BAND per selezionare la banda FM o quella AM. 2. Premete il tasto TUNING MODE per selezionare “PRESET”, poi girate il controllo UP/DOWN per selezionare il canale desiderato. Per accendere il sistema ed ascoltare l'ultima stazione ricevuta, Oppure premete brevemente il tasto PRESET sul telecomando. - Seite 101 ASCOLTO DEI NASTRI [Piastra a cassette] PTY (Tipo Programma) “PTY” appare sul display, seguito dal tipo del programma trasmesso. Se non viene ricevuto nessun segnale PTY, appare Se avete inserito una cassetta, potete accendere il sistema ed iniziare sul display l'indicazione “NO PTY”, seguito dal nome della stazione la riproduzione immediatamente premendo il tasto TAPE a o quello o dalla frequenza della stazione.
- Seite 102 Premete il tasto z/ON (piastra MD) per accendere la corrente se necessario. Riproduzione ripetuta (solo con il telecomando) Appaiono sul display prima “SANYO”, poi “No Disc”. Premete il tasto CD/MD REPEAT prima o dopo la riproduzione per Se il sistema è spento (sintonizzatore/amplificatore), il tasto z/ON selezionare il modo di ripetizione desiderato.
-
Seite 103: Registrazione Manuale
REGISTRAZIONE DEL NASTRO [Piastra a I dati programmati non possono venire modificati. Il programma viene cancellato alla pressione del tasto MD PLAY cassetta] MODE nel modo di arresto. REGISTRAZIONE COMPUTERIZZATA DAL CD AL Nota: NASTRO Dopo aver spento la corrente nel modo di attesa ecologica, vengono cancellati i modi di riproduzione casuale e riproduzione programmata. - Seite 104 REGISTRAZIONE DELL' MD [Piastra MD] Registrazione sincronizzata dal CD al nastro o dall' MD al nastro 1. Inserite la cassetta. 2. Inserite il CD e selezionate la funzione “CD” oppure inserite il REGISTRAZIONE COMPUTERIZZATA DAL CD ALL' minidisco e selezionate la funzione “MD”. Per la registrazione programmata, programmate il materiale in Con la registrazione computerizzata, potete registrare un CD su un MD precedenza.
- Seite 105 REGISTRAZIONE MANUALE Registrazione parallela dal CD al nastro o dal CD all' I contenuti precedentemente registrati sul minidisco rimangono e la sorgente selezionata viene registrata sulla parte vuota dell' MD. 1. Inserite la cassetta e l' MD. Nota: 2. Inserite il CD e selezionate la funzione “CD”. Non selezionate la funzione “MD”, altrimenti la piastra entrerà...
- Seite 106 EDITING DELL' MD REGISTRATO [Piastra Combinazione dei brani (COMBINE) Potete combinare più brani in un unico brano. Esempio: combinazione del brano 2 con quello 3 (Fig. 24) Questa piastra è in grado di effettuare l'editing di un MD registrato. Potete 1.
-
Seite 107: Funzionamento Del Timer
FUNZIONAMENTO DEL TIMER Prima di dare un nome al disco o ai brani Potete immettere un nome di un disco e un massimo di 254 nomi di brani [Sintonizzatore/Amplificatore] per un MD. Potete immettere un totale di 1700 caratteri (circa) per il nome del Uso del timer (solo con l'unità... -
Seite 108: Pulizia Dell'unità
MANUTENZIONE Controllo delle impostazioni del timer Premete ripetutamente il tasto TIMER. Le impostazioni del timer appaiono nel seguente ordine: Pulizia della testina del nastro (piastra a cassetta) Tempo di accensione v Tempo di spegnimento v Modo/funzione Per assicurare delle alte prestazioni, usate un bastoncino per pulire le del timer v Ritorno del display originale testine, i premirulli ed i capstan ogni 10 ore di utilizzo (Fig. -
Seite 109: Funzionamento Del Telecomando
FUNZIONAMENTO DEL TELECOMANDO Nota: I tasti del telecomando funzionano in modo simile ai tasti posti sul pannello anteriore. Generalità z/ON Accensione/spegnimento della corrente Regolazione del volume VOLUME – o + Aumento dei bassi SUPER BASS Selezione della funzione “Video/DVD” VIDEO Silenziamento temporaneo del suono MUTE –20dB Impostazione/controllo dello sleep timer... - Seite 110 MESSAGGI MD Se appare un messaggio sul display, fate riferimento al seguente diagramma. DISPLAY SPIEGAZIONE RIMEDIO Blank Disc Non è stato registrato nessun segnale sul minidisco. Cannot Copy Avete cercato di registrare un CD protetto. Usate un altro CD. Disc Error Il minidisco è...
- Seite 111 CAPACITÀ DEL SISTEMA MD Gli MD vengono registrati in modo diverso rispetto alle cassette. Il sistema di registrazione MD rende possibile l'aggiunta o la modifica dei titoli del disco e del brano dopo aver effettuato la registrazione. Ma è anche possibile modificare l'ordine di riproduzione senza effettuare una nuova registrazione. Per via di queste caratteristiche particolari, i seguenti sintomi si possono verificare durante l'utilizzo del minidisco.
- Seite 112 130 W 4,7 kg (per altoparlante) 0,8 W (modo di attesa ecologica attivato) 16 W (modo di attesa ecologica disattivato) Piastra a cassette (SANYO RD-007, OPZIONE) Dimensioni: Sistema dei brani: 270 (A) x 122 (A) x 287 (P) mm Stereo a 2 canali e 4 brani...
-
Seite 113: Español
Equipo de vídeo/reproductor de DVD regrabar cierto material, primero deberá obtener la autorización del propietario de dichos derechos. SANYO no aprueba ni se hace responsable Conecte los cables de audio (no incluidos) desde los conectores de salida por el uso ilegal de este aparato. -
Seite 114: Control Remoto
CONTROLES CONTROL REMOTO Cambiador de CD (Fig. 1a) Controles (Fig. 1e) 1. Compartimiento de los discos 1. Interruptor de alimentación (z/ON) 2. Botón/indicador de reproducción (PLAY) 2. Botón de temporizador de desactivación automática (SLEEP) 3. Botón de pausa (PAUSE) 3. Controles de cambiador de CD 4. -
Seite 115: Ajuste Del Reloj
OPERACIÓN GENERAL [Sintonizador/ Instalación de las pilas Instale dos pilas tamaño “R6/AA” (no incluidas) como se muestra en la Fig. Amplificador] Conexión y desconexión de la alimentación Nota: Presione el interruptor z/ON (sintonizador/amplificador). Todas las Extraiga siempre las pilas cuando el control remoto vaya a estar fuera de unidades se encenderán. - Seite 116 Sistema de acentuación de tonos graves Cómo pegar una etiqueta en el MD (sólo en el Siga las instrucciones que se dan a continuación. control remoto) Asegúrese de colocar la etiqueta en el lugar correcto (dentro del área Presione el botón SUPER BASS para incrementar el sonido de graves. En rebajada).
-
Seite 117: Reproducción Programada
Expulsión o cambio de CDs Para cambiar de CD durante la reproducción 1. Durante la reproducción de un CD o durante el modo de detención, Mientras el cambiador reproduce un CD, presione uno de los botones presione uno de los botones DISC SELECT (el que corresponda al DISC SELECT para cambiar a otro CD. -
Seite 118: Recepción De Radio
RECEPCIÓN DE RADIO O presione brevemente el botón PRESET en el control remoto. También se puede usar los botones numéricos del control remoto. [Sintonizador/Amplificador] Exploración de estaciones presintonizadas (sólo en el control remoto) Para encender la unidad y escuchar la última emisora recibida, 1. - Seite 119 REPRODUCCIÓN DE CINTAS [Magnetófono RT (radiotexto) La indicación “RT” aparece en el visualizador, y luego se de cassettes] visualizan los mensajes de texto que la estación transmite. Si no se recibe ninguna señal RT, la indicación “NO RT” aparece en Si ya hay un cassette cargado en la unidad, usted podrá...
- Seite 120 Cuando el botón sea liberado, la reproducción normal alimentación en caso de ser necesario. La indicación “SANYO” aparecerá continuará. en el visualizador, y luego será reemplazada por “No Disc”.
-
Seite 121: Grabación Manual
GRABACIÓN DE CINTAS [Magnetófono de Una vez que todas las pistas programadas hayan sido reproducidas, el grabador se detendrá automáticamente. cassettes] El contenido del programa será retenido en la memoria. GRABACIÓN COMPUTARIZADA DE CD A CINTA El número máximo de pistas que se puede programar es 30. Si intenta Con la función de grabación computarizada, usted podrá... - Seite 122 GRABACIÓN DE MDs [Grabador de MD] Grabación sincronizada de CD a cinta/MD a cinta 1. Cargue el cassette. 2. Cargue el CD y seleccione la función “CD”, o cargue el MD y GRABACIÓN COMPUTARIZADA DE CD A MD seleccione la función “MD”. La función de grabación computarizada le permite grabar un CD en un MD Para grabación programada, programe el material deseado de utilizando sólo un botón.
- Seite 123 GRABACIÓN MANUAL Grabación paralela de CD a cinta/CD a MD El material previamente grabado en el MD permanece inalterado, y la 1. Cargue el cassette y el MD. fuente seleccionada es grabada en la parte en blanco del MD. 2. Cargue el CD y seleccione la función “CD”. Nota: 3.
- Seite 124 EDICIÓN DEL MD GRABADO [Grabador de Combinación de pistas (COMBINE) Usted puede combinar varias pistas en una sola. Ejemplo: Para combinar las pistas 2 y 3 (Fig. 24) Esta unidad incorpora funciones de edición de MDs grabados. Estas 1. Presione el botón PAUSE mientras reproduce la pista 3. funciones permiten modificar un MD como se desee.
- Seite 125 OPERACIÓN CONTROLADA POR Antes de asignar un nombre al disco o a las pistas En un MD usted puede registrar un nombre de disco y un máximo de 254 TEMPORIZADOR [Sintonizador/ nombres de pista. Amplificador] En un MD se puede introducir un total de 1700 caracteres (aproximadamente) para nombre de disco y nombres de pista.
-
Seite 126: Limpieza De La Unidad
MANTENIMIENTO La indicación “0” (o “0 REC”) parpadeará durante la operación controlada por temporizador. Para desconectar la alimentación a la unidad durante la operación Limpieza de los cabezales (magnetófono de controlada por temporizador, presione el interruptor z/ON. El cassettes) temporizador asumirá el modo de espera. Para garantizar un alto desempeño en todo momento, utilice un bastoncillo de algodón para limpiar los cabezales, rodillos de presión y cabestrantes Cómo verificar los ajustes de temporizador... -
Seite 127: Uso Del Control Remoto
USO DEL CONTROL REMOTO Nota: Los botones del control remoto realizan funciones similares a los botones correspondientes del panel frontal. General z/ON Conexión/desconexión de la alimentación Ajuste de volumen – o + VOLUME Acentuación de graves SUPER BASS Selección de función “Vídeo/DVD” VIDEO Silenciamiento temporal del sonido MUTE –20dB... - Seite 128 MENSAJES MD Si aparece un mensaje en el visualizador, consulte la siguiente tabla. VISUALIZACIÓN EXPLICACIÓN SOLUCIÓN Blank Disc No hay ninguna señal grabada en el MD. Cannot Copy Se ha intentado copiar desde un CD protegido contra Use otro CD. copia.
- Seite 129 CARACTERÍSTICAS DEL SISTEMA MD Los MDs se graban de manera distinta que los cassettes. El sistema de grabación MD permite añadir o cambiar títulos de disco o de pista después de realizada la grabación. También permite cambiar el orden de reproducción sin necesidad de hacer una nueva grabación. Debido a estas características especiales, pueden producirse los siguientes síntomas durante el uso de un MD.
-
Seite 130: Português
Ligue os cabos audio (não fornecidos) das tomadas de saída audio de um dos direitos de autor. A SANYO não aprova, e não pode ser responsável equipamento vídeo/leitor de DVD às tomadas VIDEO (AUDIO). -
Seite 131: Controlo Remoto
CONTROLOS CONTROLO REMOTO Carregador de CD (Fig. 1a) Controlos (Fig. 1e) 1. Compartimento dos discos 1. Botão de corrente (z/ON) 2. Botão de reprodução/indicador (PLAY) 2. Botão temporizador de sono (SLEEP) 3. Botão pausa (PAUSE) 3. Controlos de carregador CD 4. -
Seite 132: Acerto Do Relógio
OPERAÇÃO GERAL [Sintonizador/ Introdução das pilhas Instale duas pilhas “R6/AA” (não fornecidas) como indicado na Fig. 7. Amplificador] Nota: Ligar e desligar a corrente Remova sempre as pilhas caso o controlo remoto não seja usado durante Prima o botão z/ON (Sintonizador/Amplificador). Todas as unidades um mês ou mais. - Seite 133 REPRODUÇÃO DE CD [Carregador de CD] Regulação do brilho do mostrador (Ambos Sintonizador/Amplificador e Leitor MD) Nota: (Apenas unidade principal) Não toque no tabuleiro do disco enquanto este estiver em movimento. Enquanto prime o botão MEMORY, prima o botão CLOCK/ECO. Nunca coloque nada excepto um CD no tabuleiro do disco.
-
Seite 134: Reprodução Programada
5. Prima o botão d / f para seleccionar a faixa 2, e depois prima Saltar reprodução MEMORY. Para saltar para a faixa 6 enquanto a faixa 3 está a tocar, prima 6. Prima o botão DISC SELECT para seleccionar DISC 3, e depois prima repetidamente o botão e / c até... - Seite 135 ESCUTA DE RÁDIO Escuta de estações pré-seleccionadas 1. Prima o botão BAND para seleccionar FM ou AM. [Sintonizador/Amplificador] 2. Prima o botão TUNNING MODE para seleccionar “PRESET”, depois rode o controlo UP/DOWN para seleccionar o canal desejado. Para ligar o sistema e escutar a última estação a ser escutada, prima Ou prima brevemente o botão PRESET do controlo remoto.
- Seite 136 ESCUTA DE CASSETES [Leitor de RT (Texto de Rádio) Aparece “RT” e então são apresentadas as mensagens de texto cassetes] que a estação emite. Se não for recebido nenhum sinal RT, aparece “NO RT”. Se estiver carregada uma cassete, poderá ligar o sistema e iniciar a Frequência reprodução imediatamente premindo o botão TAPE a ou TAPE b Frequência da estação (serviço não RDS)
- Seite 137 Prima o botão z/ON (leitor MD) para ligar a corrente se necessário. Prima o botão CD/MD REPEAT antes ou durante a reprodução para Aparece “SANYO” e depois “No Disc” no mostrador. seleccionar o modo de repetição desejado. Cada vez que o botão é...
-
Seite 138: Gravação Manual
ESCUTA DE FONTES DE VÍDEO/DVD GRAVAÇÃO DE CASSETES [Leitor de [Sintonizador/Amplificador] cassetes] 1. Prima o botão INPUT para seleccionar “VIDEO:DVD”. GRAVAÇÃO POR COMPUTADOR DE CD PARA 2. Siga as instruções fornecidas com o equipamento de vídeo/leitor de CASSETE DVD. Com a gravação por computador, pode gravar um CD numa cassete pressionando apenas um botão. - Seite 139 Gravação de MD [Leitor MD] Gravação síncrono CD para Cassete/MD para Cassete 1. Carregue a cassete. 2. Carregue o CD e seleccione a função “CD”, ou carregue o MD e GRAVAÇÃO POR COMPUTADOR CD PARA MD seleccione a função “MD”. Com gravação por computador, poderá...
- Seite 140 GRAVAÇÃO MANUAL Gravação paralela CD para Cassete/CD para MD O conteúdo anteriormente gravado no MD permanece e a fonte 1. Carregue a cassete ou o MD. seleccionada é gravada na porção em branco do MD. 2. Carregue o CD e seleccione a função “CD”. Nota: 3.
- Seite 141 EDIÇÃO DE MD GRAVADO [Leitor MD] Combinação de faixas (COMBINE) Poderá combinar várias faixas numa só. Este leitor tem a possibilidade de editar um MD gravado. Poderá modificar Exemplo: Para combinar a faixa 2 com a faixa 3 (Fig. 24) um MD como desejar.
-
Seite 142: Operação Do Temporizador
OPERAÇÃO DO TEMPORIZADOR Antes de dar nome ao disco ou faixas Pode ser gravado num MD um nome de disco e um máximo de 254 nomes [Sintonizador/Amplificador] de faixas. Pode ser introduzido um total de 1700 caracteres (aprox.) num MD Utilização do temporizador (Apenas unidade principal) para o nome do disco e nomes das faixas. -
Seite 143: Manutenção
MANUTENÇÃO Para verificar as regulações do temporizador Prima repetidamente o botão TIMER. As regulações do temporizador são apresentadas na ordem seguinte: Limpeza da cabeça da fita (Leitor de cassetes) Hora de ligar v Hora de desligar v Modo/Função do temporizador Para assegurar um elevado desempenho de forma continuada, use v Volta o mostrador original cotonetes para limpar as cabeças, roletes de arrasto e cabrestantes ao... - Seite 144 OPERAÇÃO POR CONTROLO REMOTO Nota: Os botões do controlo remoto executam funções similares aos botões correspondentes do painel frontal. General z/ON Ligar/desligar a corrente Ajustar o volume – ou + VOLUME Acentuar os baixos SUPER BASS Seleccionar a função “Video/DVD” VIDEO Emudecer temporariamente o som MUTE –20dB...
- Seite 145 MENSAGENS MD Consulte a seguinte tabela se aparecer uma mensagem no mostrador. MOSTRADOR EXPLICAÇÃO ACÇÃO CORRECTIVA Blank Disc Não há nenhum sinal gravado no MD. Cannot Copy Tentou gravar-se de um CD protegido contra cópia. Use outro CD. Disc Error O MD está...
- Seite 146 CAPACIDADES DO SISTEMA MD Os MDs são gravados de forma diferente das cassetes. O sistema de gravação MD torna possível acrescentar ou alterar títulos de faixas ou de disco após ter sido efectuada a gravação. Também é possível alterar a ordem de reprodução sem efectuar nova gravação. Devido a estas características especiais, poderão ocorrer os seguintes sintomas ao utilizar-se o MD.
- Seite 148 270(W) x 87(H) x 285(D) mm Weight: 2.3 kg Specifications subject to change without notice. SI DICHIARA CHE: L’apparecchio Sistema a minicomponenti, marca SANYO, modello JCX- 007/CP-007/RD-007/MDG-007, risponde alle prescrizioni dell’articolo 2 comma 1 del D.M.28 agosto 1995 n°548. fatto a München 28 marzo 1999...