Werbung
Multistrada 1200 Enduro
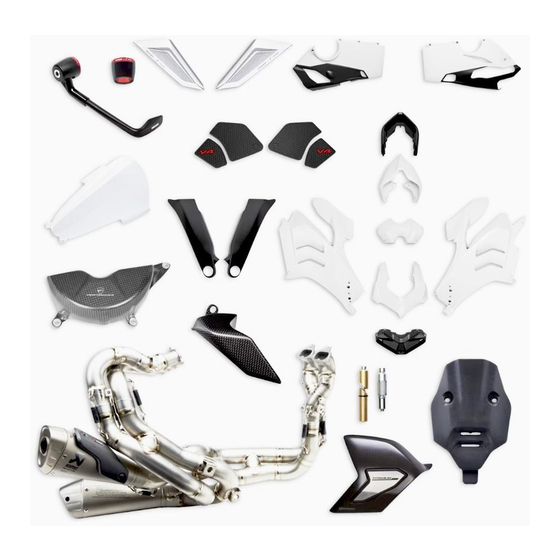
Kit scarico completo Racing
Racing complete exhaust system kit
Simbologia
Per una lettura rapida e razionale sono stati impiegati simboli che
evidenziano situazioni di massima attenzione, consigli pratici o
semplici informazioni.
Prestare molta attenzione al significato dei simboli, in quanto la
loro funzione è quella di non dovere ripetere concetti tecnici o
avvertenze di sicurezza. Sono da considerare, quindi, dei veri e
propri "promemoria" .
Consultare questa pagina ogni volta che sorgeranno dubbi sul loro
significato.
Attenzione
La non osservanza delle istruzioni riportate può creare una
situazione di pericolo e causare gravi lesioni personali e anche la
morte.
Importante
Indica la possibilità di arrecare danno al veicolo e/o ai suoi
componenti se le istruzioni riportate non vengono eseguite.
Note
Fornisce utili informazioni sull'operazione in corso.
Riferimenti
I particolari evidenziati in grigio e riferimento numerico (Es.
rappresentano l'accessorio da installare e gli eventuali componenti
di montaggio forniti a kit.
I particolari con riferimento alfabetico (Es.
componenti originali presenti sul motoveicolo.
Tutte le indicazioni destro o sinistro si riferiscono al senso di marcia
del motociclo.
Avvertenze generali
Attenzione
Le operazioni riportate nelle pagine seguenti devono essere
eseguite da un tecnico specializzato o da un'officina autorizzata
DUCATI.
Attenzione
Le operazioni riportate nelle pagine seguenti se non eseguite a
regola d'arte possono pregiudicare la sicurezza del pilota.
Note
Documentazione necessaria per eseguire il montaggio del Kit
è il MANUALE OFFICINA, relativo al modello di moto in vostro
possesso.
Note
Nel caso fosse necessaria la sostituzione di un componente del kit
consultare la tavola ricambi allegata.
1
)
A
) rappresentano i
ISTR - 780 / 00
Symbols
To allow quick and easy consultation, this manual uses graphic
symbols to highlight situations in which maximum care is required,
as well as practical advice or information.
Pay attention to the meaning of the symbols since they serve to
avoid repeating technical concepts or safety warnings throughout
the text. The symbols should therefore be seen as real reminders.
Please refer to this page whenever in doubt as to their meaning.
Warning
Failure to follow these instructions might give raise to a dangerous
situation and provoke severe personal injuries or even death.
Caution
Failure to follow these instructions might cause damages to the
vehicle and/or its components.
Notes
Useful information on the procedure being described.
References
Parts highlighted in grey and with a numeric reference
1
(Example
) are the accessory to be installed and any assembly
components supplied with the kit.
Parts with an alphabetic reference (Example
components fitted on the vehicle.
Any right- or left-hand indication refers to the vehicle direction of
travel.
General notes
Warning
Carefully perform the operations on the following pages since they
might negatively affect rider safety.
Warning
Carefully perform the operations on the following pages since they
might negatively affect rider safety.
Notes
The following documents are necessary for assembling the Kit:
WORKSHOP MANUAL of your bike model.
Notes
Should it be necessary to change any kit parts, please refer to the
attached spare part table.
96480951A
A
) are the original
1
Werbung
Inhaltsverzeichnis

Verwandte Anleitungen für DUCATI Performance Racing


Inhaltszusammenfassung für DUCATI Performance Racing
- Seite 1 Multistrada 1200 Enduro ISTR - 780 / 00 96480951A Kit scarico completo Racing Racing complete exhaust system kit Simbologia Symbols Per una lettura rapida e razionale sono stati impiegati simboli che To allow quick and easy consultation, this manual uses graphic...
- Seite 2 Warning Il presente kit di scarico è per utilizzo esclusivo su pista (esempio: This exhaust kit is for racing use (i.e., closedcourse competition) gare sportive su circuiti).Dopo il montaggio del kit, il motoveicolo only. After mounting this exhaust kit, the vehicle cannot be used non può...
- Seite 3 Smontaggio componenti originali Removing the original components Attenzione Warning Il motore e le parti del sistema di scarico diventano molto calde The engine and exhaust parts become hot when the motorcycle con l'uso della motocicletta, e rimangono calde ancora per lungo engine is running and will stay hot for some time after the engine tempo dopo aver fatto funzionare il motore.
-
Seite 4: Removing The Silencer
Smontaggio silenziatore Removing the silencer Svitare le n.3 viti (F1) di fissaggio del paracalore (F) al silenziatore Loosen no.3 screws (F1) fastening heat guard (F) to silencer (D) (D) e al presilenziatore (E). and pre-silencer (E). Rimuovere il paracalore (F). Remove heat guard (F). - Seite 5 G1 G2 E1 E2 E3 Smontaggio presilenziatore Removing the pre-silencer Operando sul lato destro del motoveicolo, svitare la vite (E1) con Working on vehicle RH side, loosen screw (E1) with washer (E2) rondella (E2) e rimuovere il passacavo (E3). and remove cable ring (E3). Recuperare la vite (E1).
- Seite 6 H1 H3 Operando sul lato sinistro del motoveicolo, smontare la molla (L) Working on motorcycle's LH side, disassemble spring (L) using a utilizzando un tiramolle commerciale. spring stretcher available on the market. Operando sul cilindro orizzontale, svitare i n.3 dadi di fissaggio Working on horizontal cylinder, loosen no.3 retaining nuts (H1).
- Seite 7 Montaggio componenti kit Kit installation Importante Caution Verificare, prima del montaggio, che tutti i componenti risultino Check that all components are clean and in perfect condition puliti e in perfetto stato. before installation. Adottare tutte le precauzioni necessarie per evitare di danneggiare Adopt any precaution necessary to avoid damages to any part of qualsiasi parte nella quale ci si trova ad operare.
- Seite 8 ISTR 780 / 00...
- Seite 9 Montaggio collettori Manifold assembly Inserire il collettore (2) sul tubo di scarico orizzontale (H) fino a Fit manifold (2) fully home on horizontal exhaust pipe (H). battuta. Fit exhaust gasket (H2) to horizontal head stud bolts and fit Inserire la guarnizione di scarico (H2) sui prigionieri della testa horizontal exhaust pipe (H) by screwing no.3 original nuts (H1) orizzontale e montare il tubo di scarico orizzontale (H) avvitando without tightening them.
- Seite 10 20 Nm ± 10% ISTR 780 / 00...
- Seite 11 Premontaggio gruppo silenziatore omologato Type-approved silencer unit pre-assembly Inserire la fascetta (8) sul collo (1A) del silenziatore (1) orientata Fit clamp (8) on silencer (1) neck (1A), aiming it as shown in the come mostrato in figura. figure. Premontare le n.2 clips (6) sul silenziatore (1). Pre-assemble no.
- Seite 12 18 Nm ± 10% 22 Nm ± 10% 10 Nm ± 10% 10 Nm ± 10% 10 Nm ± 10% ISTR 780 / 00...
- Seite 13 Serrare l’impianto di scarico Racing nell’ordine seguente: Tighten the Racing exhaust system fixing elements in the following order: Operando sul lato destro del motoveicolo, serrare la vite originale (E1) alla coppia indicata.
- Seite 14 5 Nm ± 10% 5 Nm ± 10% 5 Nm ± 10% 5 Nm ± 10% Montaggio paracalore Fitting the heat guard Operando sul lato destro del motoveicolo, posizionare il paracalore Working on vehicle RH side, position the heat guard (5) and start (5) e impuntare le n.3 viti (7).
- Seite 15 20 Nm ± 10% 10 Nm ± 10% 24 Nm ± 10% 10 Nm ± 10% 20 Nm ± 10% Rimontaggio paracoppa Reassembling the sump guard Operando sul lato sinistro del motoveicolo, posizionare il paracoppa Working on vehicle LH side, position sump guard (A), start the (A), impuntare la vite originale (A1) sulla piastra portapedana original screw (A1) on the LH front footpeg holder plate (B) and no.
- Seite 16 Calibrazione centralina controllo motore Engine control unit calibration Note Notes Il kit silenziatori Racing viene fornito con MAP-KEY che consente The Racing silencer kit is supplied with MAP-KEY, which enables il download della calibrazione centralina controllo motore engine control unit "Performance" calibration download.
- Seite 17 Scollegare dalla spina (T) il coperchio connettore (U). Disconnect connector cover (T) from plug (U). Collegare alla spina (T) l'abilitatore centralina racing (map-key) (3). Connect Racing control unit enabler (mapkey) (3) to plug (T). Importante Caution Per effettuare il download è necessario rivolgersi ad un’Officina To download, contact a Ducati Authorised Service Centre.
- Seite 18 10 Nm ± 10% 10 Nm ± 10% Rimontaggio sella pilota Rider seat reassembly Posizionare la parte anteriore della sella pilota (S2), provvista di Position the front side of the rider seat (S2), provided with slots asole (S6), nelle guide (S3). (S6), in the guides (S3).
- Seite 19 Rimontaggio sella passeggero Passenger seat reassembly Lubrificare la sede (V1) del perno (S7) con SHELL GADUS S2 V220 Lubricate the seat (V1) of the pin (S7) with SHELL GADUS S2 V220 AD 2. AD 2. Posizionare la sella passeggero (S1) e inserire la linguetta (S8) Position passenger seat (S1) and insert the tab (S8) into the nell’alloggio (V2) presente all’interno della vasca portaoggetti.
- Seite 20 NOTE / NOTES ISTR 780 / 00...
- Seite 21 Multistrada 1200 Enduro ISTR - 780 / 00 96480951A Kit système d’échappement complet Racing Kit kompletter Racing-Auspuff Symboles Symbole Pour faciliter la consultation de ce manuel, des symboles signalent Zum schnellen und übersichtlichen Lesen werden Symbole des situations exigeant le maximum d'attention, des conseils verwendet, die außerordentlich wichtige Situationen, praktische...
- Seite 22 Gesetze und Verordnungen zu beachten. Pos. Designation Bezeichnung Silencieux Schalldämpfer Collecteur 2 en 1 2 in 1-Krümmer Dispositif d'activation boîtier électronique racing (map-key) Freischalter Racing-Steuergerät (Map-Key) Ressort Feder Pare-chaleur Hitzeschutz Clip Clip Vis tbhcf M5x12 Geflanschte Linseninnensechskantschraube M5x12...
-
Seite 23: Ausbau Der Original-Bestandteile
Dépose composants d'origine Ausbau der Original-Bestandteile Attention Achtung Le moteur et le système d'échappement atteignent des Der Motor und die Auspuffanlage werden während der Fahrt sehr températures très élevées pendant l'utilisation de la moto et heiß und behalten diese Temperaturen auch nach Abstellen des restent chauds longtemps après l'arrêt du moteur. - Seite 24 Dépose du silencieux Ausbau des Schalldämpfers Desserrer les 3 vis (F1) de fixation du pare-chaleur (F) au silencieux Die 3 Schrauben (F1) für die Befestigung des Wärmeschutzes (F) (D) et au pré-silencieux (E). am Schalldämpfer (D) und am Vorschalldämpfer (E) lösen. Déposer le pare-chaleur (F).
- Seite 25 G1 G2 E1 E2 E3 Dépose du pré-silencieux Abnahme des Vorschalldämpfers En intervenant du côté droit du motocycle, desserrer la vis (E1) An der rechten Motorradseite die Schraube (E1) mit avec rondelle (E2) et déposer le passe-fil (E3). Unterlegscheibe (E2) lösen, dann die Kabelführung (E3) entfernen. Récupérer la vis (E1).
- Seite 26 H1 H3 En intervenant du côté gauche du motocycle déposer le ressort (L) An der linken Motorradseite die Feder (L) mit einem à l'aide d'un tire-ressort disponible dans le commerce. handelsüblichen Federzieher entfernen. En intervenant sur le cylindre horizontal, desserrer les trois écrous Die 3 Klemmmuttern (H1) am waagrechten Zylinder lösen.
-
Seite 27: Montage Der Komponenten Des Kits
Pose composants kit Montage der Komponenten des Kits Important Wichtig Vérifier, avant la pose, que tous les composants sont propres et en Vor der Montage überprüfen, dass sich alle Komponenten im parfait état. sauberen und perfekten Zustand befinden. Adopter toutes les précautions nécessaires pour éviter Alle erforderlichen Vorsichtsmaßnahmen treffen, um eine d'endommager la surface externe des composants où... - Seite 28 ISTR 780 / 00...
- Seite 29 Pose du collecteur horizontal Montage der Krümmer Den Krümmer (2) bis auf Anschlag am Auspuffrohr (H) des Pose collecteurs waagrechten Zylinders einfügen. Die Auspuffdichtung (H2) über die Stiftschrauben des waagrechten Introduire le collecteur (2) sur le tuyau d'échappement horizontal Zylinderkopfs fügen und das Auspuffrohr des waagrechten (H) jusqu'en butée.
- Seite 30 20 Nm ± 10% ISTR 780 / 00...
- Seite 31 Pré-montage ensemble silencieux homologué Vormontage der zugelassenen Schalldämpfereinheit Introduire le collier serre-flex (8) sur le col (1A) du silencieux (1) et Die Schelle (8) am Bund (1A) des Schalldämpfers (1) anfügen und l'orienter comme la figure le montre. gemäß Abbildung ausrichten. Pré-monter les 2 clips (6) sur le silencieux (1).
- Seite 32 18 Nm ± 10% 22 Nm ± 10% 10 Nm ± 10% 10 Nm ± 10% 10 Nm ± 10% ISTR 780 / 00...
- Seite 33 Muttern der Auspuffanlage werden der mittlere Ständer und der Seitenständer nicht dargestellt. Serrer le système d'échappement Racing dans l'ordre suivant : Die Schrauben und Muttern der Racing-Auspuffanlage in der En intervenant du côté droit du motocycle, serrer la vis d'origine folgenden Reihenfolge anziehen: (E1) au couple prescrit.
- Seite 34 5 Nm ± 10% 5 Nm ± 10% 5 Nm ± 10% 5 Nm ± 10% Pose pare-chaleur Montage des Wärmeschutzes En intervenant du côté droit du motocycle positionner le pare- An der rechten Seite des Motorrads den Hitzeschutz (5) anordnen chaleur (5) et présenter les 3 vis (7).
- Seite 35 20 Nm ± 10% 10 Nm ± 10% 24 Nm ± 10% 10 Nm ± 10% 20 Nm ± 10% Repose sous-carter d'huile Montage des Ölwannenschutzes En intervenant du côté gauche du motocycle, positionner le sous- An der linken Seite des Motorrads nun den Ölwannenschutz carter d'huile (A), présenter la vis d'origine (A1) sur la platine de (A) anordnen, die Original-Schraube (A1) in der vorderen linken support repose-pied avant gauche (B) et les 2 vis d'origine (A2) sur...
- Seite 36 Calibrage centrale commande moteur Kalibrierung des Motorsteuergeräts Remarques Hinweis Le kit silencieux Racing est fourni avec MAP-KEY qui permet de Das Kit Racing-Schalldämpfer wird mit dem MAP-KEY geliefert, télécharger le réglage de la centrale commande moteur der das Download der „Performance”-Kalibrierung des «...
- Seite 37 Débrancher de la fiche (T) le couvercle connecteur (U). Die Abdeckung des Verbinders (U) vom Stecker (T) lösen. Relier à la fiche (T) le dispositif d'activation boîtier électronique Den Stick des Racing-Mappings (Map-Key) (3) an den Stecker (T) Racing (map-key) (3). schließen.
-
Seite 38: Montage Der Fahrersitzbank
10 Nm ± 10% 10 Nm ± 10% Repose de la selle pilote Montage der Fahrersitzbank Positionner la partie avant de la selle pilote (S2), dotée de crans Den vorderen, mit den Langlöchern (S6) versehenen Teil der (S6), dans les guides (S3). Fahrersitzbank (S2) in die Führungen (S3) einfügen. - Seite 39 Repose selle passager Montage der Beifahrersitzbank Lubrifier le logement (V1) du pivot (S7) avec SHELL GADUS S2 Den Sitz (V1) des Bolzen (S7) mit SHELL GADUS S2 V220 AD 2 V220 AD 2. schmieren. Positionner la selle passager (S1) et insérer la languette (S8) dans Die Beifahrersitzbank (S1) anordnen und die Lasche (S8) in die le logement (V2) qui se trouve à...
- Seite 40 REMARQUES / HINWEIS ISTR 780 / 00...
- Seite 41 Multistrada 1200 Enduro ISTR - 780 / 00 96480951A Conjunto de escape completo Racing Racing complete exhaust system kit Símbolos Symbols Para uma leitura rápida e racional, foram utilizados símbolos que To allow quick and easy consultation, this manual uses graphic evidenciam situações de máxima atenção, conselhos práticos ou...
- Seite 42 Warning Este kit de escape é para a utilização exclusiva na pista (exemplo: This exhaust kit is for racing use (i.e., closedcourse competition) provas desportivas em circuitos). Após a montagem do kit, a moto only. After mounting this exhaust kit, the vehicle cannot be used não pode circular em estradas públicas.O proprietário empenha-se...
- Seite 43 Desmontagem dos componentes originais Removing the original components Atenção Warning O motor e as partes do sistema de escape ficam muito quentes The engine and exhaust parts become hot when the motorcycle com o uso da moto, permanecendo quentes por muito tempo engine is running and will stay hot for some time after the engine mesmo depois de o motor ter sido desligado.
- Seite 44 Desmontagem do silenciador Removing the silencer Desatarraxe os 3 parafusos (F1) de fixação da proteção anticalor (F) Loosen no.3 screws (F1) fastening heat guard (F) to silencer (D) do silenciador (D) e do pré-silenciador (E). and pre-silencer (E). Remova a proteção anticalor (F). Remove heat guard (F).
- Seite 45 G1 G2 E1 E2 E3 Desmontagem do pré-silenciador Removing the pre-silencer Atuando no lado direito da moto, desatarraxe o parafuso (E1) com Working on vehicle RH side, loosen screw (E1) with washer (E2) anilha (E2) e remova o passa-cabo (E3). and remove cable ring (E3).
- Seite 46 H1 H3 Atuando no lado esquerdo da moto, desmonte a mola (L) utilizando Working on motorcycle's LH side, disassemble spring (L) using a um esticador de molas disponível no comércio. spring stretcher available on the market. Atuando no cilindro horizontal, desatarraxe as 3 porcas de fixação Working on horizontal cylinder, loosen no.3 retaining nuts (H1).
-
Seite 47: Montagem Dos Componentes
Montagem dos componentes Kit installation Importante Caution Verifique, antes da montagem, se todos os componentes estão Check that all components are clean and in perfect condition limpos e em perfeito estado. before installation. Adote todas as precauções necessárias para evitar danificar Adopt any precaution necessary to avoid damages to any part of qualquer peça com a qual deve trabalhar. - Seite 48 ISTR 780 / 00...
- Seite 49 Montagem do coletor horizontal Manifold assembly Fit manifold (2) fully home on horizontal exhaust pipe (H). Montagem dos coletores Fit exhaust gasket (H2) to horizontal head stud bolts and fit horizontal exhaust pipe (H) by screwing no.3 original nuts (H1) Introduza o coletor (2) no tubo de escape horizontal (H) até...
- Seite 50 20 Nm ± 10% ISTR 780 / 00...
- Seite 51 Pré-montagem do grupo do silenciador homologado Type-approved silencer unit pre-assembly Insira a braçadeira (8) no gargalo (1A) do silenciador (1), orientada Fit clamp (8) on silencer (1) neck (1A), aiming it as shown in the como mostrado na figura. figure. Pré-monte os 2 clips (6) no silenciador (1).
- Seite 52 18 Nm ± 10% 22 Nm ± 10% 10 Nm ± 10% 10 Nm ± 10% 10 Nm ± 10% ISTR 780 / 00...
- Seite 53 To better understand the exhaust system fixing element descansos lateral e central não são mostrados. tightening, side and central stands are not shown. Tighten the Racing exhaust system fixing elements in the Aperte o sistema de escape Racing na ordem seguinte: following order: Atuando do lado direito da moto, aperte o parafuso original (E1) ao binário indicado.
- Seite 54 5 Nm ± 10% 5 Nm ± 10% 5 Nm ± 10% 5 Nm ± 10% Montagem da proteção anticalor Fitting the heat guard Atuando no lado direito da moto, posicione a proteção anticalor (5) Working on vehicle RH side, position the heat guard (5) and start e encoste os 3 parafusos (7).
- Seite 55 20 Nm ± 10% 10 Nm ± 10% 24 Nm ± 10% 10 Nm ± 10% 20 Nm ± 10% Remontagem do protetor do cárter Reassembling the sump guard Atuando no lado esquerdo da moto, posicione o protetor do cárter Working on vehicle LH side, position sump guard (A), start the (A), encoste o parafuso original (A1) na placa porta-patim dianteira original screw (A1) on the LH front footpeg holder plate (B) and no.
- Seite 56 Engine control unit calibration Notas Notes O conjunto de silenciadores Racing é fornecido com MAP-KEY que The Racing silencer kit is supplied with MAP-KEY, which enables permite descarregar a calibração da unidade eletrónica de controlo engine control unit "Performance" calibration download.
- Seite 57 Desligue pela ficha (T) a tampa do conector (U). Disconnect connector cover (T) from plug (U). Ligue à ficha (T) o ativador da unidade eletrónica racing (map-key) Connect Racing control unit enabler (mapkey) (3) to plug (T). (3). Caution Importante To download, contact a Ducati Authorised Service Centre.
- Seite 58 10 Nm ± 10% 10 Nm ± 10% Remontagem do assento do piloto Rider seat reassembly Posicione a parte dianteira do assento do condutor (S2), provida de Position the front side of the rider seat (S2), provided with slots olhais (S6), nas guias (S3). (S6), in the guides (S3).
- Seite 59 Remontagem do assento do passageiro Passenger seat reassembly Lubrifique a sede (V1) do pino (S7) com SHELL GADUS S2 V220 Lubricate the seat (V1) of the pin (S7) with SHELL GADUS S2 V220 AD 2. AD 2. Coloque o assento do passageiro (S1) e introduza a lingueta (S8) Position passenger seat (S1) and insert the tab (S8) into the no alojamento (V2) presente no interior do compartimento porta- housing (V2) present inside the glove compartment.
- Seite 60 NOTAS / NOTES ISTR 780 / 00...
-
Seite 61: Advertencias Generales
Multistrada 1200 Enduro ISTR - 780 / 00 96480951A Kit escape completo Racing スリップオンレーシングサイレンサーキット レーシングエキゾーストユニットキット Símbolos シンボル Para una lectura rápida y racional se han empleado símbolos que 素早くかつ合理的に読み進めることができるように、本マニュア evidencian situaciones de máxima atención, consejos prácticos o ルではいくつかのシンボルを導入し、最大限の注意を払う必要が simples informaciones. Prestar mucha atención al significado de ある状況や、推奨事項、または一般情報を明確にしてあります。... - Seite 62 および規制を必ず遵守してください。 de carreras. Pos. Denominacion 説明 Silenciador サイレンサー Colector 2 en 1 2 in 1 マニホールド Habilitador central racing (map-key) レーシングコントロールユニットイネーブラー (MAP-KEY) Muelle スプリング Protector calor ヒートガード Clip クリップ Tornillo especial TBEIF M5x12 スクリュー TBEIF M5X12 Abrazadera クランプ...
- Seite 63 Desmontaje protector cárter オリジナル部品の取り外し Atención 注記 El motor y el sistema de escape alcanzan altas temperaturas エンジンおよびエキゾーストシステム部品は、モーターサイクル cuando la motocicleta está en marcha y permanecen calientes を使用することにより非常に高温になります。 durante mucho tiempo después de apagar el motor. またエンジンを切った後も高温状態が長時間続きます。 Para manipular estas partes, usar guantes aislantes o esperar これらの部品で作業をおこなう際は、保護手袋を着用するか、部...
- Seite 64 Desmontaje silenciador サイレンサーの取り外し Desatornillar los 3 tornillos (F1) que fijan el protector calor (F) al ヒートガード ( ) をサイレンサー (D) とプリサイレンサー (E) silenciador (D) y al pre-silenciador (E). に固定している 3 本のスクリュー ( 1) を緩めて外します。 Quitar el protector calor (F). ヒートガード (F) を取り外します。 Aflojar la abrazadera (J).
- Seite 65 G1 G2 E1 E2 E3 Desmontaje pre-silenciador プリサイレンサーの取り外し Operando desde el lado derecho de la motocicleta, desatornillar el 車両の右側で作業します。スクリュー (E1) を緩めてワッシャー tornillo (E1) con arandela (E2) y quitar el pasacable (E3). (E2) と一緒に外し、オイルパンガード (E3) を取り外します。 Recuperar el tornillo (E1). スクリュー (E1) を回収します。 Girar la polea (G) de la válvula de escape para simplificar la salida エキゾーストバルブのプーリー...
- Seite 66 H1 H3 Operando desde el lado izquierdo de la moto, desmontar el muelle 車両の左側で作業します。市販のスプリングテンショナーを使用 (L) utilizando un tensor de muelles comercial. してスプリング (L) を取り外します。 Operando en el cilindro horizontal, desatornillar las 3 tuercas de ホリゾンタルシリンダーの作業をおこないます。3 個の固定ナッ fijación (H1). ト (H1) を緩めて外します。 Extraer el tubo de escape horizontal (H) del pre-silenciador (E) y ホリゾンタルエキゾーストパイプ...
- Seite 67 Montaje componentes kit キット部品の取り付け Importante 重要 Controlar, antes del montaje, que todos los componentes se 取り付け前にすべての部品に汚れがなく、完璧な状態であること encuentren limpios y en perfecto estado. を確認します。作業する部品の外側表面を傷つけないために、必 Adoptar todas las precauciones necesarias para evitar daños en la 要な予防措置を取ってください superficie exterior de los componentes donde se debe operar. エキゾーストバルブケーブルの配置...
- Seite 68 ISTR 780 / 00...
- Seite 69 Montaje colector horizontal ホリゾンタルマニホールドの取り付け Introducir la junta de escape (H2) en los espárragos de la culata エキゾーストガスケット (H2) をホリゾンタルヘッドのスタッド horizontal y montar el tubo de escape horizontal (H) atornillando sin ボルトに挿入します。ホリゾンタルヘッドエキゾーストパイプ apretar las 3 tuercas originales (H1). (H) を取り付け、3 個のオリジナルナット (H1) を締め付けずに ねじ込みます。...
- Seite 70 20 Nm ± 10% ISTR 780 / 00...
- Seite 71 Pre-montaje grupo silenciador homologado 基準適合サイレンサーユニットの仮取り付け Introducir la abrazadera (8) en el cuello (1A) del silenciador (1) サイレンサー (1) のネック (1A) にクランプ (8) を図のように orientada como ilustra la figura. 向けて挿入します。 Premontar los 2 clips (6) en el silenciador (1). サイレンサー (1) に 2 個のクリップ (6) に仮取り付けします。 Montaje silenciador サイレンサーの取り付け...
- Seite 72 18 Nm ± 10% 22 Nm ± 10% 10 Nm ± 10% 10 Nm ± 10% 10 Nm ± 10% ISTR 780 / 00...
- Seite 73 Para comprender mejor el ajuste del sistema de escape, no se エキゾーストシステムの締め付けを分かりやすくするため、サイ muestran los caballetes lateral y central. ドスタンドおよびセンタースタンドは図に示されていません。 Ajustar el sistema de escape Racing en el siguiente orden: レーシングエキゾーストシステムを以下の順に締め付けます。 Operando desde el lado derecho de la motocicleta, ajustar el 車両の右側で作業します。オリジナルのスクリュー (E1) を規定...
- Seite 74 5 Nm ± 10% 5 Nm ± 10% 5 Nm ± 10% 5 Nm ± 10% Montaje protector calor ヒートガードの取り付け Operando desde el lado derecho de la motocicleta, colocar el 車両の右側で作業します。ヒートガード (5) を配置し、3 本のス protector calor (5) e introducir los 3 tornillos (7). クリュー...
- Seite 75 20 Nm ± 10% 10 Nm ± 10% 24 Nm ± 10% 10 Nm ± 10% 20 Nm ± 10% Montaje protector cárter オイルパンガードの取り付け Operando desde el lado izquierdo de la motocicleta, colocar el 車両の左側で作業します。ヒートガード (A) を配置し、オリジナ protector cárter motor (A), introducir el tornillo original (A1) en la ルのスクリュー...
- Seite 76 OPEN Calibración central de control del motor エンジンコントロールユニットのキャリブレーション Notas 参考 El kit silenciadores Racing se suministra con MAP-KEY que レーシングサイレンサーキットには、ECU キャリブレーション permite la descarga de la calibración de la central control motor “Performance”のダウンロードが可能な MAP-KEY が付属しま “Performance” . す。 Introducir la llave (S) en la cerradura y girarla en el sentido de las シートロックにキー...
- Seite 77 強力な洗剤や溶剤でMAP-KEY 装置を絶対に清掃しないでくださ い。取り返しのつかない損傷の原因になることがあります。 Al final de la calibración de la central, desconectar el habilitador central racing (map-key) (3) e introducir la tapa conector (U) en la コントロールユニットのキャリブレーションが終了したら、レー clavija (T). シングコントロールユニットアクチュエーター (MAP-KEY)(3) の 接続を切り離し、コネクターキャップ (U) をプラグ (T) に差し...
- Seite 78 10 Nm ± 10% 10 Nm ± 10% Montaje asiento piloto ライダーシートの取り付け Colocar la parte delantera del asiento piloto (S2), con ojales (S6), ライダーシート (S2) の溝 (S6) が設けられている前部をガイド en las guías (S3). (S3) に配置します。 Presionar el asiento piloto (S2) hacia la parte delantera de la ライダーシート...
- Seite 79 Montaje asiento pasajero パッセンジャーシートの取り付け Lubricar el alojamiento (V1) del perno (S7) con SHELL GADUS S2 ピン (S7) の取り付け位置 (V1) を SHELL GADUS S2 V220 AD 2 V220 AD 2. で潤滑します。 Posicionar el asiento pasajero (S1) e introducir la lengüeta (S8) パッセンジャーシート...
- Seite 80 NOTAS / 参考 ISTR 780 / 00...
- Seite 81 DUCATI PERFORMANCE レース専用部品 ご注文書 ご注文商品 商品名 P/N P/N 商品名 商品名 P/N P/N 商品名 P/N 商品名 お客様ご記入欄 私は上記レース専用部品を下記車両に装着し、サーキット走行のみに 利用し、一般公道には利用しません。 車台番号 ZDM モデル名 お客様署名 ご注文日 ドゥカティ正規ネットワーク店記入欄 お客様に上記レース専用部品を販売し、レース専用部品のご利用方法を 説明いたしました。 販売店署名 販売日 年 月 日 販売店様へお願い 1. 上記ご記入の上、弊社アフターセールス部までFAXしてください。FAX:03-6692-1317 1. 上記ご記入の上、弊社アフターセールス部までFAXしてください。FAX:03-6692-1317 2. 取り付け車両1台に1枚でご使用ください。...