Storz ROTOCUT G2 2672 RC Serie Handbuch
Elektromechanischer morcellator; motorensystem unidrive s iii model 20701020-1
Inhaltsverzeichnis
Elektromechanischer Morcellator ROTOCUT G2 Modelle 2672x RC
Motorensystem UNIDRIVE
®
S III Modell 20701020-1
ROTOCUT G2 Electromechanical Morcellator models 2672x RC
UNIDRIVE
S III motor system model 20701020-1
®
Электромеханический морцеллятор ROTOCUT G2 модели 2672x RC
Моторная система UNIDRIVE
®
S III модели 20701020-1
Inhaltsverzeichnis
Fehlerbehebung

Verwandte Anleitungen für Storz ROTOCUT G2 2672 RC Serie


Inhaltszusammenfassung für Storz ROTOCUT G2 2672 RC Serie
- Seite 1 Elektromechanischer Morcellator ROTOCUT G2 Modelle 2672x RC Motorensystem UNIDRIVE ® S III Modell 20701020-1 ROTOCUT G2 Electromechanical Morcellator models 2672x RC UNIDRIVE S III motor system model 20701020-1 ® Электромеханический морцеллятор ROTOCUT G2 модели 2672x RC Моторная система UNIDRIVE ® S III модели 20701020-1...
-
Seite 3: Wichtiger Hinweis Für Die Benutzer Von Karl Storz Geräten Und Instrumenten
Vielen Dank für Ihr Vertrauen in den Namen Thank you for your confidence in the brand name KARL STORZ. Auch in diesem Produkt steckt KARL STORZ. Like all of our other products, Благодарим Вас за доверие, оказанное unsere ganze Erfahrung und Sorgfalt. Sie und this product is the result of years of experience торговой... -
Seite 4: Geräteabbildungen
Geräteabbildungen Images of the equipment Сопроводительные иллюстрации Geräteabbildungen Images of the equipment Сопроводительные иллюстрации... -
Seite 6: Bedienungselemente, Anzeigen, Anschlüsse Und Ihre Funktion
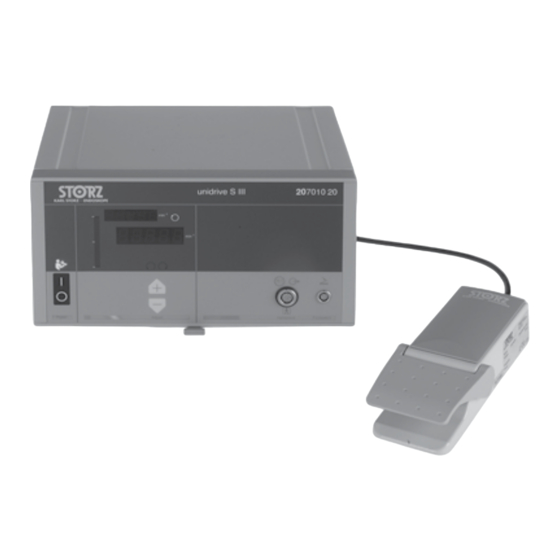
Controls, displays, Bedienungselemente, Элементы управления, Anzeigen, Anschlüsse connectors, индикаторы, разъемы and their uses und ihre Funktion и их функции Bedienungselemente, Controls, displays, Элементы управления, Anzeigen, Anschlüsse connectors, индикаторы, разъемы und ihre Funktion and their uses и их функции... - Seite 7 Controls, displays, Bedienungselemente, Элементы управления, Anzeigen, Anschlüsse connectors, индикаторы, разъемы and their uses und ihre Funktion и их функции Q Netzschalter zum Ein- bzw. Ausschalten Q Power switch for turning the unit on and off Q Сетевой переключатель для включения/ des Gerätes выключения прибора W Bargraph display for indicating the actual W Balkenanzeige zur Anzeige der Ist- bzw.
- Seite 8 Controls, displays, Bedienungselemente, Элементы управления, Anzeigen, Anschlüsse connectors, индикаторы, разъемы and their uses und ihre Funktion и их функции } q w VIII...
- Seite 9 Controls, displays, Bedienungselemente, Элементы управления, Anzeigen, Anschlüsse connectors, индикаторы, разъемы and their uses und ihre Funktion и их функции Q Zangeneinsatz Q Forceps insert Q Рабочая вставка-щипцы W Outer sheath W Außenschaft W Внешний тубус E Handgriff E Handle E Рукоятка R CLICKLINE tenaculum forceps, 15 mm R CLICKLINE Tenaculum-Zange, 15 mm R Щипцы...
-
Seite 10: Symbolerläuterungen
Symbolerläuterungen Symbols employed Пояснение символов Symbolerläuterungen Symbols employed Пояснение символов Vor Inbetriebnahme des Gerätes Read the instructions carefully before operating Перед началом эксплуатации прибора Gebrauchsanweisung beachten! equipment! ознакомьтесь с инструкцией по эксплуатации! Осторожно! Соблюдайте указания по Vorsicht, Bedienung beachten! Caution, observe operating instructions! эксплуатации! Anschlussbuchse Motor/Handstück (M) Motor/handpiece connections (M) -
Seite 11: Inhaltsverzeichnis
Inhalt Contents Содержание Wichtiger Hinweis für die Benutzer Important note for users of Важная информация для лиц, von KARL STORZ Geräten und KARL STORZ devices and пользующихся приборами и Instrumenten .......... III instruments ..........III инструментами KARL STORZ ..... III Geräteabbildungen ........ IV Images of the equipment ...... - Seite 12 Inhalt Contents Содержание Instandhaltung ........38 Maintenance ......... 38 Технический уход ........ 38 8. 1 Sicherungswechsel ........38 8. 1 Changing the fuse ........38 8. 1 Замена предохранителей ...... 38 8. 2 Demontage des Morcellator- 8. 2 Dismantling the Morcellator handle 8.
-
Seite 13: Allgemeines
Allgemeines General information Общая информация Allgemeines General information Общая информация 5. 1 Systembeschreibung 5. 1 System description 5. 1 Описание системы Elektromechanischer Morcellator ROTOCUT G2 Electromechanical Morcellator Электромеханический морцеллятор ROTOCUT G2 für die endoskopische for endoscopic morcellation in conjunction ROTOCUT G2 для эндоскопической Morcellation in Verbin dung mit dem with the UNIDRIVE ®... - Seite 14 ® S III произ- UNIDRIVE ® S III zeichnet sich durch modernste system features state-of-the-art electronics and водства KARL STORZ отличается самой совре- Elektronik und Flexibilität aus. flexibility. менной электроникой и универсальностью. Durch einen bürstenlosen Hohlwellen-Hoch- The brushless high-performance, hollow shaft Благодаря бесщеточному мощному электромо-...
-
Seite 15: Sicherheitshinweise
Sicherheitshinweise Safety instructions Инструкция по технике безопасности Sicherheitshinweise Safety instructions Инструкция по технике безопасности Sicherheitshinweise sind Maßnahmen zum Schutz Safety instructions are measures intended to des Anwenders und Patienten vor Gefährdungen, protect the user and patients from the risks which Указания... - Seite 16 Sicherheitshinweise Safety instructions Инструкция по технике безопасности WARNUNG: Lesen Sie diese WARNING: Read this instruction manual ПРЕДУПРЕЖДЕНИЕ: Перед вводом Gebrauchsanweisung genau durch, bevor thoroughly before using the equipment. прибора в эксплуатацию внимательно Sie das Gerät in Betrieb nehmen. Lesen Read the section on safety instructions прочтите...
- Seite 17 нием, указанным на заводской mit Zubehörteilen und Einwegartikeln items which have been designated for use табличке. verwendet werden, die von KARL STORZ by KARL STORZ. ОСТОРОЖНО: При замене предохра- für den entsprechenden Zweck нителей используйте только предохра- vorgesehen sind.
- Seite 18 Sicherheitshinweise Safety instructions Инструкция по технике безопасности VORSICHT: Ein Eindringen von Flüssigkeit CAUTION: Avoid allowing liquids to enter ОСТОРОЖНО: Не допускайте попада- in das Gehäuse ist unbedingt zu the device. Do not store liquids on or ния жидкости в корпус прибора. Не vermeiden.
-
Seite 19: Zweckbestimmung
Sicherheitshinweise Safety instructions Инструкция по технике безопасности 6. 2 Zweckbestimmung 6. 2 Intended use 6. 2 Целевое назначение Die Motorsteuereinheit dient zur Regelung und The purpose of the motor control unit is used for Блок управления мотором служит для регули- Steuerung von Motoren oder Handstücken und the regulation and control of motors or handpieces рования... -
Seite 20: Qualifikation Des Anwenders
ющие для этого необходимые знания. Your local representative or responsible Die zuständige Gebietsvertretung oder der KARL STORZ member of staff is available to По вопросам проведения обучения по месту zuständige KARL STORZ Vertreter steht für die provide training on your premises and to give you Вашей... -
Seite 21: Anwenderprofil Arzt Und Assistenzpersonen
• Подвижность: может перемещаться при раз- мещении на тележке. • Kombination: kann mit anderen für die • Control: Can be controlled via the KARL STORZ Operationen notwendigen Geräten gleichzeitig • Сочетание: может применяться на пациенте am Patienten eingesetzt werden одновременно... -
Seite 22: Position Des Anwenders
Sicherheitshinweise Safety instructions Инструкция по технике безопасности 6. 11 Position des Anwenders 6. 11 User position 6. 11 Положение пользователя Für die Bedienung des Gerätes steht der To operate the device, the user should always be Для управления прибором пользователь Anwender innerhalb eines Sichtkegels mit standing in front of the device within a cone of должен... -
Seite 23: Aufstellen Und Bedienungshinweise
Aufstellen und Installation and operating Инструкция по установке и Bedienungshinweise instructions эксплуатации Aufstellen und Installation and operating Инструкция по установке и Bedienungshinweise instructions эксплуатации 7. 1 Auspacken 7. 1 Unpacking the device 7. 1 Распаковка Die Einheit und die Zubehörteile sorgfältig aus der Carefully remove the device and the accessories Осторожно... - Seite 24 Aufstellen und Installation and operating Инструкция по установке и Bedienungshinweise instructions эксплуатации Set-Nr. 26723 RC 11/15 mm Morcellator Set no. 26723 RC 11/15 mm Morcellator Комплект № 26723 RC 11/15 мм, морцеллятор 1 Hollow shaft motor 26720 M 1 Hohlwellen Motor 26720 M 1 мотор с полым валом 26720 M 1 Handgriff, laparoskopisch, 11 mm/15 mm, 1 Handle, laparoscopic, 11 mm/15 mm, 26720 H 1 рукоятка, лапароскопическая, 11 мм/15 мм,...
- Seite 25 Aufstellen und Installation and operating Инструкция по установке и Bedienungshinweise instructions эксплуатации Set-Nr. 26721 RC 11 mm Morcellator Set no. 26721 RC 11 mm Morcellator Комплект № 26721 RC 11 мм, морцеллятор 1 Hollow shaft motor 26720 M 1 Hohlwellen Motor 26720 M 1 мотор с полым валом 26720 M 1 Handgriff, laparoskopisch, 11 mm/15 mm, 1 Handle, laparoscopic, 11 mm/15 mm, 26720 H 1 рукоятка, лапароскопическая, 11 мм/15 мм,...
- Seite 26 Aufstellen und Installation and operating Инструкция по установке и Bedienungshinweise instructions эксплуатации Weiteres Zubehör Further accessories Другие принадлежности (für laparoskopische Anwendung): (for laparoscopic application): (для лапароскопического применения): laparoskopisch mit Standardnutzlänge 9,5 cm Laparoscopic with standard working length лапароскопические со стандартной 9.5 cm рабочей...
- Seite 27 Aufstellen und Installation and operating Инструкция по установке и Bedienungshinweise instructions эксплуатации Weiteres optionales Zubehör Further optional accessories Другие опциональные принадлежности (für laparoskopische Anwendung) (for laparoscopic application) (для лапароскопического применения) 091112-05 * (Fünferpackung) 091112-05 * (pack of five) 091112-05 * (упаковка по 5 шт.) Messer Set, 11 mm Ø, steril, zum Cutter set, 11 mm dia., sterile, for single use, Комплект...
-
Seite 28: Aufstellen Und Anschließen Des Gerätes
Aufstellen und Installation and operating Инструкция по установке и Bedienungshinweise instructions эксплуатации Extra kurze Tenaculum-Fasszange für Extra-short tenaculum forceps for laparoscopic Очень короткие захватывающие щипцы Tenaculum длиной 9,5 см для стандартного laparoskopische Standard-Anwendung 9,5 cm, standard application 9.5 cm, for reduction of лапароскопического... - Seite 29 Aufstellen und Installation and operating Инструкция по установке и Bedienungshinweise instructions эксплуатации WARNUNG: Der UNIDRIVE ® S III sowie WARNING: The UNIDRIVE ® S III including ПРЕДУПРЕЖДЕНИЕ: Система angeschlossenes Zubehör ist nicht für den the accessories connected is not intended UNIDRIVE ®...
- Seite 30 Aufstellen und Installation and operating Инструкция по установке и Bedienungshinweise instructions эксплуатации Die Steuereinheit UNIDRIVE ® S III auf eine ebene Place the UNIDRIVE ® S III control unit on a level Поставьте блок управления UNIDRIVE ® S III на Fläche stellen (siehe Abb. 3). surface (see Fig.
-
Seite 31: Karl Storz-Scb
SCB sockets q . Connect the кер в одно из гнезд SCB q . Другой конец Ende des Kabels mit einem KARL STORZ-SCB other end of the cable to the KARL STORZ-SCB кабеля соедините с управляющим устрой- ®... -
Seite 32: Inbetriebnahme
Aufstellen und Installation and operating Инструкция по установке и Bedienungshinweise instructions эксплуатации 7. 4 Inbetriebnahme 7. 4 Commissioning 7. 4 Ввод в эксплуатацию UNIDRIVE ® S III am Netz schalter Q einschalten Switch the UNIDRIVE ® S III on at the power switch Включите... - Seite 33 Aufstellen und Installation and operating Инструкция по установке и Bedienungshinweise instructions эксплуатации An die Steuereinheit können diverse Applikations- Various application instruments operated within К блоку управления можно подключать различ- instrumente angeschlossen werden, welche innerhalb various speed ranges can be connected up to the ные...
-
Seite 34: Morcellator Rotocut G2
Aufstellen und Installation and operating Инструкция по установке и Bedienungshinweise instructions эксплуатации 7. 5. 1 Morcellator ROTOCUT G2 7. 5. 1 ROTOCUT G2 Morcellator 7. 5. 1 Морцеллятор ROTOCUT G2 Betriebsmodus konfigurieren Configuring the operating mode Настройка режима работы Maximaldrehzahl Maximum speed Максимальное... - Seite 35 Aufstellen und Installation and operating Инструкция по установке и Bedienungshinweise instructions эксплуатации Werden die ± Tasten T 2 s lang nicht mehr If the ± buttons T are not pressed for 2 s, the Если кнопки ± T не нажимаются в течение betätigt, schaltet das Display wieder auf die display returns to indication of the operating 2 с, на...
-
Seite 36: Bedienung Fußschalter
Aufstellen und Installation and operating Инструкция по установке и Bedienungshinweise instructions эксплуатации 7. 5. 2 Bedienung Fußschalter 7. 5. 2 Operating the footswitch 7. 5. 2 Работа с педальным переключателем 20016230 im Betriebsmodus P5 20016230 in operating mode P5 20016230 в рабочем режиме P5 Pedal Pedal Педаль... - Seite 37 Aufstellen und Installation and operating Инструкция по установке и Bedienungshinweise instructions эксплуатации Ist ein Fehler aufgetreten, so steht vor dem If an error has occurred, the display shows an В случае возникновения ошибки перед entsprechenden Fehlercode ein ,E‘ im Display. “E”...
-
Seite 38: Einführen Des Stand Alone Trokar
Aufstellen und Installation and operating Инструкция по установке и Bedienungshinweise instructions эксплуатации 7. 5. 4 Einführen des Stand Alone Trokar 7. 5. 4 Inserting the stand-alone trocar 7. 5. 4 Введение автономного троакара Den Trokar mit montiertem Ventil und eingeführtem Insert the trocar with assembled valve and Введите... -
Seite 39: Vormontage Der Trokar-Baugruppe
Aufstellen und Installation and operating Инструкция по установке и Bedienungshinweise instructions эксплуатации 7. 5. 5 Vormontage der Trokar-Baugruppe 7. 5. 5 Preassembling the trocar 7. 5. 5 Предварительная сборка узла assembly троакара Die Komponenten in korrekt abgestimmter Größe, Select correctly coordinated components, 11 mm oder 15 mm Durchmesser, auswählen. - Seite 40 Aufstellen und Installation and operating Инструкция по установке и Bedienungshinweise instructions эксплуатации Einführen der Trokar-Baugruppe Inserting the trocar assembly Введение узла троакара Die Trokar-Baugruppe (mit montiertem Ventil und Insert the trocar assembly (with assembled valve Введите узел троакара (с установленным eingeführtem Obturator) unter optischer Kontrolle and inserted obturator) through an incision into the клапаном...
-
Seite 41: Vormontage Und Einführen Des Morcellators
Aufstellen und Installation and operating Инструкция по установке и Bedienungshinweise instructions эксплуатации 7. 5. 6 Vormontage und Einführen des 7. 5. 6 Preassembly and insertion of 7. 5. 6 Предварительная сборка и Morcellators the Morcellator введение морцеллятора Dichtungskappe aufsetzen Attaching the sealing cap Установка... - Seite 42 Aufstellen und Installation and operating Инструкция по установке и Bedienungshinweise instructions эксплуатации Messer aufsetzen Attaching the cutter Установка ножа Passend zum Außenschaft das Messer Select the cutter to suit the outer sheath. To avoid Выберите нож, подходящий для внешнего тубу- auswählen.
- Seite 43 Aufstellen und Installation and operating Инструкция по установке и Bedienungshinweise instructions эксплуатации Messer einführen Inserting the cutter Введение ножа Den Handgriff mit arretiertem Messer axial durch Insert the handle with locked cutter axially through Вставьте рукоятку с зафиксированным ножом den Motor einführen und am Außengewinde the motor and position it on the external thread аксиально...
- Seite 44 Perforationslinie, abhängig diameter used. Alternatively, the tenaculum его скальпелем посередине вдоль линии vom verwendeten Zangendurchmesser bzw. forceps recommended by KARL STORZ (e.g., перфорации в зависимости от диаметра Opturatordurchmesser, unter sterilen 33592UM / 33552UM) can be used with используемых...
- Seite 45 Körperhöhle führen kann, ist die NOTE: The tenaculum forceps ственность, а также прочих тканей, которые Verwendung eines Extraktions beutels (Best.-Nr. recommended by KARL STORZ (e.g., могут привести к контаминации полостей 040143-05 oder 040144-05) angezeigt. 33592 UM / 33552 UM) with suitable jaws тела, показано...
- Seite 46 Aufstellen und Installation and operating Инструкция по установке и Bedienungshinweise instructions эксплуатации Distanzplatte/n verwenden Using space plate(s) Использование дистанционной(ых) прокладки(ок) Bei ,dünnleibigen‘ Patienten kann mit einer oder When operating on thinner patients, one or more mehrerer aufeinander gesteckter Distanzplatten space plates placed on top of each other can be Для...
- Seite 47 Aufstellen und Installation and operating Инструкция по установке и Bedienungshinweise instructions эксплуатации Verwendung des Trokar als „Stand Using the trocar as a stand-alone sheath with Применение троакара в качестве автоном- Alone Schaft“ mit Instrumenten zur instruments for subsequent preparation ного тубуса с инструментами для дополни- Nachpräparation тельного...
-
Seite 48: Instandhaltung
Instandhaltung Maintenance Технический уход Instandhaltung Maintenance Технический уход 8. 1 Sicherungswechsel 8. 1 Changing the fuse 8. 1 Замена предохранителей Die Steuereinheit ausschalten und Netzverbindung Switch off the control unit and disconnect the Выключите блок управления и отсоедините его trennen (siehe Abb. 56). power (see Fig. -
Seite 49: Demontage Des Morcellator-Handgriffs Zur Reinigung
Instandhaltung Maintenance Технический уход 8. 2 Demontage des Morcellator- 8. 2 Dismantling the Morcellator 8. 2 Демонтаж рукоятки Handgriffs zur Reinigung handle for cleaning морцеллятора для очистки Zange entfernen und separat aufbereiten (siehe Remove forceps and prepare separately (see Fig. Извлеките... -
Seite 50: Технический Уход
Instandhaltung Maintenance Технический уход Dichtungskappe lösen Removing the sealing cap Отсоединение уплотнительного колпачка Am hinteren Ende des Handgriffs befindet sich The sealing cap is still fitted at the back end of На заднем конце рукоятки все еще находится noch die Dichtungskappe. Diese durch leichtes the handle. -
Seite 51: Demontage Der Trokar-Baugruppe
Instandhaltung Maintenance Технический уход 8. 3 Demontage der Trokar- 8. 3 Dismantling the trocar 8. 3 Разборка узла троакара Baugruppe assembly 1. Уплотнение необходимо отсоединить от кор- пуса клапана, стянув его. 1. Die Dichtung ist vom Ventilkörper durch 1. The seal is to be released from the valve body Abziehen zu lösen. - Seite 52 Instandhaltung Maintenance Технический уход Austausch des O-Ringes im Handgriff Replacing the O-ring in the handle 26720 H Замена кольца круглого сечения в 26720 H рукоятке 26720 H If the cutter can not be smoothly inserted into Bei zu hoher Schwergängigkeit beim Einführen or removed from the handle, the O-ring can be При...
-
Seite 53: Reinigung, Desinfektion Und Sterilisation
УКАЗАНИЕ: Необходимо соблюдать Desinfektion, Pflege und Sterilisation von and Sterilization of KARL STORZ руководство «Очистка, дезинфекция, сте- KARL STORZ Instrumenten‘ muss beachtet Instruments” instructions must be followed. рилизация и уход за инструментами werden. Dort sind die Verfahren zur The cleaning, disinfection, care and KARL STORZ». -
Seite 54: Tabelle Aufbereitungsverfahren
HINWEIS: Zur Reinigung und Desinfektion NOTE: For cleaning and disinfection, use a УКАЗАНИЕ: Для очистки и дезинфекции ein Produkt der von KARL STORZ product from the KARL STORZ list of применяйте средства, которые входят в freigegebenen Chemikalienliste verwenden approved chemicals (see Appendix). Please перечень... -
Seite 55: Manuelle Vorreinigung/Desinfektion
очистка/дезинфекция Hohlwellen-Motor Hollow shaft motor Мотор с полым валом HINWEIS: Für die manuelle Reinigung und NOTE: Use a KARL STORZ approved УКАЗАНИЕ: Для ручной очистки и Desinfektion eine von KARL STORZ chemical for manual cleaning and дезинфекции используйте средство, freigegebene Chemikalie verwenden disinfection (see www.karlstorz.com). -
Seite 56: Maschinelle Reinigung/Desinfektion
выполнить ручную (предварительную) очистку. • Im Vorfeld der maschinellen Aufbereitung muss eine manuelle (Vor-) Reinigung erfolgen. NOTE: Use a KARL STORZ approved УКАЗАНИЕ: Для машинной очистки и chemical for machine cleaning and дезинфекции применяйте химикаты, раз- HINWEIS: Für die maschinelle Reinigung... -
Seite 57: Sterilisation
Instandhaltung Maintenance Технический уход 8. 7 Sterilisation 8. 7 Sterilization 8. 7 Стерилизация Den Hohlwellen-Motor (mit Verbindungskabel) in Vacuum seal the hollow shaft motor (with Запаяйте мотор с полым валом (с соединитель- Sterilgutverpackung einschweißen. Anschließend connecting cable) in sterile goods packaging. ным... -
Seite 58: Dampfsterilisation
чения ожогов! После стерилизации Abkühlen lassen! cool down! паром детали горячие. Дайте им остыть! Die folgenden Dampf-Sterilisationsverfahren KARL STORZ has validated the following steam Компанией KARL STORZ валидированы следу- wurden von KARL STORZ validiert: sterilization methods: ющие методы стерилизации паром: • Fraktioniertes Vorvakuumverfahren •... -
Seite 59: Gassterilisation Mit Ethylenoxid (Eto)
30 minutes Длительность: 30 мин. • Система сетчатых лотков, в сборе Das EtO-Sterilisationsverfahren wurde von KARL STORZ has validated ethylene oxide (EtO) Метод стерилизации окисью этилена валиди- (без изделий ROTOCUT, на фото KARL STORZ mit folgenden Parametern validiert: sterilization using the following parameters: рован... -
Seite 60: Wartung Und Sicherheitsüberprüfung
Instandhaltung Maintenance Технический уход 8. 8 Wartung und 8. 8 Maintenance and safety check 8. 8 Техобслуживание и контроль Sicherheitsüberprüfung технического состояния 8. 8. 1 Maintenance 8. 8. 1 Wartung 8. 8. 1 Техобслуживание Preventive maintenance is not essential. Regular Eine vorbeugende Wartung ist nicht zwingend Профилактическое... - Seite 61 Instandhaltung Maintenance Технический уход Funktionsprüfung Test for proper functioning Проверка функционирования Funktionskontrolle nach Gebrauchsanweisung A functional check must be carried out in Проверьте функционирование в соответствии durchführen (siehe Kapitel 8.8.2, S. 50). accordance with the instruction manual с инструкцией по эксплуатации (см. главу (see section 8.8.2, page 50).
-
Seite 62: Instandsetzung
Nach Ablauf der Le bensdauer ist das Gerät als as electronic waste. прибор как электронный лом. Elektronikschrott zu entsorgen. Please ask KARL STORZ GmbH & Co. KG, a Для получения информации о соответствую- Hierzu erfragen Sie bitte die für Sie zuständige KARL STORZ subsidiary, or your authorized dealer щем... -
Seite 63: Verantwortlichkeit
8. 11 Limitation of liability 8. 11 Ответственность Als Hersteller dieses Gerätes betrachten wir uns KARL STORZ shall be liable for failure or Как производитель данного прибора мы für die Sicherheit, Zuverlässigkeit und Leistung des deterioration in the safe operation, operational считаем... -
Seite 64: Garantie
Instandhaltung Maintenance Технический уход 8. 12 Garantie 8. 12 Warranty 8. 12 Гарантия Für die Dauer von zwei Jahren ab Übergabe an For a period of two years after delivery to the end- В течение двух лет с момента передачи конеч- den Endkunden leisten wir unentgeltlich Ersatz user, we shall replace free of charge equipment ному... -
Seite 65: Technische Beschreibung
WARNUNG: Im Inneren des Geräts liegt device’s interior. The device must only be ПРЕДУПРЕЖДЕНИЕ: Высокое напря- Hochspannung an, das Gerät darf nur opened by an authorized KARL STORZ жение внутри прибора. Вскрывать при- vom autorisierten KARL STORZ customer service technician. бор разрешается только уполномочен- Kundendiensttechniker geöffnet werden. -
Seite 66: Fehlertabelle Unidrive
Handstück am 2. Kanal betreiben. 14 = E14: - 15 = E15: - 16 = E16: - Verwendung nur von KARL STORZ Am Kanal 1 angeschlossener Motor/Handstück wird 17 = E17: MOTOR WIRD NICHT UNTERSTÜTZT M freigegebenen Handstücken. Ev. Update nicht unterstützt durch Servicestelle notwendig. -
Seite 67: Unidrive ® Troubleshooting Table
16 = E16: - Only use handpieces approved by The motor/handpiece connected on channel 1 is not 17 = E17: MOTOR NOT SUPPORTED M KARL STORZ. A service update may be supported. necessary. 18 = E18: - Release footswitch and restart. -
Seite 68: Таблица Неисправностей Unidrive
16 = E16: - Следует использовать только наконечники, разрешенные Мотор/наконечник, подключенные к 17 = E17: НЕПОДДЕРЖИВАЕМЫЙ МОТОР M к применению компанией KARL STORZ. Возможно, каналу 1, не поддерживаются. необходимо обновление в сервисной службе. 18 = E18: - Отпустите педальный переключатель и перезапустите... -
Seite 69: Fehlersuchliste
Technische Beschreibung Technical description Техническое описание 9. 3 Fehlersuchliste 9. 3 Troubleshooting 9. 3 Список неисправностей WARNUNG: Vor sämtlichen WARNING: Always unplug the device ПРЕДУПРЕЖДЕНИЕ: Перед проведе- Wartungsarbeiten am Gerät die before performing any maintenance work нием любых работ по техобслуживанию Netzverbindung trennen! on it. - Seite 70 Technische Beschreibung Technical description Техническое описание WARNUNG: Vor sämtlichen WARNING: Always unplug the device ПРЕДУПРЕЖДЕНИЕ: Перед проведе- Wartungsarbeiten am Gerät die before performing any maintenance work нием любых работ по техобслуживанию Netzverbindung trennen! on it. прибора следует отключить его от сети! Fehlerbeschreibung: Error description: Описание...
-
Seite 71: Fehlersuchliste Zum Morcellator
Technische Beschreibung Technical description Техническое описание 9. 4 Fehlersuchliste zum 9. 4 Morcellator troubleshooting 9. 4 Список неисправностей Morcellator морцеллятора Error description: • The cutter cannot be easily inserted into or Fehlerbeschreibung: Описание неисправности: removed from the handle. • Das Messer lässt sich nur sehr schwer in den •... -
Seite 72: Technische Daten
Technische Beschreibung Technical description Техническое описание 9. 5 Technische Daten 9. 5 Technical data 9. 5 Технические данные UNIDRIVE S III 20701020 UNIDRIVE S III 20701020 UNIDRIVE S III 20701020 ® ® ® Netzspannung 100…120/ Line voltage 100…120/ Напряжение сети 100…120/ 230…240 Vp 230…240 Vp 230…240 Вp Netzfrequenz... -
Seite 73: Normenkonformität
Technische Beschreibung Technical description Техническое описание 9. 6 Normenkonformität 9. 6 Standard compliance 9. 6 Соответствие стандартам (für 20701020) (for 20701020) (для 20701020) Nach IEC 60601-1, UL 60601-1, According to IEC 60601-1, UL 60601-1, Согласно МЭК 60601-1, UL 60601-1, CAN/CSA C22.2 No. 601.1-M90: CAN/CSA C22.2 No. -
Seite 74: Technische Unterlagen
Technische Beschreibung Technical description Техническое описание 9. 8 Technische Unterlagen 9. 8 Technical documentation 9. 8 Техническая документация Auf Anfrage stellt der Hersteller ihm verfügbare On request, the manufacturer will provide По запросу заказчика производитель пре- Schaltpläne, ausführliche Ersatzteillisten, those circuit diagrams, itemized parts listings, доставляет... -
Seite 75: Blockschaltbild
Technische Beschreibung Technical description Техническое описание 9. 9 Blockschaltbild 9. 9 Block diagram 9. 9 Блок-схема... -
Seite 76: Ersatzteile, Empfohlenes Zubehör
Ersatzteile, Spare parts, Запчасти, рекомендуемые empfohlenes Zubehör recommended accessories принадлежности Ersatzteile, Spare parts, recommended Запчасти, рекомендуемые empfohlenes Zubehör accessories принадлежности 10. 1 Ersatzteile 10. 1 Spare parts 10. 1 Запчасти UNIDRIVE ® S III UNIDRIVE ® S III UNIDRIVE ® S III Artikel Article Изделие... - Seite 77 Ersatzteile, Spare parts, Запчасти, рекомендуемые empfohlenes Zubehör recommended accessories принадлежности ROTOCUT G2 für laparoskopische ROTOCUT G2 for laparoscopic applications ROTOCUT G2 для лапароскопических Anwendungen процедур Elektromechanischer Morcellator Electromechanical Morcellator Электромеханический морцеллятор 26714001 (Ø 11 mm/15 mm) 26714001 (dia. 11 mm/15 mm) 26714001 (Ø 11 мм/15 мм) Artikel Article Изделие...
- Seite 78 Ersatzteile, Spare parts, Запчасти, рекомендуемые empfohlenes Zubehör recommended accessories принадлежности ROTOCUT G2 für laparoskopische ROTOCUT G2 for laparoscopic applications ROTOCUT G2 для лапароскопических Anwendungen процедур Elektromechanischer Morcellator Electromechanical Morcellator Электромеханический морцеллятор 26721 RC (Ø 11 mm) 26721 RC (dia. 11 mm) 26721 RC (Ø 11 мм) Artikel Article Изделие...
- Seite 79 Ersatzteile, Spare parts, Запчасти, рекомендуемые empfohlenes Zubehör recommended accessories принадлежности ROTOCUT G2 für laparoskopische ROTOCUT G2 for laparoscopic applications ROTOCUT G2 для лапароскопических Anwendungen процедур Elektromechanischer Morcellator Electromechanical Morcellator Электромеханический морцеллятор 26725 RC (Ø 15 mm) 26725 RC (dia. 15 mm) 26725 RC (Ø 15 мм) Artikel Article Изделие...
- Seite 80 Ersatzteile, Spare parts, Запчасти, рекомендуемые empfohlenes Zubehör recommended accessories принадлежности Weiteres Zubehör Other accessories Дополнительные принадлежности (für laparoskopische Anwendungen , (for laparoscopic applications, working length (для лапароскопического применения, Nutzlänge 9,5 cm, zur Verwendung mit 9.5 cm, for use with ROTOCUT G2 26714001, рабочая длина 9,5 см, для применения с ROTOCUT G2 26714001, 26721 RC, 26725 RC) 26721 RC, 26725 RC) ROTOCUT G2 26714001, 26721 RC, 26725 RC)
- Seite 81 Ersatzteile, Spare parts, Запчасти, рекомендуемые empfohlenes Zubehör recommended accessories принадлежности Weiteres Zubehör Other accessories Дополнительные принадлежности (für laparoskopische Anwendungen adipöser (for laparoscopic applications on adipose (для лапароскопического применения, Patienten, Nutzlänge 12,5 cm) patients, working length 12.5 cm) для страдающих ожирением пациентов, рабочая длина 12,5 см). Artikel Article Изделие...
-
Seite 82: Anhang
Anhang Appendix Приложение Anhang Appendix Приложение 11. 1 Allgemeine Hinweise zu 11. 1 General information on 11. 1 Общие указания по поводу Einwegmessern disposable cutters одноразовых ножей • Die Originalverpackung ist erst unmittelbar vor • The original packaging must not be opened until •... - Seite 83 Monate verwendbar usable for longer than three months, will be ный. Изделия с черным индикаторным полем sind, werden von KARL STORZ (in Nordamerika replaced with new products free of charge by использовать больше нельзя! Поврежденные...
-
Seite 84: Reinigungs- Und Desinfektionsmittel
Ручная очистка и дезинфекция/ Ultraschall ультразвуковая обработка The following instruments and telescopes Folgende von KARL STORZ hergestellte produced by KARL STORZ must not be fully Следующие инструменты и оптика Instrumente und Optiken sind nicht für ein immersed in a liquid: HAMOU telescopes производства... -
Seite 85: Maschinelle Reinigung Und Desinfektion
изводителю. Предпочтительна термическая For information on the material compatibility of дезинфекция. Die von KARL STORZ freigegebenen Mittel bzgl. the agents approved by KARL STORZ visit our der Material kompatibilität finden Sie auf unserer homepage at www.karlstorz.com. Список разрешенных компанией KARL STORZ Homepage www.karlstorz.com. -
Seite 86: Hinweise Zur Elektromagnetischen Verträglichkeit (Emv)
Anhang Appendix Приложение 11. 4 Hinweise zur 11. 4 Information on 11. 4 Указания по электромагнит- elektromagnetischen electromagnetic ной совместимости (ЭМС) Verträglichkeit (EMV) compatibility (EMC) ПРЕДУПРЕЖДЕНИЕ: При работе с медицинскими электроприборами требу- WARNUNG: Medizinische elektrische WARNING: Medical electrical devices are ются... - Seite 87 портативных и мобильных средств ВЧ cables other than those specified in the связи может оказывать влияние на этот WARNUNG: Werden Zubehör oder KARL STORZ instruction manual may или другие медицинские электрические Leitungen verwendet, die nicht in der result in increased emissions or decreased приборы.
- Seite 88 Anhang Appendix Приложение Tabelle 201 Leitlinien und Herstellererklärung – Elektromagnetische Aussendungen UNIDRIVE ® S III Modell 20 7010 20-1 ist für den Betrieb in einer wie unten angegebenen Umgebung bestimmt. Der Anwender des Gerätes sollte sicherstellen, dass der UNIDRIVE ® S III Modell 20 7010 20-1 in einer derartigen Umgebung betrieben wird. Störaussendungsmessungen Übereinstimmung Elektromagnetische Umgebung –...
- Seite 89 Anhang Appendix Приложение Таблица 201 Директивы и декларация производителя – Электромагнитное излучение Прибор UNIDRIVE ® S III модели 20 7010 20-1 предназначается для применения в электромагнитной обстановке, определенной ниже. Пользователь прибора должен обеспечить применение UNIDRIVE ® S III модели 20 7010 20-1 в указанной электромагнитной обстановке. Измерение...
- Seite 90 Anhang Appendix Приложение Tabelle 202 Leitlinien und Herstellererklärung – Elektromagnetische Störfestigkeit UNIDRIVE ® S III Modell 20 7010 20-1 für den Betrieb in der unten angegebenen elektromagnetischen Umgebung bestimmt. Der Anwender des UNIDRIVE ® S III Modell 20 7010 20-1 sollte sicherstellen, dass das Gerät in einer solchen Umgebung benutzt werden. Störfestigkeitsprüfungen EN/IEC 60601 Prüfpegel Übereinstimmungspegel...
- Seite 91 Anhang Appendix Приложение Table 202 Guidelines and manufacturer’s declaration – electromagnetic immunity The UNIDRIVE ® S III model 20 7010 20-1 is intended for use in the electromagnetic environment specified below. The user of the UNIDRIVE ® S III model 20 7010 20-1 should make sure that the device is used in such an environment. Immunity tests EN/IEC 60601 test level Compliance level...
- Seite 92 Anhang Appendix Приложение Таблица 202 Директивы и декларация производителя – Электромагнитная помехоустойчивость Прибор UNIDRIVE ® S III модели 20 7010 20-1 предназначается для применения в электромагнитной обстановке, определенной ниже. Пользователь прибора UNIDRIVE ® S III модели 20 7010 20-1 должен обеспечить применение прибора в указанной электромагнитной обстановке. Уровень...
- Seite 93 Anhang Appendix Приложение Tabelle 204 Leitlinien und Herstellererklärung – Elektromagnetische Störfestigkeit – Für medizinische elektrische Geräte, die nicht lebenserhaltend sind UNIDRIVE ® S III Modell 20 7010 20-1 ist für den Betrieb in der unten angegebenen elektromagnetischen Umgebung bestimmt. Der Anwender des Gerätes sollte sicherstellen, dass das Gerät in einer solchen Umgebung benutzt wird. EN/IEC 60601 Störfestigkeitsprüfungen Übereinstimmungspegel...
- Seite 94 Anhang Appendix Приложение Table 204 Guidelines and manufacturer’s declaration – electromagnetic immunity – for medical electrical devices that are not life-supporting The UNIDRIVE ® S III model 20 7010 20-1 is intended for use in the electromagnetic environment specified below. The user of the device should make sure that it is used in such an environment. EN/IEC 60601 Immunity tests Compliance level...
- Seite 95 Anhang Appendix Приложение Таблица 204 Директивы и декларация производителя – Электромагнитная помехоустойчивость – для медицинских электрических приборов, не относящихся к жизнеобеспечению Прибор UNIDRIVE ® S III модели 20 7010 20-1 предназначается для применения в электромагнитной обстановке, определенной ниже. Пользователь прибора должен обеспечить применение прибора в указанной электромагнитной обстановке. Уровень...
- Seite 96 Anhang Appendix Приложение Tabelle 206 Empfohlene Schutzabstände zwischen tragbaren und mobilen HF-Telekommunikationsgeräten und der UNIDRIVE ® S III Modell 20 7010 20-1 UNIDRIVE ® S III Model 20 7010 20-1 ist für den Betrieb in einer elektromagnetischen Umgebung bestimmt, in der die HF-Störgrößen kontrolliert sind. Der Anwender des Geräts kann dadurch helfen, elektromagnetische Störungen zu vermeiden, indem er den Mindestabstand zwischen tragbaren und mobilen HF-Telekommunikationsgeräten (Sendern) und dem Gerät –...
- Seite 97 Anhang Appendix Приложение Table 206 Recommended separation distances between portable and mobile RF communications equipment and the UNIDRIVE ® S III model 20 7010 20-1 The UNIDRIVE ® S III model 20 7010 20-1 is intended for use in an electromagnetic environment in which the RF disturbances are controlled. The customer or user of the device can help prevent electromagnetic interference by maintaining a minimum distance between portable and mobile RF communications equipment (transmitters) and the unit as recommended below, according to the maximum output power of the communications equipment.
- Seite 98 Anhang Appendix Приложение Таблица 206 Рекомендуемые значения пространственного разнесения между портативными/мобильными ВЧ средствами связи и прибором UNIDRIVE ® S III модели 20 7010 20-1 Прибор UNIDRIVE ® S III модели 20 7010 20-1 предназначается для применения в электромагнитной обстановке, при которой осуществляется контроль...
- Seite 99 KARL STORZ Endoszkóp Magyarország Kft. E-Mail: kundservice@karlstorz.se Phone: +86 28 8620-0175, Fax: +86 28 8620-0177 Ohlauer Straße 43 Toberek utca 2. fsz. 17/b KARL STORZ ENDOSKOPE East Mediterranean & Gulf E-Mail: info@karlstorz.com.cn 10999 Berlin, Germany KARL STORZ Endoscopy Suomi OY HU-1112 Budapest, HUNGARY Building 25 (Al-Hayyan) – Units 205 – 206 Phone: +49 (0)30 30 69090, Fax: +49 (0)30 30 19452 Valimotie 1 B, 4.
- Seite 100 KARL STORZ GmbH & Co. KG Mittelstraße 8 78532 Tuttlingen Postfach 230 78503 Tuttlingen Germany Telefon: +49 (0)7461 708-0 Telefax: +49 (0)7461 708-105 E-Mail: info@karlstorz.de Web: www.karlstorz.com...