Herunterladen Diese Seite drucken

Werbung

Verfügbare Sprachen

Verfügbare Sprachen

Operating Instructions
Liquiport 2000 Ex
Automatic sampler for liquid media
0
BA 165R/09/c4/05.08
51007207

Werbung

loading

Inhaltszusammenfassung für Endress+Hauser Liquiport 2000 Ex

  • Seite 1 Operating Instructions Liquiport 2000 Ex Automatic sampler for liquid media BA 165R/09/c4/05.08 51007207...
  • Seite 4 Kurzübersicht Liquiport 2000 Ex Kurzübersicht Für die schnelle und einfache Inbetriebnahme: → Seite 7 Sicherheitshinweise → Seite 11 Montage Montage auf einen Blick, Einbaubedingungen, Einbaukontrolle → Seite 14 Verdrahtung Verdrahtung auf einen Blick → Seite 17 Anzeige- und Bedienelemente Bedienung auf einen Blick, Vor Ort Bedienung, Kalibrierung →...
  • Seite 5 Transportabler Probenehmer Liquiport 2000 Ex Deutsch Betriebsanleitung 4 ... 47 (Bitte lesen, bevor Sie das Gerät in Betrieb nehmen) Gerätenummer:........Portable water sampler Liquiport 2000 Ex English Operating manual 48 ... 91 (Please read before installing the unit) Unit number:........
  • Seite 6 Inhaltsverzeichnis Liquiport 2000 Ex Inhaltsverzeichnis Sicherheitshinweise ....5 Kalibrierung ......17 Bestimmungsgemäße Verwendung .
  • Seite 7 Sicherheitshinweise Bestimmungsgemäße Verwendung Bestimmungsgemäße Ver- Der Liquiport 2000 Ex ist ein für den Betrieb in explosionsgefährdeten Bereichen Zone 1 und 2 wendung zugelassener tragbarer Probenehmer für flüssige Medien. Die Proben werden diskontinuierlich mit- tels einer Schlauchpumpe entnommen und in Probebehälter verteilt.
  • Seite 8 Rücksendung Rücksendung Folgende Maßnahmen müssen ergriffen werden, bevor Sie das Gerät an Endress+Hauser, z.B. für eine Reparatur, zurücksenden: • Legen Sie dem Gerät in jedem Fall ein vollständig ausgefülltes “Gefahrgutblatt” bei. Nur dann ist es Endress+Hauser möglich, ein zurückgesandtes Gerät zu transportieren, zu prüfen oder zu reparieren.
  • Seite 9 Liquiport 2000 Ex 1 Sicherheitshinweise Sicherheitszeichen und Symbole Sicherheitszeichen und Ein einwandfreier und zuverlässiger Betrieb dieses Gerätes ist nur gewährleistet, wenn Sie die Symbole Sicherheitshinweise in dieser Betriebsanleitung beachten. Die in dieser Betriebsanleitung enthalte- nen Sicherheitshinweise sind mit folgenden Symbolen belegt: Warnung! “Warnung”...
  • Seite 10 D-87484 Nesselwang "Liquiport 2000 Ex" (beispielhaft) Lieferumfang Lieferumfang Der Lieferumfang des Probenehmers besteht aus: • Liquiport 2000 Ex mit Ansaugschlauch PVC • Signalkabel • Betriebsanleitung + Sicherheitshinweise für elektrische Betriebsmittel für explosionsgefährdete Bereiche (XA 037R/09/a3) • Akku (und Ladegerät, falls bestellt) •...
  • Seite 11 
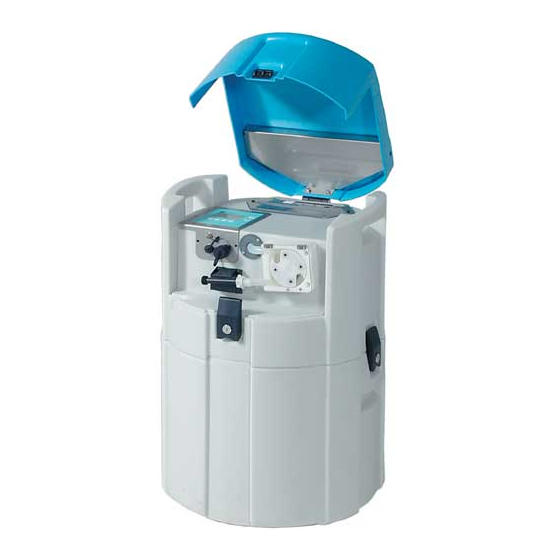
Steuerung k: Elektrische Anschlüsse l: Mediumsdetektion m: Schlauchanschluss n: Flaschenverteilung Abb. 2: Liquiport 2000 Ex Montageübersicht Warenannahme, Transport, Lagerung 3.2.1 Warenannahme Kontrollieren Sie nach der Warenannahme folgende Punkte: • Sind Verpackung oder Inhalt beschädigt? • Ist die gelieferte Ware vollständig? Vergleichen Sie den Lieferumfang mit Ihren Bestellangaben.
  • Seite 12 3 Montage Liquiport 2000 Ex 3.2.2 Lagerung Beachten Sie folgende Punkte: • Für Lagerung (und Transport) ist das Gerät stoßsicher zu verpacken. Dafür bietet die Originalver- packung optimalen Schutz. • Die zulässige Lagerungstemperatur beträgt −20...+60 °C (vorzugsweise +20 °C). Einbaubedingungen 3.3.1...
  • Seite 13 Liquiport 2000 Ex 3 Montage Einbau Hinweis! Das Gerät wird mit ausgebauten Akku verschickt. Vor der ersten Inbetriebnahme muss der Akku eingebaut werden. Warnung! Das Öffnen des Akkufachs und das Laden des Akku darf nur außerhalb explosionsgefährdeter Berei- che erfolgen Einbau Akku Schrauben Sie die Abdeckplatte des Akkufachs ( →...
  • Seite 14 4 Verdrahtung Liquiport 2000 Ex Verdrahtung " Achtung! Vergleichen Sie bitte vor der Verdrahtung die Versorgungsspannung mit den Angaben auf dem Typenschild. Wenn festzustellen ist, dass ein gefahrloser Betrieb nicht mehr möglich ist (z.B. bei sichtbaren Beschädigungen), setzen Sie bitte das Gerät außer Betrieb und sichern Sie es gegen unabsichtliche Inbetriebnahme ab.
  • Seite 15 Die RS232 Schnittstelle darf nur außerhalb explosionsgefährdeter Bereiche betrieben werden. An die Anschlussbuchse (4-polig, weiblich) für die digitale Schnittstelle RS232 wird über das RS232 Schnittstellenkabel (4-polig, männlich) ein PC (9-poliger SUB-D Stecker) angeschlossen. Eine Fern- parametrierung und Messdatenabfrage über den PC ist mit der Endress+Hauser Gerätesoftware ® ReadWin 2000 möglich.
  • Seite 16 4 Verdrahtung Liquiport 2000 Ex Anschlusskontrolle Anschlusskontrolle Führen Sie nach den elektrischen Anschlüssen des Gerätes folgende Kontrollen durch: Gerätezustand und -spezifikationen Hinweise − Sind Gerät oder Kabel beschädigt (Sichtkontrolle)? Elektrischer Anschluss Hinweise Stimmt die Versorgungsspannung mit den Angaben auf dem Typenschild überein? vgl.
  • Seite 17 Liquiport 2000 Ex 5 Bedienung Bedienung Bedienung auf einen Blick Bedienung auf einen Blick Abb. 7: Bedienung auf einen Blick Anzeige- und Bedienelemente Anzeige- und Bedienele- A = Schalter "EIN" mente B = Schalter "AUS" C = LC-Display: 32 Zeichen, 8 Zeilen D = Bedientasten Abb.
  • Seite 18 Fehlermeldungen auf dem Display der Steuerung werden durch Drücken der Bedientaste unter dungen dem OK-Feld quittiert. ® Kommunikation via ReadWin 2000 Kommunikation via Read- Außer über die Vor-Ort-Bedienung kann das Gerät auch über einen PC mit der Endress+Hauser ® ® ® 2000 Bediensoftware ReadWin 2000 fernparametriert und Messwerte abgefragt werden. ReadWin 2000 ist ein universelles PC-Programm für die Fernbedienung des Gerätes.
  • Seite 19 Liquiport 2000 Ex 5 Bedienung Kalibrierung 5.6.1 Kalibrierung Probevolumen Kalibrierung Probevolu- Eine Kalibrierung des Probevolumens muss durchgeführt werden, wenn: • das in der Steuerung eingestellte Volumen nicht mit der entnommenen Probenmenge überein- stimmt, • oder der Pumpenschlauch gewechselt wurde. Hinweis! Für die Kalibrierung des Probevolumens ist ein Messbecher mit einem Volumen von mind.
  • Seite 20 5 Bedienung Liquiport 2000 Ex Starten Sie ein Probenahme, indem Sie aus der Auswahlliste ( → Abb. 13, Pos. D) die Funk- tion PROBE auswählen. Warten Sie, bis der Probenahmezyklus beendet ist. Lesen Sie das Probevolumen im Messbecher In der Menüebene KALIBRIERUNG erscheint nun statt dem Menüpunkt DOSIER-VOL der...
  • Seite 21 Liquiport 2000 Ex 6 Inbetriebnahme Inbetriebnahme Installations- und Funktionskontrolle Installations- und Wenn Sie folgende Fragen mit JA beantworten können, Gerät in Betrieb nehmen (siehe Kap. 6.2 Funktionskontrolle "Messgerät einschalten"). Bei NEIN bitte im entsprechenden Kapitel nachlesen: Hinweis! Der Probenehmer ist ohne eingebauten Akku nicht betriebsfähig!
  • Seite 22 6 Inbetriebnahme Liquiport 2000 Ex Quick-Setup Abb. 14: Quick-Setup Liquiport 2000 Ex Endress+Hauser...
  • Seite 23 Liquiport 2000 Ex 6 Inbetriebnahme Gerätekonfiguration Hinweis! Für die jeweiligen Konfigurationsparameter sind die Menüstrukturen mit Display-Anzeige und Aus- wahlliste in den Abbildungen angegeben. Unter den jeweiligen Abbildungen befinden sich Tabellen, die die zugehörigen Funktionsbeschreibungen zu den Parametern beinhalten. 6.4.1 Parametrierung der Eingänge Bei einer Parametrierung im "Quick-Setup"...
  • Seite 24 6 Inbetriebnahme Liquiport 2000 Ex Analogeingang Menüstruktur: Abb. 16: Menüstruktur Analogeingang Signal Ausgangssignal des angeschlossenen Geräts eingeben: 0-20mA, 4-20mA Dimension SI-Einheit des Analogsignals eingeben Komma Anzahl der Dezimalstellen des Analogsignals eingeben Messber. Maximalen Messbereich eingeben 6.4.2 Parametrierung des internen Daten-Loggers Der Probenehmer Liquiport 2000 verfügt über einen internen Datenlogger (378 kByte RAM Ring-...
  • Seite 25 Liquiport 2000 Ex 6 Inbetriebnahme 6.4.3 Parametrierung der Ausgänge Menüstruktur: Abb. 18: Menüstruktur Ausgänge Netzaus Der Ausgangskontakt wird bei einem Netzausfall geschaltet Probe Der Ausgangskontakt wird bei einer Probenahme geschaltet Flasche Der Ausgangskontakt wird bei einem Flaschenwechsel geschaltet Ext.Stopp Der Ausgangskontakt wird bei einem externen Stopp geschaltet Füllende...
  • Seite 26 6 Inbetriebnahme Liquiport 2000 Ex 6.4.4 Programmauswahl Hinweis! Die Auswahl von Umschalt- und Ereignisprogrammen ist nur im 7-Programm Modus möglich! Menüstruktur: Abb. 19: Menüstruktur Programmauswahl Für die 7-Programmversion stehen mehrere Programmkombinationen zur Verfügung: Ein Hauptprogramm ist aktiv Ein Hauptprogramm und ein Umschaltprogramm sind aktiv...
  • Seite 27 Liquiport 2000 Ex 6 Inbetriebnahme Ext.Signal Wechsel ins Umschaltprogramm durch ein externes Digital-Signal. Hinweis! Für diese Funktion muss einer der beiden Digitaleingänge belegt sein und mit der Funk- tion UMSCHALT parametriert werden. Für die Umschaltprogramme können separate Probenahmeprogramme und Flaschen definiert wer- den.
  • Seite 28 6 Inbetriebnahme Liquiport 2000 Ex Probenahmearten Menüstruktur: Abb. 21: Menüstruktur Probenahmearten Die Proben können zeitproportional, mengenproportional, durchflussproportional oder ereignisge- steuert (siehe auch s. Seite 42, Probenahmearten) entnommen werden. Zeit Die Probenahme wird nach einer einstellbaren Zeit ausgelöst. Menge Die Probenahme wird nach einer bestimmten gemessenen Durchflussmenge ausgelöst.
  • Seite 29 Liquiport 2000 Ex 6 Inbetriebnahme Start-Stopp-Betrieb Menüstruktur: Abb. 23: Menüstruktur Start-Stopp-Betrieb Der Start des Probenahmeprogramms kann entweder sofort mit Drücken der AUT-Taste oder zu einem einstellbaren Zeitpunkt erfolgen. Der Stopp des Probenahmeprogramms kann wie folgt fest- gelegt werden: • Programmende, d.h.: das Gerät stoppt selbsttätig die Probeentnahme nach Durchlaufen des ein- gestellten Programms "...
  • Seite 30 6 Inbetriebnahme Liquiport 2000 Ex 6.4.6 Umschaltprogramme erstellen Probenahmemodus Menüstruktur: Abb. 25: Menüstruktur Probenahmemodus In den Umschaltprogrammen kann wie in den Hauptprogrammen die Probenentnahme Zeit-, Men- gen-, Durchflussproportional oder durch externes Signal ausgelöst werden. Verteilung Für die Umschaltprogramme können separate Flaschen reserviert werden. Grundsätzlich gilt bei der Einteilung der Flaschen: Die erste Flaschengruppe einer Verteilung ist für die Hauptprogramme reserviert.
  • Seite 31 Liquiport 2000 Ex 6 Inbetriebnahme 6.4.7 Ereignisprogramm erstellen Menüstruktur: Abb. 27: Menüstruktur Ereignisprogramm Probenahmemodus Menüstruktur: Abb. 28: Menüstruktur Probenahmemodus Im Ereignisprogramm stehen für die Probeentnahme die gleichen Möglichkeiten (Zeit-, Menge-, ext.Signal- und Durchfluss) zur Verfügung wie in den Haupt- und Umschaltprogrammen. Zusätz- lich dazu kann die Funktion einmal ausgewählt werden.
  • Seite 32 6 Inbetriebnahme Liquiport 2000 Ex 1-9 Flaschen Bei Wechsel ins Ereignisprogramm werden, von der letzten Flaschengruppe der Vertei- lung, 1-9 Flaschen befüllt. Die Anzahl der Flaschen, die für das Ereignisprogramm reser- viert werden können, sind abhängig von der Gesamtanzahl der Flaschen (max. 9 Fla- schen).
  • Seite 33 Liquiport 2000 Ex 6 Inbetriebnahme Programmauswahl ↵ Anzahl 1: 1 Hauptprogramm aktiv ↵ Programmauswahl 2: 1 Hauptprogramm und 1 Umschaltprogramm aktiv Anzahl 1+Ereignis: 1 Hauptprogramm und ein Ereignisprogramm aktiv 2+Ereignis: 1 Hauptprogramm, 1 Umschaltprogramm und 1 Ereignisprogramm aktiv ↵ Prog.Bez.
  • Seite 34 6 Inbetriebnahme Liquiport 2000 Ex Programme ändern – Umschaltprogramme ↵ Umschalt Probe: Probenahmeart im Umschaltprogramm ↵ Programme ändern Verteilung: Verteilungsmodus für das Umschaltprogramm Umschalt 1,2 ↵ Probe Zeit: Probenahme zeitproportional Zeit ↵ Programme ändern Menge: Probenahme mengenproportional (Mengensignal anschlie- ↵...
  • Seite 35 7 Wartung Wartung Warnung! • Das Gehäuse (z.B.: Ausbau der Steuerung oder des Verteilerantriebs) von Liquiport 2000 Ex darf nur vom E+H Service geöffnet werden. • Das Öffnen des Akkufachs und das Laden des Akku darf nur außerhalb explosionsgefährdeter Bereiche erfolgen.
  • Seite 36 8 Zubehör Liquiport 2000 Ex Zubehör Für das Gerät sind verschiedene Zubehörteile lieferbar, die bei Endress+Hauser separat bestellt wer- den können. Ausführliche Angaben zum betreffenden Bestellcode erhalten Sie von Ihrer E+H-Ser- viceorganisation. Bestell-Code Zubehörteile 51002425 Saugkorb, komplett 51003198 Schlauchendstück 50053928...
  • Seite 37 Liquiport 2000 Ex 9 Störungsbehebung Störungsbehebung Warnung! (Alle für den Explosionsschutz relevanten Daten finden Sie in separaten Ex-Dokumentationen, die Sie bei Bedarf anfordern können (siehe "ergänzende Dokumentationen"). Fehlersuchanleitung Fehlersuchanleitung Beginnen Sie die Fehlersuche in jedem Fall mit den nachfolgenden Checklisten, falls nach der Inbe- triebnahme oder während des Messbetriebs Störungen auftreten.
  • Seite 38 9 Störungsbehebung Liquiport 2000 Ex Prozessfehler ohne Meldungen Prozessfehler ohne Mel- dungen Problem Ursachen Lösung – Akku leer – Akku aufladen – Akku nicht angeschlossen – Überprüfen Sie den korrekten Gerät lässt sich nicht einschalten Anschluss im Akkufach bzw. Anzeige bleibt dunkel –...
  • Seite 39 Liquiport 2000 Ex 9 Störungsbehebung Ersatzteile Ersatzteile Abb. 30: Ersatzteile Liquiport 2000 Ex (Positionsnummern sind in der Ersatzteilliste erläutert) Steuerung/CPU Software 1 Programm 7 Programme Sprache Deutsch Englisch Französisch Italienisch Spanisch Holländisch / Niederländisch Dänisch Tschechisch Polnisch Modul Steuerung komplett ( → Abb. 30, Pos. 1) CPU inkl.
  • Seite 40 9 Störungsbehebung Liquiport 2000 Ex ® Softwarenachrüstung (Programm, ReadWin 2000, Schnittstellenkabel) Software 7 Programme Sprache Deutsch Englisch Französisch Italienisch Spanisch Holländisch / Niederländisch Dänisch Tschechisch Polnisch ⇐ RPT20A1- Order-Code Pos.-Nr. Bestell-Code Ersatzteile RPT22X-GA Grundkarte RPT22X-GZ Barriereboard RPT22X-HA Ex-Gehäuseunterteil PE RPT22X-HB Deckel für Gehäuseunterteil...
  • Seite 41 Liquiport 2000 Ex 9 Störungsbehebung Pos.-Nr. Bestell-Code Ersatzteile 50030554 Batterie ER ½ AA Entsorgung Entsorgung Für eine spätere Entsorgung des Gerätes beachten Sie bitte die Entsorgungsvorschriften Ihres Lan- des. Endress+Hauser...
  • Seite 42 Herzstück des Systems ist ein Drucksensor. Der Drucksensor erkennt den Unterschied zwischen gefüllter und nicht gefüllter Pum- penleitung. Die Vorteile des Endress+Hauser Systems: • Intelligent: Die Saughöhe wird automatisch erkannt und muss nicht eingestellt werden • Wartungsfrei: Keramikmembran Die Probenahme erfolgt in drei Schritten: •...
  • Seite 43 Liquiport 2000 Ex 10 Technische Daten Zeitproportional: in zeitlich konstanten Abständen wird ein kon- stantes Probevolumen entnommen Mengenproportional: In zeitlich variablen Abständen wird ein konstan- tes Probevolumen entnommen Durchflussproportional: In zeitlich gleichen Abständen wird ein variables Probevolumen entnommen. Probenverteilung Die Probenflüssigkeit wird mittels eines drehbaren Verteilerrohres in die einzelnen Flaschen gefüllt.
  • Seite 44 230 V ; Ladestrom 2,0 A Hinweis! Der Ladevorgang darf nur außerhalb explosionsgefährdeter Bereiche durchgeführt werden. Bei Liquiport 2000 Ex muss der Akku zum Anschluss an das Ladegerät ausgebaut werden. Leistungsaufnahme max. 29 W Kapazität Akku 94 Stunden (bei einem Probenahmeintervall von 15 Minuten, einem Probenahmevolumen von 100 ml und einer Saughöhe von 4 Meter)
  • Seite 45 Liquiport 2000 Ex 10 Technische Daten Betriebsdruckbereich drucklos Probemedien Probemedien müssen frei von abrasiven Stoffen sein. Werkstoffbeständigkeiten der medienführenden Teile beachten! 10.8 Konstruktiver Aufbau Abmessungen und Gewicht 21,5 kg (Leergewicht) 25,5 kg (inkl. Akku, 24 x 1 ltr. Flaschen) 16,5 kg (Oberteil mit Akku) 15,2 kg (Unteretil mit 8 x 1,8 l Glasflaschen) 9 kg (Unterteil mit 24 x 1 ltr.
  • Seite 46 10.10 Zertifikate und Zulassungen ATEX-Zulassung Liquiport 2000 Ex ist mit der Zertifizierung ATEX II2G EEx dem[ib]IIC T4 für den Betrieb in explo- sionsgefährdeten Bereichen der Zone 1 zugelassen. CE-Zeichen Das Gerät erfüllt die gesetzlichen Anforderungen der EG-Richtlinien. Endress+Hauser bestätigt die erfolgreiche Prüfung des Gerätes mit der Anbringung des CE-Zeichens.
  • Seite 47 Liquiport 2000 Ex Kurzübersicht Abmessungen ........43 Mengenproportional .
  • Seite 48 Brief overview Liquiport 2000 Ex Brief overview For rapid and easy commissioning: → Page 51 Safety instructions → Page 55 Installation Quick installation guide, Installation, Post-installation check → Page 58 Wiring Quick wiring guide → Page 61 Display and operating elements Quick operating guide, Local operation, Calibration →...
  • Seite 49 Transportabler Probenehmer Liquiport 2000 Ex Deutsch Betriebsanleitung 4 ... 47 (Bitte lesen, bevor Sie das Gerät in Betrieb nehmen) Gerätenummer:........Portable water sampler Liquiport 2000 Ex English Operating Instructions 48 ... 91 (Please read before installing the unit) Unit number:........
  • Seite 50 Table of contents Liquiport 2000 Ex Table of contents Safety instructions ....49 Calibration ......61 Designated use .
  • Seite 51 Designated use Designated use The Liquiport 2000 Ex is a portable sampler for liquid media approved for use in Ex areas, Zone 1 and 2. The samples are taken discontinuously using a hose pump and distributed to sampling con- tainers.
  • Seite 52 Return Return You should take the following measures before sending the device back to Endress+Hauser, for example for repair: • Always enclose a fully-completed "Dangerous Goods Sheet" with the device. Only then can Endress+Hauser transport, test or repair a returned device.
  • Seite 53 Liquiport 2000 Ex 1 Safety instructions Notes on safety conventions and icons Notes on safety conven- Perfect and reliable device operation is only guaranteed if you observe the safety instructions in tions and icons these Operating Instructions . The safety instructions contained in these Operating Instructions are...
  • Seite 54 "Liquiport 2000 Ex" (example) Scope of delivery Scope of delivery The sampler's scope of delivery consists of: • Liquiport 2000 Ex with PVC suction hose • Signal cable • Operating Instructions + safety instructions for electrical equipment for Ex-areas (XA 037R/09/a3) •...
  • Seite 55 Electrical connections l: Medium detection m: Hose connection n: Bottle distribution Fig. 2: Liquiport 2000 Ex split elevation view Incoming acceptance, transport, storage 3.2.1 Incoming acceptance After receiving the goods, check the following points: • Is the packaging or the contents damaged? •...
  • Seite 56 3 Installation Liquiport 2000 Ex 3.2.2 Storage Observe the following points: • The device must be packed in shockproof packaging for storage (and transport). The original pack- aging offers the best protection for this. • The permitted storage temperature is −20...+60 °C (preferably +20 °C).
  • Seite 57 Liquiport 2000 Ex 3 Installation Installation instructions Note! The unit is always shipped with the battery removed. The battery must therefore be fitted before the unit is initially commissioned. Warning! The battery compartment may be opened and the battery may be charged outside the Ex-area only.
  • Seite 58 4 Wiring Liquiport 2000 Ex Wiring " Caution! Before wiring, please compare the supply voltage with the information specified on the nameplate. If safe operation is no longer possible (e.g. visible damage) please take the device out of service and secure it against unintentional start-up.
  • Seite 59 The RS232 interface may only be used outside Ex areas. A PC (9-pin SUB-D plug) is connected to the connection socket (4-pin, female) for the RS232 digital interface using the RS232 interface cable (4-pin, male). The Endress+Hauser device software Read- ®...
  • Seite 60 4 Wiring Liquiport 2000 Ex Post-connection check Post-connection check After completing the device's electrical connections, carry out the following checks: Device status and specifications Notes − Is the device or cable damaged (visual inspection)? Electrical connection Notes Does the supply voltage match the information on the nameplate?
  • Seite 61 Liquiport 2000 Ex 5 Operation Operation Quick operation guide Quick operation guide Fig. 7: Quick operation guide Display and operating elements Display and operating ele- A = "ON" switch ments B = "OFF" switch C = LC display: 32 characters, 8 lines D = Operating keys Fig.
  • Seite 62 ® ® ReadWin 2000 values using a PC with the Endress+Hauser operating software ReadWin 2000. ReadWin 2000 is a universal PC programme for remote device operation. The interface for remote configuration is the RS232 connection socket. You can find detailed information on operating the device using Read- ®...
  • Seite 63 Liquiport 2000 Ex 5 Operation Calibration 5.6.1 Sample volume calibration Sample volume calibration The sample volume must be calibrated if: • The volume set in the controller does not match the sample quantity taken, • Or the pump hose has been changed.
  • Seite 64 5 Operation Liquiport 2000 Ex 5.6.2 Tap calibration Tap calibration You must calibrate the tap if: • The tap motor was replaced, or • the error message <Tap calibration> appears in the display. Calibration procedure: 1.Switch the device on 2.Under <Set -> Service - Calibration>, select the item <distr.
  • Seite 65 Liquiport 2000 Ex 6 Commissioning Commissioning Function check Function check If you can answer the following questions with YES, commission the device (see Section 6.2 "Switching on the measuring device"). If the answer is NO, then please refer to the appropriate sec-...
  • Seite 66 6 Commissioning Liquiport 2000 Ex Quick Setup Fig. 14: Liquiport 2000 Ex Quick Setup Endress+Hauser...
  • Seite 67 Liquiport 2000 Ex 6 Commissioning Device configuration Note! The figures show the menu structures with the display and picklist for the different configuration parameters. Below the figures are tables containing the corresponding function descriptions for the parameters. 6.4.1 Configuring the inputs You can assign the inputs when configuring in the "Quick Setup"...
  • Seite 68 6 Commissioning Liquiport 2000 Ex Analog input Menu structure: Fig. 16: Analog input menu structure Signal Enter the output signal of the connected device: 0-20 mA, 4-20 mA Units Enter the SI unit of the analog signal. Dec. point Enter the number of decimal places of the analog signal.
  • Seite 69 Liquiport 2000 Ex 6 Commissioning 6.4.3 Configuring the outputs Menu structure: Fig. 18: Outputs menu structure Power down The output contact is switched on a power failure. Sample The output contact is switched on a sample. Bottle The output contact is switched on bottle replacement.
  • Seite 70 6 Commissioning Liquiport 2000 Ex 6.4.4 Programme selection Note! You can only select switching and event programmes in the 7-programme module. Menu structure: Fig. 19: Programme selection menu structure Several programme combinations are available for the 7 programme version: A main programme is active.
  • Seite 71 Liquiport 2000 Ex 6 Commissioning Ext. signal Switch to switching programme by means of an external digital signal. Note! For this function, one of the two digital inputs must be assigned and configured using the SWITCH function. You can define separate sampling programmes and bottles for the switching programmes.
  • Seite 72 6 Commissioning Liquiport 2000 Ex Sampling types Menu structure: Fig. 21: Sampling types menu structure You can take samples proportional to time, quantity or flow or controlled by events (see also see Page 86, sampling types). Time Sampling is triggered after a set time.
  • Seite 73 Liquiport 2000 Ex 6 Commissioning Start-stop operation Menu structure: Fig. 23: Start-stop operation menu structure You can start the sampling programme either immediately by pressing the AUT key, or at a settable time. You can specify the sampling programme stop as follows: •...
  • Seite 74 6 Commissioning Liquiport 2000 Ex 6.4.6 Creating switching programmes Sample mode Menu structure: Fig. 25: Sample mode menu structure In the switching programmes, like in the main programmes, you can trigger sampling by time, vol- ume, flow or an external signal.
  • Seite 75 Liquiport 2000 Ex 6 Commissioning 6.4.7 Creating an event programme Menu structure: Fig. 27: Event programme menu structure Sample mode Menu structure: Fig. 28: Sample mode menu structure The event programme contains the same sampling options (time, volume, ext. signal and flow) as those of the main and switching programmes.
  • Seite 76 6 Commissioning Liquiport 2000 Ex 6.4.8 Description of device functions The following table lists and describes all the setting parameters which you can read off and config- ure when configuring the device. Parameter Menu level Setting options Factory setting Info ↵...
  • Seite 77 Liquiport 2000 Ex 6 Commissioning ↵ Switch (only for an Day: ↵ active switching pro- Programme selection Switch between main and switching programmes on two specific times gramme) Switch a day. Week: Switch between main and switching programmes on three specific weekdays.
  • Seite 78 6 Commissioning Liquiport 2000 Ex ↵ Distribution Time: Time ↵ Creating programmes Bottle change after a specific time. ↵ Switch 1,2 Number: Distribution Bottle change after a specific number of samples. Ext. sig.: Bottle change on external signal (connect signal input!).
  • Seite 79 Maintenance Warning! • The housing (e.g. removing the controller or the distributor drive) of Liquiport 2000 Ex may only be opened by E+H Service. • The battery compartment may be opened and the battery may be charged outside the Ex-area only.
  • Seite 80 8 Accessories Liquiport 2000 Ex Accessories Various accessories can be supplied for the device and can be ordered separately from Endress+Hauser. More detailed information on the particular order code can be obtained from your local E+H service organisation. Order code Accessories 51002425 Suction filter, cpl.
  • Seite 81 Liquiport 2000 Ex 9 Trouble-shooting Trouble-shooting Warning! All explosion protection data are given in a separate documentation which is available upon request (see "Documentation"). Trouble-shooting instructions Trouble-shooting instruc- Always begin trouble-shooting using the following checklists if faults occur after commissioning or tions during operation.
  • Seite 82 9 Trouble-shooting Liquiport 2000 Ex Process errors without messages Process errors without messages Problem Cause Solution – Battery empty – Charge battery – Battery not connected – Check that the battery is correctly Device does not switch on, or connected in the battery compart- display stays dark –...
  • Seite 83 Liquiport 2000 Ex 9 Trouble-shooting Spare parts Spare parts Fig. 30: Spare parts for Liquiport 2000 Ex (item numbers explained in the spare parts list) Controller/CPU Software 1 programme 7 programmes Language German English French Italian Spanish Dutch Danish Czech...
  • Seite 84 9 Trouble-shooting Liquiport 2000 Ex ® Software retrofitting kit (programme, ReadWin 2000, interface cable) Software 7 programmes Language German English French Italian Spanish Dutch Danish Czech Polish ⇐ RPT20A1- Order code Item no. Order code Spare parts RPT22X-GA Motherboard RPT22X-GZ...
  • Seite 85 Liquiport 2000 Ex 9 Trouble-shooting Item no. Order code Spare parts 50030554 ER ½ AA battery Disposal Disposal When disposing of the device, please observe your national disposal regulations. Endress+Hauser...
  • Seite 86 The medium detection system controls the electronic volume cal- culation. The medium detection system is a new sys- tem developed by Endress+Hauser. A pres- sure sensor is at the heart of the system. The pressure sensor detects the difference Rotor...
  • Seite 87 Liquiport 2000 Ex 10 Technical data Time proportional: A constant sample volume is taken at constant time intervals. Flow curve Quantity proportional: Time based A constant sample volume is taken at variable time intervals. Flow based Flow proportional: A variable sample volume is taken at the same time intervals.
  • Seite 88 110 V to 230 V ; charge current 2.0 A Note! The unit can only be charged outside Ex-areas. In the case of Liquiport 2000 Ex, you must remove the battery for connecting to the charger. Power consumption Max. 29 W...
  • Seite 89 Liquiport 2000 Ex 10 Technical data Sampling media The sampling media must be free of abrasive substances. Pay particular attention to the material resistances of the parts carrying media! 10.8 Mechanical construction Dimensions and Weight 21.5 kg (empty weight) 25.5 kg (incl. battery, 24 x 1 ltr. bottles) 16.5 kg (upper compartment with battery)
  • Seite 90 • Internal memory read out with measured flow rate, sample quantity taken, etc. 10.10 Certificates and approvals ATEX approval With the ATEX II2G EEx dem[ib]IIC T4 certificate, the Liquiport 2000 Ex is approved for operation in hazardous areas, Zone 1. CE mark The device meets the legal requirements of the EC directives.
  • Seite 91 Brief overview Liquiport 2000 Ex Programme selection ......67 Accessories ........77 Analog input .
  • Seite 92 Mise en service condensée Liquiport 2000 Ex Mise en service condensée Pour une mise en service simple et rapide. → page 95 Conseils de sécurité → page 99 Montage Montage en bref, conditions de montage, contrôle de montage → page 102 Raccordement électrique...
  • Seite 93 Transportabler Probenehmer Liquiport 2000 Ex Deutsch Betriebsanleitung 4 ... 47 (Bitte lesen, bevor Sie das Gerät in Betrieb nehmen) Gerätenummer:........Portable water sampler Liquiport 2000 Ex English Operating manual 48 ... 91 (Please read before installing the unit) Unit number:........
  • Seite 94 Sommaire Liquiport 2000 Ex Sommaire Conseils de sécurité Mise en service ........
  • Seite 95 Conseils de sécurité Utilisation conforme Utilisation conforme Le Liquiport 2000 Ex est un échantillonneur portable pour liquides en zone explosive 1 et 2. Les échantillons sont prélevés de façon discontinue au moyen d'une pompe péristaltique et répartis dans des flacons à échantillons.
  • Seite 96 être respectées ! Retour de matériel Retour de matériel Avant de retourner un appareil à Endress+Hauser, par ex. pour réparation, il convient de prendre les mesures suivantes : • Toujours joindre une “Déclaration de décontamination” dûment complétée, faute de quoi Endress+Hauser ne pourra transporter, contrôler ou réparer l'appareil retourné.
  • Seite 97 Liquiport 2000 Ex 1 Conseils de sécurité Symboles de sécurité utilisés Symboles de sécurité Un fonctionnement sûr et fiable de cet appareil n'est garanti que si les instructions et les conseils de utilisés sécurité contenus dans le présent manuel sont suivis. Les conseils de sécurité dispensés dans le présent manuel sont accompagnés des symboles suivants :...
  • Seite 98 Contenu de la livraison La livraison du préleveur d'échantillons comprend : • le Liquiport 2000 Ex avec tuyau d'aspiration PVC • un câble de signal • le manuel de mise en service + les conseils de sécurité pour les appareils électriques en zone explosive (XA 037R/09/a3) •...
  • Seite 99 : Détection du produit m : Raccord de tuyau n : Répartition des flacons Fig. 2 : Aperçu du Liquiport 2000 Ex Réception de marchandises, transport, stockage 3.2.1 Réception de marchandises A la réception de la marchandise, contrôlez les points suivants : •...
  • Seite 100 3 Montage Liquiport 2000 Ex 3.2.2 Stockage Tenir compte des points suivants : • Pour le stockage (et le transport), l'appareil doit être protégé des chocs. L'emballage d'origine offre une protection optimale. • La température de stockage admissible est de −20...+60 °C (de préférence +20 °C).
  • Seite 101 Liquiport 2000 Ex 3 Montage Montage Remarque ! L'accu n'étant pas inséré dans l'appareil à la livraison, il faut le mettre en place avant la première mise en route. Danger ! Le compartiment de l'accu ne peut être ouvert et l'accu chargé qu'en zone non explosive.
  • Seite 102 4 Raccordement électrique Liquiport 2000 Ex Raccordement électrique " Attention ! Avant d'effectuer le raccordement, comparez la tension d'alimentation avec les indications portées sur la plaque signalétique. Si l'on constate que le fonctionnement risque d'être dangereux (par ex. en cas de dommages visibles), l'appareil doit immédiatement être mis hors service et protégé...
  • Seite 103 Liquiport 2000 Ex 4 Raccordement électrique Remarque ! Vous trouverez une description détaillée de l'affectation des signaux (entrées et sorties) dans le chap. »Configuration de l'appareil« page 111. 4.1.2 Raccordement de l'interface RS232 (→ fig. 4, pos. A) Danger ! L'interface RS232 ne doit être utilisée qu'en zone non Ex.
  • Seite 104 4 Raccordement électrique Liquiport 2000 Ex Contrôle du raccordement Contrôle du raccordement Après avoir réalisé le raccordement électrique de l'appareil, effectuez les contrôles suivants : Etat et spécifications de l'appareil Conseils − L'appareil ou le câble sont-ils endommagés (contrôle visuel) ? Raccordement électrique...
  • Seite 105 Liquiport 2000 Ex 5 Configuration Configuration Configuration en bref Configuration en bref Fig. 7 : Configuration en bref Interface utilisateur Interface utilisateur A = Commutateur "MARCHE" B = Commutateur "ARRET" C = Affichage LCD : 32 digits, 8 lignes D = Touches de commande Fig.
  • Seite 106 Outre la configuration sur site, il est également possible de configurer l'appareil à distance sur PC ® ® ReadWin 2000 via le logiciel d'exploitation Endress+Hauser ReadWin 2000 et d'interroger les valeurs mesurées. ® ReadWin 2000 est un logiciel PC universel pour la configuration à distance de l'appareil.
  • Seite 107 Liquiport 2000 Ex 5 Configuration Etalonnage 5.6.1 Etalonnage du volume de l'échantillon Etalonnage du volume de l'échantillon Il faut effectuer un étalonnage du volume de l'échantillon lorsque : • le volume réglé dans l'unité de commande ne correspond pas au volume prélevé, •...
  • Seite 108 5 Configuration Liquiport 2000 Ex 5.6.2 Etalonnage du bras répartiteur Etalonnage du bras réparti- Il faut étalonner le bras répartiteur lorsque : teur • le moteur du bras a été remplacé • le message : <Etalonnage bras répartiteur> s'affiche. Procédure: 1.Mettre l'appareil sous tension.
  • Seite 109 Liquiport 2000 Ex 6 Mise en service Mise en service Contrôle de l'installation et du fonctionnement Contrôle de l'installation et Si la réponse aux questions suivantes est OUI, l'appareil peut être mis en route (voir chap. 6.2 "Mise du fonctionnement sous tension de l'appareil").
  • Seite 110 6 Mise en service Liquiport 2000 Ex Quick setup Fig. 14 : Quick setup Liquiport 2000 Ex Endress+Hauser...
  • Seite 111 Liquiport 2000 Ex 6 Mise en service Configuration de l'appareil Remarque ! Pour chaque paramètre de configuration, les structures des menus sont représentées dans les figures avec affichage et liste de sélection. Sous chaque figure se trouvent des tableaux contenant les descriptions des fonctions correspondant aux paramètres.
  • Seite 112 6 Mise en service Liquiport 2000 Ex Entrée analogique Structure du menu : Fig. 16 : Structure du menu Entrée analogique Signal Entrer le signal de sortie de l'appareil raccordé : 0-20mA, 4-20mA Unité Entrer l'unité SI du signal analogique Décimale...
  • Seite 113 Liquiport 2000 Ex 6 Mise en service 6.4.3 Paramétrage des sorties Structure du menu : Fig. 18 : Structure du menu Sorties Coup. sect. Le contact de sortie est activé en cas de coupure secteur. Prise éch. Le contact de sortie est activé en cas de prélèvement d'échantillon.
  • Seite 114 6 Mise en service Liquiport 2000 Ex 6.4.4 Choix du programme Remarque ! La sélection des programmes de commutation et événementiels n'est possible que dans le mode "7 programmes" ! Structure du menu : Fig. 19 : Structure du menu Choix programme Il existe plusieurs combinaisons de programmes pour la version "7 programmes"...
  • Seite 115 Liquiport 2000 Ex 6 Mise en service Q pl. faib. Passage au programme de commutation en cas de dépassement par défaut d'un seuil réglable. Signal ext. Passage au programme de commutation par un signal digital externe. Remarque ! L'une des deux entrées digitales doit être affectée à cette fonction et paramétrée avec la fonction COMMUTAT.
  • Seite 116 6 Mise en service Liquiport 2000 Ex Types de prélèvements Structure du menu : Fig. 21 : Structure du menu Prélèvement Les échantillons peuvent être prélevés en fonction du temps, de la quantité, du débit ou des événements (voir aussi voir page 130, Prélèvements).
  • Seite 117 Liquiport 2000 Ex 6 Mise en service Mode Start-Stop Structure du menu : Fig. 23 : Structure du menu Start-Stop Le programme de prélèvement peut être lancé soit immédiatement en appuyant sur la touche AUT, soit à un instant réglable. Son arrêt peut être défini de la façon suivante : •...
  • Seite 118 6 Mise en service Liquiport 2000 Ex 6.4.6 Elaboration des programmes de commutation Mode de prélèvement Structure du menu : Fig. 25 : Structure du menu Mode de prélèvement Dans les programmes de commutation, comme dans les programmes principaux, le prélèvement d'échantillon peut se faire en fonction du temps, de la quantité, du débit ou être déclenché...
  • Seite 119 Liquiport 2000 Ex 6 Mise en service 6.4.7 Elaboration d'un programme événementiel Structure du menu : Fig. 27 : Structure du menu Programme événementiel Mode de prélèvement Structure du menu : Fig. 28 : Structure du menu Mode de prélèvement Dans le programme événementiel, il existe les mêmes possibilités de prélèvement que dans les...
  • Seite 120 6 Mise en service Liquiport 2000 Ex 6.4.8 Description des fonctions de l'appareil Le tableau suivant contient la liste et la description de tous les paramètres nécessaires à la configuration de l'appareil. Paramètre Menu Possibilités de réglage Réglage par défaut Info ↵...
  • Seite 121 Liquiport 2000 Ex 6 Mise en service ↵ Commutat. Jour : Jour ↵ (uniquement si Choix du programme Commutation entre le programme principal et le programme de programme de Commutat. commutation à deux instants définis de la journée commutation activé)
  • Seite 122 6 Mise en service Liquiport 2000 Ex ↵ Prélèvement Temps : prélèvement en fonction du temps Temps ↵ Chgt de programme Quantité : prélèvement en fonction de la quantité (raccorder un signal ↵ Commutat. 1,2 de quantité !) Prélèvement Sign. ext. : prélèvement si signal externe (affecter une entrée de signal !) Débit : prélèvement en fonction du débit (raccorder un signal de...
  • Seite 123 Maintenance Danger ! • Seul le SAV E+H est habilité à ouvrir le boîtier du Liquiport 2000 Ex (par ex. : démontage de l'unité de commande ou de l'entraînement du bras répartiteur). • Le compartiment de l'accu ne peut être ouvert et l'accu chargé qu'en zone non explosive.
  • Seite 124 8 Accessoires Liquiport 2000 Ex Accessoires Il existe différents accessoires qui peuvent être commandés séparément auprès d'Endress+Hauser. Pour plus de renseignements sur les références de commande, contactez le SAV E+H. Référence Accessoires 51002425 Filtre d'aspiration complet 51003198 Extrémité lestée 50053928 Tuyau d'aspiration en PVC, diamètre intérieur 10 mm...
  • Seite 125 Liquiport 2000 Ex 9 Suppression des défauts Suppression des défauts Danger ! (Toutes les données importantes pour la protection antidéflagrante figurent dans des documentations Ex séparées, disponibles sur simple demande (voir "Documentation complémentaire") Recherche des défauts Recherche des défauts Toujours commencer la recherche de défaut par la checklist ci-dessous si des défauts apparaissent après la mise en service ou pendant le fonctionnement.
  • Seite 126 9 Suppression des défauts Liquiport 2000 Ex Erreurs process sans messages Erreurs process sans messages Problème Causes Solution – Accu vide – Charger l'accu – Accu pas raccordé – Vérifier que l'accu est Impossible de mettre l'appareil correctement raccordé dans son sous tension ou l'affichage reste –...
  • Seite 127 Liquiport 2000 Ex 9 Suppression des défauts Pièces de rechange Pièces de rechange Fig. 30 : Pièces de rechange Liquiport 2000 Ex (pour la légende, voir liste des pièces de rechange page suivante) Unité de commande/CPU Software 1 programme 7 programmes...
  • Seite 128 9 Suppression des défauts Liquiport 2000 Ex ® Mise à jour software (programme, ReadWin 2000, câble d'interface) Software 7 programmes Langue allemand anglais français italien espagnol hollandais / néerlandais danois tchèque polonais ⇐ RPT20A1- Référence de commande N° pos. Référence Pièces de rechange...
  • Seite 129 Liquiport 2000 Ex 9 Suppression des défauts N° pos. Référence Pièces de rechange 50030554 Batterie ER ½ AA Mise au rebut Mise au rebut Lors de la mise au rebut de l'appareil, les directives nationales en vigueur doivent être respectées.
  • Seite 130 La détection de produit commande le comptage électronique du volume. La détection de produit est un système nouvellement développé par Endress+Hauser. Le coeur du système est Galets de Détection un capteur de pression qui fait la différence pompe...
  • Seite 131 Liquiport 2000 Ex 10 Caractéristiques techniques Proportionnel au temps : A intervalles de temps constants, un volume d'échantillon constant est prélevé. Proportionnel à la quantité : A intervalles de temps variables, un volume d'échantillon constant est prélevé. Proportionnel au débit : A intervalles de temps constants, un volume d'échantillon variable est prélevé.
  • Seite 132 10 Caractéristiques techniques Liquiport 2000 Ex 10.3 Entrées et sorties Affectation des connecteurs, Voir »Raccordement en bref« page 102. schéma de connexion Endress+Hauser...
  • Seite 133 à 230 V ; courant de charge 2,0 A Remarque ! Le chargement ne peut être effectué qu'en zone non Ex. Dans le cas du Liquiport 2000 Ex, il faut retirer l'accu pour raccorder l'appareil au chargeur. Consommation max. 29 W Capacité...
  • Seite 134 10 Caractéristiques techniques Liquiport 2000 Ex 10.8 Construction Dimensions et poids 21,5 kg (poids à vide) 25,5 kg (avec accu, flacons 24 x 1 l.) 16,5 kg (partie supérieure avec accu) 15,2 kg (partie inférieure avec flacons en verre 8 x 1,8 l) 9 kg (partie inférieure avec flacons PE 24 x 1 l)
  • Seite 135 10 Caractéristiques techniques 10.10 Certificats et agréments Certificat ATEX Le Liquiport 2000 Ex est agréé ATEX II2G EEx dem[ib]IIC T4 pour le fonctionnement en zone explosive 1. Sigle CE L'appareil remplit les exigences légales des directives CE. Par l'apposition du sigle CE, Endress+Hauser certifie que l'appareil a passé...
  • Seite 136 Caractéristiques techniques Liquiport 2000 Ex Accessoires ........121 Paramétrage des entrées .
  • Seite 137 Déclaration de décontamination Cher client, conformément aux directives légales et pour la sécurité de nos employés et de nos équipements, nous avons besoin de cette "Déclaration de décontamination" signée, avant de pouvoir traiter votre commande. Par conséquent, nous vous prions de joindre la présente déclaration dûment complétée aux documents de transport.
  • Seite 138 Breve panoramica Liquiport 2000 Ex Breve panoramica Per una rapida e semplice messa in servizio: → Pagina 141 Istruzioni di sicurezza → Pagina 145 Installazione Guida rapida all'installazione, Installazione, Verifica finale dell'installazione → Pagina 148 Cablaggio Guida rapida al cablaggio →...
  • Seite 139 Transportabler Probenehmer Liquiport 2000 Ex Deutsch Betriebsanleitung 4...47 (Bitte lesen, bevor Sie das Gerät in Betrieb nehmen) Gerätenummer:........Portable water sampler Liquiport 2000 Ex English Operating Instructions 48 ... 91 (Please read before installing the unit) Unit number:........Echantillonneur portable Liquiport 2000 Ex Français...
  • Seite 140 Sommario Liquiport 2000 Ex Sommario Istruzioni di sicurezza ... 137 Comunicazione mediante ReadWin® 2000 ..148 Taratura ....... 149 Uso previsto .
  • Seite 141 Uso previsto Uso previsto Liquiport 2000 Ex è un campionatore portatile per acque reflue, superficiali e potabili, approvato per impieghi in area Ex, zona 1 e 2. I campioni sono prelevati in modo discontinuo, mediante una pompa peristaltica e distribuiti nei serbatoi di campionamento.
  • Seite 142 Spedizione in fabbrica Spedizione in fabbrica Prima di inviare lo strumento a Endress+Hauser per interventi o riparazioni, si prega di adottare le seguenti misure: • Allegare il modulo "Dichiarazione di decontaminazione" interamente compilato insieme allo stru- mento. Tale documento è necessario affinché Endress+Hauser possa trasportare, testare o riparare lo strumento reso.
  • Seite 143 Liquiport 2000 Ex 1 Istruzioni di sicurezza Note sulle convenzioni e sui simboli di sicurezza Note sulle convenzioni e Il funzionamento affidabile e in sicurezza del dispositivo è assicurato solo se si rispettano le istruzioni sui simboli di sicurezza di sicurezza indicate in questo manuale operativo. Le istruzioni di sicurezza sono evidenziate con i...
  • Seite 144 "Liquiport 2000 Ex" (esempio) Fornitura Fornitura La fornitura del campionatore comprende: • Liquiport 2000 Ex con tubo flessibile di aspirazione in PVC • Cavo di segnale • Istruzioni di funzionamento + Istruzioni di sicurezza per apparecchiature elettriche in area Ex (XA 037R/09/a3) •...
  • Seite 145 Collegamenti elettrici l: Rilevamento del fluido m: Connessione del tubo flessibile n: Distribuzione delle bottiglie Fig. 2: Liquiport 2000 Ex: panoramica dei componenti Accettazione all’arrivo, trasporto, stoccaggio 3.2.1 Accettazione all’arrivo All’arrivo della merce, controllare quanto segue: • che gli imballi e il contenuto non siano danneggiati •...
  • Seite 146 3 Installazione Liquiport 2000 Ex 3.2.2 Stoccaggio Osservare quanto segue: • Per lo stoccaggio ed il trasporto, imballare lo strumento in confezioni a prova d’urto. Gli imballi originali forniscono la migliore protezione. • La temperatura di immagazzinamento consentita è −20...+60 °C (preferibilmente +20 °C).
  • Seite 147 Liquiport 2000 Ex 3 Installazione Istruzioni di installazione Nota! Il campionatore viene sempre spedito con la batteria non installata. Di conseguenza, la batteria deve essere inserita prima di eseguire la messa in servizio iniziale. Attenzione! Aprire il vano batteria e caricare la batteria solo fuori dall'area Ex.
  • Seite 148 4 Cablaggio Liquiport 2000 Ex Cablaggio " Pericolo! Prima di eseguire il cablaggio, confrontare la tensione di alimentazione con quella riportata sulla tar- ghetta informativa. Se la sicurezza operativa non è più garantita (ad es. per danni visibili), porre lo strumento fuori ser- vizio e al sicuro da messe in marcia accidentali.
  • Seite 149 Un PC (spina SUB-D a 9 pin) può essere collegato all'ingresso di connessione (femmina, a 4 pin) ® mediante il cavo di interfaccia RS232 (a 4 pin, maschio). Il software operativo ReadWin 2000 di Endress+Hauser consente la configurazione a distanza del campionatore e l'interrogazione dei dati di misura. 4.1.3 Connessione del caricabatteria e carica della batteria Attenzione! Aprire il vano batteria e caricare la batteria solo fuori dall'area Ex.
  • Seite 150 4 Cablaggio Liquiport 2000 Ex Controlli post-connessione Controlli post-connessione Dopo aver completato le connessioni elettriche dello strumento, eseguire i seguenti controlli: Stato del dispositivo e specifiche Note − Strumento o cavo danneggiati (ispezione visiva)? Connessione elettrica Note La tensione di alimentazione corrisponde a quanto indicato sulla targhetta informa-...
  • Seite 151 Liquiport 2000 Ex 5 Funzionamento Funzionamento Guida rapida al funzionamento Guida rapida al funzionamento Tasti scorrimento Avvio programma Elenco eventi campionamento Statistiche Avvio manuale Accensione/spegnimento "Quick Set up"; set up; campione campione singolo unità impostazioni unità; servizio; programmi di campionamento Fig.
  • Seite 152 5 Funzionamento Liquiport 2000 Ex Le impostazioni possibili vengono visualizzate automaticamente per mezzo di opzioni di menu. L'impostazione selezionata (ad es. tempo, quantità, segnale esterno, portata) è evidenziata su sfondo nero ('-modalità' nella figura). Fig. 10: Elenchi di selezione (esempio: 'Menu Quick Setup') 5.2.2...
  • Seite 153 Liquiport 2000 Ex 5 Funzionamento Taratura 5.6.1 Taratura del volume del campione Taratura del volume del campione Il volume del campione deve essere tarato se: • il volume impostato nel controllore non corrisponde alla quantità di campione prelevata, • oppure è stato cambiato il tubo flessibile della pompa.
  • Seite 154 5 Funzionamento Liquiport 2000 Ex 5.6.2 Taratura del rubinetto a snodo Taratura del rubinetto a È necessario effettuare la taratura del rubinetto a snodo quando: snodo • il motore dello stesso è stato sostituito oppure • sul display è visualizzato il messaggio di errore <Taratura rubinetto a snodo>.
  • Seite 155 Liquiport 2000 Ex 6 Messa in servizio Messa in servizio Verifica funzionale Verifica funzionale Se si può rispondere alle seguenti domande in modo affermativo, procedere con la messa in servizio del dispositivo (v. par. 6.2 "Accensione del misuratore"). In caso di risposta negativa, consultare i...
  • Seite 156 Immettere il numero e il volume delle bottiglie. Immettere l'ora di avvio. Se si seleziona la funz. AUT, il programma viene automaticamente avviato appena si preme il pulsante AUT. Immettere modalità STOP. Avvio programma. Fig. 14: Menu Quick Setup del Liquiport 2000 Ex Endress+Hauser...
  • Seite 157 Liquiport 2000 Ex 6 Messa in servizio Configurazione dello strumento Nota! Le figure mostrano le strutture del menu con il display e l'elenco di selezione per i diversi parametri configurativi. Sotto le figure sono presenti delle tabelle con le descrizioni della funzione corrispon- dente per i parametri.
  • Seite 158 6 Messa in servizio Liquiport 2000 Ex Ingresso analogico Struttura del menu: Fig. 16: Struttura del menu dell'ingresso analogico Segnale Inserire il segnale di uscita dello strumento collegato: 0-20 mA, 4-20 mA Unità ingegneristiche Inserire le unità SI del segnale analogico.
  • Seite 159 Liquiport 2000 Ex 6 Messa in servizio 6.4.3 Configurazione delle uscite Struttura del menu: Fig. 18: Struttura del menu delle uscite Interruzione dell'alimen- Il contatto di uscita commuta in caso di caduta di alimentazione. tazione Campione Il contatto di uscita commuta in caso di prelievo di un campione.
  • Seite 160 6 Messa in servizio Liquiport 2000 Ex 6.4.4 Selezione del programma Nota! Possono essere selezionati solo programmi di commutazione ed evento nel modulo del pro- gramma 7. Struttura del menu: Fig. 19: Struttura del menu per la selezione del programma Per la versione del programma 7 sono disponibili diverse funzioni tra loro combinate: È...
  • Seite 161 Liquiport 2000 Ex 6 Messa in servizio Segnale esterno Passaggio al programma di commutazione comandato da un segnale digitale esterno. Nota! Per questa funzione, uno dei due ingressi digitali deve essere assegnato e configurato mediante la funzione COMMUTA. L'operatore può definire programmi di campionamento specifici e bottiglie separate per i programmi di commutazione.
  • Seite 162 6 Messa in servizio Liquiport 2000 Ex Tipo di sequenze di campionamento Struttura del menu: Fig. 21: Struttura del menu per i tipi di campionamento I campioni possono essere prelevati proporzionalmente al tempo, alla quantità, alla portata o in caso di evento (vedere Pagina 176, tipi di campionamento).
  • Seite 163 Liquiport 2000 Ex 6 Messa in servizio Funzionamento Start-stop Struttura del menu: Fig. 23: Struttura del menu del funzionamento Start-stop Il programma di campionamento può essere avviato sia immediatamente, premendo il tasto AUT, sia a un orario predeterminato. L'arresto del programma di campionamento può essere specificato come di seguito descritto.
  • Seite 164 6 Messa in servizio Liquiport 2000 Ex 6.4.6 Creazione di programmi di commutazione Modalità di campionamento Struttura del menu: Fig. 25: Struttura del menu della modalità di campionamento Nei programmi di commutazione, come in quelli principali, è possibile attivare il campionamento in base a tempo, volume, flusso o comandato da un segnale esterno.
  • Seite 165 Liquiport 2000 Ex 6 Messa in servizio 6.4.7 Creazione di un programma evento Struttura del menu: Fig. 27: Struttura del menu del programma evento Modalità di campionamento Struttura del menu: Fig. 28: Struttura del menu della modalità di campionamento Il programma evento contiene le medesime opzioni di campionamento (tempo, volume, segnale est.
  • Seite 166 6 Messa in servizio Liquiport 2000 Ex 6.4.8 Descrizione delle funzioni dello strumento La seguente tabella elenca e descrive tutti i parametri configurabili, che possono essere letti e definiti durante la configurazione del sistema. Impostazioni di Parametro Livello del menu...
  • Seite 167 Liquiport 2000 Ex 6 Messa in servizio ↵ Nome Imposta Per selezionare il programma di campionamento attivo Programma 1-4; ↵ Selezione del programma 1-U1; 1-E; Nome 1-U1-E ↵ Commutazione Imposta Giorno: Giorno ↵ (solo per un pro- Selezione del programma...
  • Seite 168 6 Messa in servizio Liquiport 2000 Ex Creazione di programmi - Programmi di commutazione ↵ Commutazione Imposta Campionamento: tipo di campionamento nel programma di commutazione. ↵ Creazione dei programmi Distribuzione: modalità di distribuzione per il programma di commutazione. Commutazione 1,2 ↵...
  • Seite 169 Manutenzione Attenzione! • La custodia (ad es. per togliere il controllore o l'azionatore del distributore) del Liquiport 2000 Ex può essere aperta solo dall'Organizzazione di Assistenza Endress+Hauser. • Il vano batteria può essere aperto e la batteria può essere caricata solo fuori dall'area Ex.
  • Seite 170 8 Accessori Liquiport 2000 Ex Accessori Per il campionatore sono disponibili diversi accessori, che possono essere ordinati separatamente all'Ufficio Vendite Endress+Hauser locale. Per maggiori informazioni e per definire il codice d'ordine specifico rivolgersi alla rete commerciale Endress+Hauser locale. Codice d’ordine Accessori 51002425 Filtro di aspirazione, compl.
  • Seite 171 Liquiport 2000 Ex 9 Risoluzione dei problemi Risoluzione dei problemi Attenzione! Tutti i dati per la protezione antideflagrante sono riportati in una documentazione separata disponi- bile su richiesta (v. "Documentazione"). Istruzioni per la risoluzione dei problemi Istruzioni per la risoluzione...
  • Seite 172 9 Risoluzione dei problemi Liquiport 2000 Ex Errori di processo senza messaggi Errori di processo senza messaggi Problema Causa Soluzione – Batteria scarica – Caricare la batteria – Batteria non collegata – Controllare che la batteria sia col- Il sistema non si accende o il...
  • Seite 173 Liquiport 2000 Ex 9 Risoluzione dei problemi Parti di ricambio Parti di ricambio Fig. 30: Parti di ricambio per il campionatore Liquiport 2000 Ex (i numeri delle varie posizioni sono descritti nell'elenco delle parti di ricambio) Controllore/CPU Software 1 programma...
  • Seite 174 9 Risoluzione dei problemi Liquiport 2000 Ex ® Aggiornamento del software (programma, ReadWin 2000, cavo di interfaccia) Software 7 programmi Lingua Tedesco Inglese Francese Italiano Spagnolo Olandese Danese Ceco Polacco ⇐ RPT20A1- Codice d’ordine Po n. Codice d’ordine Parti di ricambio...
  • Seite 175 Liquiport 2000 Ex 9 Risoluzione dei problemi Po n. Codice d’ordine Parti di ricambio 50040379 Batteria di ricambio 3N100 3,6 V 50030554 Batteria ER ½ AA Smaltimento Smaltimento Per lo smaltimento del campionatore, rispettare la normativa locale. Endress+Hauser...
  • Seite 176 10 Dati tecnici Liquiport 2000 Ex Dati tecnici 10.1 Funzionamento e struttura del sistema Principio di campionamento Per aspirare e dosare il liquido campionato è utilizzata una pompa peristaltica. Il tubo flessibile della pompa è stretto periodica- mente da rulli che corrono intorno alla sua...
  • Seite 177 Liquiport 2000 Ex 10 Dati tecnici Proporzionale al tempo: un volume costante di campione è prelevato a intervalli costanti. Curva portata Proporzionale alla quantità: Basato sul tempo un volume costante di campione è prelevato a intervalli variabili. Proporzionale alla quantità...
  • Seite 178 10 Dati tecnici Liquiport 2000 Ex 10.3 Ingressi ed uscite Assegnazione dei pin, Vedere "Istruzioni veloci di cablaggio" a pagina 148. schema del circuito Endress+Hauser...
  • Seite 179 ; corrente di carica 2,0 A; c.a. c.a. campo Nota! L'unità può essere ricaricata solo all'esterno delle aree Ex. Per il Liquiport 2000 Ex, per connettere il caricabatterie è necessario rimuovere la batteria. Potenza assorbita 29 W max. Capacità della batteria...
  • Seite 180 151. Elenchi di selezione e menu operativo rapido (“Quick-Setup”) per una facile messa in marcia. Funzionamento a distanza La configurazione del Liquiport 2000 (e di altri dispositivi Endress+Hauser) è molto semplice grazie ® al software ReadWin 2000 PC. Consente di creare i programmi su PC e di trasmetterli tramite l'interfaccia RS232.
  • Seite 181 10 Dati tecnici 10.10 Certificati e approvazioni Approvazione ATEX Il campionatore Liquiport 2000 Ex con certificazione ATEX II2G EEx dem[ib]IIC T4 è approvato per impieghi in area pericolosa, Zona 1. Marchio CE Questo strumento è conforme ai requisiti previsti dalle direttive CE. Endress+Hauser conferma il superamento di tutte le prove apponendo il marchio CE sull'unità.
  • Seite 182 Breve panoramica Liquiport 2000 Ex Programma evento ......156 Programmi di commutazione ..... 155 Accessori .
  • Seite 184 www.endress.com/worldwide BA165R/09/c4/05.08 51007207 FM+SGML6.0...

Diese Anleitung auch für:

Liquiport 2000 ex rpt22