Herunterladen Inhalt Inhalt Diese Seite drucken
bürkert 8045 Schnellstartanleitung
Vorschau ausblenden Andere Handbücher für 8045:
Inhaltsverzeichnis

Werbung

Verfügbare Sprachen

Verfügbare Sprachen

Type 8045
Electromagnetic flowmeter
Quickstart
English

Werbung

Inhaltsverzeichnis
loading

Inhaltszusammenfassung für bürkert 8045

  • Seite 1 Type 8045 Electromagnetic flowmeter Quickstart English...
  • Seite 2: Inhaltsverzeichnis

    1. About the QuickstArt.................3 2. intended use ....................4 3. bAsic sAfety informAtion ...............4 4. GenerAl informAtion ................6 5. description of the nAme plAte ..........6 6. technicAl dAtA ...................7 7. instAllAtion And wirinG ..............11 8. Adjustment, commissioninG ................23 9. mAintenAnce And troubleshootinG ........30 10. pAckAGinG, trAnsport ..............30 11. storAGe ....................... 30 12. disposAl of the product ............31 We reserve the right to make technical changes without notice. Technische Änderungen vorbehalten.
  • Seite 3: About The Quickstart

    Type 8045 About the Quickstart AbouT The QuicksTArT attention The quickstart describes the life cycle of the device. Please keep this warns against a possible risk. manual in a safe place, accessible to all users and any new owners. • Failure to observe this warning can result in substantial or minor injuries.
  • Seite 4: Intended Use

    • the local safety regulations for which the operating company • The 8045 flowmeter is intended exclusively to measure flow rate is responsible including the staff in charge of installation and in liquids.
  • Seite 5 Type 8045 Basic safety information note the device may be damaged by the fluid in contact with. Various dangerous situations • Systematically check the chemical compatibility of the compo- To avoid injury take care: nent materials of the device and the fluids likely to come into • not to use the device for the measurement of gas flow rates.
  • Seite 6: General Information

    4.2. Warranty conditions The condition governing the legal warranty is the conforming use of the 8045 in observance of the operating conditions specified in this manual. 4.3. information on the internet You can find the user manuals and technical data sheets regarding the type 8045 at: www.burkert.com...
  • Seite 7: Technical Data

    Shows the flow direction • Vibration: EN 60068-2-6 Fig. 1: Name plate of the 8045 flowmeter • Shock: EN 60068-2-27 Pressure: article 3§3 of the Pressure Directive 97/23/CE. Acc. to the Pressure Directive 97/23/CE: the device can only be used in the following cases (depending on the max.
  • Seite 8: Mechanical Data

    / seal • 8045 with flow sensor • 0 to +80 °C Screws Stainless steel in PVDF • 8045 with flow sensor in • -15 to +110 °C stainless steel Flow sensor PVDF Stainless steel 316L (exposed to the (DIN 1.4404)
  • Seite 9 Except DN100 for measuring devices with a clamp connection A: range of use T (°C) Fig. 3: Fluid pressure /temperature dependency for a 8045 with stainless steel flow sensor and a fitting S020 in metal, A: range of use PVC, PVDF or PP Fig.
  • Seite 10: Electrical Data

    Type 8045 Technical data 6.5. electrical data relay outputs (do2 and do3) Power supply • 18-36 V DC, filtered and • operating • hysteresis (by default), configu- regulated rable, normally open • oscillation rate: ±5 % • electrical data of the load • 250 V AC / 3 A or 30 V DC / Current consumption 300 mA max.
  • Seite 11: Electrical Connection

    Type 8045 Installation and wiring 6.6. electrical connection insTAllATion AnD WirinG Type of connection Through two M20x1,5 cable 7.1. safety instructions glands Cable specifications danger • cable type • shielded • Cross section • 0,5 to 1,5 mm risk of injury due to high pressure in the installation. • Diameter of each cable: risk of injury due to electrical voltage.
  • Seite 12 7.2. recommandations for installing the 8045 on the pipe → Choose an S020 fitting appropriate to the velocity of the fluid 50 x DN 5 x DN 40 x DN 5 x DN inside the pipe.
  • Seite 13 Type 8045 Installation and wiring → Respect the following additional mounting conditions to ensure Horizontal mounting that the measuring device operates correctly: - Preferably install the device at a 45° angle to the horizontal centre of the pipe to avoid having deposits on the electrodes and false meas- urements due to air bubbles (see Fig.
  • Seite 14 Type 8045 Installation and wiring 7.3. installation into the pipe of a 8045 with a G2'' nut In order to ensure a high accuracy of the measurements and good stability of the „flow zero“ point, install the device into Correct...
  • Seite 15 Charge the pipe to make sure the installation is tight. flow direction Electrodes Fig. 8: Installation into the pipe of a 8045 with a G2'' nut 7.4. installation into the pipe of a 8045 with a clamp connection In order to ensure a high accuracy of the measurements and good stability of the „flow zero“...
  • Seite 16 Type 8045 Installation and wiring 7.5. Wiring Insert the supplied stopper gasket into the unused cable gland to ensure the tightness of the device. danger risk of injury due to electrical voltage. If two cables are used in the same cable gland, first insert • Shut down the electrical power source of all the conductors and the supplied multi-way seal.
  • Seite 17 Type 8045 Installation and wiring → Connect the negative power supply terminal to the earth to sup- press the effects of common mode currents. If this connection Power cable shield cannot be made directly, a 100 nF/50 V capacitor can be fitted Power supply between the negative power supply terminal and the earth.
  • Seite 18 Type 8045 Installation and wiring 7.5.2. Terminal assignment and use of the Power cable shield selectors Power supply 18-36VDC CURRENT Iout L+ L - PE P+ P- SINK SOURCE Supply PULSE 18...36 Vdc Metal pipe 4 pin ribbon ca- ble coming from...
  • Seite 19 Type 8045 Installation and wiring terminal block 1 Use switch A to configure the wiring of the 4-20 mA cur- Iout: 4-20 mA output (AO1) rent output in sinking or sourcing mode. L+: V+ (positive voltage) L-: 0V (power supply ground) PE: functional earth, wired in the factory (see Fig. 15)
  • Seite 20 Type 8045 Installation and wiring 7.5.4. Wiring the Ao1 current output 1 2 3 4 5 6 For safety reasons, secure the cables using a non-con- ducting cable clamp. The 4-20 mA output can be wired in either sourcing or sinking mode.
  • Seite 21 Type 8045 Installation and wiring 7.5.5. Wiring the Do1 transistor output Position the switch to the left. 18-36 V DC 300 mA 5-36 VDC 18-36 V DC 300 mA Power supply 4-20mA input at external device Power supply Iout L+ L - PE P+ P-...
  • Seite 22 Type 8045 Installation and wiring 7.5.6. Wiring the Di1 digital input 18-36 V DC 300 mA 5-36 VDC 18-36 V DC Power supply Power supply CURRENT Iout L+ L - PE P+ P- SINK SOURCE Supply PULSE 18...36 Vdc Iout...
  • Seite 23: Adjustment, Commissioning

    Type 8045 Adjustment, commissioning ADjusTmenT, commissioninG Power supply 18-36 V DC 8.1. safety instructions Warning risk of injury due to non-conforming operating. Non-conforming operating could lead to injuries and damage the CURRENT Iout L+ L - PE P+ P- device and its surroundings. SINK SOURCE Supply PULSE 18...36 Vdc...
  • Seite 24: Operating Levels Of The Device

    Type 8045 Adjustment, commissioning 8.2. operating levels of the device The device has two operating levels: the Process level and the Con- figuration level. Table 1: Default settings of the device Function Default value Function Default value LANGUAGE English OUTPUT...
  • Seite 25 Type 8045 Adjustment, commissioning Configuration level Process level 12.6 L/s > 2 s > 5 s ENTER 0..9 16.45 mA Parameters menu Test Menu Information menu 0..9 ENTER mEAs. OVF CAL AO1 LANGUAGE > 5 s UNit CALiB 0 CAL. FAiL...
  • Seite 26 Type 8045 Adjustment, commissioning 8.3. Description of the navigation keys and the state leDs • Scrolling up the • Selecting the displayed parameter parameters • Confirming the settings • Incrementing the figure selected Status LED of relay DO3 (LED ON =...
  • Seite 27 Type 8045 Adjustment, commissioning 8.4. using the navigation keys you want to... press... move between parameters within a level or a menu. • to go to the next parameter. • to go to the previous parameter. 0..9 access the Parameters menu. ENTER simultaneously for 5 s, in the Process level access the Test menu.
  • Seite 28: Choosing The Display Language

    Type 8045 Adjustment, commissioning 8.5. choosing the display language 8.6. entering the k factor of the fitting used: When the device is energized for the first time, the display language is English. The device determines the flow rate in the pipe using the fitting K factor.
  • Seite 29 Type 8045 Adjustment, commissioning K-FACtOR K=10.000 K=2.8500 → The display shows the K factor of the Enter the K factor (value between 0,0001 and fitting, may it have been entered or 9999,9) of the fitting used. → determined by a teach-in procedure;...
  • Seite 30: Maintenance And Troubleshooting

    Type 8045 Maintenance and troubleshooting pAckAGinG, TrAnsporT mAinTenAnce AnD TroubleshooTinG note damage due to transport 9.1. safety instructions Transport may damage an insufficiently protected device. • Transport the device in shock-resistant packaging and away danger from humidity and dirt. risk of injury due to high pressure in the installation. • Do not expose the device to temperatures that may exceed the admissible storage temperature range.
  • Seite 31: Disposal Of The Product

    Type 8045 Disposal of the product DisposAl of The proDucT → Dispose of the device and its packaging in an environmentally- friendly way. note damage to the environment caused by products contami- nated by fluids. • Keep to the existing provisions on the subject of waste disposal and environmental protection.
  • Seite 32 Type 8045 English...
  • Seite 33: Quick Start

    Typ 8045 Magnetisch-induktives Durchfluss-Messgerät Quickstart Deutsch...
  • Seite 34 1. Über den Quickstart ................3 2. bestimmungsgemässe Verwendung ........4 3. grundlegende sicherheitshinweise ........4 4. allgemeine hinweise ................6 5. beschreibung des typenschilds ..........6 6. technische daten ...................7 7. installation und Verkabelung ..........12 8. bedienung und inbetriebnahme ..........24 9. wartung, Fehlerbehebung ............31 10. Verpackung, transport .............. 31 11. lagerung ....................31 12. entsorgung des gerätes ............32 We reserve the right to make technical changes without notice.
  • Seite 35: Type 8045 Über Den Quickstart

    Arbeitsschritt, den Sie ausführen müssen. GefaHR! 1.2. Begriffsdefinition "Gerät" warnt vor einer unmittelbaren gefahr! Der in dieser Anleitung verwendete Begriff "Gerät" steht immer für das Durchfluss-Messgerät Typ 8045. • Bei Nichteinhaltung sind Tod oder schwere Verletzungen die Folge. waRnunG! warnt vor einer möglicherweise gefährlichen situation! • Bei Nichteinhaltung drohen schwere Verletzungen oder Tod.
  • Seite 36: Bestimmungsgemässe Verwendung

    Wartung der Geräte auftreten können. und die umwelt entstehen. • Ortsbezogenen Sicherheitsbestimmungen, für deren Einhaltung, auch • Das Durchfluss-Messgerät 8045 ist ausschließlich für die in Bezug auf das Installations- und Wartungspersonal, der Betreiber Durchflussmessung in Flüssigkeiten bestimmt. verantwortlich ist. • Schützen Sie das Gerät vor elektromagnetischen Stö- rungen, U.V.-Bestrahlung und bei Außenanwendung vor...
  • Seite 37 Type 8045 Grundlegende Sicherheitshinweise HInweIS! das gerät kann durch das medium beschädigt werden. allgemeine gefahrensituationen. • Kontrollieren Sie systematisch die chemische Verträglichkeit der Zum Schutz vor Verletzungen ist zu beachten Werkstoffe, aus denen das Gerät besteht, und der Flüssigkei- • Dieses Gerät nicht für die Durchflussmessung von Gas ten, die mit diesem in Berührung kommen können (zum Beispiel:...
  • Seite 38: Allgemeine Hinweise

    Die internationalen Kontaktadressen finden Sie im Internet unter: www.burkert.com 4.2. Gewährleistung Voraussetzung für die Gewährleistung ist der bestimmungsgemäße Gebrauch des Gerätes unter Beachtung der in der vorliegenden Bedienungsanleitung spezifizierten Einsatzbedingungen. 4.3. informationen im internet Bedienungsanleitungen und Datenblätter zum Typ 8045 finden Sie im Internet unter: www.buerkert.de deutsch...
  • Seite 39: Technische Daten

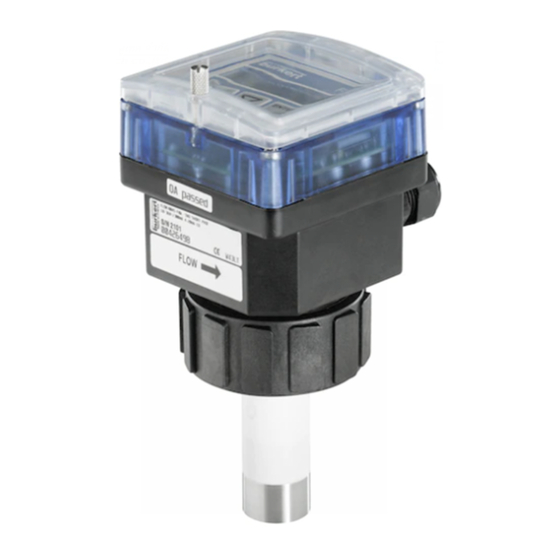
    Bestellnummer erfüllt: Zeigt die Fließrichtung an • EMV: EN 61000-6-2, EN 61000-6-3 Bild 1: Typenschild des Durchfluss-Messgerätes 8045 (Beispiel) • Niederspannungsrichtlinie: EN 61 010-1 • Vibration: EN 60068-2-6 • Schock: EN 60068-2-27 • Druck: Gemäß Artikel 3§3 der 97/23/CE Druckgeräterichtlinie.
  • Seite 40: Mechanische Daten

    Sensor (in 1.4404) Flüssigkeitsgruppe 1 PNxDN ≤ 2000 Kontakt mit der Kap. 1.3.b Flüssigkeit) DN ≤ 200 Dichtung 8045 mit G2"-Über- Flüssigkeitsgruppe 2 oder PN ≤ 10 wurfmutter: FKM Kap. 1.3.b Erdungsring Edelstahl 316L (DIN oder PNxDN ≤ 5000 des Durchfluss- 1.4404) oder Alloy...
  • Seite 41: Allgemeine Daten

    Druck der Flüssigkeit, den Werk- PVC + PP stoff des Durchfluss-Sensors und den Werkstoff des verwendeten Fittings PP (PN10) S020 eingeschränkt sein. • 8045 mit Durchfluss- PVC (PN10) Sensor aus PVDF • 0 bis +80 °C • 8045 mit Durchfluss- T (°C) Sensor aus Edelstahl •...
  • Seite 42: Elektrische Daten

    T (°C) • Schutz • galvanisch getrennt; Schutz Außer DN100 für Messgeräte mit Clamp-Anschluss gegen Überspannung, Ver- A: Verwendungsbereich polung und Kurzschluss Bild 3: Flüssigkeits-Druck-Temperatur-Abhängigkeit eines 8045 mit Durchfluss-Sensor aus Edelstahl und Fitting S020 aus Metall, PVC, PVDF oder PP deutsch...
  • Seite 43: Elektrischer Anschluss

    Type 8045 Technische Daten 6.6. elektrischer anschluss relais-ausgänge do2 und Anschluss-Typ Über zwei • Umschaltbetrieb • Hysterese (Grundeinstellung), M20x1,5-Kabelverschraubungen einstellbar, stromlos geöffnet Kabel-Daten • Elektrische Daten der Last • 250 V AC / 3 A oder 30 V DC / • Kabeltyp •...
  • Seite 44: Installation Und Verkabelung

    Schützen Sie das Gerät vor elektromagnetischen Stö- rungen, U.V.-Bestrahlung und bei Außenanwendung vor VerkaBelunG Witterungseinflüssen. 7.1. sicherheitshinweise 7.2. empfehlungen für die montage des 8045 in die rohrleitung GefaHR! → Das Fitting S020 so auswählen, das der Flüssigkeitsgeschwin- Verletzungsgefahr durch hohen druck in der anlage! digkeit in der Rohrleitung geeignet ist. Verletzungsgefahr durch stromschlag! →...
  • Seite 45 Type 8045 Installation und Verkabelung → Die folgenden zusätzlichen Montagebedingungen beachten, um eine korrekte Funktion des Messgerätes zu gewährleisten: Fließrichtung - Das Gerät mit einem Winkel von 45° zum horizontalen Mittelpunkt des Rohrs montieren (siehe Bild 5), um eventuelle Ablagerungen auf den Elektroden sowie verfälschte Messungen durch Luftblasen...
  • Seite 46 Type 8045 Installation und Verkabelung Horizontale Montage Richtig Falsch Richtig Falsch Fließrichtung Vertikale Montage Fließrichtung Richtig Falsch Bild 7: Luftblasen in der Rohrleitung → Gegebenenfalls einen Strömungsgleichrichter verwenden, um Richtig Falsch die Messgenauigkeit zu verbessern. Bild 6: Füllung der Rohrleitung - Die Bildung von Luftblasen in der Rohrleitung am Gerät ver-...
  • Seite 47 Die Überwurfmutter (Punkt 3 Bild 8) auf das Fitting setzen. → Den Sprengring (Punkt 2 Bild 8) in die Rille (Punkt 5 Bild 8) Bild 8: Installation in die Rohrleitung eines 8045 mit einsetzen. G2''-Überwurfmutter → Das Gerät so positionieren, dass der Pfeil auf der Seite des Gehäuses in die Fließrichtung zeigt: Die Zähler werden...
  • Seite 48: Verkabelung

    Schutzschalter absichern. • Das Relais mit einer 3A-Sicherung (max.) und einem Fließrichtung Sicherungsautomat schützen.(für den Prozess geeignet). • Nicht gleichzeitig eine gefährliche Spannung und eine Bild 9: Installation in die Rohrleitung eines 8045 mit Schutzkleinspannung an die Relais anschließen. Clamp-Anschluss deutsch...
  • Seite 49: Potentialausgleich Der Installation Gewährleisten

    Type 8045 Installation und Verkabelung → Die verschiedenen Erdungspunkte der Installation aneinander Den mitgelieferten Stopfen in die nicht verwendete Kabel- anschließen, damit die zwischen zwei Erdungspunkten mögli- verschraubung stecken, um die Dichtheit des Gerätes zu cherweise erzeugten Potentialdifferenzen beseitigt werden.
  • Seite 50 Type 8045 Installation und Verkabelung Abschirmung des Versorgungskabels Abschirmung des Versorgungskabels Versorgungsspannung Versorgungsspannung 18-36VDC 18-36VDC Rohrleitung aus Kunststoff Rohrleitung aus Metall Ventil, Pumpe,... (oder Erdungs- Wenn eine direkte Erdung nicht möglich ist, einen Kondensator ringe, nicht mitgeliefert, in die mit 100 nF / 50 V zwischen Minuspol der Stromversorgung und Rohrleitung eingesetzt) Erde anschließen.
  • Seite 51: Klemmenbelegung Und Verwendung Der Auswahl-Schalter

    Type 8045 Installation und Verkabelung 7.5.2. klemmenbelegung und Verwendung klemmleiste 1 der auswahl-schalter Iout: 4-20 mA-Ausgang (AO1) L+: V+ (positive Stromversorgung) L-: 0V (Erde der Stromversorgung) PE: Funktionnelle Erde, im Werk verkabelt (siehe Bild 15) P+: positiver Transistorausgang (DO1) P-: negativer Transistorausgang (DO1)
  • Seite 52: Verkabelung Der Do2- Und Do3-Relais-Ausgänge

    Type 8045 Installation und Verkabelung Der Auswahl-Schalter A dient zur Konfiguration des 4-20 1 2 3 4 5 6 mA-Anschlusses als Quelle oder Senke. CURRENT CURRENT Erdungskabel, das vom Gehäuse herkommt. SINK SOURCE SINK SOURCE Bei einer Ausführung mit Durchfluss-Sensor aus Edelstahl kommt ein zweites Kabel vom Sensor.
  • Seite 53 Type 8045 Installation und Verkabelung 7.5.4. Verkabelung des ao1-stromausgangs Den Schalter nach Linkss stellen. Aus Sicherheitsgründen die Kabel mittels einer nicht lei- tenden Klemmschelle fixieren. 18-36 V DC 300 mA Der 4-20 mA-Stromausgang kann entweder als Quelle oder als Senke angeschlossen werden.
  • Seite 54 Type 8045 Installation und Verkabelung 7.5.5. Verkabelung des 18-36 V DC 300 mA do1-Transistor-ausgangs 5-36 VDC 18-36 V DC 300 mA 5-36 VDC Versorgungs- spannung Versorgungs- spannung Iout L+ L - PE P+ P- Supply PULSE 18...36 Vdc Iout L+ L - PE P+ P-...
  • Seite 55 Type 8045 Installation und Verkabelung 7.5.6. Verkabelung des Versorgungs- di1-digitaleingangs spannung 18-36 V DC 18-36 V DC Versorgungs- spannung CURRENT Iout L+ L - PE P+ P- SINK SOURCE CURRENT Supply PULSE Iout L+ L - PE P+ P- 18...36 Vdc...
  • Seite 56: Bedienung Und Inbetriebnahme

    Type 8045 Bedienung und Inbetriebnahme BedienunG und waRnunG! inBeTrieBnahme Verletzungsgefahr bei unsachgemäßer inbetriebnahme! Nicht sachgemäßer Betrieb kann zu Verletzungen sowie Schäden 8.1. sicherheitshinweise am Gerät und seiner Umgebung führen. • Vor der Inbetriebnahme muss gewährleistet sein, dass der Inhalt waRnunG! der Bedienungsanleitung dem Bedienungspersonal bekannt ist und vollständig verstanden wurde.
  • Seite 57: Bedienebenen Des Gerätes

    Type 8045 Bedienung und Inbetriebnahme 8.2. Bedienebenen des Gerätes Grundein- Grundein- Funktion Funktion stellung stellung Das Gerät verfügt über zwei Bedienebenen: Die Prozess-Ebene und AUSGANG Hysterese CUT-OFF 0.000 die Einstellungs-Ebene. 2-= 0.000 BACKLIT Filter 9, Akti- Tab. 1: Grundeinstellung des Gerätes...
  • Seite 58 Type 8045 Bedienung und Inbetriebnahme Einstellungs-Ebene Prozess-Ebene 12.6 l/S > 2 s > 5 s ENTER 0..9 16.45 mA Parametriermenü Testmenü Informationsmenü 0..9 ENTER CAl AO1 mEAS. OVF SPRACHE > 5 s KAliB 0 CAl. FAil EinHEit 87654 l K-FACtOR duRCHFlu.
  • Seite 59: Beschreibung Der Navigations-Tasten Und Der Status-Leds

    Type 8045 Bedienung und Inbetriebnahme 8.3. Beschreibung der navigations-Tasten und der status-leds • Funktionen nach oben • Angezeigte Funktion auswählen durchlaufen • Einstellungen bestätigen • Ausgewählte Ziffer erhöhen Status-LED des DO3-Relais (LED AN = Kontakt geschlossen) Geräte-Status-LED: Siehe Status-LED des DO2-Relais (LED AN folgende Tabelle.
  • Seite 60: Verwendung Der Navigations-Tasten

    Type 8045 Bedienung und Inbetriebnahme 8.4. Verwendung der navigations-Tasten sie wollen... drücken sie... sich in den Funktionen einer Ebene oder eines Menüs • nächste Funktion: bewegen. • vorherige Funktion: 0..9 das Parametriermenü anzeigen. ENTER gleichzeitig für 5 s in der Prozess-Ebene das Testmenü anzeigen.
  • Seite 61: Display-Sprache Auswählen

    Type 8045 Bedienung und Inbetriebnahme 8.5. display-sprache auswählen 8.6. k-Faktor des verwendeten Fittings eingeben Beim ersten Einschalten ist die Display-Sprache Englisch. Das Gerät berechnet den Durchfluss der Flüssigkeit in der Rohr- leitung mittels des K-Faktors des Fittings. lAnguAgE EngliSH Der K-Faktor des verwendeten Fittings kann hier eingegeben werden.
  • Seite 62 Type 8045 Bedienung und Inbetriebnahme K-FACtOR K=10.000 K=2.8500 → Das Display zeigt den K-Faktor des K-Faktor (Wert zwischen 0,0001 und 9999,9) Fittings an, ob eingegeben oder mittels des verwendeten Fittings einstellen. → Teach-in bestimmt, der durch das Gerät Den angezeigten Wert bestätigen.
  • Seite 63: Wartung, Fehlerbehebung

    Type 8045 Wartung, Fehlerbehebung warTunG, VerpackunG, TransporT FehlerBeheBunG HInweIS! transportschäden! 9.1. sicherheitshinweise Ein unzureichend geschütztes Gerät kann durch den Transport beschädigt werden. GefaHR! • Transportieren Sie das Gerät vor Nässe und Schmutz geschützt Verletzungsgefahr durch hohen druck in der anlage! in einer stoßfesten Verpackung. • Das Gerät keinen Temperaturen außerhalb des zulässigen Tem- Verletzungsgefahr durch stromschlag! peraturbereichs für die Lagerung aussetzen.
  • Seite 64: Entsorgung Des Gerätes

    Type 8045 Entsorgung des Gerätes enTsorGunG des GeräTes → Entsorgen Sie das Gerät und die Verpackung umweltgerecht. HInweIS! umweltschäden durch teile, die durch Flüssigkeiten kontami- niert wurden! • Geltende Entsorgungsvorschriften und Umweltbestimmungen einhalten! hinweis! Beachten Sie die nationalen Abfallbeseitigungsvorschriften. deutsch...
  • Seite 65 Type 8045 Débitmètre électromagnétique Quickstart Français...
  • Seite 66 1. À propos du Quickstart ..............3 2. utilisation conforme................4 3. consignes de sécurité de base ..........4 4. informations générales ..............6 5. description de l'étiQuette d'identification ....6 6. caractéristiQues techniQues ...........7 7. installation et câblage..............11 8. réglage et mise en service ............23 9. maintenance et dépannage ............29 10. emballage et transport ............29 11. stockage ....................29 12. élimination de l’appareil ............. 30 We reserve the right to make technical changes without notice. Technische Änderungen vorbehalten.
  • Seite 67: À Propos Du Quickstart

    Définition du terme "appareil" met en garde contre un danger imminent. Dans ce manuel d'utilisation, le terme "appareil" désigne toujours le • Son non-respect peut entraîner la mort ou de graves blessures. débitmètre électromagnétique type 8045. aVertiSSement met en garde contre une situation éventuellement dangereuse. • Son non-respect peut entraîner de graves blessures, voire la mort.
  • Seite 68: Utilisation Conforme

    • des imprévus pouvant survenir lors de l’assemblage, de l’utilisation l‘environnement. et de l’entretien des appareils. • Le débitmètre 8045 est destiné à la mesure du débit de • des prescriptions de sécurité locales que l’exploitant est tenu de faire liquides.
  • Seite 69 Type 8045 Consignes de sécurité de base remarque l'appareil peut être endommagé au contact de certains situations dangereuses diverses fluides. Pour éviter toute blessure, veiller à : • Vérifier systématiquement la compatibilité chimique des maté- • ne pas utiliser cet appareil pour mesurer le débit d'un gaz. riaux composant l'appareil et les fluides susceptibles d’entrer en contact avec celui-ci (par exemple : alcools, acides forts ou •...
  • Seite 70: Informations Générales

    4.2. conditions de garantie La condition pour bénéficier de la garantie légale est l’utilisation conforme de l'appareil type 8045 dans le respect des conditions d’utilisation spécifiées dans le présent manuel d'utilisation. 4.3. informations sur internet Retrouvez sur internet les manuels d'utilisation et les fiches tech- niques relatifs au type 8045 sous : www.burkert.fr...
  • Seite 71: Caractéristiques Techniques

    Indique le sens de circulation du fluide • CEM : EN 61000-6-2, EN 61000-6-3 Fig. 1 : Étiquette d’identification du débitmètre 8045 • DBT: EN 61 010-1 • Tenue aux vibrations : EN 60068-2-6 • Tenue aux chocs : EN 60068-2-27 Pression : article 3§3 de la directive pression 97/23/CE.
  • Seite 72: Caractéristiques Mécaniques

    Fluide groupe 1 § 1.3.a interdit pvdf) acier inoxydable) DN ≤ 32 Joint 8045 avec écrou G2" : Fluide groupe 2 § 1.3.a ou DN > 32 et PNxDN ≤ 1000 PNxDN ≤ 2000 Anneau de terre acier inoxydable 316L Fluide groupe 1 § 1.3.b du capteur de (DIN 1.4404) ou Alloy...
  • Seite 73 8045 avec capteur de débit en acier inoxydable et raccord A : plage d'utilisation S020 en métal, PVC, PVDF ou PP Fig. 2 : Dépendance température - pression du fluide pour un 8045 avec capteur de débit en PVDF et raccord S020 en métal, PVC, PVDF ou PP français...
  • Seite 74: Caractéristiques Électriques

    Type 8045 Caractéristiques techniques 6.5. caractéristiques électriques sortie courant ao1 • 4-20 mA, puits ou source (par • caractéristiques Alimentation électrique • 18-36 V DC, filtrée et régulée câblage), 22 mA pour indiquer • tolérance : ±5 % une erreur Consommation propre 300 mA max. à 18 V DC •...
  • Seite 75: Installation Et Câblage

    Type 8045 Installation et câblage insTallaTion eT câblage Protéger l’appareil contre les perturbations électromagné- tiques, les rayons ultraviolets et, lorsqu’il est installé à l’exté- rieur, des effets des conditions climatiques. 7.1. consignes de sécurité 7.2. recommandations d'installation danger du 8045 sur la conduite risque de blessure dû à la pression élevée dans l'installation. → Sélectionner un raccord S020 adapté à la vitesse du fluide cir- risque de blessure par décharge électrique.
  • Seite 76 Type 8045 Installation et câblage → Respecter les conditions additionnelles de montage suivantes pour assurer un fonctionnement correct de l'appareil de mesure : Sens de circulation du fluide - installer de préférence l'appareil avec un angle de 45° par rapport à une horizontale centrée sur la conduite pour éviter les dépôts sur les électrodes et des erreurs de mesure dues à...
  • Seite 77 Type 8045 Installation et câblage Montage horizontal Correct Incorrect Correct Incorrect sens de circulation Montage vertical du fluide sens de circulation Correct Incorrect du fluide Fig. 7 : Bulles d'air dans la canalisation → Utiliser si nécessaire un tranquiliseur de circulation pour amé-...
  • Seite 78 → Orienter la flèche sur le côté de l'appareil dans le sens de circulation Fig. 8 : Installation d'un 8045 avec écrou G2" sur la canalisation du fluide : les totalisateurs s'incrémenteront. → Insérer l'appareil (repère 1 Fig. 8) dans le raccord.
  • Seite 79 (TBTS) sur les relais. Sens de circulation du fluide Boucher le presse-étoupes inutilisé à l'aide du joint obtu- Fig. 9 : Installation d'un 8045 avec raccordement clamp sur la rateur fourni, pour assurer l'étanchéité de l'appareil. canalisation français...
  • Seite 80 Type 8045 Installation et câblage → Raccorder la borne négative de l’alimentation à la terre pour Si deux câbles sont utilisés dans un seul presse-étoupe, supprimer les courants de mode commun. Si cette liaison n’ est insérer d'abord le joint multi-passage fourni.
  • Seite 81 Type 8045 Installation et câblage Blindage du câble d'alimentation Blindage du câble d'alimentation Alimentation Alimentation 18-36VDC 18-36VDC Conduite en Conduite en plastique métal Vanne, pompe,... (ou anneaux de Si une mise à la terre directe est impossible, brancher un terre, non livrés, insérés à l'intérieur condensateur de 100 nF / 50 V entre la borne négative de l'ali-...
  • Seite 82 Type 8045 Installation et câblage 7.5.2. affectation des bornes et utilisation bornier 1 des sélecteurs Iout : sortie 4-20 mA (AO1) L+ : V+ (alimentation positive) L- : 0V (masse de l'alimentation) PE : terre fonctionnelle câblée en usine (voir Fig. 15) P+ : sortie transistor positive (DO1) P- : sortie transistor négative (DO1)
  • Seite 83 Type 8045 Installation et câblage Le sélecteur A permet de configurer le câblage de la sortie 1 2 3 4 5 6 courant 4-20 mA en puits ou source. CURRENT CURRENT Câble de terre provenant du boîtier. SINK SOURCE SINK SOURCE Sur une version avec capteur de débit en acier inoxydable, un...
  • Seite 84 Type 8045 Installation et câblage 7.5.4. câbler la sortie courant ao1 Positionner le sélecteur à gauche. Pour des raisons de sécurité, bloquer les câbles à l'aide d'un collier de serrage non conducteur. 18-36 V DC 300 mA La sortie 4-20 mA peut être raccordée en puits ou en source.
  • Seite 85 Type 8045 Installation et câblage 7.5.5. câbler la sortie transistor Do1 18-36 V DC 300 mA 5-36 VDC 18-36 V DC 300 mA 5-36 VDC Alimentation Alimentation Iout L+ L - PE P+ P- Supply PULSE 18...36 Vdc Iout L+ L - PE P+ P-...
  • Seite 86 Type 8045 Installation et câblage 7.5.6. câbler l'entrée numérique Di1 Alimentation 18-36 V DC 18-36 V DC Alimentation CURRENT Iout L+ L - PE P+ P- CURRENT Iout L+ L - PE P+ P- SINK SOURCE Supply PULSE SINK SOURCE Supply PULSE 18...36 Vdc 18...36 Vdc...
  • Seite 87: Réglage Et Mise En Service

    Type 8045 Réglage et mise en service réglage eT mise en 8.2. niveaux d’utilisation de l’appareil service L‘appareil comprend 2 niveaux d‘utilisation : le niveau Process et le niveau Configuration. 8.1. consignes de sécurité Tab. 1 : Configuration par défaut de l'appareil Valeur par Valeur par aVertiSSement Fonction Fonction défaut...
  • Seite 88 Type 8045 Réglage et mise en service Niveau Configuration Niveau Process 12.6 L/s > 2 s > 5 s ENTER 0..9 16.45 mA Menu Réglages Menu Test Menu Information 0..9 ENTER cAL Ao1 mEAs. oVf LANGUE > 5 s cALiB 0 cAL.
  • Seite 89 Type 8045 Réglage et mise en service 8.3. Description des touches de navigation et des voyants • Faire défiler les para- • Sélectionner le paramètre affiché mètres vers le haut • Confirmer les réglages • Incrémenter le chiffre sélectionné Voyant d'état du relais DO3 (voyant allumé = contact fermé) Voyant d'état de l'appareil :...
  • Seite 90 Type 8045 Réglage et mise en service 8.4. utilisation des touches de navigation vous voulez... appuyez sur... vous déplacer dans les paramètres d'un niveau ou d'un • pour aller au paramètre suivant. menu. • pour aller au paramètre précédent. 0..9 accéder au menu Réglages. ENTER simultanément pendant 5 s, depuis le niveau Process accéder au menu Test.
  • Seite 91 Type 8045 Réglage et mise en service 8.5. choisir la langue d'affichage 8.6. saisir le facteur k du raccord utilisé À la première mise sous tension, la langue d'affichage est l'anglais. L'appareil détermine le débit du fluide dans la canalisation grâce au facteur K du raccord. LANGUAGE ENGLish Le facteur K du raccord utilisé peut être saisi dans ce paramètre.
  • Seite 92 Type 8045 Réglage et mise en service fAct. k k=10.000 k=2.8500 → L'afficheur indique le facteur K du Saisir le facteur K (valeur entre 0,0001 et raccord, saisi ou déterminé par Teach- 9999,9) du raccord utilisé. → in, et utilisé actuellement par l'appareil Confirmer la valeur affichée.
  • Seite 93: Maintenance Et Dépannage

    Type 8045 Maintenance et dépannage mainTenance eT 10. emballage eT TransporT Dépannage remarque dommages dus au transport 9.1. consignes de sécurité Le transport peut endommager un appareil insuffisamment protégé. danger • Transporter l'appareil dans un emballage résistant aux chocs, à risque de blessure dû à la pression élevée dans l'installation. l'abri de l'humidité et des impuretés. • Ne pas exposer l'appareil à des températures pouvant entraîner risque de blessure par décharge électrique.
  • Seite 94: Élimination De L'appareil

    Type 8045 Élimination de l’appareil 12. éliminaTion De l’appareil → Éliminer l’appareil et l’emballage dans le respect de l’environnement. remarque dommages à l'environnement causés par des pièces conta- minées par des fluides. • Respecter les prescriptions en vigueur en matière d'élimination des déchets et de protection de l'environnement. remarque Respecter les prescriptions nationales en matière d'élimi- nation des déchets .
  • Seite 95 Type 8045 français...
  • Seite 96 Type 8045 français...
  • Seite 98 www.burkert.com...

Inhaltsverzeichnis