Herunterladen Inhalt Inhalt Diese Seite drucken
Inhaltsverzeichnis

Werbung

Verfügbare Sprachen

Verfügbare Sprachen

EXERCISE BAR
EXERCISE BAR
Operation and Safety Notes
FITNESS-TRAININGSSTANG
Bedienings- en veiligheidsinstructies
IAN 282674
BARRE D'ENTRAÎNEMENT FITNESS
Instructions d'utilisation et consignes de sécurité
FITNESS-TRAININGSSTANGE
Bedienungs- und Sicherheitshinweise

Werbung

Inhaltsverzeichnis
loading

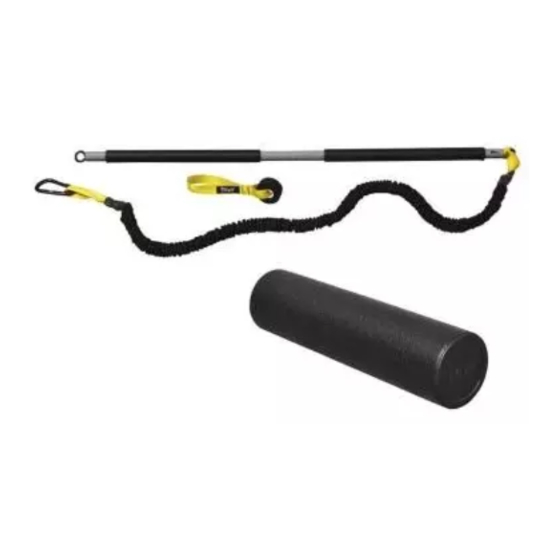
Inhaltszusammenfassung für Crivit IAN 282674

  • Seite 1 EXERCISE BAR EXERCISE BAR BARRE D’ENTRAÎNEMENT FITNESS Operation and Safety Notes Instructions d‘utilisation et consignes de sécurité FITNESS-TRAININGSSTANG FITNESS-TRAININGSSTANGE Bedienings- en veiligheidsinstructies Bedienungs- und Sicherheitshinweise IAN 282674...
  • Seite 2 GB / IE / NI Operation and Safety Notes Page FR / BE Instructions d‘utilisation et consignes de sécurité Page NL / BE Bedienings- en veiligheidsinstructies Pagina 24 DE / AT / CH Bedienungs- und Sicherheitshinweise Seite...
  • Seite 5: Inhaltsverzeichnis

    Introduction ...........................Page 6 Intended Use ............................Page 6 Parts Description ..........................Page 6 Scope of delivery ..........................Page 6 Technical Data ............................Page 6 Safety Notices ..........................Page 6 Exercise area ..........................Page 7 Product Assembly ........................Page 7 Attaching the product ......................Page 7 Attaching the product to a door ......................Page 7 Attaching the product to a column or tree ..................Page 8 Attaching the product to a fence......................Page 8 General exercise information...
  • Seite 6: Introduction

    Exercise Bar Weight: Multifunction exercise bar: approx. 1930 g Elastic cord: approx. 232 g Introduction Anchor: approx. 19.5 g We congratulate you on the purchase of your new Stretch (cm): 140 160 185 225 product. You have chosen a high quality product. Force (N) 133 195 Familiarise yourself with the product before using it...
  • Seite 7: Exercise Area

    Product Assembly Only use the product in areas where you can (see Fig. B, Step 1–7) maintain adequate distance from persons/ob- jects to avoid injuries and property damage. Do not use the product near steps or stairs. Screw the two parts of the exercise bar Always exercise on a flat, non-slip surface.
  • Seite 8: Attaching The Product To A Column Or Tree

    Attaching the product Only secure the product to doors which open to a fence outward (away from you). Attach the door anchor at the middle of the door. For cord resistance at one end only Close the door. Hook the snap hook straight around the fence.
  • Seite 9: Exercise Instructions

    1. Always use the safety strap. - Take a 30 second break after every set. - To build muscle you should use less reps and Place the (included) safety strap around your increase the intensity. wrist and pull tight. - For endurance training, use more reps and less intensity.
  • Seite 10: Starting Positions

    Starting positions With every starting position, move away from the anchor point so you will have adequate resistance during the exercise. Posture Stand with the back to the Stand sideways to the Stand facing the anchor anchor point. anchor point. point.
  • Seite 11: How Do I Make Exercises More Or Less Intense

    Hand positions Standard grip Rotated grip How do I make exercises more Suggested exercises or less intense For exercises 1–5 (cord resistance at one end), attach the exercise bar to a door, a You can easily adapt the intensity of each exer- fence or a tree as described under cise by changing your posture, grip, speed of movements or the type of resistance cord.
  • Seite 12 Position 3: side to the anchor point Position 7: back to the anchor point Grab the exercise bar using a standard grip, Hold the exercise bar using a standard grip. the left hand at the top. The resistance cord is Take a walking stance with the right foot at the at the right.
  • Seite 13: Care And Storage

    Care and Storage The warranty applies to defects in material or ma- nufacture. This warranty does not cover product Note: Routine maintenance and cleaning helps parts subject to normal wear, thus possibly conside- keep your product safe and ensures its longevity. red consumables (e.g.
  • Seite 14 Introduction ...........................Page 15 Utilisation conforme ..........................Page 15 Descriptif des pièces ...........................Page 15 Contenu de la livraison ........................Page 15 Caractéristiques techniques ........................Page 15 Consignes de sécurité ......................Page 15 Environnement d‘entraînement ...................Page 16 Montage du produit .......................Page 16 Fixation du produit .........................Page 17 Fixation du produit à...
  • Seite 15: Introduction

    Barre d’entraînement fitness Caractéristiques techniques Dimensions : Introduction Barre en acier : env. 108 cm (L) Corde élastique : env. 150 cm (L) Nous vous félicitons pour l‘achat de votre nouveau Poids : produit. Vous avez opté pour un produit de grande qualité.
  • Seite 16: Environnement D'entraînement

    ATTENTION ! RISQUE DE BLESSURES ATTENTION ! RISQUE DE BLESSURE ! CAUSÉES PAR L‘USURE ! Utilisez unique- Testez toujours la résistance à la traction des ment le produit lorsqu‘il se trouve en parfait état. points de connexion, afin de vous assurer qu‘ils Avant chaque utilisation, vérifiez le produit pour disposent de réserves suffisantes.
  • Seite 17: Fixation Du Produit

    Fixation du produit et peut supporter le poids de votre corps. Assurez-vous que l‘ancre de porte est bien fixée. Tirez à plu- Choisissez un environnement d‘entraînement sieurs reprises avec force sur la corde élastique d‘environ 3,00 x 1,80 m (L x l). afin de vous assurer de sa stabilité.
  • Seite 18: Généralités Sur Les Exercices

    Généralités sur les exercices - Pour un entraînement d‘endurance, il convient de faire plus de mouvements, avec un niveau Les instructions suivantes sont juste des exemples de difficulté moins élevé. d‘exercices possibles. Vous trouverez d‘autres exer- Échauffez suffisamment vos groupes de muscles cices dans la littérature spécialisée.
  • Seite 19: Positions De Départ

    Correct Positions de départ Lors de chaque position de départ, éloignez-vous du point d‘ancrage, afin d‘exercer une résis- tance suffisante lors de votre mouvement. Posture du corps Tournez-vous sur le côté Tournez le dos Tournez-vous face par rapport au point d'an- au point d'ancrage.
  • Seite 20: Comment Diminuer Ou Augmenter Le Niveau De Difficulté Des Exercices

    Positions du pied Position de fente en Position parallèle Position de pas avant Positions de la main Poignée standard Poignée torsadée Comment diminuer ou Posture du corps augmenter le niveau de Plus vous vous éloignez du point d‘ancrage, plus difficulté des exercices l‘exercice est difficile.
  • Seite 21: Propositions D'exercice

    Propositions d‘exercice Effectuez l‘ensemble des séries composant le déroulé de l‘exercice. Changez ensuite de côté. Pour les exercices 1–5 (résistance de corde unilatérale), fixez la barre d‘exercice à 4e position : tournez le dos au point une porte, une clôture ou un arbre, comme d‘ancrage décrit au chapitre „Fixation du produit“.
  • Seite 22: Entretien Et Rangement

    7e position : tournez le dos au point 10e position : debout sur la corde de d‘ancrage résistance Attrapez la barre d‘exercice avec la poignée Attrapez la corde d‘exercice des deux mains standard. en les plaçant sous la poignée (les paumes Placez les pieds en position de pas, le pied vers le haut).
  • Seite 23 de retourner ce produit au vendeur. La présente ga- rantie ne constitue pas une restriction de vos droits légaux. Ce produit bénéficie d‘une garantie de 3 ans à compter de sa date d’achat. La durée de garantie débute à la date d’achat. Veuillez conserver le ticket de caisse original.
  • Seite 24 Inleiding ............................Pagina 25 Correct gebruik ..........................Pagina 25 Beschrijving van de onderdelen ..................... Pagina 25 Omvang van de levering ........................ Pagina 25 Technische gegevens ........................Pagina 25 Veiligheidsinstructies ......................Pagina 25 Trainingsomgeving ......................Pagina 26 Product monteren ........................ Pagina 26 Product bevestigen ......................
  • Seite 25: Inleiding

    Fitness-trainingsstang Technische gegevens Afmetingen: Inleiding Stalen stang: ca. 108 cm (l) Elastiek: ca. 150 cm (l) Hartelijk gefeliciteerd met de aankoop van uw nieuwe product. U hebt voor een hoogwaardig product Gewicht: gekozen. Maak u voor de eerste ingebruikname Multifunctionele vertrouwd met het product.
  • Seite 26: Trainingsomgeving

    VOORZICHTIG! KANS OP LETSEL ALS VOORZICHTIG! KANS OP LETSEL! Sluit GEVOLG VAN SLIJTAGE! Gebruik het pro- altijd de deur waaraan u de deurverankering duct alleen in onberispelijke staat. Controleer het bevestigt. product voor elk gebruik op slijtage. De veiligheid VOORZICHTIG! Gebruik altijd het meegele- van het product kan alleen worden gewaarborgd verde deurbordje als u traint.
  • Seite 27: Product Aan Een Deur Bevestigen

    Product aan een deur Product aan een zuil of een bevestigen boom bevestigen Bevestig de deurverankering Alleen voor elastische weerstand aan één zijde Haak de karabijnhaak om het elastiek Voor elastische weerstand aan beide zijden (zie afb. BI / stap 6–7): Product aan een schutting Trek de lus van de deurverankering over...
  • Seite 28: Algemeen Trainingsschema

    Trainingshandleidingen Train als beginner niet te intensief en overschat uzelf niet. Voer de intensiteit van de training langzaam op. In onderstaande vindt u handleidingen die een Voer alle oefeningen gelijkmatig uit. Vermijd veilige en efficiënte training waarborgen en die u snelle en plotselinge bewegingen.
  • Seite 29: Uitgangsposities

    Uitgangsposities Beweeg u bij elke uitgangspositie bij het anker- punt vandaan, zodat u tijdens de beweging voldoende weerstand heeft. Lichaamshouding Sta met uw Sta met uw zij Sta tegenover het rug naar het ankerpunt. naar het ankerpunt. ankerpunt. Voetposities Stand voor zijwaartse Parallelle stand Stap-stand stap...
  • Seite 30: Hoe Maak Ik Trainingsoefeningen Makkelijker Of Moeilijker

    Handposities Standaard handgreep Gedraaide handgreep Hoe maak ik boom zoals beschreven onder ‚Product trainingsoefeningen bevestigen‘. makkelijker of moeilijker 1e positie: met uw rug naar het ankerpunt U kunt de moeilijkheidsgraad van elke oefening Pak de trainingsstang met de standaard hand- eenvoudig aanpassen door uw lichaamshouding, greep vast.
  • Seite 31 3e positie: zijwaarts ten opzichte van het Begin met uitgestoken armen. ankerpunt Trek uw armen in een gelijkmatige beweging Pak de trainingsstang met de standaard hand- naar uw borst toe. greep vast, met uw linkerhand bovenaan. Het Keer terug naar de uitgangspositie. elastiek bevindt zich aan de rechterkant.
  • Seite 32: Onderhoud En Opslag

    10e positie: staande op het elastiek product. Deze wettelijke rechten worden door onze Pak de trainingsstang met beide handen in een hierna vermelde garantie niet beperkt. onderhandse greep vast (handpalmen naar boven). Op dit product verlenen wij 3 jaar garantie vanaf Zet uw voeten in de stap-stand, met uw voorste aankoopdatum.
  • Seite 33 Einleitung ............................Seite 34 Bestimmungsgemäße Verwendung ....................Seite 34 Teilebeschreibung ..........................Seite 34 Lieferumfang ............................Seite 34 Technische Daten ..........................Seite 34 Sicherheitshinweise ........................Seite 34 Trainingsumgebung .......................Seite 35 Produkt montieren ........................Seite 35 Produkt befestigen .........................Seite 36 Produkt an einer Tür befestigen ......................Seite 36 Produkt an einer Säule oder einem Baum befestigen ...............Seite 36 Produkt an einem Zaun befestigen ....................Seite 36 Allgemeine Hinweise zu Übungen ................Seite 37...
  • Seite 34: Einleitung

    Fitness-Trainingsstange Technische Daten Maße: Einleitung Stahl-Stange: ca. 108 cm (L) Elastisches Seil: ca. 150 cm (L) Wir beglückwünschen Sie zum Kauf Ihres neuen Gewicht: Produkts. Sie haben sich damit für ein hochwertiges Produkt entschieden. Machen Sie sich vor der ers- Multifunktions-Trainingsstange: ca.
  • Seite 35: Trainingsumgebung

    VORSICHT! VERLETZUNGSGEFAHR VORSICHT! VERLETZUNGSGEFAHR! DURCH VERSCHLEISS! Verwenden Sie das Testen Sie immer die Zugbeständigkeit der Produkt nur, wenn es in einem einwandfreien Verbindungspunkte, um sicher zu gehen, dass Zustand ist. Prüfen Sie das Produkt vor jeder ausreichende Reserven vorhanden sind. An- Verwendung auf Verschleiß.
  • Seite 36: Produkt Befestigen

    Produkt befestigen VORSICHT! VERLETZUNGSGEFAHR! Schließen Sie die Tür, an der Sie die Türveran- Wählen Sie eine Trainingsumgebung von etwa kerung befestigen, immer ab. Verwenden Sie 3,00 x 1,80 m (L x W) aus. immer das beiliegende Türschild, während Sie trainieren. Produkt an einer Hinweis: Stellen Sie sicher, dass die Tür, an der Tür befestigen...
  • Seite 37: Allgemeine Hinweise Zu Übungen

    Allgemeine Hinweise zu - Wärmen Sie Ihre Muskelgruppen ausreichend Übungen auf, bevor Sie mit den Übungen beginnen. - Streck- und Dehnübungen werden vor Die folgenden Anleitungen sind nur Beispiele für Trainingsbeginn empfohlen. mögliche Übungen. Über weitere Übungsmöglich- keiten informieren Sie sich bitte in der einschlägigen Trainingsanleitungen Literatur.
  • Seite 38: Ausgangspositionen

    2. Bewahren Sie Haltung. Wirbelsäulenhaltung wird Ihre Trainingseffizi- Halten Sie Ihre Wirbelsäule gerade. Achten enz erhöhen, Ihren Schwerpunkt zentriert hal- Sie darauf, Ihre Wirbelsäule nicht zu überdeh- ten und Unfallrisiken vermeiden. nen oder übermäßig zu beugen. Eine gerade Falsch Falsch Richtig Ausgangspositionen Bewegen Sie sich bei jeder Ausgangsposition...
  • Seite 39: Wie Mache Ich Trainingsübungen Leichter Oder Schwerer

    Fußpositionen Parallelstand Schrittstand Ausfallschritt-Stand Handpositionen Standard-Handgriff Gedrehter Handgriff Wie mache ich Handposition Trainingsübungen leichter Je weiter Ihre Hände vom Widerstandsseil entfernt oder schwerer sind, desto schwerer wird die Übung. Körperhaltung Sie können den Schwierigkeitsgrad jeder Übung leicht anpassen, indem Sie Ihre Körper- Je weiter Sie sich vom Ankerpunkt entfernen, desto haltung, die Griffhaltung, die Geschwindigkeit schwieriger wird es.
  • Seite 40: Übungsvorschläge

    Übungsvorschläge 3. Position: seitlich zum Ankerpunkt Greifen Sie die Trainingsstange mit dem Stan- Für die Übungen 1–5 (einseitigen Seilwi- dard-Handgriff, die linke Hand fasst oben an. derstand) befestigen Sie die Trainings- Das Widerstandsseil befindet sich auf der stange an einer Tür, einem Zaun oder rechten Seite.
  • Seite 41: Position: Stehend Auf Dem Widerstandsseil

    Für die Übungen 6–8 befestigen Sie die Für die Übungen 9–10 montieren Sie das Trainingsstange mittels der Türveranke- Produkt wie unter Kapitel „Produkt mon- rung . Wie in Kapitel „Produkt an einer tieren“ beschrieben. Tür befestigen“ (für beidseitigen Seilwi- derstand) beschrieben. 9.
  • Seite 42: Entsorgung

    Entsorgung Die Verpackung besteht aus umwelt- freundlichen Materialien, die Sie über die örtlichen Recyclingstellen entsorgen können. Möglichkeiten zur Entsorgung des ausgedienten Produkts erfahren Sie bei Ihrer Gemeinde- oder Stadtverwaltung. Garantie Das Produkt wurde nach strengen Qualitätsrichtlinien sorgfältig produziert und vor Anlieferung gewissen- haft geprüft.
  • Seite 44 Stiftsbergstraße 1 DE-74167 Neckarsulm GERMANY Model no.: HG02128B Version: 12 / 2016 Last Information Update · Version des informations Stand van de informatie · Stand der Informationen: 01 / 2017 · Ident.-No.: HG02128B012017-GB / IE / NI / NL IAN 282674...

Inhaltsverzeichnis