Werbung
Verfügbare Sprachen
Verfügbare Sprachen
Quicklinks
Instructions for Use | Gebrauchsanleitung | Manuel d'utilisation | Instrucciones de uso | Istruzioni per l'uso |
Instruções Para Uso | 使用说明 | 使用説明書 | 사용 지침 | Инструкция по применению
Sartobind
Rapid A Lab
®
Laboratory-Scale Membrane Adsorber Unit for Affinity Purification
ZUNT: 1000135976
Werbung

Verwandte Anleitungen für Sartorius Sartobind Rapid A Lab


Inhaltszusammenfassung für Sartorius Sartobind Rapid A Lab
- Seite 1 Instructions for Use | Gebrauchsanleitung | Manuel d’utilisation | Instrucciones de uso | Istruzioni per l’uso | Instruções Para Uso | 使用说明 | 使用説明書 | 사용 지침 | Инструкция по применению Sartobind Rapid A Lab ® Laboratory-Scale Membrane Adsorber Unit for Affinity Purification ZUNT: 1000135976...
- Seite 2 English page Deutsch Seite Français page Español página Italiano pagina Português página 中文 页码 日本語 ページ 한국어 페이지 Русский страница...
- Seite 3 Contents Contents 1 About these Instructions . . . . . . . . . . . . . . . . . . . . . . . . . . . . . . . . . . . . . . . . . . . . . . . . . . . . . . . . . . . . . 5 Validity .
- Seite 4 Contents 9 Technical Data . . . . . . . . . . . . . . . . . . . . . . . . . . . . . . . . . . . . . . . . . . . . . . . . . . . . . . . . . . . . . . . . . . . . . . 24 Dimensions and Weight .
- Seite 5 About these Instructions About these Instructions 1 . 1 Validity These instructions are part of the product; they must be read in full and stored. These instructions apply to the following version of the product: Sartobind Rapid A Lab . ® 1 .2 Related Documents In addition to these instructions, observe the following documents:...
- Seite 6 About these Instructions 1 .5 Abbreviations Used Abbreviation Meaning EtOH Ethanol Fragment crystallizable Ion exchange chromatography Immunoglobulin G Liquid chromatography Monoclonal antibody Membrane volume NaOH Sodium hydroxide Polyamide Phosphate-buffered saline Polycarbonate PEEK Polyether ether ketone Polypropylene Polyvinyl chloride Unified fine thread Ultraviolet Instructions for Use Sartobind Rapid A Lab...
- Seite 7 — Risk of injury to persons — Damage, malfunctions, or failure of the product Only use accessories that have been approved by Sartorius for this product . Instructions for Use Sartobind Rapid A Lab ®...
- Seite 8 Safety Instructions 2 .4 Personal Protective Equipment Personal protective equipment protects against risks arising from the product. If the personal protective equipment is missing or is unsuitable for the work processes on the product, persons may be injured. The following personal protective equipment must be worn: —...
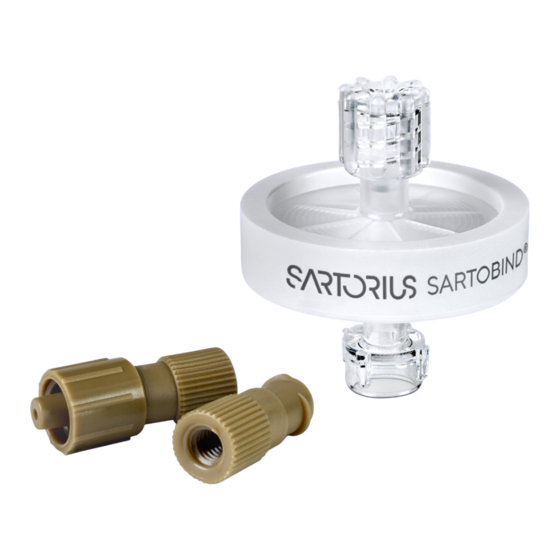
- Seite 9 Product Description Product Description 3 . 1 Product Overview Fig . 1: Sartobind Rapid A Lab with UNF 10|32 adapters ® Pos . Name Description Inlet Female Luer-Lock connector with protective cap Arrow Indicates the flow direction. The arrow is not visible in this picture. Outlet Male Luer-Lock connector with protective cap Downstream UNF 10|32...
- Seite 10 5 . 1 Preparing the Sample Sartorius recommends prefiltering the sample to avoid fouling and clogging of the membrane. Unfiltered samples can block the product, leading to in- creased back pressure and loss of binding capacity.
- Seite 11 Operation Procedure If operating without inline prefiltration, prefilter the sample. Proceed to purify the sample immediately after prefiltration. If operating with inline prefiltration: When using a syringe, follow the steps described in chapter “5.2.2 Loading the Sample“, page 12. When using a peristaltic pump, follow the steps described in chap- ter “5.3.2 Installing and Equilibrating the Product“, page 15.
- Seite 12 Operation If air was introduced into the product: Invert the product so that the arrow indicating the flow direction (4) points up . Press the syringe plunger slowly until the air is removed. Return the product to an upright position with the arrow indicating the flow direction (5) pointing down.
- Seite 13 Operation Procedure Fill the syringe with the sample. Hold the product in an upright position with the arrow indicating the flow direction (2) pointing down. Remove the protective cap (1) from the product inlet. If operating without inline prefiltration, connect the syringe to the prod- uct inlet (3).
- Seite 14 Operation 5 .2 .3 Performing a Purification Cycle Materials required: — Syringe ≥ 10 mL — Buffers — Beaker | tube to collect flow-through — Tubes to collect eluate fractions Chromatography Recommended values for step Buffer Volume Washing Commonly used buffers for equilibra- 10 mL tion | washing, e.g., 1 x PBS pH 7.4 Elution...
- Seite 15 Operation 5 .3 Using a Peristaltic Pump 5 .3 . 1 Preparing the Peristaltic Pump Materials required: — Sartobind Lab pump tubing (see chapter “10.2 ® Accessories“, page 26) — ≥ 10 mL equilibration buffer, e.g. 1 x PBS pH 7.4 — Beaker | tube to collect flow-through Fig .
- Seite 16 Operation Requirements The pump tubing is loaded into the peristaltic pump and filled with equili- bration buffer . Procedure Run the peristaltic pump at a low flow rate . Hold the product in an upright position with the arrow indicating the flow direction (2) pointing down.
- Seite 17 Operation 5 .3 .3 Performing a Purification Cycle Sartorius recommends using a peristaltic pump only for equilibration, sam- ple loading with high volumes and washing. For further purification steps, see: — chapter 5 .2 .3, page 14, for purification with syringe, or —...
- Seite 18 Operation 5 .4 Using a LC System 5 .4 . 1 Preparing the LC System Materials required: Buffers, see chapter “5.4.3 Performing a Purifica- tion Cycle“, page 20 Procedure Prepare the LC system for purification (see instructions for the LC sys- tem).
- Seite 19 Operation If operating with inline prefiltration: Run the LC system at a low flow rate (~ 1 mL/min). Disconnect the UNF 10|32 adapters from each other. Connect the upstream UNF 10|32 adapter (4) to the microfilter inlet . Fill the microfilter (5) with equilibration buffer via the LC system. Connect the microfilter outlet to the product inlet (6) drop-to-drop.
- Seite 20 Storage 5 .4 .3 Performing a Purification Cycle Materials required: — Buffers — Plates or tubes to collect eluate fractions Chromatography Recommended values for step Buffer Volume Flow Rate Loading Not applicable Not applicable 2.5 – 15 mL/min | 5 – 30 MV/min Washing Commonly used buffers for equili- 10 mL | 20 MV ≤...
- Seite 21 Troubleshooting Troubleshooting Fault Cause Solution Chapter, page Air bubbles in the prod- Air has been introduced Connect a ≥ 10 mL syringe with equilibra- 5 .2 . 1 , 11, into the product . The air tion buffer to the product inlet . Close the 5 .3 .2, 15 has not been completely product outlet with a protective cap.
- Seite 22 Troubleshooting Fault Cause Solution Chapter, page The target antibody is The binding conditions Use a suitable ultrafilter, e.g., Vivaflow ® not captured . are unsuitable . Vivaspin , to exchange the sample into ® the same buffer used to equilibrate the product (equilibration buffer).
- Seite 23 Disposal Fault Cause Solution Chapter, page The eluted antibody has Cross-contamination Perform a regeneration step after each 5 .2 .3, 14, low purity. from a previous purifica- purification cycle. 5 .3 .3, 17, tion 5 .4 .3, 20 When purifying antibodies from multiple sources, use a separate product for each antibody type and | or batch.
- Seite 24 Technical Data Technical Data 9 . 1 Dimensions and Weight Unit Value Height Diameter (housing) Weight ~ 9 9 .2 Operating Conditions Unit Value Operating pressure Maximum operating pressure at 20 °C 0 .8 When using inline prefiltration, the operating pressure must be reduced to the maximum operating pressure of the microfilter used.
- Seite 25 ® 9 .8 Buffer Requirements The choice of buffers depends on the stability of the target antibody and has to be verified previously. Sartorius rec- ommends pefiltering all buffers before use (0.2 μm). Instructions for Use Sartobind Rapid A Lab...
- Seite 26 ® Sartobind Rapid A Lab SBLRA025EL-A ® 10 .2 Accessories This table contains an excerpt of the accessories that can be ordered . For information on other products, contact Sartorius. Item Quantity Order number Sartobind Lab LC system adapter SBLAAU01-1 ®...
- Seite 27 Inhaltsverzeichnis Inhaltsverzeichnis 1 Über diese Anleitung . . . . . . . . . . . . . . . . . . . . . . . . . . . . . . . . . . . . . . . . . . . . . . . . . . . . . . . . . . . . . . . . 29 Gültigkeit .
- Seite 28 Inhaltsverzeichnis 9 Technische Daten . . . . . . . . . . . . . . . . . . . . . . . . . . . . . . . . . . . . . . . . . . . . . . . . . . . . . . . . . . . . . . . . . . . 49 Abmessungen und Gewicht .
- Seite 29 Über diese Anleitung Über diese Anleitung 1 . 1 Gültigkeit Diese Anleitung ist Teil des Produkts. Sie muss vollständig durchgelesen und an einem sicheren Ort aufbewahrt werden. Die Anleitung gilt für fol- gende Ausführung des Produkts: Sartobind Rapid A Lab . ®...
- Seite 30 Über diese Anleitung 1 .5 Abkürzungen Abkürzung Bedeutung EtOH Ethanol Fragment crystallizable, kristallisierbares Fragment Ion Exchange Chromatography, Ionenaustausch-Chromatografie Immunglobulin G Liquid Chromatography, Flüssigkeitschromatografie Monoclonal Antibody, monoklonaler Antikörper Membranvolumen NaOH Natriumhydroxid Polyamid Phosphate-buffered Saline, phosphatgepufferte Kochsalzlösung Polycarbonat PEEK Polyether-Etherketon Polypropylen Polyvinylchlorid Unified Fine Thread, standardisiertes Feingewinde Ultraviolett Gebrauchsanleitung zu Sartobind Rapid A Lab...
- Seite 31 Ungeeignetes Zubehör kann die Funktion und Betriebssicherheit des Produkts beeinträchtigen und folgende Konsequenzen haben: — Verletzungsgefahr — Schäden, Störungen oder Ausfälle des Produkts Ausschließlich Zubehör verwenden, das von Sartorius für dieses Produkt zugelassen wurde. Gebrauchsanleitung zu Sartobind Rapid A Lab...
- Seite 32 Sicherheitshinweise 2 .4 Persönliche Schutzausrüstung Die persönliche Schutzausrüstung schützt vor Gefährdungen durch das Produkt. Wenn die persönliche Schutzausrüstung fehlt oder für die Arbeitsprozesse mit dem Produkt ungeeignet ist, besteht Verletzungsgefahr . Die folgende persönliche Schutzausrüstung tragen: — Schutzhandschuhe — Schutzbrille —...
- Seite 33 Produktbeschreibung Produktbeschreibung 3 . 1 Produktübersicht Abb. 1: Sartobind Rapid A Lab mit UNF 10|32-Adaptern ® Pos . Name Beschreibung Einlass Luer-Lock-Anschluss (weiblich) mit Schutzkappe Pfeil Zeigt die Flussrichtung an. Der Pfeil ist auf diesem Bild nicht zu sehen. Auslass Luer-Lock-Anschluss (männlich) mit Schutzkappe Nachgelagerter Luer-Lock-Anschluss (weiblich) an UNF 10|32-Adapter (weiblich), zum UNF 10|32-Adapter...
- Seite 34 Betrieb keine Luft in das Produkt gelangt. 5 . 1 Probe vorbereiten Sartorius empfiehlt eine Vorfilterung der Probe, damit es nicht zu Fouling und Verstopfung der Membran kommt. Ungefilterte Proben können das Produkt verstopfen und zu erhöhtem Gegendruck und Verlust an Bin- dungskapazität führen.
- Seite 35 Bedienung Vorgehen Beim Betrieb ohne Inline-Vorfiltration die Probe vorfiltern. Die Probe unmittelbar nach der Vorfiltration aufreinigen. Beim Betrieb mit Inline-Vorfiltration: Bei Verwendung einer Spritze die in Kapitel „5.2.2 Probe laden“, Sei- te 36, beschriebenen Schritte ausführen . Bei Verwendung einer Schlauchpumpe die in Kapitel „5.3.2 Produkt installieren und äquilibrieren“, Seite 40, beschriebenen Schritte ausführen .
- Seite 36 Bedienung Wenn Luft ins Produkt gelangt ist: Das Produkt umdrehen, sodass der Flussrichtungspfeil (4) nach oben weist. Langsam auf den Spritzenkolben drücken, bis die Luft entwichen ist. Das Produkt wieder in die aufrechte Position bringen, sodass der Fluss- richtungspfeil (5) nach unten weist. 10 mL Äquilibrierungspuffer durch das Produkt bringen.
- Seite 37 Bedienung Vorgehen Die Spritze mit der Probe füllen. Das Produkt in aufrechter Position halten, sodass der Flussrichtungs- pfeil (2) nach unten weist. Die Schutzkappe (1) vom Produkteinlass abnehmen. Beim Betrieb ohne Inline-Vorfiltration die Spritze mit dem Produktein- lass (3) verbinden. Beim Betrieb mit Inline-Vorfiltration: Die Spritze mit dem Mikrofiltereinlass (4) verbinden.
- Seite 38 Bedienung 5 .2 .3 Aufreinigungszyklus ausführen Erforderliche — Spritze ≥ 10 mL Materialien: — Puffer — Becherglas | Schlauch zum Auffangen des Durchflusses — Schläuche zum Auffangen der Eluat-Fraktionen Chromatografie- Empfohlene Werte für schritt Puffer Volumen Waschen Gängige Puffer zum Äquilibrieren | Wa- 10 mL schen, z. B.
- Seite 39 Bedienung 5 .3 Schlauchpumpe verwenden 5 .3 . 1 Schlauchpumpe vorbereiten Erforderliche — Sartobind Lab-Pumpenschlauch (siehe Kapi- ® Materialien: tel „10.2 Zubehör“, Seite 51) — ≥ 10 mL Äquilibrierungspuffer, z. B. 1 x PBS mit pH 7,4 — Becherglas | Schlauch zum Auffangen des Durchflusses Abb. 2: Sartobind Lab-Pumpenschlauch ®...
- Seite 40 Bedienung 5 .3 .2 Produkt installieren und äquilibrieren Erforderliche — Optional: 0,2-µm-Mikrofilter für die Inline-Vorfilt- Materialien: ration (siehe Kapitel „9.7 Zugelassene Mikrofil- ter“, Seite 50) — > 10 mL Äquilibrierungspuffer, z. B. 1 x PBS mit pH 7,4 — Becherglas | Schlauch zum Auffangen des Durchflusses Voraussetzungen Der Pumpenschlauch wurde in die Schlauchpumpe eingesetzt und mit Äquilibrierungspuffer gefüllt.
- Seite 41 Das Produkt ist äquilibriert und bereit für die Probenbeladung. 5 .3 .3 Aufreinigungszyklus ausführen Sartorius empfiehlt eine Schlauchpumpe nur für die Äquilibrierung, für die Probenbeladung mit großen Volumina und zum Waschen. Weitere Aufreinigungsschritte siehe: — Kapitel 5 .2 .3, Seite 38, für die Aufreinigung mit Spritze oder —...
- Seite 42 Bedienung Vorgehen Probe und Puffer in den empfohlenen Volumina und mit den empfohle- nen Durchflussraten durch das Produkt bringen (siehe die Tabelle weiter oben und die Anleitung zur Schlauchpumpe). Dabei das Totvolumen des Pumpenschlauchs berücksichtigen. Im Allgemeinen kann Puffer aus dem vorhergehenden Schritt durch den Puffer für den nächsten Schritt aus dem Pumpenschlauch verdrängt werden.
- Seite 43 Bedienung Vorgehen Das LC-System mit Äquilibrierungspuffer spülen. Darauf achten, dass sich keine Luft im Strömungsweg befindet. Das Produkt in aufrechter Position halten, sodass der Flussrichtungs- pfeil (2) nach unten weist. Die Schutzkappe (1) vom Produkteinlass abnehmen. Beim Betrieb ohne Inline-Vorfiltration: Das LC-System mit niedriger Durchflussrate (~ 1 mL/min) laufen las- sen .
- Seite 44 Bedienung Den nachgelagerten UNF 10|32-Adapter (8) mit dem Produktauslass verbinden. Das Produkt ist in aufrechter Position im Prozessfluss installiert. Das Produkt mit bis zu 25 mL/min mit 10 mL Äquilibrierungspuffer spü- len . Das Produkt ist äquilibriert und bereit für die Probenbeladung. 5 .4 .3 Aufreinigungszyklus ausführen Erforderliche Ma- —...
- Seite 45 Lagerung Lagerung Voraussetzungen Das Produkt ist re-äquilibriert. Vorgehen Das Produkt mit Aufbewahrungspuffer füllen (siehe Kapitel „9.6 Lage- rungsbedingungen“, Seite 50). Die Schutzkappen an Produkteinlass und Produktauslass installieren. Gebrauchsanleitung zu Sartobind Rapid A Lab ®...
- Seite 46 Fehlerbehebung Fehlerbehebung Fehler Ursache Lösung Kapitel, Seite Luftblasen im Produkt Luft ist ins Produkt ge- Eine ≥ 10-mL-Spritze mit Äquilibrie- 5 .2 . 1 , 35, langt. Die Luft wurde bei rungspuffer mit dem Produkteinlass ver- 5 .3 .2, 40 dem in dieser Anleitung binden.
- Seite 47 Fehlerbehebung Fehler Ursache Lösung Kapitel, Seite Der Zielantikörper bin- Die Bindungsbedingun- Die Probe mit einem geeigneten Ultrafil- det nicht . gen sind ungeeignet . ter, z. B. Vivaflow oder Vivaspin , in den ® ® gleichen Puffer überführen, der für die Äquilibrierung des Produkts verwendet wurde (Äquilibrierungspuffer).
- Seite 48 Entsorgung Fehler Ursache Lösung Kapitel, Seite Der elutierte Antikörper Kreuzkontamination von Nach jedem Aufreinigungszyklus einen 5 .2 .3, 38, weist eine geringe Rein- einer vorhergehenden Regenerationsschritt ausführen . 5 .3 .3, 41, heit auf . Aufreinigung 5 .4 .3, 44 Beim Aufreinigen von Antikörpern aus mehreren Quellen für jeden Antikörper- typ und | oder jede Antikörper-Charge...
- Seite 49 Technische Daten Technische Daten 9 . 1 Abmessungen und Gewicht Einheit Wert Höhe Durchmesser (Gehäuse) Gewicht ~ 9 9 .2 Betriebsbedingungen Einheit Wert Betriebsdruck Maximaler Betriebsdruck bei 20 °C Bei Inline-Vorfiltration muss der Betriebsdruck auf den maximalen Be- triebsdruck des verwendeten Mikrofilters reduziert werden. Betriebstemperatur °C 4 – 25...
- Seite 50 ® 9 .8 Anforderungen an die Puffer Die Auswahl der Puffer hängt von der Stabilität der Zielantikörper ab und muss im Voraus geprüft werden. Sartorius empfiehlt eine Vorfilterung aller Puffer vor Gebrauch (0,2 μm). Gebrauchsanleitung zu Sartobind Rapid A Lab...
- Seite 51 Rapid A Lab SBLRA025EL-1 ® Sartobind Rapid A Lab SBLRA025EL-A ® 10 .2 Zubehör Diese Tabelle enthält einen Auszug aus den bestellbaren Zubehörartikeln. Für Informationen zu weiteren Produkten Sartorius kontaktieren. Artikel Anzahl Bestellnummer Sartobind Lab-Adapterkit für SBLAAU01-1 ® LC-Systeme Schlauchpumpe...
- Seite 52 Table des matières Table des matières 1 À propos de ce manuel . . . . . . . . . . . . . . . . . . . . . . . . . . . . . . . . . . . . . . . . . . . . . . . . . . . . . . . . . . . . . . 54 1 .
- Seite 53 Table des matières 9 Caractéristiques techniques . . . . . . . . . . . . . . . . . . . . . . . . . . . . . . . . . . . . . . . . . . . . . . . . . . . . . . . . 73 Dimensions et poids .
- Seite 54 À propos de ce manuel À propos de ce manuel 1 . 1 Validité Ce manuel fait partie intégrante du produit. Il faut le lire dans son intégralité et le conserver. Ce manuel est valable pour la version suivante du produit : Sartobind Rapid A Lab.
- Seite 55 À propos de ce manuel 1 .5 Abréviations utilisées Abréviation Signification EtOH Éthanol Fragment cristallisable Chromatographie à échange d’ions Immunoglobuline G Chromatographie en phase liquide Anticorps monoclonal Volume de la membrane NaOH Hydroxyde de sodium Polyamide Tampon phosphate salin Polycarbonate PEEK Polyétheréthercétone Polypropylène Polychlorure de vinyle...
- Seite 56 Toute modification du produit peut entraîner des risques pour les per- sonnes. Les documents spécifiques au produit et les approbations du pro- duit peuvent perdre leur validité. Contacter Sartorius pour toute question relative à des modifications. 2 .2 Qualification du personnel Les personnes qui ne possèdent pas les connaissances adéquates sur la fa-...
- Seite 57 Consignes de sécurité 2 .4 Équipement de protection individuelle L’équipement de protection individuelle protège contre les risques qui émanent du produit. Si l’équipement de protection individuelle est manquant ou inadapté aux processus de travail sur le produit, des personnes peuvent être blessées. L’équipement de protection individuelle suivant doit impérativement être porté : —...
- Seite 58 Description du produit Description du produit 3 . 1 Vue d’ensemble du produit Ill . 1: Sartobind Rapid A Lab avec adaptateurs UNF 10|32 ® Pos . Description Entrée Raccord Luer-Lock femelle avec bouchon de protection Flèche Indique le sens d’écoulement. La flèche n’est pas visible sur cette illustration. Sortie Raccord Luer-Lock mâle avec bouchon de protection Adaptateur aval...
- Seite 59 5 . 1 Préparer l’échantillon Sartorius recommande de préfiltrer l’échantillon pour éviter l’encrassement et le colmatage de la membrane. Les échantillons non filtrés peuvent blo- quer le produit, ce qui entraîne une augmentation de la contre-pression et une perte de la capacité...
- Seite 60 Fonctionnement Procédure En cas de fonctionnement sans préfiltration en ligne, préfiltrer l’échantil- lon . Procéder à la purification de l’échantillon immédiatement après la préfiltration . En cas de fonctionnement avec préfiltration en ligne : Si une seringue est utilisée, suivre les étapes décrites au cha- pitre « 5.2.2 Charger l’échantillon », page 61.
- Seite 61 Fonctionnement Si de l’air est entré dans le produit : Retourner le produit de manière à ce que la flèche indiquant le sens d’écoulement (4) soit dirigée vers le haut. Appuyer lentement sur le piston de la seringue jusqu’à ce qu’il n’y ait plus d’air à...
- Seite 62 Fonctionnement Procédure Remplir la seringue avec l’échantillon. Tenir le produit en position verticale, la flèche indiquant le sens d’écoule- ment (2) étant dirigée vers le bas. Retirer le bouchon de protection (1) de l’entrée du produit. En cas de fonctionnement sans préfiltration en ligne, raccorder la se- ringue à...
- Seite 63 Fonctionnement 5 .2 .3 Effectuer un cycle de purification Matériel requis : — Seringue ≥ 10 mL — Tampons — Bécher | tube pour recueillir le liquide écoulé — Tubes pour recueillir les fractions d’éluat Étape de chro- Valeurs recommandées pour matographie Tampon Volume Lavage ...
- Seite 64 Fonctionnement 5 .3 Utiliser une pompe péristaltique 5 .3 . 1 Préparer la pompe péristaltique Matériel requis : — Tube de pompe Sartobind Lab (voir cha- ® pitre « 10.2 Accessoires », page 75) — ≥ 10 mL de tampon d’équilibrage, p. ex. 1 x PBS pH 7,4 — Bécher | tube pour recueillir le liquide écoulé Ill .
- Seite 65 Fonctionnement Conditions requises Le tube de la pompe est installé dans la pompe péristaltique et rempli de tampon d’équilibrage. Procédure Faire fonctionner la pompe péristaltique à faible débit. Tenir le produit en position verticale, la flèche indiquant le sens d’écoule- ment (2) étant dirigée vers le bas.
- Seite 66 Fonctionnement 5 .3 .3 Effectuer un cycle de purification Sartorius recommande d’utiliser une pompe péristaltique uniquement pour l’équilibrage, le chargement d’échantillons avec des volumes élevés et le lavage. Pour d’autres étapes de purification, voir : — chapitre 5 .2 .3, page 63 pour la purification avec une seringue, ou —...
- Seite 67 Fonctionnement 5 .4 Utiliser un système CPL 5 .4 . 1 Préparer le système CPL Matériel requis : Tampons, voir chapitre « 5.4.3 Effectuer un cycle de purification », page 69 Procédure Préparer le système CPL pour la purification (voir le manuel du sys- tème CPL). Raccorder les adaptateurs UNF 10|32 au système CPL. S’assurer que les raccordements sont étanches.
- Seite 68 Fonctionnement En cas de fonctionnement avec préfiltration en ligne : Faire fonctionner le système CPL à faible débit (~ 1 mL/min). Déconnecter les adaptateurs UNF 10|32 l’un de l’autre . Raccorder l’adaptateur UNF 10|32 amont (4) à l’entrée du microfiltre. Remplir le microfiltre (5) de tampon d’équilibrage à l’aide du sys- tème CPL.
- Seite 69 Stockage 5 .4 .3 Effectuer un cycle de purification Matériel requis : — Tampons — Plaques ou tubes pour recueillir les frac- tions d’éluat Étape de chroma- Valeurs recommandées pour tographie Tampon Volume Débit Chargement Non applicable Non applicable 2,5 – 15 mL/min | 5 – 30 MV/min Lavage Tampons couramment utilisés pour l’équi-...
- Seite 70 Élimination des erreurs Élimination des erreurs Erreur Cause Remède Chapitre, page Bulles d’air dans le pro- De l’air est entré dans le Raccorder une seringue ≥ 10 mL avec du 5 .2 . 1 , 60, duit produit. L’air n’a pas été tampon d’équilibrage à...
- Seite 71 Élimination des erreurs Erreur Cause Remède Chapitre, page L’anticorps cible ne se Les conditions de liaison Utiliser un ultrafiltre adapté, p. ex. Viva- lie pas . ne sont pas adaptées . flow ou Vivaspin , pour transférer ® ® l’échantillon dans le même tampon que celui utilisé...
- Seite 72 Élimination Erreur Cause Remède Chapitre, page L’anticorps élué a une Contamination croisée Effectuer une étape de régénération 5 .2 .3, 63, faible pureté . provenant d’une purifica- après chaque cycle de purification. 5 .3 .3, 66, tion précédente 5 .4 .3, 69 Lors de la purification d’anticorps prove- nant de sources multiples, utiliser un pro- duit distinct pour chaque type et | ou lot...
- Seite 73 Caractéristiques techniques Caractéristiques techniques 9 . 1 Dimensions et poids Unité Valeur Hauteur Diamètre (boîtier) Poids ~ 9 9 .2 Conditions de fonctionnement Unité Valeur Pression de fonctionnement Pression de fonctionnement maximale à 20 °C En cas de préfiltration en ligne, la pression de fonctionnement doit être réduite à...
- Seite 74 Exigences concernant les tampons Le choix des tampons dépend de la stabilité de l’anticorps cible et doit être approuvé pour l’utilisation en métrologie légale au préalable. Sartorius recommande de préfiltrer tous les tampons avant utilisation (0,2 μm). Manuel d’utilisation Sartobind Rapid A Lab...
- Seite 75 Rapid A Lab SBLRA025EL-A ® 10 .2 Accessoires Le tableau ci-dessous contient un extrait des accessoires qui peuvent être commandés. Pour obtenir des informations sur d’autres produits, contacter Sartorius . Article Quantité Référence Kit adaptateur pour système CPL SBLAAU01-1 Sartobind ®...
- Seite 76 Contenido Contenido 1 Acerca de estas instrucciones . . . . . . . . . . . . . . . . . . . . . . . . . . . . . . . . . . . . . . . . . . . . . . . . . . . . . . . 78 1 .
- Seite 77 Contenido 9 Datos técnicos . . . . . . . . . . . . . . . . . . . . . . . . . . . . . . . . . . . . . . . . . . . . . . . . . . . . . . . . . . . . . . . . . . . . . . 97 Dimensiones y peso .
- Seite 78 Acerca de estas instrucciones Acerca de estas instrucciones 1 . 1 Validez Estas instrucciones forman parte del producto; se deben leer en su totali- dad y guardarse. Estas instrucciones hacen referencia a la siguiente versión del producto: Sartobind Rapid A Lab. ®...
- Seite 79 Acerca de estas instrucciones 1 .5 Abreviaturas utilizadas Abreviatura Significado EtOH Etanol Fragmento cristalizable Cromatografía de intercambio de iones Immunoglobulina G Cromatografía líquida Anticuerpo monoclonal Volumen de membrana NaOH Hidróxido de sodio Poliamida Solución salina tamponada con fosfato Policarbonato PEEK Polieteretercetona Polipropileno Cloruro de polivinilo Rosca fina unificada...
- Seite 80 Si se modifica el producto, puede suponer un riesgo para las personas. Los documentos y homologaciones específicos del producto podrían perder su validez. Póngase en contacto con Sartorius si tiene alguna pregunta relativa a las modificaciones. 2 .2 Cualificaciones del personal Las personas que no poseen los conocimientos adecuados sobre cómo uti-...
- Seite 81 Instrucciones de seguridad 2 .4 Equipo de protección individual El equipo de protección individual protege de los peligros que se puedan derivar del producto. Si no hay equipo de protección individual o es inadecuado para los procesos de trabajo en el producto, se pueden producir lesiones personales .
- Seite 82 Descripción del producto Descripción del producto 3 . 1 Vista general del producto Fig . 1: Sartobind Rapid A Lab con adaptadores UNF 10|32 ® Pos . Nombre Descripción Entrada Conector hembra Luer-Lock con tapa protectora Flecha Indica la dirección del flujo. La flecha no está visible en esta imagen. Salida Conector macho Luer-Lock con tapa protectora Adaptador UNF 10|32...
- Seite 83 5 . 1 Preparar la muestra Sartorius recomienda prefiltrar la muestra para evitar que la membrana se ensucie y se obstruya. Las muestras sin filtrar pueden obstruir el producto, lo que hace que aumente la contrapresión y se reduzca la capacidad de unión .
- Seite 84 Funcionamiento Procedimiento Si no utiliza prefiltración en línea, prefiltre la muestra. Purifique la muestra justo después de la prefiltración. Si utiliza prefiltración en línea: Cuando use una jeringa, siga los pasos que se describen en capítu- lo “5.2.2 Cargar la muestra”, página 85. Cuando use una bomba de manguera, siga los pasos que se descri- ben en capítulo “5.3.2 Instalar y equilibrar el producto”, página 89.
- Seite 85 Funcionamiento Si ha penetrado aire en el producto: Invierta el producto de modo que la flecha que indica la dirección del flujo (4) apunte hacia arriba. Presione el émbolo de la jeringa lentamente hasta que salga el aire. Vuelva a colocar el producto en posición vertical de modo que la fle- cha que indica la dirección del flujo (5) apunte hacia abajo.
- Seite 86 Funcionamiento Procedimiento Llene la jeringa con la muestra. Sujete el producto en posición vertical de modo que la flecha que indica la dirección del flujo (2) apunte hacia abajo. Retire la tapa protectora (1) de la entrada del producto. Si no utiliza prefiltración en línea, conecte la jeringa a la entrada del pro- ducto (3).
- Seite 87 Funcionamiento 5 .2 .3 Realizar un ciclo de purificación Materiales nece- — Jeringa de ≥ 10 mL sarios: — Tampones — Vaso de precipitados | manguera para recoger el flujo continuo — Mangueras para recoger las fracciones de eluido Paso de cromato- Valores recomendados para grafía Tampón...
- Seite 88 Funcionamiento 5 .3 Si se utiliza una bomba de manguera 5 .3 . 1 Preparar la bomba de manguera Materiales nece- — Manguera de bomba Sartobind Lab (véase ® sarios: capítulo “10.2 Accesorios”, página 99chap- ter “10.2 Accessories“, page 88) —...
- Seite 89 Funcionamiento 5 .3 .2 Instalar y equilibrar el producto Materiales nece- — Opcional: microfiltro de 0,2 µm para prefiltra- sarios: ción en línea (véase capítulo “9.7 Microfiltros autorizados”, página 98) — > 10 mL de tampón de equilibrado, p. ej., 1 x PBS pH 7,4 — Vaso de precipitados | manguera para recoger el flujo continuo Requisitos La manguera de la bomba está...
- Seite 90 El producto se ha equilibrado y está listo para cargar la muestra. 5 .3 .3 Realizar un ciclo de purificación Sartorius recomienda el uso de una bomba de manguera solo para el equili- brado, la carga de muestras con volúmenes elevados y el lavado. Para más pasos de purificación, véase: —...
- Seite 91 Funcionamiento 5 .4 Si se utiliza un sistema LC 5 .4 . 1 Preparar el sistema LC Materiales nece- Tampones, véase capítulo “5.4.3 Realizar un ciclo sarios: de purificación”, página 93 Procedimiento Prepare el sistema LC para la purificación (véanse las instrucciones para el sistema LC).
- Seite 92 Funcionamiento Si utiliza prefiltración en línea: Haga funcionar el sistema LC con un caudal bajo (~ 1 mL/min). Desconecte los adaptadores UNF 10|32 entre sí. Conecte el adaptador UNF 10|32 (4) en sentido ascendente a la en- trada del microfiltro. Llene el microfiltro (5) con tampón de equilibrado a través del siste- ma LC.
- Seite 93 Almacenamiento 5 .4 .3 Realizar un ciclo de purificación Materiales nece- — Tampones sarios: — Placas o mangueras para recoger las fracciones de eluido Paso de cromato- Valores recomendados para grafía Tampón Volumen Caudal Cargar No aplicable No aplicable 2.5 – 15 mL/min | 5 – 30 MV/min Lavado Tampones de uso frecuente para equi-...
- Seite 94 Resolución de problemas Resolución de problemas Avería Causa Solución Capítulo, página Burbujas de aire en el Ha penetrado aire en el Conecte una jeringa de ≥ 10 mL con tam- 5 .2 . 1 , 84, producto producto . El aire no se ha pón de equilibrado a la entrada del pro- 5 .3 .2, 89 eliminado por completo...
- Seite 95 Resolución de problemas Avería Causa Solución Capítulo, página El anticuerpo objetivo Las condiciones de unión Utilice un ultrafiltro adecuado, p. ej., Vi- no se ha capturado . no son adecuadas . vaflow o Vivaspin , para trasladar la ® ® muestra al mismo tampón usado para equilibrar el producto (tampón de equili- brado).
- Seite 96 Eliminación Avería Causa Solución Capítulo, página El anticuerpo eluido Contaminación cruzada Realice un paso de regeneración de cada 5 .2 .3, 87, tiene una pureza baja. de una purificación ante- ciclo de purificación . 5 .3 .3, 90, rior 5 .4 .3, 93 Cuando purifica anticuerpos de varias fuentes, utilice un producto distinto para cada tipo y | o lote de anticuerpo.
- Seite 97 Datos técnicos Datos técnicos 9 . 1 Dimensiones y peso Unidad Valor Altura Diámetro (carcasa) Peso ~ 9 9 .2 Condiciones de funcionamiento Unidad Valor Presión de funcionamiento Presión máxima de funcionamiento a 20 °C Si se utiliza la prefiltración en línea, la presión de funcionamiento debe reducirse a la presión de funcionamiento máxima del microfiltro utilizado .
- Seite 98 ® 9 .8 Requisitos del tampón La elección de tampones depende de la estabilidad del anticuerpo objetivo y debe verificarse previamente. Sartorius recomienda prefiltrar todos los tampones antes de su uso (0,2 μm). Instrucciones de uso de Sartobind Rapid A Lab...
- Seite 99 Rapid A Lab SBLRA025EL-A ® 10 .2 Accesorios Esta tabla muestra un extracto de los accesorios que pueden solicitarse. Para obtener información sobre otros productos, póngase en contacto con Sartorius . Artículo Cantidad Número de pedido Kit de adaptadores Sartobind SBLAAU01-1 ®...
- Seite 100 Indice Indice 1 Riguardo questo manuale . . . . . . . . . . . . . . . . . . . . . . . . . . . . . . . . . . . . . . . . . . . . . . . . . . . . . . . . . . 102 Validità...
- Seite 101 Indice 9 Dati tecnici . . . . . . . . . . . . . . . . . . . . . . . . . . . . . . . . . . . . . . . . . . . . . . . . . . . . . . . . . . . . . . . . . . . . . . . . . . 121 Dimensioni e peso .
- Seite 102 Riguardo questo manuale Riguardo questo manuale 1 . 1 Validità Il presente manuale fa parte del prodotto; deve essere letto integralmente e conservato. Il manuale vale per le seguenti versioni del prodotto: Sartobind ® Rapid A Lab. 1 .2 Documenti di riferimento Oltre al presente manuale tenere in considerazione anche i seguenti do- cumenti: —...
- Seite 103 Riguardo questo manuale 1 .5 Abbreviazioni usate Abbreviazione Significato EtOH Etanolo Frammenti cristallizzabili Cromatografia a scambio ionico Immunoglobulina G Cromatografia liquida Anticorpo monoclonale Volume della membrana NaOH Idrossido di sodio Poliammide Soluzione fisiologica tamponata con fosfato Policarbonato PEEK Polietere etere chetone Polipropilene Polivinilcloruro Filettatura fine unificata...
- Seite 104 — Rischio di lesioni per le persone — Danni, malfunzionamenti o guasti del prodotto Utilizzare solo accessori che sono stati approvati da Sartorius per questo prodotto . Istruzioni per l’uso Sartobind Rapid A Lab...
- Seite 105 Istruzioni di sicurezza 2 .4 Attrezzature di protezione individuale Le attrezzature di protezione individuale servono a proteggere contro i pericoli causati dal prodotto. Se le attrezzature di protezione individuale mancano o sono inadeguate per i processi di lavoro con il prodotto, le persone possono ferirsi .
- Seite 106 Descrizione del prodotto Descrizione del prodotto 3 . 1 Visione d’insieme del prodotto Fig . 1: Sartobind Rapid A Lab con adattatori UNF 10|32 ® Pos . Nome Descrizione Ingresso Raccordo Luer lock femmina con cappuccio protettivo Freccia Indica la direzione del flusso. La freccia non è visibile in questa figura. Uscita Raccordo Luer lock maschio con cappuccio protettivo Adattatore a valle...
- Seite 107 5 . 1 Preparare il campione Sartorius consiglia di prefiltrare il campione per prevenire incrostazioni e in- tasamento della membrana. I campioni non filtrati possono ostruire il pro- dotto con conseguente aumento della contropressione e perdita della ca- pacità...
- Seite 108 Funzionamento Procedura Se si lavora senza prefiltrazione in linea, prefiltrare il campione. Procedere alla purificazione del campione subito dopo la prefiltrazio- ne . Se si lavora con prefiltrazione in linea: Utilizzando una siringa, procedere come descritto nel capitolo “5.2.2 Caricare il campione”, pagina 109. Utilizzando una pompa peristaltica, procedere come descritto nel ca- pitolo “5.3.2 Installare ed equilibrare il prodotto”, pagina 112.
- Seite 109 Funzionamento Se è penetrata dell’aria nel prodotto: Capovolgere il prodotto in modo che la freccia indicante direzione del flusso (4) sia rivolta verso l’alto. Premere lentamente lo stantuffo della siringa fino a quando l’aria è espulsa . Riportare il prodotto in posizione verticale con la freccia indicante la di- rezione del flusso rivolta verso il basso (5).
- Seite 110 Funzionamento Procedura Riempire la siringa con il campione. Tenere il prodotto in posizione verticale con la freccia indicante la dire- zione del flusso rivolta verso il basso (2). Rimuovere il cappuccio protettivo (1) dall’ingresso del prodotto. Se si lavora senza prefiltrazione in linea, collegare la siringa all’ingres- so (3) del prodotto.
- Seite 111 Funzionamento 5 .2 .3 Eseguire un ciclo di purificazione Materiali richie- — Siringa ≥ 10 mL sti: — Tamponi — Becher | tubo flessibile per raccogliere il flusso — Tubi flessibili per raccogliere le frazioni di eluato Step di cromato- Valori consigliati per grafia Tampone Volume...
- Seite 112 Funzionamento 5 .3 Usare una pompa peristaltica 5 .3 . 1 Preparare la pompa peristaltica Materiali richiesti: — Tubo flessibile per pompa Sartobind Lab (vedi ® capitolo “10.2 Accessori”, pagina 123chap- ter “10.2 Accessories“, page 112) — ≥ 10 mL di tampone di equilibrazione, per es. 1 x PBS pH 7.4 —...
- Seite 113 Funzionamento Presupposti Il tubo flessibile per pompa è caricato nella pompa peristaltica e riempito con tampone di equilibrazione. Procedura Far funzionare la pompa peristaltica a una portata bassa. Tenere il prodotto in posizione verticale con la freccia indicante la dire- zione del flusso rivolta verso il basso (2).
- Seite 114 Funzionamento 5 .3 .3 Eseguire un ciclo di purificazione Sartorius consiglia di utilizzare una pompa peristaltica solamente per l’equi- librazione, il caricamento del campione con volumi elevati e il lavaggio. Per ulteriori step di purificazione, vedi: — capitolo 5 .2 .3, pagina 111, per la purificazione con siringa, oppure —...
- Seite 115 Funzionamento 5 .4 Usare un sistema LC 5 .4 . 1 Preparare il sistema LC Materiali richiesti: Tamponi, vedi capitolo “5.4.3 Eseguire un ciclo di purificazione”, pagina 117 Procedura Preparare il sistema LC per la purificazione (vedi il manuale per il sistema LC).
- Seite 116 Funzionamento Se si lavora con prefiltrazione in linea: Far funzionare il sistema LC a una portata bassa (~ 1 mL/min). Scollegare gli adattatori UNF 10|32 l’uno dall’altro . Collegare l’adattatore a monte (4) UNF 10|32 all’ingresso del microfil- tro . Riempire il microfiltro (5) con il tampone di equilibrazione mediante il sistema LC.
- Seite 117 Stoccaggio 5 .4 .3 Eseguire un ciclo di purificazione Materiali richiesti: — Tamponi — Piastre o tubi flessibili per raccogliere le frazioni il eluato Step di cromato- Valori consigliati per grafia Tampone Volume Portata Caricamento Non applicabile Non applicabile 2,5 – 15 mL/min | 5 – 30 MV/min Lavaggio Tamponi comunemente usati per l’equili-...
- Seite 118 Risoluzione dei problemi Risoluzione dei problemi Guasto Causa Soluzione Capitolo, pagina Bolle d’aria nel prodotto È penetrata dell’aria nel Collegare una siringa con ≥ 10 mL di tam- 5 .2 . 1 , 108, prodotto. L’aria non è pone di equilibrazione all’ingresso del 5 .3 .2, 112 stata espulsa completa- prodotto .
- Seite 119 Risoluzione dei problemi Guasto Causa Soluzione Capitolo, pagina L’anticorpo target non Le condizioni di legame Usare un ultrafiltro idoneo, per es . Vi- si lega . sono sfavorevoli. vaflow o Vivaspin , per trasferire il cam- ® ® pione nello stesso tampone che è stato usato per equilibrare il prodotto (tampo- ne di equilibrazione).
- Seite 120 Smaltimento Guasto Causa Soluzione Capitolo, pagina L’anticorpo eluito ha Contaminazione crociata Eseguire uno step di rigenerazione dopo 5 .2 .3, 111, una scarsa purezza . da un ciclo di purificazio- ogni ciclo di purificazione . 5 .3 .3, 114, ne precedente 5 .4 .3, 117 Quando si purificano anticorpi da più...
- Seite 121 Dati tecnici Dati tecnici 9 . 1 Dimensioni e peso Unità Valore Altezza Diametro (housing) Peso ~ 9 9 .2 Condizioni di funzionamento Unità Valore Pressione di esercizio Pressione di esercizio massima a 20 °C Se si usa la prefiltrazione in linea, la pressione di esercizio massima deve essere ridotta fino alla pressione di esercizio massima del microfiltro usato .
- Seite 122 Minisart ® 9 .8 Requisiti dei tamponi La scelta dei tamponi dipende dalla stabilità dell’anticorpo target e ciò deve essere verificato in precedenza. Sartorius consiglia prefiltrare tutti i tamponi prima dell’uso (0,2 μm). Istruzioni per l’uso Sartobind Rapid A Lab...
- Seite 123 ® Sartobind Rapid A Lab SBLRA025EL-A ® 10 .2 Accessori Questa tabella contiene un estratto degli accessori ordinabili . Per informazioni su ulteriori prodotti, rivolgersi a Sartorius. Articolo Quantità Codice d’ordine Kit di adattatori per sistema LC SBLAAU01-1 Sartobind ®...
- Seite 124 Conteúdo Conteúdo 1 Sobre estas Instruções . . . . . . . . . . . . . . . . . . . . . . . . . . . . . . . . . . . . . . . . . . . . . . . . . . . . . . . . . . . . . 126 1 .
- Seite 125 Conteúdo 9 Dados Técnicos . . . . . . . . . . . . . . . . . . . . . . . . . . . . . . . . . . . . . . . . . . . . . . . . . . . . . . . . . . . . . . . . . . . . 145 Dimensões e Peso .
- Seite 126 Sobre estas Instruções Sobre estas Instruções 1 . 1 Validade Estas instruções fazem parte do produto; eles devem ser lidos na íntegra e armazenados. Estas instruções se aplicam à seguinte versão do produto: Sartobind Rapid A Lab. ® 1 .2 Documentos Relacionados Além dessas instruções, observe os seguintes documentos: —...
- Seite 127 Sobre estas Instruções 1 .5 Abreviações Usadas Abreviação Significado EtOH Etanol Fragmento cristalizável Cromatografia de troca iônica Imunoglobulina G Cromatografia liquida Anticorpo monoclonal Volume da membrana NaOH Hidróxido de sódio Poliamida Salina tamponada com fosfato Policarbonato PEEK Poliéter éter cetona Polipropileno Cloreto de polivinila Rosca fina unificada Ultravioleta...
- Seite 128 Modificações ao Produto Se o produto for modificado, as pessoas podem correr riscos. Documentos específicos do produto e aprovações de produtos podem perder a validade. Entre em contato com a Sartorius se tiver alguma dúvida sobre modificações. 2 .2 Qualificações de Funcionários Pessoas que não possuam conhecimento adequado sobre como usar o pro-...
- Seite 129 Instruções de Segurança 2 .4 Equipamento de Proteção Individual Equipamento de proteção individual protege contra os riscos decorrentes do produto. Se o equipamento de proteção individual estiver faltando ou for inadequado para os processos de trabalho no produto, as pessoas podem ser feridas .
- Seite 130 Descrição do produto Descrição do produto 3 . 1 Visão geral do produto Fig . 1: Sartobind Rapid A Lab com adaptadores UNF 10|32 ® Pos . Nome Descrição Entrada Conector Luer-Lock fêmea com tampa protetora Seta Indica a direção do fluxo. A seta não está visível nesta imagem. Saída Conector Luer-Lock macho com tampa protetora Adaptador UNF 10|32 a...
- Seite 131 5 . 1 Preparando a Amostra A Sartorius recomenda pré-filtrar a amostra para evitar incrustações e entu- pimento da membrana. Amostras não filtradas podem bloquear o produto, levando ao aumento da contrapressão e à perda da capacidade de ligação.
- Seite 132 Operação Procedimento Se estiver operando sem pré-filtração em linha, pré-filtre a amostra. Proceda à purificação da amostra imediatamente após a pré-filtração. Se estiver operando com pré-filtração em linha: Ao usar uma seringa, siga as etapas descritas em capítulo “5.2.2 Car- regando a Amostra“, página 133.
- Seite 133 Operação Se foi introduzido ar no produto: Inverta o produto de forma que a seta indicando a direção do flu- xo (4) aponte para cima. Pressione o êmbolo da seringa lentamente até que o ar seja removi- do . Retorne o produto para a posição vertical com a seta indicando a direção do fluxo (5) apontando para baixo.
- Seite 134 Operação Procedimento Encha a seringa com a amostra. Segure o produto na posição vertical com a seta indicando a direção do fluxo (2) apontando para baixo. Remova a tampa protetora (1) da entrada do produto. Se estiver operando sem pré-filtração em linha, conecte a seringa à en- trada do produto (3).
- Seite 135 Operação 5 .2 .3 Realizando um Ciclo de Purificação Materiais requi- — Seringa ≥ 10 mL sitados: — Tampões — Béquer | tubo para coletar o fluxo — Tubos para coletar frações de eluato Etapa de Valores recomendados para cromatografia Tampão Volume Lavagem ...
- Seite 136 Operação 5 .3 Usando uma Bomba Peristáltica 5 .3 . 1 Preparando a Bomba Peristáltica Materiais requi- — Tubulação da bombaSartobind Lab (ver capítu- ® sitados: lo “10.2 Acessórios“, página 147chapter “10.2 Accessories“, page 136) — ≥ 10 mL de tampão de equilíbrio, por exemplo 1 x PBS pH 7,4 —...
- Seite 137 Operação Requisitos A tubulação da bomba é carregada na bomba peristáltica e preenchida com tampão de equilíbrio. Procedimento Opere a bomba peristáltica com uma vazão baixa. Segure o produto na posição vertical com a seta indicando a direção do fluxo (2) apontando para baixo. Remova a tampa protetora (1) da entrada do produto.
- Seite 138 Operação 5 .3 .3 Realizando um Ciclo de Purificação A Sartorius recomenda usar uma bomba peristáltica apenas para equilíbrio, carregamento de amostras com grandes volumes e lavagem. Para etapas adicionais de purificação, ver: — capítulo 5 .2 .3, página 135, para purificação com seringa, ou —...
- Seite 139 Operação 5 .4 Usando um sistema LC 5 .4 . 1 Preparando o Sistema LC Materiais requi- Tampões, ver capítulo “5.4.3 Realizando um Ciclo de sitados: Purificação“, página 141 Procedimento Prepare o sistema LC para purificação (ver instruções para o sistema LC). Conecte os adaptadores UNF 10|32 ao sistema LC.
- Seite 140 Operação Se estiver operando com pré-filtração em linha: Execute o sistema LC com uma taxa de fluxo baixa (~ 1 mL/min). Desconecte os adaptadores UNF 10|32 um do outro. Conecte o adaptador UNF 10|32 a montante (4) à entrada do micro- filtro . Preencha o microfiltro (5) com tampão de equilíbrio através do siste- ma LC.
- Seite 141 Armazenamento 5 .4 .3 Realizando um Ciclo de Purificação Materiais requisitados: — Tampões — Placas ou tubos para coletar frações de eluato Etapa de cromato- Valores recomendados para grafia Tampão Volume Vazão Carregamento Não aplicável Não aplicável 2,5 – 15 mL/min | 5 – 30 MV/min Lavagem Tampões comumente usados para equilí- 10 mL | 20 MV...
- Seite 142 Solução de Problemas Solução de Problemas Falha Causa Solução Capítulo, pá- gina Bolhas de ar no produto O ar foi introduzido no Conecte uma seringa ≥ 10 mL com tam- 5 .2 . 1 , 132, produto. O ar não foi pão de equilíbrio à entrada do produto. 5 .3 .2, 136 completamente removi- Feche a saída do produto com uma tam-...
- Seite 143 Solução de Problemas Falha Causa Solução Capítulo, pá- gina O anticorpo alvo não é As condições de ligação Use um ultrafiltro adequado, por exem- capturado . são inadequadas. plo, Vivaflow ou Vivaspin , para trocar a ® ® amostra no mesmo tampão usado para equilibrar o produto (tampão de equilí- brio).
- Seite 144 Descarte Falha Causa Solução Capítulo, pá- gina O anticorpo eluído tem Contaminação cruzada Realize uma etapa de regeneração após 5 .2 .3, 135, baixa pureza . de uma purificação ante- cada ciclo de purificação. 5 .3 .3, 138, rior 5 .4 .3, 141 Ao purificar anticorpos de múltiplas fon- tes, use um produto separado para cada tipo de anticorpo e | ou lote.
- Seite 145 Dados Técnicos Dados Técnicos 9 . 1 Dimensões e Peso Unidade Valor Height Diâmetro (carcaça) Peso ~ 9 9 .2 Condições Operacionais Unidade Valor Pressão de operação Pressão máxima de operação a 20 °C Ao usar a pré-filtração em linha, a pressão de operação deve ser reduzi- da à...
- Seite 146 ® 9 .8 Requisitos de Tampão A escolha dos tampões depende da estabilidade do anticorpo alvo e deve ser verificada previamente. A Sartorius re- comenda pefiltrar todos os tampões antes do uso (0,2 μm). Instruções para Uso Sartobind Rapid A Lab...
- Seite 147 Rapid A Lab SBLRA025EL-A ® 10 .2 Acessórios Esta tabela contém um resumo dos acessórios que podem ser encomendados. Para obter informações sobre outros produtos, entre em contato com a Sartorius. Item Quantidade Número do pedido Kit adaptador do sistema LC SBLAAU01-1 Sartobind ®...
- Seite 148 目录 目录 1 关于这些说明 . . . . . . . . . . . . . . . . . . . . . . . . . . . . . . . . . . . . . . . . . . . . . . . . . . . . . . 150 有效性...
- Seite 149 目录 9 技术参数 . . . . . . . . . . . . . . . . . . . . . . . . . . . . . . . . . . . . . . . . . . . . . . . . . . . . . . . . . . 169 尺寸及重量...
- Seite 150 关于这些说明 关于这些说明 有效性 这些说明是产品的一部分; 必须完整阅读并保存它们。 这些说明适用于以下版 本的产品: Sartobind® Rapid A Lab。 相关文档 除这些说明之外, 请遵循以下文档: — 材料安全数据表 — (内联) 预过滤用微孔过滤器使用说明 — 使用该产品的蠕动泵或液相色谱 (LC) 系统的操作说明 目标群体 这些说明专供下列目标群体阅读和使用。 目标群体必须具备以下所列的知识。 目标群体 知识和资质 操作员 操作员熟悉产品和相关的工作流程。 操作员了解使用该 产品时可能出现的危险并知道如何防范它们。 使用的符号 所需操作: 描述必须执行的活动。 按顺序执行的活动必须依次执 行。 结果: 描述已执行操作的结果。 Sartobind® Rapid A Lab 使用说明...
- Seite 151 关于这些说明 使用的缩略语 缩写 含义 EtOH 乙醇 可结晶片段 离子交换色谱 免疫球蛋白 G 液相色谱 单克隆抗体 膜体积 NaOH 氢氧化钠 聚酰胺 磷酸盐缓冲盐水 聚碳酸脂 PEEK 聚醚醚酮 聚丙烯 聚氯乙烯 统一标准细牙螺纹 紫外线 Sartobind® Rapid A Lab 使用说明...
- Seite 152 外诊断或临床手术。 该产品以非灭菌状态供货。 只要遵守有关样品预过滤、 使用、 再生和产品存放的说明与建议, 该产品可用于 执行多个纯化循环。 必须按照这些说明使用本产品。 任何其它用途将视为不当使用, 并可能影响产 品的保护功能。 产品的操作条件 该产品只能在这些说明的技术参数部分所述的操作条件下使用。 2.1.1 产品改造 若对该产品进行改造, 可能会给人员带来风险。 产品特定文档和产品批准可能 会失效。 如有任何关于产品改造的问题, 请联系 Sartorius。 人员资质 对如何使用该产品不具备足够知识的人可能会伤害自己和他人。 配件 使用不合适的配件会影响产品的功能和操作可靠性, 后果如下: — 人身伤害的危险 — 产品损坏、 失效或故障 仅使用获得 Sartorius 认可的针对该产品的配件。 Sartobind® Rapid A Lab 使用说明...
- Seite 153 安全说明 个人防护装备 个人防护装备可防止来自产品的风险。 如果个人防护装备丢失或不适合在产 品上进行的工作流程, 可能会导致人员受伤。 必须佩戴以下个人防护装备: — 安全手套 — 安全护目镜 — 实验工作服 从产品中泄漏液体 如果产品损坏或安装不正确, 液体可能会从产品中泄漏。 存在皮肤刺激的风 险。 使用前进行目视检查, 确保产品和配件之间的所有接口均不漏液。 确保正确安装 UNF 10|32 适配器 (如适用) 。 产品爆裂 如果对产品施加的压力过大, 产品外壳可能会爆裂。 存在割伤或刺激皮肤的风 险。 建议内联预过滤用微孔过滤器的工作压力不超过产品的工作压力。 不得超过产品的最大工作压力 (参见 第 169 页的章节 “9.2 运行条件” ) 。 如果进行内联预过滤,...
- Seite 154 产品说明 产品说明 产品概述 插图 1: Sartobind® Rapid A Lab 及 UNF 10|32 适配器 位置 名称 说明 入口 带防护帽的母鲁尔锁接头 箭头 指示流向。 箭头在此图片中不可见。 出口 带防护帽的公鲁尔锁接头 下游 UNF 10|32 适配器 母鲁尔锁转母 UNF 10|32 适配器, 用于将 LC 系统连接到产品出口 上游 UNF 10|32 适配器 公鲁尔锁转母 UNF 10|32 适配器, 用于将 LC 系统连接到产品入口 包装上的符号...
- Seite 155 下游 UNF 10|32 适配器 Quick Start Guide 取出填料 步骤 产品开箱。 对产品进行目视检查。 如果产品损坏, 则应予以更换。 操作 该产品已预装存放缓冲液。 操作时注意不要让任何空气进入产品。 准备样品 Sartorius 建议对样品进行预过滤, 以免膜结垢堵塞。 未过滤的样品会堵塞产 品, 导致背压增加和结合能力下降。 预过滤可以在上样前的单独步骤中进行, 也可以在上样过程中通过内联预过滤 进行。 所需材料: 0.2 µm 微孔过滤器, 参见第 170 页的章节 “9.7 经批准 的微孔过滤器” Sartobind® Rapid A Lab 使用说明...
- Seite 156 操作 步骤 如果不进行内联预过滤, 则应对样品进行预过滤。 预过滤后立即进行样品纯化。 如果进行内联预过滤: 使用注射器时, 按照第 157 页的章节 “5.2.2 上样” 中的步骤操作。 使用蠕动泵时, 按照第 160 页的章节 “5.3.2 安装并平衡产品” 中的步骤 操作。 使用 LC 系统时, 按照第 163 页的章节 “5.4.2 安装并平衡产品” 中的步 骤操作。 样品将在上样过程中进行预过滤。 使用注射器 5.2.1 平衡产品 所需材料: — 容量 ≥ 10 mL 的注射器 —...
- Seite 157 操作 如果有空气进入产品: 倒置产品, 使指示流向的箭头 (4) 朝上。 缓慢按下注射器柱塞, 直到将空气排出。 让产品恢复到直立状态, 指示流向的箭头 (5) 朝下。 将 10 mL 平衡缓冲液注入产品。 确保液体从出口滴出, 而非流出。 产品已经过平衡处理。 用防护帽密封产品出口。 拆下注射器, 用防护帽密封产品入口。 5.2.2 上样 所需材料: — 容量 ≥ 10 mL 的注射器 — 可选: 用于进行内联预过滤的 0.2 µm 微孔过滤器, 参 见第 170 页的章节 “9.7 经批准的微孔过滤器” —...
- Seite 158 操作 步骤 将样品装入注射器。 使产品保持直立状态, 指示流向的箭头 (2) 朝下。 取下产品入口处的防护帽 (1)。 如果不进行内联预过滤, 则将注射器连接到产品入口 (3)。 如果进行内联预过滤: 将注射器连接到微孔过滤器入口 (4)。 将样品装入微孔过滤器。 将微孔过滤器出口一点一点地连接到产品入口 (5)。 取下产品出口处的防护帽。 上样。 确保液体从出口滴出, 而非流出。 进行内联预过滤时: 如果在上样期间检测到压力增加, 则应更换预过滤器。 用防护帽密封产品出口。 从产品上拆下注射器和微孔过滤器 (如适用) 。 用防护帽密封产品入口。 Sartobind® Rapid A Lab 使用说明...
- Seite 159 操作 5.2.3 执行纯化循环 所需材料: — 容量 ≥ 10 mL 的注射器 — 缓冲液 — 用于收集流通液的烧杯 | 管路 — 用于收集洗脱组分的管路 色谱步骤 建议值 缓冲液 体积 清洗 用于平衡 | 清洗的常用缓冲液, 例如 1 x PBS 10 mL pH 7.4 洗脱 pH 2.5 – 4, 例如 50 – 100 mM 柠檬酸、 乙酸 5 mL 或甘氨酸...
- Seite 160 操作 使用蠕动泵 5.3.1 准备蠕动泵 所需材料: — Sartobind® Lab 泵管 (参见第 171 页的章节 “10.2 配件” ) — ≥ 10 mL 平衡缓冲液, 例如 1 x PBS pH 7.4 — 用于收集流通液的烧杯 | 管路 插图 2: Sartobind® Lab 泵管 位置 名称 说明 管道 将缓冲液和样品从容器 (例如烧杯) 转移到产 品中。...
- Seite 161 操作 要求 泵管已接入蠕动泵, 且已装入平衡缓冲液。 步骤 以低流速运行蠕动泵。 使产品保持直立状态, 指示流向的箭头 (2) 朝下。 取下产品入口处的防护帽 (1)。 如果不进行内联预过滤: 将泵管上的鲁尔锁接头 (3) 一点一点地连接到产品入口 (4)。 如果进行内联预过滤: 将泵管上的鲁尔锁接头 (5) 连接到微孔过滤器入口。 将缓冲液泵送到微孔过滤器 (6) 中。 将微孔过滤器出口一点一点地连接到产品入口 (7)。 取下产品出口处的防护帽。 如果有空气进入产品: 倒置产品, 使指示流向的箭头 (8) 朝上。 用平衡缓冲液冲洗产品, 直到产品出口不再冒出气泡。 让产品恢复到直立状态, 指示流向的箭头朝下。 用 10 mL 平衡缓冲液冲洗产品, 流速不超过 25 mL/min。 产品已经过平衡处理,...
- Seite 162 操作 5.3.3 执行纯化循环 Sartorius 建议仅在平衡、 大量上样和清洗步骤中使用蠕动泵。 有关进一步的纯化步骤, 参见: — 第 159 页的章节 “5.2.3” ( 利用注射器进行纯化) , 或 — 第 165 页的章节 “5.4.3” ( 利用 LC 系统进行纯化) 。 所需材料: — 缓冲液 — 用于收集流通液的烧杯 | 管路 色谱步骤 建议值 缓冲液 体积 流速 加载...
- Seite 163 操作 使用 LC 系统 5.4.1 准备 LC 系统 所需材料: 缓冲液, 参见第 165 页的章节 “5.4.3 执行纯化循环” 步骤 准备 LC 系统以进行纯化 (参见 LC 系统的说明) 。 将 UNF 10|32 适配器连接到 LC 系统。 确保接口不漏液。 5.4.2 安装并平衡产品 所需材料: — 可选: 用于进行内联预过滤的 0.2 µm 微孔过滤器 (参 见第...
- Seite 164 操作 如果进行内联预过滤: 以低流速 (~ 1 mL/min) 运行 LC 系统。 断开 UNF 10|32 适配器之间的连接。 将上游 UNF 10|32 适配器 (4) 连接到微孔过滤器入口。 将平衡缓冲液通过 LC 系统装入微孔过滤器 (5) 中。 将微孔过滤器出口一点一点地连接到产品入口 (6)。 取下产品出口处的防护帽。 如果有空气进入产品: 倒置产品, 使指示流向的箭头 (7) 朝上。 用平衡缓冲液冲洗产品, 直到产品出口不再冒出气泡。 让产品恢复到直立状态, 指示流向的箭头朝下。 将下游 UNF 10|32 适配器 (8) 连接到产品出口。 产品已按照过程流程竖直安装。...
- Seite 165 存放 5.4.3 执行纯化循环 所需材料: — 缓冲液 — 用于收集洗脱组分的滤管或滤管 色谱步骤 建议值 缓冲液 体积 流速 加载 不适用 不适用 2.5 – 15 mL/min | 5 – 30 MV/min 清洗 用于平衡 | 清洗的常用缓冲液, 例 10 mL | 20 MV ≤ 25 mL/min | 如 1 x PBS pH 7.4 ≤...
- Seite 166 故障排除 故障排除 故障 原因 解决方法 章节, 页码 产品中有气泡 有空气进入产品。 未使用 将一支注有平衡缓冲液的 ≥ 10 mL 注射 5.2.1, 156、 这些说明所述的排气步骤 器连接到产品入口。 用防护帽密封产品出 5.3.2, 160 将空气尽数排出。 口。 持住注射器, 使产品保持直立状态, 同 时指示流向的箭头朝下。 小幅度地上下活 动注射器柱塞, 使气泡上升到注射器中。 产品入口附近的极小气泡不会影响纯化。 只要小气泡保留在膜床外部, 产品就能正 常工作。 上样过程出现高背压 样品尚未过滤。 对样品进行预过滤。 重新为产品上样。 9.7, 170、 5.1, 155 样品已过滤,...
- Seite 167 故障排除 故障 原因 解决方法 章节, 页码 产品的结合能力不足。 抗体上样量过大。 串联 2 个产品, 提高结合能力。 串联 2 个产 5.2.2, 157、 品时应遵循带有内联预过滤用微孔过滤器 5.3.2, 160、 的产品的连接说明。 根据经验, 当流速保持 5.4.2, 163 恒定时, 压力会加倍。 减少上样量并连续执行几个循环。 降低所加入的样本中的抗体浓度。 产品结合了上一个纯化循 在每个纯化循环结束后执行再生步骤。 5.2.3, 159、 环残留的抗体和 | 或污染。 5.3.3, 162、 5.4.3, 165 产品存储不当。...
- Seite 168 废弃处理 废弃处理 清除产品污垢 步骤 如果产品已接触危险物质, 则应清除产品污垢。 处置产品 必须由处置设施妥善处置产品。 要求 如果适用: 产品上的污垢必须已清除。 步骤 根据当地政府法规处置产品及包装。 Sartobind® Rapid A Lab 使用说明...
- Seite 169 技术参数 技术参数 尺寸及重量 单位 数值 高度 直径 (外壳) 重量 运行条件 单位 数值 工作压力 最大工作压力 20 °C 使用内联预过滤时, 工作压力必须降至所用微孔过滤器的最大工作压力。 工作温度 °C 4 – 25 上样温度 °C ≤ 40 流速建议 mL/min 2.5 – 25 MV/min 5 – 50 结合能力 单位 数值 膜体积 在穿透性为...
- Seite 170 存放温度 °C 4 – 25 存放缓冲液: 20 % EtOH 加入 1 x PBS 存储在清洁处, 避免阳光直射。 经批准的微孔过滤器 上样前进行预过滤: Sartoclear Dynamics® Lab Sartolab® RF | BT 上样期间通过内联预过滤进行预过滤: Minisart® NML 缓冲液要求 缓冲液的选择取决于目标抗体的稳定性, 且必须事先进行验证。 Sartorius 建议在使用所有缓冲液前进行预过滤 (0.2 μm) 。 Sartobind® Rapid A Lab 使用说明...
- Seite 171 订购信息 10 订购信息 10.1 产品 项目 数量 订购编号 Sartobind® Rapid A Lab SBLRA025EL-1 Sartobind® Rapid A Lab SBLRA025EL-A 10.2 配件 此表包含可以订购的配件摘录。 有关其它产品的信息, 请联系 Sartorius。 项目 数量 订购编号 Sartobind® Lab LC 系统适配器套件 SBLAAU01-1 蠕动泵 VF-APD0001-1 适用于 1.6 mm 管道的蠕动泵头 VF-APH0001-1 泵管...
- Seite 172 目次 目次 1 本取扱説明書について . . . . . . . . . . . . . . . . . . . . . . . . . . . . . . . . . . . . . . . . . . . . . . . . 174 有効性...
- Seite 173 目次 9 技術データ . . . . . . . . . . . . . . . . . . . . . . . . . . . . . . . . . . . . . . . . . . . . . . . . . . . . . . . . . 193 寸法と重量...
- Seite 174 本取扱説明書について 本取扱説明書について 有効性 本書は製品の一部です。 最後までよ く読み、 保管して ください。 本書の説明は、 以 下のバージョンの製品に適用されます : Sartobind® Rapid A Lab。 関連文書 本書に加えて、 以下の文書も参照して ください : — 材料安全データシート — (インライン) 前置ろ過に使用するマイクロフィ ルターの使用説明書 — 本製品を使用するペリスタルティ ックポンプまたは液体クロマ トグラフィー (LC) システムの使用説明書 ターゲッ トグループ 本書は、 以下のターゲッ トグループを対象としています。 各ターゲッ トグループに は、...
- Seite 175 本取扱説明書について 使用している略語 略語 意味 EtOH エタノール フラグメン ト結晶化 イオン取り換えクロマトグラフィー 免疫グロブリンG 液体クロマトグラフィー 単クローン抗体 メンブレン容量 NaOH 水酸化ナトリウム ポリアミ ド リン酸緩衝生理食塩水 ポリカーボネート PEEK ポリエーテルエーテルケトン ポリプロピレン ポリ塩化ビニル インチねじ 紫外線 Sartobind® Rapid A Lab使用説明書...
- Seite 176 本製品は、 製品の試料の前置ろ過、 使用、 再生、 および保管に関する指示と推奨 事項を遵守するかぎり、 複数の浄化サイクルで使用できます。 本製品は、 本書に従った使用のみを意図しています。 用途以外での使用は不適 切と見なされ、 製品の保護機能を妨げる場合があります。 製品の操作条件 本製品は、 本書の技術データの章に記載された操作条件でのみ使用できます。 2.1.1 製品の改造 本製品を改造すると人が危険にさらされるおそれがあります。 製品別文書と製 品認可の有効性が損なわれることがあります。 改造についてご不明な点は、 Sartoriusにお問い合わせください。 人員の適格性 製品の使用方法について十分な知識を持たない場合、 自分自身がケガをした り、 他の人にケガをさせたりすることがあります。 付属品 不適切な付属品の使用は、 製品の機能と操作の信頼性に影響し、 以下の結果に つながることがあります : — ケガのリスク — 製品の損傷、 作動不良、 または故障 本製品についてザルトリウスが認定した付属品のみを使用して ください。...
- Seite 177 安全上の注意 個人用保護具 身体保護具は、 製品のもたらすリスクから人体を保護します。 個人用保護具が 不足している、 または機器の作業プロセスに不適切な場合、 ケガをするおそれが あります。 以下の個人用保護具を必ず着用して ください : — 保護手袋 — 保護メガネ — 白衣 製品からの液体の漏れ 製品が損傷していたり、 正し く設置されていない場合、 製品から液体が漏れる可 能性があります。 皮膚を刺激するリスクがあります。 使用する前に目視点検を実施し、 製品と付属品のすべての接続部分が流体 密封されていることを確認して ください。 UNF 10|32アダプターが正し く取り付けられていることを確認して ください ( アダプターが正し く取り付けられていることを確認して ください ( 該当する場合) 。 該当する場合)...
- Seite 178 製品の説明 製品の説明 製品概要 図 1: Sartobind® Rapid A Lab (UNF 10|32アダプター付き) 位置 名前 説明 注入口 保護キャ ップ付きメスルアーロックコネクター 矢印 流れの方向を示す。 矢印はこの図では表示されていません。 排出口 保護キャ ップ付きオスルアーロックコネクター 下流UNF 10|32アダプタ メスルアーロックからメスUNF 10|32アダプター、 LCシステムを製品の排出口に接 ー 続 上流UNF 10|32アダプタ オスルアーロックからメスUNF 10|32アダプター、 LCシステムを製品の注入口に接 ー 続 パッケージの記号 記号 意味 可燃性の液体...
- Seite 179 プロセスの準備 プロセスの準備 同梱物の内容 品目 数量 コンポジッ トパウチに入った製品 1または4個 上流UNF 10|32アダプター 下流UNF 10|32アダプター クイックスタートガイド 開梱 手順 製品を開梱します。 製品の目視検査を実施して ください。 製品が損傷している場合は、 交換して ください。 操作 製品は保管バッファーで充填されています。 操作中に製品に空気が入らないよ うにして ください。 試料の準備 ザトリウスでは、 メンブレンのファウリングや詰まりを防ぐため、 試料を前置ろ過 することをお勧めしています。 未ろ過の試料を通すと製品が目詰まりし、 背圧が 上昇して結合能が減少する場合があります。 試料を投入する前、 またはインライン前置ろ過で試料を投入している間に個別 のステップで前置ろ過を実施できます。 必要な材料 : 0.2 µmマイクロフィ ルター、 「 9.7 認定済みのマイクロフ ィ...
- Seite 180 操作 手順 インライン前置ろ過なしで操作している場合、 試料を前置ろ過します。 前置ろ過後にすぐに試料を浄化します。 インライン前置ろ過を使って操作している場合 : シリンジを使用するときは、 「 5.2.2 試料の投入」 章 (181ページ) に記載 されたステップに従って ください。 ペリスタルティ ックポンプを使用するときは、 「 5.3.2 製品の設置と平衡 化」 章 (184ページ) に記載されたステップに従って ください。 LCシステムを使用するときは、 「 5.4.2 製品の設置と平衡化」 章 (187ペー ジ) に記載されたステップに従って ください。 試料は試料の投入中に前置ろ過されます。 シリンジの使用 5.2.1 製品の平衡化 必要な材料 : —...
- Seite 181 操作 製品に空気が侵入した場合 : 製品を反転させ、 流れの方向の矢印 (4) が上を向く ようにします。 シリンジのプランジャーをゆっ く りと空気が抜けるまで押します。 流れの方向の矢印 (5) が下を向く ようにして、 製品を再び直立の位置に戻し ます。 製品に10 mLの平衡化バッファーを入れます。 必ずフローは連続的な流れで はなく、 排出口から1滴ずつ出るようにします。 製品が平衡化されている。 製品の排出口を保護キャ ップで閉じます。 シリンジを外し、 製品の注入口を保護キャ ップで閉じます。 5.2.2 試料の投入 必要な材料 : — 10 mL以上のシリンジ — オプション : インライン前置ろ過用の0.2 µmマイクロ フィ...
- Seite 182 操作 手順 シリンジに試料を充填します。 流れの方向の矢印 (2) が下を向く ようにして、 製品を直立させて維持します。 製品の注入口の保護キャ ップ (1) を外します。 インライン前置ろ過なしで操作している場合、 シリンジを製品の注入口 (3) に 接続します。 インライン前置ろ過を使って操作している場合 : シリンジをマイクロフィ ルターの注入口 (4) に接続します。 マイクロフィ ルターに試料を充填します。 マイクロフィ ルターの排出口を製品の注入口 (5) に1滴ずつ流れるように 接続します。 製品の排出口の保護キャ ップを外します。 試料を投入します。 必ずフローは連続的な流れではなく、 排出口から1滴ず つ出るようにします。 インライン前置ろ過を使用する場合 : 試料の投入中に圧力の増加が検出さ れた場合は、 プレフィ ルターを交換して ください。 製品の排出口を保護キャ...
- Seite 183 操作 5.2.3 浄化サイクルの実行 必要な材料 : — 10 mL以上のシリンジ — バッファー — 初出部分を収集するためのビーカー | チューブ — 溶出フラクションを収集するためのチューブ クロマトグラフィ 推奨値 ーステップ バッファー 容量 洗浄 平衡化または洗浄に一般に使用されるバッ 10 mL ファー (1 x PBS pH 7.4など) 溶出 pH 2.5~4、 50~100 mMのクエン酸、 酢酸 5 mL またはグリシン 洗浄...
- Seite 184 操作 ペリスタルティ ックポンプの使用 5.3.1 ペリスタルティ ックポンプの準備 必要な材料 : — Sartobind® Labポンプチューブ ( 「10.2 付属品」 章 (195ページ) を参照) — 10 miL以上の平衡化バッファー (1 x PBS pH 7.4な ど) — 初出部分を収集するためのビーカー | チューブ 図 2: Sartobind® Labポンプチューブ 位置 名前 説明 チューブ 容器 (ビーカーなど) から製品にバッファーを 試料を移します。...
- Seite 185 操作 要件 ポンプチューブをペリスタルティ ックポンプのに搭載し、 平衡化バッファーを充填 します。 手順 ペリスタルティ ックポンプを低速の流量で運転します。 流れの方向の矢印 (2) が下を向く ようにして、 製品を直立させて維持します。 製品の注入口の保護キャ ップ (1) を外します。 インライン前置ろ過を使わずに操作している場合 : ポンプチューブのルアーロックコネクター (3) を製品の注入口 (4) に1滴ず つ流れるように接続します。 インライン前置ろ過を使って操作している場合 : ポンプチューブのルアーロックコネクター (5) をマイクロフィ ルターの注 入口に接続します。 ポンプを経由してマイクロフィ ルター (6) にバッファーを充填します。 マイクロフィ ルターの排出口を製品の注入口 (7) に1滴ずつ流れるように 接続します。...
- Seite 186 操作 5.3.3 浄化サイクルの実行 ザトリウスでは、 平衡化、 高容量の試料を投入する場合、 および洗浄のみにペリ スタルティ ックポンプを使用することをお勧めしています。 さらなる浄化ステップについては、 以下を参照して ください。 — 「5.2.3」 章 (183ページ) ( シリンジでの浄化) 、 または — 「5.4.3」 章 (189ページ) ( LCシステムでの浄化) 。 必要な材料 : — バッファー — 初出部分を収集するためのビーカー | チューブ クロマトグラフィー 推奨値 ステップ バッファー 容量 流速...
- Seite 187 操作 LCシステムの使用 5.4.1 LCシステムの準備 必要な材料 : バッファー、 「 5.4.3 浄化サイクルの実行」 章 (189ペー ジ) を参照 手順 LCシステムを浄化するために準備します (LCシステムの使用説明書を参照) 。 UNF 10|32アダプターをLCシステムに接続します。 接続部分は流体密封され ていることを確認して ください。 5.4.2 製品の設置と平衡化 必要な材料 : — オプション : インライン前置ろ過用の0.2 µmマイクロ フィ ルター ( 「9.7 認定済みのマイクロフィ ルター」 章 (194ページ) を参照) —...
- Seite 188 操作 インライン前置ろ過を使って操作している場合 : LCシステムを低速の流量 (~1 mL/分) で運転します。 UNF 10|32アダプター同士の接続を解除します。 上流UNF 10|32アダプター (4) をマイクロフィ ルターの注入口に接続しま す。 LCシステムを通してマイクロフィ ルター (5) を平衡化バッファーで充填し ます。 マイクロフィ ルターの排出口を製品の注入口 (6) に1滴ずつ流れるように 接続します。 製品の排出口の保護キャ ップを外します。 製品に空気が侵入した場合 : 製品を反転させ、 流れの方向の矢印 (7) が上を向く ようにします。 製品の排出口から気泡がなくなるまで、 平衡化バッファーで製品を洗浄し ます。 流れの方向の矢印が下を向く ようにして、 製品を再び直立の位置に戻し ます。...
- Seite 189 保管 5.4.3 浄化サイクルの実行 必要な材料 : — バッファー — 溶出フラクションを収集するためのプレートまたは チューブ クロマトグラフィー 推奨値 ステップ バッファー 容量 流速 充てん 該当しない 該当しない 2.5~15 mL/分 | 5 ~30 MV/分 洗浄 平衡化または洗浄に一般に使用され 10 mL | 20 MV 25 mL/分以下 | るバッファー (1 x PBS pH 7.4など) 50 MV/分以下...
- Seite 190 トラブルシューティ ング トラブルシューティ ング 障害 原因 解決策 章、 ページ 製品に気泡がある 製品に気泡が侵入してい 平衡化バッファーの入った10 mL以上のシ 5.2.1, 180、 ます。 使用説明書に記載 リンジを製品の注入口に接続します。 製品 5.3.2, 184 された換気手順に従って の排出口を保護キャ ップで閉じます。 製品 空気が完全に除去されて を直立させた状態でシリンジを保持します いません。 (流れの方向を示す矢印が下を向く ように します) 。 シリンジのプランジャー上下に短 いス トロークで動かし、 気泡をシリンジに上 がって く るようにします。 製品の注入口付近の非常に小さな気泡は 浄化の妨げにはなりません。...
- Seite 191 トラブルシューティ ング 障害 原因 解決策 章、 ページ 標的抗体が捕捉されてい 結合条件が適切ではあり 適切な限外ろ過装置 (Vivaflow またはVi- ® ません。 ません。 vaspin など) を使って、 製品を平衡化する ® のに使用したのと同じバッファー (平衡化バ ッファー) に試料を取り替えます。 試料を再 投入します。 バッファーのpH上げたり、 または滞留時間 を伸ばすなど、 投入条件を最適化します。 抗体のプロテインAの親和 プロテインAに対する抗体の親和性を確認 性が低いか、 またはFc領 して ください。 域が不足しています。 プロ テインAの親和性はすべて の種類の抗体で等し くあり 異なるクロマトグラフィーのモダリティを試...
- Seite 192 廃棄処分 廃棄処分 製品の除染 手順 製品が危険物質に接触した場合、 製品を除染して ください。 製品の廃棄 本製品は、 廃棄施設で適切に処分する必要があります。 要件 該当する場合 : 製品を除染する必要があります。 手順 都道府県庁の規制に従って、 製品とパッケージを廃棄して ください。 Sartobind® Rapid A Lab使用説明書...
- Seite 193 技術データ 技術データ 寸法と重量 単位 値 高さ 直径 (ハウジング) 重量 ~9 操作条件 単位 値 操作圧力 20 °Cでの最大操作圧力 インライン前置ろ過を使用する場合、 操作圧力は使用するマイクロフィ ルタ ーの最大操作圧力まで下げる必要があります。 動作温度 ℃ 4~25 投入温度 ℃ ≤ 40 流速 (推奨) mL/分 2.5~25 MV/分 5~50 結合能 単位 値 メンブレン容量 10%分裂時の動的結合能、 流速5 MV/分、 試料ヒトIgG (1 x PBS pH 7.4) 、 伝導 mg/mL ≥...
- Seite 194 技術データ 材料 材料の構造 ハウジング : PP キャ ップ : PC メンブレン タイプ : Sartobind® Rapid A リガンド : プロテインA LCシステムのアダプター : PEEK Sartobind Lab ポンプチューブ : PVC、 PA ® 保管条件 単位 値 保管温度 ℃ 4~25 保管バッファー : 1 x PBS中20 % EtOH 清潔な場所に保管し、...
- Seite 195 注文情報 10 注文情報 10.1 製品 品目 数量 注文番号 Sartobind® Rapid A Lab SBLRA025EL-1 Sartobind® Rapid A Lab SBLRA025EL-A 10.2 付属品 以下の表は、 注文可能な付属品の一部です。 その他の製品に関する情報は、 ザ ルトリウスにお問い合わせください。 品目 数量 注文番号 Sartobind® Lab LCシステムアダプター SBLAAU01-1 キッ ト ペリスタルティ ックポンプ VF-APD0001-1 1.6 mmチューブ用ペリスタルティ ックポ VF-APH0001-1 ンプヘッ...
- Seite 196 목차 목차 1 설명서 소개 . . . . . . . . . . . . . . . . . . . . . . . . . . . . . . . . . . . . . . . . . . . . . . . . . . . . . . . . . 198 유효성.
- Seite 197 목차 9 기술 데이터 . . . . . . . . . . . . . . . . . . . . . . . . . . . . . . . . . . . . . . . . . . . . . . . . . . . . . . . . . 217 치수...
- Seite 198 설명서 소개 설명서 소개 유효성 이 지침은 제품의 일부이며, 전체 내용을 읽고 보관해야 합니다. 이 지침은 다음 버 전의 제품에 적용됩니다. Sartobind® Rapid A Lab. 관련 문서 본 사용 설명서 외에도 다음과 같은 문서에 유의하십시오. — 물질 안전 보건 자료 —...
- Seite 199 설명서 소개 사용된 약어 약어 의미 EtOH 에탄올 결정화 가능한 단편 이온 교환 크로마토그래피 면역글로불린 G 액체 크로마토그래피 단클론 항체 멤브레인 용적 NaOH 수산화나트륨 폴리아미드 인산염 완충 식염수 폴리카보네이트 PEEK 폴리에테르에테르케톤 폴리프로필렌 폴리염화비닐 Unified fine trhead(유니파이드 미세 나사산) 자외선 Sartobind® Rapid A Lab 사용 지침...
- Seite 200 이 제품을 개조하면 사람이 위험에 처할 수 있습니다. 제품 관련 문서 및 제품 승인의 효력이 상실될 수 있습니다. 개조에 관해 궁금한 점이 있으면 Sartorius로 문의하십시오. 직원 자격 제품 사용 방법에 대한 적절한 지식을 갖고 있지 않은 사람은 자신은 물론 다른 사람...
- Seite 201 안전 지침 개인 보호 장구 개인 보호 장구는 제품으로 인한 위험으로부터 보호합니다. 개인 보호 장구가 없거나 제품 작업 프로세스에 적합하지 않으면 사람이 부상을 입을 수 있습니다. 다음과 같은 개인 보호 장구를 착용해야 합니다. — 안전 장갑 — 보안경 — 실험복 제품에서...
- Seite 202 제품 설명 제품 설명 제품 개요 그림 1: UNF 10|32 어댑터가 있는 Sartobind® Rapid A Lab 위치 이름 설명 유입구 보호캡이 있는 암 루어록 커넥터 화살표 흐름 방향을 표시합니다. 이 그림에는 화살표가 보이지 않습니다. 배출구 보호캡이 있는 수 루어록 커넥터 다운스트림...
- Seite 203 이 제품에는 보관용 완충액이 채워져 있습니다. 작동 중에는 제품 내부에 공기가 유 입되지 않도록 하십시오. 샘플 준비 Sartorius는 멤브레인이 오염되거나 막히는 것을 방지하기 위해 샘플을 사전 여과 할 것을 권장합니다. 여과되지 않은 샘플은 제품을 막아서 역압이 증가하고 결합 용 량이 손실될 수 있습니다.
- Seite 204 작동 절차 인라인 사전 여과 없이 작동하는 경우, 샘플을 사전 여과합니다. 사전 여과 후 즉시 샘플 정제를 진행합니다. 인라인 사전 여과 후 작동하는 경우: 주사기를 사용할 때는 205페이지의 '5.2.2 샘플 로드'장에 설명된 단계를 따르십시오. 연동 펌프를 사용할 때는 208페이지의 '5.3.2 제품 설치 및 평형화'장에 설 명된...
- Seite 205 작동 제품에 공기가 유입된 경우: 흐름 방향(4)을 나타내는 화살표가 위쪽을 가리키도록 제품을 뒤집습니다. 공기가 제거될 때까지 주사기 플런저를 천천히 누릅니다. 흐름 방향(5)을 나타내는 화살표가 아래쪽을 가리키도록 제품을 수직으로 되돌 립니다. 제품을 통해 10mL의 평형 완충액을 주입합니다. 흐름이 지속적인 것이 아니라 배출구에서...
- Seite 206 작동 절차 주사기에 샘플을 채웁니다. 흐름 방향(2)을 나타내는 화살표가 아래쪽을 가리키도록 제품을 수직으로 세워 잡습니다. 제품 유입구에서 보호캡(1)을 제거합니다. 인라인 사전 여과 없이 작동하는 경우, 주사기를 제품 유입구(3)에 연결합니다. 인라인 사전 여과 후 작동하는 경우: 주사기를 마이크로필터 유입구(4)에 연결합니다. 마이크로필터를 샘플로 채웁니다. 마이크로필터...
- Seite 207 작동 5.2.3 정제 주기 수행 필요한 재료: — 주사기 ≥10mL — 완충액 — 비커 | 통과액 수집용 튜브 — 용출액 분획 수집용 튜브 크로마토그래피 권장 용량 단계 완충액 용량 세척 평형화에 일반적으로 사용되는 완충액 | 세척( 10mL 예: 1 x PBS pH 7.4) 용출...
- Seite 208 작동 연동 펌프 사용 5.3.1 연동 펌프 준비 필요한 재료: — Sartobind Lab 펌프 튜브(219페이지의 ‘10.2 부속 ® 품’장 참고) — ≥10mL 평형 완충액, 예: 1 x PBS pH 7.4 — 비커 | 통과액 수집용 튜브 그림 2: Sartobind® Lab 펌프 튜브 위치...
- Seite 209 작동 요건 펌프 튜브가 연동 펌프에 로드되고 평형 완충액으로 채워집니다. 절차 적은 유량으로 연동 펌프를 실행합니다. 흐름 방향(2)을 나타내는 화살표가 아래쪽을 가리키도록 제품을 수직으로 세워 잡습니다. 제품 유입구에서 보호캡(1)을 제거합니다. 인라인 사전 여과 없이 작동하는 경우: 펌프 튜브의 루어록 커넥터(3)를 제품 유입구(4)에 드롭투드롭으로 연결합니 다.
- Seite 210 작동 5.3.3 정제 주기 수행 Sartorius는 평형화, 대용량 샘플 로드 및 세척에만 연동 펌프를 사용하는 것을 권 장합니다. 추가 정제 단계는 다음을 참고하십시오. — 주사기로 정제하는 경우: 207페이지의 5.2.3장chapter 5.2.3, page 210 또 는 — LC 시스템으로 정제하는 경우: 213페이지의 5.4.3장chapter 5.4.3, page 210 필요한 재료:...
- Seite 211 작동 LC 시스템 사용 5.4.1 LC 시스템 준비 필요한 재료: 완충액, 213페이지의 ‘5.4.3 정제 주기 수행’장 참고 절차 LC 시스템의 정제를 준비합니다(LC 시스템 지침 참고). UNF 10|32 어댑터를 LC 시스템에 연결합니다. 유체가 새지 않도록 연결되었는 지 확인합니다. 5.4.2 제품 설치 및 평형화 필요한 재료: —...
- Seite 212 작동 인라인 사전 여과 후 작동하는 경우: 낮은 유량(~1mL/min)으로 LC 시스템을 실행합니다. 연결된 UNF 10|32 어댑터를 분리합니다. 업스트림 UNF 10|32 어댑터(4)를 마이크로필터 유입구에 연결합니다. LC 시스템을 통해 평형 완충액으로 마이크로필터(5)를 채웁니다. 마이크로필터 배출구를 제품 유입구(6)에 드롭투드롭으로 연결합니다. 제품 배출구에서 보호캡을 제거합니다. 제품에...
- Seite 213 보관 5.4.3 정제 주기 수행 필요한 재료: — 완충액 — 용출액 분획 수집용 플레이트 또는 튜브 크로마토그래피 단계 권장 용량 완충액 용량 유량 로드 해당 없음 해당 없음 2.5 ~ 15mL/min | 5 ~ 30MV/min 세척 평형화에 일반적으로 사용되는 완충 10mL | 20MV ≤25mL/min | 액...
- Seite 214 문제 해결 문제 해결 결함 원인 해결 방법 장, 페이지 제품 내 기포 제품에 공기가 유입되었습 평형 완충액이 포함된 ≥10mL 주사기를 제 5.2.1, 204, 니다. 이 지침에 설명된 배 품 유입구에 연결합니다. 보호캡으로 제품 배 5.3.2, 208 기 절차를 사용해도 공기가 출구를 닫습니다. 화살표가 아래쪽을 가리키 완전히...
- Seite 215 문제 해결 결함 원인 해결 방법 장, 페이지 표적 항체가 포획되지 않 바인딩 조건이 적합하지 않 적합한 울트라필터(예: Vivaflow 또는 Vi- ® 습니다. 습니다. vaspin )를 사용하여 샘플을 제품을 평형화 ® 하는 데 사용된 것과 동일한 완충액(평형 완충 액)으로 교환합니다. 샘플을 다시 로드합니 다.
- Seite 216 폐기 폐기 제품 오염 제거 절차 제품이 위험 물질과 접촉했다면 오염을 제거하십시오. 제품 폐기 제품은 폐기 시설을 통해 적절하게 폐기해야 합니다. 요건 해당되는 경우: 제품의 오염을 제거해야 합니다. 절차 현지 정부 규정에 따라 제품과 포장재를 폐기하십시오. Sartobind® Rapid A Lab 사용 지침...
- Seite 217 기술 데이터 기술 데이터 치수 및 무게 단위 값 높이 직경(하우징) 무게 작동 조건 단위 값 작동 압력 20°C에서 최대 작동 압력 인라인 사전 여과를 사용할 경우, 작동 압력을 사용되는 마이크로필터의 최대 작 동 압력까지 낮추어야 합니다. 작동 온도 ℃ 4 ~ 25 로드...
- Seite 218 Sartolab® RF | BT 인라인 사전 여과를 통한 샘플 로드 중 사전 여과: Minisart® NML 완충액 요건 완충액의 선택은 표적 항체의 안정성에 따라 달라지며, 사전에 검증해야 합니다. Sartorius는 사용하기 전에 모든 완충액을 여과 할 것을 권장합니다(0.2μm). Sartobind® Rapid A Lab 사용 지침...
- Seite 219 주문 번호 Sartobind® Rapid A Lab SBLRA025EL-1 Sartobind® Rapid A Lab SBLRA025EL-A 10.2 부속품 이 표에는 주문 가능한 부속품의 일부만 포함되어 있습니다. 기타 제품에 관한 정보는 Sartorius에 문의하십시오. 품목 수량 주문 번호 Sartobind® Lab LC 시스템 어댑터 키트 SBLAAU01-1 연동 펌프 VF-APD0001-1 1.6mm 튜브용...
- Seite 220 Содержание Содержание 1 Сведения о данных инструкциях . . . . . . . . . . . . . . . . . . . . . . . . . . . . . . . . . . . . . . . . . . . . . . . . . 222 Область...
- Seite 221 Содержание 9 Технические характеристики . . . . . . . . . . . . . . . . . . . . . . . . . . . . . . . . . . . . . . . . . . . . . . . . . . . . . 244 Размеры...
- Seite 222 Сведения о данных инструкциях Сведения о данных инструкциях 1 . 1 Область действия Настоящие инструкции являются частью продукта. Их необходимо про- читать полностью и сохранить. Данная инструкция относится к следую- щим версиям продукта: Sartobind Rapid A Lab. ® 1 .2 Связанные документы В...
- Seite 223 Сведения о данных инструкциях 1 .5 Используемые аббревиатуры Сокращение Значение EtOH Этиловый спирт Кристаллизующийся фрагмент Ионообменная хроматография Иммуноглобулин G ЖХ Жидкостная хроматография Моноклональное антитело Объем мембраны NaOH Гидроксид натрия Полиамид Физиологический раствор, забуференный фосфа- том Поликарбонат PEEK Полиэфирный ефиркетон Полипропилен Поливинилхлорид Унифицированная...
- Seite 224 При модификации продукта люди могут подвергнуться опасности. До- кументы, относящиеся к продукту, и сертификаты на продукцию могут утратить свою силу. В случае возникновения каких-либо вопросов, касающихся модифика- ций, свяжитесь с компанией Sartorius. 2 .2 Квалификация персонала Лица, не обладающие достаточными знаниями о том, как использовать...
- Seite 225 последствиям: — риск травмирования людей; — повреждения, неисправности или выход из строя продукта. Используйте с этим продуктом только принадлежности, одобренные компанией Sartorius. 2 .4 Средства индивидуальной защиты Средства индивидуальной защиты обеспечивают защиту от рисков, связанных с продуктом. Если средства индивидуальной защиты...
- Seite 226 Правила техники безопасности 2 .7 Воспламеняемые жидкости Продукт содержит небольшое количество 20–24 % EtOH. Существует риск возгорания. При распаковке и эксплуатации продукта не стойте возле источника тепла, открытого пламени и горячих поверхностей. Соблюдайте инструкции на упаковке. Инструкция по применению Sartobind Rapid A Lab ®...
- Seite 227 Описание продукта Описание продукта 3 . 1 Обзор продукта Рис. 1: Sartobind Rapid A Lab с переходниками UNF 10|32 ® Поз. Название Описание Впуск Гнездовой разъем с фиксатором Люэра с защитным колпачком Стрелка Указывает направление потока. На этом изображении стрелку не видно. Выпуск...
- Seite 228 ния. Следите за тем, чтобы во время эксплуатации в продукт не попал воздух. 5 . 1 Подготовка образца Компания Sartorius рекомендует предварительно фильтровать образцы, чтобы предотвратить загрязнение и засорение мембраны. Неотфиль- трованные образцы могут закупорить продукт, что приведет к избытку обратного давления и утрате связывающей способности.
- Seite 229 Эксплуатация Процедура При эксплуатации продукта без линейной предварительной филь- трации необходимо предварительно отфильтровать образец. После предварительной фильтрации можно сразу же приступать к очистке образца. При работе с линейной предварительной фильтрацией выполните указанное далее. При использовании шприца соблюдайте инструкции, описанные в глава «5.2.2 Загрузка образца», стр. 231. При...
- Seite 230 Эксплуатация Подсоедините шприц ко впускному отверстию продукта. Снимите защитный колпачок с выпускного отверстия продукта (3). Если в продукт попал воздух, выполните указанное далее. Переверните продукт, чтобы стрелка, указывающая направление потока (4), была направлена вверх. Медленно нажимайте на поршень шприца, пока не выйдет весь воздух.
- Seite 231 Эксплуатация 5 .2 .2 Загрузка образца Необходимые — шприц ≥ 10 мл; материалы: — опционально: микрофильтр 0,2 мкм для линей- ной предварительной фильтрации, см. гла- ва «9.7 Одобренные микрофильтры», стр. 245; — резервуар | шланг для сбора протекающей жид- кости. Требования Продукт сбалансирован. Процедура Наполните...
- Seite 232 Эксплуатация Снимите защитный колпачок с выпускного отверстия продукта. Загрузите образец. Убедитесь, что поток выходит из выпускного от- верстия по капле, а не струей. При использовании линейной предварительной фильтрации: если при загрузке образца давление увеличилось, замените предвари- тельный фильтр. Закройте выпускное отверстие продукта защитным колпачком. Снимите...
- Seite 233 Эксплуатация Процедура Наполните шприц буферным раствором, необходимым для проведе- ния хроматографии. Убедитесь, что в буферном растворе в шприце нет воздуха. Держите продукт вертикально. Стрелка, указывающая направление потока (2), должна быть направлена вниз. Снимите защитный колпачок (1) со впускного отверстия продукта и подсоедините шприц. Снимите...
- Seite 234 Эксплуатация 5 .3 Использование перистальтического насоса 5 .3 . 1 Подготовка перистальтического насоса Необходимые — шланг насоса Sartobind Lab (см. глава «10.2 ® материалы: Принадлежности», стр. 246chapter “10.2 Accessories“, page 234); — ≥ 10 мл балансирующего буферного раствора, например 1 × PBS pH 7,4; — резервуар | шланг для сбора протекающей жид- кости.
- Seite 235 Эксплуатация 5 .3 .2 Установка и балансировка продукта Необходимые — опционально: микрофильтр 0,2 мкм для линей- материалы: ной предварительной фильтрации (см. гла- ва «9.7 Одобренные микрофильтры», стр. 245); — > 10 мл балансирующего буферного раствора, например 1 × PBS pH 7,4; — резервуар | шланг для сбора протекающей жид- кости.
- Seite 236 расходе до 25 мл/мин. Продукт сбалансирован и готов к загрузке образца. 5 .3 .3 Запуск цикла очистки Компания Sartorius рекомендует для балансировки, загрузки образца в больших объемах и промывки использовать только перистальтический насос. Последующие этапы очистки см. тут: — глава 5.2.3, стр. 232 — очистка с помощью шприца;...
- Seite 237 Эксплуатация Процедура Нанесите образец и буферный раствор на всю поверхность продук- та, соблюдая рекомендации в отношении объема и расхода (см. та- блицу выше и инструкции к перистальтическому насосу). Учитывайте мертвую зону шланга насоса. В большинстве случаев буферный раствор с предыдущего этапа можно...
- Seite 238 Эксплуатация Процедура Промойте систему ЖХ балансирующим буферным раствором. Убедитесь, что в проточном канале нет воздуха. Держите продукт вертикально. Стрелка, указывающая направление потока (2), должна быть направлена вниз. Снимите защитный колпачок (1) со впускного отверстия продукта. При работе без линейной предварительной фильтрации выполните указанное...
- Seite 239 Эксплуатация Подсоедините нижний переходник UNF 10|32 (8) к выпускному от- верстию продукта. Продукт установлен вертикально соответственно технологическому потоку. Промойте продукт 10 мл балансирующего буферного раствора при расходе до 25 мл/мин. Продукт сбалансирован и готов к загрузке образца. 5 .4 .3 Запуск цикла очистки Необходимые —...
- Seite 240 Хранение Требования — При работе с линейной предварительной фильтрацией выполните указанное далее. микрофильтр установлен на систему ЖХ и подсое- динен ко впускному отверстию продукта. — Продукт сбалансирован. Процедура Запустите очистку вручную или с помощью автоматизированной программы, соблюдая рекомендации в отношении объема и расхода (см.
- Seite 241 Поиск и устранение неисправностей Поиск и устранение неисправностей Неисправность Причина Решение Глава, стр. Пузырьки воздуха в В продукт попал воздух. Подсоедините ко впускному отвер- 5 .2 . 1 , 229, продукте Воздух не был полно- стию продукта шприц ≥ 10 мл с балан- 5 .3 .2, 235 стью...
- Seite 242 Поиск и устранение неисправностей Неисправность Причина Решение Глава, стр. Целевое антитело не Неподходящие условия Используйте надлежащий ультра- фиксируется. связывания. фильтр, например Vivaflow или ® Vivaspin , чтобы заменить образец на ® такой же буферный раствор, который используется для балансировки про- дукта...
- Seite 243 Утилизация Неисправность Причина Решение Глава, стр. У элюированного ан- Перекрестное загряз- Запускайте этап регенерации после 5 .2 .3, 232, титела низкая чистота. нение после предыду- каждого цикла очистки. 5 .3 .3, 236, щей очистки 5 .4 .3, 239 При очистке антител из различных источников...
- Seite 244 Технические характеристики Технические характеристики 9 . 1 Размеры и вес Ед. изм. Значение Высота мм Диаметр (корпус) мм Масса г ~ 9 9 .2 Условия эксплуатации Ед. изм.: Значение Рабочее давление Максимальное рабочее давление при 20 °C МПа При использовании линейной предварительной фильтрации рабо- чее...
- Seite 245 Предварительная фильтрация при загрузке образца через линейную предварительную фильтрацию. Minisart ® 9 .8 Требования к буферному раствору Выбор буферного раствора зависит от стабильности целевого антитела и требует предварительной проверки. Компания Sartorius рекомендует предварительно фильтровать все буферные растворы перед использованием (0,2 мкм). Инструкция по применению Sartobind Rapid A Lab ®...
- Seite 246 Rapid A Lab SBLRA025EL-A ® 10 .2 Принадлежности В данной таблице приведены некоторые принадлежности, которые можно заказать. Для получения информации о других продуктах обращайтесь в компанию Sartorius. Поз. Количество Номер для заказа Набор переходников для систе- SBLAAU01-1 мы ЖХ Sartobind ®...
- Seite 247 The information and figures contained in these instructions correspond to the version date specified below. Sartorius reserves the right to make changes to the technology, features, specifications and design of the equipment without notice. Masculine or feminine forms are used to facilitate legibility in these instructions and always simultaneously denote all genders.