Medion MD 81664 Bedienungsanleitung
Vorschau ausblenden
Andere Handbücher für MD 81664:
- Bedienungsanleitung (44 Seiten) ,
- Bedienungsanleitung (140 Seiten)
Inhaltsverzeichnis
Verfügbare Sprachen
Verfügbare Sprachen
Visión general
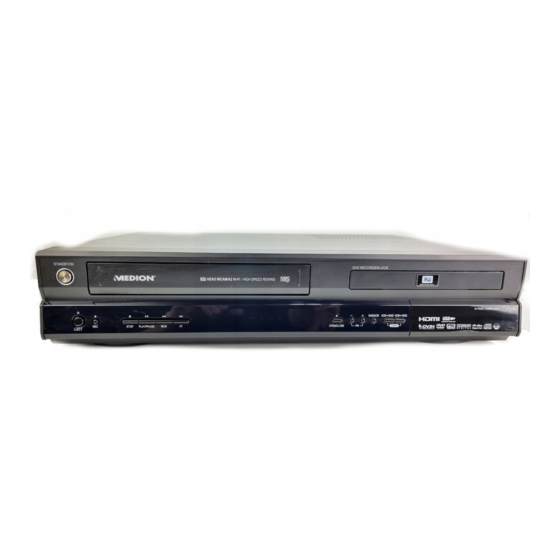
Parte delantera
STANDBY/ON: Enciende y apaga el aparato
1.
Compartimento de cintas (vídeo)
2.
Compartimento de CD/ DVD (DVD)
3.
EJECT: Expulsa la cinta
4.
RECORD: Comenzar la grabación;
5.
pulse esta tecla varias veces para establecer el
tiempo de grabación
STOP: Detener la reproducción o la grabación
6.
PLAY/PAUSE: Iniciar la reproducción de una
7.
cinta o DVD; establecer una pausa en la
reproducción o grabación
REW:
8.
DVD: Para saltar al capítulo anterior
VCR: Para rebobinar la cinta; rebobina
rápidamente en la búsqueda de imágenes
durante la reproducción
FF:
9.
DVD: Para saltar al capítulo siguiente
VCR: Para avanzar la cinta; mueve la cinta hacia
delante rápidamente en la búsqueda de
imágenes durante la reproducción
Indicativo frontal: Muestra el estado
10.
momentáneo del DVD/reproductor de vídeo
OPEN/CLOSE (DVD): Abre y cierra el
11.
compartimento del disco
PR +/-: Selecciona los canales de televisión
12.
guardados; navegación en el menú DVD
SELECT DVD/VCR: Seleccionar los modos DVD
13.
y vídeo
COPY: Comienza la función de copia del DVD a
14.
vídeo o vídeo a DVD
Conexiones tras la solapa:
VIDEO: Entrada de imágenes para aparatos
15.
externos como una cámara de vídeo
L-AUDIO-R: Entrada de sonido para aparatos
16.
externos como una cámara de vídeo
DV IN: Entrada digital para cable Firewire
17.
Entrada USB
18.
ES
EN
DE
3
Kapitel
Inhaltsverzeichnis
Fehlerbehebung

Verwandte Anleitungen für Medion MD 81664


Inhaltszusammenfassung für Medion MD 81664
-
Seite 97: Geräteübersicht
Geräteübersicht Vorderseite... -
Seite 98: Rückseite
Rückseite... - Seite 99 Fernbedienung...
- Seite 100 Inhaltsverzeichnis Geräteübersicht ......................... i Vorderseite ..............................i Rückseite ..............................ii Fernbedienung ............................iii Inhaltsverzeichnis ........................iv Sicherheitshinweise ........................1 Zu dieser Anleitung ..........................1 Gefahr für Kinder und Schwache ......................1 Das Gerät sicher aufstellen ........................
- Seite 101 Der DVD-PLayer ........................14 Disk einlegen ............................14 Wiedergabefunktionen (DVD, VCD, CD, DivX) ..................14 Wiedergabemenü einblenden - DISPLAY ....................15 Suchfunktionen ............................15 Wiederholungsfunktionen ........................16 Audio- und Untertitelmenü ........................16 Bildfunktionen ............................
-
Seite 103: Sicherheitshinweise
Sicherheitshinweise Zu dieser Anleitung Lesen Sie vor Inbetriebnahme die Sicherheitsvorschriften aufmerksam durch. Beachten Sie die Warnungen in der Bedienungsanleitung. Bewahren Sie die Bedienungsanleitung immer in Reichweite auf. Wenn Sie das Gerät verkaufen oder weggeben, händigen Sie unbedingt auch diese Anleitung und den Garantieschein aus. Gefahr für Kinder und Schwache Dieses Gerät ist nicht dafür bestimmt, durch Personen (einschließlich Kinder) mit eingeschränkten physischen, sensorischen, oder geistigen Fähigkeiten oder mangels Erfahrung und/oder mangels Wissen... -
Seite 104: Niemals Selbst Reparieren
Niemals selbst reparieren Ziehen Sie bei Beschädigung des Steckers, der Anschlussleitung oder des Gerätes oder, wenn Flüssigkeiten oder Fremdkörper ins Innere des Gerätes gelangt sind, sofort den Stecker aus der Steckdose. Wenn die Anschlussleitung dieses Gerätes beschädigt wird, muss sie durch den Hersteller oder seinen Kundendienst oder eine ähnlich qualifizierte Person ersetzt werden, um Gefährdungen zu vermeiden. -
Seite 105: Allgemeines
Allgemeines Über DVD Die DVD - Digital Versatile Disc (englisch für „vielseitige digitale Scheibe“) ist ein digitales Speichermedium für Informationen. DVDs sind durch eins der nebenstehenden Symbole gekennzeichnet. Abhängig davon, wie die Informationen aufgebracht sind, ergeben sich verschiedene DVD-Typen mit unterschiedlichen Speicherkapazitäten. -
Seite 106: Das Mp3-Format
DVD-Rohlinge Ihr Recorder kann zwei Arten von DVD-Rohlingen beschreiben: DVD-RW, DVD+RW: ReWritable-Rohlinge (RW) können mehrmals beschrieben werden. Sie sind auch ohne vorherige Finalisierung (Abschließen) in anderen DVD-Geräten abspielbar. DVD-R, DVD+R: Recordable-Rohlinge (R) sind einmal beschreibbare DVDs und können ohne vorheriges Abschließen nicht auf anderen DVD-Geräten abgespielt werden. -
Seite 107: Verfügbare Surround-Tonformate
Verfügbare Surround-Tonformate Dolby Digital 5.1 Beim Dolby-Digital-Tonformat wird das Audiomaterial digital gespeichert. Dabei werden bis zu fünf separate Vollfrequenz-Audiokanäle (vorne links und rechts, Mitte, hinten links und rechts) sowie ein Effekt- bzw. Tiefenkanal (5.1) angesteuert. Tonträger im Dolby-Digital-Format sind mit nebenstehendem Warenzeichen gekennzeichnet. -
Seite 108: Vorbereitung
Vorbereitung Gerät auspacken Entfernen Sie sämtliches Verpackungsmaterial, auch die Folien an der Gerätefront. ACHTUNG! Lassen Sie kleine Kinder nicht mit Folie spielen. Es besteht Erstickungsgefahr! Lieferumfang prüfen Vergewissern Sie sich beim Auspacken, dass folgende Teile mitgeliefert wurden: DVD-/Videorecorder SCART-Kabel ... -
Seite 109: Anschlüsse Und Anschlussmöglichkeiten
Anschlüsse und Anschlussmöglichkeiten Der DVD-/Videorecorder kann auf vielseitige Weise mit anderen Eingangs- und Ausgangsgeräten verbunden werden: mit einem Fernsehgerät mit einem Verstärker/Receiver mit einem Videorecorder mit weiteren Audio-/ Videogeräten Achten Sie darauf, dass alle Geräte ausgeschaltet sind, bevor Sie sie anschließen. Nehmen Sie die Geräte erst ans Netz, wenn die Anschlüsse vorgenommen wurden. -
Seite 110: Verbindung Mit Dem Fernseher Über Ein Scart- Oder Hdmi-Kabel
Verbindung mit dem Fernseher über ein SCART- oder HDMI-Kabel Sie können den DVD-/Videorecorder entweder mit einem SCART-Kabel oder einem HDMI-Kabel (nicht im Lieferumfang) mit Ihrem Fernsehgerät verbinden. Die Zeichnung zeigt zwei Anschlussvarianten: 1. Variante: Schließen Sie das SCART-Kabel an die SCART-Buchse des DVD-/Videorecorders und die SCART-Eingangsbuchse Ihres Fernsehers an. -
Seite 111: Verbindung Mit Dem Fernseher Über Ein S-Video-Kabel
Verbindung mit dem Fernseher über ein S-Video-Kabel Den DVD-/Videorecorder können Sie auch über ein S-Video-Kabel (nicht im Lieferumfang) anschließen. Bei dieser Anschlussvariante muss für das Tonsignal ein zusätzliches Kabel verwendet werden. Für das Tonsignal verwenden Sie bitte ein Audio-Cinch-Kabel (rot/weiß; nicht im Lieferumfang). ... -
Seite 112: Verbindung Mit Einem Surround-Verstärker/Receiver
Verbindung mit einem Surround-Verstärker/Receiver Optional haben Sie die Möglichkeit, den DVD-/Videorecorder an einem Audio- oder digitalen Surround- Verstärker anzuschließen. Die Zeichnung zeigt zwei Varianten: Variante 1: Schließen Sie das Audio-Cinch-Kabel (rot/weiß; nicht im Lieferumfang) an den Anschlüssen AUDIO OUT L/R an Ihrem DVD-/Videorecorder an. Verbinden Sie das andere Ende mit den entsprechenden Buchsen am AV-Receiver. -
Seite 113: Videokamera Anschließen
Videokamera anschließen Verbinden Sie die AV-Ausgangsbuchsen Ihrer Kamera über das AV-Kabel mit den Eingangsbuchsen Ihres DVD-Recorders wie unten links abgebildet. Wenn Sie Ihre Kamera über ein Firewire-Kabel (nicht im Lieferumfang) anschließen wollen, so verbinden Sie den Firewire-Stecker mit dem DV-Eingang hinter der Frontblende des Recorders. -
Seite 114: Allgemeines Zur Bedienung
Allgemeines zur Bedienung Tasten am Gerät und an der Fernbedienung Mit den Tasten am Gerät können Sie die wesentlichen Wiedergabe- und Aufnahmefunktionen des Geräts aktivieren. Über die Grundbedienung hinaus bietet die Fernbedienung zahlreiche weitere Funktionen. Insbesondere können Sie nur mit der Fernbedienung in den Setup-Menüs navigieren. Die Bezeichnungen und Funktionen der Tasten am Gerät und der Fernbedienung finden Sie zu Beginn dieser Anleitung in der Ausklappseite. -
Seite 115: Erstinbetriebnahme
Erstinbetriebnahme Wenn Sie Ihren DVD-/Videorecorder richtig angeschlossen haben, schalten Sie zunächst Ihr Fernsehgerät ein. Stellen Sie, je nach Anschlussart, den Videokanal (AV) oder einen anderen Empfangskanal ein. Schalten Sie nun den DVD-/Videorecorder ein. Im ersten Schritt erscheint ein Begrüßungsfenster des Installationsassistenten, mit dem die wichtigsten Einstellungen für das Gerät durchgeführt werden. -
Seite 116: Zeit Und Datum Einstellen
Zeit und Datum einstellen Im sechsten Schritt stellen Sie Datum und Uhrzeit ein. Dies ist notwendig, wenn Sie Aufnahmen programmieren möchten. Das Gerät stellt anhand des Sendersignals automatisch die richtige Uhrzeit ein. Prüfen Sie, ob das angezeigte Datum und die Uhrzeit korrekt sind. ... -
Seite 117: Wiedergabemenü Einblenden - Display
Wiedergabemenü einblenden - DISPLAY Drücken Sie die Taste DISPLAY im DVD/VCD Betrieb, um die Wiedergabeleiste einzublenden. Es erscheint ein Menü mit folgenden Einträgen. Die Anzeige kann je nach Art der DVD/CD variieren. Ggf. sind nicht alle Funktionen verfügbar. Titel: aktueller Titel / Anzahl der Titel auf der Disk Kapitel: aktuelles Kapitel / Anzahl der Kapitel im gewählten Titel Abgelaufene Zeit in Stunden, Minuten, Sekunden Audio: gesprochene Sprache / Audioformat... -
Seite 118: Wiederholungsfunktionen
Wiederholungsfunktionen Wiederholung REPEAT Drücken Sie während der Wiedergabe die Taste REPEAT. Auf dem Bildschirm erscheint das Wiederholungssymbol. Drücken Sie REPEAT wiederholt, um folgende Funktionen durchzuschalten: DVD-Betrieb: A u s : Normale Wiedergabe T i t e l : Wiederholt den aktuellen Titel K a p i t e l : Wiederholt das aktuelle Kapitel A l l e :... -
Seite 119: Bildfunktionen
Bildfunktionen Bild vergrößern – ZOOM Drücken Sie die Taste ZOOM. Auf dem Bildschirm erscheint das Symbol des verkleinerten Gesamtbildes mit dem Vergrößerungsfaktor. Das Bild wird mittig vergrößert. ZOOM einmal drücken: Vergrößerungsfaktor 2 x ZOOM zweimal drücken: Vergrößerungsfaktor 3x ZOOM dreimal drücken: Vergrößerungsfaktor 4x . Mit dem vierten ZOOM kehren Sie zur normalen Ansicht zurück. -
Seite 120: Audio-Cds Und Mp3-Cds Wiedergeben
Audio-CDs und MP3-CDs wiedergeben Die Wiedergabe von Audio-CDs und MP3-CDs steuern Sie über das Dateimenü, das nach dem Einlegen einer CD oder MP3 erscheint. Legen Sie eine Audio- oder MP3-CD ein. Es erscheint ein Menü. Auf MP3-CDs können die Titel in Ordnern organisiert sein. Falls auf der CD vorhanden, erscheinen auf der linken Seite die obersten Ebenen der Ordner. - Seite 121 Wiedergabefunktionen einer JPEG-CD Wenn Sie alle Bilder nacheinander abspielen möchten, wählen Sie das erste Bild aus und drücken PLAY/PAUSE. Nach dem letzten Bild erscheint wieder das Menü. Wenn Sie während der Wiedergabe die Taste PLAY/PAUSE erneut drücken, wird die Wiedergabe angehalten und es erscheint ein Pause-Symbol ...
-
Seite 122: Auf Dvd Aufnehmen Und Aufnahmen Bearbeiten
Auf DVD aufnehmen und Aufnahmen bearbeiten Manuelle Aufnahme Sie können mit Ihrem DVD-Recorder folgende Diskformate abspielen und beschreiben. Beschreibbare Formate: Das Gerät kann DVD+R, DVD-R und DVD+RW, DVD-RW Rohlinge beschreiben. Lesbare Formate: Das Gerät kann DVD-Video-, SVCD-, DVD+RW-, DVD+R-, CD-R-, DVD-RW-, DVD-R-, CD-RW-, Audio-CD-, MP3- und JPEG-Formate lesen. -
Seite 123: Automatische Aufnahme
Mit der Taste AUDIO können Sie den Tonkanal von Sendungen, die im Zweikanalton gesendet werden, einstellen. Aufnehmen Drücken Sie REC auf Ihrer Fernbedienung oder RECORD an der Gerätefront, um mit der Aufnahme zu beginnen. Sie können die Aufnahme mit der Taste PLAY/PAUSE unterbrechen und wieder starten. ... -
Seite 124: Startzeit Für Die Aufnahme Einstellen
Ziel Wählen Sie mit den Navigationstasten das Ziel D V D oder V C R (Videokassette) für die Aufnahme aus und drücken dann, um in das nächste Feld zu gelangen. Datum für die Aufnahme einstellen Geben Sie mit den Zifferntasten das gewünschte Datum Ihrer Aufnahme ein oder verändern Sie den Eintrag mit den Navigationstasten . -
Seite 125: Dvd-Aufnahme Bearbeiten
Programmierung abschließen Wenn Sie alle Einstellungen vorgenommen haben, drücken Sie ENTER zur Bestätigung. Die Einstellungen werden gespeichert. Schalten Sie das Gerät in den Standby-Modus. Erst bei ausgeschaltetem Gerät ist der Timer aktiviert. Befindet sich das Gerät kurz vor Erreichen der Aufnahmezeit nicht im Standby-Modus, erscheint auf dem Bildschirm eine Meldung. - Seite 126 Bearbeiten Hier haben Sie die Möglichkeit, dem gewählten Titel einen anderen Namen zu geben, den Titel in zwei Titel zu unterteilen, einen bestimmten Teil herauszuschneiden oder ein Indexbild zu setzen. Die Funktionen „Aufnahme teilen“ und „Abschnitt löschen“ lassen sich nicht bei den Datenträgern DVD±R durchführen.
-
Seite 127: Der Videorecorder
Indexbild setzen Sie können ein Indexbild für jede Aufnahme setzen. Dieses wird als Vorschaubild in der Aufnahmeübersicht angezeigt, um leichter zu erkennen, um welche Aufnahme es sich handelt. Wählen Sie I n d e x b i l d s e t z e n aus und bestätigen mit ENTER. ... -
Seite 128: Wiedergabemenü Einblenden - Display
Wiedergabemenü einblenden - DISPLAY Drücken Sie die Taste DISPLAY im Videorecorder-Betrieb, um die Wiedergabeleiste einzublenden. Es erscheint ein Menü mit folgenden Einträgen. Die Anzeige kann je nach Art der Videokassette variieren. Wiedergabefunktionen Suchen Sie können das Band in zwei Geschwindigkeitsstufen vor- und zurückspulen. ... -
Seite 129: Tracking
Tracking Mit Tracking wird die optimale Ausrichtung des Videobandes bezeichnet, das z. B. Schnee oder Streifen im Bild verhindert. Automatisches Tracking Nach dem Einlegen einer Videokassette wird das Band automatisch ausgerichtet. So wird gewährleistet, dass das Bild fehlerfrei und klar dargestellt wird. Außerdem wird das Band nachjustiert, wenn Sie die Bandgeschwindigkeiten (SP, LP) wechseln oder wenn Störungen im Bild auftreten. -
Seite 130: Auf Videokassette Aufnehmen
Auf Videokassette aufnehmen Manuelle Aufnahme So nehmen Sie eine manuelle Aufzeichnung vor: Legen Sie eine Videokassette in den Recorder ein. Vergewissern Sie sich, dass das Band zurück gespult ist bzw. ausreichend freies Band für die Aufnahme zur Verfügung steht. ... - Seite 131 Drücken Sie TIMER an Ihrer Fernbedienung, um das Timer-Menü aufzurufen. Sie sehen eine Liste mit den vorprogrammierten Aufnahmen, sofern bereits Aufnahmen eingegeben wurden. Wählen Sie mit den Navigationstasten einen leeren Speicherplatz aus. Dieser ist mit - - - gekennzeichnet.
-
Seite 132: Divx-/Usb-Wiedergabe
eingeschaltet ist. Bitte ziehen Sie dazu die Bedienungsanleitung des Receivers zu Rate, da viele Receiver ebenfalls eine Aufnahmeprogrammierung besitzen. Programmierung abschließen Wenn Sie alle Einstellungen vorgenommen haben, drücken Sie ENTER zur Bestätigung. Die Einstellungen werden gespeichert. Schalten Sie das Gerät in den Standby-Modus. Erst bei ausgeschaltetem Gerät ist der Timer aktiviert. Ist keine Kassette eingelegt, erscheint eine Meldung auf dem Bildschirm. -
Seite 133: Kopierfunktionen
Kopierfunktionen Sie können den Inhalt einer DVD auf eine VHS-Kassette oder umgekehrt kopieren. So können Sie Videoaufnahmen für jemanden anfertigen, der keinen DVD-Player besitzt oder um den Inhalt von VHS- Kassetten auf eine DVD archivieren. Datenträger, die kopiergeschützt sind, können nicht kopiert werden. Es verboten, kopiergeschützte Inhalte zu vervielfältigen. -
Seite 134: Einstellungen Im Setup-Menü
Einstellungen im SETUP-Menü Im SETUP-Menü, das Sie über die Taste SETUP aufrufen, nehmen Sie alle Einstellungen vor. Das SETUP- Menü umfasst die Menüs I n s t a l l a t i o n , A u f z e i c h n u n g , S p r a c h e , V o r e i n s t e l l u n g e n , S y s t e m , D i s k . -
Seite 135: Setup „Aufzeichnung
Automatischer Suchlauf Wählen Sie diese Funktion, um einen automatischen Suchlauf durchzuführen. Dabei werden alle verfügbaren Frequenzen durchsucht. Die gefundenen Sender werden automatisch in der Senderliste des DVD-/Videorecorders gespeichert. Uhr Einstellung Hier können Sie Zeit und Datum einstellen, wie im Abschnitt Zeit und Datum einstellen, beschrieben. Dies ist notwendig, wenn Sie Aufnahmen programmieren möchten. -
Seite 136: Setup „Sprache
Setup „Sprache“ Wählen Sie in O S D - S p r a c h e die Sprachdarstellung des Bildschirmmenüs und unter M e n ü S p r a c h e die bevorzugte Sprache für DVD-Menüs. Außerdem können Sie die bevorzugten Sprachen für die Tonwiedergabe von DVDs und die Untertitelsprache angeben. - Seite 137 Zu Ihrer Orientierung führen wir hier die Freigabeklassen auf, die die Motion Picture Association etabliert hat: 1 K i n d e r s c h u t z : auch für kleine Kinder geeignet; 2 G : für alle Altersgruppe; 3 P G : elterliche Aufsicht empfohlen;...
-
Seite 138: Setup „System
Setup „System“ System Info Mit System-Info erhalten Sie Informationen über die gespeicherte Software-Version auf dem Gerät. Diese Information ist in der Regel nur für Techniker notwendig. DivX VOD In diesem Menüpunkt ist der DivX-Registrierungscode hinterlegt, den Sie benötigen, um das Video-On- Demand Angebot auf der DivX-Homepage (www.divx.com/vod) und von diversen anderen Anbietern nutzen zu können. - Seite 139 Geschützt Um unbeabsichtigte Aufnahmen auf einer DVD zu vermeiden, können Sie die DVD schützen und so vor weiteren Aufnahmen sichern. Dieser Vorgang lässt sich rückgängig machen, sodass nach dem Entfernen des Schutzes wieder Aufnahmen möglich sind. Etikett Jede DVD kann mit einem Namen benannt werden. Dieser ist frei wählbar. Gehen Sie dazu wie folgt vor: ...
-
Seite 140: Wenn Störungen Auftreten
Wenn Störungen auftreten Sollten Störungen auftreten, prüfen Sie bitte zunächst, ob Sie das Problem selbst beheben können. Die folgende Übersicht kann Ihnen dabei helfen. Versuchen Sie auf keinen Fall, das Gerät selbst zu reparieren. Wenn eine Reparatur notwendig ist, wenden Sie sich bitte an unser Service-Center oder eine andere geeignete Fachwerkstatt. - Seite 141 Sehr verzerrtes Bild Die Norm Ihrer DVD stimmt eventuell nicht mit der Norm Ihres Keine Farbe im Bild Fernsehers überein (NTSC/PAL). Schlechtes Bild Es ist ein Video-Ausgangssignal eingestellt, das der Fernseher nicht unterstützt (NTSC/PAL). Falsches Bildformat (4:3, 16:9) Prüfen Sie im SETUP-Menü...
- Seite 142 Die programmierte Zeit liegt in der Vergangenheit. Alle 16 Speicherplätze für die Aufnahme sind belegt. Die gewählte Quelle gibt kein Signal ab. Die DVD-Timer-Aufnahme hat Das Gerät war eingeschaltet. Zur Timer-Aufnahme muss das Gerät nicht funktioniert im Standby-Modus sein.
-
Seite 143: Technische Daten
Technische Daten Spannungsversorgung AC 230 V ~ 50 Hz Leistungsaufnahme < 26 W Standby-Stromaufnahme < 5 W Batterien für Fernbedienung 2 X 1.5V R03 / LR03 TYPE AAA Farbfernsehsystem Videosystem Eingänge: Antenneneingang 75 , Video In, Audio In, DV In (IEEE Anschlüsse 1394), USB 2.0 In/Out Ausgänge: Video Out (Composite, RGB), Component Video Out... -
Seite 144: Entsorgung
Entsorgung Verpackung Nicht mehr benötigte Verpackungen und Packhilfsmittel sind recyclingfähig und sollten grundsätzlich der Wiederverwertung zugeführt werden. Gerät Werfen Sie das Gerät am Ende seiner Lebenszeit keinesfalls in den normalen Hausmüll! Erkundigen Sie sich bei Ihrer Stadt- oder Gemeindeverwaltung nach Möglichkeiten einer umwelt- und sachgerechten Entsorgung des Gerätes.