Herunterladen Inhalt Inhalt Diese Seite drucken
Inhaltsverzeichnis

Werbung

Verfügbare Sprachen
  • DE

Verfügbare Sprachen

  • DEUTSCH, seite 1
Joghurtmaker
10029903

Werbung

Inhaltsverzeichnis
loading

Inhaltszusammenfassung für oneConcept 10029903

  • Seite 1 Joghurtmaker 10029903...
  • Seite 2: Inhaltsverzeichnis

    Wein-Zubereitung 11 Reinigung und Pflege 12 Fehlersuche und Fehlerbehebung 12 Hinweise zur Entsorgung 14 Konformitätserklärung 14 Technische Daten Artikelnummer 10029903 Stromversorgung 230-240 V ~ 50-60 Hz Leistung 20 W Fassungsvermögen 170 ml x 6 Flaschen = 1020 ml Kontinuierliche Arbeitszeit...
  • Seite 3: Sicherheitshinweise

    Sicherheitshinweise • Lesen Sie sich die Bedienungsanleitung vor der Benutzung sorgfältig durch. • Prüfen Sie vor der Benutzung die Spannung auf der Geräteplakette und schließen Sie das Gerät nur an Steckdosen an, die der Spannung des Geräts entsprechen. • Wenn die Wartung erforderlich ist, wenden Sie sich bitte an den Kunden-Service unseres Unternehmens oder lassen Sie das Gerät von einem Fachbetrieb reparieren und warten.
  • Seite 4: Geräteübersicht

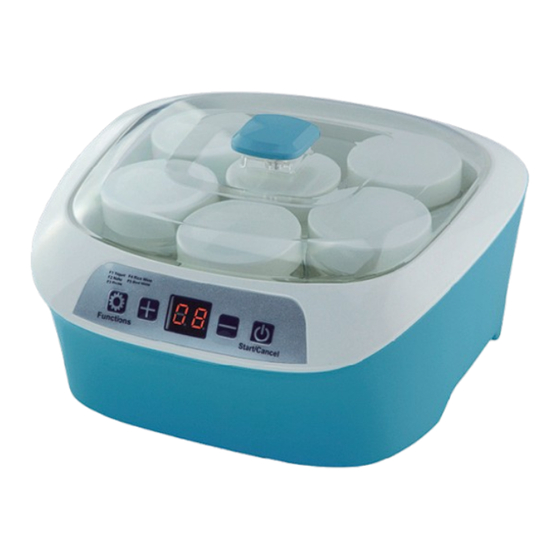
    Geräteübersicht 1 Gerätebasis: Lebensmittel wärmen 2 Bedienfeld: Funktionen einstellen 3 Getrennter Tank: Für 6 Glasbehälter 4 Deckel: Staubdicht, Wärmedämmung Bedienfeld und Funktionstasten Hinweis: Sobald eine Funktion gestartet wurde kann die Zeit nicht mehr eingestellt werden. Funktionen der Funktionstaste (SET) Die Zeit auf dem Bildschirm blinkt. Wenn Sie innerhalb der nächsten 8 Funktion 1x drü- Sekunden keine Einstellung vornehmen, geht das Gerät in den Standby-...
  • Seite 5: Temperatureinstellung Ändern

    Die Zeit auf dem Bildschirm blinkt. Wenn Sie innerhalb der nächsten 8 Funktion Sekunden keine Einstellung vornehmen, geht das Gerät in den Standby- 2x drücken Zustand. Die voreingestellte Zeit beträgt 18 Stunden. Durch jeden (Natto) Tastendruck auf [+] erhöht sich die Zeit um 1 Stunde bis 36 Stunden. Die Zeit auf dem Bildschirm blinkt.
  • Seite 6: Joghurt-Zubereitung

    Joghurt-Zubereitung ACHTUNG: Falls das Netzkabel beschädigt ist, muss es vom Hersteller oder einem autori- sierten Fachbetrieb oder einer ähnlich qualifizierten Person ersetzt werden. Allgemeine Vorgehensweise Stecken Sie den Stecker ein. Drücken Sie auf SET, um die Drücken Sie auf START/CANCEL, Das Display zeigt „--“.
  • Seite 7 Falls die Umgebungstemperatur niedrig ist, gehen Sie wie folgt vor: 1. Bereiten Sie die Milch oder Sojamilch vor und gießen Sie 40-60 °C warmes Wasser in den Tank. Befüllen Sie die Gläser und stellen Sie sie in den Tank. Setzen Sie den Deckel auf und schalten Sie das Gerät ein.
  • Seite 8: Natto-Zubereitung

    Natto-Zubereitung Stecken Sie den Stecker ein. Drücken Sie auf SET, um die Drücken Sie auf START/CANCEL, Das Display zeigt „--“. Drücken Funktion F2 (Natto) zu starten. um mit der Herstellung zu be- Drücken Sie auf die [+] Taste, Sie auf START/CANCEL, um den ginnen.
  • Seite 9: Kimchi-Zubereitung

    Kimchi-Zubereitung Stecken Sie den Stecker ein. Drücken Sie auf SET, um die Drücken Sie auf START/CANCEL, Das Display zeigt „--“. Drücken Funktion F3 (Kimchi) zu starten. um mit der Herstellung zu be- Drücken Sie auf die [+] Taste, Sie auf START/CANCEL, um den ginnen.
  • Seite 10: Reiswein-Zubereitung

    Reiswein-Zubereitung Stecken Sie den Stecker ein. Drücken Sie auf SET, um die Drücken Sie auf START/CANCEL, Das Display zeigt „--“. Drücken Funktion F4 (Reiswein) zu star- um mit der Herstellung zu be- ten. Drücken Sie auf die [+] Sie auf START/CANCEL, um den ginnen.
  • Seite 11: Wichtige Hinweise Zur Reiswein-Herstellung

    Wichtige Hinweise zur Reiswein-Herstellung • Der Reiswein wird durch anaerobe Bakterien fermentiert, daher muss der Tank während der Herstellung verschlossen sein. • Nachdem der Reiswein fertig ist, ertönt ein Ton und das Display zeigt „00“ an. Die Funk- tion wird angehalten. Wein-Zubereitung Stecken Sie den Stecker ein.
  • Seite 12: Reinigung Und Pflege

    Wichtige Hinweise zur Wein-Zubereitung • Dieses Gerät ist nur mit Gläsern ausgestattet. Der Behälter zur Wein-Herstellung muss separat gekauft werden. • Die Fermentationszeit beträgt 7 x 24 Stunden = 168 Stunden. • Nachdem der Wein eine Woche gegärt hat, filtern Sie den Wein mit Hilfe der Gaze und füllen Sie ihn in einen Sauberen Behälter.
  • Seite 13 Fehler Mögliche Ursache Zeit zu kurz eingestellt? Natto: Nach der Zubereitung haben die Raumtemperatur und Bohnetemperatur zu niedrig? (Wenn die Sojabohnen nicht richtig Temperatur zu niedrig ist, sollte die Betriebsdauer länger sein) gegärt. Stromausfall oder Kurzschluss und während der Natto-Zubereitung? Zeit zu kurz eingestellt? Der Geruch des zubereiteten Natto ist...
  • Seite 14: Hinweise Zur Entsorgung

    Hinweise zur Entsorgung Befi ndet sich die linke Abbildung (durchgestrichene Mülltonne auf Rädern) auf dem Produkt, gilt die Europäische Richtlinie 2002/96/EG. Diese Pro- dukte dürfen nicht mit dem normalen Hausmüll entsorgt werden. Infor- mieren Sie sich über die örtlichen Regelungen zur getrennten Sammlung elektrischer und elektronischer Gerätschaften.
  • Seite 15 Cleaning and Care 24 Troubleshooting 24 Hints on Disposal 26 Declaration of Conformity 26 Technical Data Item number 10029903 Power supply 230-240 V ~ 50-60 Hz Power consumtion 20 W Rated capacity 170 ml x 6 glasses = 1020 ml...
  • Seite 16: Safety Instructions

    Safety Intructions • During use of this electrical appliance, the following basic safety measures shall be abided by. • The input voltage of this product is AC220-240V, 50/60Hz 20W. Please confirm the supply voltage before use. • If this product should be repaired, please contact the Customer Service Department of our company, or send it directly to any of the maintenance points designated by our com- pany for repair.
  • Seite 17: Product Description

    Product Description 1 Main Body: Heat food 2 Control Panel Set program and function 3 Container: 6 glasses for holding food 4 Cover: Dustproof and thermal insulation Control Panel and Controls Note: Under the mode of initial function setting, the keys can be used to increase or decrease the time.
  • Seite 18 Function The time on the screen flashes, if it is not set within 8s, it backs to the Press 2x standby mode. The default time is 18h. How to set: At this time, press (Natto) the key [+] to increase 1h each time till 36h; Function The time on the screen flashes, if it is not set within 8s, it backs to the Press 3x...
  • Seite 19: Making Yogurt

    Making Yogurt Warning: If the power cord is exposed or damaged, it shall not be used and must be repla- ced by the same power cord. For avoidance of accident, the replacement shall be conducted by a professional or our after-sale service department. General Procedure Plug in, the screen displays Press the “Set”...
  • Seite 20 When the ambient temperature is low, this product is used as follows: • Prepare the milk, dry milk or soybean milk and pour 40~60 °C warm water into the main body; • Place the glasses (containing the prepared milk, dry milk or soybean milk) inside the main body, mount the cover and power on;...
  • Seite 21: Making Natto

    Making Natto Plug in, the screen displays Press the “Set” ket to select the Press the “Start/Cancel” key to function of F1 Yogurt. Press the “——”. Press the “Start/Cancel” start the maker. (the default “+ -” keys to set the time. Press to enter the standby mode.
  • Seite 22: Making Kimchi

    Making Kimchi Plug in, the screen displays Press the “Set” ket to select the Press the “Start/Cancel” key to function of F1 Yogurt. Press the “——”. Press the “Start/Cancel” start the maker. (the default “+ -” keys to set the time. Press to enter the standby mode.
  • Seite 23: Making Rice Wine

    Making Rice Wine Plug in, the screen displays Press the “Set” ket to select the Press the “Start/Cancel” key to function of F1 Yogurt. Press the “——”. Press the “Start/Cancel” start the maker. (the default “+ -” keys to set the time. Press to enter the standby mode.
  • Seite 24: Making Wine

    Important Hints on making Rice Wine • Attention: Rice wine is fermented by anaerobic bacteria, so the container must be sealed during making; • Microcomputer controlled yogurt maker reminds the completion of making with a tone, and the screen still shows 00, but the operation has stopped. Making Wine Plug in, the screen displays Press the “Set”...
  • Seite 25: Cleaning And Care

    Important Hints on making Wine • This product is provided with only glasses, so the large container must be purchased separately. • Fermentation: The time of fermentation is 7d×24h=168h (a week). • Filtration: Filter the wine with the gauze and pour it into a clean container one week after fermentation, and dump dregs into dustbin.
  • Seite 26 Problem Possible Cause Is the time controlled or set too short? Natto Is indoor temperature or soybean temperature too low? (If too low, Failure to make natto after the time of fermentation is extended properly) fermentation Is there power failure, short circuit or unstable voltage during making? Is the time controlled or set too short? Too strong abnormal odor Is soybean fully steamed?
  • Seite 27: Hints On Disposal

    Hints on Disposal According to the European waste regulation 2002/96/EG this symbol on the product or on its packaging indicates that this product may not be treated as household waste. Instead it should be taken to the ap- propriate collection point for the recycling of electrical and electronic equipment.
  • Seite 28: Datos Técnicos

    Limpieza y cuidado 38 Detección y resolución de problemas 38 Indicaciones para la retirada del aparato 40 Declaración de conformidad 40 Datos técnicos Número de artículo 10029903 Suministro eléctrico 230-240 V - 50-60 Hz Potencia 20 W Capacidad 170 ml x 6 botellas = 1020 ml...
  • Seite 29: Indicaciones De Seguridad

    Indicaciones de seguridad • Lea atentamente este manual de instrucciones antes de utilizar este aparato. • Antes de utilizar el aparato, compruebe la tensión en la placa técnica del mismo y conecte el aparato solamente a tomas de corriente que se adecuen a dicha tensión. •...
  • Seite 30: Descripción Del Aparato

    Descripción del aparato 1 Base del aparato: Calentar alimentos 2 Panel de control: Configurar funciones 3 Depósito divisible Para 6 recipientes de cristal 4 Tapa: Hermética, mantiene el calor Panel de control y botones de función Advertencia: cuando haya iniciado una función, el tiempo no podrá ajustarse. Funciones y botón de funciones (SET) El tiempo parpadea en el monitor.
  • Seite 31 El tiempo parpadea en el monitor. Si no realiza ninguna acción en los 8 Pulsar 2 Función F2 segundos siguientes, el aparato entra en modo standby. El tiempo pre- (Natto) veces determinado es de 18 horas. Cada vez que pulse el botón [+], el tiempo se aumenta 1 hora hasta un rango de 36 horas.
  • Seite 32: Preparación Del Yogur

    Preparación de yogur Advertencia: si el cable de alimentación está dañado, deberá ser sustituido por el fabrican- te, un servicio técnico autorizado o una personal igualmente cualificada. Procedimiento general Conecte el enchufe. El display Pulse SET para iniciar la función Pulse el botón START/CANCEL F1 (yogur).
  • Seite 33 Si la temperatura ambiente es baja, proceda del siguiente modo: 1. Prepare la leche o la leche de soja y vierta agua caliente a 40-60 °C en el depósito. Llene los vasos e introdúzcalos en el depósito. Coloque la tapa y encienda el aparato. 2.
  • Seite 34: Preparación De Natto

    Preparación de natto Conecte el enchufe. El display Pulse SET para iniciar la función Pulse el botón START/CANCEL F2 (natto). Pulse el botón [+] muestra “- -“. Pulse START/ para comenzar con la producci- para ajustar el tiempo. Pulse si- CANCEL para iniciar el modo ón.
  • Seite 35: Preparación De Kimchi

    Preparación de kimchi Conecte el enchufe. El display Pulse SET para iniciar la función Pulse el botón START/CANCEL F3 (kimchi). Pulse el botón [+] muestra “- -“. Pulse START/ para comenzar con la producci- para ajustar el tiempo. Pulse si- CANCEL para iniciar el modo ón.
  • Seite 36: Preparación De Vino De Arroz

    Preparación de arroz de vino Conecte el enchufe. El display Pulse SET para iniciar la funci- Pulse el botón START/CANCEL ón F4 (arroz de vino). Pulse el muestra “- -“. Pulse START/ para comenzar con la producci- botón [+] para ajustar el tiem- CANCEL para iniciar el modo ón.
  • Seite 37: Preparación De Vino

    Indicaciones importantes para la producción de vino de arroz • El arroz de vino se fermenta a partir de bacterias anaerobias, por lo que el depósito debe cerrarse durante la producción. • Cuando el vino de arroz esté listo, escuchará un pitido y el display muestra “00”. La fun- ción se detiene.
  • Seite 38: Limpieza Y Cuidado

    Indicaciones importantes para preparar vino • Este aparato solo está equipado con vasos. El recipiente para la producción de vino debe comprarse por separado. • El periodo de fermentación comprende 7 x 24 horas = 168 horas. • Cuando el vino se haya cocinado durante una semana, fíltrelo con ayuda de la gasa y viértalo en un recipiente limpio.
  • Seite 39 Problema Posible causa Natto: tras la Ha configurado un periodo de tiempo demasiado breve preparación, La temperatura ambiente y la temperatura de los granos es demasiado baja (si la los granos de temperatura es demasiado baja, el tiempo de funcionamiento deberá ser mayor) soja no se han Corte de luz o cortocircuito durante la preparación del natto.
  • Seite 40: Indicaciones Para La Retirada Del Aparato

    Indicaciones para la retirada del aparato Si el aparato lleva adherida la ilustración de la izquierda (el contene- dor de basura tachado) entonces rige la normativa europea, directiva 2002/96/CE. Este producto no debe arrojarse a un contenedor de basura común. Infórmese sobre las leyes territoriales que regulan la recogida separada de aparatos eléctricos y electrónicos.
  • Seite 41: Fiche Technique

    Nettoyage et entretien 53 Identification et résolution des problèmes 53 Information sur le recyclage 55 Déclaration de conformité 55 Fiche technique Numéro d’article 10029903 Alimentation électrique 230-240 V ~ 50-60 Hz Puissance 20 W Capacité 170 ml x 6 bouteilles = 1 020 l Durée de fonctionnement en continu...
  • Seite 42: Consignes De Sécurité

    Consignes de sécurité • Lire attentivement ce mode d’emploi avant d’utiliser l’appareil. • Avant d’utiliser l’appareil, vérifier sa tension sur la plaque signalétique et le brancher uni- quement à une prise de terre correspondant à la tension supportée par l’appareil. •...
  • Seite 43: Aperçu De L'appareil

    Aperçu de l’appareil Socle de l’appareil : Chauffer les aliments Panneau de commande : Régler les fonctions Réservoir séparé : Pour 6 bocaux Couvercle : anti-poussière, isolation thermique Panneau de commande et touches de commande Remarque : une fois qu’une fonction est activée, il n’est plus possible de régler le temps. Fonctions de la touche de commande (SET) Le temps clignote sur l’affichage.
  • Seite 44 Le temps clignote sur l’affichage. Si aucun réglage n’est effectué dans Fonction un laps de temps de 8 secondes, l’appareil bascule automatiquement en Appuyer 2x F2 (Natto) mode veille. La durée par défaut est de 18 heures. À chaque pression sur la touche [+], la durée augmente de 1 heure jusqu’à...
  • Seite 45: Préparation De Yaourt

    Préparation du yaourt ATTENTION : si le cordon d’alimentation est endommagé, le faire remplacer par le fab- ricant, une entreprise spécialisée ou une personne présentant une qualification similaire. Étapes principales de préparation Brancher la fiche dans la pri- Appuyer sur SET pour démarrer Appuyer sur la touche START/ la fonction F1 (yaourt).
  • Seite 46 Si la température ambiante est trop basse, procéder comme suit : 1. Préparer le lait ou le lait de soja et verser de l’eau à 40-60 °C dans le réservoir. Remplir les bocaux et les placer dans le réservoir. Refermer le couvercle et mettre l’appareil en marche.
  • Seite 47: Préparation De Natto

    Préparation du natto Brancher la fiche dans la pri- Appuyer sur SET pour démarrer Appuyer sur la touche START/ la fonction F2 (natto). Appuyer se. L’afficheur indique « -- ». CANCEL pour commencer sur la touche [+] pour régler la Appuyer START/CANCEL préparation.
  • Seite 48: Préparation De Kimchi

    Préparation du kimchi Brancher la fiche dans la pri- Appuyer sur SET pour démarrer Appuyer sur la touche START/ la fonction F3 (kimchi). Appuyer se. L’afficheur indique « -- ». CANCEL pour commencer sur la touche [+] pour régler la Appuyer START/CANCEL préparation.
  • Seite 49: Préparation De Saké

    Préparation du saké Brancher la fiche dans la pri- Appuyer sur SET pour démarrer Appuyer sur la touche START/ la fonction F4 (saké). Appuyer se. L’afficheur indique « -- ». CANCEL pour commencer sur la touche [+] pour régler la Appuyer START/CANCEL préparation.
  • Seite 50: Préparation De Vin

    Remarques importantes sur la fabrication de saké • Le saké s’obtient par fermentation grâce à des bactéries à anaérobie. Par conséquent, le réservoir doit être fermé pendant le processus de fabrication. • Une fois que le saké est prêt, un son retentit et l’affichage indique « 00 ». La fonction s’arrête.
  • Seite 51: Nettoyage Et Entretien

    Remarques importantes sur la fabrication de vin • Cet appareil est équipé uniquement de bocaux. Le récipient pour la préparation de vin doit être acheté séparément. • Le temps de fermentation est de 7 x 24 heures = 168 heures. •...
  • Seite 52 Problème Cause possible Natto : après Réglage d’une durée trop courte ? la préparation, Température ambiante et température des haricots trop basse ? (Si la les haricots de température est trop basse, la durée de fonctionnement doit être plus longue). soja n’ont pas Panne de courant ou court-circuit pendant la préparation du natto ? convenablement...
  • Seite 53: Information Sur Le Recyclage

    Information sur le recyclage Vous trouverez sur le produit l’image ci-contre (une poubelle sur roues, barrée d‘une croix), ce qui indique que le produit se trouve soumis à la directive européenne 2002/96/CE. Renseignez-vous sur les disposi- tions en vigueur dans votre région concernant la collecte séparée des appareils électriques et électroniques.
  • Seite 54: Dati Tecnici

    Preparazione vino 63 Pulizia e manutenzione 64 Ricerca e risoluzione dei problemi 64 Smaltimento 65 Dichiarazione di conformità 65 Dati tecnici Articolo numero 10029903 Alimentazione 230-240 V ~ 50-60 Hz Potenza 20 W Capacità 170 ml x 6 vasetti = 1020 ml Operatività...
  • Seite 55: Avvertenze Di Sicurezza

    Avvertenze di sicurezza • Leggere attentamente il manuale di istruzioni prima dell’utilizzo. • Collegare il dispositivo ad una presa la cui tensione è conforme a quella indicata sulla targhetta identificativa. • Rivolgersi al servizio clienti dell’azienda oppure ad un tecnico competente per la manu- tenzione del dispositivo.
  • Seite 56: Descrizione Del Prodotto

    Descrizione del prodotto 1 Base: riscaldare gli alimenti 2 Pannello dei comandi: impostare le funzioni 3 Serbatoio separato: per 6 vasetti 4 Coperchio: antipolvere, isolamento termico Pannello dei comandi e tasti funzione Nota: appena viene avviata una funzione, non è più possibile impostare il. Funzioni dei tasti (SET) Il tempo sul display lampeggia.
  • Seite 57 Il tempo sul display lampeggia. In caso di inattività superiore agli 8 Funzione secondi, il dispositivo passa in modalità standby. Il tempo predefinito Premere 2x F2 (Natto) è di 18 ore. Ad ogni pressione del tasto [+], il tempo aumenta di 1 ora fino a 36 ore.
  • Seite 58: Preparazione Yogurt

    Preparazione dello yogurt ATTENZIONE: se il cavo di alimentazione è danneggiato, farlo sostituire dal produttore o da un tecnico competente. Procedura generale Inserire la spina nella presa. Premere SET per avviare la Premere START/CANCEL per av- funzione F1 (Yogurt). Preme- Il display indica “- “.
  • Seite 59 Se la temperatura ambiente è bassa, procedere nel seguente modo: 1. Preparare il latte o il latte di soia e versare acqua calda (40-60°C) nel serbatoio. Riem- pire i vasetti e introdurli nel serbatoio. Mettere il coperchio e accendere il dispositivo. 2.
  • Seite 60: Preparazione Del Natto

    Preparazione del Natto Inserire la spina nella presa. Sul Premere SET per avviare la fun- Premere START/CANCEL zione F2 (Natto). Premere il tas- display compare “- -“. Premere avviare il processo di prepara- to [+] per impostare il tempo. START/CANCEL per avviare la zione.
  • Seite 61: Preparazione Del Kimchi

    Preparazione del Kimchi Inserire la spina nella presa. Sul Premere SET per avviare la fun- Premere START/CANCEL zione F3 (Kimchi). Premere il display compare “- -“. Premere avviare il processo di prepara- tasto [+] per impostare il tem- START/CANCEL per avviare la zione.
  • Seite 62: Preparazione Del Vino Di Riso

    Preparazione del vino di riso Inserire la spina nella presa. Sul Premere SET per avviare la fun- Premere START/CANCEL zione F4 (vino di riso). Preme- display compare “- -“. Premere avviare il processo di prepara- re il tasto [+] per impostare il START/CANCEL per avviare la zione.
  • Seite 63: Preparazione Vino

    Importanti indicazioni per la preparazione del vino di riso • Il vino di riso viene fermentato tramite batteri anaerobici, pertanto durante il processo di preparazione il serbatoio deve essere chiuso. • Quando il vino di riso è pronto, il dispositivo emette un segnale acustico, sul display com- pare “00”...
  • Seite 64: Pulizia E Manutenzione

    Importanti indicazioni per la preparazione del vino • Il dispositivo è munito solo di vasetti. Il contenitore per la produzione del vino deve essere acquistato separatamente. • Il tempo di fermentazione è di 7 x 24 ore = 168 ore. •...
  • Seite 65 Errore Causa possibile Natto: al È stato impostato un tempo troppo breve? termine della La temperatura ambiente e la temperatura dei semi sono troppo bassi? (se la preparazione, i temperatura è troppo bassa, il dispositivo deve restare in funzione più a lungo). semi di soia non Mancanza di corrente oppure corto circuito durante la preparazione? sono fermentati.
  • Seite 66: Smaltimento

    Smaltimento Se sul prodotto è presente la fi gura a sinistra (il cassonetto dei rifi uti mo- bile sbarrato), si applica la direttiva europea 2002/96/CE. Questi prodotti non possono essere smaltiti con i rifi uti normali. Informarsi sulle disposizio- ni vigenti in merito alla raccolta separata di dispositivi elettrici ed elettroni- ci.

Inhaltsverzeichnis