Ducati 96580081B Anweisungen
Superbike 1299/1299S/Panigale R
Kit cambio rovesciato
Reversed shift kit
Simbologia
Per una lettura rapida e razionale sono stati impiegati simboli che
evidenziano situazioni di massima attenzione, consigli pratici o
semplici informazioni.
Prestare molta attenzione al significato dei simboli, in quanto la
loro funzione è quella di non dovere ripetere concetti tecnici o
avvertenze di sicurezza. Sono da considerare, quindi, dei veri e
propri "promemoria" .
Consultare questa pagina ogni volta che sorgeranno dubbi sul loro
significato.
Attenzione
La non osservanza delle istruzioni riportate può creare una
situazione di pericolo e causare gravi lesioni personali e anche la
morte.
Importante
Indica la possibilità di arrecare danno al veicolo e/o ai suoi
componenti se le istruzioni riportate non vengono eseguite.
Note
Fornisce utili informazioni sull'operazione in corso.
Riferimenti
I particolari evidenziati in grigio e riferimento numerico (Es.
rappresentano l'accessorio da installare e gli eventuali componenti
di montaggio forniti a kit.
I particolari con riferimento alfabetico (Es.
componenti originali presenti sul motoveicolo.
Tutte le indicazioni destro o sinistro si riferiscono al senso di marcia
del motociclo.
Avvertenze generali
Attenzione
Le operazioni riportate nelle pagine seguenti devono essere
eseguite da un tecnico specializzato o da un'officina autorizzata
DUCATI.
Attenzione
Le operazioni riportate nelle pagine seguenti se non eseguite a
regola d'arte possono pregiudicare la sicurezza del pilota.
Note
Documentazione necessaria per eseguire il montaggio del Kit
è il MANUALE OFFICINA, relativo al modello di moto in vostro
possesso.
Note
Nel caso fosse necessaria la sostituzione di un componente del kit
consultare la tavola ricambi allegata.
1
)
A
) rappresentano i
ISTR - 675 / 01
Symbols
To allow quick and easy consultation, this manual uses graphic
symbols to highlight situations in which maximum care is required,
as well as practical advice or information.
Pay attention to the meaning of the symbols since they serve to
avoid repeating technical concepts or safety warnings throughout
the text. The symbols should therefore be seen as real reminders.
Please refer to this page whenever in doubt as to their meaning.
Warning
Failure to follow these instructions might give raise to a dangerous
situation and provoke severe personal injuries or even death.
Caution
Failure to follow these instructions might cause damages to the
vehicle and/or its components.
Notes
Useful information on the procedure being described.
References
Parts highlighted in grey and with a numeric reference
1
(Example
) are the accessory to be installed and any assembly
components supplied with the kit.
Parts with an alphabetic reference (Example
components fitted on the vehicle.
Any right- or left-hand indication refers to the vehicle direction of
travel.
General notes
Warning
Carefully perform the operations on the following pages since they
might negatively affect rider safety.
Warning
Carefully perform the operations on the following pages since they
might negatively affect rider safety.
Notes
The following documents are necessary for assembling the Kit:
WORKSHOP MANUAL of your bike model.
Notes
Should it be necessary to change any kit parts, please refer to the
attached spare part table.
96580081B
A
) are the original
1
Inhaltsverzeichnis

Verwandte Anleitungen für Ducati 96580081B


Inhaltszusammenfassung für Ducati 96580081B
- Seite 1 Superbike 1299/1299S/Panigale R ISTR - 675 / 01 96580081B Kit cambio rovesciato Reversed shift kit Simbologia Symbols Per una lettura rapida e razionale sono stati impiegati simboli che To allow quick and easy consultation, this manual uses graphic evidenziano situazioni di massima attenzione, consigli pratici o symbols to highlight situations in which maximum care is required, semplici informazioni.
- Seite 2 Attenzione Warning Il presente kit è per utilizzo esclusivo su pista (esempio: gare This kit is for racing use only (e.g.: competitive trials on tracks). sportive su circuiti). After mounting this exhaust kit, the vehicle cannot be used on Dopo il montaggio del kit, il motoveicolo non può circolare su public roads.
- Seite 3 Smontaggio componenti originali Removing the original components Smontaggio semicarena inferiore sinistra Removing the LH lower half-fairing Svitare le viti (A4) e (A5) di fissaggio della semicarena inferiore Loosen screws (A4) and (A5) securing LH lower half-fairing (A) at sinistra (A) nella parte inferiore. the bottom.
- Seite 4 Smontaggio semicarena superiore sinistra Removing the LH upper half-fairing Svitare le n.4 viti (B1) con rosette (B2) di fissaggio della semicarena Loosen no.4 screws (B1) with washers (B2) fastening LH upper superiore sinistra (B). half-fairing (B). Svitare la vite (B4) di fissaggio posteriore della semicarena inferiore Loosen screw (B4) securing LH lower half-fairing (B) at the rear.
- Seite 5 Rimuovere le n.3 fascette a strappo piccole (D1). Remove no. 3 small self-locking ties (D1). Aprire il tappo spurgo frizione (E). Open the clutch bleed plug (E). Scollegare il connettore (F1) del sensore Quick Shift (F) dal Disconnect connector (F1) of Quick Shift sensor (F) from main cablaggio principale.
- Seite 6 Smontaggio pistoncino frizione Removing the clutch slave cylinder Note Notes La lunghezza del tubo dell’impianto frizione rappresentato in figura The length of the clutch system hose shown in the figure is to be è da ritenersi puramente indicativa. considered purely indicative. Svitare le n.3 viti (G1) di fissaggio del pistoncino frizione (G) al carter.
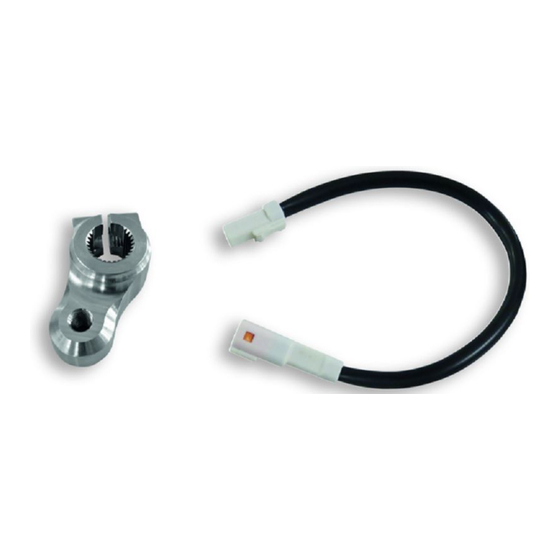
- Seite 7 Smontaggio bielletta cambio Removing the gearbox connecting rod Svitare la vite (H1) con rosetta (H2). Loosen screw (H1) with washer (H2). Svitare la vite (L1) e rimuovere la bielletta cambio (L). Loosen screw (L1) and remove gearbox connecting rod (L). Recuperare la vite (H1), la rosetta (H2) e la vite (L1).
- Seite 8 5 Nm ± 10% Rotazione asta quick shift Quick Shift linkage rotation Mantenendo l'asta quick shift (M) dalla presa di chiave (M2), Hold quick shift linkage (M) from the flat (M2) and loosen nut (M1). allentare il dado (M1). Rotate quick shift linkage unit (M) by 180°. Ruorate il gruppo asta quick shift (M) di 180°.
- Seite 9 10 Nm ± 10% 10 Nm ± 10% Montaggio componenti kit Kit installation Importante Caution Verificare, prima del montaggio, che tutti i componenti risultino Check that all components are clean and in perfect condition puliti e in perfetto stato. before installation. Adottare tutte le precauzioni necessarie per evitare di danneggiare Adopt any precaution necessary to avoid damages to any part of qualsiasi parte nella quale ci si trova ad operare.
- Seite 10 10 Nm ± 10% Rimontaggio pistoncino frizione Refitting the clutch slave cylinder Note Notes La lunghezza del tubo dell’impianto frizione rappresentato in figura The length of the clutch system hose shown in the figure is to be è da ritenersi puramente indicativa. considered purely indicative.
- Seite 11 Collegamento cablaggio Wiring connection Collegare il connettore (2A) al cablaggio principale (Q) e il Connect connector (2A) to main wiring (Q) and connector (2B) to connettore (2B) al connettore (F1) del sensore Quick Shift (F). connector (F1) of Quick Shift sensor (F). Inserire all’interno dell’anello di trattenimento del tappo spurgo Fit Quick Shift cable and gear sensor cable inside the retaining frizione (E) il cavo Quick Shift e il cavo sensore marce.
- Seite 12 2,5 Nm ± 10% 2,5 Nm ± 10% 2,5 Nm ± 10% 0,4 Nm ± 10% Montaggio semicarena superiore sinistra LH upper half-fairing assembly Posizionare la semicarena superiore sinistra (B) inserendo i n.2 dentini Place LH upper half-fairing (B) by fitting no.2 teeth (B9) into no.2 (B9) nelle n.2 asole (U1) del supporto componenti elettrici (U) e le n.
- Seite 13 2.5 Nm ± 10% 2.5 Nm ± 10% 2.5 Nm ± 10% Rimontaggio semicarena inferiore sinistra Refitting the LH lower half-fairing Posizionare la semicarena inferiore sinistra (A) facendone passare il Position LH lower half-fairing (A) by routing its rear lug on the inner puntale posteriore sul lato interno della leva cambio (C).
- Seite 14 NOTE / NOTES ISTR 675 / 01...
- Seite 15 Superbike 1299/1299S/Panigale R ISTR - 675 / 01 96580081B Kit sélecteur de vitesse inversé Kit Schaltautomat mit umgekehrter Schaltfolge Symboles Symbole Pour faciliter la consultation de ce manuel, des symboles signalent Zum schnellen und übersichtlichen Lesen werden Symbole des situations exigeant le maximum d'attention, des conseils verwendet, die außerordentlich wichtige Situationen, praktische...
- Seite 16 Attention Achtung Ce kit est pour une utilisation exclusivement sur piste (ex. Das vorliegende Kit ist ausschließlich zur Anwendung auf der compétition sportive sur circuit). Rennstrecke ausgelegt (Beispiel: Rennen auf Rennbahnen). Après l’installation du kit, le motocycle ne peut pas circuler sur des Nach der Montage des Auspuffkits darf das Motorrad nicht mehr voies publiques.
-
Seite 17: Ausbau Der Original-Bestandteile
Dépose composants d'origine Ausbau der Original-Bestandteile Dépose demi-carénage inférieur gauche Abnahme der unteren linken Verkleidungshälfte Desserrer les vis (A4) et (A5) de fixation du demi-carénage inférieur Die Befestigungsschrauben (A4) und (A5) der unteren linken gauche (A) dans la partie inférieure. Verkleidungshälfte (A) im unteren Bereich lösen. - Seite 18 Dépose du demi-carénage supérieur gauche Abnahme der oberen linken Verkleidungshälfte Desserrer les 4 vis (B1) avec rondelles (B2) de fixation du demi- Die 4 Schrauben (B1) mit Unterlegscheiben (B2) der oberen linken carénage supérieur gauche (B). Verkleidungshälfte (B) lösen. Desserrer la vis (B4) de fixation partie arrière du demi-carénage Die hintere Befestigungsschraube (B4) der unteren linken inférieur gauche (B).
- Seite 19 Retirer les 3 petits colliers rilsan (D1). Die 3 kleinen Zugschellen (D1) entfernen. Ouvrir le bouchon purge embrayage (E). Die Kupplungsentlüftungsschraube (E) öffnen. Débrancher le connecteur (F1) du capteur Quick Shift (F) du Den Verbinder (F1) des Quick Shift-Sensors (F) vom câblage principal.
- Seite 20 Dépose cylindre récepteur d'embrayage Ausbau des Kupplungssteuerkolbens Remarques Hinweis La longueur du tuyau du système d'embrayage représenté dans la Die Länge der in der Abbildung abgebildeten Leitung des figure est sensée être indicative. Kupplungssystems als reines Anhaltsmaß zu verstehen. Desserrer les 3 vis (G1) de fixation du cylindre récepteur Die 3 Schrauben (G1) der Befestigung des Kupplungssteuerkolbens d'embrayage (G) au carter.
- Seite 21 Dépose biellette sélecteur de vitesse Ausbau des Getriebepleuels Desserrer la vis (H1) avec rondelle (H2). Die Schraube (H1) mit Unterlegscheibe (H2) lösen. Desserrer la vis (L1) et retirer la biellette sélecteur de vitesse (L). Die Schraube (L1) lösen, dann das Getriebepleuel (L) abnehmen. Récupérer la vis (H1), la rondelle (H2) et la vis (L1).
- Seite 22 5 Nm ± 10% Rotation tige quick shift Drehung des Quick Shift-Stabs En tenant la tige quick shift (M) par la prise de clé (M2), desserrer Während der Quick Shift-Stab (M) am Schlüsselansatz (M2) l'écrou (M1). gehalten wird, die Mutter (M1) lockern. Tourner de 180°...
-
Seite 23: Montage Der Komponenten Des Kits
10 Nm ± 10% 10 Nm ± 10% Pose composants kit Montage der Komponenten des Kits Wichtig Important Vor der Montage überprüfen, dass sich alle Komponenten im Vérifier, avant la pose, que tous les composants sont propres et en sauberen und perfekten Zustand befinden. parfait état. - Seite 24 10 Nm ± 10% Repose cylindre récepteur d'embrayage Montage des Kupplungssteuerkolbens Remarques Hinweis La longueur du tuyau du système d'embrayage représenté dans la Die Länge der in der Abbildung abgebildeten Leitung des figure est sensée être indicative. Kupplungssystems als reines Anhaltsmaß zu verstehen. Insérer le cylindre récepteur d'embrayage (G), complet de l'insert Den Kupplungssteuerkolben (G) einschließlich Drehschutzeinsatz anti-rotation (G2), sur la tige d'embrayage (P).
- Seite 25 Connexion câblage Anschluss der Verkabelungen Brancher le connecteur (2A) au câblage principal (Q) et le Den Verbinder (2A) an den Hauptkabelbaum (Q) und den Verbinder connecteur (2B) au connecteur (F1) du capteur Quick Shift (F). (2B) an den Verbinder (F1) des Quick Shift-Sensors (F) schließen. Insérer dans la bague de retenue du bouchon de purge embrayage Das Kabel des Quick Shift und das Kabel des Gangsensors in den (E) le câble Quick Shift et le câble du capteur des vitesses.
- Seite 26 2,5 Nm ± 10% 2,5 Nm ± 10% 2,5 Nm ± 10% 0,4 Nm ± 10% Pose du demi-carénage supérieur gauche Montage der oberen linken Verkleidungshälfte Positionner le demi-carénage supérieur gauche (B) en insérant Die obere linke Verkleidungshälfte (B) anordnen, dazu les 2 ergots (B9) dans les 2 crans (U1) du support composants die 2 Zähne (B9) in die 2 Langlöcher (U1) des Halters der électriques (U) et les 2 pattes (B8) à...
- Seite 27 2.5 Nm ± 10% 2.5 Nm ± 10% 2.5 Nm ± 10% Repose demi-carénage inférieur gauche Montage der unteren linken Verkleidungshälfte Placer le demi-carénage inférieur gauche (A) en faisant passer le Die untere linke Verkleidungshälfte (A) anordnen und die hintere carter arrière sur le côté...
- Seite 28 REMARQUES HINWEIS ISTR 675 / 01...
-
Seite 29: Advertências Gerais
Superbike 1299/1299S/Panigale R ISTR - 675 / 01 96580081B Conjunto de caixa de velocidades invertida Reversed shift kit Símbolos Symbols Para uma leitura rápida e racional, foram utilizados símbolos que To allow quick and easy consultation, this manual uses graphic evidenciam situações de máxima atenção, conselhos práticos ou... - Seite 30 Warning Atenção Este conjunto deve ser utilizado exclusivamente na pista (exemplo: This kit is for racing use only (e.g.: competitive trials on tracks). competições desportivas em circuitos). Após a montagem do After mounting this exhaust kit, the vehicle cannot be used on kit, a moto não pode circular em estradas públicas.O proprietário public roads.
- Seite 31 Desmontagem dos componentes originais Removing the original components Desmontagem da semicarenagem inferior esquerda Removing the LH lower half-fairing Desatarraxe os parafusos (A4) e (A5) de fixação da semicarenagem Loosen screws (A4) and (A5) securing LH lower half-fairing (A) at inferior esquerda (A) na parte inferior. the bottom.
- Seite 32 Desmontagem da semicarenagem superior esquerda Removing the LH upper half-fairing Desatarraxe os 4 parafusos (B1) com anilhas (B2) de fixação da Loosen no.4 screws (B1) with washers (B2) fastening LH upper semicarenagem superior esquerda (B). half-fairing (B). Desatarraxe o parafuso (B4) de fixação traseira da semicarenagem Loosen screw (B4) securing LH lower half-fairing (B) at the rear.
- Seite 33 Remova as 3 braçadeiras de serrilha grandes (D1). Remove no. 3 small self-locking ties (D1). Abra a tampa de purga da embraiagem (E). Open the clutch bleed plug (E). Desligue o conector (F1) do sensor Quick Shift (F) da cablagem Disconnect connector (F1) of Quick Shift sensor (F) from main principal.
- Seite 34 Desmontagem do êmbolo da embraiagem Removing the clutch slave cylinder Notas Notes O comprimento do tubo do sistema da embraiagem representado The length of the clutch system hose shown in the figure is to be na figura deve ser considerado puramente indicativo. considered purely indicative.
- Seite 35 Desmontagem da biela da caixa de velocidades Removing the gearbox connecting rod Desatarraxe o parafuso (H1) com a anilha (H2). Loosen screw (H1) with washer (H2). Desatarraxe o parafuso (L1) e remova a biela da caixa de Loosen screw (L1) and remove gearbox connecting rod (L). velocidades (L).
- Seite 36 5 Nm ± 10% Rotação da haste quick shift Quick Shift linkage rotation Mantendo a haste quick shift (M) pela tomada de chave (M2), Hold quick shift linkage (M) from the flat (M2) and loosen nut (M1). desaperte a porca (M1). Rotate quick shift linkage unit (M) by 180°.
-
Seite 37: Montagem Dos Componentes
10 Nm ± 10% 10 Nm ± 10% Montagem dos componentes Kit installation Importante Caution Verifique, antes da montagem, se todos os componentes Check that all components are clean and in perfect condition estão limpos e em perfeito estado. Adote todas as precauções before installation. - Seite 38 10 Nm ± 10% Remontagem do êmbolo da embraiagem Refitting the clutch slave cylinder Notas Notes O comprimento do tubo do sistema da embraiagem representado The length of the clutch system hose shown in the figure is to be na figura deve ser considerado puramente indicativo. considered purely indicative.
- Seite 39 Ligação da cablagem Wiring connection Ligue o conector (2A) à cablagem principal (Q) e o conector (2B) ao Connect connector (2A) to main wiring (Q) and connector (2B) to conector (F1) do sensor Quick Shift (F). connector (F1) of Quick Shift sensor (F). Insira dentro do anel de retenção da tampa de purga da Fit Quick Shift cable and gear sensor cable inside the retaining embraiagem (E) o cabo Quick Shift e o cabo do sensor de marchas.
- Seite 40 2,5 Nm ± 10% 2,5 Nm ± 10% 2,5 Nm ± 10% 0,4 Nm ± 10% Montagem da semicarenagem superior esquerda LH upper half-fairing assembly Posicione a semicarenagem superior esquerda (B), inserindo os Place LH upper half-fairing (B) by fitting no.2 teeth (B9) into no.2 2 dentes (B9) nos 2 olhais (U1) do suporte dos componentes slots (U1) on electric component support (U) and no.2 tabs (B8) elétricos (U) e as 2 aletas (B8) dentro dos 2 anéis de borracha...
- Seite 41 2.5 Nm ± 10% 2.5 Nm ± 10% 2.5 Nm ± 10% Remontagem da semicarenagem inferior esquerda Refitting the LH lower half-fairing Posicione a semicarenagem inferior esquerda (A) fazendo passar Position LH lower half-fairing (A) by routing its rear lug on the inner a respetiva ponteira para o lado interno da alavanca da caixa de side of gearchange lever (C).
- Seite 42 NOTAS / NOTES ISTR 675 / 01...
-
Seite 43: Advertencias Generales
Superbike 1299/1299S/Panigale R ISTR - 675 / 01 96580081B Kit cambio invertido リバースギアチェンジキット Símbolos シンボル Para una lectura rápida y racional se han empleado símbolos que 素早くかつ合理的に読み進めることができるように、本マニュア evidencian situaciones de máxima atención, consejos prácticos o ルではいくつかのシンボルを導入し、最大限の注意を払う必要が simples informaciones. Prestar mucha atención al significado de ある状況や、推奨事項、または一般情報を明確にしてあります。... - Seite 44 Atención 注記 El presente kit es para usar exclusivamente en pista (por ejemplo: 本キットはサーキットでの使用専用です (例:サーキットでの競 competencias deportivas en circuitos). Tras el montaje del kit, la 技)。 本キットを motocicleta no podrá circular en carreteras públicas. El propietario 取り付けた車両は一般公道を走行することはできません。 se compromete a cumplir con todas las leyes y regulaciones sobre 車両の所有者はサーキット走行やレース用バイクに関連...
- Seite 45 Desmontaje componentes originales オリジナル部品の取り外し Desmontaje semicarenado inferior izquierdo 左ロアフェアリングの取り外し Desatornillar los tornillos (A4) y (A5) de fijación del semicarenado 左ロアフェアリング (A) の下部を固定しているスクリュー (A4) inferior izquierdo (A) en la parte inferior. および (A5) を緩めて外します。 Desatornillar el tornillo (A3) de fijación delantero interno del 左ロアフェアリング...
- Seite 46 Desmontaje semicarenado superior izquierdo 左アッパーフェアリングの取り外し Desatornillar los 4 tornillos (B1) con arandelas (B2) de fijación del 左アッパーフェアリング (B) を固定している 4 本のスクリュー semicarenado superior izquierdo (B). (B1) をワッシャー (B2) と一緒に緩めて外します。 Desatornillar el tornillo (B4) de fijación trasero del semicarenado 左ロアフェアリング (B) の後側を固定しているスクリュー (B4) inferior izquierdo (B).
- Seite 47 Quitar las 3 abrazaderas de tirón pequeñas (D1). 3 つの小さなケーブルストラップ (D1) を取り外します。 Abrir el tapón de purga embrague (E). クラッチオイルブリードキャップ (E) を開けます。 Desconectar el conector (F1) del sensor Quick Shift (F) del クイックシフトセンサー (F) のコネクター (F1) を主要配線から cableado principal. 切り離します。 ISTR 675 / 01...
- Seite 48 Desmontar el émbolo embrague クラッチピストンの取り外し Notas 参考 La longitud del tubo del sistema de embrague representado en la 図中に描かれているクラッチシステムホースの長さは参考です。 figura se debe considerar puramente indicativa. クラッチピストン (G) をエンジンクランクケースに固定している Desatornillar los 3 tornillos (G1) de fijación del émbolo embrague 3 本のスクリュー (G1) を緩めて外します。 (G) al cárter.
- Seite 49 Desmontaje bieleta cambio ギアチェンジコネクティングロッドの取り外し Desatornillar el tornillo (H1) con arandela (H2). スクリュー (H1) をワッシャー (H2) と一緒に緩めて外します。 Desatornillar el tornillo (L1) y quitar la bieleta cambio (L). スクリュー (L1) を緩めて外し、ギアチェンジコネクティングロ Recuperar el tornillo (H1), la arandela (H2) y el tornillo (L1). ッド...
- Seite 50 5 Nm ± 10% Rotación vástago quick shift クイックシフトロッドの回転 Manteniendo el vástago quick shift (M) de la toma de llave (M2), クイックシフトロッド (M) をレンチ (M2) で保持して、ナット aflojar la tuerca (M1). (M1) を緩めます。 Girar 180º el grupo vástago quick shift (M). クイックシフトロッドユニット...
- Seite 51 10 Nm ± 10% 10 Nm ± 10% Montaje componentes kit キット部品の取り付け Importante 重要 Controlar, antes del montaje, que todos los componentes se 取り付け前にすべての部品に汚れがなく、完璧な状態であること encuentren limpios y en perfecto estado. を確認します。作業する部品の外側表面を傷つけないために、必 Adoptar todas las precauciones necesarias para evitar daños en la 要な予防措置を取ってください...
- Seite 52 10 Nm ± 10% Volver a montar el émbolo embrague クラッチピストンの取り付け Notas 参考 La longitud del tubo del sistema de embrague representado en la 図中に描かれているクラッチシステムホースの長さは参考です。 figura se debe considerar puramente indicativa. 回転防止インサート (G2) 付きクラッチピストン (G) をクラッチ Introducir el émbolo embrague (G), con la aplicación anti-rotación ロッド...
- Seite 53 Conexión cableado 配線の接続 Conectar el conector (2A) al cableado principal (Q) y el conector コネクター (2A) を主要配線 (Q) に接続し、コネクター (2B) を (2B) al conector (F1) del sensor Quick Shift (F). クイックシフトセンサー (F) のコネクター (F1) に接続します。 Introducir en el interior del anillo de retención del tapón purga クラッチオイルブリードキャップ...
- Seite 54 2,5 Nm ± 10% 2,5 Nm ± 10% 2,5 Nm ± 10% 0,4 Nm ± 10% Montaje semicarenado superior izquierdo 左アッパーフェアリングの取り付け Colocar el semicarenado superior izquierdo (B) en posición, 2 個のつめ (B9) をエレクトリック部品マウント (U) の 2 つの溝 introduciendo los 2 dientes (B9) en los 2 ojales (U1) del soporte (U1) に、2 個のタブ...
- Seite 55 2.5 Nm ± 10% 2.5 Nm ± 10% 2.5 Nm ± 10% Montaje semicarenado inferior izquierdo 左ロアフェアリングの仮取り付け Colocar el semicarenado inferior izquierdo (A) haciendo pasar el tope 後部先端をギアチェンジペダル (C) の内側を通すようにして、左 trasero por el lado interior de la maneta del cambio (C). ロアフェアリング...
- Seite 56 NOTAS 参考 ISTR 675 / 01...
- Seite 57 DUCATI PERFORMANCE レース専用部品 ご注文書 ご注文商品 商品名 P/N P/N 商品名 商品名 P/N P/N 商品名 P/N 商品名 お客様ご記入欄 私は上記レース専用部品を下記車両に装着し、サーキット走行のみに 利用し、一般公道には利用しません。 車台番号 ZDM モデル名 お客様署名 ご注文日 ドゥカティ正規ネットワーク店記入欄 お客様に上記レース専用部品を販売し、レース専用部品のご利用方法を 説明いたしました。 販売店署名 販売日 年 月 日 販売店様へお願い 1. 上記ご記入の上、弊社アフターセールス部までFAXしてください。FAX:03-6692-1317 1. 上記ご記入の上、弊社アフターセールス部までFAXしてください。FAX:03-6692-1317 2. 取り付け車両1台に1枚でご使用ください。...
- Seite 58 Superbike 1299/1299S/Panigale R ISTR - 675 / 01 96580081B Kit cambio rovesciato / Reversed shift kit / Kit cambio invertido / Kit Schaltautomat mit umgekehrter Schaltfolge / Conjunto de caixa de velocidades invertida / Kit cambio invertido / リバースギアチェンジキット...
- Seite 59 Pos. Cod. Denominazione Description Designation Bezeichnung Descrição Denominacion Q.ty 説明 Biela de reenvio da ギアチェンジトラン Bielletta rinvio Gearbox transmission Biellette renvoi Bieleta reenvío 96210431AA Getriebevorgelegepleuel caixa de velocidades スミッションコネク cambio connecting rod sélecteur de vitesse cambio invertida ティングロッド 5101A811A Cablaggio Wiring Câblage Verkabelung...