Herunterladen Inhalt Inhalt Diese Seite drucken
Silvercrest SDG 950 C3 Bedienungsanleitung
Vorschau ausblenden Andere Handbücher für SDG 950 C3:
Inhaltsverzeichnis

Werbung

Verfügbare Sprachen
  • DE

Verfügbare Sprachen

  • DEUTSCH, seite 4
HOYER Handel GmbH
Tasköprüstraße 3
DE-22761 Hamburg
GERMANY
Stand der Informationen · Status of information · Version des informations · Stand van de informatie
Stan informacji · Stav informací · Stav informácií:
06/2020
ID: SDG 950 C3_20_V1.2
IAN 340677_2004
DAMPFGARER SDG 950 C3
STEAMER SDG 950 C3
CUISEUR VAPEUR SDG 950 C3
Bedienungsanleitung
DE
AT
CH
DAMPFGARER
FR
BE
Mode d'emploi
CUISEUR VAPEUR
PL
Instrukcja obsługi
URZĄDZENIE DO GOTOWANIA
NA PARZE
Návod na obsluhu
SK
PARNÝ HRNIEC
IAN 340677_2004
Operating instructions
GB
IE
STEAMER
NL
BE
Gebruiksaanwijzing
STOOMKOKER
CZ
Návod k obsluze
PARNÍ HRNEC
DE
PL
CZ
BE
SK

Werbung

Inhaltsverzeichnis
loading

Inhaltszusammenfassung für Silvercrest SDG 950 C3

  • Seite 1 DAMPFGARER SDG 950 C3 STEAMER SDG 950 C3 CUISEUR VAPEUR SDG 950 C3 Bedienungsanleitung Operating instructions DAMPFGARER STEAMER HOYER Handel GmbH Tasköprüstraße 3 Mode d'emploi Gebruiksaanwijzing DE-22761 Hamburg CUISEUR VAPEUR STOOMKOKER GERMANY Instrukcja obsługi Návod k obsluze URZĄDZENIE DO GOTOWANIA PARNÍ...
  • Seite 2 Deutsch ..................2 English ................... 24 Français ................. 44 Nederlands ................70 Polski ..................92 Česky .................. 116 Slovenčina ................136...
  • Seite 3 Übersicht / Overview / Aperçu de l'appareil / Overzicht / Przegląd / Přehled / Prehľad...
  • Seite 4: Inhaltsverzeichnis

    Inhalt 1. Übersicht ..................3 2. Bestimmungsgemäßer Gebrauch ............4 3. Sicherheitshinweise ................. 4 4. Lieferumfang ................... 8 5. Vor dem ersten Gebrauch ..............8 6. Bedienen des Gerätes ..............9 Garen ....................9 Garpunkt überprüfen ................10 Wasser nachfüllen ................10 Betrieb beenden .................
  • Seite 5: Übersicht

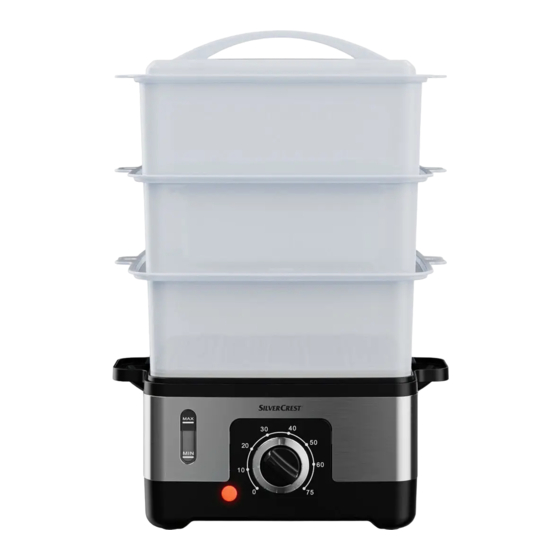
    1. Übersicht Deckel Reisschale Dampfkörbe Dampfaustritt Auffangschale Griffe mit Einfüllöffnung Dampfhülse Aussparung (am Rand der Dampfhülse) Unterteil Zeitwähler (einstellbar von 0 bis 75 Minuten) Betriebsanzeige (rot) Wasserstandsanzeiger Dampferzeuger Netzanschlussleitung mit Netzstecker Nummern der Dampfkörbe Dampföffnungen Kabelaufwicklung...
  • Seite 6: Heiße Oberflächen

    Herzlichen Dank für Ihr 2. Bestimmungsgemäßer Vertrauen! Gebrauch Mit diesem Dampfgarer können Sie Lebens- Wir gratulieren Ihnen zu Ihrem neuen mittel schonend garen. Dampfgarer. Das Gerät ist für den privaten Haushalt kon- zipiert. Das Gerät darf nur in trockenen In- Für einen sicheren Umgang mit dem Gerät nenräumen benutzt werden.
  • Seite 7: Anweisungen Für Den Sicheren Betrieb

    Anweisungen für den sicheren Betrieb Dieses Gerät kann von Kindern ab 8 Jahren und von Personen mit reduzierten physischen, sensorischen oder mentalen Fähigkei- ten oder Mangel an Erfahrung und/oder Wissen benutzt wer- den, wenn sie beaufsichtigt oder bezüglich des sicheren Gebrauches des Gerätes unterwiesen wurden und die daraus re- sultierenden Gefahren verstanden haben.
  • Seite 8: Gefahr Für Kinder

    Dieses Gerät ist ebenfalls dazu bestimmt, im Haushalt und in haushaltsähnlichen Anwendungen verwendet zu werden, wie beispielsweise ... … in Küchen für Mitarbeiter in Läden, Büros und anderen ge- werblichen Bereichen; … in landwirtschaftlichen Anwesen; … von Kunden in Hotels, Motels und anderen Wohneinrichtungen; …...
  • Seite 9 GEFAHR durch GEFAHR von Verletzung Stromschlag durch Verbrennung Nehmen Sie das Gerät nicht in Betrieb, Die Oberflächen des Gerätes werden wenn das Gerät oder die Netzan- im Betrieb sehr heiß. Berühren Sie das schlussleitung sichtbare Schäden auf- Gerät im Betrieb nur am Zeitwähler weist oder wenn das Gerät zuvor fallen oder an den Griffen.
  • Seite 10: Lieferumfang

    5. Vor dem ersten Stellen Sie das Gerät niemals auf heiße Oberflächen (z. B. Herdplatten) oder in Gebrauch die Nähe von Wärmequellen oder offe- nem Feuer. Verwenden Sie nur das Originalzubehör. BRANDGEFAHR! Das Gerät ist mit rutschfesten Kunststoff- Stellen Sie das Gerät vor dem Einschal- füßen ausgestattet.
  • Seite 11: Bedienen Des Gerätes

    Dampfkorb 3 kann nicht direkt auf Dampf- • Die maximale Füllmenge Wasser (1,2 l) korb 1 gesetzt werden. Die Nummer des reicht für eine Garzeit von ca. 60 Mi- Dampfkorbes 15 steht auf den Griffen. nuten. 6. Stellen Sie die Reisschale 2 in den 1.
  • Seite 12: Garpunkt Überprüfen

    9. Wählen Sie am Zeitwähler 10 die ge- - Ist die eingestellte Zeit abgelaufen wünschte Garzeit. bevor das Gargut fertig ist, stellen 10. Das Gerät beginnt zu heizen und die Sie den Zeitwähler 10 erneut auf die Betriebsanzeige 11 leuchtet. gewünschte Zeit, um den Garvor- gang fortzusetzen.
  • Seite 13: Überhitzungsschutz

    Überhitzungsschutz Reihenfolge von oben nach unten: Dampf- korb 3 auf Dampfkorb 2, Dampfkorb 2 auf Das Gerät besitzt einen Überhitzungsschutz. Dampfkorb 1. Dampfkorb 3 kann nicht di- Sobald sich kein Wasser mehr im Unter- rekt auf Dampfkorb 1 gesetzt werden. teil 9 befindet und dadurch die Temperatur Bild C: Beim Verstauen ist die Reihenfolge zu hoch wird, schaltet das Gerät automa- genau umgekehrt, dann passen die Dampf-...
  • Seite 14: Menüs Zubereiten

    8. Garzeiten Menüs zubereiten Die in den Tabellen angegebenen Zeiten Wenn Sie ein ganzes Menü zubereiten und sind Richtwerte. Die tatsächliche Garzeit daher mehrere Dampfkörbe 3 übereinander hängt ab von: verwenden, beachten Sie bitte: • Größe und Frische der Lebensmittel; • Das Gargut mit dem größten Gewicht •...
  • Seite 15: Garzeiten Gemüse

    Garzeiten Gemüse • Würzen und salzen Sie das Gemüse erst, wenn es gar ist. • Bereiten Sie das Gemüse vor, indem • Gefrorenes Gemüse kann wie frisches Sie Strünke abschneiden und großes gegart werden. Bei manchen Gemüsen Gemüse in gleich große Stücke teilen. verlängert sich die Garzeit um einige •...
  • Seite 16: Garzeiten Fisch

    Gemüse Menge Garzeit Bemerkungen Kartoffeln 900 g 30 - 40 min - frisch, geschält und geviertelt nach der Hälfte der Garzeit umrühren/ umschichten Neue oder 500 g 35 - 40 min - frisch und geschält im Ganzen kleine Kartoffeln Spargel 400 g 15 - 20 min - flach im Dampfkorb auslegen, 2.
  • Seite 17: Garzeiten Fleisch

    Garzeiten Fleisch • Besonders Geflügel muss vollständig durchgegart sein, um die Gefahr einer • Wählen sie ausschließlich mageres, Salmonelleninfektion zu vermeiden. weiches Fleisch, von dem Sie das Fett • Stechen Sie Würstchen ein, damit sie vollständig entfernen. nicht platzen. • Die Fleischstücke sollten nicht zu dick •...
  • Seite 18: Garzeiten Reis

    Garzeiten Reis • Achten Sie beim Öffnen des Deckels 1 darauf, dass Sie nicht von einem • Geben Sie den Reis und die passende Dampfschwall getroffen werden und Menge Wasser sowie eine Prise Salz in dass kein Kondenswasser in den Reis die Reisschale 2.
  • Seite 19: Rezepte

    9. Rezepte Lachsfilet mit Gemüse und Reis Kasseler mit Rosenkohl Zutaten für 2 Portionen: und Kartoffeln • 300 g Lachsfilet • 3 Lauchzwiebeln Zutaten: • 200 g Champignons • 500 g Rosenkohl, frisch • 3 Stangen Sellerie • 500 g Kartoffeln, frisch, geschält und •...
  • Seite 20: Gefüllte Quarkknödel

    13. Öffnen Sie 15 Minuten vor dem Ende der Garzeit den Dampfgarer, entneh- Tipps: men Sie die Reisschale 2 mit dem Reis • Sie können die fertigen Knödel vor und stellen Sie den Dampfkorb 2 mit dem Garen in Krokant drehen. dem Gemüse auf den Dampfkorb 1.
  • Seite 21: Unterteil Reinigen

    10.2 Unterteil reinigen 10.5 Gerät lagern 1. Reinigen Sie das Unterteil 9 mit einem Damit das Gerät im Schrank nicht zu hoch feuchten Tuch. Sie können auch etwas ist, lassen sich die unterschiedlich großen Spülmittel nehmen. Dampfkörbe 3 ineinander stapeln. (Bild C) 2.
  • Seite 22: Entsorgen

    11. Entsorgen 12. Problemlösung Dieses Produkt unterliegt der Sollte Ihr Gerät einmal nicht wie gewünscht europäischen Richtlinie funktionieren, gehen Sie bitte erst diese 2012/19/EU. Das Symbol Checkliste durch. Vielleicht ist es nur ein klei- der durchgestrichenen Ab- nes Problem, das Sie selbst beheben kön- falltonne auf Rädern bedeu- nen.
  • Seite 23: Technische Daten

    13. Technische Daten 14. Garantie der HOYER Handel GmbH Modell: SDG 950 C3 Sehr geehrte Kundin, sehr geehrter Kunde, Netzspannung: 220 - 240 V ~ 50 Hz Sie erhalten auf dieses Gerät 3 Jahre Ga- Schutzklasse: rantie ab Kaufdatum. Im Falle von Mängeln...
  • Seite 24: Abwicklung Im Garantiefall

    Garantieumfang • Sollten Funktionsfehler oder sonstige Män- gel auftreten, kontaktieren Sie zunächst Das Gerät wurde nach strengen Qualitäts- das nachfolgend benannte Service-Center richtlinien sorgfältig produziert und vor Aus- telefonisch oder per E-Mail. lieferung gewissenhaft geprüft. • Ein als defekt erfasstes Produkt können Die Garantieleistung gilt für Material- oder Sie dann unter Beifügung des Kaufbe- Fabrikationsfehler.
  • Seite 25: Service-Center

    Service-Center Service Deutschland Tel.: 0800 5435 111 (kostenfrei) E-Mail: hoyer@lidl.de Service Österreich Tel.: 0820 201 222 (0,15 EUR/Min.) E-Mail: hoyer@lidl.at Service Schweiz Tel.: 0842 665566 (0,08 CHF/Min., Mobilfunk max. 0,40 CHF/Min.) E-Mail: hoyer@lidl.ch IAN: 340677_2004 Lieferant Bitte beachten Sie, dass die folgende An- schrift keine Serviceanschrift ist.
  • Seite 26 Contents 1. Overview ..................25 2. Intended purpose ................26 3. Safety information ................. 26 4. Items supplied ................29 5. Before using for the first time ............30 6. Operating the appliance ..............30 Cooking .................... 30 Checking whether the food is cooked ............ 31 Topping up the water ................
  • Seite 27: Overview

    1. Overview Rice tray Steamer baskets Steam outlet Collector Handles with filling opening Steam sleeve Recess (at the edge of the steam sleeve) Bottom part Time selector (adjustable from 0 to 75 minutes) Operating display (red) Water level indicator Steam generator Power cable with power supply plug Numbers of the steamer basket Steam vents...
  • Seite 28: Hot Surfaces

    Thank you for your trust! 2. Intended purpose This steam cooker allows you to cook food Congratulations on your new steam cooker. gently. The device is designed for private, domestic For safe handling of the device and in order use. The device must only be used in dry, in- to get to know the entire scope of features: door areas.
  • Seite 29: Instructions For Safe Operation

    Instructions for safe operation This device can be used by children from the age of 8 and people with restricted physical, sensory or intellectual abilities or people with- out adequate experience and/or understanding, if they are super- vised or instructed on how to use this device safely and if they are aware of the resulting danger.
  • Seite 30: Danger For Children

    To prevent overheating, never cover the appliance, otherwise heat may build up in the appliance. Do not lean over the steam cooker … … when you open the lid and the contents are still hot, and … when hot steam is coming out of the steam vents. There is a danger of being scalded by escaping steam.
  • Seite 31: Items Supplied

    To avoid any risk, do not make modifi- Ensure that there is never too much or cations to the product. too little water in the device. You can check the water level using the water level indicator. It must always be be- FIRE HAZARD tween MAX (1.2 l) and MIN (350 ml).
  • Seite 32: Before Using For The First Time

    5. Before using for the The number of the steamer basket 15 is shown on its handles. first time 6. Place rice tray 2 in the top steamer basket 3. FIRE HAZARD! 7. Place lid 1 on the top steamer bas- Before turning the device on, place it on ket 3.
  • Seite 33: Checking Whether The Food Is Cooked

    • The maximum filling volume (1.2 l) is 10. The appliance starts heating up and sufficient for a cooking time of approx. operating display 11 comes on. 60 minutes. NOTE: Always turn the timer control 10 un- 1. Take collector 5 out of bottom part 9. til the operating display  11 lights up.
  • Seite 34: Topping Up The Water

    - If the set time has elapsed before the Thermal cut-out food being cooked is ready, set time The appliance is protected against overheat- selector 10 to the new time required ing. As soon as all the water in bottom to continue the cooking process. To part 9 has gone, making the temperature be on the safe side, check the water too high, the appliance switches off auto-...
  • Seite 35: Boiling Eggs

    Figure C: The sequence is precisely re- instructions in "Checking whether the versed for storing, when the steamer bas- food is cooked” on page 31". kets 3 fit inside one another to save space. • stir or rearrange the cooking food occa- sionally with a long cooking spoon.
  • Seite 36: Cooking Times - Vegetables

    Cooking times - NOTES: vegetables • Stir or rearrange the cooking food occa- • Prepare the vegetables by cutting off sionally with a long cooking spoon. thick stalks and cutting large vegetables • Ensure that all the pieces are about the into similar-sized pieces.
  • Seite 37: Cooking Times - Fish

    Cooking Vegetable Quantity Comments time Artichokes 2 - 3 medi- 50 - 55 min - Place in the steamer basket with the opening um-sized facing downwards so that condensation can drain off Cooking times - fish The cooking time may be extended by a few minutes for thicker pieces.
  • Seite 38: Cooking Times - Meat

    Cooking times - meat • Poultry, in particular, needs to be cooked right through to prevent the risk • Select only lean, soft meat and remove of salmonella infection. all the fat from it. • Pierce sausages to stop them bursting. •...
  • Seite 39: Cooking Times - Rice

    Cooking times - rice • When opening the lid 1, ensure you are not hit by a cloud of hot steam and • Put the rice, the right amount of water ensure that no condensation drips into and a pinch of salt into rice tray 2. the rice.
  • Seite 40: Recipes

    9. Recipes Salmon fillet with vegetables and rice Kassler ham with Ingredients for 2 portions sprouts and potatoes • 300 g salmon fillet • 3 spring onions Ingredients • 200 g mushrooms • 500 g sprouts, fresh • 3 celery stalks •...
  • Seite 41: Filled Curd Cheese Dumplings

    10. Cleaning and storing 15. Put steamer basket 3 with rice tray 2 on steamer basket 2 and continue Clean the device prior to its first use! cooking. 16. 8 minutes before the end of cooking DANGER! Risk of electric time, open the steamer, remove steam- shock! er basket 3 with the rice and steamer Pull the power supply plug 14 out of the...
  • Seite 42: Cleaning The Accessories

    10.3 Cleaning the accessories 10.6 Descaling the appliance • Clean all detachable accessories by Depending on the hardness of your water, li- hand in a sink with dishwater or in the mescale may build up in the appliance. You dishwasher. should remove this regularly to save energy, increase the service life of the appliance and for hygiene reasons.
  • Seite 43: Problem-Solving

    Packaging specifications When disposing of the packaging, make sure you comply with the environmental reg- ulations applicable in your country. Model: SDG 950 C3 Mains voltage: 220 - 240 V ~ 50 Hz 12. Problem-solving Protection class: I Power rating:...
  • Seite 44: Warranty Of The Hoyer Handel Gmbh

    14. Warranty of the The warranty applies to material or factory defects. HOYER Handel GmbH Excluded from the warranty are Dear Customer, wear parts subject to normal wear your device is provided with a 3 year war- and damages to fragile parts, e.g. ranty starting with the purchase date.
  • Seite 45: Service Centre

    At www.lidl-service.com you can download Supplier this and many other manuals, product vide- os and installation software. Please note that the following address is no service address. First contact the afore- mentioned Service Centre. HOYER Handel GmbH Tasköprüstraße 3 DE-22761 Hamburg GERMANY This QR code takes you directly to the Lidl Ser- vice website (www.lidl-service.com), where...
  • Seite 46 Sommaire 1. Aperçu de l'appareil ..............45 2. Utilisation conforme ..............46 3. Consignes de sécurité ..............46 4. Éléments livrés ................50 5. Avant la première utilisation ............50 6. Utilisation de l’appareil ...............51 Cuisson ..................51 Vérifier le juste point de cuisson ............52 Remettre de l’eau ................
  • Seite 47: Aperçu De L'appareil

    1. Aperçu de l'appareil Couvercle Panier à riz Paniers de cuisson à la vapeur Sorties de vapeur Bac récupérateur Poignées avec ouverture de remplissage Gaine à vapeur Encoche (au bord de la gaine à vapeur) Base Sélecteur de temps (réglable de 0 à 75 minutes) Voyant de fonctionnement (rouge) Indicateur du niveau d’eau Producteur de vapeur...
  • Seite 48: Surfaces Chaudes

    Merci beaucoup pour 2. Utilisation conforme votre confiance ! Ce cuiseur vapeur vous permet de faire cuire délicatement vos aliments. Nous vous félicitons pour l'achat de votre L'appareil est conçu pour un usage domes- nouveau cuiseur vapeur. tique. L'appareil doit être utilisé uniquement dans un espace intérieur sec.
  • Seite 49: Instructions Pour Une Utilisation En Toute Sécurité

    Instructions pour une utilisation en toute sécurité Cet appareil peut être utilisé par des enfants de plus de 8 ans et des personnes ayant des capacités physiques, sensorielles ou men- tales réduites ou un manque d'expérience et/ou de connaissance lorsqu'ils sont surveillés ou qu'ils ont été informés de l'utilisation sûre de l'appareil et ont compris les risques qui en résultent.
  • Seite 50: Danger Pour Les Enfants

    Cet appareil est également destiné à une utilisation domestique et quasi domestique, par exemple... … dans des cuisines du personnel aménagées dans des maga- sins, des bureaux et d'autres locaux commerciaux ; … dans des propriétés agricoles ; … par des clients dans des hôtels, motels et d'autres logements ; …...
  • Seite 51 DANGER ! Risque DANGER ! Risque d'électrocution d'incendie Ne mettez pas l’appareil en service, si Avant de mettre l'appareil en marche, l’appareil ou le câble d’alimentation posez-le sur une surface plane, stable, présente des dommages visibles ou si sèche et résistante à la chaleur. l’appareil a subi une chute.
  • Seite 52: Éléments Livrés

    4. Éléments livrés AVERTISSEMENT : risque de dommages matériels 1 base 9 avec gaine à vapeur 7 Ne faites jamais fonctionner le cuiseur 1 bac récupérateur 5 vapeur sans eau. Cela pourrait entraî- 3 paniers de cuisson à la vapeur 3 ner une surchauffe de l'appareil. 1 panier à...
  • Seite 53: Utilisation De L'appareil

    6. Utilisation de l’appa- 2. Remplissez la base 9 avec 400 ml d’eau potable. reil 3. Figure E : placez la gaine à vapeur 7 sur le producteur de vapeur 13, de telle Cuisson sorte que l'encoche 8 sur la gaine à va- peur soit alignée au coin avant gauche (en direction de l'indicateur de niveau d’eau 12).
  • Seite 54: Vérifier Le Juste Point De Cuisson

    également verser l’eau par l’ouver- ture de remplissage 6 des poignées. REMARQUE : Tournez toujours suffisam- 3. Figure E : placez la gaine à vapeur 7 ment le sélecteur de temps 10 jusqu’à ce sur le producteur de vapeur 13, de telle que le voyant de fonctionnement 11 s’al- sorte que l'encoche 8 sur la gaine à...
  • Seite 55: Remettre De L'eau

    laissez l’appareil continuer à fonc- 5. Après chaque utilisation, nettoyez soi- tionner. gneusement l’appareil (voir « Net- - Si la durée réglée est écoulée avant toyage et entreposage » à la page 61). que l’aliment soit cuit, tournez de nouveau le sélecteur de temps 10 Protection contre la sur la durée souhaitée pour pour- surchauffe...
  • Seite 56: Utilisation Des Paniers De Cuisson À La Vapeur

    Utilisation des paniers Cuire du riz et des de cuisson à la vapeur liquides En fonction des besoins, vous pouvez utiliser Dans le panier à riz 2 fourni dans la livrai- 1, 2 ou tous les 3 paniers de cuisson à la va- son, vous pouvez faire chauffer des sauces peur 3.
  • Seite 57: Temps De Cuisson

    8. Temps de cuisson 1. Remplissez le panier de cuisson à la vapeur 1 avec les aliments qui mettent Les valeurs indiquées dans le tableau sont le plus longtemps à cuire. des valeurs de référence. Le temps de cuis- Exception : Il est recommandé de tou- son réel dépend des facteurs suivants : jours faire cuire la viande et le poisson •...
  • Seite 58: Temps De Cuisson Pour Les Légumes

    Temps de cuisson pour • Les légumes à feuilles doivent cuire le moins de temps possible pour ne pas les légumes perdre leur couleur. • Préparez les légumes en coupant les tro- • Assaisonnez et salez les légumes uni- gnons et en partageant les gros mor- quement lorsqu’ils sont cuits.
  • Seite 59: Temps De Cuisson Pour Le Poisson

    Temps de Légumes Quantité Remarques cuisson Pommes de 900 g 30 - 40 min - juste épluchées et coupées en quartiers terre brasser/retourner à la moitié du temps de cuisson Pommes de 500 g 35 - 40 min - fraîches et épluchées en entier terre nouvelles ou petites Asperges...
  • Seite 60: Temps De Cuisson Pour La Viande

    Temps de cuisson pour • Le gras qui se trouve encore sur la viande est encore réduit par la vapeur. la viande • Il est important que tout particulièrement • Choisissez uniquement de la viande la viande de volaille soit bien cuite pour blanche et maigre de laquelle vous éviter une infection aux salmonelles.
  • Seite 61: Temps De Cuisson Pour Le Riz

    Temps de cuisson pour • Brassez le riz de temps en temps. • Lorsque vous enlevez le couvercle 1, le riz veillez à ne pas entrer en contact avec • Mettez le riz et la quantité d’eau néces- le nuage de vapeur brûlante et à ce saire ainsi qu’une pincée de sel dans le qu’aucune eau de condensation ne panier à...
  • Seite 62: Recettes

    9. Recettes Filet de saumon aux légumes et au riz Porc fumé aux choux Ingrédients pour 2 personnes : de Bruxelles et aux • 300 g de filet de saumon pommes de terre • 3 oignons cébettes • 200 g de champignons Ingrédients : •...
  • Seite 63: Knödel Au Fromage Blanc

    12. Disposez les légumes dans le panier de 3. Aplatir légèrement les morceaux, les cuisson à la vapeur 2. garnir de chocolat ou de crème au nou- 13. Ouvrez le cuiseur vapeur 15 minutes gat et former de petits Knödel (ra- avant la fin du temps de cuisson, reti- violes).
  • Seite 64: Démonter L'appareil

    10.1 Démonter l’appareil 2. Figure E : placez la gaine à vapeur 7 sur le producteur de vapeur 13, de telle 1. Débranchez la fiche secteur 14 de la sorte que l'encoche 8 sur la gaine à va- prise de courant. peur soit alignée au coin avant gauche 2.
  • Seite 65: Mise Au Rebut

    12. Dépannage AVERTISSEMENT : risque de dom- Si votre appareil ne fonctionne pas correcte- mages matériels ! ment, procédez dans un premier temps aux L’appareil ne doit en aucun cas être mis tests de cette liste de contrôle. Il s’agit peut- en marche pendant le détartrage.
  • Seite 66: Caractéristiques Techniques

    13. Caractéristiques 14. Garantie de techniques HOYER Handel GmbH valable pour la Modèle : SDG 950 C3 France Tension secteur : 220 - 240 V ~ 50 Hz Chère cliente, cher client, Vous obtenez pour cet appareil une garantie Classe de protection : I de 3 ans à...
  • Seite 67 Il répond également des défauts de confor- Article 1648 1er alinéa du Code mité résultant de l‘emballage, des instruc- civil tions de montage ou de l‘installation lorsque L‘action résultant des vices rédhibitoires doit celle-ci a été mise à sa charge par le contrat être intentée par l‘acquéreur dans un délai ou a été...
  • Seite 68: Etendue De La Garantie

    Etendue de la garantie • Envoyez ensuite gratuitement à l’adresse de service qu’on vous a donnée le pro- L’appareil a été fabriqué selon des prescrip- duit considéré comme défectueux en y tions de qualité rigoureuses et a été vérifié joignant la preuve d’achat (ticket de minutieusement avant livraison.
  • Seite 69: Garantie De Hoyer Handel Gmbh Valable Pour La Belgique

    15. Garantie de Fournisseur HOYER Handel GmbH Attention ! L’adresse suivante n’est pas valable pour la une adresse de service. Contactez Belgique d’abord le centre de service cité plus haut. HOYER Handel GmbH Chère cliente, cher client, Tasköprüstraße 3 Vous obtenez pour cet appareil une garantie DE-22761 Hamburg de 3 ans à...
  • Seite 70 Etendue de la garantie • Envoyez ensuite gratuitement à l’adresse de service qu’on vous a donnée le pro- L’appareil a été fabriqué selon des prescrip- duit considéré comme défectueux en y tions de qualité rigoureuses et a été vérifié joignant la preuve d’achat (ticket de minutieusement avant livraison.
  • Seite 71 Fournisseur Attention ! L’adresse suivante n’est pas une adresse de service. Contactez d’abord le centre de service cité plus haut. HOYER Handel GmbH Tasköprüstraße 3 DE-22761 Hamburg ALLEMAGNE...
  • Seite 72 Inhoud 1. Overzicht ..................71 2. Correct gebruik ................72 3. Veiligheidsinstructies ..............72 4. Levering ..................76 5. Vóór het eerste gebruik ...............76 6. Bedienen van het apparaat ............77 Stoomkoken ..................77 Gaarpunt controleren ............... 78 Water bijvullen................78 Werking beëindigen ................ 78 Beveiliging tegen oververhitting ............
  • Seite 73: Overzicht

    1. Overzicht Deksel Rijstschaal Stoommanden Stoomuitlaat Opvangschaal Handgrepen met vulopening Stoomhuls Uitsparing (aan de rand van de stoomhuls) Ondergedeelte Tijdkeuzeknop (instelbaar van 0 tot 75 minuten) Werkingsindicator (rood) Waterpeilindicatie Stoomgenerator Netaansluitsnoer met stekker Nummers van de stoommanden Stoomopeningen Kabelopwikkeling...
  • Seite 74: Hete Oppervlakken

    Hartelijk dank voor uw 2. Correct gebruik vertrouwen! Met deze stoomkoker kunt u levensmiddelen voorzichtig gaar laten worden. Gefeliciteerd met uw nieuwe stoomkoker. Het apparaat is ontworpen voor particuliere huishoudens. Het apparaat mag alleen Om het apparaat veilig te gebruiken en om droog en binnenshuis worden gebruikt.
  • Seite 75 Instructies voor een veilig gebruik Dit apparaat kan worden gebruikt door kinderen vanaf 8 jaar en door personen met verminderde fysieke, sensorische of mentale capaciteiten of een gebrek aan ervaring en/of kennis, wanneer zij onder toezicht staan of met betrekking tot het veilige gebruik van het apparaat instructies hebben gekregen en de daaruit voortvloeiende risico's hebben begrepen.
  • Seite 76: Gevaar Voor Kinderen

    Dit apparaat is eveneens bestemd om te worden gebruikt in het huishouden en voor huishoudelijke toepassingen, zoals bijvoor- beeld... … in keukens voor medewerkers in winkels, kantoren en andere bedrijfssectoren; … in landbouwbedrijven; … door gasten in hotels, motels en andere woonvoorzieningen; …...
  • Seite 77 GEVAAR door een GEVAAR van verwondin- elektrische schok gen door verbranden Neem het apparaat niet in gebruik, De oppervlakken van het apparaat wor- wanneer het apparaat of het netaan- den tijdens het gebruik erg heet. Raak sluitsnoer zichtbaar beschadigd is of het apparaat tijdens het gebruik alleen wanneer het apparaat voorheen is ge- aan de tijdkeuzeknop of aan de hand-...
  • Seite 78: Levering

    Plaats het apparaat nooit op hete op- het apparaat tijdens het gebruik alleen pervlakken (bijv. fornuisplaten) of in de aan de tijdkeuzeknop 10 of aan de buurt van warmtebronnen of open vuur. handgrepen 6 aan. Gebruik uitsluitend de originele acces- AANWIJZING: omdat het apparaat licht soires.
  • Seite 79: Bedienen Van Het Apparaat

    9. Kies met de tijdkeuzeknop 10 een 2. Doe zuiver drinkwater in het onderge- kooktijd van 5 - 10 min. deelte 9: 10. Het apparaat begint te verwarmen en - De vulhoeveelheid bedraagt 350 ml de werkingsindicator 11 gaat bran- tot 1,2 l. den. - Afbeelding A: Zorg ervoor dat het 11.
  • Seite 80: Gaarpunt Controleren

    Water bijvullen AANWIJZING: Draai de tijdkeuze- Wanneer het waterpeil in de waterpeilindi- knop 10 altijd zover, totdat de werkingsin- catie 12 tijdens de werking tot onder de dicator 11 brandt. Dan kunt u de MIN-markering daalt, moet u water bijvul- tijdkeuzeknop terugdraaien naar een korte- len om te voorkomen dat het apparaat re gaartijd.
  • Seite 81: Beveiliging Tegen Oververhitting

    Beveiliging tegen Volgorde van boven naar beneden: Stoommand 3 op stoommand 2, stoom- oververhitting mand 2 op stoommand 1. Stoommand 3 Het apparaat beschikt over een beveiliging kan niet direct op stoommand 1 worden ge- tegen oververhitting. Zodra er geen water zet.
  • Seite 82: Menu's Bereiden

    8. Kooktijden Menu's bereiden De in de tabellen aangegeven tijden zijn Wanneer u een heel menu klaarmaakt en richtwaarden. De werkelijke kooktijd hangt daarom meerdere stoommanden 3 boven af van: elkaar gebruikt, let dan op het volgende: • grootte en versheid van de levensmid- •...
  • Seite 83: Kooktijden Groenten

    Kooktijden groenten • Doe kruiden en zout pas bij de groente als deze gaar is. • Bereid de groente voor door stronkjes • Diepvriesgroente kan net als verse eraf te snijden en grote groente in even groente worden gekookt. Bij sommige grote stukken te snijden.
  • Seite 84: Kooktijden Vis

    Kooktijden vis kan komen. Bij dikkere stukken kan de kooktijd enkele minuten langer zijn. • Diepvriesvis kan zonder ontdooien • Controleer de kooktijd. Te kort stoom- worden stoomgekookt. Zorg ervoor dat gekookte vis is van binnen nog glazig. de afzonderlijke stukken van elkaar ge- Te lang stoomgekookte vis kan droog scheiden zijn, zodat de stoom overal worden.
  • Seite 85: Kooktijden Vlees

    Kooktijden vlees • Met name gevogelte moet volledig gaar zijn gemaakt, om het gevaar voor • Kies uitsluitend mager, zacht vlees, salmonellabesmetting te voorkomen. waarvan u het vet volledig verwijdert. • Prik in worstjes gaatjes om openbar- • De stukken vlees mogen niet te dik zijn. sten te voorkomen.
  • Seite 86: Kooktijden Rijst

    Kooktijden rijst • Let er bij het openen van het deksel 1 op dat u geen stoomwalm in uw ge- • Doe de rijst en de passende hoeveel- zicht krijgt en dat er geen condenswa- heid water met een snufje zout in de ter in de rijst druppelt.
  • Seite 87: Recepten

    9. Recepten Zalmfilet met groente en rijst Casselerrib met spruit- Ingrediënten voor 2 porties: jes en aardappelen • 300 g zalmfilet • 3 bosuitjes Ingrediënten: • 200 g champignons • 500 g spruitjes, vers • 3 stangen selderij • 500 g aardappels, vers, geschild en in •...
  • Seite 88: Gevulde Kwarkknoedels

    13. Open 15 minuten voor het einde van de gaartijd de stoomoven, neem de Tips: rijstschaal 2 met de rijst eruit en plaats • U kunt de knoedels voor het koken in de stoommand 2 met de groente op krokant wentelen. stoommand 1.
  • Seite 89: Ondergedeelte Reinigen

    10.2 Ondergedeelte reinigen 4. Zet de rijstschaal 2 in de stoomman- den 3. 1. Reinig het ondergedeelte 9 met een 5. Zet het deksel 1 erop vochtige doek. U kunt ook een beetje 6. Zet de stoommanden 3 op het onder- afwasmiddel nemen. gedeelte 9. 2. Neem het apparaat nog een keer af 7.
  • Seite 90: Problemen Oplossen

    13. Technische gegevens Dit recyclingsymbool markeert bijv. een voorwerp of materi- aaldelen als waardevol voor Model: SDG 950 C3 de terugwinning. Recycling Netspanning: 220 - 240 V ~ 50 Hz help het verbruik van grondstof- Beschermingsklasse: I fen te reduceren en het milieu te ontlasten.
  • Seite 91: Garantie Van Hoyer Handel Gmbh

    14.Garantie van Omvang van de garantie Het apparaat werd zorgvuldig geproduceerd HOYER Handel GmbH volgens strenge kwaliteitsrichtlijnen en nauw- Geachte klant, gezet gecontroleerd vóór levering. U heeft op dit apparaat 3 jaar garantie van- De garantie geldt voor materiaal- of fabrica- af de koopdatum.
  • Seite 92: Servicecenters

    • Wanneer zich functiestoringen of ande- Leverancier re onvolkomenheden voordoen, neemt u Let erop, dat het onderstaande adres geen eerst telefonisch of per e-mail con- serviceadres is. Neem eerst contact op tact op met het hierna genoemde ser- met het bovengenoemde servicecenter. vicecenter.
  • Seite 94 Spis treści 1. Przegląd..................93 2. Użytkowanie zgodne z przeznaczeniem.......... 94 3. Wskazówki bezpieczeństwa ............94 4. Zawartość zestawu ................ 98 5. Przed pierwszym użyciem .............. 98 6. Obsługa urządzenia ............... 99 Gotowanie na parze ................99 Sprawdzanie stopnia ugotowania............100 Uzupełnianie wody ................
  • Seite 95: Przegląd

    1. Przegląd Pokrywka Miska na ryż Kosze parowe Dysza pary Misa ociekowa Uchwyty z otworem do napełniania Tuleja parowa Wypust (na brzegu tulei parowej) Podstawa Przełącznik czasu pracy (ustawiany w zakresie od 0 do 75 minut) Wskaźnik działania (czerwone) Wskaźnik poziomu wody Generator pary Przewód sieciowy z wtyczką...
  • Seite 96: Serdecznie Dziękujemy Za Zaufanie

    Serdecznie dziękujemy 2. Użytkowanie zgodne za zaufanie! z przeznaczeniem Za pomocą niniejszego parowaru mogą Gratulujemy Państwu zakupu nowego paro- Państwo gotować na parze produkty spo- waru. żywcze. Urządzenie jest przeznaczone do użytku do- Aby móc bezpiecznie korzystać z urządze- mowego. Urządzenie może być używane wy- nia i poznać...
  • Seite 97 Wskazówki dotyczące bezpiecznego użytkowania Urządzenie może być używane przez dzieci powyżej 8. roku życia i osoby o ograniczonej sprawności fizycznej, sensorycznej lub umysłowej bądź przez osoby nieposiadające wystarczające- go doświadczenia lub wiedzy, jeżeli są nadzorowane przez inne osoby lub zostaną poinstruowane w zakresie bezpiecznego używania urządzenia i zrozumieją...
  • Seite 98 Niniejsze urządzenie nie jest przeznaczone do pracy z ze- wnętrznym zegarem sterującym lub osobnym zdalnym systemem sterującym. Urządzenie jest przeznaczone do używania zarówno w gospo- darstwach domowych jak i podobnych obiektach, na przykład… … w kuchniach dla pracowników sklepów, biur oraz innych miejsc związanych z prowadzeniem działalności gospodar- czej;...
  • Seite 99 NIEBEZPIECZEŃSTWO Przy wyciąganiu wtyczki sieciowej z gniazdka należy zawsze ciągnąć za porażenia prądem wtyczkę, w żadnym wypadku nie wolno spowodowanego wilgocią ciągnąć za kabel. Podstawy, przewodu zasilającego oraz Wtyczkę sieciową należy wyciągnąć z wtyczki sieciowej nie wolno zanurzać gniazdka, ... w wodzie ani innych cieczach.
  • Seite 100: Zawartość Zestawu

    NIEBEZPIECZEŃSTWO Urządzenie wyposażone jest w antypo- ślizgowe nóżki z tworzywa sztucznego. obrażeń na skutek Ponieważ meble mogą być pokryte róż- oparzenia norodnymi lakierami i tworzywami Nie pochylać się nad parowarem ... sztucznymi, a do ich pielęgnacji używa … podczas zdejmowania pokrywki, się...
  • Seite 101: Obsługa Urządzenia

    WSKAZÓWKA: Części urządzenia mogą 8. Włożyć wtyczkę sieciową 14 do od- być w momencie dostarczenia pokryte cien- powiedniego gniazdka z bolcami ką warstwą tłuszczu, co podczas pierwsze- ochronnymi. go użycia może spowodować lekką 9. Na przełączniku czasu pracy 10 usta- emisję dymu i tworzenie się specyficznego wić...
  • Seite 102: Sprawdzanie Stopnia Ugotowania

    1. Wyjąć misę ociekową 5 z podsta- 9. Ustawić odpowiedni czas gotowania wy 9. za pomocą przełącznika czasu pra- 2. Podstawę 9 napełnić czystą wodą zdat- cy 10. ną do picia. 10. Urządzenie powinno zacząć się na- - Wymagany poziom napełnienia wy- grzewać, a wskaźnik 11 trybu pracy nosi od 350 ml do 1,2 l.
  • Seite 103: Uzupełnianie Wody

    cy 10 na „0” w celu wyłączenia czasu gotowania, należy przekręcić urządzenia. przełącznik czasu pracy 10 na „0”. - Jeśli potrawa nie jest jeszcze goto- 3. Chwilę odczekać, aż para ulotni się z wa, położyć z powrotem pokryw- urządzenia. kę 1, a urządzenie zostawić 4.
  • Seite 104: Używanie Koszy Parowych

    Używanie koszy Gotowanie ryżu i parowych płynnych dań W zależności od potrzeby można używać W załączonej do zestawu misce na ryż 2 jednego, dwóch lub wszystkich trzech koszy można gotować sosy wraz z innymi płynny- parowych 3. mi daniami, a także można podgrzewać i Kosze parowe 3 są...
  • Seite 105: Czasy Gotowania

    8. Czasy gotowania 1. W koszu parowym 1 należy umieścić produkty wymagające najdłuższego Podane w tabelach czasy są wartościami czasu gotowania. orientacyjnymi. Rzeczywisty czas gotowa- Wyjątek: Mięso i ryby należy goto- nia zależy od następujących czynników: wać zawsze w dolnym koszu paro- •...
  • Seite 106: Czasy Gotowania Warzyw

    Czasy gotowania • Warzywa przyprawić i posolić dopie- ro po ugotowaniu. warzyw • Mrożone warzywa można gotować • W przypadku warzyw należy odciąć jak świeże. W przypadku niektórych łodygi, a duże sztuki należy podzielić warzyw czas gotowania wydłuża się o na jednakowo duże kawałki.
  • Seite 107: Czasy Gotowania Ryb

    Czas goto- Warzywa Ilość Uwagi wania Grzyby 200 g 15–20 min. - świeże, pokrojone na plasterki lub małe w całości gdy minie połowa czasu gotowania nale- ży przemieszać/przełożyć Ziemniaki 900 g 30–40 min. - świeże, obrane i pokrojone na ćwiartki gdy minie połowa czasu gotowania nale- ży przemieszać/przełożyć...
  • Seite 108: Czasy Gotowania Mięsa

    Czas goto- Ryba Ilość Uwagi wania Krewetki 400 g 10–15 min. - gdy minie połowa czasu gotowania należy przemieszać/przełożyć Ogony ho- 2 sztuki 20–25 min. mara Ostrygi 6 sztuki 15–20 min. - gotować tylko świeże ostrygi z zamkniętymi muszelkami ostrygi są ugotowane, gdy muszelki są cał- kowicie otwarte Czasy gotowania mięsa •...
  • Seite 109: Czasy Gotowania Ryżu

    Czasy gotowania ryżu • Przy otwieraniu pokrywki 1 należy uważać na to, aby nie skierować na • Dodać ryżu do odpowiedniej ilości siebie strumienia pary oraz żeby skon- wody oraz szczyptę soli do miski na densowana woda nie spłynęła do ry- ryż 2.
  • Seite 110: Przepisy

    9. Przepisy Filet z łososia z warzywami i ryżem Schab peklowany z Składniki na 2 porcje: brukselką i • 300 g filetu z łososia • 3 cebule szczypiorowe ziemniakami • 200 g pieczarek Składniki: • 3 łodygi selera • 500 g świeżych brukselek •...
  • Seite 111: Nadziewane Knedle Twarogowe

    13. Parowar otworzyć 15 min. przed koń- cem gotowania, wyjąć ryż razem z mi- Porady: ską na ryż 2 oraz wstawić kosz • Przed ugotowaniem gotowe knedle parowy nr 2 z warzywami umieszcza- można obtoczyć w krokancie. jąc go nad koszem parowym nr 1. •...
  • Seite 112: Czyszczenie Podstawy

    10.2 Czyszczenie podstawy 10.5 Przechowywanie urządzenia 1. Do czyszczenia podstawy 9 używać wilgotnej szmatki. Można dodać odro- Aby urządzenie nie zajmowało w szafie binę środka do mycia naczyń. dużo miejsca w pionie, poszczególne kosze 2. Wytrzeć używając czystej wody. parowe 3 różnych wielkości można po- 3.
  • Seite 113: Utylizacja

    12. Rozwiązywanie pro- OSTRZEŻENIE przed szkodami mate- blemów rialnymi! Jeżeli urządzenie nie będzie prawidłowo W żadnym wypadku nie wolno włą- działać, należy sprawdzić poniższą listę. czać urządzenia podczas usuwania ka- Może okazać się, że przyczyną jest niewiel- mienia. Może to spowodować ki problem, który użytkownik może usunąć...
  • Seite 114: Dane Techniczne

    13. Dane techniczne 14. Gwarancja firmy HOYER Handel GmbH Model: SDG 950 C3 Drogi Kliencie, Napięcie sieciowe: 220 – 240 V ~ 50 Hz Na niniejsze urządzenie jest udzielana 3 -let- Klasa ochronności: I nia gwarancja obowiązująca od dnia jego Moc: 950 W zakupu.
  • Seite 115: Zakres Gwarancji

    tychmiast po rozpakowaniu produktu. Postępowanie w przypadku Naprawy dokonywane po upływie okresu gwarancji obowiązywania gwarancji płatne. Aby zapewnić szybkie załatwienie zgłasza- nego przypadku, należy stosować się do Zakres gwarancji poniższych wskazówek: Urządzenie wyprodukowano zgodnie suro- • W przypadku wszystkich zapytań nale- wymi przepisami dotyczącymi jakości i do- ży mieć...
  • Seite 116: Centrum Serwisowe

    Posługując się tym kodem QR można przejść bezpośrednio do strony marki Lidl (www.lidl-service.com) i otworzyć instrukcję obsługi, wprowadzając numer artykułu (IAN) 340677_2004. Centrum Serwisowe Serwis Polska Tel.: 22 397 4996 E-Mail: hoyer@lidl.pl IAN: 340677_2004 Dostawca Należy pamiętać, że poniższy adres nie jest adresem serwisu.
  • Seite 118 Obsah 1. Přehled ..................117 2. Použití k určenému účelu ............. 118 3. Bezpečnostní pokyny ..............118 4. Rozsah dodávky ................121 5. Před prvním použitím ..............122 6. Obsluha přístroje ................. 122 Vaření ..................... 122 Kontrola varu ................... 123 Doplnění...
  • Seite 119: Přehled

    1. Přehled Víko Miska na rýži Parní koše Výstup páry Zachycovací jímka Rukojeti s plnicím otvorem Parní objímka Vybrání (na okraji parní objímky) Spodní část Časovač (nastavitelné od 0 do 75 minut) Kontrolka provozu (červené) Ukazatel vodního stavu Parní kotel Napájecí...
  • Seite 120: Děkujeme Za Vaši Důvěru

    Děkujeme za vaši 2. Použití k určenému důvěru! účelu Tímto parním hrncem můžete šetrně vařit po- Gratulujeme vám k vašemu novému parnímu traviny. hrnci. Přístroj je určen pro domácí použití. Přístroj se smí používat pouze v suchých vnitřních Pro bezpečné zacházení s přístrojem a za- prostorách.
  • Seite 121 Pokyny pro bezpečný provoz Tento přístroj smí používat děti starší 8 let a osoby s omezenými fyzickými, senzorickými nebo duševními schopnostmi nebo oso- by, které nemají dostatek zkušeností a/nebo znalostí, pouze pod dohledem nebo pokud byly poučeny, jak přístroj bezpečně pou- žívat, a pochopily, jaké...
  • Seite 122 Nenaklánějte se nad parním hrncem... … když zvedáte pokličku a obsah je ještě horký a … když z parních otvorů vystupuje horká pára. Hrozí nebezpečí opaření unikající vodní párou. Dbejte na to, aby žádná tekutina nepřetekla na zástrčky a zásuv- ky přístroje.
  • Seite 123: Rozsah Dodávky

    Přístroj nikdy nestavte pod závěsnou skříňku, protože pára vystupuje nahoru NEBEZPEČNÍ POŽÁRU a mohla by skříňku poškodit. Položte přístroj před zapnutím na rovný, K výrobě páry používejte výlučně čistou stabilní, suchý a žáruvzdorný podklad. vodu. Nepřetržitý dohled během provozu není Přístroj a příslušenství...
  • Seite 124: Před Prvním Použitím

    5. Před prvním 6. Postavte misku na rýži 2 do nejvyššího parního koše 3. použitím 7. Nasaďte víko 1 na nejvyšší parní koš 3. 8. Síťovou zástrčku 14 zasuňte do vhod- NEBEZPEČÍ POŽÁRU! né síťové zásuvky s ochranným kontak- Položte přístroj před zapnutím na rovný, tem.
  • Seite 125: Kontrola Varu

    1. Odeberte zachycovací jímku 5 ze Kontrola varu spodní části 9. 2. Naplňte čistou vodu do spodní části 9: NEBEZPEČÍ zranění v důsled- - Objem náplně činí 350 ml až 1,2 l; ku opaření! - Obrázek A: Dbejte na to, aby se Nenaklánějte se nad parním hrncem... stav vody na ukazateli vodního sta- …...
  • Seite 126: Doplnění Vody

    7. Tipy pro vaření s Doplnění vody parním hrncem Když spadne stav vody na ukazateli vodní- ho stavu 12 během provozu pod značku MIN, musíte doplnit vodu, aby přístroj ne- NEBEZPEČÍ zranění v důsled- běžel nasucho a nepřehříval se. ku opaření! 1.
  • Seite 127: Vaření Rýže A Tekutin

    Vaření rýže a tekutin 5. Víko 1 zcela sejměte. 6. Nasaďte parní koš 2 na parní koš 1 a V dodané misce na rýži 2 můžete vařit a víko 1 opět zavřete. ohřívat omáčky nebo jiné tekutiny, ovoce a 7. Parní koš 3 naplňte potravinami, které také...
  • Seite 128: Doby Vaření Zeleniny

    Doby vaření zeleniny • Okořeňte a osolte zeleninu teprve, když je uvařená. • Zeleninu připravte tak, že odříznete • Mraženou zeleninu můžete vařit stejně košťály a větší zeleninu rozdělíte na jako čerstvou. U některé zeleniny se stejně velké kusy. doba vaření o pár minut prodlouží, •...
  • Seite 129: Doby Vaření Ryb

    Doby vaření ryb • Pohlídejte si dobu vaření. Příliš krátce vařená ryba je uvnitř ještě skelná. Příliš • Mražené ryby se mohou vařit bez roz- dlouho vařená ryba se může vysušit. mrazení. Dbejte na to, aby byly jednot- livé kusy od sebe oddělené, aby se pára všude dostala.
  • Seite 130: Doby Vaření Masa

    Doby vaření masa • Obzvlášť drůbež je třeba důkladně pro- vařit, aby bylo vyloučeno nebezpečí in- • Vybírejte výhradně libové, měkké ma- fekce nákazy salmonelou. so, ze kterého jste zcela odstranili tuk. • Párky napíchněte, aby nepraskly. • Kusy masa by neměly být příliš tlusté. •...
  • Seite 131: Doby Vaření Rýže

    Doby vaření rýže • Při otvírání víka 1 dbejte nato, aby vás nezasáhl příval páry a aby do rýže ne- • Vložte do misky na rýži 2 rýži a vhod- kapala kondenzovaná voda. né množství vody a také špetku soli. • Existuje mnoho různých typů rýže. Do- •...
  • Seite 132: Recepty

    9. Recepty Filet z lososa se zeleninou a rýží Uzené maso Kasseler s Přísady pro 2 porce: růžičkovou kapustou a • 300 g filetů z lososa bramborami • 3 jarní cibulky • 200 g žampiónů Přísady: • 3 řapíky celeru •...
  • Seite 133: Plněné Tvarohové Knedlíky

    10. Čištění a skladování 14. Nasaďte misku na rýži 2 do parního koše 3. Před prvním použitím přístroj vyčis- 15. Nasaďte parní koš 3 s miskou na rý- těte ! ži 2 na parní koš 2 a pokračujte ve va- ření. NEBEZPEČÍ úrazu elektrickým 16.
  • Seite 134: Sestavení Příslušenství

    10.4 Sestavení příslušenství 1. Otřete zanesená místa hadříkem namo- čeným v troše octa. 1. Nasaďte dna do parních košů 3: 2. Pokud je parní kotel 13 silněji zanesen, - vložte dna tak, aby malé prohlubně naplňte běžný odstraňovač vodního ka- pro vejce ukazovaly směrem dolů; mene do spodní...
  • Seite 135: Řešení Problémů

    12. Řešení problémů 13. Technické parametry Pokud by váš přístroj nefungoval podle po- Model: SDG 950 C3 žadavků, projděte si, prosím, nejdříve tento Síťové napětí: 220 - 240 V ~ 50 Hz kontrolní seznam. Možná se jedná o nepatr- Třída ochrany: ný...
  • Seite 136: Záruka Společnosti Hoyer Handel Gmbh

    14. Záruka společnosti Ze záruky jsou vyloučeny díly pod- léhající rychlému opotřebení, které HOYER Handel GmbH jsou vystaveny běžnému opotřebe- Vážená zákaznice, vážený zákazníku, ní, a poškození křehkých dílů, např. na tento přístroj jste získali 3 letou záruku vypínačů, baterií, osvětlení nebo od data nákupu.
  • Seite 137: Servisní Střediska

    Na www.lidl-service.com si můžete stáhnout tento a mnoho dalších manuálů, produktová videa a instalační software. S tímto QR kódem se dostanete přímo na servisní stránku Lidl (www.lidl-service.com) a můžete zadáním čísla výrobku (IAN) 340677_2004 otevřít váš návod k použití. Servisní střediska Servis Česko Tel.: 800143873 E-Mail: hoyer@lidl.cz...
  • Seite 138 Obsah 1. Prehľad ..................137 2. Použitie podľa určenia ..............138 3. Bezpečnostné pokyny ..............138 4. Obsah balenia ................142 5. Pred prvým použitím ..............142 6. Obsluha prístroja................143 Dusenie ................... 143 Kontrola stavu varenia ............... 144 Doplnenie vody ................144 Ukončenie prevádzky ................
  • Seite 139: Prehľad

    1. Prehľad Veko Miska na ryžu Parné koše Výstup pary Záchytná miska Rukoväti s plniacim otvorom Parná objímka Výrez (na okraji parnej objímky) Spodný diel Nastavovač času (nastaviteľný od 0 do 75 minút) Indikátor prevádzky (červené) Indikátor hladiny vody Výrobník pary Sieťový...
  • Seite 140: Ďakujeme Vám Za Dôveru

    Ďakujeme vám za 2. Použitie podľa dôveru! určenia Tento parný hrniec slúži na šetrné varenie Gratulujeme vám k novému parnému hrncu. potravín v pare. Prístroj je koncipovaný na domáce používa- Pre bezpečné zaobchádzanie s prístrojom a nie. Prístroj sa smie používať len v oboznámenie sa s rozsahom výkonov: suchých vnútorných priestoroch.
  • Seite 141 Pokyny pre bezpečnú prevádzku Tento prístroj môžu používať deti od 8 rokov a osoby s obmedzenými fyzickými, zmyslovými alebo duševnými schop- nosťami alebo s nedostatkom skúseností a/alebo vedomostí, ak sú pod dozorom alebo ak boli poučené o bezpečnom používaní prístroja a pochopili riziká, ktoré sú s jeho používaním spojené. Deti sa nesmú...
  • Seite 142 Tento prístroj je taktiež určený na to, aby sa používal v domác- nosti a tiež spôsobom podobným domácemu použitiu, ako naprí- klad… … v závodných kuchyniach, predajniach, kanceláriách a iných komerčných oblastiach; … na poľnohospodárskych farmách; … hosťami v hoteloch, moteloch a iných obytných zariadeniach; …...
  • Seite 143 NEBEZPEČENSTVO v NEBEZPEČENSTVO úrazu dôsledku zásahu popálením elektrickým prúdom Povrch prístroja je počas prevádzky veľ - mi horúci. Počas prevádzky sa prístroja Prístroj neuvádzajte do prevádzky, ak dotýkajte len na nastavovači času alebo prístroj alebo sieťový kábel vykazujú vi- na rukovätiach. Parných košov, ako diteľné...
  • Seite 144: Obsah Balenia

    Používajte iba originálne príslušenstvo. UPOZORNENIE: Pretože prístroj sa dodá- Prístroj je vybavený protišmykovými va s nanesenou tenkou vrstvou tuku, môže plastovými nožičkami. Pretože povrcho- pri prvom použití dôjsť k miernemu vzniku vá úprava nábytku obsahuje rôzne laky dymu a zápachu. Nie je to škodlivé a po a plasty a nábytok sa preto ošetruje rôz- krátkom čase to ustane.
  • Seite 145: Obsluha Prístroja

    11. Po uplynutí nastavenej doby nechajte 3. Obrázok E: Parnú objímku 7 nasaďte prístroj vychladnúť a potom ho znovu na výrobník pary 13 tak, aby výrez 8 vyčistite. na parnej objímke smeroval k predné- Prístroj je teraz pripravený na prevádz- mu ľavému rohu (v smere indikátora hladiny vody 12).
  • Seite 146: Kontrola Stavu Varenia

    Kontrola stavu varenia Doplnenie vody Ak hladina vody v indikátore hladiny vo- dy 12 počas prevádzky klesne pod značku NEBEZPEČENSTVO poranenia MIN, musíte doplniť vodu, aby prístroj ne- obarením! bežal nasucho a neprehrial sa. Nenakláňajte sa nad parný hrniec... … keď otvárate veko 1 a obsah je ešte 1.
  • Seite 147: Ochrana Proti Prehriatiu

    Ochrana proti Varenie vajíčok prehriatiu Parný hrniec je vhodný aj ako varič vajíčok. Pre tento účel je na dne každého parného Prístroj je vybavený ochranou proti prehria- koša 3 vždy 6 priehlbín, do ktorých sa dajú tiu. Ak v spodnej časti 9 už nie je žiadna postaviť...
  • Seite 148: Príprava Menu

    8. Doby varenia Príprava menu Ak pripravujete celé menu a používate preto Časy uvedené v tabuľ kách sú orientačné viac parných košov 3 nad sebou, dbajte na hodnoty. Skutočná doba varenia závisí od: nasledovné: • veľ kosti a čerstvosti potravín, • Pokrm s vyššou hmotnosťou by sa mal •...
  • Seite 149: Doby Prípravy Zeleniny V Parnom Hrnci

    Doby prípravy zeleniny • Zeleninu koreňte a soľte až po uvarení. • Mrazená zelenina sa dá pripravovať v v parnom hrnci parnom hrnci rovnako ako čerstvá. Pri • Zeleninu pripravte tak, že odrežete hlú- niektorých druhoch mrazenej zeleniny by a veľ kú zeleninu rozdelíte na rovna- sa doba prípravy predlžuje o niekoľ...
  • Seite 150: Doby Varenia Rýb

    Doba va- Zelenina Množstvo Poznámky renia Zemiaky 900 g 30 – 40 min - čerstvé, ošúpané a rozštvrtené po polovici doby varenia premiešať/pre- vrstviť Nové alebo 500 g 35 – 40 min - čerstvé a ošúpané v celosti malé zemiaky Špargľa 400 g 15 –...
  • Seite 151: Doby Varenia Mäsa

    Doby varenia mäsa • Predovšetkým hydina sa musí celkom prevariť, aby sa predišlo nebezpečen- • Zvoľte výlučne chudé, mäkké mäso, z stvu infekcie salmonelózy. ktorého úplne odstránite tučné časti. • Klobásky a párky poprepichujte, aby • Kúsky mäsa by nemali byť príliš hrubé. nepraskali.
  • Seite 152: Doby Prípravy Ryže Vo Varnom Hrnci

    Doby prípravy ryže vo • Ryžu občas premiešajte. • Pri otváraní veka 1 dbajte na to, aby varnom hrnci vás nezasiahla para a skondenzovaná • Ryžu a príslušné množstvo vody so štip- voda nekvapkala do ryže. kou soli vložte do misky na ryžu 2. •...
  • Seite 153: Recepty

    9. Recepty Filé z lososa so zeleninou a ryžou Údené rebierko s Suroviny pre 2 porcie: ružičkovým kelom a • 300 g filé z lososa • 3 jarné cibuľ ky zemiakmi • 200 g šampiňóny Suroviny: • 3 vňate zeleru •...
  • Seite 154: Plnené Tvarohové Knedličky

    14. Misku na ryžu 2 vložte do parného koša 3. Tipy: 15. Nasaďte parný kôš 3 s miskou na ry- • Knedličky môžete pred vložením do žu 2 na parný kôš 2 a pokračujte v prí- parného hrnca povaľ kať v krokantovej prave pokrmu v parnom hrnci.
  • Seite 155: Čistenie Spodného Dielu

    10.2 Čistenie spodného dielu 6. Nasaďte parné koše 3 na spodný diel 9. 7. Prístroj uložte. 1. Vyčistite spodný diel 9 pomocou vlhkej handričky. Môžete použiť aj malé 10.6 Odstránenie vodného množstvo saponátu. kameňa z prístroja 2. Následne ju poutierajte čistou vodou. 3. Prístroj znovu používajte až vtedy, keď V závislosti od tvrdosti vody sa na prístroji je úplne vysušený.
  • Seite 156: Riešenie Problémov

    13. Technické údaje Tento symbol recyklácie ozna- čuje, napr. predmet alebo časti materiálu, ako hodiace sa na Model: SDG 950 C3 recykláciu. Recyklácia pomá- Sieťové napätie 220 – 240 V ~ 50 Hz ha znižovať spotrebu surovín a Trieda ochrany: I zaťaženie životného prostredia.
  • Seite 157: Záruka Spoločnosti Hoyer Handel Gmbh

    14. Záruka spoločnosti Záruka sa nevzťahuje na namáhané diely, ktoré sú vystavené normálne- HOYER Handel GmbH mu opotrebeniu, na poškodenia Vážená zákazníčka, vážený zákazník, krehkých dielov, napr. spínačov, ba- na tento prístroj sa vzťahuje záruka 3 roky térií, osvetľovacích prostriedkov ale- od dátumu kúpy.
  • Seite 158: Servisné Stredisko

    Na www.lidl-service.com si môžete stiahnuť túto a ďalšie príručky, produktové videá a in- štalačný softvér. S týmto QR kódom sa dostanete priamo na stránku Lidl servisu (www.lidl-service.com) a po zadaní čísla artikla (IAN) 340677_2004 si môžete otvoriť svoj ná- vod na obsluhu. Servisné...

Diese Anleitung auch für:

Ian 340677 2004

Inhaltsverzeichnis