DeLonghi Nespresso Vertuo Plus Bedienungsanleitung
Kapitel
Fehlerbehebung

Verwandte Anleitungen für DeLonghi Nespresso Vertuo Plus


Inhaltszusammenfassung für DeLonghi Nespresso Vertuo Plus
- Seite 1 My Machine Ma Machine Meine Maschine Моя кофемашина UM_VERTUO+_DELONGHI.indb 1 05.09.18 09:40...
-
Seite 2: Inhaltsverzeichnis
Nespresso Vertuo is an exclusive system creating a perfect coffee, from the Espresso to the large Alto, time after time. Nespresso Vertuo machines are equipped with the unique Centrifusion technology to gently extract an Alto, Mug, Gran Lungo, Double Espresso or Espresso at the touch ®... -
Seite 3: Safety Precautions
SAFETY PRECAUTIONS CAUTION: Use of controls, adjustments or performance of procedures other than those specified here in may result in hazardous radiation exposure. CAUTION: when you appliance for anything supervised and have safely and understand see this sign, please other than its intended been given instructions the dangers. - Seite 4 SAFETY PRECAUTIONS NOTE: This appliance contains a class-1 laser product. automatic reverse similarly qualified The surface must be • Never put the mechanism will persons, in order to resistant to heat and appliance or part of it operate. avoid all risks. fluids, like water, coffee, in a dishwasher.
- Seite 5 Nespresso authorised • Be careful not to period of time. dispose. representative for injure yourself on • Do not use the • Coffee machine should examination, repair or sharp points or trap appliance without not be placed in a adjustment. your fingers when a cup placed at the cabinet when in use.
-
Seite 6: Safety Precautions / Consignes De Sécurité
SAFETY PRECAUTIONS CONSIGNES DE SÉCURITÉ the right to change SAVE THESE ATTENTION: • La machine est instructions without INSTRUCTIONS Lorsque ce symbole conçue pour préparer prior notice. Pass them on to any apparaît, veuillez des boissons • Unplug appliance subsequent user. consulter les consignes conformément à... - Seite 7 ATTENTION: Les réglages, ajustements ou des procédures autres que ceux spécifiés ci-dessous peuvent entraîner une exposition dangereuse aux radiations. bureaux et d’autres la surveillance d’un avec la machine. pincement de doigt. environnement de adulte. • Le fabricant décline • Branchez la machine travail;...
- Seite 8 CONSIGNES DE SÉCURITÉ NOTE: Cette machine contient un appareil laser de classe-1. • Si le cordon et la d’entrée équivalente. d’alimentation afin de décharges électriques prise d’alimentation • Pour éviter tout danger, ne pas l’endommager. mortelles. sont endommagés, ne placez jamais la •...
- Seite 9 immédiatement de capsules ni dans le réservoir avec de l’eau • Ne nettoyez jamais la prise électrique. bac de récupération douce et potable. votre machine avec Contactez le Club des capsules. Vous • Videz le réservoir un produit d’entretien Nespresso ou un risqueriez de vous d’eau en cas de non- ou un solvant...
- Seite 10 CONSIGNES DE SÉCURITÉ Vertuo disponibles droit de modifier sans CONSERVEZ CES exclusivement auprès préavis les présentes INSTRUCTIONS du Club Nespresso consignes. Transmettez-les à tout ou des représentants • Débranchez l'appareil nouvel utilisateur de la Nespresso autorisés. en cas de non- machine.
-
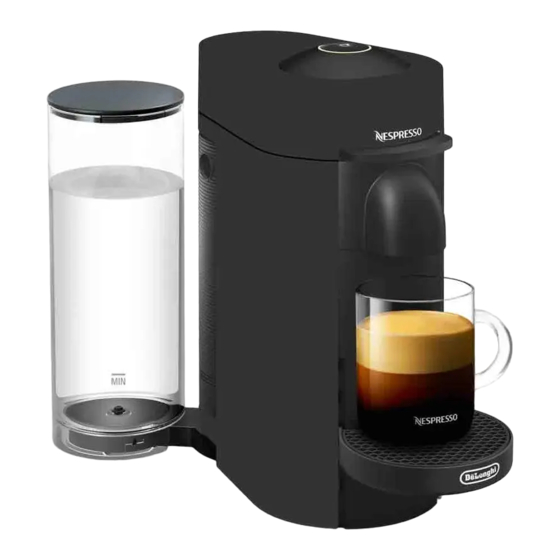
Seite 11: Overview / Présentation
OVERVIEW / PRÉSENTATION SPECIFICATIONS / SPÉCIFICATIONS OFF/Open and Close Lever ON/Coffee Button Levier d'ouverture et fermeture / Arrêt Bouton café / Marche Couvercle ENV155 220 - 240 V, 50 Hz, 1260 W ~ 4.6 kg Capsule Container 1.2 L / 1.8 L Collecteur de capsules If water tank on the side /... -
Seite 12: Machine Handling / Manipulation De L'appareil
MACHINE HANDLING / MANIPULATION DE L'APPAREIL WATER TANK / RÉSERVOIR D’EAU The water tank arm Remove the water tank by tilting it slightly backwards, then gently pulling it can be rotated and up. Put the water tank in position by placing it vertically onto its arm, until positioned at the back, there is a ‘click’... -
Seite 13: Power Cable
CUP SUPPORT / SUPPORT DE TASSE The cup support has To place the cup support, slide cup support straight 4 positions and can be into the holes and gently push down until the hooks temporarily removed to are well in place.To remove it, gently lift straight up accommodate various and then pull the cup support out. -
Seite 14: First Use Or After A Long Period Of Non-Use
FIRST USE OR AFTER A LONG PERIOD OF NON-USE / PREMIÈRE UTILISATION OU APRÈS UNE LONGUE PÉRIODE D’INUTILISATION CAUTION: First read the Safety Precautions to avoid risks of fatal electrical shock and fire. ATTENTION: Avant toute chose, lire les consignes de sécurité pour éviter tout risque de décharge électrique mortelle ou d’incendie. - Seite 15 Steady green lights will indicate the machine Place a cup of at least 0.5 l under the coffee is ready. outlet. La lumière VERTE et fixe indique que la Placer un récipient d’au moins 0.5 l sous l’orifice machine est prête. de sortie du café.
-
Seite 16: Coffee Preparation / Préparation Du Café
COFFEE PREPARATION / PRÉPARATION DU CAFÉ CAUTION: Be careful not to injure yourself on sharp points or trap your fingers when reaching inside the machine. AVERTISSEMENT: Soyez prudent de ne pas vous blesser sur les pointes coupantes ou de coincer vos doigts dans la machine. Fill the water tank Turn the machine “ON”... - Seite 17 Insert a capsule with the dome shape facing downward. NOTE: Insérer une capsule en plaçant le côté arrondi vers le bas. The factory settings and recommended cup sizes are: NOTE: Alto: 414 ml Gran Lungo: 150 ml To avoid damaging the machine, use only Mug: 230 ml Double Espresso: 80 ml fresh, unused capsules.
-
Seite 18: Energy Saving Concept / Concept D'économie D'énergie
COFFEE PREPARATION / PRÉPARATION DU CAFÉ To stop the coffee flow early, push the button. Steady To manually top off your coffee, push the button and push GREEN light indicates that coffee brewing is ready. again to stop when desired volume is reached. Pour interrompre l’écoulement du café... -
Seite 19: Programming The Water Volume / Programmation Du Volume D'eau
PROGRAMMING THE WATER VOLUME / PROGRAMMATION DU VOLUME D’EAU The programming is specific to each Open the machine head by pressing the lever upwards; Insert the capsule capsule size, Alto, Mug, Gran Lungo, blend you want to program; Close the head by pushing the lever down. Double Espresso or Espresso. - Seite 20 CLEANING / NETTOYAGE CAUTION: AVERTISSEMENT: Do not use any strong or abrasive cleaning agent or Ne pas utiliser de solvants ou de produits solvent cleaner. Do not put in a dishwasher. Never immerse the appliance or nettoyants puissants ou abrasifs. Ne pas mettre au lave-vaisselle. Ne part of it in water.
-
Seite 21: Reset To Factory Settings
RESET TO FACTORY SETTINGS / RÉINITIALISER LES PARAMÈTRES DE RÉGLAGE D’USINE NOTE: NOTE: Choose Special Function by pressing the lever down: 1 time for Pour choisir les Fonctions Spéciales, appuyer sur le levier vers "Descaling". 2 times for "Emptying the system". 3 times for "Reset to factory le bas: 1 fois pour le 'Détartrage'. -
Seite 22: Emptying The System
EMPTYING THE SYSTEM BEFORE A PERIOD OF NON-USE, FOR FROST PROTECTION OR BEFORE A REPAIR VIDER LA MACHINE AVANT UNE PÉRIODE D’INUTILISATION, POUR LA PROTÉGER DU GEL OU AVANT UNE RÉPARATION Empty the water tank and put it Open the machine head Turn the machine in place. -
Seite 23: Descaling / Détartrage
Push the button. The CAUTION: Caution should be exercised as the machine evacuates remaining ORANGE light will blink liquids using heat. Small quantities of steam may emit from the machine. during the entire procedure. AVERTISSEMENT: The machine turns “OFF” Soyez prudent car la vidange de la machine se automatically when fait en chauffant le liquide. - Seite 24 DESCALING / ASSISTANCE VIDEOS ARE AVAILABLE ON WWW.NESPRESSO.COM - VISIT “MACHINES” SECTION DÉTARTRAGE ASSISTANCE VIDÉO DISPONIBLE SUR LE SITE WWW.NESPRESSO.COM - VOIR LA PAGE DES MACHINES Turn the machine "ON" Open the machine head by Turn the machine “OFF” by pushing the button. pushing the lever upwards and by pushing the lever Allumer la machine en...
- Seite 25 To start descaling, push the Empty, clean and rinse the Fill the water tank with button. The machine will water tank and cup support fresh drinking water and stop automatically when thoroughly. put it back in place on the complete. ORANGE light Vider, nettoyer et rincer le réser- machine.
-
Seite 26: Button Indicators/Blinking Summary / Résumé Des Lumières Et Clignotements
BUTTON INDICATORS/BLINKING SUMMARY / RÉSUMÉ DES LUMIÈRES ET CLIGNOTEMENTS NO LIGHT / PAS DE LUMIÈRE: No light on the button/ Machine OFF ↣ see point 1* La Lumière est éteinte Machine éteinte ↣ voir point 1* GREEN LIGHT - NORMAL USE / LUMIÈRE VERTE - UTILISATION NORMALE: Steady light / Ready mode /... - Seite 27 RED LIGHT - WARNING OR ERROR / LUMIÈRE ROUGE - AVERTISSEMENT OU ERREUR: Blink two times and then back to ORANGE blinking / Error while Special Function running ↣ see point 19* Deux clignotements puis clignotement ORANGE Erreur pendant une Fonction Spéciale ↣...
- Seite 28 TROUBLESHOOTING ASSISTANCE VIDEOS ARE AVAILABLE ON WWW.NESPRESSO.COM - VISIT “MACHINES” SECTION ↣ The machine has turned “OFF” automatically; push the button to turn the machine “ON”. 1. No light on the button. ↣ Check the mains, voltage, and fuse. ↣ Check that the light on the button is GREEN. ↣...
- Seite 29 GREEN LIGHT ↣ Check the machine head is properly closed. 10. The machine does not start and has GREEN steady ↣ If you want to brew a Alto, Mug, Gran Lungo, Double Espresso or Espresso, check that a fresh capsule is lights.
-
Seite 30: Troubleshooting / Guide De Dépannage
GUIDE DE DÉPANNAGE ASSISTANCE VIDÉO DISPONIBLE SUR LE SITE WWW.NESPRESSO.COM - VOIR LA PAGE DES MACHINES ↣ La machine s'est éteinte automatiquement. Appuyer sur le bouton pour la mettre sous tension. 1. Bouton éteint. ↣ Vérifier le connecteur, le voltage et les fusibles. ↣... - Seite 31 LUMIÈRE VERTE ↣ Vérifier que la tête de la machine est bien fermée. 10. La machine ne démarre pas et la lumière est ↣ Pour préparer un Alto, Mug, Gran Lungo, Double Espresso ou un Espresso, vérifier qu'une capsule neuve est VERTE et fixe.
-
Seite 32: Contact The Nespresso Club / Contacter Le Club Nespresso
CONTACT THE NESPRESSO CLUB / CONTACTER LE CLUB NESPRESSO Should you need any additional information, in case of problems or simply to seek advice, call the Nespresso Club. Contact details for your nearest Nespresso Club can be found in the welcome material in your machine box or at nespresso.com Pour obtenir des renseignements supplémentaires, en cas de problème ou pour obtenir des conseils, appeler le Club Nespresso. -
Seite 33: Limited Warranty / Garantie Nespresso
LIMITED WARRANTY / GARANTIE LIMITÉE De’Longhi warrants this product against defects in materials and workmanship for a period of two years from the date of purchase. during this period, De’Longhi will either repair or replace, at its discretion, any defective product at no charge to the owner. Replacement products or repaired parts will be guaranteed for only the unexpired portion of the original warranty or six months, whichever is greater. - Seite 34 Nespresso Vertuo ist ein exklusives System, das zu jeder Zeit den perfekten Kaffee zubereitet. Alle Nespresso Vertuo Maschinen sind mit der einzigartigen Centrifusion ® Technologie ausgestattet, um den Travel Mug auf Knopfdruck zu befüllen. Jeder einzelne Parameter wurde strengen Kontrollen unterzogen, um die Aromenvielfalt, den Körper sowie die unvergleichbare Crema zum Ausdruck zu bringen.
-
Seite 35: Sicherheitsvorkehrungen
SICHERHEITSVORKEHRUNGEN VORSICHT: Die Sicherheitshinweise vor • Dieses Gerät dient Wartung der Maschine Benutzung von der Inbetriebnahme des dem Einsatz in sollten nicht von anderen als den Geräts. Bewahren Sie Haushalten. Es ist Kindern durchgeführt hier angegebenen die Sicherheitshinweise nicht für die folgenden werden, es sei denn, Bedienungselementen, auf, um diese bei Bedarf... -
Seite 36: Vermeiden Sie Risiken Wie Stromschläge Und Feuer
SICHERHEITSVORKEHRUNGEN Gebrauch des Geräts Vermeiden Sie Risiken werden. Sie nur ein geerdetes erhalten und die damit wie Stromschläge und • Ziehen Sie das Kabel Kabel mit einem Feuer verbundenen Gefahren nicht über scharfe Leitungsdurchmesser verstanden haben. • Im Notfall: Trennen Sie Kanten. - Seite 37 HINWEIS: Die Maschine enthält ein Laserprodukt. Stecker und zerren Sie • Die Verbindung von der Steckdose. Wenden • Seien Sie nicht am Kabel, das Elektrizität und Wasser Sie sich zur Prüfung, vorsichtig, dass Kabel könnte sonst ist gefährlich und Reparatur oder Sie sich nicht an den beschädigt werden.
-
Seite 38: Bewahren Sie Diese Bedienungsanlei- Tung Auf
SICHERHEITSVORKEHRUNGEN das Wasser im Papiertücher). Hersteller empfohlen die einwandfreie Wassertank, wenn Sie • Wenn Sie die Maschine wurde, kann unter Funktion Ihrer das Gerät während auspacken, entfernen Umständen Feuer, Maschine und ein des Wochenendes Sie die Kunststofffolie Elektroschocks perfektes Kaffee- oder einen längeren und entsorgen Sie oder Verletzungen... -
Seite 39: Меры Предосторожности
МЕРЫ ПРЕДОСТОРОЖНОСТИ ВНИМАНИЕ: непосредственно солнечных лучей, осознают опасность использование связаны с работой длительного при неправильной элементов устройства. воздействия брызг эксплуатации. управления, настроек Внимательно изучите воды и влажности. • Очистка и ремонт или выполнение их перед первым • Кофемашина кофемашины детьми действий, отличных... - Seite 40 МЕРЫ ПРЕДОСТОРОЖНОСТИ ВАЖНО: Данная кофемашина оснащена лазером класса 1. играть с выдернув вилку из • Не протягивайте представителям кофемашиной. розетки. Исключение: кабель около острых Nespresso. • Производитель не не- не извлекайте краев. Закрепите его • Если во время сет ответственности, вилку...
- Seite 41 Поверхность должна руками. электрическим током! неисправности. быть стойкой • Никогда не • Эксплуатация Избегайте к нагреванию погружайте поврежденной возможных травм и воздействию кофемашину или кофемашины может при использовании жидкостей, таких как ее части в воду или вызвать поражение кофемашины вода, кофе, средства другую...
- Seite 42 МЕРЫ ПРЕДОСТОРОЖНОСТИ • Не погружайте резервуар для воды. поверхности. исключительно в пальцы в отверстие • Не используйте • Не используйте Клубе Nespresso, в для капсул. Это может другие жидкости, агрессивное Бутиках Nespresso, привести к травмам. такие как чистящее средство Интернет-Бутике •...
- Seite 43 электрическим током Очистка от накипи СОХРАНИТЕ или причинить вред • Правильное ДАННУЮ ИНСТРУКЦИЮ здоровью. использование • Nespresso средства от Передайте оставляет за собой накипи Nespresso инструкцию право изменять гарантирует человеку, который инструкции без исправную работу будет пользоваться предварительного кофемашины в кофемашиной...
-
Seite 44: Maschinenübersicht
MASCHINENÜBERSICHT / ОБЗОР SPEZIFIKATIONEN / ТЕХНИЧЕСКИЕ ХАРАКТЕРИСТИКИ Bügel / Öffnen und START I Kaffee-Taste Deckel Schließen des Kopfes ВКЛ / Кнопка подачи Крышка ВЫКЛ / Рычаг для открывания и напитка резервуара закрывания крышки для воды ENV155 220 - 240 V, 50 Hz, 1260 W Kapselbe- hälter Контейнер... -
Seite 45: Umgang Mit Der Maschine
UMGANG MIT DER MASCHINE / ОБРАЩЕНИЕ С КОФЕМАШИНОЙ WASSERTANK / РЕЗЕРВУАР ДЛЯ ВОДЫ Der Wassertank kann Entfernen Sie den Wassertank, indem Sie ihn leicht nach hinten neigen und bewegt und sowohl ihn dann vorsichtig hochziehen. Positionieren Sie den Wassertank, indem am hinteren Teil der Sie ihn vertikal auf seinen Arm drücken, bis ein Klickgeräusch ertönt. - Seite 46 TASSENABSTELLFLÄCHE / ПОДСТАВКА ПОД ЧАШКУ Die Tassenabstellfläche hat Um die Tassenabstellfläche zu positionieren, 4 Positionen und ist verstellbar, schieben Sie diese gerade in das dafür vorgesehene um verschiedene Tassengrößen Loch und drücken vorsichtig, bis die Aufhänger zu ermöglichen. optimal platziert sind. Um die Tassenabstellfläche Подставка...
-
Seite 47: Erste Inbetriebnahme Oder Nach Längerer Nichtbenutzung
ERSTE INBETRIEBNAHME ODER NACH LÄNGERER NICHTBENUTZUNG / ПЕРВОЕ ИСПОЛЬЗОВАНИЕ ИЛИ ПОСЛЕ ДЛИТЕЛЬНОГО ПЕРИОДА НЕИСПОЛЬЗОВАНИЯ ACHTUNG: Lesen Sie zunächst die Sicherheitshinweise, um Risiken wie Stromschläge oder Feuer zu vermeiden. ВНИМАНИЕ: в первую очередь ознакомьтесь с мерами безопасности во избежание риска смертельного поражения электрическим током или пожара. Spülen Sie den Wassertank, bevor Sie ihn Stellen Sie sicher, dass sich der Kapselbehälter mit Trinkwasser füllen. -
Seite 48: Неиспользования
ERSTE INBETRIEBNAHME ODER NACH LÄNGERER NICHTBENUTZUNG / ПЕРВОЕ ИСПОЛЬЗОВАНИЕ ИЛИ ПОСЛЕ ДЛИТЕЛЬНОГО ПЕРИОДА НЕИСПОЛЬЗОВАНИЯ Konstantes Platzieren Sie Öffnen Sie den Maschinenkopf, GRÜNES Licht die Tasse mit indem Sie den Bügel nach zeigt an, dass einer Kapazität oben drücken, um die Kapsel die Maschine von mindestens auszuwerfen. -
Seite 49: Kaffeezubereitung
KAFFEEZUBEREITUNG / ПРИГОТОВЛЕНИЕ КОФЕ ACHTUNG: Seien Sie vorsichtig, dass Sie sich nicht an den scharfen Kanten der Maschine verletzen oder sich mit den Fingern im Inneren der Maschine verfangen. ВНИМАНИЕ: Будьте осторожны, чтобы не пораниться острыми деталями и не прищемить пальцы при обращении с кофемашиной. Füllen Sie den Schalten Sie die Maschine Während die Maschi-... - Seite 50 KAFFEEZUBEREITUNG / ПРИГОТОВЛЕНИЕ КОФЕ Legen Sie die Kapsel mit der Wölbung nach unten ein. HINWEIS: Вставьте капсулу плоской стороной вверх. Die Werkseinstellungen und empfohlenen HINWEIS: Tassengrößen sind: Um zu vermeiden, dass Alto: 414 ml Gran Lungo: 150 ml die Maschine beschädigt wird, verwenden Sie Mug: 230 ml Doppelter Espresso: 80 ml ausschließlich frische und ungebrauchte Kapseln.
-
Seite 51: Energiesparkonzept
Um die Kaffeezubereitung vorzeitig abzubrechen, Um den Kaffee manuell zuzuführen, drücken Sie die drücken Sie die Taste erneut. Taste und drücken Sie diesen erneut, wenn die Tasse das Чтобы остановить приготовление кофе, gewünschte Volumen erreicht hat. нажмите на кнопку. Индикатор горит Чтобы... -
Seite 52: Programmierung Der Füllmenge
PROGRAMMIERUNG DER FÜLLMENGE / ПРОГРАММИРОВАНИЕ ОБЪЕМА ВОДЫ Die Einstellung der Füllmenge ist für jede Öffnen Sie den Kopf der Maschine. Legen Sie die Kapsel, für die Sie die Kapselgröße (Alto, Mug, Gran Lungo, Einstellung vornehmen wollen, ein. Schließen Sie den Kopf; verschließen Doppelter Espresso oder Espresso) Sie die Maschine. -
Seite 53: Reinigung
REINIGUNG / ОЧИСТКА ACHTUNG: ВНИМАНИЕ: Verwenden Sie keine starken Reinigungs- oder Не используйте агрессивные, абразивные Lösungsmittel. Stellen Sie die Maschine nicht in die Spülmaschine. Lassen Sie чистящие средства или растворитель. Не помещайте части прибора в die Maschine oder Teile niemals in Berührung mit Wasser kommen. Reinigen посудомоечную... -
Seite 54: Wiederherstellung Der Werkseinstellungen
REINIGUNG / ОЧИСТКА Der Prozess kann jederzeit gestoppt werden, indem die Taste erneut gedrückt wird. In diesem Fall wird die Taste durchgängig GRÜN leuchten. Falls Sie den Reinigungsvorgang fortsetzen möchten, folgen Sie den Anweisung en im Punkt 4. Um einen Kaffee zuzubereiten, legen Sie eine Kapsel in die Maschine ein und drücken Sie den Bügel herunter, um die Maschine zu schließen. - Seite 55 Wählen Sie eine Funktion, indem Sie den Bügel Drücken Sie die Taste, um die Einstellung zu nach unten drücken: bestätigen. ORANGES Licht wird 3 Mal alle 3 sec. - 3 Mal, um die Werkseinstellungen 3 Sekunden aufblinken, um anzuzeigen, dass zurückzusetzen.
-
Seite 56: Entleerung Der Maschine
ENTLEERUNG DER MASCHINE VOR LÄNGERER NICHTBENUTZUNG, ZUM SCHUTZ VOR FROSTSCHÄDEN ODER VOR DER REPARATUR ОПУСТОШЕНИЕ СИСТЕМЫ НА ВРЕМЯ НЕИСПОЛЬЗОВАНИЯ, ДЛЯ ЗАЩИТЫ ОТ ЗАМЕРЗАНИЯ ИЛИ ПЕРЕД РЕМОНТОМ Entleeren Sie den Wassertank Öffnen Sie den Maschinenkopf und lassen Sie die benutzte Kapsel auswerfen. Schließen und positionieren Sie ihn erneut. -
Seite 57: Entkalkung / Очистка От Накипи
Drücken Sie die Taste. ACHTUNG: Bitte beachten Sie, dass die Maschine verbliebene Flüssigkeiten Das ORANGE Licht wird unter Verwendung von Hitze herauspumpt. Geringe Mengen des heißen Dampfes während des gesamten können aus der Maschine ausströmen. Prozesses blinken. Die ВАЖНО: Maschine schaltet sich Следует... - Seite 58 ENTKALKUNG / HILFEVIDEOS STEHEN UNTER WWW.NESPRESSO.COM ZUR VERFÜGUNG - BESUCHEN SIE DEN "MASCHINEN"-BEREICH. ОЧИСТКА ОТ НАКИПИ ОБУЧАЮЩЕЕ ВИДЕО ДОСТУПНО НА WWW.NESPRESSO.COM Schalten Sie die Maschine Öffnen Sie den Kopf der Maschine, indem Sie den Bügel nach ein, indem Sie die Taste oben drücken und lassen Sie die benutzte Kapsel auswerfen.
- Seite 59 HINWEIS: Wählen Sie die gewünschte Funktion, indem Sie den Bügel nach unten drücken. Die Maschine wird 1 Mal alle - 1 Mal, um das System zu entkalken. 2 Sekunden aufblinken, bis die Taste gedrückt wird. Выберите нужную функцию, нажимая на рычаг сверху вниз: ВАЖНО: - 1 раз...
- Seite 60 ENTKALKUNG / HILFEVIDEOS STEHEN UNTER WWW.NESPRESSO.COM ZUR VERFÜGUNG - BESUCHEN SIE DEN "MASCHINEN"-BEREICH. ОЧИСТКА ОТ НАКИПИ ОБУЧАЮЩЕЕ ВИДЕО ДОСТУПНО НА WWW.NESPRESSO.COM Füllen Sie den Drücken Sie die Taste, um die Maschine zu spülen. Die Maschine stoppt automatisch, Wassertank mit frischem wenn der Vorgang beendet ist.
-
Seite 61: Übersicht Der Leuchtsignale / Цветовая Индикация / Сигналы
ÜBERSICHT DER LEUCHTSIGNALE / ЦВЕТОВАЯ ИНДИКАЦИЯ / СИГНАЛЫ KEIN LICHT / ИНДИКАТОР НЕ ГОРИТ Die Taste leuchtet nicht / Die Maschine ist aus ↣ vergleichen Sie Punkt 1* Нет цветовой индикации вокруг кнопки Кофемашина выключена ↣ см. пункт 1* GRÜNES LICHT - NORMALER GEBRAUCH / ЗЕЛЕНЫЙ... - Seite 62 ÜBERSICHT DER LEUCHTSIGNALE / ЦВЕТОВАЯ ИНДИКАЦИЯ / СИГНАЛЫ ROTES LICHT - WARNUNG ODER FEHLERMELDUNG / КРАСНЫЙ ЦВЕТ - ПРЕДУПРЕЖДЕНИЕ ИЛИ ОШИБКА Blinkt 2 Mal und bleibt dann ORANGE / Fehlermeldung bei der Spezial-Funktion ↣ Vergleichen Sie Punkt 20* Индикатор мигает 2 раза и затем горит Ошибка...
-
Seite 63: Fehlerbehebung / Устранение Неисправностей
FEHLERBEHEBUNG HILFEVIDEOS STEHEN UNTER WWW.NESPRESSO.COM ZUR VERFÜGUNG - BESUCHEN SIE DEN "MASCHINEN"BEREICH ↣ Die Maschine schaltet sich automatisch ab; drücken Sie die Taste, um die Maschine anzuschalten. 1. Tasten sind nicht beleuchtet. ↣ Überprüfen Sie das Stromnetz, den Stecker, die Stromspannung und die elektrische Sicherung. ↣... - Seite 64 FEHLERBEHEBUNG HILFEVIDEOS STEHEN UNTER WWW.NESPRESSO.COM ZUR VERFÜGUNG - BESUCHEN SIE DEN "MASCHINEN"BEREICH GRÜNES LICHT 11. GRÜNES Licht blinkt ununterbrochen und die ↣ Die Maschine heizt ungefähr 1 Minute lang auf. Maschine funktioniert nicht. 12. Während die Maschine arbeitet, wird das Licht GRÜN. ↣...
-
Seite 65: Устранение Неисправностей
УСТРАНЕНИЕ НЕИСПРАВНОСТЕЙ ОБУЧАЮЩЕЕ ВИДЕО ДОСТУПНО НА WWW.NESPRESSO.COM ↣ Кофемашина выключилась автоматически; нажмите на кнопку. 1. Индикатор кнопки не работает. ↣ Проверьте наличие электропитания и предохранитель. ↣ Проверьте, что индикатор кнопки горит зеленым цветом. ↣ Проверьте наличие воды в резервуаре и корректность его установки. ↣... - Seite 66 УСТРАНЕНИЕ НЕИСПРАВНОСТЕЙ ОБУЧАЮЩЕЕ ВИДЕО ДОСТУПНО НА WWW.NESPRESSO.COM ЗЕЛЕНЫЙ ИНДИКАТОР ↣ Проверьте что крышка корпуса кофемашины корректно закрыта. 10. Кофемашина не включается и зеленый ↣ При приготовлении Alto, Mug, Гран Лунго, Двойной Эспрессо или Эспрессо проверьте, что новая капсула индикатор горит постоянно. вставлена...
-
Seite 67: Kontaktieren Sie Den Nespresso Club
KONTAKTIEREN SIE DEN NESPRESSO CLUB / КОНТАКТЫ КЛУБА NESPRESSO Für jede weitere Information, bei auftretenden Problemen oder wenn Sie eine Beratung wünschen, kontaktieren Sie den Nespresso Club. Kontaktdetails zum Nespresso Club finden Sie in der Broschüre "Herzlich Willkommen" im Maschinenkarton oder auf www.nespresso.com Для... -
Seite 68: Gewährleistung / Ограниченная Гарантия
GEWÄHRLEISTUNG / ОГРАНИЧЕННАЯ ГАРАНТИЯ De’Longhi gewährt eine Garantie von 2 Jahren ab dem Kauf des Geräts gegen Materialdefekte und Fehler in der handwerklichen Ausführung. Während dieser Zeitspanne wird De’Longhi jedes defekte Produkt nach eigenem Ermessen reparieren oder austauschen, ohne Kosten für den Besitzer. Die Austauschprodukte oder reparierten Einzelteile unterstehen der noch verbleibenden Original-Garantiedauer oder einer Garantiedauer von sechs Monaten, je nachdem, was länger ist. - Seite 69 UM_VERTUO+_DELONGHI.indb 69 05.09.18 09:40...
- Seite 70 UM_VERTUO+_DELONGHI.indb 70 05.09.18 09:40...
- Seite 71 UM_VERTUO+_DELONGHI.indb 71 05.09.18 09:40...
- Seite 72 www.nespresso.com UM_VERTUO+_DELONGHI.indb 72 05.09.18 09:40...
- Seite 74 EN - FR 2-14 ES - BR 15-26 http://www.nespresso.com/ultimate-coffee-creations...
- Seite 75 >40° >40° e) e)+d) ...
-
Seite 76: Important Safeguards
AEROCCINO Important SafeguardS The instructions are part of the appliance. Read and follow all instructions to avoid possible harm and damage. Save Content/ContenU these instructions and pass them on to any subsequent owner. Important SafegUardS/ ConSIgneS de SéCUrIté ��������������������������������� 02-09 InStrUCtIon of USe/ InStrUCtIonS d’UtIlISatIon ��������������������������������... - Seite 77 • If the supply cord is damaged, it must be replaced by the manufacturer, 2) a grounding-type 3- wire cord is used its service agent or similarly qualified persons. 3) cord (s) is arranged so that it will not drape over the counter top or •...
- Seite 78 • This applicance can be used by children 8 years old and older, as well • Extreme caution must be used when moving an appliance containing as persons with reduced physical, sensory, mental capabilities or lack hot liquids. of experience, only if they have been given supervision and instruction •...
- Seite 79 Disposal Your appliance contains materials which can be recovered or recycled. Separation of the remaining waste products into different types facilitates the recycling of raw materials. You can obtain information on disposal from your local authority. SAVE THESE INSTRUCTIONS...
-
Seite 80: Consignes De Sécurité
ConSIgneS de SÉCurItÉ • Toujours brancher le cordon à l’appareil en premier, puis brancher les instructions font partie l’appareil dans la prise électrique. Pour débrancher, éteindre l’appareil, de l’appareil� puis retirer le câble de la prise électrique. lisez ce mode d’emploi dans son intégralité... - Seite 81 Évitez les dangers inhérents à l’utilisation de l’appareil • Avant le nettoyage, retirer la fiche de la prise et la base de l’appareil devra être séché avant de réutiliser l’appareil. • Ne jamais laisser l’appareil sans surveillance pendant son fonctionnement. •...
- Seite 82 instructions quant à l’utilisation de l’appareil en toute sécurité et en • Risque de brûlure si retrait du couvercle en cours d’utilisation. comprennent bien les dangers potentiels. Les enfants ne doivent pas • Une attention particulière doit être donnée lorsque l’appareil est déplacé jouer avec l’appareil.
- Seite 83 électrocution. • Si l’ A eroccino tombe, ne plus l’utiliser car de petites fissures potentielles pourraient causer l’ e ntrée de l’ e au dans le compartiment électrique. Recyclage Votre appareil contient de nombreux matériaux valorisables ou recyclables. En triant les déchets en différentes catégories d’ o rdures, vous facilitez le recyclage des matières premières.
-
Seite 84: Instructions Of Use
InStruCtIonS of uSe – CaUtIon: Risk of electrical shock and fire! Make sure the under side of the milk frother is dry. TIP: For optimal milk froth, use whole or semi skimmed milk at refrigerated temperature (39-43 F). To guarantee hygiene conditions, use heat treated (pasteurized), refrigerated & freshly opened only. - Seite 85 CaUtIon: Ensure the Aeroccino is cold before removing it from the base. Or, if removing with care, rinse with cold water immediately to cool down the Aeroccino and avoid burning risks. CaUtIon: Do not immerse neither the Aeroccino nor the base in the water. CaUtIon: In case the base needs to be cleaned, unplug it first and use only a damp cloth.
-
Seite 86: Nettoyage Après Chaque Utilisation
InStruCtIonS d’utILISatIon – ATTENTION: Risque d’électrocution et d’incendie! Assurez-vous que le dessous du mousseur à lait est sec. Conseil: Pour un résultat optimal de mousse de lait, utilisez du lait entier ou demi-écrémé réfrigéré (environ 4-6° C). Pour assurer des conditions d’hygiène, utiliser du lait traité thermiquement (pasteurisé), réfrigéré... - Seite 87 avertISSement: Laisser le pot à lait refroidir avant de le retirer de la base. Ou encore, retirer prudemment le pot et le rincer immédiatement à l’eau froide pour le refroidir et éviter les risques de brûlure. avertISSement: Ne jamais immerger le pot avertISSement: Si la base doit être nettoyée, la débrancher et utiliser uniquement un linge humide.
- Seite 88 WarrantY Nespresso warrants this product against defects in materials and workmanship for a period Except to the extent allowed by applicable law, the terms of this limited warranty do not of one year from the date of purchase. During this period, Nespresso will either repair or exclude, restrict or modify, and are in addition to, the mandatory statutory rights applicable replace, at its discretion, any defective product at no charge to the owner.
- Seite 89 AEROCCINO InStruCCIoneS de SegurIdad las instrucciones son parte del accesorio� lea y siga las instrucciones para evitar posibles daños y perjuicios� ContenIdo/ÍndICe guarde estas instrucciones y transmítalas a cualquier propietario posterior� InStrUCCIoneS de SegUrIdad / InStrUÇÕeS de SegUranÇa������������������� 15-21 InStrUCCIoneS de USo / InStrUÇÕeS de USo ������������������������������������������...
- Seite 90 • No tire del cable sobre bordes afilados, sujetarlo, ni permita que • Los cables mas largos o desmontables serán usados solo si se tiene un cuelgue. Mantenga el cable lejos del calor y de la humedad. cuidado adecuado en su uso y: •...
- Seite 91 EN eS instrucciones. funcionamiento incorrecto o que se haya dañado o caido de alguna • Este aparato es de uso exclusivamente doméstico. No ha sido diseñado forma. Enviar el aparato al Centro de Servicio autorizado más cercano para ser utilizado: en cocinas para empleados en tiendas, oficinas y para su examinación, reparación, y ajustes mecanicos o eléctricos.
- Seite 92 superficies calientes, por ejemplo, radiadores, hornillas de la cocina, Disposicion quemadores de gas o similares. Su electrodoméstico contiene materiales que pueden ser • Asegúrese de que la parte inferior de la Aeroccino y el área debajo de la recuperados o reciclados. La separación de los productos de base esté...
-
Seite 93: Instruções De Segurança
InStruÇÕeS de SeguranÇa nem deixe-o pendurado. Mantenha o cabo longe do calor e da umidade. as instruções fazem parte do • Se o cabo de alimentação for danificado, ele deverá ser substituído pelo aparelho� leia e siga todas as fabricante, por um agente de serviços ou por profissionais igualmente instruções para evitar possíveis ferimentos e danos�... - Seite 94 tropeços. • Este é um aparelho de uso exclusivamente doméstico. Não se destina a • Cabos logos (ou destacáveis) podem ser utilizados tomando-se cuidado: ser utilizado em: áreas de cozinha para funcionários em lojas, escritórios 1) a tensão elétrica demarcada é, pelo menos, do tamanho da tensão ou noutros locais de trabalho;...
- Seite 95 mal funcionamento do equipamento ou se cair ou estiver danificado de superfícies quentes, por exemplo, radiadores, forno, fogão ou similares. alguma maneira. Retorne o aparelho ao Centro de Reparo mais próximo • Certifique-se de que a parte inferior do Aeroccino e a área sob a base para avaliação, reparo elétrico ou mecânico.
- Seite 96 InStruCCIoneS de uSo – ATENCIÓN: Peligro de descarga eléctrica e incendio. Asegúrese de que la parte inferior del espumador de leche está seca. CONSEJO: Para un uso óptimo del espumador de leche, utilice leche entera o semidescremada a temperatura del refrigerador (entre 4 ° C y 6° C). Para garantizar las condiciones de higiene, utilizar leche tratada térmicamente (pasteurizada), refrigerados y recién abierto solamente.
-
Seite 97: Solución De Problemas
preCaUCIón: Asegúrese de que la jarra esté fría antes de retirarla de la base. O, si se retira con cuidado, enjuague con agua fría inmediatamente para enfriar la jarra y evitar riesgos de quemaduras. preCaUCIón: No sumerja la jarra ni la base en agua. preCaUCIón: En caso de que la base tenga que ser limpiada desenchufe primero y utilice sólo un paño húmedo. - Seite 98 InStruÇÕeS de uSo – AVISO: Risco de incêndio e choque elétrico! Certifique-se de que a parte inferior do espumador de leite esteja seca. DICA: Para obter uma espuma de leite ideal, use leite integral ou semidesnatado refrigerado (entre 4° C e 6° C). Para garantir as condições de higiene, use leite pasteurizado, refrigerado e recentemente aberto.
-
Seite 99: Solução De Problemas
CUIdado: certifique-se de que o bule esteja frio antes de retirá-lo da base. Você também pode removê-lo cuidadosamente e enxaguá-lo com água fria imediatamente para resfriar o bule e evitar riscos de queimaduras. CUIdado: não mergulhe o bule nem a base na água. CUIdado: caso a base precise ser limpa, desligue-a da tomada primeiro e utilize apenas um pano úmido. - Seite 100 garantÍa La garantía Nespresso para este producto cubre los defectos de los materiales y de la mano Salvo que la ley aplicable establezca lo contrario, las condiciones de esta garantía no de obra durante un periodo de un año a partir de la fecha de compra. Durante este periodo, excluyen, restringen ni modifican los derechos legales obligatorios aplicables a la venta del Nespresso reparará...
- Seite 102 A E R O C C I N O B Y N E S P R E S S O...