Herunterladen Inhalt Inhalt Diese Seite drucken
Inhaltsverzeichnis

Werbung

Verfügbare Sprachen

Verfügbare Sprachen

Accutom-50
Instruction Manual
Manual No.: 15017001
Date of Release 15.11.2012

Werbung

Inhaltsverzeichnis
loading

Inhaltszusammenfassung für struers Accutom-50

  • Seite 1 Accutom-50 Instruction Manual Manual No.: 15017001 Date of Release 15.11.2012...
  • Seite 2 Service Manuals: Struers Service Manual may only be used by a trained technician authorised by Struers. The Service Manual may only be used in connection with Struers equipment covered by the Service Manual. Struers assumes no responsibility for errors in the manual text/illustrations. The information in this manual is subject to changes without notice.
  • Seite 3 The equipment should only be used for its intended purpose and as detailed in the Instruction Manual. The equipment is designed for use with consumables supplied by Struers. If subjected to misuse, improper installation, alteration, neglect, accident or improper repair, Struers will accept no responsibility for damage(s) to the user or the equipment.
  • Seite 4 Accutom-50 Instruction Manual Disposal Equipment marked with a WEEE symbol contain electrical and electronic components and must not be disposed of as general waste. Please contact your local authorities for information on the correct method of disposal in accordance with national legislation.
  • Seite 5: Inhaltsverzeichnis

    Configuration Menu ..............7 Setting the Language ..............8 2. Basic Operations Using the Controls ................9 Front Panel Controls of Accutom-50 ......... 9 Groups of Keys ................. 9 Acoustic Signals ................ 9 Location of Main Switch ............9 Front Panel Controls ................ 10 Display ..................
  • Seite 6 Accutom-50 Instruction Manual Cutting Mode ..................21 Single Cut ................21 Multiple Cut ................21 Rotation ................... 22 Water ..................22 Starting the Cutting ................22 During Cutting .................. 23 Changing the Feed Speed ............23 Retracting the sample ............. 23 Force Limit Reached ...............
  • Seite 7: Getting Started

    Screws M4x20 Screws M4x35 Set of Instruction Manuals Accutom-50 should be placed on a stable and plane (tolerance Placing Accutom-50 ±1 mm) table. The table must be able to carry a weight of min. 50 kg. Take a moment to familiarise yourself with the location and names of Getting Acquainted with the Accutom-50 components.
  • Seite 8: Supplying Power

    Changing the voltage setting The factory setting for Accutom-50 is 240V. If the factory setting is not the correct setting for your mains supply the setting can be changed from 240V to 220V: ...
  • Seite 9 Accutom-50 Instruction Manual Accutom-50 is shipped with 2 types of Mains cables: Single-phase Supply The 2-pin (European Schuko) plug is for use on single-phase connections. If the plug supplied on this cable is not approved in your country, then the plug must be replaced with an approved plug. The leads...
  • Seite 10: Recirculation Unit

    Pull out the recirculation tank. Recirculation Unit  Fill the tank with 3.88 l of water and 120 ml Struers Additive. The water level should be 5 mm below the edge of the front hole in the tank cover. IMPORTANT Always ensure that there is sufficient water in the tank as the recirculation pump will be damaged if it is running dry.
  • Seite 11: Software Settings

    The following display will appear briefly: Afterwards the display will change to the same screen which was shown before Accutom-50 was switched off, usually a cutting or grinding method. When switching Accutom-50 on for the first time, the display to appear should be the MAIN MENU. If the heading in the display is different, press Esc, until the MAIN MENU appears.
  • Seite 12: Setting The Language

    Accutom-50 Instruction Manual   Setting the Language Press MENU UP/DOWN to select OPTIONS.   CONFIGURATION CUT-OFF WHEELS CUP WHEELS OPTIONS    Press ENTER to activate the OPTIONS menu.  OPTIONS  Language ENGLISH X-retract Contrast No. of final grinding sweeps: F1: DEFAULT VALUE ...
  • Seite 13: Basic Operations

    Accutom-50 Groups of Keys Programming and monitoring functions Positioning of the specimen holder Start/stop of Accutom-50  Short Beep: when a key is pressed, a short beep indicates that Acoustic Signals the command has been accepted.  Long Beep: a long beep indicates that the key is inactive at that moment.
  • Seite 14 Accutom-50 Instruction Manual Front Panel Controls Name Function Name Function   The main switch is located on Leaves the present menu or the back of the machine. specimen holder position screen. MAIN SWITCH     Starts the cutting or grinding...
  • Seite 15: Display

    Accutom-50 Instruction Manual Display  SELECT CUTTING METHOD 1.EMPTY METHOD 2.EMPTY METHOD 3.EMPTY METHOD 4.EMPTY METHOD 5.EMPTY METHOD 6.EMPTY METHOD 7.EMPTY METHOD 8.EMPTY METHOD 9.EMPTY METHOD 10.EMPTY METHOD 11.EMPTY METHOD 12.EMPTY METHOD F1:COPY F2:INSERT F3:RESET F4:RENAME Heading Inverted text. Cursor...
  • Seite 16: Reading The Display

    Accutom-50 Instruction Manual The display can show various kinds of information, for example about Reading the Display the cutting or grinding method or about the sample position. A screen for a cutting or grinding method could look as the following example: ...
  • Seite 17: Changing/Editing Values

    Accutom-50 Instruction Manual Changing/Editing Values Depending on the type of value, there are two different ways of editing.  Numeric Values Cutting Method: 1. EMPTY METHOD Wheel B0D15 Speed : 2700 rpm Feed :0.100 mm/s Force MEDIUM Rotation: Water F1:MULTI. CUT ...
  • Seite 18: Alphanumeric Values

    Accutom-50 Instruction Manual  Alphanumeric Values Cutting Method: 1. EMPTY METHOD Wheel B0D15 Speed : 2700 rpm Feed :0.100 mm/s Force MEDIUM Rotation: Water F1:MULTI. CUT    Press MENU UP/DOWN to select the alphanumeric   value you want to change, e.g. Cut-off wheel: ...
  • Seite 19: Positioning The Sample

    Reference Position Every time the power is switched on while the cover is closed, Accutom-50 checks its own reference position. The sample holder head will be moved back as far as possible, to the reference position (X=0.000 Y=0.0), and thereafter it will return to the position where it was before the power was switched on.
  • Seite 20: Selecting Between Cutting And Grinding

    To select between cutting and grinding you must be in the Main Selecting between Menu. As Accutom-50 always starts up in the same state as when Cutting and Grinding the voltage was switched of last time, it might be necessary to go back to the Main Menu.
  • Seite 21: Cutting Display

    Accutom-50 Instruction Manual  Cutting Display SELECT CUTTING METHOD 1.EMPTY METHOD 2.EMPTY METHOD 3.EMPTY METHOD 4.EMPTY METHOD 5.EMPTY METHOD 6.EMPTY METHOD 7.EMPTY METHOD 8.EMPTY METHOD 9.EMPTY METHOD 10.EMPTY METHOD 11.EMPTY METHOD 12.EMPTY METHOD F1:COPY F2:INSERT F3:RESET F4:RENAME  If you selected GRINDING METHODS, the screen will look as follows.
  • Seite 22: Cutting

    Accutom-50 Instruction Manual Cutting  Changing the Cut-off Wheel Open the cover and swing the right cooling tube in the air.  Insert the stop pin in the hole of the inner flange.  Use the spanner (17 mm) to loosen the flange screw.
  • Seite 23: Clamping The Sample And Specimen Holder

    Accutom-50 Instruction Manual  Clamping the Sample and Clamp the sample securely in the specimen holder using the Specimen Holder appropriate Allen key.  Fasten the specimen holder in the specimen holder head by pushing the specimen holder into the dovetail fixture and tightening the screw with an Allen key.
  • Seite 24: Setting The Cutting Parameters

    Speed The speed of the cut-off wheel can be set between 300 and 5000 rpm in steps of 100 rpm. The default values for all Struers cut-off wheels are already saved together with the wheel definitions. Whenever a different cut-off wheel is selected the recommended speed will automatically be inserted.
  • Seite 25: Cutting Mode

    Thickness The thickness of the slices to be cut is defined. After start is pressed, Accutom-50 will perform one straight cut to have a reference surface. Then the sample is retracted and moved to the left in the X-direction, according to the set thickness of the slice.
  • Seite 26: Rotation

    IMPORTANT Especially when using Multiple Cut, the debris collecting tray must be cleaned before Accutom-50 is started to avoid a build-up of removed material. This might result in a reduction of the cooling water flow, which might damage the sample or the cut-off wheel.
  • Seite 27: During Cutting

    If the pre-set feed speed can not be achieved because the force limit is reached, Accutom-50 automatically reduces the feed speed to the maximum possible speed. This value is displayed, and after the cut is finished,...
  • Seite 28: Stopping The Cutting

    Instruction Manual Stopping the Cutting  Automatic Stop Accutom-50 automatically stops the cutting process at the pre- set stop position. (Make sure to compensate for possible wheel wear when setting the stop position).  The sample is then retracted and the cut-off wheel is stopped.
  • Seite 29: Grinding

    Connecting the Vacuum Chuck to Before the vacuum chuck is used for the first time, it has to be the Vacuum System connected to a vacuum pump. Accutom-50 is prepared for the connection through a lead-in bushing into the cutting chamber. ...
  • Seite 30: Clamping The Sample And Specimen Holder

    Accutom-50 Instruction Manual  Clamping the Sample and Clamp the sample securely in the specimen holder using the Specimen Holder appropriate Allen key or place the sample mounted on a glass plate on the vacuum holder.  Fasten the specimen holder in the specimen holder head by pushing the specimen holder into the dovetail fixture and tighten the screw with an Allen key.
  • Seite 31: Positioning The Sample

    Accutom-50 Instruction Manual  Positioning the Sample Move the sample into the correct start position, close to the cup wheel by using the position keys, as follows: − Move the sample in the X-direction until it slightly touches the cup wheel grinding surface. NB: The wheel should still be able to be freely turned manually.
  • Seite 32: Setting The Grinding Parameters

    Speed The speed of the cup wheel can be set between 300 and 5000 rpm in steps of 100 rpm. The default values for all Struers cup wheels are already saved together with the wheel definitions. Whenever a different cup wheel is selected the recommended speed will automatically be inserted.
  • Seite 33: Rotation

    Accutom-50 Instruction Manual Rotation Sample rotation can be an advantage to get a more uniform scratch pattern on the surface and a better planeness. On Accutom-50, three different settings are possible. Rotation: Off The sample does not rotate. Rotation: Continuous The sample is rotating around its centre.
  • Seite 34 Hint To facilitate the production of thin sections, using permanent start positions, Accutom-50 can recall the original position settings. When changing back to a grinding method which has been used before you will see F1:RECALL REL. X. POS Pressing F1 will recall the original relative positions.
  • Seite 35: Starting The Grinding

    Wheel speed 4000 rpm Both the pre-set and the actual removal or thickness are displayed.  Accutom-50 automatically stops the grinding process at the pre- Stopping the Grinding Automatic Stop set stop position or after the pre-defined amount of material has been removed.
  • Seite 36: Maintenance

    Additive for Cooling Fluid: One part of Additive for 33 parts of water. To check the concentration of additive, use a refractometer. Concentration = Brix value. The concentration of additive should always lie between 2.7 and 3.3 %. Add Struers Additive for Cooling Fluid if the concentration is too low. IMPORTANT Always maintain the correct concentration of Struers Additive in the cooling water (percentage stated on the container of the Additive).
  • Seite 37: Weekly Service

     Refilling the Tank Refill the tank with 3.88 l of water and 120 ml Struers Additive . The water level should be 5 mm below the edge of the front hole in the tank cover.
  • Seite 38: Maintenance Of Cut-Off Wheels

    Accutom-50 Instruction Manual Maintenance of Cut-off Wheels Maintenance of Diamond and The precision of diamond and CBN cut-off wheels and thus the cut CBN Cut-off Wheels depends on how carefully the following instructions are observed:  Never expose the cut-off wheel to overload, such as a heavy mechanical load, or heat.
  • Seite 39: Reference Guide

    Accutom-50 Instruction Manual Reference Guide Table of Contents Page 1. Advanced Operations Configuration Menu ................36 Cut-off Wheels ................ 37 Cup Wheels ................38 Options ..................39 Manual Functions ................40 Sample Rotation ..............41 Recirculation Pump ..............42 Dressing .................. 43 Method Options ................
  • Seite 40: Advanced Operations

    Accutom-50 Instruction Manual 1. Advanced Operations Press Esc until you reach the Main Menu. (A long beep can be Configuration Menu heard). MAIN MENU CUTTING METHODS GRINDING METHODS MANUAL FUNCTIONS CONFIGURATION    Press MENU UP/DOWN to select ...
  • Seite 41: Cut-Off Wheels

    Accutom-50 Instruction Manual Cut-off Wheels If you want to use other than Struers cut-off wheels, these must be configured to contain the correct values for force limit, wheel thickness and speed. To configure your own cut-off wheels,   Press MENU UP/DOWN to select CUT-OFF ...
  • Seite 42: Cup Wheels

    Accutom-50 Instruction Manual Cup Wheels If you want to use non-Struers cup wheels, be sure to configure the correct values for the speed.   Press MENU UP/DOWN to select CUP WHEELS.     Press ENTER to activate the cup wheels menu.
  • Seite 43: Options

    Accutom-50 Instruction Manual Options In the options menu various items can be configured. Language See how to change the language in the Getting Started section of this Instruction Manual. After the stop position is reached, the sample is normally moved ...
  • Seite 44: Manual Functions

    Accutom-50 Instruction Manual Several functions on Accutom-50 can also be carried out manually. Manual Functions All of these functions are available from the Manual Functions Menu. Press Esc until you reach the Main Menu. MAIN MENU CUTTING METHODS GRINDING METHODS...
  • Seite 45: Sample Rotation

    Accutom-50 Instruction Manual   Sample Rotation Press MENU UP/DOWN to select SAMPLE  ROTATION.    Press ENTER to activate the SAMPLE ROTATION menu.  SAMPLE ROTATION Sample Rotation: CONTINUOUS Speed Level Direction > < F1:START ROTATION ...
  • Seite 46: Recirculation Pump

    Accutom-50 Instruction Manual  Recirculation Pump From the MANUAL FUNCTIONS MENU press MENU   UP/DOWN to select RECIRCULATION PUMP.  MANUAL FUNCTIONS MENU SAMPLE ROTATION RECIRCULATION PUMP DRESSING OF CUT-OFF WHEEL DRESSING OF CUP WHEEL    Press ENTER to activate the recirculation pump option.
  • Seite 47: Dressing

    Accutom-50 Instruction Manual Dressing Diamond and CBN cut-off wheels and cup wheels may have to be dressed to open up the wheel again and achieve maximum effect after cutting or grinding of ductile materials. This can be done using the following routine: ...
  • Seite 48 Accutom-50 Instruction Manual DRESSING OF CUT-OFF WHEEL Feed Speed 0.5 mm/s Wheel Speed 5000 rpm  Cooling Water: Y-Distance 10.0 mm F1:START DRESSING    Press MENU UP/DOWN to select the value to be  changed.   ...
  • Seite 49 Accutom-50 Instruction Manual  Dressing of Cup Wheels Mount the cup wheel to be dressed.  Clamp the dressing stick in the sample holder and position it correctly. − The dressing stick has to be positioned so that the cup wheel is grinding a piece of the end of the stick.
  • Seite 50: Method Options

    Accutom-50 Instruction Manual Method Options Saving a Method While working with a specific method, you can save the changes you have made in the database.  As soon as a parameter is changed in a cutting or grinding method, F4:SAVE will be shown on the bottom line of the display.
  • Seite 51: Copying A Method

    Accutom-50 Instruction Manual Copying a Method Copying a method is a shortcut to creating a new cutting or grinding method on the basis of an existing one.  Select the cutting or grinding method you want to copy from. ...
  • Seite 52: Inserting A Method

    Accutom-50 Instruction Manual Inserting a Method If you want to insert the method in a different method:   Press MENU UP/DOWN to select   the method, in which you want to insert the method.  If it is not an EMPTY METHOD: ...
  • Seite 53: Resetting A Method

    Accutom-50 Instruction Manual Resetting a Method If a method is not in use any more, it should be reset. The parameters will change to default values, which can easily be changed to a new method later on. The method name will change to: EMPTY METHOD, telling you, that you can copy to or modify in this method without replacing any valuable data.
  • Seite 54: Accutom

    Accutom-50 Instruction Manual Editing Names The names for the methods, cut-off wheels and cup wheels can be edited and changed to suit your preference.  Select the method, cut-off wheel or cup wheel you want to rename. SELECT CUTTING METHOD A 1.UNNAMED METHOD...
  • Seite 55: Name Editing Principles

    Accutom-50 Instruction Manual  Name Editing Principles Place the main cursor on the character you want to change,  using F1:LEFT or F4:RIGHT. Use MENU DOWN to move to the character set in the next line. An auxiliary cursor in the text line shows the position in the method name.
  • Seite 56: Accessories

    Instruction Manual 2. Accessories Flange Sets Specification Cat. No: For cut-off wheels. 04946902 65 mm dia. For use on Accutom-50 to achieve highest precision. For cup wheels. 05016901 Specimen Holders Specification Cat. No: For general use. Vice type with max. opening...
  • Seite 57: Consumables

    Please refer to the Selection Guide in the Struers Cut-off Wheels Cut-off Wheels brochure. Accutom-50 accepts cut-off wheels with a diameter of 75 mm (smallest flange is ø42 mm) up to 152 mm. Hole 12.7 mm. IMPORTANT! Always use large flanges (65 mm) for the highest possible accuracy.
  • Seite 58: Common Cutting Questions

    Accutom-50 Instruction Manual Common Cutting Questions The following table shows the possible answers to a number of common cutting questions: Optimising the Cutting Results Objective How to achieve it Better surface Use lowest recommended feed speed and no specimen quality holder rotation.
  • Seite 59: Optimising The Grinding Results

    Accutom-50 Instruction Manual Optimising the Grinding Results Grinding Parameters Use the following table to select proper wheel and grinding parameters according to the sample material. Recommended Grinding Parameters Material Hardness Wheel Precision Feed speed X-increment No. of final Wheel [mm/s]...
  • Seite 60: Trouble-Shooting

    The machine searches for the initial Wait for the search process to finish reference positions Reference pos. not found, close Accutom-50 was started with the Close the cover, wait for the cover cover open and did not search for reference search to finish and press START ...
  • Seite 61 The inductive sensor cannot detect Check for mechanical blockage of the end position of the X-table the table. If that is not the case, call a Struers service technician X-MIN sensor not deactivated The inductive sensor for the X-posi- Check for mechanical blockage of tion cannot be deactivated the table.
  • Seite 62: Technical Data

    Accutom-50 Instruction Manual 5. Technical Data Subject Specifications Cutting Cutting Speed: 300-5000 rpm (adjustable in steps of 100 rpm) Feed Speed: 0.005-3.000 mm/s (adjustable in steps of 0.005 mm/s) Max. Positioning Speed: Y = 13 mm/s, X = 13 mm/s Force Limits: LOW: approx.
  • Seite 63: Menu Overview

    Accutom-50 Instruction Manual 6. Menu Overview Accutom-50 MAIN Menu Structure MENU F1 Copy F1 Copy Select F2 Insert Select F2 Insert Manual Configuration Cutting Methods F3 Reset Grinding Methods F3 Reset Functions F4 Rename F4 Rename   Sample Cut-off...
  • Seite 64: Quick Reference Guide

    Accutom-50 Instruction Manual Quick Reference Guide Cutting with Accutom-50  Press Esc until the Main Menu appears. Loading a Cutting Method  Select Cutting Methods and press Enter .  Select the method you want to use and press Enter .
  • Seite 65 Accutom-50 Instruction Manual Grinding with Accutom-50  Press Esc until the Main Menu appears. Loading a Grinding Method  Select Grinding Methods and press Enter .  Select the method you want to use and press Enter .  Positioning the Sample Place the specimen holder with the sample in the specimen holder head and clamp it.
  • Seite 66 Accutom-50 Gebrauchsanweisung Handbuch Nr.: 15017001 Auslieferungsdatum 15.11.2012...
  • Seite 67 Zusammenhang mit dem Struers-Gerät benutzt werden, für das dieses Wartungshandbuch ausdrücklich bestimmt ist. Struers übernimmt für Irrtümer in Text und Bild der Veröffentlichungen keine Verantwortung. Wir behalten uns das Recht vor, den Inhalt der Gebrauchsanweisungen und Wartungshandbücher jederzeit und ohne Vorankündigung zu ändern.
  • Seite 68 Das Gerät darf nur für seinen vorgesehenen Anwendungszweck und wie in der Gebrauchsanweisung beschrieben verwendet werden. Für die Benutzung der Geräte bzw. der Maschinen sind die Verbrauchsmaterialien von Struers vorgesehen. Falls unzulässiger Gebrauch, falsche Installation, Veränderung, Vernachlässigung, unsachgemäße Reparatur oder ein Unfall vorliegt, übernimmt Struers weder die Verantwortung für Schäden des Benutzers noch für solche am Gerät.
  • Seite 69: Entsorgung

    Accutom-50 Gebrauchsanweisung Entsorgung Das WEEE-Symbol auf Ihrem Gerät weist darauf hin, dass es sich um ein WEEE-relevantes Gerät handelt, dass entsprechend getrennt entsorgt werden muss. Nähere Informationen über das Recycling dieses Produkts erhalten Sie bei der zuständigen Verwaltungsbehörde.
  • Seite 70 Software-Einstellungen ..............8 Konfigurationsmenü ..............8 Sprache einstellen ..............9 2. Grundzüge der Bedienung Gebrauch der Bedienelemente ............11 Bedienungsfeld des Accutom-50 ..........11 Tastengruppen ................ 11 Akustische Signale ..............11 Hauptschalter ................11 Tasten des Bedienungsfelds ............12 Display ..................13 Lesen des Displays ................
  • Seite 71 Accutom-50 Gebrauchsanweisung Trennbetrieb ..................23 Einzelschnitt ................23 Serienschnitt ................23 Rotation ................... 24 Kühlwasser ................24 Trennvorgang starten ............... 24 Während des Trennvorgangs ............25 Vorschubgeschwindigkeit ändern ........... 25 Probe einziehen ..............25 Kraftgrenze erreicht ..............25 Trennvorgang Stoppen ..............26 Automatischer Stopp ...............
  • Seite 72: Zu Beginn

    Inbusschlüssel, 3 mm Inbusschlüssel, 4 mm Inbusschlüssel, 5 mm Schrauben M4x20 Schrauben M4x35 Satz Gebrauchsanweisungen Accutom-50 aufstellen Accutom-50 sollte auf einem stabilen und ebenen (Toleranz: ±1 mm) Tisch aufgestellt werden. Der Tisch muß ein Gewicht von mindestens 50 kg tragen können.
  • Seite 73: Accutom-50 Kennenlernen

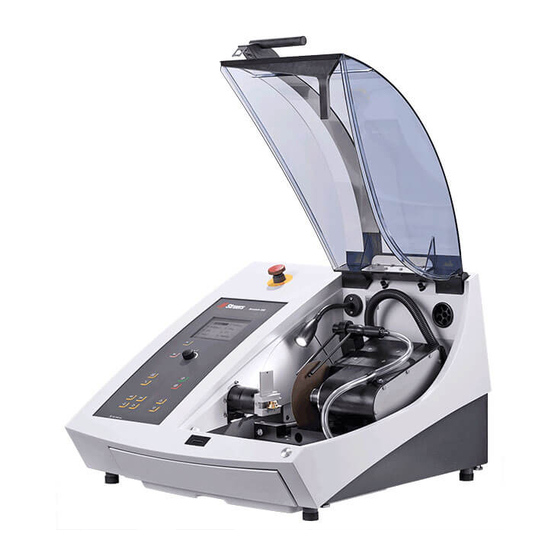
    Accutom-50 Gebrauchsanweisung Nehmen Sie sich einen Augenblick Zeit, um sich mit der Position und Accutom-50 kennenlernen den Bezeichnungen der Komponenten von Accutom-50 vertraut zu machen. Bedienungsfeld/Taste(n) des Bedienungsfelds Hauptschalter Umlaufkühleinheit Trennscheibe/Topfscheibe Probenhalterkopf Schraube für Vakuumanschluß...
  • Seite 74: Netzanschluß

    Vergewissern Sie sich, daß die Netzspannung der Spannung entspricht, die auf dem Typenschild auf der Maschinenrückseite angegeben ist. Ändern der Die Werkseinstellung für Accutom-50 ist 240V. Spannungseinstellung Wenn die Werkseinstellung nicht Ihrer Netzspannung entspricht, können Sie die Einstellung von 240V auf 220V ändern.
  • Seite 75 Accutom-50 Gebrauchsanweisung Das Accutom-50 wird mit 2 verschiedenen Netzkabeln geliefert: Einphasige Stromversorgung Der zweipolige Stecker (europäische Schukodose) wird für einphasigen Anschluss verwendet. Falls der mit diesem Kabel mitgelieferte Stecker nicht ihren Landesvorschriften entspricht, muss dieser durch einen zugelassenen Stecker ersetzt werden. Die Adern müssen wie folgt angeschlossen werden: gelb/grün: Erde...
  • Seite 76: Umlaufkühleinheit

    Gebrauchsanweisung Ziehen Sie den Umlaufkühltank heraus. Umlaufkühleinheit  Befüllen Sie den Tank mit 3,88 Litern Wasser und 120 ml Struers Additive. Der Wasserspiegel sollte sich 5 mm unterhalb des Rands des vorderen Lochs im Tankdeckel befinden. WICHTIG Sorgen Sie dafür, dass immer genügend Kühlflüssigkeit in der Wanne ist, damit die Pumpe nicht trocken läuft, sonst wird sie beschädigt.
  • Seite 77: Software-Einstellungen

    Maschinenrückseite befindet. Die folgende Anzeige wird kurz eingeblendet: Danach wird dieselbe Anzeige eingeblendet, die zu dem Zeitpunkt angezeigt wurde, als Sie Accutom-50 ausgeschaltet haben; im allgemeinen handelt es sich dabei um eine Trenn- oder Schleif- methoden. Wenn Sie Accutom-50 zum erstenmal einschalten, sollte das HAUPTMENÜ...
  • Seite 78: Sprache Einstellen

    Accutom-50 Gebrauchsanweisung   Sprache einstellen Drücken Sie MENÜ-AUF/AB- , um OPTION  auszuwählen.  CONFIGURATION CUT-OFF WHEELS CUP WHEELS OPTIONS    Drücken Sie EINGABE , um das Menü OPTIONS zu aktivieren.  OPTIONS Language : ENGLISH X-retract : Contrast No.
  • Seite 79: Drücken Sie Menü-Auf/Ab

    Accutom-50 Gebrauchsanweisung LANGUAGE ENGLISH DEUTSCH FRANÇAIS ESPAÑOL    Drücken Sie MENÜ-AUF/AB- , um die gewünschte  Sprache auszuwählen.    Drücken Sie EINGABE , um die Sprache zu bestätigen, die Sie ausgewählt haben.  Das Menü OPTIONEN erscheint jetzt in der gewählten ...
  • Seite 80: Grundzüge Der Bedienung

    Accutom-50 Gebrauchsanweisung 2. Grundzüge der Bedienung Gebrauch der Bedienelemente Bedienungsfeld des Accutom-50 Tastengruppen Programmier- und Überwachungsfunktionen Positionierung des Probenhalters Starten/Stoppen des Accutom-50  Kurzer Piepton: Wenn eine Taste gedrückt wird, gibt ein kurzer Akustische Signale Piepton an, daß der Befehl akzeptiert worden ist.
  • Seite 81: Tasten Des Bedienungsfelds

     Zurückblättern () oder Vorblättern  langsames Bewegen des () in der Menübaumstruktur des Probenhalters nach rechts in X- Accutom-50. Wird ein Parameter  POSITIO- Richtung in Schritten von 5 µm. MENÜ  geändert, so wird der Wert erhöht () NIERUNG Halten Sie die Taste gedrückt, um...
  • Seite 82: Display

    Accutom-50 Gebrauchsanweisung Display WÄHLE TRENNMETHODE 1.LEERE METHODE 2.LEERE METHODE 3.LEERE METHODE 4.LEERE METHODE 5.LEERE METHODE 6.LEERE METHODE 7.LEERE METHODE 8.LEERE METHODE 9.LEERE METHODE 10.LEERE METHODE 11.LEERE METHODE 12.LEERE METHODE F1:KOPIE F2:EINFÜG. F3:NULLST. F4:N.NAME Überschrift Invertierter Text. Cursor Funktionstastenoptionen D Pfeil zeigt an, daß noch weitere Zeilen im Bild...
  • Seite 83: Lesen Des Displays

    Accutom-50 Gebrauchsanweisung Das Display kann verschiedene Arten von Informationen anzeigen, Lesen des Displays beispielsweise über die Trenn- oder Schleifmethode oder über die Probenposition. Ein Bildschirm zur Anzeige einer Trenn- oder Schleifmethode könnte wie das folgende Beispiel aussehen:  Trennmethode: 1. LEERE METHODE Trennscheibe: B0D15 Geschw.
  • Seite 84: Werte Ändern

    Accutom-50 Gebrauchsanweisung In Abhängigkeit vom Wertetyp gibt es zwei unterschiedliche Arten Werte ändern der Änderung.  Numerische Werte Trennmethode: 1. LEERE METHODE Trennscheibe: B0D15 Geschw. : 2700 rpm Vorsch. :0,100 mm/s Kraft : MITTEL Rotation: Kühlwasser: F1:SERIENSCHNITT   ...
  • Seite 85: Alphanumerische Werte

    Accutom-50 Gebrauchsanweisung  Alphanumerische Werte Trennmethode: 1. LEERE METHODE Trennscheibe: B0D15 Geschw. : 2700 rpm Vorsch : 0,100 mm/s Kraft : MITTEL Rotation: Kühlwasser:  F1:SERIENSCHNITT    Drücken Sie MENÜ-AUF/AB , um den alphanu-   merischen Wert auszuwählen, der geändert werden soll, also beispielsweise: Trennscheibe.
  • Seite 86: Probe Positionieren

    Das Display zeigt die Position entweder in X- oder Y-Richtung. Bezugsposition Wenn die Stromversorgung bei geschlossener Haube eingeschaltet wird, überprüft Accutom-50 die eigene Bezugsposition. Der Probenhalter wird zur Bezugsposition (X=0,000 Y=0,0) zurück- gefahren, und anschließend wird wieder die Position angefahren, die eingenommen wurde, bevor die Stromversorgung eingeschaltet worden ist.
  • Seite 87: Zwischen Trennen Und Schleifen Auswählen

    Gebrauchsanweisung Sie müssen sich im Hauptmenü befinden, um zwischen Trennen und Zwischen Trennen und Schleifen auswählen zu können. Da Accutom-50 stets im selben Schleifen auswählen Zustand gestartet wird, der vorlag, als die Stromversorgung nach der letzten Benutzung abgeschaltet wurde, ist es eventuell erforderlich, in das Hauptmenü...
  • Seite 88: Anzeige Der Trennmethode

    Accutom-50 Gebrauchsanweisung WÄHLE TRENNMETHODE  Anzeige der Trennmethode 1.LEERE METHODE 2.LEERE METHODE 3.LEERE METHODE 4.LEERE METHODE 5.LEERE METHODE 6.LEERE METHODE 7.LEERE METHODE 8.LEERE METHODE 9.LEERE METHODE 10.LEERE METHODE 11.LEERE METHODE 12.LEERE METHODE F1:KOPIE F2:EINFÜG. F3:NULLST. F4:N.NAME Wenn Sie SCHLEIFMETHODEN ausgewählt haben, sieht ...
  • Seite 89: Trennen

    Accutom-50 Gebrauchsanweisung Trennen  Trennscheibe auswechseln Öffnen Sie die Haube und drehen Sie das rechte Kühlröhrchen in die Luft.  Führen Sie den Anschlagstift in die Bohrung des Innenflansches ein. Kühlwasserröhrchen  Anschlagstift Lösen Sie die Flanschschraube anhand des Schlüssels (17 mm).
  • Seite 90: Probe Und Probenhalter Einspannen

    Accutom-50 Gebrauchsanweisung  Probe und Probenhalter Spannen Sie die Probe mit einem Inbusschlüssel fest in den einspannen Probenhalter ein.  Befestigen Sie den Probenhalter im Probenhalterkopf, indem Sie den Probenhalter in die Schwalbenschwanzführung einschieben und die Schraube mit einem Inbusschlüssel festziehen.
  • Seite 91: Trennparameter Einstellen

    Rotation: KONT. Geschw.: 3 Rich.: > < Kühlwasser: F1:EINZELSCHNITT F3:ROT.TEST. F4:SICHERN Alle Struers-Trennscheiben sind mit ihren Standardwerten für Kraftgrenze, Scheibenstärke und Geschwindigkeit aufgelistet. Darüber hinaus wurden acht undefinierte Scheiben aufgenommen, damit Sie eine eigene Wahl von Trennscheiben treffen können. (Sehen Sie sich in diesem Zusammenhang „Konfiguration von Trennscheiben“...
  • Seite 92: Trennbetrieb

    Scheiben, die von der Probe abgetrennt werden soll eingestellt. Dicke Hier wird die Dicke der Scheiben definiert, die abgetrennt werden sollen. Nachdem START gedrückt worden ist, führt Accutom-50 einen Schnitt durch, um eine Bezugsfläche zu erzeugen. Anschließend wird die Probe eingezogen und nach links in X- Richtung entsprechend der eingegebenen Scheibendicke bewegt.
  • Seite 93: Rotation

    Es sollte kein abgetragenes Material oder andere Teilchen im Abriebsammelsieb sein. WICHTIG Besonders beim Serienschnitten muß dafür gesorgt sein, daß das Abriebsammelsieb leer ist bevor Accutom-50 gestartet wird. Angestautes Material kann zu einer Reduzierung des Kühlwasserflußes führen, und Probe oder Trennscheibe können beschädigt werden. ...
  • Seite 94: Während Des Trennvorgangs

    Vorschubgeschwindigkeit vorwärts. Kraftgrenze erreicht Wenn die voreingestellte Vorschubgeschwindigkeit nicht erreicht werden kann, weil die Kraftgrenze erreicht ist, verringert Accutom-50 automatisch die Vorschubgeschwindigkeit auf die maximal mögliche Geschwindigkeit. Dieser Wert wird angezeigt, und wenn der Trennvorgang beendet ist, wird die folgende Nachricht auf dem...
  • Seite 95: Trennvorgang Stoppen

    Accutom-50 Gebrauchsanweisung Trennvorgang Stoppen  Automatischer Stopp Accutom-50 stoppt den Trennprozeß automatisch an der voreingestellten Stopposition. (Vergewissern Sie sich, daß ein eventueller Scheibenverschleiß berücksichtigt wird, wenn die Stopposition eingestellt wird.)  Die Probe wird anschließend eingezogen, und die Trennscheibe wird gestoppt.
  • Seite 96: Schleifen

    Ende des kurzen Schlauchs an den Ausgang an.  Drehen Sie die Schraube auf der linken Seite der Rückseite von Accutom-50 heraus und schließen Sie den langen Schlauch, den Sie von dem Vakuumhalter abgeschraubt haben, an diesen Eingang an.
  • Seite 97: Probe Und Probenhalter Einspannen

    Accutom-50 Gebrauchsanweisung  Probe und Probenhalter Befestigen Sie den Probenhalter im Probenhalterkopf, indem Sie einspannen den Probenhalter in die Schwalbenschwanzführung einschieben und die Schraube mit einem Inbusschlüssel festziehen.  Wenn Sie den Schleifvorgang mit Rotation oder Oszillation durchführen, sollten Probe und Probenhalter so eingespannt sein, daß...
  • Seite 98: Probe Positionieren

    Accutom-50 Gebrauchsanweisung  Probe positionieren Bewegen Sie die Probe mit Hilfe der Positionstasten in die richtige Startposition in der Nähe der Topfscheibe wie folgt: − Die Proben in die X-Richtung bewegen bis sie leicht die Topfscheibe berührt. Bemerke! Die soll immer noch von Hand gedreht werden können.
  • Seite 99: Schleifparameter Einstellen

    REL. X POSITION WIEDEREINLESEN F2:WECHSLE ZU STOP POS. MODUS Topfscheibe Alle Struers-Topfscheiben sind mit ihren Standardwerten für Geschwindigkeit aufgelistet. Darüber hinaus wurden acht undefinierte Scheiben aufgenommen, damit Sie eine eigene Wahl von Topfscheiben treffen können. (Sehen Sie sich in diesem Zusammenhang „Konfiguration von Topfscheiben“...
  • Seite 100: Rotation

    Accutom-50 Gebrauchsanweisung Rotation Die Probenrotation kann ein Vorteil sein, um ein gleichförmigeres Schleifenmuster auf der Oberfläche und eine besser Planheit zu erzielen. Bei Accutom-50 sind drei verschiedene Einstellungen möglich. Rotation: aus Die Probe rotiert nicht. Rotation: kontinuierlich Die Probe rotiert um ihren Mittelpunkt.
  • Seite 101 , um die Probe auf die richtige Dicke abzuschleifen. Hinweis Um die Produktion von Dünnschliffen wo die Startpositionen immer gleich sind zu vereinfachen kann Accutom-50 die Originalpositionen wiedereinlesen. Bei dem Wiederaufrufen einer schon einmal benutzten Schleifmethode steht auf der unteren Linie F1:REL. X POSITION WIEDEREINLESEN.
  • Seite 102: Schleifvorgang Starten

    10,0 mm/s Geschwindigkeit 4000 rpm Sowohl der voreingestellte als auch der tatsächliche Abtrag oder Dicke werden angezeigt.  Accutom-50 stoppt den Schleifprozeß automatisch an der Schleifvorgang Stoppen voreingestellten Stopposition oder nachdem die vordefinierte Automatischer Stopp Materialmenge abgetragen worden ist. ...
  • Seite 103: Wartung

    Arbeitsstunden , oder wenigstens jede Woche, überprüft werden. Wenn die Pumpe nicht mehr in das Kühlwasser eintaucht muss der Tank aufgefüllt werden. Denken Sie daran, Struers Additiv für Kühlwasser zuzusetzen, ein Teil Additiv auf 33 Teile Wasser. Die Konzentration des Additivs wird mit Hilfe eines Refraktometers gemessen: Konzentration = Brix.
  • Seite 104: Wöchentliche Wartungsarbeiten

    Umlaufkühlsystem mit klarem Wasser. Das verhindert, dass trockene Trennrückstände in die Pumpe gelangen und diese beschädigen.  Tank befüllen Befüllen Sie den Tank mit 3,88 Litern Wasser und 120 ml Struers Additive Der Wasserspiegel sollte 5 mm unterhalb des Rands des vorderen Lochs im Tankdeckel befinden. ...
  • Seite 105: Wartung Der Trennscheiben

    Accutom-50 Gebrauchsanweisung Wartung der Trennscheiben Wartung der Diamant- und CBN- Die Genauigkeit der Diamant- und CBN-Trennscheiben und damit Trennscheiben des Schnitts hängt davon ab, wie sorgfältig die nachstehenden Anweisungen eingehalten werden:  Die Trennscheibe darf niemals etwa durch schwere mechanische oder thermische Belastungen überlastet werden.
  • Seite 106 Accutom-50 Gebrauchsanweisung Referenzhandbuch Inhaltsverzeichnis Seite 1. Details und Besonderheiten der Bedienung Konfigurationsmenü ................. 38 Trennscheiben ................ 38 Topfscheiben ................40 Optionen ................. 41 Manuelle Funktionen ................ 42 Probenrotation ................ 43 Kühlwasserpumpe ..............44 Abrichten ................. 45 Methodenoptionen ................48 Methode speichern ..............48 Methode kopieren ..............
  • Seite 107: Konfigurationsmenü

     KONFIGURATION TRENNSCHEIBEN TOPFSCHEIBEN OPTIONEN Wenn Sie andere als Struers Trennscheiben verwenden wollen, so müssen sie jene konfigurieren, so daß sie die richtigen Werte für Kraftgrenze, Scheibendicke und -geschwindigkeit enthalten. Um Ihre eigenen Trennscheiben zu konfigurieren, gehen Sie folgendermaßen vor: Trennscheiben ...
  • Seite 108: Konfiguration Der Trennscheiben

    Accutom-50 Gebrauchsanweisung KONFIGURATION DER TRENNSCHEIBEN Trennscheibe : ANW. 1 Kraftgrenze MITTEL Scheibendicke : 0,50 mm Geschwindigkeit: 3000 rpm F1:VORIGE SCH. F2:NÄCHSTE SCH. F4:N.NAME    Drücken Sie MENÜ-AUF/AB , um den Wert  auszuwählen, der geändert werden soll. ...
  • Seite 109: Drücken Sie Menü-Auf/Ab

    Accutom-50 Gebrauchsanweisung Topfscheiben Wenn Sie andere als Struers Topfscheiben verwenden wollen, dann denken Sie daran, diese auf die richtigen Geschwindigkeitswerte zu konfigurieren.   Drücken Sie MENÜ-AUF/AB , um TOPFSCHEIBEN  auszuwählen.    Drücken Sie EINGABE , um das Menü TOPFSCHEIBEN zu aktivieren.
  • Seite 110 Accutom-50 Gebrauchsanweisung Optionen Im Menü OPTIONEN können verschiedene Einträge konfiguriert werden. Sprache Im Abschnitt „Zu Beginn“ dieser Gebrauchsanweisung können Sie nachlesen, wie die Sprache geändert wird. Nachdem die Stopposition erreicht wurde, wird die Probe direkt zur X-Einzug  relativen Nullposition zurückgefahren. Um jeglichen Kontakt mit der Trennscheibe während dieser Bewegung zu vermeiden, kann die...
  • Seite 111: Manuelle Funktionen

    Accutom-50 Gebrauchsanweisung Mehrere Funktion können bei Accutom-50 auch manuell ausgeführt Manuelle Funktionen werden. Alle diese Funktionen stehen im Menü MANUELLE FUNKTIONEN zur Verfügung. Drücken Sie ESC, bis Sie zum Hauptmenü gelangen. HAUPTMENÜ TRENNMETHODEN SCHLEIFMETHODEN MANUELLE FUNKTIONEN KONFIGURATION   ...
  • Seite 112 Accutom-50 Gebrauchsanweisung   Probenrotation Drücken Sie MENÜ-AUF/AB , um  PROBENROTATION auszuwählen.    Drücken Sie EINGABE , um das Menü PROBENROTATION zu aktivieren.  PROBENROTATION PROBENROTATION: KONTINUIERLICH Geschwindigkeitsstufe: Richtung: > < F1: ROTATION STARTEN   ...
  • Seite 113 Accutom-50 Gebrauchsanweisung  Kühlwasserpumpe Vom Menü MANUELLE FUNKTIONEN, drücken Sie   MENÜ-AUF/AB , um Kühlwasserpumpe zu wählen.  MANUELLE FUNKTIONEN PROBENROTATION KÜHLWASSERPUMPE ABRICHTEN DER TRENNSCHEIBE ABRICHTEN DER TOPFSCHEIBE    Drücken Sie EINGABE , um die Option KÜHLWASSERPUMPE zu aktivieren.
  • Seite 114: Abrichten

    Accutom-50 Gebrauchsanweisung Abrichten Diamant- und CBN-Trennscheiben und Topfscheiben müssen eventuell abgerichtet werden, um die Scheibe wieder zu öffnen und eine maximale Wirkung zu erzielen, wenn zähe Materialien getrennt oder geschliffen worden sind. Dieses Abrichten können Sie folgendermaßen durchführen:  Abrichten der Trennscheibe Setzen Sie die Trennscheibe ein, die abgerichtet werden soll.
  • Seite 115: Abrichten Der Trenncheibe

    Accutom-50 Gebrauchsanweisung ABRICHTEN DER TRENNCHEIBE Vorschub 0.5 mm/s Scheibengeschwindigkeit: 3000 rpm Kühlwasser Y-Abstand: 10.0 mm F1: ABRICHTEN STARTEN    Drücken Sie MENÜ-AUF/AB , um den Wert  auszuwählen, der geändert werden soll.    Drücken Sie EINGABE , um den Wert zu ändern.
  • Seite 116: Abrichten Der Topfscheibe

    Accutom-50 Gebrauchsanweisung   Drücken Sie EINGABE , um die Abrichtoption zu aktivieren.  ABRICHTEN DER TOPFSCHEIBE X-Zustellung  : 0.010 mm Geschwindigkeit : 4000 rpm Kühlwasser Y-Abstand : 15.0 mm F1:ABRICHTEN STARTEN    Drücken Sie MENÜ-AUF/AB , um den Wert ...
  • Seite 117: Methodenoptionen

    Accutom-50 Gebrauchsanweisung Methodenoptionen Methode speichern Während Sie mit einer speziellen Methode arbeiten, können Sie Änderungen, die Sie vorgenommen haben, in der Datenbank speichern.  Sobald ein Parameter in einer Trenn- oder Schleifmethode geändert wird, wird F4:SICHERN in der untersten Zeile des Displays angezeigt.
  • Seite 118: Methode Kopieren

    Accutom-50 Gebrauchsanweisung Methode kopieren Das Kopieren einer Methode ist ein abkürzendes Verfahren, um eine neue Trenn- oder Schleifmethode auf der Grundlage einer bereits vorhandenen Methode zu erstellen.  Wählen Sie die Trenn- oder Schleifmethode aus, von der Sie eine Kopie erstellen möchten.
  • Seite 119: Methode Einfügen

    Accutom-50 Gebrauchsanweisung Methode einfügen Wenn Sie eine Methode in eine andere Methode einfügen wollen:   Drücken Sie MENÜ-AUF/AB , um die Methode  auszuwählen , in die Sie die Methode einfügen wollen.  Wenn es sich nicht um eine LEERE METHODE handelt: ...
  • Seite 120: Methode Nullstellen

    Accutom-50 Gebrauchsanweisung Methode nullstellen Wenn eine Methode nicht mehr gebraucht wird, sollte sie nullgestellt werden. Die Parameter werden auf die Standardwerte geändert, die später ganz einfach in eine neue Methode geändert werden können. Der Methodenname wird auf LEERE METHODE geändert und teilt Ihnen auf diese Weise mit, daß...
  • Seite 121: Namen Ändern

    Accutom-50 Gebrauchsanweisung Namen ändern Die Namen für die Methoden, Trennscheiben und Topfscheiben können nach Belieben geändert und ausgetauscht werden.  Wählen Sie die Methode, Trennscheibe oder Topfscheibe aus, die Sie umbenennen wollen. WÄHLE TRENNMETHODE  1.UNBENANNTE METH. 2.LEERE METHODE 3.LEERE METHODE 4.UNBENANNTE...
  • Seite 122: Prinzipien Der Namensänderung

    Accutom-50 Gebrauchsanweisung  Prinzipien der Namensänderung Führen Sie den Hauptcursor mit Hilfe von F1:LINKS oder F4:RECHTS auf das Zeichen, das Sie ändern wollen.  Verwenden Sie MENÜ-AB , um zum nächsten Zeichensatz in der nachfolgenden Zeile zu gelangen. Ein Hilfscursor in der Textzeile gibt die Position im Methodennamen an.
  • Seite 123: Zubehör

    Accutom-50 Gebrauchsanweisung 2. Zubehör Flanschsätze Spezifikation Kat. Nr. Für Trennscheiben. 65 mm Durchmesser. Zum Einsatz in Accutom- 50, um höchste Präzision zu erzielen. 04946902 Für Topfscheiben. 05016901 Probenhalter Spezifikation Kat. Nr. Für allgemeinen Einsatz. Schraubstock mit 04946903 maximaler Öffnung von 60 mm.
  • Seite 124: Verbrauchsmaterialien

    Siehe Tabelle zur Auswahl der Trennscheiben in der Broschüre für Trennscheiben Trennscheiben. Accutom-50 akzeptiert Trennscheiben mit einem Durchmesser von 75 mm (der kleinste Flansch hat einen Durchmesser von 42 mm) bis 152 mm. Bohrung: 12,7 mm. WICHTIG! Verwenden Sie stets große Flansche (65 mm), um die größtmögliche Genauigkeit zu erzielen.
  • Seite 125: Allgemeine Fragen Zum Trennvorgang

    Accutom-50 Gebrauchsanweisung Allgemeine Fragen zum In der folgenden Tabelle finden Sie mögliche Antworten auf eine Trennvorgang Reihe allgemeiner Fragen zum Trennvorgang: Trennergebnisse optimieren Ziel Umsetzung Besser Verwenden Sie die geringste empfohlene Oberflächengüte Vorschubgeschwindigkeit und keine Rotation des Probenhalters. Geringerer Verwenden Sie die geringste empfohlene Vorschub- Scheiben- geschwindigkeit und keine Rotation des Probenhalters.
  • Seite 126: Schleifergebnisse Optimieren

    Accutom-50 Gebrauchsanweisung In der folgenden Tabelle können Sie die richtige Scheiben und die Schleifergebnisse optimieren Schleifparameter entsprechend dem Probenmaterial auswählen. Schleifparameter Empfohlene Schleifparameter Material Härte Scheibe Genauigkeit Vorschub- X-Einzug Anzahl der Drehzahl geschwin- Endbewe- [U/min] digkeit gungen [mm/s] Keramik, > HV 800 M0P10...
  • Seite 127: Fehlersuche

    Die Maschine sucht die Warten Sie, bis der Suchprozeß Ausgangsreferenzpositionen abgeschlossen ist Ref.-Pos. nicht gefunden, Haube Accutom-50 wurde mit offener Schließen Sie die Haube, warten schließen Haube gestartet und suchte nicht Sie, bis die Suche nach der nach der Referenzposition Referenzposition abgeschlossen ist, und drücken Sie erneut auf START...
  • Seite 128 Überprüfen Sie, ob der Tisch Endposition des X-Tisches nicht mechanisch blockiert ist. Ist dies erfassen nicht der Fall, rufen Sie einen Kundendiensttechniker von Struers X-MIN-Sensor nicht deaktiviert Der Induktivsensor für die X-Position Überprüfen Sie, ob der Tisch läßt sich nicht deaktivieren mechanisch blockiert ist.
  • Seite 129: Technische Daten

    Accutom-50 Gebrauchsanweisung 5. Technische Daten Gegenstand Spezifikationen Trennen Trenngeschwindigkeit: 300-5000 U/min (einstellbar in Schritten von 100 U/min) Vorschubgeschwindigkeit: 0,005-3,000 mm/s (einstellbar in Schritten von 0,005 mm/s) Max. Positioniergeschwindigkeit: Y = 13 mm/s, X = 13 mm/s Kraftgrenzen: gering: etwa 20N; mittel: etwa 40N; hoch: etwa 60N...
  • Seite 130: Menüstruktur

    Accutom-50 Gebrauchsanweisung 6. Menüstruktur Accutom-50 HAUPTMENÜ Menüstruktur F1 Kopie F1 Kopie Wähle F2 Einfüg. Wähle F2 Einfüg. Manuelle Konfiguration Trennmethoden F3 Nullst. Schleifmethoden F3 Nullst. Funktionen F4 N. Name F4 N. Name   Proben- Trenn- rotation scheiben  Parameter ...
  • Seite 131: Schnellinformation

    Accutom-50 Gebrauchsanweisung Schnellinformation Trennen mit Accutom-50  Trennmethode laden Drücken Sie die ESC-Taste, bis das Hauptmenü angezeigt wird.  Wählen Sie Trennmethoden oder Schleifmethoden aus und drücken Sie die Eingabetaste .  Wählen Sie die Methode aus, die Sie verwenden möchten, und drücken Sie die Eingabetaste .
  • Seite 132: Schleifen Mit Accutom

    Accutom-50 Gebrauchsanweisung Schleifen mit Accutom-50  Schleifmethode laden Drücken Sie die ESC-Taste, bis das Hauptmenü angezeigt wird.  Wählen Sie Schleifmethoden aus und drücken Sie die Eingabetaste .  Wählen Sie die Methode aus, die Sie verwenden wollen, und drücken Sie die Eingabetaste .
  • Seite 133 Accutom-50 Mode d’emploi Mode d’emploi no.: 15017001 Date de parution 15.11.2012...
  • Seite 134 Les restrictions suivantes doivent être observées. Le non respect de ces restrictions pourra entraîner une annulation des obligations légales de Struers: Mode d'emploi: Le mode d'emploi Struers ne peut être utilisé que pour l'équipement Struers pour lequel il a été spécifiquement rédigé.
  • Seite 135 L’équipement ne devra servir qu’à l’usage auquel il est destiné et ainsi que décrit en détails dans le Mode d’emploi. La machine est conçue pour être utilisée avec des articles consommables fournis par Struers. En cas de mauvais usage, d'installation incorrecte, de modification, de négligence, d'accident ou de réparation impropre, Struers n'acceptera aucune responsabilité...
  • Seite 136 Accutom-50 Mode d'emploi Élimination Les équipements marqués d’un symbole WEEE contiennent des composants électriques et électroniques et ne doivent pas être jetés avec les ordures ménagères. Veuillez contacter les autorités locales pour toutes informations sur la procédure correcte d’élimination à...
  • Seite 137 Page 1. Installation 3 Vérifier le contenu de l'emballage ............3 Placer Accutom-50 ................3 Se familiariser avec Accutom-50 ............3 Alimentation en courant ..............4 Changer les réglages du courant ..........4 Unité de recyclage ................6 Programmation du logiciel ..............7 Menu de Configuration ..............
  • Seite 138 Accutom-50 Mode d'emploi Programmer les paramètres de tronçonnage........20 Meule ..................20 Vitesse ..................20 Avance ..................20 Limite de force ................ 20 Mode de tronçonnage ..............21 Coupe unique ................21 Coupe multiple ................ 21 Rotation ................... 22 Eau de refroidissement ............22 Commencer le tronçonnage .............
  • Seite 139: Installation

    Clé hexagonale, 5 mm Vis M4x20 Vis M4x35 Jeux de Mode d’emploi Accutom-50 doit être placée sur une table stable et plane (tolérance Placer Accutom-50 ±1 mm). La table doit pouvoir porter un poids de 50 kg min. Se familiariser Prendre le temps de se familiariser avec l'emplacement et les noms des composants d'Accutom-50.
  • Seite 140: Alimentation En Courant

    Vérifier que le courant utilisé correspond bien au courant indiqué sur la plaque au dos de la machine. Le réglage standard de Accutom-50 est 240V. Changer les réglages du courant Si les réglages à l'usine ne correspondent pas à la tension du réseau, le réglage peut être modifié...
  • Seite 141 Accutom-50 Mode d'emploi Accutom-50 est livré avec 2 types de câbles électriques : Alimentation monophasée La prise à 2 tiges (Schuko européenne) est pour une utilisation monophasée. Si la prise fournie sur ce câble n’est pas autorisée dans le pays d’utilisation, celle-ci devra être remplacée par une prise homologuée.
  • Seite 142: Unité De Recyclage

    Sortir le réservoir de recyclage. Unité de recyclage  Remplir le réservoir de 3,88 l d’eau additionnée de 120 ml d’additif Struers d’eau. Le niveau d'eau doit être d'au minimum 5 mm au dessous du bord de l'orifice frontal du couvercle du réservoir. ...
  • Seite 143: Programmation Du Logiciel

    Ensuite l'affichage retournera à l'écran qui était montré avant d'éteindre Accutom-50, généralement une méthode de tronçonnage ou de prépolissage. Lorsqu'Accutom-50 est allumée pour la première fois, l'affichage qui apparaît doit être MENU PRINCIPAL. Si l'entête de l'affichage est différente, appuyer sur ESC, jusqu'à ce que MENU PRINCIPAL apparaisse.
  • Seite 144: Choisir La Langue

    Accutom-50 Mode d'emploi   Choisir la langue Appuyer sur MENU VERS LE HAUT/LE BAS pour  choisir OPTIONS.  CONFIGURATION CUT-OFF WHEELS CUP WHEELS OPTIONS    Appuyer sur RETOUR pour activer le menu OPTIONS.  OPTIONS Language : ENGLISH X-retract ...
  • Seite 145: Opérations De Base

    Groupes de fonctions Fonctions de programmation et de surveillance Positionnement du porte-échantillons Mise en marche/arrêt d'Accutom-50  Bip bref: lorsqu'une touche est pressée, un bip bref indique que Signaux sonores la commande a été acceptée.  Bip long: un bip long indique que la touche est inactive à ce moment.
  • Seite 146: Touches Du Panneau Frontal

     Se déplace vers le haut () ou le bas () Se déplace au menu POSITION ou  dans le menu arborescent d'Accutom-50. déplace le porte-échantillons lentement Lorsqu'un paramètre est programmé, la vers la droite en direction X en échelons ...
  • Seite 147: Affichage

    Accutom-50 Mode d'emploi Affichage  CHOIX DE METHODE DE TRONÇONNAGE 1.METHODE VIDE 2.METHODE VIDE 3.METHODE VIDE 4.METHODE VIDE 5.METHODE VIDE 6.METHODE VIDE 7.METHODE VIDE 8.METHODE VIDE 9.METHODE VIDE 10.METHODE VIDE 11.METHODE VIDE 12.METHODE VIDE Entête Texte clignotant. Marqueur Options touches de contrôle Flèche indiquant qu'il y a d'autres lignes dans l'image...
  • Seite 148: Lecture De L'affichage

    Accutom-50 Mode d'emploi L'affichage peut montrer différentes sortes d'informations, par Lecture de l'affichage exemple sur la méthode de tronçonnage ou de prépolissage ou sur la position de l'échantillon. Un écran pour un tronçonnage ou une méthode de prépolissage pourrait ressembler à l'exemple suivant: ...
  • Seite 149: Changer/Editer Les Valeurs

    Accutom-50 Mode d'emploi Changer/Editer les valeurs Selon le type de valeur, il y a deux différentes façons d'éditer.  Valeurs numériques Méthode tronç.: 1. METHODE VIDE Meule : B0D15 Vitesse : 2700 t/m Avance :0.100 mm/s Limite f.: MOYENNE Rotation: F1:COUPE MULTI.
  • Seite 150: Valeurs Alphanumériques

    Accutom-50 Mode d'emploi  Valeurs alphanumériques Méthode tronç.: 1. METHODE VIDE Meule : B0D15 Vitesse : 2700 t/m Avance :0.100 mm/s Limite f.: MOYENNE Rotation: F1:COUPE MULTI.    Appuyer sur MENU VERS LE HAUT/LE BAS pour  ...
  • Seite 151: Positionner L'échantillon

    Position de référence A chaque fois que le courant est allumé alors que le couvercle est fermé, Accutom-50 vérifie sa propre position de référence. La tête du porte-échantillons sera éloignée autant que possible, à la position de référence (X=0.000 Y=0.0), et retournera ensuite à la position où elle était avant que le courant ne soit allumé.
  • Seite 152: Choisir Entre Tronçonnage Et Prépolissage

    Mode d'emploi Pour choisir entre tronçonnage et prépolissage, il faut se trouver Choisir entre dans le Menu principal. Comme Accutom-50 se met toujours en tronçonnage et prépolissage marche dans les mêmes conditions que lorsque le courant a été éteint la dernière fois, il peut s'avérer nécessaire de retourner au Menu principal.
  • Seite 153: Affichage Tronçonnage

    Accutom-50 Mode d'emploi  Affichage tronçonnage CHOIX DE METHODE DE TRONÇONNAGE 1.METHODE VIDE 2.METHODE VIDE 3.METHODE VIDE 4.METHODE VIDE 5.METHODE VIDE 6.METHODE VIDE 7.METHODE VIDE 8.METHODE VIDE 9.METHODE VIDE 10.METHODE VIDE 11.METHODE VIDE 12.METHODE VIDE F1:COPIER F3:EFFACER F4:NOM  Après le choix de METHODES PREPOL., l'écran suivant apparaît.
  • Seite 154: Tronçonnage

    Accutom-50 Mode d'emploi Tronçonnage  Changer la meule de Ouvrir le couvercle et faire basculer vers le haut le tube de tronçonnage refroidissement de droite.  Insérer la tige d'arrêt dans l'orifice du flasque interne.  Utiliser la clé (17 mm) pour desserrer la vis du flasque.
  • Seite 155: Serrer L'échantillon Et Le Porte-Échantillons

    Accutom-50 Mode d'emploi  Serrer l'échantillon et le porte- Serrer fermement l'échantillon dans le porte-échantillons à l'aide échantillons de la clé hexagonale.  Fixer le porte-échantillons dans la tête du porte-échantillons en poussant le porte-échantillons dans la fixation en queue d'aronde et en serrant la vis à...
  • Seite 156: Programmer Les Paramètres De Tronçonnage

    Rotation: CONT. Vitesse: 3 Sens: > < F1:COUPE UNIQUE F3:Rot. TEST F4:SAUVER Meule Toutes les meules de tronçonnage Struers sont listées avec leur valeur de référence pour la limite de force, l'épaisseur de la meule et la vitesse. Sont également inclues huit meules non-définies pour le propre choix de meules de tronçonnage du client (Voir également...
  • Seite 157: Mode De Tronçonnage

    être programmé. L'épaisseur des coupes à tronçonner est définie. Epaisseur Après sa mise en marche, Accutom-50 va effectuer une coupe droite pour avoir une surface de référence. Puis l'échantillon est rétracté et déplacé vers la gauche dans la direction X, selon l'épaisseur de la coupe programmée.
  • Seite 158: Rotation

    Accutom-50 Mode d'emploi Rotation La rotation peut se révéler un avantage lors du tronçonnage des échantillons grands, très durs, revêtus ou très longs. Sur Accutom- 50, trois programmations différentes sont possibles. Rotation: Off L'échantillon ne tourne pas. Rotation: Continue L'échantillon tourne autour de son centre.
  • Seite 159: Commencer Le Tronçonnage

    En particulier lors de l'emploi de la fonction de coupe multiple, il est nécessaire de nettoyer le récipient de recueil des débris avant de mettre Accutom-50 en marche, afin d'éviter que la matière enlevée ne s'amalgame. Ceci pourrait avoir pour résultat une réduction du débit d'eau de refroidissement, ce qui pourrait endommager l'échantillon ou la meule de...
  • Seite 160: Pendant Le Tronçonnage

    à la vitesse d'avance préprogrammée. Si la vitesse d'avance préprogrammée ne peut pas être obtenue parce que la limite de force est atteinte, Accutom-50 réduit automatiquement la vitesse d'avance à la vitesse maximale possible. Cette valeur est affichée, et une fois la coupe achevée, le message suivant apparaît sur...
  • Seite 161: Arrêter Le Tronçonnage

    Accutom-50 Mode d'emploi Arrêter le tronçonnage  Arrêt automatique Accutom-50 interrompt automatiquement le processus de tronçonnage à la position d'arrêt pré-programmée. (Se rappeler d'assurer la compensation d'une usure possible de la meule lors du réglage de la position d'arrêt). ...
  • Seite 162: Prépolissage

    Brancher le mandrin à vide au Avant d'utiliser le mandrin à vide pour la première fois, il doit système à vide être branché à la pompe à vide. Accutom-50 est conçu pour un branchement par une douille se trouvant dans le compartiment de tronçonnage.
  • Seite 163: Serrer L'échantillon Et Le Porte-Échantillons

    Accutom-50 Mode d'emploi  Serrer l'échantillon et le porte- Serrer fermement l'échantillon dans le porte-échantillons à l'aide échantillons de la clé hexagonale ou placer l'échantillon monté sur le verre porte-objet sur le porte-échantillons à vide.  Fixer le porte-échantillons dans la tête du porte-échantillons en poussant le porte-échantillons dans la fixation en queue d'aronde...
  • Seite 164: Positionner L'échantillon

    Accutom-50 Mode d'emploi  Déplacer l'échantillon dans la position de début correcte, proche de la meule boisseau à l'aide des touches POSITION comme suit: − Déplacer l'échantillon en direction X jusqu'à ce qu'il touche légèrement la surface de prépolissage de la meule boisseau.
  • Seite 165: Programmer Les Paramètres De Tronçonnage

    :0.100 mm F2:CHOISIR MODE POS. ARRET Meule Toutes les meules boisseaux Struers sont listées avec leur valeur de référence pour la vitesse. Sont également inclues huit meules non- définies pour le propre choix de meules boisseaux du client (Voir également Configuration de meules boisseaux).
  • Seite 166: Rotation

    L'angle peut être réglé de 10° à 400°. Appuyer sur F3 pour tester la rotation de l'échantillon avec les paramètres programmés. Sur Accutom-50, il existe deux façons différentes de procéder à Mode Enlèvement de matière l'enlèvement d'une certaine quantité de matière.
  • Seite 167 Conseil Pour faciliter la production des lames minces, en utilisant des positions de départ permanentes, Accutom-50 peut rappeler les paramètres de position originaux. En revenant à une méthode de prépolissage, ayant été utilisée auparavant, F1:RAPPEL POS. X RELATIVE apparait. Une simple pression de F1 rappellera les positions relatives d'origine.
  • Seite 168: Commencer Le Prépolissage

    : 4000 t/m L'enlèvement de matière ou l'épaisseur préprogrammés ou actuels sont affichés.  Accutom-50 interrompt automatiquement le processus de Interrompre le prépolissage Arrêt automatique prépolissage à la position d'arrêt préprogrammée ou après que la quantité pré-définie de matière ait été enlevée.
  • Seite 169: Maintenance

    être remplie si la pompe de rinçage ne parvient plus à atteindre l’eau de refroidissement. Ne pas oublier d’ajouter l’additif pour liquide de refroidissement de Struers: Une part d’additif pour 33 parts d’eau. Pour vérifier la concentration d’additif, utiliser un réfractomètre.
  • Seite 170: Hebdomadaire

     Remplir le réservoir Remplir le réservoir de 3,88 l d’eau additionnée de 120 ml d’additif Struers d’eau. Le niveau d'eau ne doit pas être en dessous de 5 mm du bord de l'orifice frontal du couvercle du réservoir. ...
  • Seite 171: Maintenance Des Meules De Tronçonnage

    Accutom-50 Mode d'emploi Maintenance des meules de tronçonnage La précision des meules de tronçonnage diamantées et CBN, et Maintenance des meules donc de la coupe, dépend de la précision avec laquelle les diamantées et CBN instructions suivantes ont été suivies: ...
  • Seite 172 Accutom-50 Mode d'emploi Guide de Référence Table des matières Page 1. Opérations avancées Menu Configuration ................37 Meules de tronçonnage ............38 Meules boisseaux ..............39 Options ..................40 Fonctions manuelles ................ 41 Rotation de l'échantillon ............42 Pompe de recyclage ............... 43 Dressage .................
  • Seite 173: Opérations Avancées

    Accutom-50 Mode d'emploi 1. Opérations avancées Appuyer sur ESC jusqu'à ce que le Menu principal soit atteint. (Un Menu Configuration bip long retentit). MENU PRINCIPAL METHODES DE TRONÇONNAGE METHODES DE PREPOLISSAGE FONCTIONES MANUELLES CONFIGURATION    Appuyer sur MENU VERS LE HAUT/LE BAS pour ...
  • Seite 174 Accutom-50 Mode d'emploi Meules de tronçonnage Pour utiliser d'autres meules que les meules de tronçonnage Struers, celles-ci doivent être configurées pour contenir les valeurs correctes de limite de force, d'épaisseur de meule et de vitesse. Pour que l'utilisateur configure ses propres meules de tronçonnage, ...
  • Seite 175 Accutom-50 Mode d'emploi Meules boisseaux Pour utiliser d'autres meules que les meules boisseaux Struers, s'assurer de configurer les valeurs correctes de vitesse.   Appuyer sur MENU VERS LE HAUT/LE BAS pour  choisir MEULES BOISSEAUX.    Appuyer sur RETOUR pour activer le menu MEULES BOISSEAUX.
  • Seite 176 Accutom-50 Mode d'emploi Options Dans le menu d'options, différents articles peuvent être configurés. Langue Voir comment changer de langue à la section Installation de ce Mode d'emploi. Après avoir atteint la position d'arrêt, l'échantillon normale retourne  directement à la position zéro relatif. Pour éviter tout contact avec la X-rétracte...
  • Seite 177: Fonctions Manuelles

    Accutom-50 Mode d'emploi Fonctions manuelles Sur Accutom-50, plusieurs fonctions peuvent aussi être effectuées manuellement. Toutes ces fonctions sont disponibles au Menu Fonctions manuelles. Appuyer sur ESC jusqu'au Menu principal. MENU PRINCIPAL METHODES DE TRONÇONNAGE METHODES DE PREPOLISSAGE FONCTIONS MANUELLES CONFIGURATION ...
  • Seite 178 Accutom-50 Mode d'emploi   Rotation de l'échantillon Appuyer sur MENU VERS LE HAUT/LE BAS pour  choisir ROTATION ECHANTILLONS.    Appuyer sur RETOUR pour activer le menu ROTATION ECHANTILLONS.  ROTATION DE L’ECHANTILLON Rotation de l’échantillon: CONTINUE...
  • Seite 179 Accutom-50 Mode d'emploi  Pompe de recyclage A partir du MENU FONCTIONS MANUELLES appuyer sur   MENU VERS LE HAUT/BAS pour choisir la POMPE DE RECYCLAGE.  MENU FONCTIONS MANUELLES ROTATION ECHANTILLONS POMPE RECYCLAGE DRESSAGE MEULE TRONÇONNAGE DRESSAGE MEULE BOISSEAU ...
  • Seite 180: Dressage

    Accutom-50 Mode d'emploi Dressage Les meules de tronçonnage diamantées et CBN et les meules boisseaux peuvent avoir besoin d'un dressage pour "acérer" de nouveau la meule et obtenir un effet maximum après le tronçonnage ou le prépolissage des matériaux ductiles. Pour cela, procéder comme suit: ...
  • Seite 181 Accutom-50 Mode d'emploi DRESSAGE DE LA MEULE DE TRONÇONNAGE Vitesse d’avance 0.5 mm/s Vitesse de la meule 3000 t/m Eau de refroidissement : Distance Y  : 10.0 mm F1:DRESSAGE MARCHE    Appuyer sur MENU VERS LE HAUT/LE BAS pour ...
  • Seite 182 Accutom-50 Mode d'emploi     Appuyer sur RETOUR pour activer l'option DRESSAGE MEULE BOISSEAU.  DRESSAGE DE LA MEULE BOISSEAU X-Déplacement  0.010 mm Vitesse de la meule : 4000 t/m Eau de refroidissement: Distance Y  : 15.0 mm...
  • Seite 183: Options De Méthodes

    Accutom-50 Mode d'emploi Options de méthodes Sauver une Méthode En travaillant avec une méthode spécifique, il est possible de garder en mémoire les changements opérés dans la base de données.  Dès qu'un paramètre est changé dans une méthode de tronçonnage ou de prépolissage, F4:SAUVER apparaîtra au bas...
  • Seite 184: Copier Une Méthode

    Accutom-50 Mode d'emploi Copier une méthode Copier une méthode est un raccourci pour créer une nouvelle méthode de tronçonnage ou de prépolissage en se basant sur une méthode déjà existante.  Choisir la méthode de tronçonnage ou de prépolissage à partir de laquelle copier.
  • Seite 185: Insérer Une Méthode

    Accutom-50 Mode d'emploi Insérer une méthode Pour insérer une méthode dans une autre méthode:   Appuyer sur MENU VERS LE HAUT/LE BAS pour   choisir la méthode, dans laquelle insérer une méthode.  S'il ne s'agit pas d'une METHODE VIDE: ...
  • Seite 186: Effacer Une Méthode

    Accutom-50 Mode d'emploi Effacer une méthode Si une méthode n'est plus utile, il faut l'effacer. Les paramètres seront remplacés par les valeurs de référence, pouvant facilement être remplacées par une nouvelle méthode, plus tard. Le nom de la méthode sera remplacé par: METHODE VIDE, indiquant qu'il est possible de copier dans cette méthode, ou de la...
  • Seite 187: Editer Les Noms

    Accutom-50 Mode d'emploi Editer les noms Les noms de méthodes, de meules de tronçonnage et de meules boisseaux peuvent être édités et changés à volonté.  Choisir la méthode, la meule de tronçonnage ou la meule boisseau à nommer. CHOIX DE METHODE DE TRONÇONNAGE 1.METH.
  • Seite 188: Nommer Les Principes D'édition

    Accutom-50 Mode d'emploi  Nommer les principes d'édition Placer le marqueur principal sur le caractère à changer à l'aide de F1:GAUCHE ou F4:DROITE. Utiliser MENU VERS LE BAS  pour se déplacer au jeu de caractères de la ligne suivante.
  • Seite 189: Accessoires

    Mode d'emploi 2. Accessoires Jeux de flasques Spécification No. de cat. Pour meules de tronçonnage. 04946902 65 mm dia. Pour une utilisation sur Accutom-50 pour parvenir à la plus haute précision. Pour meules boisseaux. 05016901 Porte-échantillons Spécification No. de cat.
  • Seite 190: Consommables

    Brochure sur les meules de Meules de tronçonnage tronçonnage de Struers. Accutom-50 accepte les meules de tronçonnage d'un diamètre de 75 mm (le flasque le plus petit est de ø42 mm) jusqu'à 152 mm. Orifice 12,7 mm. IMPORTANT! Utiliser toujours des flasques larges (65 mm) pour la précision la plus élevée possible.
  • Seite 191: Questions De Tronçonnage Courantes

    Accutom-50 Mode d'emploi Questions de tronçonnage Le tableau suivant montre les réponses possibles à un certain courantes nombre de questions de tronçonnage courantes: Optimiser les résultats de tronçonnage Objectif Comment y parvenir Meilleure qualité Utiliser la vitesse d'avance recommandée la plus basse et de la surface pas de rotation du porte-échantillons.
  • Seite 192: Optimiser Les Résultats De Prépolissage

    Accutom-50 Mode d'emploi Optimiser les résultats de Prépolissage Paramètres de prépolissage Utiliser le tableau suivant pour choisir la meule et les paramètres de prépolissage corrects selon le matériau échantillon. Paramètres de prépolissage recommandés Matériau Dureté Meule Précision Vit. d'avance X-Inc.
  • Seite 193: Indications D'erreurs

    Attendre que le processus de de référence initiales recherche soit terminé Pos. de réf. pas trouvée, fermer Accutom-50 a été mis en marche Fermer le couvercle, attendre que la couv. avec le couvercle ouvert et n'a pas recherche de la référence soit recherché...
  • Seite 194 Accutom-50 Mode d'emploi Messages d'erreur Message sur l'affichage Explication Action Enlèv. trop grand, déplacer table x En relation avec le mode de Réduire la quantité de matériau à prépolissage ENLEVEMENT, le enlever ou serrer l'échantillon réglage de l'enlèvement est différemment supérieur au mouvement possible de...
  • Seite 195: Données Techniques

    Accutom-50 Mode d'emploi 5. Données techniques Sujet Spécifications Tronçonnage Vitesse de tronçonnage: 300 à 5000 t/m (réglable en échelons de 100 t/m) Vitesse d'avance: 0,005 à 3,000 mm/s (réglable en échelons de 0,005 mm/s) Vitesse de positionnement max.: Y = 13 mm/s, X = 13 mm/s Limites de force: BASSE: env.
  • Seite 196: Structure De Menus

    Accutom-50 Mode d'emploi 6. Structure de Menus MENU Accutom-50 Structure de menus PRINCIPAL F1 Copier F1 Copier Choisir Choisir Fonctions Configuration F2 Insérer F2 Insérer méthodes tronçonnage F3 Effacer méthodes prépolissage F3 Effacer manuelles F4 Nom F4 Nom  ...
  • Seite 197: Référence Rapide

    Accutom-50 Mode d'emploi Référence rapide Tronçonnage sur Accutom-50  Appuyer sur ESC jusqu'à ce que le Menu principal apparaisse.  Charger une méthode de Choisir Méthodes de tronçonnage ou prépolissage et appuyer sur Retour . tronçonnage  Choisir la méthode à utiliser et appuyer sur Retour .
  • Seite 198 Accutom-50 Mode d'emploi Prépolissage sur Accutom-50  Charger une méthode de Appuyer sur ESC jusqu'à ce que le Menu principal apparaisse.  Choisir METHODES PREPOL. et appuyer sur Retour . prépolissage  Choisir la méthode à utiliser et appuyer sur Retour .
  • Seite 199 Accutom-50 Spare Parts and Diagrams Manual No.: 15017001 Date of Release 15.11.2012...
  • Seite 200: Always State Serial No And Voltage/Frequency If You Have Technical Questions Or When Ordering Spare Parts

    The manual may mention accessories or parts not included in the present version of the equipment. The contents of this manual is the property of Struers. Reproduction of any part of this manual without the written permission of Struers is not allowed.
  • Seite 201 Accutom-50 Spare Parts and Diagrams Spare Parts and Diagrams Table of contents Drawing Accutom-50, complete ............. 15010001A Drawings Cabinet ................15010021D Water Cock ..............14940044B Recirculation Tank ............14940041G Lid for Recirculation Tank, complete ......15010427 Bottom ................15010051N Back plate ................ 15010054E Various Parts Block and Wiring Diagram ..........
  • Seite 202 Accutom-50 Spare Parts and Diagrams Spare Part List for Accutom-50 Drawing Pos. Spare Part Cat no. 15010001 Accutom-50, Complete Flange ø42, back 14940527 Flange ø42, front 14940529 Flange screw M5 427MP012 Backstop with 1 hole 14278017 Backstop with 2 holes...
  • Seite 203 Accutom-50 Spare Parts and Diagrams Spare Part List for Accutom-50 Drawing Pos. Spare Part Cat no. 15010054 Back Plate Fuse glass tube 10A T (10 pcs.) 392MP075 Various Parts Grate 14940220 Grate, large R4940222 Backstop spanner for cut-off wheel mounting...
  • Seite 211 WH = white OSCILLATING PUMP PK = pink COOLING UNIT BE = beige RO = rose *Note: STRUERS A/S Rev B: A1, S1, S2, S3 added PEDERSTRUPVEJ 84 DK-2750 BALLERUP Rev C: Connections on DENMARK Old Version ___________ New Version...
  • Seite 212 X17:18 ROTARY OPTICAL X10:2 X17:19 ENCODER BR01 X21:2 INPUT SIGN. A X17:20 RVERS STRUERS A/S Rev B : Motor Control. X10:5 VALHOEJS ALLÉ 176 ENCODERS AT Y-POS. S1, S2, S3 added. DK-2610 ROEDOVRE X21:3 POWER DENMARK X10:4 PHONE:+45 3670 3500 Rev C : Motor Control.
  • Seite 213: Declaration Of Conformity

    Information FCC part 15, subpart B and UL508. The above has been declared according to the global method, module A Christian Skjold Heyde, Date: 14.01.2014 Vice President, R & D and Production, Struers A/S  Overensstemmelseserklæring Dansk Fabrikant Struers A/S...
  • Seite 214: Konformitätserklärung

    L’équipement est conforme aux standards américains: supplémentaires FCC paragraphe 15, sous-paragraphe B et UL508. La déclaration ci-dessus a été faite d’après la méthode globale, module A Christian Skjold Heyde, Date: 14.01.2014 Vice- President, R & D et Production, Struers A/S...
  • Seite 215 Accutom-50 ... and grinding machine Common features of Accutom-5/-50 Additional features of Accutom-50 - Positioning accuracy of 5 µm - Pre-set, constant feed speed (0.005 to 3 mm/sec) - Serial cutting of slices (Multi-cut) - Adjustable force limit...
  • Seite 216 Built-in cut-off wheel list has been closed properly, thus provi- most delicate materials to be cut. A list of all Struers cut-off wheels is stored ding maximum safety for the operator. Both the pre-set and the actual speeds are in an internal database together with their shown on the display.
  • Seite 217 Grinding on Accutom-50 can be carried out in two different ways: The grinding operation can be stopped at a specified position, or a well-defined amount of material can be removed Grinding of thin sections Database for both cutting and Cup wheels...
  • Seite 218 18-6, Higashi Ueno 1-chome Taito-ku, Tokyo 110-0015 Phone +81 3 5688 2914 Struers’ equipment is in conformity with the provisions of the applicable International Directives and their appurtenant Fax +81 3 5688 2927 struers@struers.co.jp Standards. (Please contact you local supplier for details) Struers’...
  • Seite 219: Allgemeine Funktionsmerkmale Von Accutom-5

    ... und Präzisionsschleifmaschine Allgemeine Funktionsmerkmale von Accutom-5/50 Zusätzliche Funktionsmerkmale - Positionierung auf 5 µm genau von Accutom-50 - Konstante, einstellbare Vorschubgeschwindigkeit (0,005 bis 3 mm/s) - Einstellbare Kraftgrenzwerte - Serielles Trennen von Scheiben - Rotation oder Oszillation der Probe (Mehrfachtrennen) - Variable Drehgeschwindigkeit der Trennscheibe bis 3000 U/min - Schleifen von Dünnschliffen...
  • Seite 220 Probe innerhalb 5 µm sowie voreingestellte Wert der Kraftgrenze er- die konstante Vorschubgeschwin-digkeit reicht wird, verringert sich die Vorschubge- Accutom-50 läßt sich so programmieren, daß Serien von Scheiben von derselben Probe automatisch abgetrennt und Probenrotation oder Oszillation stel- schwindigkeit, und der Prozeß wird abge- werden können...
  • Seite 221 Mit der Accutom-50 kann auf zwei Arten geschliffen werden: Der Schleifvorgang kann an einer bestimmten Postion unterbrochen werden, oder es kann eine genau definierte Materialmenge abgetragen werden scheiben an, die alle möglichen Anwen- auch Scheibendicke und geringfügige Ab- Auf diese Weise kann eine noch höhere dungen abdecken.
  • Seite 222 Normen. (Für Details setzen Sie sich bitte mit Ihrem lokalen Struers Vertreter in Verbindung) Alle Struers Produkte werden laufend weiter entwickelt. Wir behalten uns deshalb das Recht vor, Änderungen unserer Produkte ohne vorherige Ankündigung vorzunehmen. 11.2012B / 62215010.
  • Seite 223 Accutom Accutom-5 Tronçonneuse automatique de précision Accutom-50 ... et prépolisseuse de précision Les fonctions communes d’Accutom-5 et -50 Fonctions supplémentaires sur - Une précision de positionnement de 5 µm Accutom-50 - Une vitesse d’avance constante, préprogrammée (de 0,005 à 3 m/sec.) - Une limite de force réglable...
  • Seite 224 à tronçonner les échantil lons longs, ce qui réduit considé rablement le temps de tronçonnage La technologie d’Accutom-50 se base sur même aux matériaux les plus délicats celle déjà bien connue et rigoureusement d’être tronçonnés. Les vitesses prépro- testée d’Accutom-5. Le positionnement grammées et réelles sont affichées sur...
  • Seite 225 Le prépolissage sur Accutom-50 peut être effectué de deux façons différentes: l‘opération de prépolissage peut être interrompue à une position spécifée, ou bien une quantité bien définie de matière peut être enlevée même échantillon. Le logiciel sophistiqué Vitesse variable de la meule de tous les types de meules de tronçonnage,...
  • Seite 226 18-6, Higashi Ueno 1-chome Taito-ku, Tokyo 110-0015 Phone +81 3 5688 2914 Les équipements Struers sont conformes aux dispositions des directives internationales ainsi qu'aux standards qui y sont Fax +81 3 5688 2927 struers@struers.co.jp rattachés. (Pour plus de détails, veuillez contacter votre fournisseur local) Les produits Struers subissent continuellement des modifications et des perfectionnements.

Inhaltsverzeichnis