Weidmuller CUTFIX PRO Originalbetriebsanleitung
Ablängautomat und mehrfachzuführung
Inhaltsverzeichnis
Verfügbare Sprachen
Verfügbare Sprachen
Quicklinks
CUTFIX PRO
CUTFIX PRO
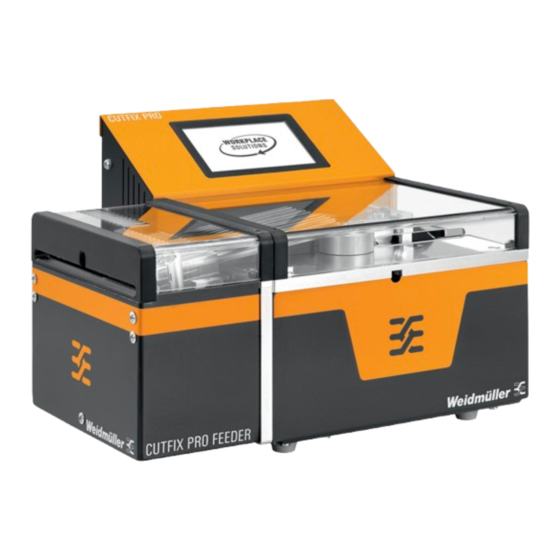
CUTFIX PRO FEEDER
Ablängautomat und Mehrfachzuführung, Originalbetriebsanleitung
Automatic cutter and feeder, Original operating instructions
Máquina automática para cortar y alimentador múltiple, instrucciones de uso originales
Automat do cięcia i podajnik wielokrotny, Oryginalna instrukcja eksploatacji
Machine automatique de coupe à longueur et alimentation multiple, Manuel d'origine
Macchina di spellatura e alimentazione multipla, istruzioni per l'uso originali
2797190000
2797200000
3
29
55
81
107
133
Kapitel
Inhaltsverzeichnis
Fehlerbehebung

Verwandte Anleitungen für Weidmuller CUTFIX PRO


Inhaltszusammenfassung für Weidmuller CUTFIX PRO
- Seite 1 CUTFIX PRO CUTFIX PRO 2797190000 CUTFIX PRO FEEDER 2797200000 Ablängautomat und Mehrfachzuführung, Originalbetriebsanleitung Automatic cutter and feeder, Original operating instructions Máquina automática para cortar y alimentador múltiple, instrucciones de uso originales Automat do cięcia i podajnik wielokrotny, Oryginalna instrukcja eksploatacji Machine automatique de coupe à longueur et alimentation multiple, Manuel d'origine...
- Seite 2 2819930000/02/06.2022...
-
Seite 3: Inhaltsverzeichnis
Inhalt Über diese Dokumentation Automat bedienen Quickstart-Funktion nutzen Allgemeine Sicherheitshinweise Projekt in der Jobliste anlegen Bestimmungsgemäße Verwendung Job oder Projekt ändern Verarbeitbares Material Job oder Projekt löschen Personal Projekt starten Sicherheitseinrichtungen Einzelnen Leiter bearbeiten Sicherheitskennzeichnung am Automaten Vorschubrollen öffnen oder schließen Stillsetzen im Notfall Serviceanzeige Gerätebeschreibung... -
Seite 4: Über Diese Dokumentation
Über diese Dokumentation Die Warnhinweise in dieser Dokumentation sind nach Die situationsbezogenen Warnhinweise können folgende Schwere der Gefahr unterschiedlich gestaltet. Warnsymbole enthalten: Symbol Bedeutung WARNUNG Warnung vor gefährlicher elektrischer Span- Lebensgefahr möglich! nung Hinweise mit dem Signalwort „Warnung“ warnen Sie vor Situationen, die zu tödlichen Warnung vor Handverletzungen durch oder schweren Verletzungen führen können, scharfe Klingen... -
Seite 5: Allgemeine Sicherheitshinweise
Allgemeine Sicherheitshinweise 2.1 Bestimmungsgemäße Verwendung 2.4 Sicherheitseinrichtungen Der Automat CUTFIX PRO ist für das Ablängen von fle- Der Automat ist mit folgenden Sicherheitseinrichtungen xiblen Rundleitern vorgesehen. Mit dem Automaten darf ausgestattet: nur das unten b eschriebene Material verarbeitet werden – Gehäuse (s. -
Seite 6: Stillsetzen Im Notfall
Allgemeine Sicherheitshinweise 2.6 Stillsetzen im Notfall Der Automat kann im Notfall durch Ziehen des Netzste- ckers stromlos geschaltet werden. Um diese Not-Aus- Funktion nicht zu gefährden, muss der Netzstecker jeder- zeit frei zugänglich sein. 2819930000/02/06.2022... -
Seite 7: Gerätebeschreibung
Gerätebeschreibung Bild 3.1 Frontansicht Mehrfachzuführung (Feeder) Leiterzuführrohre (Slots) Schutzabdeckungen Automat und Feeder Einstellschraube für Anpressdruck der Vorschubrollen Vorschubrollen Bedieneinheit mit Touchdisplay Abdeckblech Schneidmesser Rutsche 10 Werkzeug 11 Ethernet 12 USB Typ A (USB-Stick) 13 USB Typ B (PC) 14 RS-232 15 Ein-/Ausschalter 16 Sicherungsfach 17 Netzanschlussbuchse... -
Seite 8: Technische Daten
Gerätebeschreibung 3.1 Technische Daten CUTFIX PRO mit CUTFIX PRO FEEDER Antrieb elektrisch Versorgungsspannung 100 – 240 V AC; 50/60 Hz Leistungsaufnahme 240 VA Sicherung (Netzfilter-Modul) 2 x T2AH250V Schutzart IP20 Schutzklasse I / Schutzleiter Leitereinführlänge 180 mm 285 mm Querschnitt feindrähtig 0.08 – 10.0 mm² (AWG 28–8) feindrähtig 11 x 0,5 –... -
Seite 9: Typenschild
Gerätebeschreibung 3.2 Typenschild Bild 3.3 Typenschild an der Rückseite Hersteller Modell, Typenbezeichnung Seriennummer Technische Angaben Baujahr Die folgenden Symbole sind auf dem Typenschild abgebil- det. Symbol Bedeutung Nur für die Verwendung in Innen- räumen vorgesehen Dokumentation beachten Entsorgungshinweise beachten EU-Konformität 2819930000/02/06.2022... -
Seite 10: Automat Transportieren Und Aufstellen
► Stellen Sie sicher, dass die Betriebsanleitung für das Bedienpersonal jederzeit zugänglich ist. 4.4 Lieferumfang – Ablängautomat CUTFIX PRO – Mehrfachzuführung CUTFIX PRO FEEDER (optional) – Netzanschlusskabel (10 A, 250 V) – PC-Anschlusskabel – USB-Stick mit Software (Cutfix PRO Manager) – Betriebsanleitung 2819930000/02/06.2022... -
Seite 11: Automat Einrichten
Automat einrichten 5.1 Allgemeine Bedienhinweise WARNUNG ACHTUNG Lebensgefahr durch Stromschlag möglich! Das Display kann beschädigt werden! Schalten Sie den Automaten nur ein, wenn Das Display kann durch ungeeignetes Werkzeug zer- diese Voraussetzungen gegeben sind: kratzt werden. – Das Netzanschlusskabel ist einwandfrei. ►... -
Seite 12: Menü-Übersicht
Automat einrichten Einige Einstellungen lassen sich mit Pfeiltasten einrichten. Menü Funktionen Einige Funktionen lassen sich aktivieren oder deaktivieren, – Verarbeitungsauftrag eingeben und indem ein Häkchen gesetzt oder entfernt wird. Einige Ein- direkt starten stellungen lassen sich mit einem Schieberegler einrichten. Quickstart Einstellungen Allgemein –... -
Seite 13: Sprache Ändern
Automat einrichten 5.3 Sprache ändern 5.5 Bildschirmschoner einstellen ► Öffnen Sie das Menü Einstellungen. Der Bildschirmschoner startet, sobald die eingestellte Zeit ► Öffnen Sie das Menü Einstellungen Allgemein. ohne eine Aktivität am Display abgelaufen ist. ► Tippen Sie auf Gerät. ►... -
Seite 14: Benutzertyp Ändern
Automat einrichten 5.7 Benutzertyp ändern Falls Sie die Einstellung für das Zurücksetzen nicht än- dern, bleiben die Benutzertypen Einrichter und Service Beim jedem Einschalten des Automaten ist der Benutzer- jeweils nur für 10 Minuten aktiv, danach wird automatisch typ Anwender aktiv. In der Bediensoftware sind drei Benut- wieder der Typ Anwender eingestellt. -
Seite 15: Jobliste Einrichten
Automat einrichten 5.9 Jobliste einrichten ► Wählen Sie unter Externe Kommunikation das ge- wünschte Verhalten in Kombination mit dem Weidmüller Sie können für jede Jobliste folgende Funktionen einstel- WPC: len. – 1 = Event-Handling – Löschen nach Verarbeitung: Jeder Job wird gelöscht, –... -
Seite 16: Geräteinformationen Anzeigen
Automat einrichten 5.12 Geräteinformationen anzeigen 5.13 Liste der Fehlermeldungen anzeigen ► Öffnen Sie das Menü Info/System. ► Öffnen Sie das Menü Info/Fehler. Bild 5.14 Menü Info/System Bild 5.15 Menü Info/Fehler Die letzten Fehlerereignisse werden protokolliert. Zu jedem Parameter Bedeutung Fehlerereignis wird der aktuelle Zählerstand, die Feh- Gerätenummer Seriennummer des Automaten lernummer und das Datum mit Uhrzeit angezeigt. -
Seite 17: Motor Einrichten
Automat einrichten 5.14 Motor einrichten 5.15 Systemeinstellungen ändern In diesem Menü können Sie das Verhalten und die Ge- ► Öffnen Sie das Menü Einstellungen. ► Öffnen Sie das Menü Einstellungen Allgemein. schwindigkeit der Motoren einstellen. ► Öffnen Sie das Menü System. ►... -
Seite 18: Wartezeiten Einstellen
Automat einrichten 5.16 Wartezeiten einstellen ► Lösen Sie die Bremse des jeweiligen Zuführrohrs mit dem Werkzeug. In diesem Menü können Sie die Wartezeiten zwischen ein- zelnen Vorgängen oder Prozessschritten feinjustieren. 5.18 Feeder mit Leitern bestücken ► Öffnen Sie das Menü Einstellungen. Voraussetzung: Um einen Leiter in ein Zuführrohr einfüh- ►... -
Seite 19: Feeder Einrichten
Automat einrichten 5.19 Feeder einrichten Parameter Bedeutung ACHTUNG Feeder EIN/AUS Kontrollkästchen aktivieren, wenn ein Feeder angeschlossen ist Der Automat kann beschädigt werden! Referenzpunkt Neuen Nullpunkt für die Kalibrierung des Falsch gewählte Einstellungen können zu Beschädigung Feeders definieren. Abstand vom alten und Fehlfunktion führen. -
Seite 20: Automat Bedienen
Automat bedienen WARNUNG ACHTUNG Lebensgefahr durch Stromschlag Der Automat kann beschädigt werden! möglich! Falls während eines Schneidvorgangs das Leiterende erreicht wird, kann das letzte Leiterstück im Zuführrohr, Schalten Sie den Automaten nur ein, wenn zwischen den Rollen oder zwischen den Messern hängen diese Voraussetzungen gegeben sind: bleiben und der Automat blockiert. -
Seite 21: Projekt In Der Jobliste Anlegen
Automat bedienen 6.2 Projekt in der Jobliste anlegen Voraussetzung: Sie sind als Einrichter angemeldet. Sie können beliebig viele Projekte anlegen. In jedem Pro- jekt können Sie mehrere Verarbeitungsaufträge (Jobs) defi- nieren. Sobald ein Projekt gestartet wird, werden alle Jobs dieses Projekts abgearbeitet. ►... -
Seite 22: Projekt Starten
Automat bedienen 6.7 Vorschubrollen öffnen oder schließen ► Tippen Sie auf den Job, den Sie löschen wollen. ► Tippen Sie auf Löschen. Die Stellung der Vorschubrollen können Sie im Quickstart- Der Job wird aus dem Projekt entfernt. Menü ändern. 6.5 Projekt starten ►... -
Seite 23: Automat Reinigen Und Warten
Automat reinigen und warten 7.1 Automat warten ► Reinigen Sie die Schutzabdeckungen und die Oberflä- che des Automaten mit einem weichen Tuch und bei Um den einwandfreien Betrieb zu gewährleisten, müssen Bedarf einem Reinigungmittel auf Seifenbasis. die beschriebenen Wartungsarbeiten in den angegebenen Intervallen ausgeführt werden. -
Seite 24: Arbeitsbereich Reinigen
Automat reinigen und warten 7.5 Arbeitsbereich reinigen Zum Arbeitsbereich gehören: – Zuführrohr (Bild 7.2, 1) – Vorschubrollen (Bild 7.2, 2) – Schneidbereich (Bild 7.2, 3) – Rutsche (Bild 7.2, 4) Bild 7.2 Arbeitsbereich reinigen ► Stellen Sie sicher, dass der Automat stromlos ist (s. Ka- pitel 7.1). -
Seite 25: Störungen Beseitigen
Störungen beseitigen Falls sich eine Störung mit den hier beschriebe- nen Maßnahmen nicht beseitigen lässt, wenden Sie sich an den Weidmüller Service. 8.1 Störungstabelle Störung Mögliche Ursache Empfohlene Maßnahme siehe Kapitel Automat lässt sich Stromversorgung ist unterbrochen ► Prüfen Sie das Netzkabel und den Netz- nicht einschalten. -
Seite 26: Schneidmesser Erneuern
Störungen beseitigen 8.3 Schneidmesser erneuern WARNUNG Lebensgefahr durch Stromschlag möglich! ► Schalten Sie den Automaten aus. ► Ziehen Sie den Netzstecker aus der Netz- anschlussbuchse, um den Automaten stromlos zu machen. Bild 8.2 Klingen ausrichten VORSICHT ► Setzen Sie die neuen Klingen ein. Verletzungsgefahr durch scharfe ►... -
Seite 27: Anpressdruck Der Vorschubrollen Ändern
Störungen beseitigen 8.5 Anpressdruck der Vorschubrollen än- 8.6 Vorschubrollen erneuern dern Innensechskantschlüssel 3,0 mm An der Frontseite des Automaten befindet sich die Einstell- schraube für den Anpressdruck (Bild 8.4). Innensechskantschlüssel 4,0 mm ► Stellen Sie sicher, dass der Automat stromlos ist (s. Ka- pitel 8.3). -
Seite 28: Automat Außer Betrieb Nehmen Und Entsorgen
Automat außer Betrieb nehmen und entsorgen 9.1 Automat außer Betrieb nehmen ► Schalten Sie den Automaten aus. ► Ziehen Sie den Netzstecker aus der Netzanschluss- buchse. ► Verpacken Sie den Automaten in der Original- verpackung. Der Automat ist jetzt für den Transport und ggf. die Entsorgung vorbereitet. - Seite 54 2819930000/02/06.2022...
-
Seite 159: Appendice
ANHANG Elektroanschlussplan Konformitätserklärung APPENDIX Electrical connection layout Declaration of conformity Apéndice Layout de la conexión eléctrica Declaración de conformidad ZAŁĄCZNIK Schemat połączeń elektrycznych Deklaracja zgodności Annexe Disposition des raccordements électriques Déclaration de conformité Appendice Layout dei collegamenti elettrici Dichiarazione di conformità 2819930000/02/06.2022... -
Seite 160: Electrical Connection Layout
Elektroanschlussplan / Electrical connection layout / Layout de la conexión eléctrica / Schemat połączeń elektrycznych / Schéma de raccordement électrique / Layout del collegamento elettrico 2819930000/02/06.2022... - Seite 161 Elektroanschlussplan / Electrical connection layout / Layout de la conexión eléctrica / Schemat połączeń elektrycznych / Schéma de raccordement électrique / Layout del collegamento elettrico 2819930000/02/06.2022...
-
Seite 162: Konformitätserklärung
Konformitätserklärung / Declaration of conformity / Declaración de conformidad / Deklaracja zgodności / Déclaration de conformité / Dichiarazione di conformità 2819930000/02/06.2022... - Seite 163 Konformitätserklärung / Declaration of conformity / Declaración de conformidad / Deklaracja zgodności / Déclaration de conformité / Dichiarazione di conformità 2819930000/02/06.2022...