Herunterladen Inhalt Inhalt Diese Seite drucken
Inhaltsverzeichnis

Werbung

Verfügbare Sprachen

Verfügbare Sprachen

ProntoPress-10
Instruction Manual
Manual No.: 15067003
Date of Release 11.01.2008

Werbung

Inhaltsverzeichnis
loading

Inhaltszusammenfassung für struers ProntoPress-10

  • Seite 1 ProntoPress-10 Instruction Manual Manual No.: 15067003 Date of Release 11.01.2008...
  • Seite 2 The manual may mention accessories or parts not included in the present version of the equipment. The contents of this manual is the property of Struers. Reproduction of any part of this manual without the written permission of Struers is not allowed.
  • Seite 3 10. Do not operate the machine whilst assembling or disassembling the mounting unit. The equipment is designed for use with consumables supplied by Struers. If subjected to misuse, improper installation, alteration, neglect, accident or improper repair, Struers will accept no responsibility for damage(s) to the user or the equipment.
  • Seite 5: Inhaltsverzeichnis

    ProntoPress-10................3 Mounting Unit ................3 Unpacking ProntoPress-10............... 3 Placing ProntoPress-10 ..............3 Transport Screw Cap ................ 3 Getting Acquainted with ProntoPress-10........4 Noise Level..................5 Supplying Power ................5 Supplying Water ................5 Water Inlet................. 5 Water Outlet ................5 Assembling the Mounting Unit............
  • Seite 6 ProntoPress-10 Instruction Manual 2. Basic Operations Using the Controls................12 Front Panel Controls of ProntoPress-10 ........ 12 Groups of Keys................. 12 Acoustic Signals............... 12 Display ..................14 Main Switch ................14 Mounting Method Options ............. 15 Select a Mounting Method ............15 Method Edit ................
  • Seite 7: Getting Started

    Piston pin Dust protection ring Mould release agent (FASTI) Scraper (PROAN) ProntoPress-10 is detached from the bottom of the packing case Unpacking ProntoPress-10 by removing the four screws from below. ProntoPress-10 should be placed on a steady table with an Placing ProntoPress-10 adequate working height.
  • Seite 8: Getting Acquainted With Prontopress-10

    ProntoPress-10 Instruction Manual Take a moment to familiarise yourself with the location and Getting Acquainted with names of the ProntoPress-10 components. ProntoPress-10 Front panel Top closure Main switch Mounting unit Dust protection ring Cover for mounting unit Swivel arm for top closure...
  • Seite 9: Noise Level

    The noise level of the machine is 60 dB (A) measured when the Noise Level pump is running, at a distance of 1.0 m/39.4" from the machine. ProntoPress-10 is factory mounted with an electric cable. Mount a Supplying Power plug on the cable:...
  • Seite 10: Assembling The Mounting Unit

    The axle journal is part of the machine’s safety mechanism to protect against damage to the machine. If it breaks, it must only be replaced with a Struers replacement part or the safety mechanism may not function. Installing the Mounting Unit...
  • Seite 11: Installing The Cover

    ProntoPress-10 Instruction Manual Unscrew the fixation screw about 10 mm. Place the mounting cylinder over the lower ram with the fixation screw in the position shown. Turn the mounting unit in a clockwise direction until it stops. Tighten the fixation screw completely.
  • Seite 12: Removing The Cover

    The axle journal is part of the machine’s safety mechanism to protect against damage to the machine. Please see: Maintenance. If it breaks, it must only be replaced with a Struers replacement part or the safety mechanism may not function.
  • Seite 13: Software Settings

    ProntoPress-10 Instruction Manual Software Settings Configuration Menu Switch on the power at the main switch. The following display will appear briefly: ProntoPress-10 Version: 2.0 The mounting press will start in the same state, as when the voltage was last switched off. The display to appear could be the Select Method Group Menu.
  • Seite 14: Setting The Language

    ProntoPress-10 Instruction Manual Setting the Language mO N Press MENU UP/DOWN to select the Language parameter. CONFIGURATION Language: ENGLISH Countdown mode: COUNT FROM START Press ENTER to activate the Language Options. LANGUAGE ENGLISH DEUTSCH FRANCAIS JAPANESE mO N Press MENU UP/DOWN to select the Language you prefer.
  • Seite 15: Setting The Cylinder Diameter

    ProntoPress-10 Instruction Manual Setting the Cylinder Diameter The cylinder diameter has to be set, in order to have the right values of force or pressure. When a cylinder diameter is changed, the database values of force or pressure in the methods will automatically change to maintain the conditions in the mounting cylinder.
  • Seite 16: Basic Operations

    ProntoPress-10 Instruction Manual 2. Basic Operations Using the Controls Front Panel Controls of ProntoPress-10 Groups of Keys Programming and monitoring functions. B Operation controls for the mounting cylinder. Acoustic Signals Short Beep: when a key is pressed, a short beep indicates that the command has been accepted.
  • Seite 17 ProntoPress-10 Instruction Manual Pos. No. Key Function Pos. No. Key Function Turns the main power of the Control for various purposes. machine on/off. The main switch is located at the right hand side FUNCTION MAIN of the cabinet. SWITCH Lights up when the main power Control for various purposes.
  • Seite 18: Display

    ProntoPress-10 Instruction Manual Display SELECT METHOD GROUP 1. STRUERS 2. GROUP NUMBER 2 3. GROUP NUMBER 3 4. GROUP NUMBER 4 F1:CONFIG. F3:MAN. FUNC. A Heading. B Flashing text. Cursor. C Function key options. D Arrow indicates that there are more lines in the picture.
  • Seite 19: Mounting Method Options

    ProntoPress-10 Instruction Manual The mounting press will start in the same state, as when the Mounting Method Options voltage was last switched off. If a mounting method was selected at that time, this method will appear on the display. Grp: 2...
  • Seite 20 ProntoPress-10 Instruction Manual Group:GROUP NUMBER 2 SELECT METHOD 1. METHOD 1 2.METHOD 2 3. METHOD 3 4.EMPTY METHOD F1:COPY F3:RESET F4:RENAME Press MENU UP/DOWN until you reach the desired Method, e.g. METHOD 3. Group:GROUP NUMBER 2 SELECT METHOD 1. METHOD 1 2.METHOD 2...
  • Seite 21: Method Edit

    ProntoPress-10 Instruction Manual Method Edit Select a Mounting Method. (The Struers methods in Group 1 are protected against editing). Grp: 2 Method: 3 Resin:MultiFast HEAT: Time: 7:00 T: 180°C F: 20 kN COOLING: Rate: HIGH Time: 3:00 F1:SELECT PREHEATING Move the cursor, to the desired parameter to be changed, e.g.
  • Seite 22: Placing The Specimen

    The "Mould Release Agent" must always be applied to the mounting rams as a thin layer to prevent the resins sticking to the surface. By means of Struers AntiStick a thin layer of stearate powder can easily be dabbed on the rams.
  • Seite 23: Placing Two Specimens

    ProntoPress-10 Instruction Manual Follow the instructions in Placing the Specimen. Placing Two Specimens Apply "Mould Release Agent" to all surfaces of the intermediate ram. Place the intermediate ram on top of the resin. Place the second specimen on the intermediate ram and fill the cylinder with an adequate quantity of resin.
  • Seite 24: Starting The Mounting Process

    ProntoPress-10 Instruction Manual Select a Mounting Method. See Select a Mounting Method. Starting the Mounting Process Press START , and the process will run automatically. Display during The display with the mounting parameters will change to a new the Mounting Process...
  • Seite 25 ProntoPress-10 Instruction Manual Reference Guide Table of Contents Page 1. Advanced Operations Installation..................23 Recirculation Cooling Unit (Optional)........23 Socket for Recirculation ............23 Software Settings................24 Configuration Menu ..............24 Setting the Temperature Unit ..........25 Setting the Force or Pressure Mode ........26 Setting the Force Unit.............
  • Seite 26 ProntoPress-10 Instruction Manual 2. Struers Metalog Guide™ ..........41 3. Application Guide for Hot Mounting ......41 4. Accessories ................. 42 5. Consumables ............... 43 6. Trouble-Shooting ............... 44 7. Maintenance Daily Service ................... 48 After 200 mountings ............... 48 Removing residues..............
  • Seite 27: Advanced Operations

    Replace the outlet tube on the pump in TRECI with the non- return valve with elbow and hexagon nipple from ROPRE. Struers recommends that you seal the threads. Connect the pressure hose of the mounting press to the hexagon nipple. Remember to mount the gasket.
  • Seite 28: Software Settings

    ProntoPress-10 Instruction Manual Software Settings Configuration Menu Switch on the power at the main switch. The following display will appear briefly: ProntoPress-10 Version: 2.0 The mounting press will start in the same state, as when the voltage was last switched off. The display to appear could be the Select Method Group Menu.
  • Seite 29: Setting The Temperature Unit

    ProntoPress-10 Instruction Manual Setting the Temperature Unit mO N Press MENU UP/DOWN select the Temperature Unit. CONFIGURATION Cylinder Diameter: 50 mm Temperature Unit: CELSIUS Force or Pressure: FORCE Unit: kN Press ENTER to activate the Temperature Unit Menu. TEMPERATURE UNIT...
  • Seite 30: Setting The Force Or Pressure Mode

    ProntoPress-10 Instruction Manual Setting the Force or FORCE mode is the common function mode for a mounting press, Pressure Mode setting the actual force on the ram. In PRESSURE mode, you set the absolute pressure independently of the cylinder diameter.
  • Seite 31: Setting The Force Unit

    ProntoPress-10 Instruction Manual Setting the Force Unit The press has to be in Force mode. See above. mO N Press MENU UP/DOWN select the Force Unit parameter. CONFIGURATION Cylinder Diameter: 50 mm Temperature Unit: CELSIUS Force or Pressure: FORCE Unit: kN...
  • Seite 32: Setting The Pressure Unit

    ProntoPress-10 Instruction Manual Setting the Pressure Unit The press has to be in Pressure mode. See above. mO N Press MENU UP/DOWN select the Pressure Unit Menu. CONFIGURATION Cylinder Diameter: 50 mm Temperature Unit: CELSIUS Force or Pressure: PRESSURE Unit:MPa...
  • Seite 33: Setting The Countdown Mode

    ProntoPress-10 Instruction Manual Setting the Countdown Mode The Countdown mode COUNT FROM START is the common control of heating time on a mounting press, setting the heating time, and allowing the mounting press to start and stop independently of the temperature.
  • Seite 34: Mounting Method Options

    ProntoPress-10 Instruction Manual Mounting Method Options You can save the changes you have made, while working with a Saving a Method specific method, in the database. Edit the method. See Getting Started. Grp: 2 Method: 3 Resin:MultiFast HEAT: Time: 6:30 T: 180°C...
  • Seite 35: Copying A Method

    ProntoPress-10 Instruction Manual Copying a Method Copying a method is a shortcut to creating a new mounting method on the basis of an existing one. Select the group with the mounting method you want to copy from. See Getting Started, Select a Mounting Method.
  • Seite 36: Insert Method

    ProntoPress-10 Instruction Manual Insert Method If you want to insert the method in a different group: Press Esc to return to the Method Group Screen. mO N Press MENU UP/DOWN select the group, in which you want to insert the method.
  • Seite 37 ProntoPress-10 Instruction Manual If it is not an EMPTY METHOD: Press ENTER to see the method. Press Esc to return to the above display. Press F2:INSERT to insert the method from the buffer. Do you want to copy buffer to Group: 3.
  • Seite 38: Reset A Method

    ProntoPress-10 Instruction Manual Reset a Method If a method is not relevant any more, it should be reset. The parameters will change to default values, which can easily be changed to a new method later on. The method name will change to: EMPTY METHOD, telling you, that you can copy to or modify in this method without replacing any valuable data.
  • Seite 39: Editing Names

    ProntoPress-10 Instruction Manual Editing Names The names for the method groups, methods and mounting resins can be edited and changed to suit your preference. Group:GROUP NUMBER 2 SELECT METHOD 1.METHOD 1 2.METHOD 2 3.METHOD 3 4.EMPTY METHOD F1:COPY F2.INSERT F3:RESET F4:RENAME Press F4:RENAME.
  • Seite 40: Process Control

    ProntoPress-10 Instruction Manual Process Control Preheating A preheating phase can improve the quality of the mount in some applications. To activate the preheating in a mounting method: Grp: 2 Method: 3 Resin:MultiFast HEAT: Time: 7:00 T: 180°C F: 20 kN...
  • Seite 41: Heating Time

    ProntoPress-10 Instruction Manual Heating Time The machine can count the preheating and heating time either from start or from when the pre-set temperatures are reached. To set the Counting mode for heating time: See Software Settings, Setting the Countdown Mode.
  • Seite 42: Manual Functions

    ProntoPress-10 Instruction Manual Manual Functions Heating of Cylinder The mounting cylinder can be heated without pressure on. It can be closed or open. This feature can be used as stand by, to reduce the process time, or for special applications.
  • Seite 43: Cooling Of Cylinder

    ProntoPress-10 Instruction Manual Cooling of Cylinder The mounting cylinder can be cooled without pressure on. This can be performed with the top closure removed or in place. This feature can be used for supplementary cooling, if, for example, an ongoing mounting process should be stopped.
  • Seite 44 ProntoPress-10 Instruction Manual To start cooling: Press F1:START COOLING to start cooling. To stop cooling: Press F1:STOP COOLING to stop cooling. The cooling is automatically switched off, if manual heating is selected or if a mounting process is started.
  • Seite 45: Struers Metalog Guide

    Metalog Guide  3. Application Guide for Hot Mounting Useful mounting data and hints can be found in the Struers Application Guide for Hot Mounting or visit the Struers website on http://www.struers.com and see the section on Knowledge.
  • Seite 46: Accessories

    ProntoPress-10 Instruction Manual 4. Accessories Type Description Code Mounting Unit 25 mm dia. CYLMI consisting of cylinder, upper and lower ram, heating/cooling 30 mm dia. CYLTE unit and top closure 1 ¼" dia. CYLQU 1 ½" dia. CYLHA 40 mm dia.
  • Seite 47: Consumables

    ProntoPress-10 Instruction Manual 5. Consumables Resin Application Specific property Material Contents Code ConduFast Electropolishing Electrically conductive Acrylic resin with iron 1 kg RESFE Very low shrinkage powder filler (Resin 1) Thermoplastic, Grey SpeciFast Glass clear mounts Transparent Acrylic 1.5 kg...
  • Seite 48: Trouble-Shooting

    Error Message Mounting unit not connected The plug for the mounting unit is not Insert the plug firmly. If message still connected properly. (Appears when appears, call a Struers service START is pressed). technician. PT100 amplifier uncalibrated The temperature measurement Call a Struers service technician.
  • Seite 49 Top closure not mounted correctly. Screw the top closure to the bottom Appears, when pressing: START position and unscrew it ¼ turn. If this does not help: Call a Struers service technician. Pre-set force too high The pre-set value of force exceeds No action is needed the maximum force on the piston rod.
  • Seite 50 Fill to the correct water level. See the Recirculation Cooling Unit. The water section: Maintenance. is too hot. Defect in the cooling system. Call a Struers service technician. Cooling water drips underneath the The quick coupling is not mounted Remove the cover from the mounting machine.
  • Seite 51 Maintenance). Try both the following procedures to identify the problem: Try to mount the top closure, without the upper ram. If this is not possible, call a Struers service technician. Try to insert the disconnected upper ram into the mounting cylinder.
  • Seite 52: Maintenance

    ProntoPress-10 Instruction Manual 7. Maintenance Clean all accessible surfaces with a moist cloth. Daily Service When mounting, some old cured resin will fall down from the After 200 mountings lower ram and built up underneath. The cured resin must be cleaned away, to avoid it harming the machine.
  • Seite 53: Removing The Upper Ram

    ProntoPress-10 Instruction Manual Take the cover plugs out of the ends of the handles. Removing the Upper Ram Unscrew the two handles with an Allen key (pos. 1). Remove the plastic cover (pos.2). Lift the upper ram and remove the lock washer (pos.3).
  • Seite 54: Replacing The Cooling Water

    Put the lid on the tank. Place the pump in the lid IMPORTANT Always maintain the correct concentration of Struers Additive in the cooling water (percentage stated on the container of the Additive). Remember to add Struers Additive each time you refill with water.
  • Seite 55: Technical Data

    ProntoPress-10 Instruction Manual 8. Technical Data Subject Specifications Metric/International Mounting Units Diameter 25, 30, 40, 50 mm 1 ¼", 1½" (Optional) Compression Force on piston rod Preheating: Preheating: 0-20 kN in steps of 5 0 - 5000 Lbf in steps of...
  • Seite 56 ProntoPress-10 Instruction Manual Subject Specifications Metric/International Software and LC display 4 x 40 characters Electronics Controls Touch pad Memory EPROM, RAM, and non-volatile RAM 8 kb containing 100 mounting methods Socket for connected For connector (ROPRE) to be connected with...
  • Seite 57: Menu Overview

    ProntoPress-10 Instruction Manual 9. Menu Overview Method Groups Configuration Manual Rename Mounting Menu Functions Method Group Methods Cylinder Heating of Copy Diameter Cylinder Temperature Cooling of Mounting Unit Cylinder Parameters Force Unit Preheating Insert Force or Pressure Pressure Unit Mounting...
  • Seite 58 ProntoPress-10 Instruction Manual Quick Reference Card Placing the Specimen Press and hold RAM UP to raise the lower ram to its upper limit. Apply "Mould Release Agent" to the surface of the lower ram. Place the specimen on the ram.
  • Seite 59 ProntoPress-10 Gebrauchsanweisung Handbuch Nr.: 15067003 Auslieferungsdatum 11.01.2008...
  • Seite 61 Wartungshandbücher: Ein von der Firma Struers veröffentlichtes Wartungshandbuch darf nur von ausgebildeten Technikern benutzt werden, die von Struers dazu berechtigt wurden. Das Wartungshandbuch darf nur in Zusammenhang mit dem Struers Gerät benützt werden, für das dieses Wartungshandbuch ausdrücklich bestimmt ist.
  • Seite 63: Vor Gebrauch Sorgfältig Lesen

    10. Während des Aus/Einbaus der Einbetteinheit darf das Gerät nicht in Gang gesetzt werden. Für die Benutzung der Geräte bzw. der Maschinen sind die Verbrauchsmaterialien von Struers vorgesehen. Falls unzulässiger Gebrauch, falsche Installation, Veränderung, Vernachlässigung, unsachgemäße Reparatur oder ein Unfall vorliegt, übernimmt Struers weder die Verantwortung für Schäden des Benutzers, noch für solche am Gerät.
  • Seite 65 Gebrauchsanweisung Benutzerhandbuch Inhaltsverzeichnis Seite 1. Zu Beginn Packungsinhalt prüfen ..............3 ProntoPress-10................3 Einbetteinheit................3 ProntoPress-10 auspacken ............... 3 ProntoPress-10 aufstellen ..............3 Transportschraubkappe ..............3 ProntoPress-10 kennenlernen............4 Geräuschpegel................... 5 Netzanschluß ..................5 Wasseranschluß ................5 Wasserzufluß ................5 Wasserabfluß...
  • Seite 66 ProntoPress-10 Gebrauchsanweisung 2. Grundzüge der Bedienung Gebrauch der Bedienelemente ............12 Bedienungsfeld des ProntoPress-10 ........12 Gruppen der Bedienungstasten ..........12 Akustische Signale ..............12 Anzeige ..................14 Hauptschalter ................14 Optionen der Einbettmethode............15 Einbettmethode auswählen ............ 15 Methode bearbeiten..............17 Probe einlegen.................
  • Seite 67: Zu Beginn

    Unterer Stempel Stempelstift Staubschutzring Anti-Haftmittel (FASTI) Schaber (PROAN) Nehmen Sie ProntoPress-10 vom Boden der Verpackung ab; dazu ProntoPress-10 auspacken entfernen Sie die vier Schrauben von der Unterseite her. ProntoPress-10 sollte auf einem stabilen Tisch in geeigneter ProntoPress-10 aufstellen Arbeitshöhe aufgestellt werden. Das Gerät muß sich in Nähe des Netzanschlusses, der Wasserversorgung und des Wasserabflusses befinden.
  • Seite 68: Prontopress-10 Kennenlernen

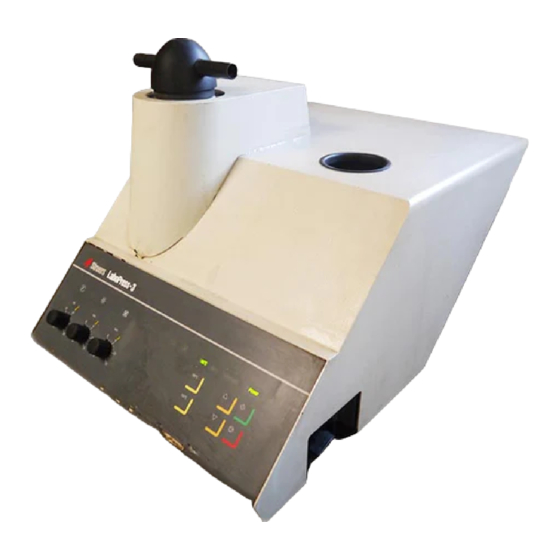
    ProntoPress-10 Gebrauchsanweisung ProntoPress-10 kennenlernen Nehmen Sie sich einen Augenblick Zeit, um Lage und Bezeichnung aller Teile des ProntoPress-10 kennenzulernen. Bedienungsfeld Verschluß Hauptschalter Einbetteinheit Staubschutz Abdeckung der Einbetteinheit Schwenkarm für den Verschluß...
  • Seite 69: Geräuschpegel

    Der Geräuschpegel der Maschine beträgt etwa 60 dB (A), Geräuschpegel gemessen bei laufender Pumpe in einer Entfernung von 1,0 m/39.4" zum Gerät. ProntoPress-10 wird mit elektrischem Anschlußkabel geliefert. Netzanschluß Bringen Sie einen Stecker am Kabel an, und schließen Sie die Maschine an das Netz an:...
  • Seite 70: Einbetteinheit Zusammenbauen

    WICHTIG Der Achszapfen ist ein Teil des Sicherheitsmechanismus des Gerätes, um das Gerät gegen Schäden zu schützen. Falls er bricht darf er nur mit einem originalen Struers Ersatzstift erstattet werden, da die Sicherheitsmechanismen sonst nicht optimal sind. Einbetteinheit montieren Einbettzylinder Feststellschraube Obere Schnellkupplung für das Kühlwasser...
  • Seite 71: Abdeckung Montieren

    ProntoPress-10 Gebrauchsanweisung Schrauben Sie die Feststellschraube etwa 10 mm heraus. Führen Sie den Einbettzylinder so über den unteren Stempel, daß die Feststellschraube die in der Zeichnung gezeigte Lage einnimmt. Drehen Sie die Einbetteinheit im Uhrzeigersinn bis sie stoppt Ziehen Sie die Feststellschraube vollständig an.
  • Seite 72: Einbetteinheit Zerlegen

    ProntoPress-10 Gebrauchsanweisung Einbetteinheit zerlegen Schwenkarm abnehmen Ziehen Sie den Stab aus der Öffnung oben an der Abdeckung der Einbetteinheit heraus. Unteren Stempel absenken Schalten Sie das Gerät mit dem Hauptschalter ein. Mit der Taste STEMPEL AB bewegen Sie den unteren Stempel in seine tiefste Lage.
  • Seite 73: Entfernen Des Unterstempels

    Der Achszapfen ist ein Teil des Sicherheitsmechanismus des Gerätes, um das Gerät gegen Schäden zu schützen. Sehen Sie: Wartung. Falls er bricht darf er nur mit einem originalen Struers Ersatzstift erstattet werden, da die Sicherheitsmechanismen sonst nicht optimal sind. Folgen Sie den Anweisungen zum Aus/Einbau der Einbetteinheit.
  • Seite 74: Sprache Einstellen

    ProntoPress-10 Gebrauchsanweisung Sprache einstellen m O N Drücken Sie MENÜ AUF/AB so oft, bis der Sprachparameter angezeigt wird. CONFIGURATION Language: ENGLISH Countdown mode: COUNT FROM START Mit EINGABE rufen Sie das Menü SPRACHE auf. LANGUAGE ENGLISH DEUTSCH FRANCAIS JAPANESE m O N Mit MENÜ...
  • Seite 75: Zylinderdurchmesser Einstellen

    ProntoPress-10 Gebrauchsanweisung Zylinderdurchmesser einstellen Damit in der Betriebsart DRUCK die richtige Umrechnung erfolgt, muß der Zylinderdurchmesser eingestellt werden. Wenn ein Zylinderdurchmesser geändert wird, werden die Werte von Druck oder Kraft in den Methoden automatisch geändert um die gleichen Bedingungen beim Einbetten zu gewährleisten.
  • Seite 76: Grundzüge Der Bedienung

    ProntoPress-10 Gebrauchsanweisung 2. Grundzüge der Bedienung Gebrauch der Bedienelemente Bedienungsfeld des ProntoPress-10 Gruppen der Bedienungstasten für den linken Einbettzylinder. Bedienungstasten B Steuertasten für die Programmierung und die Anzeige. Akustische Signale Ein kurzer Ton zeigt an, daß die erfolgte Tastatureingabe registriert wurde.
  • Seite 77 ProntoPress-10 Gebrauchsanweisung Pos. Nr. Taste Funktion Pos. Nr. Taste Funktion Schaltet die Stromversorgung Steuerfunktion für ein/aus. Der Hauptschalter liegt unterschiedliche Vorgänge. rechts am Gehäuse der FUNKTIONS HAUPT Maschine. TASTE SCHALTER Leuchtet bei eingeschaltetem Steuerfunktion für POWER Netz. unterschiedliche Vorgänge. FUNKTIONS...
  • Seite 78: Anzeige

    ProntoPress-10 Gebrauchsanweisung Anzeige METHODENGRUPPE WÄHLEN 1. STRUERS 2. GRUPPE NR. 2 3. GRUPPE NR. 3 4. GRUPPE NR. 4 F1:KONFIG. F3:VON HAND A Überschrift/Menüname. B Blinkender Text. Cursor. C Zur Verfügung stehende Funktionstasten. D Pfeil zeigt an, daß die Anzeige aus weiteren Linien besteht.
  • Seite 79: Optionen Der Einbettmethode

    ProntoPress-10 Gebrauchsanweisung Die Einbettpresse startet in dem Zustand, in dem sie sich beim Optionen der Einbettmethode letzten Ausschalten der Netzspannung befand. Falls zu diesem Zeitpunkt eine Einbettmethode ausgewählt war, wird diese in der Anzeige wieder angezeigt. Grp: 2 Methode: 3...
  • Seite 80 ProntoPress-10 Gebrauchsanweisung Gruppe:GRUPPE NR. 2 METHODE WÄHLEN 1. METHODE 1 2. METHODE 2 3. METHODE 3 4. LEERE METHODE F1:KOPIE F3:NULLST F4:N.NAME Markieren Sie mit dem Cursor die gewünschte Methode, z.B. METHODE 3 Gruppe:GRUPPE NR. 2 METHODE WÄHLEN 1. METHODE 1 2.
  • Seite 81: Methode Bearbeiten

    ProntoPress-10 Gebrauchsanweisung Methode bearbeiten Wählen Sie eine Einbettmethode. (Die Struers Methoden in Gruppe 1 können nicht bearbeitet werden). Grp: 2 Methode: 3 Resin:MultiFast HEIZEN: Zeit: 7:00 T: 180°C F: 20 kN KÜHLEN: Geschw.: HOCH Zeit: 3:00 F1:MIT VORWÄRMEN Markieren Sie mit dem Cursor den zu ändernden Parameter, z.B.
  • Seite 82: Probe Einlegen

    WICHTIG Damit das Anti-Haftmittel ein Kleben des Einbettmittels an der Oberfläche verhindert, muß es immer in einer dünnen Schicht auf die Oberflächen der Einbettstempel aufgetragen werden. Mit dem Struers AntiStick kann eine dünne Schicht Pulver auf die Stempel getupft werden.
  • Seite 83: Zwei Proben Einlegen

    ProntoPress-10 Gebrauchsanweisung Gehen Sie vor, wie oben unter Proben einlegen beschrieben Zwei Proben einlegen ist. Tragen Sie das Anti-Haftmittel auf die beiden Oberflächen des Zwischenstempels auf. Legen Sie den Zwischenstempel oben auf das Einbettmittel. Legen Sie die zweite Probe auf den Zwischenstempel, und füllen Sie die geeignete Menge Einbettmittel in den Zylinder.
  • Seite 84: Einbettvorgang Starten

    ProntoPress-10 Gebrauchsanweisung Wählen Sie eine Einbettmethode aus, wie dies im Abschnitt Einbettvorgang starten Einbettmethode wählen beschrieben ist. Drücken Sie START , und der Vorgang läuft automatisch In der Anzeige werden die Einbettparameter durch einen neuen Anzeige bei laufendem Text ersetzt, der den Stand des Einbettvorgangs laufend...
  • Seite 85 Vorwärmen ................36 Heizzeit ..................37 Kühlung ................... 37 Funktionen von Hand..............38 Zylinder heizen ................ 38 Zylinder kühlen ............... 39 2. Struers Metalog Guide™ ..........41 3. Anwendungshilfen für das Warmeinbetten ..41 4. Zubehör .................. 42 5. Verbrauchsmaterialien ...........
  • Seite 86 ProntoPress-10 Gebrauchsanweisung 7. Wartung Tägliche Pflege................48 Nach 200 Einbettungen..............48 Einbettmittelreste entfernen ..........48 Nullstellen des Zählers ............48 Stempel reinigen................48 Oberen Stempel ausbauen ............. 49 Schmieren der Gewinde des Verschlusses ........49 Entkalken der Kühlspirale in der Einbetteinheit......49 Kühlwasser ersetzen ..............
  • Seite 87: Details Und Besonderheiten Der Bedienung

    ProntoPress-10 Gebrauchsanweisung 1. Details und Besonderheiten der Bedienung Installation Umlaufkühleinheit (Optional) Die Umlaufkühleinheit (TRECI) wird über einen Adapter (ROPRE) an die Einbettpresse angeschlossen. TRECI Das Kabel verbinden, das von der TRECI-Pumpe kommt, mit ROPRE ROPRE, wie es das Anschlußdiagramm für ROPRE zeigt.
  • Seite 88: Software Einstellungen

    ProntoPress-10 Gebrauchsanweisung Schalten Sie das Gerät mit dem Hauptschalter ein. Einen Software Einstellungen Konfigurationsmenü Augenblick lang erscheint folgende Anzeige: ProntoPress-10 Version: 2.0 Die Einbettpresse startet in dem Zustand, in dem Sie sich beim letzten Ausschalten der Netzspannung befand. In der Anzeige erscheint u.U.
  • Seite 89: Temperatureinheit Einstellen

    ProntoPress-10 Gebrauchsanweisung m O N Drücken Sie MENÜ AUF/AB so oft, bis die Temperatureinheit einstellen Einheit der Temperatur markiert ist. KONFIGURATION Zylinderdurchm.: 50 mm Einheit der Temperatur: CELSIUS Kraft oder Druck: KRAFT Einheit: kN Mit EINGABE rufen Sie das Menü...
  • Seite 90: Betriebsart Kraft/Druck Einstellen

    ProntoPress-10 Gebrauchsanweisung Betriebsart Kraft/Druck Normalerweise arbeitet eine Einbettpresse in der Betriebsart einstellen KRAFT, wobei die auf den Stempel tatsächlich wirkende Kraft eingestellt wird. Bei der Betriebsart DRUCK wird der Druck im Zylinder absolut, d.h. unabhängig vom Zylinderdurchmesser eingestellt. m O N Drücken Sie MENÜ...
  • Seite 91: Krafteinheit Einstellen

    ProntoPress-10 Gebrauchsanweisung Krafteinheit einstellen Dazu muß die Betriebsart KRAFT (siehe oben) eingestellt sein. m O N Drücken Sie MENÜ AUF/AB so oft, bis die Einheit der Kraft markiert ist. KONFIGURATION ‘ Zylinderdurchm.: 50 mm Einheit der Temperatur: CELSIUS Kraft oder Druck:...
  • Seite 92: Druckeinheit Einstellen

    ProntoPress-10 Gebrauchsanweisung Druckeinheit einstellen Dazu muß die Betriebsart DRUCK (siehe oben) eingestellt sein. m O N Drücken Sie MENÜ AUF/AB so oft, bis die Einheit des Drucks markiert ist. KONFIGURATION Zylinderdurchm.: 50 mm Einheit der Temperatur: CELSIUS Kraft oder Druck:...
  • Seite 93: Zählart Einstellen

    ProntoPress-10 Gebrauchsanweisung Zählart einstellen Normalerweise wird eine Einbettpresse in der Betriebsart VOM START AN betrieben, wobei die entsprechenden Zeiten für Vorwärmen und Heizen voreingestellt werden und die Presse, unabhängig vom Temperaturzustand der Einbetteinheit, startet und stoppt. In der Betriebsart VON EINGEST. TEMP. An erfolgt die Zeitzählung der Vorwärm- und Heizzeit von dem Augenblick an,...
  • Seite 94: Optionen Der Einbettmethoden

    ProntoPress-10 Gebrauchsanweisung Optionen der Einbettmethoden Während Sie mit einer bestimmten Methode arbeiten, können Sie Methode sichern (speichern) die vorgenommenen Änderungen in der Datenbank sichern. Eine Methode bearbeiten: Siehe Kapitel Zu Beginn. Grp: 2 Methode: 3 Resin:MultiFast HEIZEN: Zeit: 6:30 T: 180°C F: 20 kN KÜHLEN:...
  • Seite 95: Methode Kopieren

    ProntoPress-10 Gebrauchsanweisung Methode kopieren Der schnellste Weg, eine neue Einbettmethode auf der Grundlage einer bestehenden zu erstellen, ist das Kopieren einer Methode in den Zwischenspeicher. Wählen Sie die Gruppe mit der Einbettmethode aus, aus der Sie kopieren wollen. Siehe Zu Beginn, Einbettmethode wählen.
  • Seite 96: Methode Einfügen

    ProntoPress-10 Gebrauchsanweisung Methode einfügen Wenn Sie die Methode in eine andere Gruppe einfügen wollen: Mit Esc rufen Sie das Menü METHO- DENGRUPPE WÄHLEN auf. m O N Drücken Sie MENÜ AUF/AB oft, bis die gewünschte Gruppe markiert ist, in die die Methode eingefügt werden soll.
  • Seite 97 ProntoPress-10 Gebrauchsanweisung Falls es sich um eine unbenannte Methode (LEERE METHODE) handelt: Mit EINGABE werden die Parameter der Methode angezeigt. Mit Esc kehren Sie zur obigen Anzeige zurück. Mit F2:EINFÜG. rufen Sie ein Menü zur Entscheidung über das Einfügen auf.
  • Seite 98: Methode Null Stellen

    ProntoPress-10 Gebrauchsanweisung Methode Null stellen Wird eine Methode nicht mehr benötigt, sollte sie auf Null zurückgestellt werden. Die Parameter nehmen dabei die Werte der Grundeinstellung an und können später problemlos mit einer neuen Methode überschrieben werden. Die Methode nimmt automatisch den Namen LEERE METHODE an, was besagt, daß...
  • Seite 99: Namen Geben

    ProntoPress-10 Gebrauchsanweisung Namen geben Die Namen der Methodengruppen, Methoden und Einbettmittel können bearbeitet und an Ihre Bedürfnisse angepaßt werden. Gruppe:GRUPPE NR. 2 METHODE WÄHLEN 1. METHODE 1 2. METHODE 2 3. METHODE 3 4. LEERE METHODE F1:KOPIE F2:EINFÜG.F3:NULLST.F4:N.NAME Mit F4:N.NAME rufen Sie ein Menü...
  • Seite 100: Verfahrenssteuerung

    ProntoPress-10 Gebrauchsanweisung Verfahrenssteuerung Die Qualität der Einbettung kann bei einigen Anwendungen Vorwärmen durch eine Vorwärmphase verbessert werden. Wenn Sie in einer Einbettmethode die Vorwärmung benutzen wollen: Grp: 2 Methode: 3 Resin:MultiFast HEIZEN: Zeit: 7:00 T: 180°C F: 20 kN KÜHLEN: Geschw.:...
  • Seite 101: Heizzeit

    ProntoPress-10 Gebrauchsanweisung Heizzeit Heiz- bzw. Kühlzeit werden entweder vom Start an, oder ab dem Erreichen der voreingestellten Temperaturen gezählt. Die Einstellung der Zählart für die Heizzeit ist im Abschnitt Software Einstellungen; Zählart einstellen, erklärt. Kühlung Die Kühlzeit wird immer vom Kühlbeginn an gezählt.
  • Seite 102: Funktionen Von Hand

    ProntoPress-10 Gebrauchsanweisung Funktionen von Hand Der Einbettzylinder kann ohne Begleitdruck erwärmt werden. Er Zylinder heizen kann geöffnet und geschlossen werden. Diese Möglichkeiten kommen zum Einsatz, wenn die Maschine in Warteposition ist, wenn die Verfahrenszeit verkürzt werden soll und im Falle spezieller Anwendungen.
  • Seite 103: Zylinder Kühlen

    ProntoPress-10 Gebrauchsanweisung Zylinder kühlen Von dieser Möglichkeit machen Sie Gebrauch, wenn beispielsweise die Abkühlung beschleunigt, oder ein laufender Einbettvorgang gestoppt werden soll. Rufen Sie das Menü METHODENGRUPPE WÄHLEN auf: METHODENGRUPPE WÄHLEN 1. STRUERS GRUPPE NR. 2 3. GRUPPE NR. 3 GRUPPE NR.
  • Seite 104 ProntoPress-10 Gebrauchsanweisung Kühlen beginnen: Mit F1:KÜHLEN STARTEN wird der Kühlvorgang gestartet. Der Status springt auf EIN. Das Kühlen beenden: Mit F1:KÜHLEN STOPPEN wird der Kühlvorgang beendet. Der Status springt auf AUS. Wenn Sie den Zylinder heizen oder den Einbettvorgang starten,...
  • Seite 105: Struers Metalog Guide

    ProntoPress-10 Gebrauchsanweisung 2. Struers Metalog Guide ™ Der Struers Metalog Guide™ bietet für die meisten gängigen Materialien Präparationsmethoden an, die sich an der einfachen Untersuchung zweier Schlüsseleigenschaften orientieren: Härte und Duktilität. Die richtige Methode ist ebenso leicht herauszufinden, wie die Wahl der Verbrauchsmaterialien. Wenn Sie für Ihre vorliegenden Proben die geeignete...
  • Seite 106: Zubehör

    Herstellung von 2 Einbettungen 30 mm Durchm. CYLDO 1 ¼" Durchm. CYLDO 1 ½" Durchm. CYLDO 40 mm Durchm. CYLDO 50 mm Durchm. CYLDO Umlaufkühleinheit TRECI Adapter ROPRE für die Umlaufkühleinheit für den Anschluß der Umlaufkühleinheit (TRECI) an ProntoPress-10...
  • Seite 107: Verbrauchsmaterialien

    ProntoPress-10 Gebrauchsanweisung 5. Verbrauchsmaterialien Spezifische Eigenschaften Material Inhalt Kenn- Name Anwendung wort ConduFast Elektrolytisches Polieren Elektrisch leitend Akryl mit Eisenpulver 1 kg RESFE Sehr geringe Schrumpfung Füllstoff (Resin 1) Thermoplastisch, Grau SpeciFast Glasklare Einbettungen Transparent Akryl 1,5 kg RESTH Poröse Proben...
  • Seite 108: Fehlersuche

    Den Stecker richtig anschließen. nicht richtig angeschlossen (Entsteht Kommt diese Anzeige trotzdem, wenn START gedrückt ist). rufen Sie den Struers Kundendienst PT100 Verstärker ist nicht geeicht Die Temperaturmessung ist nicht Rufen Sie den Struers Kundendienst oder falsch geeicht Erscheint, wenn das Gerät gestartet wird zusammen mit einem langen Ton.
  • Seite 109 Erscheint beim Drücken der Taste weit es geht fest, dann 1/4 Drehung START zurück. Falls dies nicht hilft, rufen Sie den Struers Kundendienst an. Eingest. Kraft zu hoch Die voreingestellte Kraft übersteigt Keine Maßnahmen notwendig. die maximale Kraft auf der Alternative: Wenn Sie die Kraft an Stempelstange.
  • Seite 110 Wasserstand in der Wasser bis zur Füllhöhe nachfüllen. Umlaufkühleinheit zu gering. Siehe Kapitel Wartung. Wassertemperatur zu hoch. Kühlsystem schadhaft. Rufen Sie den Struers Kundendienst Kühlwasser tropft unten aus der Schnellkupplung ist nicht richtig Nehmen Sie die Abdeckung von der Maschine. montiert.
  • Seite 111 Schmutz auf dem Gewinde des Die Gewinde reinigen. Nur trockenes zugedreht werden Verschlusses und des Zylinders Schmierpulver verwenden Die Scheibe für die Wärmeisolation Bestellen Sie einen Struers Service auf dem Oberstempel hat einen Techniker größeren Durchmesser als der Oberstempel Der Verschluß kann nicht Der Verschluß...
  • Seite 112: Wartung

    ProntoPress-10 Gebrauchsanweisung 7. Wartung Tägliche Pflege Reinigen Sie alle zugänglichen Oberflächen mit einem feuchten Tuch. Nach 200 Einbettungen Beim Einbetten kann ausgehärtetes Resin vom Unterstempel fallen und sich darunter aufbauen. Das ausgehärtete Einbettmittel muß entfernt werden, damit das Gerät nicht zerstört wird.
  • Seite 113: Oberen Stempel Ausbauen

    ProntoPress-10 Gebrauchsanweisung Die Kunststoffkappe entfernen (Pos. 2). Oberen Stempel ausbauen Den Oberstempel anheben und die Unterlegscheibe entfernen (Pos. 3). Den Oberstempel herausziehen. Nicht den Stab (Pos. 4) aus den Oberstempel entfernen, es sei denn es ist absolut notwendig Muß der Stab entfernt werden soll der Oberstempel in einem Schraubstock oder ähnlichen anbringen.
  • Seite 114: Kühlwasser Ersetzen

    Füllen Sie 30 Liter Wasser in den Tank. Hinweis! Ein zu hoher Wasserstand im Tank kann die Pumpe beschädigen. Setzen Sie Struers Zusatzmittel gemäß der Angaben zu. Verschließen Sie den Tank mit dem Deckel. Setzen Sie die Pumpe in den Deckel ein.
  • Seite 115: Technische Daten

    ProntoPress-10 Gebrauchsanweisung 8. Technische Daten Gegenstand Kenndaten Einbetteinheiten Durchmesser 25, 30, 40, 50 mm (Optional) Komprimieren Kraft auf die Vorwärmen: Pleuelstange 0-20 kN in Schritten von 5 kN 0-2000 kp in Schritten von 500 kp Heizen: 0 - 50 kN in Schritten von 5 kN...
  • Seite 116 ProntoPress-10 Gebrauchsanweisung Gegenstand Kenndaten Software und Elektronik LCD-Anzeige 4 x 40 Zeichen Tasten Sensortastenfeld EPROM, RAM, und nichtflüchtiges RAM Speicher ProntoPress-20 8 kB enthält 2 x 100 Einbettmethoden ProntoPress-10 8 kB enthält 100 Einbettmethoden Steckverbindung für Für Stecker des Adapters (ROPRE)wird an die Anschlußgeräte...
  • Seite 117: Menüstruktur

    ProntoPress-10 Gebrauchsanweisung 9. Menüstruktur Methoden gruppen Konfigura- Funktionen Namen Einbett- tionsmenü von Hand geben methoden Zylinderdurch Zylinder Kopie messer heizen Temperatur- Zylinder Einbett- einheit kühlen parameter Krafteinheit Vorwärmen Einfügen Kraft/ Druck Druckeinheit Einbett- vorgang Sprache Parameter Null stellen einstellen Zählart...
  • Seite 118: Schnellinformation

    ProntoPress-10 Gebrauchsanweisung Schnellinformation Probe einlegen Drücken und halten Sie die Taste STEMPEL AUF , um den unteren Stempel in seine oberste Lage zu fahren. Tragen Sie das Anti-Haftmittel auf die Oberfläche des unteren Stempels auf. Legen Sie die Probe auf den unteren Stempel.
  • Seite 119 ProntoPress-10 Mode d’emploi Mode d’emploi no.: 15067003 Date de parution 11.01.2008...
  • Seite 121 Les restrictions suivantes doivent être observées. Le non respect de ces restrictions pourra entraîner une annulation des obligations légales de Struers: Mode d'emploi: Le mode d'emploi Struers ne peut être utilisé que pour l'équipement Struers pour lequel il a été spécifiquement rédigé.
  • Seite 123 10. Ne pas faire fonctionner la machine lors de l'assemblage ou du désassemblage de l'unité d'enrobage. La machine est conçue pour être utilisée avec des articles consommables fournis par Struers. En cas de mauvais usage, d'installation incorrecte, de modification, de négligence, d'accident ou de réparation impropre, Struers n'acceptera aucune responsabilité...
  • Seite 125 Unité d'enrobage................ 3 Déballer ProntoPress-10 ..............3 Placer ProntoPress-10 ..............3 L'écrou de transport à chapeau............3 Se familiariser avec ProntoPress-10..........4 Niveau de bruit ................. 5 Alimentation en courant ..............5 Alimentation en eau ................. 5 Arrivée d'eau................5 Ecoulement d'eau...............
  • Seite 126 ProntoPress-10 Mode d’emploi 2. Opérations de base Utiliser les touches de contrôle ............12 Touches de contrôle sur la plaque avant de ProntoPress-10. 12 Groupes de touches..............12 Signaux sonores ............... 12 Affichage .................. 14 Interrupteur principal ............. 14 Options de méthodes d'enrobage............ 15 Choisir une méthode d'enrobage..........
  • Seite 127: Installation

    Déballer ProntoPress-10 Détacher ProntoPress-10 du fond de la caisse de transport en retirant les quatre vis du dessous. ProntoPress-10 doit être placée sur une table stable à hauteur de Placer ProntoPress-10 travail adéquate. La machine doit être placée à proximité de l'alimentation en courant, d'un robinet d'eau et de l'écoulement.
  • Seite 128: Se Familiariser Avec Prontopress-10

    ProntoPress-10 Mode d’emploi Se familiariser avec Prendre le temps de se familiariser avec l'emplacement et les ProntoPress-10 noms des composants de ProntoPress-10. Plaque avant Fermeture supérieure Interrupteur principal Unité d'enrobage Bague de protection contre la poussière Couvercle de l'unité d'enrobage...
  • Seite 129: Niveau De Bruit

    Le niveau de bruit de la machine est de 60 dB (A) mesuré quand Niveau de bruit la pompe est en marche, à une distance de 1,0 m de la machine. Alimentation en courant ProntoPress-10 est, à l'usine, munie d'un câble électrique. Monter une prise sur le câble: Marron: phase...
  • Seite 130: Assemblage De L'unité D'enrobage

    Le tourillon fait partie intégrante du mécanisme de sécurité de la machine et il est conçu pour la proteger contre les dégâts. S’il se casse ou disparaît, il ne doit être remplacé que par une pièce de rechange Struers, sinon le mécanisme de sécurité ne pourrait plus fonctionner.
  • Seite 131: Installer Le Couvercle

    ProntoPress-10 Mode d’emploi IMPORTANT Ne pas faire fonctionner la machine lors de l'installation de l'unité d'enrobage. Dévisser la vis de fixation d'environ 10 mm. Placer le cylindre d'enrobage au dessus du piston inférieur avec la vis de fixation dans la position montrée.
  • Seite 132: Retirer La Bague De Protection Contre La Poussière

    Veuillez voir: Maintenance. S’il se casse ou disparaît, il ne doit être remplacé que par une pièce de rechange Struers, sinon le mécanisme de sécurité ne pourrait plus fonctionner. Suivre les instructions au paragraphe Retirer l'unité d'enrobage Changer d'unité...
  • Seite 133: Programmation Du Logiciel

    ProntoPress-10 Mode d’emploi Programmation du logiciel Menu de configuration Allumer le courant à l'interrupteur principal. L'affichage suivant apparaît brièvement: ProntoPress-10 Version: 2.0 La presse d'enrobage sera mise en marche dans les mêmes conditions que lorsque le courant a été éteint la dernière fois.
  • Seite 134: Choisir La Langue

    ProntoPress-10 Mode d’emploi Choisir la langue m O N Appuyer sur MENU VERS LE HAUT/LE BAS pour choisir le paramètre langue. CONFIGURATION Langue: FRANÇAIS Mode compte à rebours: COMPTE DES DEBUT Appuyer sur RETOUR pour activer les Options langue. LANGUE...
  • Seite 135: Choisir Le Diamètre Du Cylindre

    ProntoPress-10 Mode d’emploi Choisir le diamètre du cylindre Le diamètre du cylindre doit être choisi afin d'assurer la conversion correcte lorsque le mode Pression est choisi. Lorsqu'un diamètre de cylindre est changé, les valeurs de force ou de pression de la base de données dans les méthodes changeront automatiquement pour maintenir les conditions dans le cylindre d'enrobage.
  • Seite 136: Opérations De Base

    ProntoPress-10 Mode d’emploi 2. Opérations de base Utiliser les touches de contrôle Touches de contrôle sur la plaque avant de ProntoPress-10 Groupes de touches Fonctions de programmation et de surveillance. B Touches d'opération du cylindre d'enrobage. Signaux sonores Bip bref: lorsqu'une touche est pressée, un bip bref indique que la commande a été...
  • Seite 137 ProntoPress-10 Mode d’emploi Pos. No. Touche Fonction Pos. No. Touche Fonction Allume et éteint le courant Touche à usage varié. principal de la machine. L'interrupteur principal est placé TOUCHE INTERRUP- à la droite du coffret. TEUR FONCTION PRINCIPAL S’allume quand le courant Touche à...
  • Seite 138: Affichage

    ProntoPress-10 Mode d’emploi Affichage CHOISIR GROUPE DE METHODES 1. STRUERS 2. GROUPE NO. 3. GROUPE NO. 4. GROUPE NO. F1:CONFIG. F3:FONC. MAN. Entête. Texte clignotant. Marqueur. Options touches de fonction. Une flèche indique qu'il y a d'autres lignes dans l'image.
  • Seite 139: Options De Méthodes D'enrobage

    ProntoPress-10 Mode d’emploi La presse d'enrobage sera mise en marche dans les mêmes Options de méthodes conditions que lorsque le courant a été éteint la dernière fois. La d'enrobage méthode d'enrobage choisie alors apparaît sur l'affichage. Grp: 2 Méthode: 3 Résine:MultiFast...
  • Seite 140 ProntoPress-10 Mode d’emploi Groupe:GROUPE NO 2 CHOISIR METHODE 1. METHODE 1 2. METHODE 2 3. METHODE 3 4. METHODE VIDE F1:COPIER F3: EFFACER F4:NOM Appuyer sur MENU VERS LE HAUT/LE BAS jusqu’à la méthode désirée, par ex. METHODE 3. Groupe:GROUPE NO. 2 CHOISIR METHODE 1.
  • Seite 141: Editer La Méthode

    ProntoPress-10 Mode d’emploi Editer la méthode Sélectionner une méthode d'enrobage. (Les méthodes Struers du Groupe 1 sont protégées contre toute édition). Grp: 2 Méthode: 3 Résine:MultiFast CHAUFFAGE: Temps: 7:00 T: 180°C F: 20 kN REFROID.: Taux: ELEVE Temps: 3:00 F1: PRECHAUFFAGE Déplacer le marqueur au paramètre à...
  • Seite 142: Placer L'échantillon

    Le "Produit anti-adhérent" doit toujours être appliqué sur les pistons d'enrobage, car en couches fines, il empêche les résines de coller à la surface. AntiStick de Struers permet d'appliquer facilement une fine couche de poudre de stéarate sur les pistons.
  • Seite 143: Placer Deux Échantillons

    ProntoPress-10 Mode d’emploi Placer deux échantillons Suivre les instructions au paragraphe Placer l'échantillon. Appliquer le "Produit anti-adhérent" sur toutes les surfaces du piston intermédiaire. Placer le piston intermédiaire au dessus de la résine. Placer le second échantillon sur le piston intermédiaire et remplir le cylindre d'une quantité...
  • Seite 144: Commencer Le Processus D'enrobage

    ProntoPress-10 Mode d’emploi Choisir une méthode d'enrobage. Voir Choisir une méthode Commencer le processus d'enrobage. d'enrobage Appuyer sur MARCHE , et le processus va se dérouler automatiquement. L'affichage avec les paramètres d'enrobage sera remplacé par un Affichage lors du nouvel affichage qui surveillera constamment le processus...
  • Seite 145 ProntoPress-10 Mode d’emploi Guide de référence Table des matières Page 1. Opérations avancées Installation..................23 Unité de recyclage (Optionnelle)..........23 Douille pour le recyclage ............23 Programmation du logiciel ............. 24 Menu de configuration ............24 Choisir l'unité de température..........25 Choisir le mode Force ou Pression..........
  • Seite 146 ProntoPress-10 Mode d’emploi 2. Struers Metalog Guide™ ..........41 3. Guide d'application pour l'enrobage à chaud ..41 4. Accessoires ................. 42 5. Consommables ..............43 6. Indication d'erreurs ............44 7. Maintenance Quotidienne..................49 Après 200 enrobages............... 49 Eliminer les restes..............49 Remettre le compteur à...
  • Seite 147: Opérations Avancées

    Remplacer le tube d'écoulement sur la pompe dans TRECI avec la soupape de retenue coudée et le mamelon hexagonal de ROPRE. Struers recommande de sceller les filetages. Brancher le tuyau de pression de la presse d'enrobage au mamelon hexagonal. Ne pas oublier de monter le joint.
  • Seite 148: Programmation Du Logiciel

    ProntoPress-10 Mode d’emploi Programmation du logiciel Menu de configuration Allumer le courant à l'interrupteur principal. L'affichage suivant apparaît brièvement: ProntoPress-10 Version: 2.0 La presse d'enrobage sera mise en marche dans les mêmes conditions que lorsque le courant a été éteint la dernière fois.
  • Seite 149: Choisir L'unité De Température

    ProntoPress-10 Mode d’emploi Choisir l'unité de température m O N Appuyer sur MENU VERS LE HAUT/LE BAS jusqu'au menu UNITE DE TEMPÉRATURE. CONFIGURATION Diamètre cylindre: 50 mm Unité de température: CELSIUS Force ou Pression: FORCE Unité: kN Appuyer sur RETOUR pour activer le menu UNITE DE TEMPERATURE.
  • Seite 150: Choisir Le Mode Force Ou Pression

    ProntoPress-10 Mode d’emploi Choisir le mode Force ou Le mode FORCE est la fonction la plus commune pour une presse Pression d'enrobage, appliquant la force sur le piston. En mode PRESSION, la pression absolue est appliquée indépendamment du diamètre du cylindre.
  • Seite 151: Choisir L'unité De Force

    ProntoPress-10 Mode d’emploi Choisir l'unité de force La presse doit être en mode FORCE. Voir plus haut. m O N Appuyer sur MENU VERS LE HAUT/LE BAS jusqu'au menu UNITE DE FORCE. CONFIGURATION Diamètre cylindre: 50 mm Unité de température:...
  • Seite 152: Choisir L'unité De Pression

    ProntoPress-10 Mode d’emploi Choisir l'unité de pression La presse doit être en mode Pression. Voir plus haut. m O N Appuyer sur MENU VERS LE HAUT/LE BAS jusqu'au menu UNITE DE PRESSION. CONFIGURATION Diamètre cylindre: 50 mm Unité de température:...
  • Seite 153: Choisir Le Mode Compte À Rebours

    ProntoPress-10 Mode d’emploi Choisir le mode compte à rebours Le mode compte à rebours COMPTE DES DEBUT est le contrôle habituel du temps de chauffage sur une presse d'enrobage, programmant le temps de chauffage et permettant à la presse d'enrobage de se mettre en marche et de s'arrêter, indépendamment de la température.
  • Seite 154: Options Méthodes D'enrobage

    ProntoPress-10 Mode d’emploi Options méthodes d'enrobage Il est possible de sauver les changements pratiqués pendant le Sauver une méthode travail avec une méthode spécifique dans la base de données. Editer la méthode. Voir Installation. Grp: 2 Méthode: 3 Résine: MultiFast CHAUFFAGE:Temps: 6:30 T: 180°C F:20 kN...
  • Seite 155: Copier Une Méthode

    ProntoPress-10 Mode d’emploi Copier une méthode Copier une méthode est un raccourci pour créer une nouvelle méthode d'enrobage basée sur une méthode existante. Choisir le groupe comportant la méthode d'enrobage à partir de laquelle l'opérateur veut copier. Voir Installation, Choisir une méthode d'enrobage.
  • Seite 156: Insérer La Méthode

    ProntoPress-10 Mode d’emploi Insérer la méthode Pour insérer la méthode dans un groupe différent: Appuyer sur Esc pour retourner au menu CHOISIR GROUPE DE METHODES. m O N Appuyer sur MENU VERS LE HAUT/LE BAS pour choisir le groupe dans lequel la méthode doit être ajoutée.
  • Seite 157 ProntoPress-10 Mode d’emploi Si ce n'est pas une METHODE VIDE: Appuyer sur RETOUR pour voir la méthode. Appuyer sur Esc pour retourner à l'affichage ci-dessus. Appuyer sur F2:INSERER pour insérer la méthode à partir de la mémoire-tampon. Voulez-vous sauver la mémoire dans Groupe: 3.
  • Seite 158: Effacer Une Méthode

    ProntoPress-10 Mode d’emploi Effacer une méthode Si une méthode n'a plus d'intérêt, il faut l'effacer. Les paramètres seront remplacés par les valeurs de référence qui pourront facilement être remplacées, plus tard, par une nouvelle méthode. Le nom de la méthode sera alors: METHODE VIDE, ce qui veut dire que l'on peut copier dans cette méthode ou la modifier sans...
  • Seite 159: Editer Les Noms

    ProntoPress-10 Mode d’emploi Editer les noms Les noms des groupes de méthodes, des méthodes et des résines d'enrobage peuvent être édités et changés, si besoin est. Groupe:GROUPE NO. 2 CHOISIR METHODE 1.METHODE 1 2.METHODE 2 3.METHODE 3 4.METHODE VIDE F1:COPIER F2.INSERER F3:EFFACER F4:NOM Appuyer sur F4:NOM.
  • Seite 160: Contrôle Du Processus

    ProntoPress-10 Mode d’emploi Contrôle du processus Préchauffage Une phase de préchauffage peut améliorer la qualité d'un enrobage dans certaines applications. Pour activer le préchauffage dans une méthode d'enrobage: Grp: 2 Méthode: 3 Résine:MultiFast CHAUFFAGE: Temps: 7:00 T: 180°C F: 20 kN REFROID.:...
  • Seite 161: Refroidissement

    ProntoPress-10 Mode d’emploi Le temps de refroidissement est toujours compté à rebours à Refroidissement partir du début du refroidissement. La machine peut faire le compte à rebours du refroidissement au moyen des trois taux de refroidissement différents. Température Niveau de refroidissement [°C]...
  • Seite 162: Fonctions Manuelles

    ProntoPress-10 Mode d’emploi Fonctions manuelles Chauffage du cylindre Le cylindre d'enrobage peut être chauffé sans application de la pression. Il peut être fermé ou ouvert. Cette fonction peut être utilisée pour réduire le temps du processus ou pour certaines applications spécifiques.
  • Seite 163: Refroidissement Du Cylindre

    ProntoPress-10 Mode d’emploi Refroidissement du cylindre Le cylindre d'enrobage peut être refroidi sans application de pression. Cette fonction peut être effectuée avec ou sans la fermeture supérieure. Elle peut être utilisée comme un refroidissement supplémentaire, si, par exemple, un processus d'enrobage en cours doit être interrompu.
  • Seite 164 ProntoPress-10 Mode d’emploi Régler le temps de refroidissement et le taux de refroidissement aux valeurs désirées. Voir Editer la méthode. Si le temps de refroidissement est mis à 0:00, le compte à rebours du temps de refroidissement aura lieu automatiquement à partir de la valeur maximum: 15:00, quand le refroidissement est commencé.
  • Seite 165: Struers Metalog Guide

    Mode d’emploi 2. Struers Metalog Guide ™ Le Metalog Guide™ de Struers offre des méthodes de préparation pour les matériaux les plus communs, basées sur la simple analyse de deux propriétés clés: la dureté et la ductilité. Trouver la méthode correcte est simple, ainsi que le choix des consom- mables.
  • Seite 166: Accessoires

    ProntoPress-10 Mode d’emploi 4. Accessoires Type Description Code Unité d'enrobage 25 mm dia. CYLMI constituée d'un cylindre, d'un piston supérieur et inférieur, 30 mm dia. CYLTE d'une unité de chauffage/refroidissement et d'une fermeture 1 ¼" dia. CYLQU supérieure 1 ½" dia.
  • Seite 167: Consommables

    ProntoPress-10 Mode d’emploi 5. Consommables Résine Application Propriété spécifique Matériau Contenu Code ConduFast Polissage électrolytique Conductrice d'électricité Résine acrylique avec 1 kg RESFE Retrait très faible charge de poudre de fer (Resin 1) Thermoplastique, Grise SpeciFast Enrobages transparents Transparente Acrylique...
  • Seite 168: Indication D'erreurs

    Insérer fermement la prise. Si le pas correctement branchée. message apparaît toujours, appeler (Apparaît lorsque la touche un technicien de service Struers. MARCHE s est pressée). Amplificateur PT100 non calibré Le mécanisme de température n'est Appeler un technicien de service pas calibré...
  • Seite 169 ProntoPress-10 Mode d’emploi Affichage/erreur Cause Action Fermeture supérieure non dévissée La fermeture supérieure n'a pas été Faire tourner la fermeture supérieure complètement dévissée après un jusqu'à ce qu'elle sorte entièrement enrobage. du filetage. Si cela a déjà été fait, le Apparaît quand la touche PISTON...
  • Seite 170 ProntoPress-10 Mode d’emploi Affichage/erreur Cause Action Problèmes de machine Compression insuffisante Réglage incorrect de la Régler le paramètre correct. La force force/pression. doit être au min. 5 kN/1000 Lbf/500 Configuration incorrecte du diamètre Vérifier la configuration. du cylindre. Unité de force ou de pression incorrecte.
  • Seite 171 Struers. Essayer d'insérer le piston supérieur démonté dans le cylindre d'enrobage. Si cela n'est pas possible, appeler un technicien de service Struers. La fermeture supérieure ne peut pas Des salissures se trouvent dans les Nettoyer les filetages. être complètement vissée.
  • Seite 172 ProntoPress-10 Mode d’emploi Affichage/erreur Cause Action TEXTES JAPONAIS L'affichage peut montrer les textes Pour retourner aux textes anglais, en japonais. Lors du choix d'une allemand ou français, suivre la langue européenne dans le menu procédure suivante: LANGUE, l'opérateur peut Appuyer sur Esc jusqu’à ce accidentellement appuyer sur qu’un bip long retentisse.
  • Seite 173: Maintenance

    ProntoPress-10 Mode d’emploi 7. Maintenance Quotidienne Nettoyer toutes les surfaces accessibles à l'aide d'un chiffon humide. Lors de l'enrobage, des restes de résine durcie tomberont du Après 200 enrobages piston inférieur et se déposeront en dessous. La résine durcie doit être éliminée afin d'éviter d'endommager la machine.
  • Seite 174: Retirer Le Piston Supérieur

    ProntoPress-10 Mode d’emploi Retirer les prises de couverture des extrémités des poignées Retirer le piston supérieur Dévisser les deux poignées à l'aide d'une clé hexagonale (pos. 1). Retirer le chapeau en plastique (pos.2). Soulever le piston supérieur et retirer le joint de fermeture (pos.3).
  • Seite 175: Remplacer L'eau De Refroidissement

    Mettre le couvercle sur le réservoir. Placer la pompe dans le couvercle. IMPORTANT Toujours maintenir la concentration correcte d'additif Struers dans l'eau de refroidissement (pourcentage indiqué sur la bouteille d'additif). Se rappeler d'ajouter l'additif Struers chaque fois que l'on rajoute de l'eau.
  • Seite 176: Données Techniques

    ProntoPress-10 Mode d’emploi 8. Données techniques Sujet Spécifications Unités d'enrobage Diamètre 25, 30, 40, 50 mm (Optionnelles) Compression Force sur la tige du Préchauffage: piston 0-20 kN en échelons de 5 kN 0-2000 kp en échelons de 500 kp Chauffage: 0 - 50 kN en échelons de 5 kN...
  • Seite 177 ProntoPress-10 Mode d’emploi Sujet Spécifications Environnement Standards de sécurité Généraux 89/392/EEC & 91/386/EEC & 93/44/EEC EN292-1, EN292-2, EN60204-1 (IEC 204-1) 89/336/EEC & 92/231/EEC EN50081-2, EN50082-2 FCC part 15, subpart B Niveau de bruit Env. 60 dB(A), à une distance de 1,0 m/39,4" de la machine Température ambiante...
  • Seite 178: Aperçu De Menu

    ProntoPress-10 Mode d’emploi 9. Aperçu de menu Groupes de méthodes Menu Fonctions Nom groupe Méthodes configuration manuelles de méthodes d'enrobage Diamètre Chauffage du Copier cylindre cylindre Unité de Refroid. du Paramètres température cylindre d'enrobage Unité de Préchauffage Insérer force Force ou pression Unité...
  • Seite 179 ProntoPress-10 Mode d’emploi Carte de référence rapide Appuyer continûment sur PISTON VERS LE HAUT O pour faire Placer l'échantillon monter le piston inférieur à sa limite supérieure. Appliquer le "Produit anti-adhérent" sur la surface du piston inférieur. Placer l'échantillon sur le piston.
  • Seite 180 ProntoPress-20 ProntoPress-10 Manual No.: 15067003 Date of Release 10.05.2005 Spare Parts and Diagrams...
  • Seite 181 The manual may mention accessories or parts not included in the present version of the equipment. The contents of this manual is the property of Struers. Reproduction of any part of this manual without the written permission of Struers is not allowed.
  • Seite 182 ProntoPress-10/-20 Spare Parts and Diagrams Spare Parts and Diagrams Table of contents Drawing Common Parts to ProntoPress-10 and ProntoPress-20 Drawings ProntoPress-10, complete ..........15060002B Bottom, Complete, ProntoPress-10......... 15060051Q Cylinder Unit ..............15360036C Top Closure ..............15360026A ProntoPress-10 Diagrams Hydraulic Diagram ............15061002D Wiring Diagram ...............
  • Seite 183 ProntoPress-10/-20 Spare Parts and Diagrams Pos. Spare Part Drawing Cat. No. 15060002 ProntoPress-10, complete Top cabinet, Left 15060112 Top cabinet, Right (ProntoPress-20) 15070112 15060051 Bottom, complete 30+40 Rubber foot with screw and spacer R4910140 Fuse 3.15A T, glass tube 359MP109A...
  • Seite 184 ProntoPress-10/-20 Spare Parts and Diagrams Drawing Pos. Spare Part Cat No. 15360026 Top closure ø25 Top closure ø25, complete 15360020 Insulation, disc for ø25 top closure 15360300 Pressure spring ø12.5x1.0 2GF10125 Top part of ø25 top closure 15360170 Lock washer 15050241 Insulation shell for ø25 top closure...
  • Seite 185 ProntoPress-10/-20 Spare Parts and Diagrams Drawing Pos. Spare Part Cat No. 15360036 Cylinder unit ø40 Lower ram ø40 R5368014 15360026 Top closure ø40 Top closure ø40, complete 15360024 15360036 Cylinder unit ø50 Cover plate ø50 15368008 Lower ram ø50 R5368015 Piston pin, for ø50 ram...
  • Seite 191 X3:6 AVREF- --- " --- (WH) X6:3 N24V RAM DOWN X7:5 X6:7 OUT3 X3:7 N.C. STRUERS A/S X7:6 N220V PUMP MOTOR REV.A: REV.D: XPE3 VALHOEJS ALLE 176 X6:1 BK -> BL REV.E: XPE3 -> XPE2 DK-2610 ROEDOVRE X6:5 BL -> BK...
  • Seite 193 X7:4 N220V HEATING X3:6 AVREF- --- " --- (WH) X6:3 N24V RAM DOWN X5:3 N24V COOLING X7:5 STRUERS A/S X6:7 OUT3 X5:6 OUT4 X3:7 N.C. X7:6 N220V PUMP MOTOR REV.A: REV.D: VALHOEJS ALLE 176 X6:1 BK -> BL XPE15 -> XPE2;...
  • Seite 194: Overensstemmelseserklæring

    The equipment complies with the American standards: Supplementary FCC part 15, subpart B and UL508. Information The above has been declared according to the global method, module A Date: 01.07.2006 Christian Skjold Heyde, Vice President, R& D and Production, Struers A/S eu_erkl\506f.doc...
  • Seite 195: Konformitätserklärung

    L’équipement est conforme aux standards américains: FCC paragraphe 15, sous-paragraphe B et UL508. supplémentaires La déclaration ci-dessus a été faite d’après la méthode globale, module A Date: 01.07.2006 Christian Skjold Heyde, Vice- President, R& D et Production, Struers A/S eu_erkl\506f.doc...
  • Seite 196: With Complete Process Control And Built-In Database

    Effi cient Hot Mounting the Struers Way ProntoPress-20 Advanced, programmable mounting press with two cylinders. Complete process control and built-in database. Synchronous or independent operation on the two mounting cylinders, for highest throughput ProntoPress-10 Advanced, programmable single cylinder mounting press.
  • Seite 197 Perfect Mounting with APC force, exerted on the mount itself. If Struers Advanced Process the cylinder diameter is changed, the This results in almost the same cool- Control takes care of all press will automatically re cal cu late ing rate as a constant fl...
  • Seite 198 - na tion with resin is not possible. rat ed. ProntoPress-10 can save up Elevator with steering arm and to 100 mounting meth ods, whereas built in safety switch ProntoPress-20 can save up to 200 mounting meth ods, 100 per cylinder.
  • Seite 199 Erskine Ferry Road, Old Kilpatrick Glasgow, G60 5EU Phone 01 389 877 222 e-mail: info@struers.co.uk Struers’ products are subject to constant product development. Therefore, we reserve the right to introduce USA and CANADA changes in our products without notice. Struers Inc.
  • Seite 200 Einbettpresse mit zwei Zylindern. Prozesssteuerung und eingebaute Datenbank. Gleichzeitige oder unabhängige Bedienung der beiden Einbettzylinder bewirkt höchsten Probendurchsatz ProntoPress-10 Hochentwickelte, programmierbare Einbettpresse mit einem Zylinder. Prozess- steuerung und eingebaute Datenbank Die Energiesparer Wirksame Kühlung Die neuentwickelten Einbettpressen Schwere, konventionelle Pressen erzeugen mit halbiertem Energiebe- kühlen sich langsam ab, wogegen...
  • Seite 201 Druck vor- einzelne Einbettung ist demzufolge sätzlich verringert. gewärmt wird. Zur Anpassung der ohne Neueinstellung unter genau neuen Struers Pressen an spezifi- gleichen Druckverhält-nissen er- Zwischenstempel sche Anforderungen, sind sowohl zeugt worden. Die Verwendung eines Zwischen- Vorwärmzeit als auch Temperatur...
  • Seite 202 Stempel nach unten in Materialien oder Einbettmittel wer- den Zylinder schiebt, was den den in der eingebauten Daten- Arbeitsablauf für den Benutzer bank gespeichert. ProntoPress-10 ganz erheblich vereinfacht. Die vermag 100 Einbettmethoden zu Außenlage des Gewindes vermei- speichern, wogegen ProntoPress-...
  • Seite 203 Struers Inc. 810 Sharon Drive Westlake, OH 44145 Phone (888) 787-8377 Alle Struers Produkte werden laufend weiter entwickelt. Wir behalten uns deshalb das Recht vor, Fax (440) 871 8188 Änderungen unserer Produkte ohne vorherige Ankündigung vorzunehmen. e-mail: info@struers.com 04.01 / 62225060. Printed in Denmark...
  • Seite 204: Economies D'énergie

    Un enrobage à chaud à la Struers ProntoPress-20 Presse d’enrobage sophistiquée, programmable, à deux cylindres. Contrôle complet du processus et base de données intégrée. Fonctionnement synchronisé ou indépendant des deux cylindres d’enrobage pour un rendemen plus élevé ProntoPress-10 Presse d’enrobage sophistiquée,...
  • Seite 205 Ainsi, même temps. sion donnera les meilleurs résultats. chaque enrobage sera exactement Sur les nouvelles presses Struers, le similaire, sans avoir besoin de modi- Remplacement facile - six tailles temps de préchauffage, la tempéra- fier les réglages.
  • Seite 206 Les deux presses contiennent 10 choisissant parmi les quatre lan- La presse se règle automatique- méthodes Struers avec les valeurs gues les plus répandues. ment sur les paramètres corrects Les unités physiques, également, correspondant au diamètre du cylin- peuvent être affichées si besoin...
  • Seite 207 810 Sharon Drive Westlake, OH 44145 Phone (888) 787-8377 Les produits Struers subissent continuellement des modifications et des perfectionnements. Nous Fax (440) 871 8188 nous réservons donc le droit de pratiquer des changements sur nos produits sans avis préalable e-mail: info@struers.com 04.01 / 62325060.

Inhaltsverzeichnis