Herunterladen Inhalt Inhalt Diese Seite drucken
Inhaltsverzeichnis

Werbung

Verfügbare Sprachen

Verfügbare Sprachen

SALVIS
SousChef
Betriebsanleitung
de: Original-Betriebsanleitung
Bitte lesen Sie die Betriebsanleitung, bevor Sie das Gerät aufstellen und in Betrieb nehmen!
Operating Instructions
en: Translation of the original operating instructions
Before installing and commissioning the appliance read the operating instructions!
Mode d'emploi
fr: Traduction du mode d'emploi original
C'est pourquoi nous vous prions de lire attentivement les présentes instructions de service
avant de mettre la machine en marche.

Werbung

Inhaltsverzeichnis
loading

Inhaltszusammenfassung für Salvis SousChef

  • Seite 1 SALVIS SousChef Betriebsanleitung de: Original-Betriebsanleitung Bitte lesen Sie die Betriebsanleitung, bevor Sie das Gerät aufstellen und in Betrieb nehmen! Operating Instructions en: Translation of the original operating instructions Before installing and commissioning the appliance read the operating instructions! Mode d'emploi fr: Traduction du mode d'emploi original C'est pourquoi nous vous prions de lire attentivement les présentes instructions de service...
  • Seite 2: Inhaltsverzeichnis

    Inhaltsverzeichnis / Table of contens Seite / Page de - Originalbetriebsanleitung ....... Sicherheitshinweise .
  • Seite 3 Inhaltsverzeichnis / Table of contens Seite / Page en - Translation of the original operating instructions ... Safety ..............Safety instructions for Sous Vide cooking .
  • Seite 4 Inhaltsverzeichnis / Table of contens Seite / Page fr - Traduction du mode d'emploi original ..... . Instructions complémentaires ......... . . Consignes de sécurité...
  • Seite 5: De - Originalbetriebsanleitung

    de - Originalbetriebsanleitung Sicherheitshinweise Die Betriebsanleitung ist Teil des Geräts. Die Informationen dieser Betriebsanleitung müssen in unmittelbarer Nähe des Geräts zur Verfügung stehen. Lesen Sie die Be­ triebsanleitung sorgfältig durch. Personen, die das Gerät bedienen, müssen die Be­ triebsanleitung gelesen und verstanden haben. Die Betriebsanleitung beschreibt die bestimmungsgemäße Verwendung des Geräts.
  • Seite 6: Sicherheitshinweise Für Das Sous-Vide-Garen

    Die Wasserqualität im Gargefäß des Sous-Vide-Garers muss Wasserwechsel: überwacht und das Wasser regelmäßig gewechselt werden. Entkalken: Wir empfehlen, Ihren SousChef regelmäßig zu entkalken. Verwenden Sie hierfür einen lebensmittelverträglichen Entkalker. Kühlung: Bei der Kühlung müssen die Lebensmittel sofort nach Beendigung des Garprozesses aus dem Sous-Vide-Garer genommen und schnellstmöglich auf eine Kerntemperatur von maximal 3°C herun­...
  • Seite 7: Allgemeine Sicherheit

    Allgemeine Sicherheit Die Geräte dürfen nur bestimmungsgemäß laut den Anweisungen dieser Betriebsanleitung betrieben werden. Jede andere Betriebsart gilt als nichtbestimmungsgemäß. Für nichtbestimmungsgemäße Verwendung übernimmt der Hersteller keine Gewährleistung oder Ga­ rantie. Die Betriebsanleitung ist Teil des Geräts. Lesen Sie die Be­ triebsanleitung daher sorgfältig durch.
  • Seite 8: Bestimmungsgemäße Verwendung

    Bestimmungsgemäße Verwendung □ Dieser Niedrigtemperaturgarer ist ausschließlich zum Erhitzen Bestimmungsgemäß von Wasser gebaut. Das Gerät ist ausschließlich zum Nied­ rigtemperaturgaren (Sous-Vide-Verfahren) von Lebensmitteln in speziellen, hierfür geeigneten Vakuumbeuteln geeignet. □ Der Niedrigtemperaturgarer darf ausschließlich im komplett aufgebauten Zustand betrieben werden. Nichtbestimmungsgemäß...
  • Seite 9: Einsatzbereich

    Einsatzbereich Das Gerät darf nur in der gewerblichen Gastronomie verwendet werden. Der Aufstellort des Geräts muss die folgenden Anforderungen erfüllen: □ Innenraum □ Aufstellung auf einem Tisch oder ähnlichem Untergrund; die Aufstellfläche muss dicht, eben, rutschfest und nicht brennbar sein □...
  • Seite 10: Warnsymbole Am Niedrigtemperaturgarer

    Warnsymbole am Niedrigtemperaturgarer Warnung vor heißer Oberfläche Auf dem Gerät ist das Symbol "Warnung vor heißer Oberfläche" aufgeklebt. Mit diesem Hinweis wird vor heißen Oberflächen des Geräts gewarnt. Diese Oberflächen dürfen im Betriebszustand nicht berührt werden. Um diese Oberflächen in anderen Leben­ sphasen, wie beispielsweise bei der Instandhaltung, zu berühren, müssen diese auf Raumtemperatur abgekühlt sein.
  • Seite 11: Aufbau Und Funktion

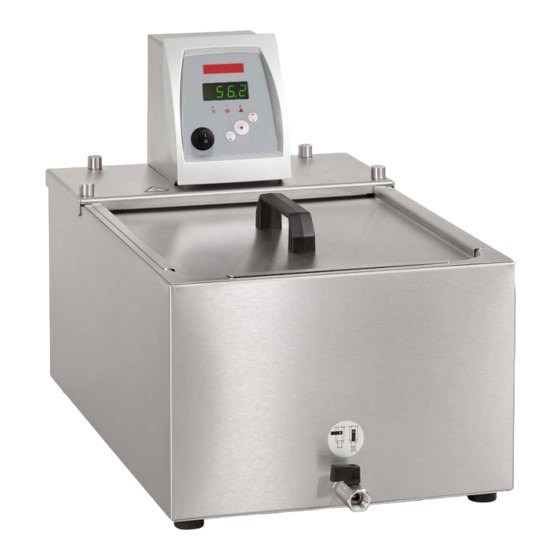
    Aufbau und Funktion Aufbau des Niedrigtemperaturgarers Vorderseite Kontrollkopf Gargefäßbrücke, zur Reinigung abnehmbar Gargefäßdeckel mit Griff Gargefäß Entleerungshahn Vier Standfüße Jedem Gerät liegt serienmäßig ein Entleerungs­ schlauch bei. Abb. 1: Aufbau Front Kontrollkopf LED-Display (vierstellige Segmentanzeige) LED-Signalleuchten Displaytasten Netzschalter Der Netzschalter kann in die folgenden Posi­ tionen gebracht werden: □...
  • Seite 12: Displaytasten

    Rückseite 1 Rückstellknopf (Reset) für den Sicherheitstemperaturbegren­ zer (STB) 2 Lüftungsöffnungen 3 Technische Angaben 4 Netzanschlusskabel Abb. 4: Aufbau Rückseite Displaytasten 1 Pfeiltaste oben 2 Eingabetaste 3 Pfeiltaste unten Mit den Displaytasten können Funktionen im Display des Geräts gesteuert werden. □...
  • Seite 13: Auspacken

    Auspacken Vor Beginn aller Arbeiten Betriebsanleitung lesen! GEFAHR! Transportschaden Stromschlag . Prüfen Sie das Gerät vor Inbetriebnahme genau auf äußere Transportschäden! . Nehmen Sie das Gerät niemals in Betrieb, wenn Sie einen Transportschaden festgestellt haben! VORSICHT! Herabfallen / Umstürzen des Geräts Quetschen der Hände und Füße, Stoß...
  • Seite 14: Inbetriebnahme

    Inbetriebnahme Niedrigtemperaturgarer aufstellen WARNUNG! Herabfallen / Umstürzen des Geräts an schiefer Ebene / Tischkante Quetschen der Hände und Füße . Positionieren Sie das Gerät nur auf ebenen Flächen, nicht in der Nähe von Tischkanten! Beachten Sie zusätzlich Folgendes: □ Beim Transport von Hand: Gewicht des Geräts beachten und Schutzhandschuhe tragen.
  • Seite 15: Niedrigtemperaturgarer Mit Wasser Füllen

    Niedrigtemperaturgarer mit Wasser füllen VORSICHT! Verwendung ungeeigneter Temperierflüssigkeiten Verpuffung, Verbrennung, Verbrühung, Feuer ● Betreiben Sie das Gerät nur mit Wasser! VORSICHT! Überfüllen des Gargefäßes, Verschütten von Wasser Verbrühung ● Berücksichtigen Sie, dass der Wasserstand ansteigt, wenn Sie das Gargut in das Wasser geben! ●...
  • Seite 16: Betrieb

    Betrieb Allgemeine Sicherheitshinweise Betreiben Sie das Gerät nur mit Wasser! Das Gerät darf erst eingeschaltet werden, wenn es mit Wasser mindestens bis zur MIN-Markierung gefüllt ist! WARNUNG! Kontrollkopf fällt ins Gargefäß Stromschlag ● Betreiben Sie das Gerät nur im vollständig montierten Zustand! ●...
  • Seite 17: Menüstruktur

    Menüstruktur Hier sind die im Gerät vorkommenden Menüpunkte dargestellt. 8888 Selbsttest beim Einschalten gewünschte Gartemperatur einstellen Zeitschaltuhr mit Funktion zum automatischen Aus­ schalten (Auto-Shut-Down) StbY Betriebsart Stand-by (nach dem Ablaufen der Zeit­ schaltuhr) Ende der Menüstruktur Abb. 8: Menüstruktur Gargut vorbereiten 1.
  • Seite 18: Gartemperatur Einstellen

    Gartemperatur einstellen 1. Drücken Sie die Eingabetaste. Die folgende Anzeige erscheint. Abb. 10: Gewünschte Temperatur einstellen 2. Drücken Sie erneut die Eingabetaste. 3. Verwenden Sie die Pfeiltasten, um die gewünschte Gartem­ peratur einzustellen. Die Anzeige blinkt. Mit der Pfeiltaste oben können Sie die Temperatur erhöhen, mit der Pfeiltaste unten die Temperatur senken.
  • Seite 19 Funktionen der Zeitschaltuhr □ Ist die Zeitschaltuhr aktiv, wird die aktuelle Ist-Temperatur mit einem blinkenden Punkt im Display angezeigt. □ Wird die Zeitschaltuhr über den entsprechenden Menüpunkt aufgerufen, wird die verbleibende Zeitspanne, zum Beispiel "05.30", blinkend angezeigt. □ Ist die Zeitschaltuhr nicht aktiv, wird "00.00" blinkend ange­ zeigt.
  • Seite 20 Verbleibende Zeitspanne anzeigen und bearbeiten 1. Drücken Sie die Eingabetaste. Sie sind in der Menüstruktur des Geräts. 2. Drücken Sie die Pfeiltaste unten. Abb. 14: Auto-Shut-Down Der Menüpunkt zum Konfigurieren der Zeitschaltuhr (ASd) wird angezeigt. 3. Bestätigen Sie mit der Eingabetaste. Die verbleibende Zeitspanne wird angezeigt.
  • Seite 21: Gargut Einbringen/Entnehmen Und Garen

    Gargut einbringen/entnehmen und garen VORSICHT! Einbringen und Entnehmen von Gargut; Überlaufen des Gargefäßes durch Eintauchen von Gargut und Gegenständen Verbrennung, Verbrühung ● Berücksichtigen Sie, dass der Wasserstand ansteigt, wenn Sie das Gargut in das Wasser geben! ● Die Füllstandsmarkierung "MAX" darf nicht über­ schritten werden! Entwicklung von Heißdampf bei höheren Gartemperaturen.
  • Seite 22: Niedrigtemperaturgarer Entleeren

    Niedrigtemperaturgarer entleeren VORSICHT! Hautkontakt mit heißem Wasser und heißen Oberflä­ chen Verbrühung, Verbrennung . Lassen Sie das Wasser und die Oberflächen auf Raum­ temperatur abkühlen. . Trennen Sie das Gerät vom Netz. . Entleeren Sie das Gargefäß vor Transporten. VORSICHT! Unkontrolliertes Auslaufen von Wasser beim Entleeren Ausrutschen, Sturz .
  • Seite 23: Störungen Und Fehlersuche

    Störungen und Fehlersuche Allgemeine Sicherheitshinweise WARNUNG! Spannungsführende Teile bei Fehlersuche Stromschlag ● Lassen Sie nur Fachkräfte das Gerät reparieren. . Trennen Sie das Gerät vor der Reparatur vom Netz (z.B. beim Wechsel von Komponenten). VORSICHT! Unkontrollierter Anlauf der Pumpe bei gelöster Ver­ klemmung Quetschen ●...
  • Seite 24 Vorgehensweise bei Alarmen Personal: □ Bedienpersonal 1. Schalten Sie das Gerät am Netzschalter aus. 2. Ziehen Sie den Netzstecker ab. 3. Beseitigen Sie die Störungsursache, zum Beispiel Wasser bis mindestens zur MIN-Markierung auffüllen. 4. Zum Zurücksetzen des Alarms betätigen Sie den Rückstell­ knopf auf der Rückseite der Bedieneinheit.
  • Seite 25: Übersicht Über Alarme

    Übersicht über Alarme Ausgabe im Display Beschreibung Bei einem Unterniveaualarm befindet sich der Füllstand des Wassers unter der Minimalgrenze. Bei einem Übertemperatur-Alarm wurde das Wasser außerhalb der Temperaturgrenzen des Geräts erhitzt. Der Übertemperatur-Alarm wird bei einer Temperatur höher als 105 °C aktiv. Kon­ taktieren Sie zur Störungsbeseitigung den auto­...
  • Seite 26: Niedrigtemperaturgarer Reinigen

    Niedrigtemperaturgarer reinigen WARNUNG! Spannungsführende Teile in Kontakt mit Reinigungs­ mittel! Stromschlaggefahr! . Trennen Sie das Gerät vor der Reinigung vom Netz. . Tauchen Sie niemals den Kontrollkopf des Geräts ins Wasser. . Reinigen Sie den Kontrollkopf des Geräts niemals mit einem Wasserstrahl.
  • Seite 27 Reinigungs- und Pflegemittel Geeignete Reinigungsmittel und Pflegemittel sind zum Beispiel: □ Geschirrspülmittel □ Spezial-Edelstahlreiniger □ konservierende Edelstahlpflegemittel □ kalklösende Reinigungsmittel Reinigen der Oberflächen des Geräts 1. Um das Gerät von außen und innen zu reinigen, verwenden Sie ein feuchtes Tuch mit Wasser und handelsüblichem Ge­ schirrspülmittel.
  • Seite 28: Niedrigtemperaturgarer Entkalken

    Trocken Sie den gesamten Kontrollkopf sorgfältig, damit keine Feuchtigkeit ins Geräteinnere kommt. Stellen Sie den gereinigten Kontrollkopf mit der Gargefäß­ brücke wieder auf der weichen und trockenen Unterlage ab. Stülpen Sie das gereinigte Schutzgitter mit den Laschen voran über die Pumpe und Heizung der Bedieneinheit. Nun schieben Sie das Schutzgitter wieder unter die Hutmut­...
  • Seite 29: Außerbetriebnahme Und Entsorgung

    Außerbetriebnahme und Entsorgung Niedrigtemperaturgarer außer Betrieb nehmen Vorsicht! Heißes Wasser, heiße Oberflächen! Verletzungsgefahr! Verbrennungsgefahr! ● Wasser und Gerät abkühlen lassen. ● Gerät vor dem wegräumen vollständig entleeren. Vorsicht! Herabfallen, Umstürzen des Geräts! Verletzungsgefahr! Quetschgefahr an Händen oder Füßen! ● Mit entsprechender Vorsicht vorgehen! ●...
  • Seite 30: Technische Daten

    Technische Daten Allgemeine Daten Größe Einheit GN 2/3 GN 1/1 GN 2/1 Bestellnummer 883844 883845 883846 884871 884872 884870 °C 25 ⎯ 95 25 ⎯ 95 25 ⎯ 95 Arbeitstemperaturbereich °C -50 ⎯ 50 -50 ⎯ 50 -50 ⎯ 50 Lagertemperaturbereich ±0,05 Temperaturkonstanz...
  • Seite 31 Elektronik Die Geräte sind für eine Spannung von 230 V Wechselspannung und einer Frequenz von 50/60 Hz ausgelegt. Einheit GN 2/3 GN 1/1 GN 2/1 Maximale Stromaufnahme (bei 230 V) Minimale Netzabsicherung (bei 230 V) Heizleistung (bei 230 V, 50/60 Hz) Sicherung 230 V Wechselspannung: Schmelzsicherung 1 x F 10 A (flink);...
  • Seite 32: En - Translation Of The Original Operating Instructions

    en - Translation of the original operating instructions Safety The operating manual is part of the device. The information in this opera­ ting manual must be available in close vicinity to the device. Read through the operating manual carefully. Persons who operate the device must have read and understood the operating manual.
  • Seite 33: Safety Instructions For Sous Vide Cooking

    Safety instructions for Sous Vide cooking Cooking using the Sous Vide method should only be performed by trained personnel. Ensure that only tried and tested Sous Vide techniques from the gas­ tronomic specialist literature and/or from relevant experts are used. Follow the respective food recommendations there and the general instructions for food handling to prevent the formation of pathogens or health hazards.
  • Seite 34: General Safety

    General Safety The equipment must only be operated for the intended use according to the instructions in this operating manual. Any other type of operation is considered as non-intended use. The manufacturer does not accept any guarantee or warranty for non-intended use. The operating manual is part of the device.
  • Seite 35: Intended Use

    Intended use □ This low-temperature cooker has only been manufactured for Intended use heating water. The device is only suitable for low-temperature cooking (Sous Vide method) of food in special vacuum bags suitable for this. □ The low-temperature cooker is only permitted to be operated in completely assembled condition.
  • Seite 36: Application Area

    Application area The device is only permitted to be used in commercial gastro­ nomy. The installation location of the device must fulfil the following requirements: □ indoors □ placement on a table or similar base; the installation surface must be leak-tight, flat, non-slip and not flammable. □...
  • Seite 37: Warning Symbols On The Low-Temperature Cooker

    Warning symbols on the low-temperature cooker Warning about hot surface The "Warning: Hot Surface!" symbol is attached to the device. This notice warns about hot surfaces of the device. These sur­ faces must not be touched during operation. To be able to touch these surfaces during other life cycles such as e.g.
  • Seite 38: Design And Function

    Design and function Design of the low-temperature cooker Front side Control head Cooking tank bridge, can be removed for cleaning Cooking tank cover with handle Cooking tank Drain tap Four support feet One drain hose is included with every device as Fig.
  • Seite 39: Rear Side

    Rear side 1 Reset button (Reset) for the safety temperature limiter (STL) 2 Ventilation openings 3 Rating plate 4 Mains connection cable Fig. 4: Rear side design Display buttons 1 UP arrow button 2 ENTER button 3 DOWN arrow button Functions in the display of the device can be controlled using the display buttons.
  • Seite 40: Unpacking

    Unpacking Read the operating manual before starting all work. DANGER! Transport damage Electric shock . Before commissioning, check the device thoroughly for external transport damage! . Never commission the device if you have found any transport damage! CAUTION! Falling/overturning of the device Crushing of hands and feet, impact .
  • Seite 41: Commissioning

    Commissioning Placement of low-temperature cooker WARNING! Falling/overturning of the device on an incline/edge of a table Crushing of hands and feet . Only position the device on level surfaces, away from table edges! Also note the following: □ For transport by hand: note weight of the device and wear protective gloves.
  • Seite 42: Filling Low-Temperature Cooker With Water

    Filling low-temperature cooker with water CAUTION! Use of unsuitable heating liquids Explosions, burns, scalding, fire ● Only operate the device with water! CAUTION! Overfilling the cooking pan, spilling water Scalding ● Please note that the water level will rise when you place food items into the water! ●...
  • Seite 43: Operation

    Operation General safety instructions Only operate the device with water. The device must not be switched on until it has been filled with water up to at last the MIN marking. WARNING! Control unit falling into cooking pan Electric shock ●...
  • Seite 44: Menu Structure

    Menu structure The existing menu items in the device are shown here. 8888 Self-test when switching on Set required cooking temperature Timer with function for automatic shutdown (Auto-Shut- Down) StbY Standby operating mode (after expiry of the timer) End of the menu structure Fig.
  • Seite 45: Setting Cooking Temperature

    Setting cooking temperature 1. Press the ENTER button. The following display is shown. Fig. 10: Setting required coo­ king temperature 2. Press the ENTER button again. 3. Use the arrow buttons to set the required cooking tempera­ ture. The display flashes. You can increase the temperature with the UP arrow button and reduce it with the DOWN arrow button.
  • Seite 46: Timer Functions

    Timer functions □ If the timer is active, the current actual temperature on the display is shown with a flashing decimal point. □ If the timer is invoked using the corresponding menu item, the remaining time, for example "05:30" is shown flashing. □...
  • Seite 47 Displaying and editing remaining time 1. Press the ENTER button. You are in the menu structure of the device. 2. Press the DOWN arrow button. Fig. 14: Auto-Shut-Down The menu item for configuring the timer (ASd) is displayed. 3. Confirm with the ENTER button. The remaining time is displayed.
  • Seite 48: Inserting / Removing And Cooking Food

    Inserting / removing and cooking food CAUTION! Loading and removing food items; overflowing of the cooking pan when immersing food and objects Burns, scalding ● Please note that the water level will rise when you place food items into the water! ●...
  • Seite 49: Emptying Low-Temperature Cooker

    Emptying low-temperature cooker CAUTION! Skin contact with hot water and hot surfaces Scalding, burns . Leave the water and the surfaces to cool to room tem­ perature. . Disconnect the device from the power supply. . Drain the cooking pan before transport. CAUTION! Uncontrolled leaking of water during draining Slipping, falling...
  • Seite 50: Faults And Trobleshooting

    Faults and trobleshooting General safety instructions WARNING! Live parts during troubleshooting Electric shock ● Repairs may only be carried out by qualified profession­ als. . Disconnect the device from the power supply before car­ rying out repairs (e.g. when changing components). CAUTION! Uncontrolled startup of the pump when the connection is removed...
  • Seite 51: Procedure In The Event Of Alarms

    Procedure in the event of alarms Personnel: □ Operating personnel 1. Switch on the device at the mains power switch. 2. Unplug the mains plug. 3. Eliminate the cause of the fault; for example, fill with water up to at least the MIN marking. 4.
  • Seite 52: Alarms Overview

    Alarms overview Output on the display Description In the event of a Low Level alarm, the fill level of the water is below the minimum limit. In the event of an overtemperature alarm, the water has been heated outside the temperature limits of the device.
  • Seite 53: Cleaning Low-Temperature Cooker

    Cleaning low-temperature cooker WARNING! Live parts in contact with cleaning agent! Risk of electric shock! . Disconnect the device from the power supply before cleaning. . Never immerse the control unit of the device in water. . Never clean the control unit of the device with a water jet.
  • Seite 54 Cleaning and care materials Suitable cleaning and care materials are, for example: □ Washing-up liquid □ Special stainless steel cleaner □ Preserving stainless steel care materials □ Descaling cleaning materials Cleaning the surfaces of the device 1. Use a moist cloth with water and commercially available washing-up liquid to clean the outside and inside of the de­...
  • Seite 55: Decalcifying Low-Temperature Cooker

    Replace the cleaned control head with the cooking tank bridge on the soft and dry base. Pull the cleaned protective grill with the lugs forward over the pump and heater of the control panel. Now move the protective grill under the domed nuts again and under the screw heads.
  • Seite 56: Decommissioning And Disposal

    Decommissioning and disposal Decommissioning low-temperature cooker Caution! Hot water, hot surfaces! Risk of injury! Risk of burning! ● Leave water and device to cool down. ● Drain the device fully before storing it. Caution! Falling/overturning of the device! Risk of injury! Risk of crushing hands or feet! ●...
  • Seite 57: Technical Data

    Technical data General data Unit GN 2/3 GN 1/1 GN 2/1 883844 883845 883846 884871 884872 884870 °C 25 ⎯ 95 25 ⎯ 95 25 ⎯ 95 Operating temperature range °C -50 ⎯ 50 -50 ⎯ 50 -50 ⎯ 50 Storage temperature range Temperature accuracy (for 37 °C) ±0.05...
  • Seite 58 Elektronics The devices are designed for 230 V AC and frequency of 50/60 Hz. GN 2/3 GN 1/1 GN 2/1 Unit Maximum current consumption (for 230 V) Minimum line fuse (for 230 V) Heat output (for 230 V, 50/60 Hz) Fuse 230 V AC Fuse 1 x F 10 A (quick blow;...
  • Seite 59: Fr - Traduction Du Mode D'emploi Original

    fr - Traduction du mode d'emploi original Instructions complémentaires La notice d'instructions est partie intégrante de l'appareil. Les informations contenues dans la présente notice d'instructions doivent être gardées à proximité de l'appareil. Lire attentivement la notice d'instructions. Toutes les personnes devant se servir de l'appareil doivent avoir lu et compris la notice d'instructions.
  • Seite 60: Consignes De Sécurité Pour La Cuisson Sous Vide

    Consignes de sécurité pour la cuisson sous vide La cuisson avec la méthode sous vide ne doit être réalisée de préférence que par des personnes formées pour ce faire. Veiller à n'employer que les techniques de cuisson sous vide éprouvées et décrites dans la littérature gastronomique ou par des spécialistes chevronnés.
  • Seite 61: Sécurité Générale

    Sécurité générale Les appareils doivent être utilisés conformément à leur destina­ tion et aux instructions de la présente notice d'instructions. Tout autre mode de service est réputé non conforme à la destination. Le fabricant décline toute responsabilité en cas d'utilisation non conforme à...
  • Seite 62: Utilisation Conforme À La Destination

    Utilisation conforme à la destination Conforme à la destination □ Cet appareil de cuisson à basse température a été conçu exclusivement pour chauffer l'eau. Cet appareil est exclusive­ ment réservé à réchauffer de l'eau pour la cuisson à juste température (procédé sous vide) des produits alimentaires dans des sacs spéciaux hermétiques sans air.
  • Seite 63: Champ D'application

    Champ d'application Cet appareil est strictement réservé à une utilisation dans la gastronomie artisanale ou industrielle. Le lieu d'installation de l'appareil doit répondre aux exigences suivantes : □ À l'intérieur des locaux □ Pose sur une table ou un support similaire ; la surface de pose doit être étanche, plane, antidérapante et non combusti­...
  • Seite 64: Symboles D'avertissement Sur L'appareil De Cuisson Basse Température

    Symboles d'avertissement sur l'appareil de cuisson basse température Attention Surfaces brûlantes Le pictogramme « Attention surfaces brûlantes » est collé sur l'appareil. Cet avertissement attire l'attention sur les surfaces brûlantes de l'appareil. Tout contact avec ces surfaces est in­ terdit durant le fonctionnement. Avant de toucher ces surfaces pour des interventions, telle la maintenance, elles doivent avoir refroidi à...
  • Seite 65: Conception Et Fontion

    Conception et fontion Conception de l'appareil de cuisson à basse température Face avant Console de commande Pont du faitout, amovible pour nettoyage Couvercle du faitout, avec poignée Faitout Robinet de purge Quatre pieds Chaque appareil est accompagné de série d'un tuyau de vidage.
  • Seite 66: Face Arrière

    Face arrière Bouton de réinitialisation (reset) pour le limiteur de tempéra­ ture de sécurité (STB) Ouïes de ventilation Plaque signalétique Câble de branchement au secteur Fig. 4: Structure de la face arrière Touches afficheur Touche fléchée vers le haut Touche de saisie Touche fléchée vers le bas Les touches afficheur permettent de commander les fonc­...
  • Seite 67: Déballage

    Déballage Avant tout travail, lire la notice d'instructions ! DANGER ! Dommages survenus durant le transport Choc électrique . Vérifiez la présence d'éventuels dommages extérieures survenus sur l'appareil durant le transport avant de le mettre en service. . Ne jamais mettre l'appareil en service si vous constatez qu'il présente des dommages dus au transport ! PRUDENCE ! Chute / renversement de l'appareil...
  • Seite 68: Mise En Service

    Mise en service Installation de l'appareil de cuisson à basse température AVERTISSEMENT ! Chute / renversement de l'appareil sur un plan incliné / bord de table Écrasement des mains et des pieds . Positionnez l'appareil seulement sur des surfaces planes, pas à proximité de bords de table ! Note : □...
  • Seite 69: Remplir L'appareil De Cuisson Basse Température Avec De L'eau

    Remplir l'appareil de cuisson basse température avec de l'eau PRUDENCE ! Utilisation de liquides de thermostatisation inappropriés Déflagration, brûlures, échaudure, incendie ● Utilisez l'appareil uniquement avec de l'eau ! PRUDENCE ! Trop-plein du récipient de cuisson, renversement d'eau Échaudure ● Gardez à l'esprit que le niveau de l'eau augmente lorsque vous y mettez l'aliment ! ●...
  • Seite 70: Fonctionnement

    Fonctionnement Consignes générales de sécurité Utiliser uniquement de l'eau dans cet appareil ! L'appareil ne doit être mis en marche qu'après avoir été rempli d'eau au moins jusqu'au repère MIN ! AVERTISSEMENT ! La tête de contrôle tombe dans le récipient de cuisson Choc électrique ●...
  • Seite 71: Structure Du Menu

    Structure du menu Voici les options du menu proposées par l'appareil. 8888 Autotest à la mise en marche Réglage de la température de cuisson voulue Horloge de programmation avec fonction d'arrêt automatique (Auto-Shut-Down) StbY Mode de veille (quand le temps programmé sur l'horloge a expiré) Fin de la structure du menu Fig.
  • Seite 72: Réglage De La Température De Cuisson

    Réglage de la température de cuisson Appuyer sur la touche de saisie. L'affichage ci-contre apparaît. 2. Appuyer une deuxième fois sur la touche de saisie. Fig. 10: Régler la température vou­ 3. À l'aide des touches fléchées, régler la température de cuisson voulue.
  • Seite 73 □ Si l'horloge de programmation est active, la température Fonctions de l'horloge de réelle actuelle est indiquée sur l'afficheur avec un point programmation clignotant. □ Si l'horloge de programmation est appelée via l'option corre­ spondante du menu, le temps restant, par exemple "05.30" s'affiche en clignotant.
  • Seite 74: Remise En Marche

    Afficher et modifier le temps restant 1. Appuyer sur la touche de saisie. Le menu de l'appareil s'affiche. 2. Appuyer sur la touche fléchée vers le bas. Fig. 14: Auto-Shut-Down L'option du menu permettant de configurer l'horloge de pro­ grammation (ASd) s'affiche. 3.
  • Seite 75: Mettre Ou Sortir Les Aliments À Cuire, Cuisson

    Mettre ou sortir les aliments à cuire, cuisson PRUDENCE ! Ajouter et enlever de la nourriture ; débordement du récipient de cuisson en raison de l'immersion d'aliment et d'objet Brûlure, échaudure ● Gardez à l'esprit que le niveau de l'eau augmente lorsque vous y mettez l'aliment ! ●...
  • Seite 76: Vidange De L'appareil De Cuisson À Basse Température

    Vidange de l'appareil de cuisson à basse température PRUDENCE ! Contact de la peau avec de l'eau et des surfaces chaudes Échaudure, brûlure . Laissez l'eau et les surfaces revenir à température ambiante. . Débranchez l'appareil. . Videz le récipient de cuisson avant le transport. PRUDENCE ! Écoulement incontrôlé...
  • Seite 77: Dépistage Des Pannes

    Dépistage des pannes Consignes générales de sécurité AVERTISSEMENT ! Pièces sous tension lors de la recherche de défauts Choc électrique ● Confiez la réparation de l'appareil à des professionnels. . Débranchez l'appareil avant la réparation (p. ex. lors du changement de pièces). PRUDENCE ! Démarrage incontrôlé...
  • Seite 78 Procédure à suivre en cas d'alarmes Personnel :   □ Personnel de service Éteindre l'appareil en tournant l'interrupteur. Débrancher la fiche de la prise secteur. Remédier à la cause de la panne, par exemple en rajou­ tant de l'eau au moins jusqu'au repère MIN. L'alarme est enlevée.
  • Seite 79: Récapitulatif Des Alarmes

    Récapitulatif des alarmes Affichage à l'écran Description En cas d'alarme de seuil inférieur, le niveau de l'eau a baissé en dessous du seuil minimum. En cas d'alarme de température excessive, l'eau a chauffé au-delà des limites de température de l'appareil. L'alarme pour température excessive se déclenche quand la température est supérieure à...
  • Seite 80: Nettoyer L'appareil De Cuisson À Basse Température

    Nettoyer l'appareil de cuisson à basse température AVERTISSEMENT ! Pièces sous tension en contact avec des produits de nettoyage ! Risque d'électrocution ! . Débranchez l'appareil avant le nettoyage. . Ne jamais immerger la tête de contrôle dans l'eau. . Ne jamais nettoyer la tête de contrôle de l'appareil avec un jet d'eau.
  • Seite 81: Nettoyer Les Surfaces De L'appareil

    Les produits de nettoyage et d'entretien sont par exemple : Produits de nettoyage ou d'entretien □ Produit de vaisselle □ Nettoyant spécial acier inox □ Produit d'entretien de l'acier inox □ Produit détartrant Nettoyer les surfaces de l'appareil 1. Pour nettoyer l'intérieur et l'extérieur de l'appareil, employer un chiffon rendu humide avec de l'eau et quelques gouttes de produit vaisselle courant.
  • Seite 82: Détartrage De L'appareil De Cuisson À Basse Température

    Essuyer soigneusement la console de commande com­ plète pour qu'aucune humidité ne parvienne à l'intérieur de l'appareil. Reposer la console de commande nettoyée avec le pont du faitout sur le support souple et sec. Poser la grille de protection nettoyée, languettes en avant, sur la pompe et le chauffage.
  • Seite 83: Mise Hors Service Et Mise Au Rebut

    Mise hors service et mise au rebut Mettre hors service l'appareil de cuisson à basse température Prudence ! Eau et surfaces chaudes ! Risque de blessures ! Risques de brûlure ! ● Laisser refroidir l'eau et l'appareil. ● Vider l'appareil entièrement avant de le ranger. Prudence ! Chute / renversement de l'appareil ! Risque de blessures ! Risque d'écrasement des mains ou...
  • Seite 84: Spécifications Techniques

    Spécifications techniques Caractéristiques générales Einheit GN 2/3 GN 1/1 GN 2/1 883844 883845 883846 884871 884872 884870 °C 25 ⎯ 95 25 ⎯ 95 25 ⎯ 95 Plage de températures de service °C -50 ⎯ 50 -50 ⎯ 50 -50 ⎯ 50 Plage de température de stockage ±0,05 ±0,05...
  • Seite 85 Électronique Les appareils ont été dimensionnés pour une tension de 230 V c.a. et une fréquence de 50/60 Hz. Einheit GN 2/3 GN 1/1 GN 2/1 Puissance absorbée maximale (à 230 V) Protection secteur minimale (à 230 V) Puissance de chauffe (à 230 V, 50/60 Hz) Protection électrique 230 V c.a.
  • Seite 86 86 / 88...
  • Seite 87 87 / 88...
  • Seite 88 Artikel-Nr. 884942 / 7.15 / 4.16 SALVIS AG Nordstrasse 15 CH‐4665 Oftringen Tel. +41 (0)62 788 18 18 Fax. +41 (0)62 788 18 98 Internet: www.salvis.ch smart cooking E‐Mail: info@salvis.ch...

Inhaltsverzeichnis