Herunterladen Inhalt Inhalt Diese Seite drucken
Inhaltsverzeichnis

Werbung

Verfügbare Sprachen

Verfügbare Sprachen

MULTIFUNKTIONSLADEGERÄT
„Ultimate 400 W"
 BEDIENUNGSANLEITUNG
SEITE 2 - 50
MULTI-FUNCTIONAL CHARGER
„Ultimate 400 W"
 OPERATING INSTRUCTIONS
PAGE 51 - 99
CHARGEUR MULTIFONCTIONS
„Ultimate 400 W"
 NOTICE D'EMPLOI
PAGE 100 - 148
MULTIFUNCTIONEEL LAADAPPARAAT
„Ultimate 400 W"
 GEBRUIKSAANWIJZING
PAGINA 149 - 197
Best.-Nr. / Item No. /
N° de commande / Bestelnr.:
23 97 37
VERSION 08/12

Werbung

Inhaltsverzeichnis
loading

Inhaltszusammenfassung für VOLTCRAFT Ultimate 400 W

  • Seite 1 MULTIFUNKTIONSLADEGERÄT „Ultimate 400 W“  BEDIENUNGSANLEITUNG SEITE 2 - 50 MULTI-FUNCTIONAL CHARGER „Ultimate 400 W“  OPERATING INSTRUCTIONS PAGE 51 - 99 CHARGEUR MULTIFONCTIONS „Ultimate 400 W“  NOTICE D’EMPLOI PAGE 100 - 148 MULTIFUNCTIONEEL LAADAPPARAAT „Ultimate 400 W“  GEBRUIKSAANWIJZING PAGINA 149 - 197 Best.-Nr.
  • Seite 2: Inhaltsverzeichnis

    INHALTSVERZEICHNIS  Seite Einführung ........................4 Bestimmungsgemäße Verwendung ................5 Lieferumfang ......................... 6 Symbol-Erklärung ......................6 Sicherheitshinweise ...................... 7 Akkuhinweise ........................ 9 a) Allgemein ....................... 9 b) Zusätzliche Informationen zu Lithium-Akkus ............. 11 Verwendbare Akkutypen ..................... 13 Bedienelemente ......................15 Inbetriebnahme ......................
  • Seite 3 Seite 13. Bleiakkus (Pb) ......................29 a) Allgemein ......................29 b) Akku laden („CHARGE“) ..................29 c) Akku entladen („DISCHARGE“) ................31 14. Akkudaten speichern ....................32 15. Akkudaten laden ......................34 16. Diverse Grundeinstellungen („USER SET“) ............... 35 17. Warnmeldungen im Display ..................42 18.
  • Seite 4: Einführung

    Kauf eines Voltcraft® - Produktes haben Sie eine sehr gute Entscheidung getroffen, für die wir Ihnen danken. Voltcraft® - Dieser Name steht auf dem Gebiet der Mess-, Lade- sowie Netztechnik für überdurchschnittliche Qualitätsprodukte, die sich durch fachliche Kompetenz, außerge- wöhnliche Leistungsfähigkeit und permanente Innovation auszeichnen.
  • Seite 5: Bestimmungsgemäße Verwendung

    2. BESTIMMUNGSGEMÄSSE VERWENDUNG Das Ladegerät dient zum Aufladen von Akkus des Typs NiCd + NiMH (1 - 15 Zellen), LiPo/ LiIon/LiFe (1 - 6 Zellen) sowie für Bleiakkus (1 - 10 Zellen, 2 V - 20 V). Der Ladestrom kann abhängig von den angeschlossenen Akkus und deren Zellenzahl/ Kapazität zwischen 0,1 A und 20 A eingestellt werden (siehe Tabellen in Kapitel 22).
  • Seite 6: Lieferumfang

    3. LIEFERUMFANG • Ladegerät • Anschlusskabel-Set • XH-Balancer-Adapter • Bedienungsanleitung 4. SYMBOL-ERKLÄRUNG Das Symbol mit dem Ausrufezeichen im Dreieck weist auf wichtige Hinweise in dieser Bedienungsanleitung hin, die unbedingt zu beachten sind. Das „Pfeil“-Symbol ist zu finden, wenn besondere Tipps und Hinweise zur Bedienung gegeben werden.
  • Seite 7 • Aus Sicherheits- und Zulassungsgründen (CE) ist das eigenmächtige Umbauen und/oder Verändern des Produkts nicht gestattet. • Das Ladegerät darf nur an einer stabilisierten Gleichspannung von 12 - 18 V/DC betrieben werden. • Das Produkt darf nur in trockenen, geschlossenen Innenräumen betrieben werden.
  • Seite 8 • Achten Sie auf ausreichende Belüftung während der Betriebsphase, decken Sie das Ladegerät und/oder den angeschlossenen Akku niemals ab. Lassen Sie ausreichend Abstand (min. 20 cm) zwischen Ladegerät, Akku und anderen Objekten. Blockieren Sie niemals die im Ladegerät eingebauten Lüfter! Achten Sie außerdem darauf, dass die Lüfter keine kleinen Gegenstände einsaugen, halten Sie den Bereich um den Ansaugbereich der Lüfter frei.
  • Seite 9: Akkuhinweise

    6. AKKU-HINWEISE Obwohl der Umgang mit Akkus im täglichen Leben heute eine Selbstverständlichkeit ist, bestehen zahlreiche Gefahren und Probleme. Speziell bei LiPo-/LiIon-/LiFe-Akkus mit ihrem hohen Energieinhalt (im Vergleich zu herkömmlichen NiCd- oder NiMH-Akkus) sind diverse Vorschriften unbedingt einzuhalten, da andernfalls Explosions- und Brandgefahr besteht.
  • Seite 10 • Achten Sie beim Anschluss des Akkus an Ihr Modell oder Ladegerät auf die richtige Polung (Plus/+ und Minus/- beachten). Bei Falschpolung wird nicht nur ihr Modell, sondern auch der Akku beschädigt. Es besteht Brand- und Explosionsgefahr! Das hier gelieferte Ladegerät verfügt über eine Schutzschaltung gegen Falschpolung.
  • Seite 11: Zusätzliche Informationen Zu Lithium-Akkus

    b) Zusätzliche Informationen zu Lithium-Akkus Moderne Akkus mit Lithium-Technik verfügen nicht nur über eine deutlich höhere Kapazität als NiMH- oder NiCd-Akkus, sie haben auch ein wesentlich geringeres Gewicht. Dies macht diesen Akkutyp z.B. für den Einsatz im Modellbaubereich sehr interessant, meist werden hier sog.
  • Seite 12 • Wenn Sie einen Akku mit Lithiumtechnik mit mehr als einer Zelle aufladen, so verwenden Sie unbedingt einen sog. Balancer (z.B. im hier gelieferten Ladegerät bereits integriert). • Laden Sie LiPo-Akkus mit einem Ladestrom von max. 1C (sofern vom Akkuhersteller nicht anders angegeben!). Das bedeutet, dass der Ladestrom den auf dem Akku aufgedruckten Kapazitätswert nicht überschreiten darf (z.B.
  • Seite 13: Verwendbare Akkutypen

    7. VERWENDBARE AKKUTYPEN LiPo Nennspannung: 3,7 V/Zelle Max. Ladespannung: 4,2 V/Zelle Max. Ladestrom für Schnellladen: 1C (oder niedriger) Entladestrom-Abschaltung bei: 3,0 V/Zelle (oder höher) LiIon Nennspannung: 3,6 V/Zelle Max. Ladespannung: 4,1 V/Zelle Max. Ladestrom für Schnellladen: 1C (oder niedriger) Entladestrom-Abschaltung bei: 2,5 V/Zelle (oder höher) LiFe Nennspannung:...
  • Seite 14 NiMH Nennspannung: 1,2 V/Zelle Max. Ladespannung: 1,5 V/Zelle Max. Ladestrom für Schnellladen: 1C (oder niedriger); bei speziellen dafür ausgelegten Akkus bis zu 2C Entladestrom-Abschaltung bei: 1,0 V/Zelle (oder höher) Pb (Bleiakkus) Nennspannung: 2,0 V/Zelle Max. Ladespannung: 2,46 V/Zelle Max. Ladestrom für Schnellladen: 0,4C (oder niedriger) Entladestrom-Abschaltung bei: 1,75 V/Zelle (oder höher)
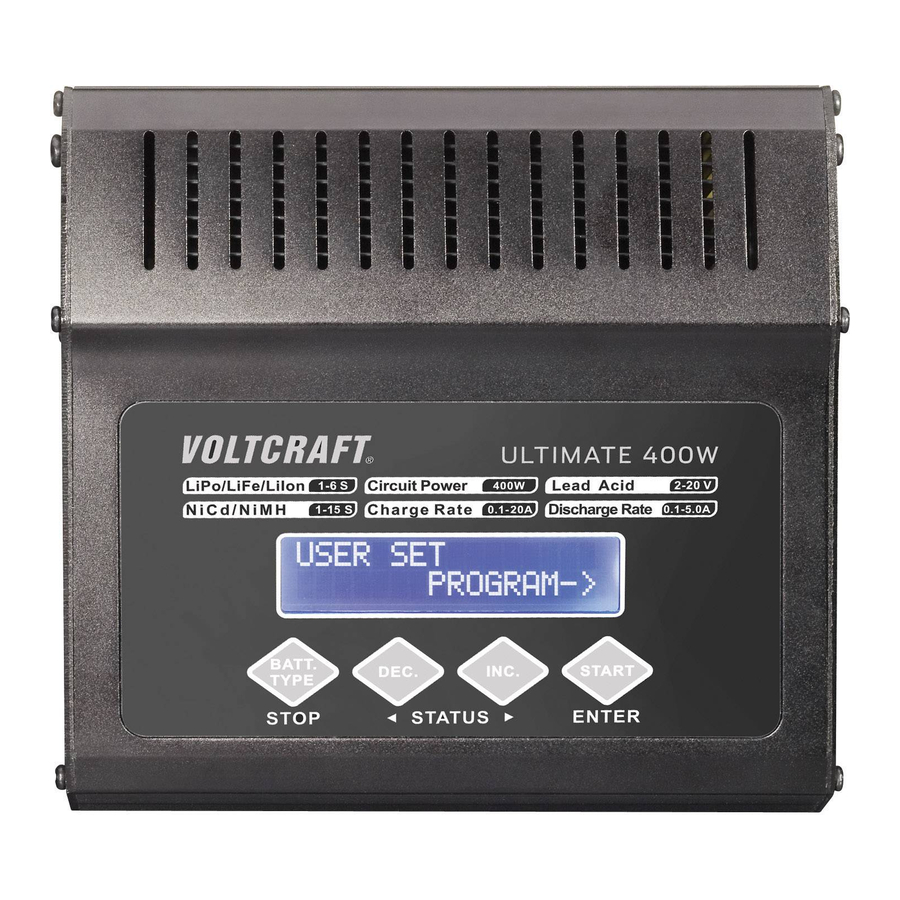
  • Seite 15: Bedienelemente

    8. BEDIENELEMENTE 1 Lüfter 2 Anschlusskabel zur Stromversorgung des Ladegeräts 3 Beleuchtetes LC-Display 4 Taste „BATT TYPE/STOP“ für Menü-Auswahl und zum Anhalten des Ladevorgangs 5 Tasten „DEC“ und „INC“ (bzw. „STATUS“) für Werte-Eingabe und Anzeige der Werte der Einzelzellen beim Balance-Lademodus 6 Taste „START/ENTER“...
  • Seite 16: Inbetriebnahme

    9. INBETRIEBNAHME Das Ladegerät muss mit einer stabilisierten Gleichspannung (12 - 18 V/DC) betrieben werden. Betreiben Sie das Ladegerät niemals an einer anderen Spannung, dies zerstört das Ladegerät, Verlust von Gewährleistung/Garantie! Je nach angeschlossenem Akku ist ein Ladestrom von bis zu 20 A möglich. Aus diesem Grund muss die Stromversorgung entsprechend stark gewählt werden.
  • Seite 17 • Sind alle Verbindungskabel und Anschlüsse einwandfrei, halten die Stecker fest in den Anschlussbuchsen? Ausgeleierte Stecker und beschädigte Kabel sollten ausgetauscht werden. • Beim Anschluss eines Akkus an das Ladegerät verbinden Sie immer zuerst das Ladekabel mit dem Ladegerät und erst danach den Akku mit dem Ladegerät/Ladekabel.
  • Seite 18: Menüstruktur

    10. MENÜSTRUKTUR...
  • Seite 19: Lithium-Akkus (Lipo, Liion, Life)

    11. LITHIUM-AKKUS (LIPO, LIION, LIFE) a) Allgemein Dieses Ladeprogramm ist nur geeignet für Akkus mit Lithium-Technik „LiPo“, „LiIon“ und „LiFe“. Die jeweilige Bauart des Akkus, den Sie am Ladegerät anschließen wollen, muss vor dem Start eines Lade-/Entladevorgangs eingestellt werden (in den „User“-Einstellungen, siehe Kapitel 16). Wenn der Akku einen Balancer-Anschluss besitzt, so müssen beim Laden/ Entladen des Akkus nicht nur die Anschlusskabel des Akkus, sondern auch der Balancer-Anschluss mit dem Ladegerät verbunden werden.
  • Seite 20: Akku Ohne Balancer-Anschluss Laden ("Charge")

    Danach können mit den Tasten „INC“ und „DEC“ die verschiedenen Funktionen ausgewählt werden: • „CHARGE“: Lithium-Akku ohne Balanceranschluss laden • „BALANCE“: Lithium-Akku mit Balanceranschluss laden • „FAST CHG“: Schnellladung eines Akkus • „STORAGE“: Akkus auf einen bestimmten Spannungswert laden bzw. entladen •...
  • Seite 21 Mit der Taste „BATT TYPE/STOP“ beenden Sie das Warnsignal; Sie gelangen wieder ins vorherige Einstellmenü zurück. Andernfalls erscheint z.B. folgende Anzeige (abwechselnd): R: 3SER S: 3SER R: 3SER S: 3SER CONFIRM(ENTER) CANCEL(STOP) Der Wert bei „R:“ gibt die Zellenzahl an, die das Ladegerät erkannt hat. Der Wert bei „S:“...
  • Seite 22: Akku Mit Balanceranschluss Laden ("Balance")

    c) Akku mit Balanceranschluss laden („BALANCE“) Im Gegensatz zum einfachen Ladeprogramm „CHARGE“ wird hier die Spannung jeder einzelnen Zelle überwacht und der Ladestrom entsprechend eingestellt. Neben den normalen zwei Akkuanschlüssen muss auch der Balancer-Anschluss des Akkus an das Ladegerät angeschlossen werden, siehe Kapitel 11. a). Die restliche Vorgehensweise beim Laden ist im Kapitel 11.
  • Seite 23: Schnellladung ("Fast Chg")

    d) Schnellladung („FAST CHG“) Beim Laden eines Lithium-Akkus wird der Ladestrom durch das verwendete Ladeverfahren bei Lithium-Akkus immer geringer, je voller der Akku ist. Dadurch steigt natürlich auch die Ladezeit. Durch ein spezielles Ladeverfahren wird bei der Schnellladung ein höherer Ladestrom erreicht.
  • Seite 24: F) Akku Entladen („Discharge")

    f) Akku entladen („DISCHARGE“) Normalerweise ist es bei Lithium-Akkus nicht erforderlich, diese zu entladen (entgegen NiCd-Akkus). Der Akku kann unabhängig von seinem vorhandenem Zustand sofort aufgeladen werden. Falls Sie trotzdem einen solchen Akku entladen möchten, so kann der Entladestrom zwischen 0,1 A und 5 A eingestellt werden. Der maximal mögliche Entladestrom ist abhängig vom Akkutyp und der Zellenzahl.
  • Seite 25: Nimh- Und Nicd-Akkus

    12. NIMH- UND NICD-AKKUS a) Akku laden („CHARGE“) Der einzustellende Ladestrom ist abhängig von der Kapazität des Akkus und sollte üblicherweise 1C betragen. Beachten Sie dazu jedoch die Angaben des Akkuherstellers. Die Angabe „1C“ bedeutet, dass der Ladestrom dem Wert der Kapazität des Akkus entspricht.
  • Seite 26 Wenn der Stromwert blinkt, kann durch gleichzeitiges Drücken der Tasten „INC“ und „DEC“ zwischen dem manuellen („Man“) und dem automatischen Modus („Aut“) umgeschaltet werden. Beim manuellen Modus („Man“) wird mit dem Strom geladen, den Sie einstellen. Beim automatischen Modus („Aut“) berechnet das Ladegerät den Ladestrom automatisch, Sie stellen nur eine Obergrenze für den Ladestrom ein.
  • Seite 27: B) Akku Entladen („Discharge")

    b) Akku entladen („DISCHARGE“) • Nachdem Sie im Hauptmenü mit der Taste „BATT TYPE/STOP“ das „NiMH“- bzw. „NiCd“-Programm ausgewählt und mit der Taste „START/ENTER“ bestätigt haben, können Sie mittels der Taste „INC“ bzw. „DEC“ die Entladefunktion auswählen (Abbildung zeigt NiMH-Akku): NiMH DISCHARGE 0.1A 0.1V...
  • Seite 28: C) Zyklus-Programm („Cycle")

    c) Zyklus-Programm („CYCLE“) Um Akkus zu testen oder zu „Refreshen“ (einen schwachen, alten Akku aufzufrischen bzw. leistungsfähiger zu machen), können Sie bis zu 5 Zyklen automatisch nacheinander durchführen. Sowohl die Kombination „Laden/Entladen“ („CHG>DCHG“) bzw. „Entladen/ Laden“ („DCHG>CHG“) ist möglich. • Nachdem Sie im Hauptmenü mit der Taste „BATT TYPE/STOP“ das „NiMH“- bzw. „NiCd“-Programm ausgewählt und mit der Taste „START/ENTER“...
  • Seite 29: Bleiakkus (Pb)

    13. BLEIAKKUS (PB) a) Allgemein Bleiakkus unterscheiden sich völlig von NiMH- oder NiCd-Akkus. Sie können verglichen mit ihrer hohen Kapazität nur geringe Ströme liefern, außerdem ist der Ladevorgang anders. Der Ladestrom für Bleiakkus darf nur maximal 1/10 (1/10C) der Kapazität des Akkus betragen.
  • Seite 30 • Um den Ladevorgang zu starten, halten Sie die Taste „START/ENTER“ länger gedrückt (ca. 3 Sekunden). • Falls die Einstellungen falsch sind bzw. das Ladegerät einen Fehler feststellt, so wird ein Warnsignal ausgegeben und eine entsprechende Information im Display. Mit der Taste „BATT TYPE/STOP“ beenden Sie das Warnsignal; Sie gelangen wieder ins vorherige Einstellmenü...
  • Seite 31: C) Akku Entladen („Discharge")

    c) Akku entladen („DISCHARGE“) • Nachdem Sie im Hauptmenü mit der Taste „BATT TYPE/STOP“ das „Pb“-Programm ausgewählt und mit der Taste „START/ENTER“ bestätigt haben, können Sie mittels der Taste „INC“ bzw. „DEC“ die Entladefunktion auswählen: Pb DISCHARGE 0.1A 12.0V(6P) Der Wert links in der zweiten Zeile gibt den Entladestrom an, der Wert rechts die Spannung bzw.
  • Seite 32: Akkudaten Speichern

    14. AKKUDATEN SPEICHERN Das Ladegerät hat insgesamt 10 Speicher, in dem Sie Akkudaten/Einstellungen ablegen können. • Wählen Sie im Hauptmenü mit der Taste „BATT TYPE/STOP“ die Funktion „SAVE DATA“ aus: PROGRAM SELECT SAVE DATA • Drücken Sie die Taste „START/ENTER“, es erscheint im Display z.B. folgende Anzeige, der Speicher „01“...
  • Seite 33 Beachten Sie: Wird die Taste „START/ENTER“ zu lang festgehalten, erscheint im Display „SAVE“, die Einstellungen werden gespeichert. Starten Sie dann einfach die Einstellung erneut, siehe oben. • Drücken Sie kurz die Taste „START/ENTER“, der Stromwert in der unteren Zeile blinkt. Bei NiCd- bzw.
  • Seite 34: Akkudaten Laden

    15. AKKUDATEN LADEN • Wählen Sie im Hauptmenü mit der Taste „BATT TYPE/STOP“ die Funktion „LOAD DATA“ aus: PROGRAM SELECT LOAD DATA • Drücken Sie die Taste „START/ENTER“, es erscheint im Display z.B. folgende Anzeige, der Speicher „01“ blinkt: LOAD [01] LiPo 3.7V 2000mAh...
  • Seite 35: Diverse Grundeinstellungen („User Set")

    16. DIVERSE GRUNDEINSTELLUNGEN („USER SET“) • Wählen Sie im Hauptmenü mit der Taste „BATT TYPE/STOP“ das „USER“-Menü aus. USER SET PROGRAM-> • Drücken Sie die Taste „START/ENTER“, es erscheint im Display z.B. folgende Anzeige: LiFe V.Type 3.3V Hier kann einer der drei Lithium-Akkutypen ausgewählt werden, mit dem das Ladegerät arbeiten kann („LiPo“, „LiIo“, „LiFe“).
  • Seite 36 • Mit der Taste „INC“ gelangen Sie zur nächsten Einstellung (bzw. mit der Taste „DEC“ zur vorhergehenden Einstellung oder mit der Taste „BATT TYPE/STOP“ zurück ins Hauptmenü). NiMH Sensitivity D.Peak 10mV/Cell Hier lässt sich die Empfindlichkeit bei der Delta-U-Erkennung von NiMH-Akkus einstellen (Spannungsdifferenz beim Delta-U-Ladeverfahren).
  • Seite 37 • Mit der Taste „INC“ gelangen Sie zur nächsten Einstellung (bzw. mit der Taste „DEC“ zur vorhergehenden Einstellung oder mit der Taste „BATT TYPE/STOP“ zurück ins Hauptmenü). Temp Cut-Off 80C 176F In diesem Menü kann die Temperaturüberwachung ein-/ausgeschaltet werden sowie die entsprechende Temperatur, bei der die Sicherheits-Abschaltung erfolgt.
  • Seite 38 • Mit der Taste „INC“ gelangen Sie zur nächsten Einstellung (bzw. mit der Taste „DEC“ zur vorhergehenden Einstellung oder mit der Taste „BATT TYPE/STOP“ zurück ins Hauptmenü). NiMH/NiCd/PB Trickle 50mA Für NiMH-, NiCd- oder Pb-Akkus kann hier der sog. Erhaltungs-Ladestrom eingestellt werden.
  • Seite 39 Drücken Sie kurz die Taste „START/ENTER“. Daraufhin blinkt „ON“ (bzw. „OFF“) in der unteren Displayzeile. Mit den Tasten „INC“ bzw. „DEC“ kann zwischen „ON“ (= Sicherheitstimer aktivert) und „OFF“ (Sicherheitstimer ausgeschaltet) gewählt werden. Speichern Sie die Einstellung mit der Taste „START/ENTER“. Nun beginnt die Zeit für den Sicherheitstimer (untere Zeile, rechts) zu blinken.
  • Seite 40 Mit der Option „Key Beep“ wird der Bestätigungston bei jedem Tastendruck ein- bzw. ausgeschaltet. Die Option „Buzzer“ schaltet den Signalton bei diversen Funktionen/Warnmeldungen ab. Drücken Sie kurz die Taste „START/ENTER“. Daraufhin blinkt „ON“ (bzw. „OFF“) in der oberen Displayzeile. Mit den Tasten „INC“ bzw. „DEC“ kann zwischen „ON“ (= Ein) und „OFF“ (= Aus) gewählt werden.
  • Seite 41 • Mit der Taste „INC“ gelangen Sie zur nächsten Einstellung (bzw. mit der Taste „DEC“ zur vorhergehenden Einstellung oder mit der Taste „BATT TYPE/STOP“ zurück ins Hauptmenü). Back-light 100% Hier lässt sich die Helligkeit der Hintergrundbeleuchtung für das Display verstellen. Drücken Sie kurz die Taste „START/ENTER“.
  • Seite 42: Warnmeldungen Im Display

    17. WARNMELDUNGEN IM DISPLAY REVERSE POLARITY Die Polarität der Akkuanschlüsse ist vertauscht. Die Verbindung zum Akku ist unberbrochen, CONNECTION BREAK z.B. wenn der Akku während dem Ladevorgang abgesteckt wurde. SHORT ERR Es wurde ein Kurzschluss am Ausgang des Ladegeräts festgestellt. INPUT VOL ERR Die Eingangsspannung (Betriebsspannung) für das Ladegerät ist zu gering.
  • Seite 43 Die Spannung in einer Zelle eines Lithium- BATTERY VOLTAGE Akkus (LiPo, LiIon, LiFe) ist zu hoch. Dies kann CELL HIGH VOL vorkommen, wenn ein mehrzelliger Akku vorher ohne Balancer geladen wurde. Das Balancer-Kabel wurde falsch angeschlos- BATTERY VOLTAGE sen oder passt nicht zur Anschlussbelegung des CELL CONNECT Ladegeräts.
  • Seite 44: Informationen Des Ladegeräts

    18. INFORMATIONEN DES LADEGERÄTS Während einem Lade-/Entladevorgang werden durch mehrfachen Druck auf die Taste „DEC“ diverse Informationen im Display angezeigt. End Voltage Spannung des Akkus bei Lade-/Entlade-Ende 12.6V(3S) Capacity Cut-OFF Akku-Kapazität für Sicherheitsabschaltung 5000mAh Safety Timer Zeit für Sicherheitstimer 200min Temperatur-Abschaltung ein/aus;...
  • Seite 45: Wartung Und Reinigung

    19. WARTUNG UND REINIGUNG Das Produkt ist für Sie wartungsfrei, zerlegen Sie es deshalb niemals. Lassen Sie eine Reparatur ausschließlich von einer Fachkraft bzw. Fachwerkstatt durchführen, andernfalls besteht die Gefahr der Zerstörung des Produkts, außerdem erlischt die Zulassung (CE) und die Gewährleistung/Garantie. Reinigen Sie das Produkt nur mit einem weichen, sauberen, trockenen und fusselfreien Tuch, verwenden Sie keine Reinigungsmittel, das Gehäuse und die Beschriftung kann dadurch angegriffen werden.
  • Seite 46 • Achten Sie beim Aufstellen und bei Betrieb darauf, dass die Kabel nicht geknickt oder gequetscht werden. • Decken Sie Ladegerät und Akku niemals ab. Durch einen Hitzestau wird nicht nur das Ladegerät zerstört, sondern es besteht Brand- und Explosions- gefahr! •...
  • Seite 47: Entsorgung

    21. ENTSORGUNG a) Allgemein Entsorgen Sie das unbrauchbar gewordene Produkt am Ende seiner Lebensdauer gemäß den geltenden gesetzlichen Bestimmungen. b) Batterien und Akkus Sie als Endverbraucher sind gesetzlich (Batterieverordnung) zur Rückgabe aller gebrauchten Batterien und Akkus verpflichtet; eine Entsorgung über den Hausmüll ist untersagt! Schadstoffhaltige Batterien/Akkus sind mit nebenstehendem Symbol ...
  • Seite 48: Technische Daten

    22. TECHNISCHE DATEN Betriebsspannung ......12 - 18 V/DC, stabilisiert Stromaufnahme ......Abhängig vom Ladestrom und Akku (30 A-Netzteil oder KFZ-Akku empfohlen) Ladestrom ........0,1 A - 20,0 A einstellbar (max. Ladeleistung 400 W) Entladestrom ......... 0,1 A - 5,0 A einstellbar (max.
  • Seite 49 Max. Ladestrom/max. Entladestrom bei LiPo-Akkus: Zellenzahl Spannung Ladestrom (A) Entladestrom (A) (3,7 V/Zelle) 20,0 20,0 11,1 20,0 14,8 20,0 18,5 20,0 22,2 19,0 Max. Ladestrom/max. Entladestrom bei LiIon-Akkus: Zellenzahl Spannung Ladestrom (A) Entladestrom (A) (3,6 V/Zelle) 20,0 20,0 10,8 20,0 14,4 20,0 18,0...
  • Seite 50 Max. Ladestrom/max. Entladestrom bei NiCd-/NiMH-Akkus: Zellenzahl Spannung Ladestrom (A) Entladestrom (A) (1,2 V/Zelle) 20,0 20,0 20,0 20,0 20,0 20,0 20,0 20,0 10,8 20,0 12,0 20,0 13,2 20,0 14,4 20,0 15,6 20,0 16,8 19,0 18,0 18,0 Max. Ladestrom/max. Entladestrom bei Pb-Akkus: Zellenzahl Spannung Ladestrom (A)
  • Seite 51 TABLE OF CONTENTS  Page Introduction ......................... 53 Intended Use ....................... 54 Scope of Delivery ......................55 Explanation of Symbols ....................55 Safety Information ....................... 56 Notes on Rechargeable Batteries ................58 a) General Information ..................... 58 b) Additional Information about Lithium Batteries ..........60 Usable Battery Types ....................
  • Seite 52 Page 13. Lead Batteries (Pb) ...................... 78 a) General Information ....................78 b) Charging Batteries („CHARGE“) ................78 c) Discharging Batteries („DISCHARGE“) ............... 80 14. Saving Battery Data ..................... 81 15. Loading Battery Data ....................83 16. Various Basic Settings („USER SET“) ................ 84 17.
  • Seite 53: Introduction

    Whether you are an ambitious hobby electronics technician or a professional user - a product of the Voltcraft® brand family will provide you with the best solution for even the most sophisticated of tasks. Special features: We offer the sophisticated technology and reliable quality of our Voltcraft®...
  • Seite 54: Intended Use

    2. INTENDED USE The charger is used to charge NiCd + NiMH type batteries (1 - 15 cells), LiPo/LiIon/LiFe batteries (1 - 6 cells) and lead acid batteries (1 - 10 cells, 2 V - 20 V). The charging current can be set between 0.1 A and 20 A depending on the connected batteries and their cell number/capacity (see tables in chapter 22).
  • Seite 55: Scope Of Delivery

    3. SCOPE OF DELIVERY • Battery charger • Connecting cable set • XH balancer adapter • Operating instructions 4. EXPLANATION OF SYMBOLS An exclamation mark in a triangle indicates important notes in these operating instructions that must be strictly observed. The „arrow“...
  • Seite 56 • The unauthorized conversion and/or modification of the product is prohibited for safety and approval reasons (CE). • The charger must only be connected to a stabilised direct current voltage between 12 - 18 V/DC. • The product is intended for dry indoor use only. It must not become damp or wet.
  • Seite 57 Never block the fans integrated in the charger! Also observe that the fans do not suck in small objects; keep the area around the fan intake area free. • Never operate the device immediately after it was taken from a cold room to a warm room.
  • Seite 58: Battery Notes

    6. BATTERY NOTES Despite the fact that batteries have become a normal part of today’s life, there are still numerous dangers and problems involved. In particular, with LiPo/LiIon/LiFe rechargeable batteries with their high energy content (in comparison with conventional NiCd or NiMH rechargeable batteries), various regulations must be observed in order to avoid the danger of explosion and fire.
  • Seite 59 • Always observe correct polarity (plus/+ and minus/-) when connecting the rechargeable battery to your model or charger. Connecting the battery incorrectly will not only damage the model but also the rechargeable battery. There is a risk of fire and explosion! This charger has a mechanism that protects against connecting the poles incorrectly.
  • Seite 60: B) Additional Information About Lithium Batteries

    b) Additional Information on Lithium Batteries Modern batteries with lithium technology do not only have a clearly higher capacity than NiMH or NiCd rechargeable battery packs but they also have a considerably lower weight. This makes this type of battery very interesting for application in model construction; so- called LiPo batteries (lithium-polymer) are often used here.
  • Seite 61 • When charging a lithium battery with more than one cell, always use a so- called „balancer“ (one is already integrated into the supplied charger). • Charge LiPo batteries with a max. charging current of 1C (if not indicated otherwise by the battery manufacturer!). This means that the charging current may not exceed the capacity value imprinted on the battery (e.g.
  • Seite 62: Usable Battery Types

    7. USABLE BATTERY TYPES LiPo Nominal voltage: 3.7 V/cell Max. charge voltage: 4.2 V/cell Max. charge current for quick-charging: 1C (or less) Discharge current cut-off at: 3.0 V/cell (or more) LiIon Nominal voltage: 3.6 V/cell Max. charge voltage: 4.1 V/cell Max.
  • Seite 63 NiMH Nominal voltage: 1.2 V/cell Max. charge voltage: 1.5 V/cell Max. charge current for quick-charging: 1C (or lower); with specially designed batteries up to 2C Discharge current cut-off at: 1.0 V/cell (or more) Pb (lead batteries) Nominal voltage: 2.0 V/cell Max.
  • Seite 64: Control Elements

    8. CONTROL ELEMENTS 1 Fan 2 Connection cable for power supply of the charger 3 Lighted LC display 4 „BATT TYPE/STOP“ button for menu selection and stopping the charging process 5 „DEC“ and „INC“ (or „STATUS“) buttons for entering values and displaying the values of the individual cells when in balance charge mode 6 „START/ENTER“...
  • Seite 65: Commissioning

    9. COMMISSIONING The charger must be operated with a stabilised direct voltage (12 - 18 V/DC). Never use the charger with another voltage as this will destroy the charger and invalidate the warranty/guarantee! Depending on the battery connected, a charging current of up to 20 A is possible.
  • Seite 66 • When connecting a battery to the charger, always connect the charging cable to the charger first, then the battery to the charger/charging cable. When disconnecting, proceed in reverse order (first disconnect the rechargeable battery from the charging cable, then the charging cable from the charger).
  • Seite 67: Menu Structure

    10. MENU STRUCTURE...
  • Seite 68: Lithium Batteries (Lipo, Liion, Life)

    11. LITHIUM BATTERIES (LIPO, LIION, LIFE) a) General Information This charge program is only suited for batteries with Lithium technology, „LiPo“, „LiIon“ and „LiFe“. The respective battery type, which you want to connect to the charger, must be set prior to starting a charge/discharge procedure (in the „User“...
  • Seite 69: B) Charging Batteries Without Balancer Connection („Charge")

    Afterwards, you can select the different functions with the buttons „INC“ and „DEC“. • „CHARGE“: Charge lithium battery without balancer connection • „BALANCE“: Charge lithium battery with balancer connection • „FAST CHG“: Fast battery charging • „STORAGE“: Charging/discharging batteries at a set voltage value •...
  • Seite 70 You can stop the warning signal by pressing the „BATT TYPE/STOP“ button. You then return to the previous configuration menu. Otherwise, the following display may appear (alternatingly): R: 3SER S: 3SER R: 3SER S: 3SER CONFIRM(ENTER) CANCEL(STOP) The „R“ value: indicates the number of cells the charger recognised. The „S“...
  • Seite 71: C) Charging Batteries With Balancer Connection („Balance")

    c) Charging Batteries with Balancer Connection („BALANCE“) In contrast to the simple charging program „CHARGE“, here the voltage of each individual cell is monitored and the charging current is adjusted correspondingly. Besides the two normal battery connections, the balancer connector for the battery must also be connected to the charger, see chapter 11.
  • Seite 72: D) Fast Charge („Fast Chg")

    d) Fast Charge („FAST CHG“) When charging a Lithium battery, the charging current becomes increasingly lower the fuller the battery due to the applied charge procedure for lithium batteries. This will, of course, also extend the charging time. A special charging procedure achieves a higher charging current in fast charging. However, this reduces the capacity, because the charge process is terminated earlier due to the safety cut-off in the charger.
  • Seite 73: F) Discharging Batteries („Discharge")

    f) Discharging Batteries („DISCHARGE“) Normally, it is not necessary to discharge lithium batteries (contrary to NiCd batteries). The battery can be charged immediately, independent of its current status. If you still want to discharge such a battery, you can set the discharge current between 0.1 A and 5 A.
  • Seite 74: Nimh And Nicd Batteries

    12. NIMH AND NICD BATTERIES a) Charging Batteries („CHARGE“) The charging current to be set depends on the battery capacity and is usually 1C. However, you should observe the battery manufacturer’s instructions. The value „1C“ means that the charging current is equivalent to the battery’s capacity. A charge current of 3 A therefore is required for a 3000 mAh-NiMH battery.
  • Seite 75 If the current value flashes, you can switch between manual („Man“) and automatic („Aut“) mode by simultaneously pressing the buttons „INC“ and „DEC“. In manual mode („Man“), the batteries are charged with the current you have set. In automatic mode („Aut“), the charger calculates the charging current automatically; all you do is set the top limit for the charging current.
  • Seite 76: B) Discharging Batteries („Discharge")

    b) Discharging Batteries („DISCHARGE“) • After you have selected the „NiMH“ or „NiCd“ program in the main menu with the button „BATT TYPE/STOP“ and confirmed this with the button „START/ENTER“, you can select the discharge function using the button „INC“ or „DEC“ (illustration shows NiMH battery): NiMH DISCHARGE 0.1A 0.1V...
  • Seite 77: C) Cycle Programme („Cycle")

    c) Cycle Program („CYCLE“) To test or refresh batteries (improving performance of a weak, old battery), you can perform up to 5 cycles in sequence. The two possible combinations are „Charge/Dis- charge“ („CHG>DCHG“) and „Discharge/Charge“ („DCHG>CHG“). • After you have selected the „NiMH“ or „NiCd“ program in the main menu with the button „BATT TYPE/STOP“...
  • Seite 78: Lead Batteries (Pb)

    13. LEAD BATTERIES (PB) a) General Information Lead acid batteries are completely different to NiMH or NiCd batteries. Despite their high capacity they can only provide low currents. The charging process is also different. The charging current for lead batteries must not exceed 1/10 (1/10C) of the battery capacity.
  • Seite 79 • To begin the charging process, keep the „START/ENTER“ button pressed for longer (approx. 3 seconds). • If the settings are wrong, or if the charger detects a problem, an audio signal is emitted and the appropriate information is shown on the display. You can stop the warning signal by pressing the „BATT TYPE/STOP“...
  • Seite 80: C) Discharging Batteries („Discharge")

    c) Discharging Batteries („DISCHARGE“) • After you have selected the „Pb“ program in the main menu with the button „BATT TYPE/ STOP“ and confirmed this with the button „START/ENTER“, you can select the discharge function using the button „INC“ or „DEC“: Pb DISCHARGE 0.1A 12.0V(6P)
  • Seite 81: Saving Battery Data

    14. SAVING BATTERY DATA The charger has altogether 10 memories in which you can save battery data/settings. • In the main menu, select the function „SAVE DATA“ with the button „BATT TYPE/STOP“: PROGRAM SELECT SAVE DATA • Press the „START/ENTER“ button, the display shows the following, for example, and memory „01“...
  • Seite 82 Observe: If you keep the „START/ENTER“ button pressed too long, the display shows „SAVE“ and the settings are saved. In this case, just restart setting. • Briefly push the „START/ENTER“ button, the current value in the bottom line starts to flash.
  • Seite 83: Loading Battery Data

    15. LOADING BATTERY DATA • In the main menu, select the function „LOAD DATA“ with the button „BATT TYPE/STOP“: PROGRAM SELECT LOAD DATA • Press the „START/ENTER“ button, the display shows the following, for example, and memory „01“ flashes: LOAD [01] LiPo 3.7V 2000mAh...
  • Seite 84: Various Basic Settings („User Set")

    16. VARIOUS BASIC SETTINGS („USER SET“) • In the main menu, select the „USER“ menu with the „BATT TYPE/STOP“ button. USER SET PROGRAM-> • Press the button „START/ENTER“; the display shows the following, for example: LiFe V.Type 3.3V Here you can select one of the three lithium battery types the charger is able to work with („LiPo“, „LiIon“, „LiFe“).
  • Seite 85 • With the „INC“ button, you access the next setting (or with the button „DEC“ the previous setting or return to the main menu with the button „BATT TYPE/STOP“.) NiMH Sensitivity D.Peak 10mV/Cell Here you can set the sensitivity of the delta-U detection of NiMH battery (voltage difference in the delta-U charge procedure).
  • Seite 86 • With the „INC“ button, you access the next setting (or with the button „DEC“ the previous setting or return to the main menu with the button „BATT TYPE/STOP“). Temp Cut-Off 80C 176F In this menu, you can activate/deactivate the temperature monitoring function as well as set the corresponding temperature at which the safety cut-off kicks in.
  • Seite 87 • With the „INC“ button, you access the next setting (or with the button „DEC“ the previous setting or return to the main menu with the button „BATT TYPE/STOP“). NiMH/NiCd/PB Trickle 50mA For NiMH, NiCd or Pb batteries, you can set the so-called trickle charge here. Briefly push the „START/ENTER“...
  • Seite 88 Briefly push the „START/ENTER“ button. „ON“ (or „OFF“) then starts to flash in the bottom display line. With the buttons „INC“ or „DEC“, you can select between „ON“ (= safety timer activated) and „OFF“ (safety timer deactivated). Save the setting by pressing the „START/ENTER“ button. Now the time for the safety timer starts to flash (bottom line on the right).
  • Seite 89 With the option „Key Beep“, you activate/deactivate the confirmation beep for each push of a button. The option „Buzzer“ switches the signal of functions/warning messages on or off. Briefly push the „START/ENTER“ button. „ON“ (or „OFF“) starts to flash in the top display line.
  • Seite 90 • With the „INC“ button, you access the next setting (or with the button „DEC“ the previous setting or return to the main menu with the button „BATT TYPE/STOP“). Back-light 100% Adjust the backlighting brightness here. Briefly push the „START/ENTER“ button. The brightness value then begins to flash. With the buttons „INC“...
  • Seite 91: Warning Messages On The Display

    17. WARNING MESSAGES ON THE DISPLAY REVERSE POLARITY The polarity of the battery connections has been switched. The connection to the battery has been CONNECTION BREAK disrupted, e.g. if the battery was disconnected during the charging process. SHORT ERR A short circuit has been identified on the charger output.
  • Seite 92 The voltage in one of the cells of a lithium BATTERY VOLTAGE battery (LiPo, LiIon, LiFe) is too high. This can CELL HIGH VOL occur if a multi-cell battery was previously charged without a balancer. The balancer cable was connected incorrectly or BATTERY VOLTAGE does not match the pin assignment of the...
  • Seite 93: Informations From The Charger

    18. INFORMATIONS FROM THE CHARGER Various information is indicated on the display during a charge/discharge process by repeatedly pressing the button „DEC“. End Voltage Voltage of the battery at the end of charging/ discharging 12.6V(3S) Capacity Cut-OFF Battery capacity for safety cut-off 5000mAh Safety Timer Time for safety timer...
  • Seite 94: Maintenance And Cleaning

    19. MAINTENANCE AND CLEANING The product does not require any maintenance. You should never take it apart. The product should only be repaired by a specialist or specialist workshop or it may be damaged. Furthermore, the CE approval and the guarantee/warranty will expire. Clean the product only with a soft, clean, dry and fuzz-free cloth.
  • Seite 95 • The feet of the device and the temperature of the casing may produce pressure marks and discolouration on sensitive surfaces. The same applies to the battery. As already described in the safety information, a suitable non-flammable and heatproof base should be used for the charger and the battery to be charged.
  • Seite 96: Disposal

    21. DISPOSAL a) General Information Dispose of the product according to the applicable statutory provisions at the end of its service life once it has become useless. b) Batteries and Rechargeable Batteries You as the end user are required by law (Battery Ordinance) to return all used batteries/ rechargeable batteries.
  • Seite 97: Technical Data

    22. TECHNICAL DATA Operating voltage ......12 - 18 V/DC, stabilised Power input ........Depending on charging current and battery (30 A mains adapter or car battery recommended) Charge Current ......0.1 A - 20.0 A adjustable (max. charging output 400 W) Discharge Current ......
  • Seite 98 Max. charging current /max. discharging current for LiPo batteries: Number of Voltage Charge Current Discharge Current Cells (3.7 V/cell) 20,0 20,0 11,1 20,0 14,8 20,0 18,5 20,0 22,2 19,0 Max. charging current /max. discharging current for LiIon batteries: Number of Voltage Charge Current Discharge Current...
  • Seite 99 Max. charging current/max. discharging current for NiCd/NiMH batteries: Number of Voltage Charge Current Discharge Current Cells (1.2 V/cell) 20,0 20,0 20,0 20,0 20,0 20,0 20,0 20,0 10,8 20,0 12,0 20,0 13,2 20,0 14,4 20,0 15,6 20,0 16,8 19,0 18,0 18,0 Max.
  • Seite 100 TABLE DES MATIÈRES  Page Introduction ........................ 102 Utilisation conforme ....................103 Étendue de la livraison ....................104 Explication des symboles ..................104 Consignes de sécurité ....................105 Remarques spécifiques aux batteries ..............107 a) Généralités ......................107 b) Informations supplémentaires à propos des batteries au lithium ..... 109 Types de batteries compatibles .................
  • Seite 101 Page 13. Batteries au plomb (Pb) ..................... 127 a) Généralités ......................127 b) Recharge d’une batterie (« CHARGE ») ............127 c) Décharge d’une batterie (« DISCHARGE ») ............. 129 14. Sauvegarde des spécifications de la batterie ............130 15. Chargement des spécifications de la batterie ............132 16.
  • Seite 102: Introduction

    1. INTRODUCTION Chère cliente, cher client, Vous avez pris une très bonne décision en achetant un produit Voltcraft® et nous vous en remercions. Voltcraft® – Dans le domaine de la technique de mesure, de charge, ainsi que de technique de réseau, ce nom est synonyme de produits de qualité supérieure qui se distinguent par une compétence technique, une extraordinaire performance et une...
  • Seite 103: Utilisation Conforme

    2. UTILISATION CONFORME Le chargeur multifonctions a été conçu pour la recharge des batteries du type NiCd + NiMH (1 à 15 cellules), LiPo / LiIon / LiFe (1 à 6 cellules) ainsi que des batteries au plomb (1 à 10 cellules, 2 V - 20 V). Indépendamment des batteries raccordées et de leur nombre respectif de cellules ou de leur capacité...
  • Seite 104: Étendue De La Livraison

    3. ÉTENDUE DE LA LIVRAISON • Chargeur • Jeu de câbles de raccordement • Adaptateur Balancer XH • Mode d’emploi 4. EXPLICATION DES SYMBOLES Le symbole avec le point d’exclamation placé dans un triangle signale les informations importantes du présent mode d’emploi qui doivent impérativement être respectées.
  • Seite 105 • Pour des raisons de sécurité et d’homologation (CE), il est interdit de transformer et / ou de modifier soi-même le produit. • Le chargeur doit exclusivement être exploité avec une tension continue stabilisée comprise entre 12 et 18 V/CC. •...
  • Seite 106 • Veillez à une aération suffisante pendant le fonctionnement, ne recouvrez jamais le chargeur ni la batterie tant qu’ils sont raccordés. Observez une distance suffisante (min. 20 cm) entre le chargeur et les autres objets. Ne bloquez jamais les ventilateurs intégrés au chargeur ! Veillez également à...
  • Seite 107: Remarques Spécifiques Aux Batteries

    6. REMARQUES SPÉCIFIQUES AUX BATTERIES Bien que la manipulation des batteries fasse désormais partie de notre quotidien, celles-ci représentent toutefois de nombreux dangers et problèmes. En particulier en ce qui concerne les batteries LiPo / LiIon / LiFe, avec leur haut contenu énergétique (en comparaison à...
  • Seite 108 • Lors du raccordement de la batterie à votre modèle réduit ou à votre chargeur, respectez la polarité (ne pas inverser plus / + et moins / -). L’inversion de la polarité risque non seulement d’endommager votre modèle réduit, mais aussi la batterie. Il y a danger d’incendie et d’explosion ! Le chargeur livré...
  • Seite 109: B) Informations Supplémentaires À Propos Des Batteries Au Lithium

    b) Informations supplémentaires à propos des batteries au lithium Les batteries modernes dotées de la technologie Lithium ne montrent pas seulement une capacité significativement plus élevée que les batteries NiMH ou NiCd, mais présentent aussi un poids bien inférieur. Ces caractéristiques rendent ce type de batteries très intéressant, par ex.
  • Seite 110 Manipulez la batterie avec prudence en utilisant des gants de protection appropriés. Éliminez la batterie en respectant les impératifs écologiques. • Pour recharger une batterie au lithium, veuillez uniquement utiliser un chargeur conçu à cet effet ou employez la méthode de charge appropriée. Ne jamais utiliser de chargeurs traditionnels destinés aux batteries NiCd, NiMH ou au plomb ! Il y a risque d’incendie et d’explosion ! •...
  • Seite 111: Types De Batteries Compatibles

    7. TYPES DE BATTERIES COMPATIBLES LiPo Tension nominale : 3,7 V/cellule Tension de charge max. : 4,2 V/cellule Courant de charge max. pour la recharge rapide : 1C (ou inférieur) Arrêt du courant de décharge pour : 3,0 V/cellule (ou supérieur) LiIon Tension nominale : 3,6 V/cellule...
  • Seite 112 NiMH Tension nominale : 1,2 V/cellule Tension de charge max. : 1,5 V/cellule Courant de charge max. pour la recharge rapide : 1C (ou inférieur) ; jusqu’à 2C dans le cas de batteries spécialement conçues à cet effet Déconnexion du courant de décharge avec : 1,0 V/cellule (ou supérieur) Batteries au plomb (Pb) Tension nominale :...
  • Seite 113: Éléments De Commande

    8. ÉLÉMENTS DE COMMANDE Ventilateur Câble de raccordement pour l’alimentation électrique du chargeur Écran à cristaux liquides éclairé Touche « BATT TYPE/STOP » pour la sélection du menu et l’arrêt du cycle de charge Touches « DEC » et « INC » (ou « STATUS ») pour la saisie et l’affichage des valeurs des différentes cellules en mode de charge Balance Touche «...
  • Seite 114: Mise En Service

    9. MISE EN SERVICE Le chargeur fonctionne sur tension continue stabilisée (12 à 18 V/CC). Ne faites jamais fonctionner le chargeur avec une autre tension, ceci entraînerait la destruction du chargeur ainsi que l’annulation de la garantie ! Selon la batterie raccordée, il est possible d’avoir un courant de charge jusqu’à 20 A par canal.
  • Seite 115 • Tous les câbles de raccordement et raccords sont-ils dans un parfait état, les fiches sont-elles correctement insérées dans les prises femelles de raccordement ? Les fiches usées et les câbles endommagés doivent être remplacés. • Lors du raccordement d’une batterie au chargeur, branchez toujours d’abord le câble de charge sur le chargeur avant de raccorder la batterie au chargeur ou câble de charge.
  • Seite 116: Structure Du Menu

    10. STRUCTURE DU MENU...
  • Seite 117: Batteries Au Lithium (Lipo, Lilon, Life)

    11. BATTERIES AU LITHIUM (LIPO, LILON, LIFE) a) Généralités Ce programme de charge convient uniquement aux batteries au lithium « LiPo », « LiIon » et « LiFe ». Avant de démarrer le cycle de charge ou de décharge, il est impératif de sélectionner le modèle de batterie que vous souhaitez raccorder au chargeur (pour ce faire, aller dans les paramètres «...
  • Seite 118: B) Recharge D'une Batterie Sans Raccordement Balancer («Charge»)

    Les touches « INC » et « DEC » permettent ensuite de sélectionner les différentes fonctions : • « CHARGE » : recharge d’une batterie au lithium sans raccordement Balancer • « BALANCE » : recharge d’une batterie au lithium avec raccordement Balancer •...
  • Seite 119 Pour arrêter le signal d’avertissement, appuyez sur la touche « BATT TYPE/STOP ». Vous êtes redirigé vers le menu de réglage précédent. Dans le cas contraire, l’écran suivant s’affiche (alternativement) : R: 3SER S: 3SER R: 3SER S: 3SER CONFIRM(ENTER) CANCEL(STOP) La valeur «...
  • Seite 120: C) Recharge D'une Batterie Avec Raccordement Balancer (« Balance »)

    c) Recharge d’une batterie avec raccordement Balancer (« BALANCE ») Contrairement au simple programme de charge « CHARGE », la tension de chaque cellule est ici surveillée et le courant de charge est régulé en conséquence. Outre les deux raccordements normaux de la batterie, le raccordement Balancer de la batterie doit aussi être branché...
  • Seite 121: D) Recharge Rapide (« Fast Chg »)

    d) Recharge rapide (« FAST CHG ») Lors de la recharge d’une batterie au lithium, le courant de charge diminue de plus en plus au fur et à mesure que la batterie se remplit. Ce faisant, la durée de charge s’en trouve naturellement prolongée.
  • Seite 122: F) Décharge D'une Batterie (« Discharge »)

    f) Décharge de la batterie (« DISCHARGE ») Normalement, il n’est pas nécessaire de décharger les batteries au lithium (contrairement aux batteries NiCd). La batterie peut être immédiatement chargée, indépendamment de son état actuel. Si vous souhaitez malgré tout décharger ce genre de batterie, il faut alors régler le courant de décharge entre 0,1 et 5 A.
  • Seite 123: Batteries Nimh Et Nicd

    12. BATTERIES NIMH ET NICD a) Recharge de la batterie (« CHARGE ») Le courant de charge à paramétrer varie en fonction de la capacité de la batterie, et est généralement de 1C. Respectez à cet effet les indications du fabricant de la batterie. L’indication «...
  • Seite 124 • Appuyez brièvement sur la touche « START/ENTER » pour ouvrir le mode de configuration. À présent, la valeur du courant clignote, en bas à droite de l’écran. Lorsque la valeur du courant clignote, il est possible de commuter entre le mode manuel («...
  • Seite 125: B) Décharge D'une Batterie (« Discharge »)

    b) Décharge de la batterie (« DISCHARGE ») • Après avoir sélectionné le programme « NiMH » ou « NiCd » à l’aide de la touche « BATT TYPE/STOP » dans le menu principal et validé la sélection en appuyant sur la touche «...
  • Seite 126: C) Programme Du Cycle (« Cycle »)

    c) Programme du cycle (« CYCLE ») Pour tester des batteries ou les « rafraîchir » (c.-à-d. améliorer les performances d’une vieille batterie), vous pouvez automatiquement effectuer jusqu’à 5 cycles de suite. De même, les combinaisons « Charge / décharge » (« CHG>DCHG »), et « Décharge / charge »...
  • Seite 127: Batteries Au Plomb (Pb)

    13. BATTERIES AU PLOMB (PB) a) Généralités Les batteries au plomb sont complètement différentes des batteries NiMh ou NiCd. Par rapport à leur capacité élevée, elles ne peuvent délivrer que de faibles courants. De plus, le cycle de charge diffère. Le courant de charge des batteries au plomb ne doit pas dépasser 1/10 (1/10C) de la capacité...
  • Seite 128 • La tension ou le nombre de cellules se mettent alors à clignoter. Modifiez la tension à l’aide des touches « INC » et « DEC ». Ce faisant, il faut noter que la tension peut uniquement être modifiée par le biais du nombre de cellules (par ex. une cellule = 2,0 V, deux cellules = 4,0 V, etc.).
  • Seite 129: C) Décharge D'une Batterie (« Discharge »)

    c) Décharge de la batterie (« DISCHARGE ») • Après avoir sélectionné le programme « Pb » à l’aide de la touche « BATT TYPE/ STOP » dans le menu principal et confirmé la sélection en appuyant sur la touche «...
  • Seite 130: Sauvegarde Des Spécifications De La Batterie

    14. SAUVEGARDE DES SPÉCIFICATIONS DE LA BATTERIE Le chargeur présente un total de 10 plages de mémoire permettant l’enregistrement des données de la batterie ou des réglages. • Dans le menu principal, sélectionnez la fonction « SAVE DATA » à l’aide de la touche «...
  • Seite 131 • Maintenez la touche « START/ENTER » enfoncée (pendant 3 secondes env.). Pour afficher le menu suivant, relâchez immédiatement la touche. On obtient par ex. l’affichage suivant (selon le type de batterie précédemment sélectionné) : NiMH CHARGE LiPo CHARGE CUR LIMIT 4.0A 1.0A 7.4V(2S)
  • Seite 132: Chargement Des Spécifications De La Batterie

    15. CHARGEMENT DES SPÉCIFICATIONS DE LA BATTERIE • Dans le menu principal, sélectionnez la fonction « LOAD DATA » à l’aide de la touche « BATT TYPE/STOP » : PROGRAM SELECT LOAD DATA • Appuyez sur la touche « START/ENTER ». L’écran affiche par ex. l’affichage suivant, la plage de mémoire «...
  • Seite 133: Différents Réglages De Base (« User Set »)

    16. DIFFÉRENTS RÉGLAGES DE BASE (« USER SET ») • Dans le menu principal, sélectionnez le menu « USER » à l’aide de la touche « BATT TYPE/STOP ». USER SET PROGRAM-> • Appuyez sur la touche « START/ENTER », l’écran suivant est alors par ex. affiché : LiFe V.Type 3.3V...
  • Seite 134 Appuyez brièvement sur la touche « START/ENTER ». À présent, l’affichage de la durée clignote. Les touches « INC » et « DEC » permettent de paramétrer la durée (5 à 250 minutes). Enregistrez le réglage à l’aide de la touche « START/ENTER », la durée arrête de clignoter.
  • Seite 135 • La touche « INC » vous permet d’accéder au réglage suivant (tandis que la touche « DEC » permet de revenir au réglage précédent et la touche « BATT TYPE/STOP » au menu principal). Temp Cut-Off 80C 176F Ce menu permet d’activer et de désactiver la surveillance de la température et de définir la température à...
  • Seite 136 • La touche « INC » vous permet d’accéder au réglage suivant (tandis que la touche « DEC » permet de revenir au réglage précédent et la touche « BATT TYPE/STOP » au menu principal). NiMH/NiCd/PB Trickle 50mA Vous pouvez ici régler le courant de charge de compensation pour les batteries NiMH, NiCd ou Pb.
  • Seite 137 Appuyez brièvement sur la touche « START/ENTER ». La mention « ON » (ou « OFF ») clignote dans la ligne inférieure de l’écran. Les touches « INC » et « DEC » permettent de sélectionner « ON » (minuterie de sécurité...
  • Seite 138 L’option « Key Beep » permet d’allumer ou d’éteindre le signal sonore de confirmation à chaque pression de touche. L’option « Buzzer » éteint le signal sonore pour diverses fonctions et avertissements. Appuyez brièvement sur la touche « START/ENTER ». « ON » (ou « OFF ») clignote alors dans la ligne supérieure de l’écran.
  • Seite 139 • La touche « INC » vous permet d’accéder au réglage suivant (tandis que la touche « DEC » permet de revenir au réglage précédent et la touche « BATT TYPE/STOP » au menu principal). Back-light 100% La luminosité du rétroéclairage de l’écran se règle ici. Appuyez brièvement sur la touche «...
  • Seite 140: Messages D'avertissement Sur L'écran

    17. MESSAGES D’AVERTISSEMENT À L’ÉCRAN REVERSE POLARITY La polarité des raccordements de la batterie est inversée. Le raccordement à la batterie est coupé, par ex. CONNECTION BREAK si la batterie a été débranchée pendant le cycle de charge. SHORT ERR Un court-circuit a été...
  • Seite 141 La tension d’une cellule d’une batterie au lithium BATTERY VOLTAGE (LiPo, LiIon, LiFe) est trop élevée. Cela peut CELL HIGH VOL survenir si une batterie à plusieurs cellules a auparavant été chargée sans Balancer. Le câble du Balancer a mal été branché ou ne BATTERY VOLTAGE correspond pas à...
  • Seite 142: Informations À Propos Du Chargeur

    18. INFORMATIONS À PROPOS DU CHARGEUR Pendant un cycle de charge ou de décharge, vous pouvez faire afficher différentes informations sur l’écran en appuyant plusieurs fois sur la touche « DEC ». End Voltage Tension de la batterie à la fin de la charge ou de la décharge 12.6V(3S) Capacity Cut-OFF...
  • Seite 143: Entretien Et Nettoyage

    19. ENTRETIEN ET NETTOYAGE Le produit ne nécessite aucun entretien de votre part, ne le démontez donc jamais. Ne confiez d’éventuelles réparations qu’à un atelier spécialisé ou à un spécialiste. Il y a sinon risque de destruction du produit ; l’homologation (CE) et la garantie seraient alors également annulées.
  • Seite 144 • Durant l’installation et le fonctionnement, veillez à ce que le câble ne soit ni coudé ni écrasé. • Ne couvrez jamais le chargeur ou la batterie. Une accumulation de chaleur peut non seulement détruire le chargeur, mais il y a également danger d’explosion ! •...
  • Seite 145: Élimination

    21. ÉLIMINATION a) Généralités Jetez l’appareil à la fin de sa durée de vie conformément aux dispositions en vigueur. b) Piles et batteries Le consommateur final est légalement tenu (ordonnance relative à l’élimination des piles usagées) de rapporter toutes les piles et batteries usagées, il est interdit de les jeter dans les ordures ménagères ! Les piles et batteries qui contiennent des substances toxiques sont identifiées ...
  • Seite 146: Caractéristiques Techniques

    22. CARACTÉRISTIQUES TECHNIQUES Tension de service ....... 12 à 18 V/CC, stabilisée Consommation de courant ....En fonction du courant de charge et de la batterie (bloc d’alimentation 30 A ou batterie automobile recommandés) Courant de charge ........ Réglable de 0,1 à 20,0 A (puissance de charge max.
  • Seite 147 Courant de charge max. / courant de décharge max. pour batteries LiPo : Nombre Tension Courant Courant d’éléments 3,7 V/élément de charge (A) de décharge (A) 20,0 20,0 11,1 20,0 14,8 20,0 18,5 20,0 22,2 19,0 Courant de charge max. / courant de décharge max. pour batteries Lilon : Nombre Tension Courant...
  • Seite 148 Courant de charge max. / courant de décharge max. pour batteries NiCd / NiMH : Nombre Tension Courant Courant d’éléments 1,2 V/élément de charge (A) de décharge (A) 20,0 20,0 20,0 20,0 20,0 20,0 20,0 20,0 10,8 20,0 12,0 20,0 13,2 20,0 14,4...
  • Seite 149 INHOUDSOPGAVE  Pagina Inleiding ........................151 Voorgeschreven gebruik ................... 152 Leveringsomvang ..................... 153 Verklaring van symbolen ..................153 Veiligheidsvoorschriften ................... 154 Accuvoorschriften ..................... 156 a) Algemeen ......................156 b) Extra informatie over lithium-accu’s ..............158 Geschikte accutypen ....................160 Bedieningselementen ....................162 Ingebruikname ......................
  • Seite 150 Pagina 13. Loodaccu’s (Pb) ......................176 a) Algemeen ......................176 b) Accu laden („CHARGE“) ..................176 c) Accu ontladen („DISCHARGE“) ................. 178 14. Accugegevens opslaan ..................... 179 15. Accugegevens laden ....................181 16. Diverse basisinstellingen („USER SET“) ..............182 17. Waarschuwingen op het display ................189 18.
  • Seite 151: Inleiding

    1. INLEIDING Geachte klant, Wij danken u hartelijk voor het aanschaffen van een Voltcraft®-product. Hiermee heeft u een uitstekend apparaat in huis gehaald. Voltcraft® - deze naam staat op het gebied van meettechniek, laadtechniek en voedingsspanning voor onovertroffen kwaliteitsproducten die worden gekenmerkt door gespecialiseerde vakkundigheid, buitengewone prestaties en permanente innovaties.
  • Seite 152: Voorgeschreven Gebruik

    2. VOORGESCHREVEN GEBRUIK Het laadapparaat dient voor het opladen van accu’s van het type NiCd + NiMH (1 - 15 cellen), LiPo/LiIon/LiFe (1 - 6 cellen) en voor loodaccu’s (1 - 10 cellen, 2 V - 20 V). De laadstroom kan afhankelijk van de aangesloten accu’s en hun aantal cellen/de capaciteit daarvan worden ingesteld tussen 0,1 A en 20 A (zie tabellen in hoofdstuk 22).
  • Seite 153: Leveringsomvang

    3. LEVERINGSOMVANG • Laadapparaat • Aansluitkabelset • XH-balanceradapter • Gebruiksaanwijzing 4. VERKLARING VAN SYMBOLEN Het symbool met het uitroepteken in een driehoek wijst op belangrijke aanwijzingen in deze gebruiksaanwijzing die in ieder geval moeten worden opgevolgd. Het „pijl“-symbool treft u aan, wanneer bijzondere tips en instructies voor de bediening worden gegeven.
  • Seite 154 • Om veiligheids- en keuringsredenen (CE) is het eigenhandig ombouwen en/ of wijzigen van het product niet toegestaan. • Het laadapparaat kan op een gestabiliseerde gelijkspanning van 12 - 18 V/DC worden gebruikt. • U mag het product enkel in droge en gesloten ruimten binnenshuis gebruiken.
  • Seite 155 • Zorg voor voldoende ventilatie rondom het apparaat tijdens het gebruik. Dek het laadapparaat en/of de aangesloten accu nooit af. Laat voldoende afstand (min. 20 cm) tussen het laadapparaat, accu en andere voorwerpen. Blokkeer nooit de in het laadapparaat ingebouwde ventilator! Let bovendien op dat de ventilatoren geen kleine voorwerpen opzuigt en houd de omgeving rond het aanzuigbereik van de ventilator vrij.
  • Seite 156: Accuvoorschriften

    6. AANWIJZINGEN M.B.T. DE ACCU Het gebruik van accu´s is vandaag de dag weliswaar vanzelfsprekend, maar er bestaan toch tal van gevaren en problemen. Vooral bij LiPo-/LiIon-/LiFe-accu´s met hun hoge energie-inhoud (in vergelijking met gewone NiCd of NiMH accu´s) moeten er verschillende voorschriften in acht worden genomen aangezien er anders explosie- en brandgevaar bestaat.
  • Seite 157 • Houd bij de aansluiting van de accu op uw model of laadapparaat rekening met de juiste polariteit (plus/+ en min/-). Bij een omgekeerde polariteit raakt niet alleen het laadapparaat maar ook de accu beschadigd. Er bestaat brand- en explosiegevaar! Het hier geleverde laadapparaat is voorzien van een veiligheidsschakeling tegen omgekeerde polariteit.
  • Seite 158: B) Extra Informatie Over Lithium-Accu's

    b) Extra informatie over lithium-accu’s Moderne accu’s met lithium-techniek hebben niet alleen een veel hogere capaciteit dan NiMH- of NiCd-accu´s, maar ze hebben ook een veel lager gewicht. Dit maakt dit type accu met name voor toepassingen in de modelbouw zeer interessant en meestal worden hier dus de zogenaamde LiPo-accu’s gebruikt (lithium-polymeer).
  • Seite 159 • Gebruik voor het opladen van een accu met lithiumtechniek alleen een hiervoor bestemd laadapparaat, resp. gebruik de juiste laadprocedure. Gewone laadapparaten voor NiCd-, NiMH- of loodaccu’s mogen niet worden gebruikt; er bestaat brand- en explosiegevaar! • Wanneer u een accu met lithiumtechniek met meer dan een cel oplaadt, gebruik dan altijd een zogenaamde balancer (bijv.
  • Seite 160: Geschikte Accutypen

    7. GESCHIKTE ACCUTYPEN LiPo Nominale spanning: 3,7 V/cel Max. laadspanning: 4,2 V/cel Max. laadstroom voor snelladen: 1C (of lager) Uitschakeling ontlaadstroom bij: 3,0 V/cel (of hoger) LiIon Nominale spanning: 3,6 V/cel Max. laadspanning: 4,1 V/cel Max. laadstroom voor snelladen: 1C (of lager) Uitschakeling ontlaadstroom bij: 2,5 V/cel (of hoger) LiFe...
  • Seite 161 NiMH Nominale spanning: 1,2 V/cel Max. laadspanning: 1,5 V/cel Max. laadstroom voor snelladen: 1C (of lager); bij speciaal hiervoor bestemde accu’s max. 2C Uitschakeling ontlaadstroom bij: 1,0 V/cel (of hoger) Pb (loodaccu’s) Nominale spanning: 2,0 V/cel Max. laadspanning: 2,46 V/cel Max.
  • Seite 162: Bedieningselementen

    8. BEDIENINGSELEMENTEN 1 Ventilator 2 Aansluitkabel voor stroomvoorziening van het laadapparaat 3 Verlicht LC display 4 Toets „BATT TYPE/STOP“ voor menukeuze en voor stoppen van het laadproces 5 Toetsen „DEC“ en „INC“ (resp. „STATUS“) voor waarde-invoer en weergave van de waarden van de afzonderlijke cellen in de Balance-laadmodus 6 Toets „START/ENTER“...
  • Seite 163: Ingebruikname

    9. INGEBRUIKNAME Het laadapparaat moet op een gestabiliseerde gelijkspanning (12 - 18 V/DC) worden gebruikt. Gebruik het laadapparaat nooit op een andere spanning; dit beschadigt het laadapparaat en de aanspraak op garantie gaat verloren. Naargelang de aangesloten accu is een laadstroom van tot 20 A mogelijk. Dat is de reden dat de stroomvoorziening stevig genoeg moet worden gekozen.
  • Seite 164 • Zijn alle verbindingskabels en aansluitingen in orde? Zijn de stekkers goed in de aansluitbussen gestoken? Beschadigde stekkers en kabels dienen te worden vervangen. • Bij het aansluiten van een accu op het laadapparaat dient u altijd eerst de laadkabel met het laadapparaat te verbinden en pas daarna de accu met het laadapparaat/de laadkabel.
  • Seite 165: Menustructuur

    10. MENUSTRUCTUUR...
  • Seite 166: Lithium-Accu's (Lipo, Liion, Life)

    11. LITHIUM-ACCU’S (LIPO, LIION, LIFE) a) Algemeen Dit laadprogramma is alleen geschikt voor accu’s met lithium-techniek „LiPo“, „LiIon“ en „LiFe“. Het betreffende type van de accu die u op het laadapparaat wilt aansluiten, moet voorafgaand aan de start van een laad-/ontlaadproces worden ingesteld (in de „User“-instellingen, zie hoofdstuk 16).
  • Seite 167: B) Accu Zonder Balancer-Aansluiting Opladen („Charge")

    Daarna kunnen met de toetsen „INC“ en „DEC“ de verschillende functies worden geselecteerd: • „CHARGE“: lithium-accu zonder balancer-aansluiting opladen • „BALANCE“: lithium-accu met balancer-aansluiting opladen • „FAST CHG“: snelladen van een accu • „STORAGE“: accu’s op een bepaalde spanningswaarde laden of ontladen •...
  • Seite 168 Met de toets „BATT TYPE/STOP“ beëindigt u het waarschuwingssignaal; u komt weer terug in het vorige instelmenu. Anders verschijnt bijv. de volgende weergave (afwisselend): R: 3SER S: 3SER R: 3SER S: 3SER CONFIRM(ENTER) CANCEL(STOP) De waarde bij „R:“ geeft het aantal cellen aan dat het laadapparaat heeft herkend. De waarde bij „S:“...
  • Seite 169: C) Accu Met Balancer-Aansluiting Opladen („Balance")

    c) Accu met Balancer-aansluiting opladen („BALANCE“) In tegenstelling tot het eenvoudige laadprogramma „CHARGE“ wordt hier de spanning van elke afzonderlijke cel bewaakt en wordt de laadstroom dienovereenkomstig ingesteld. Naast de normale twee accuaansluitingen moet ook de balancer-aansluiting van de accu op het laadapparaat worden aangesloten, zie hoofdstuk 11.
  • Seite 170: D) Snelladen („Fast Chg")

    d) Snelladen („FAST CHG“) Bij het laden van een lithium-accu wordt de laadstroom door het toegepaste laadproces bij lithium-accu’s steeds lager, des te voller de accu is. Daardoor neemt natuurlijk ook de oplaadtijd toe. Door een speciaal oplaadproces wordt bij de snellading een hogere laadstroom bereikt. Dit gaat echter ten koste van de capaciteit aangezien op grond van de veiligheidsschakelingen in het laadapparaat het laadproces vroeger wordt beëindigd.
  • Seite 171: F) Accu Ontladen („Discharge")

    f) Accu ontladen („DISCHARGE“) Normaliter is het bij lithium-accu’s niet nodig deze te ontladen (dit in tegenstelling tot NiCd- accu’s). De accu kan ongeacht zijn capaciteit direct worden opgeladen. Indien u een dergelijke accu toch wilt ontladen, dan kan de ontlaadstroom tussen 0,1 A en 5 A worden ingesteld.
  • Seite 172: Nimh- En Nicd-Accu's

    12. NIMH- EN NICD-ACCU’S a) Accu laden („CHARGE“) De in te stellen laadstroom is afhankelijk van de capaciteit van de accu en dient normaliter 1C te bedragen. Raadpleeg hiervoor echter de gegevens van de accufabrikant. De aanduiding „1C“ betekent dat de laadstroom overeenkomt met de waarde van de capaciteit van de accu.
  • Seite 173 Wanneer de stroomwaarde knippert, kan door gelijktijdig op de toetsen „INC“ en „DEC“ te drukken, worden gewisseld tussen de handmatige modus („Man“) en de automatische modus („Aut“). Bij de handmatige modus („Man“) wordt de accu geladen met de stroomwaarde die u instelt.
  • Seite 174: B) Accu Ontladen („Discharge")

    b) Accu ontladen („DISCHARGE“) • Nadat u in het hoofdmenu met de toets „BATT TYPE/STOP“ het „NiMH“- resp. „NiCd“- programma hebt geselecteerd en met de toets „START/ENTER“ hebt bevestigd, kunt u met de toets „INC“ resp. „DEC“ de ontlaadfunctie selecteren (afbeelding toont NiMH- accu): NiMH DISCHARGE 0.1A...
  • Seite 175: C) Cyclusprogramma („Cycle")

    c) Cyclusprogramma („CYCLE“) Om accu’s te testen of te „Refreshen“ (een zwakke, oude accu op te frissen of krachtiger met meer capaciteit te maken), kunt u maximaal 5 cycli automatisch achter elkaar uitvoeren. Zowel de combinatie „laden/ontladen“ („CHG>DCHG“) als „ontladen/laden“ („DCHG>CHG“) is mogelijk.
  • Seite 176: Loodaccu's (Pb)

    13. LOODACCU’S (PB) a) Algemeen Loodaccu’s zijn een heel ander soort accu’s dan NiMH- of NiCd-accu’s. Deze kunnen vergeleken met hun hoge capaciteit slechts een geringe stroom leveren en bovendien is het laadproces heel anders. De laadstroom voor loodaccu’s mag maximaal maar 1/10 (1/10C) van de capaciteit van de accu bedragen.
  • Seite 177 • Om het laadproces te starten, houdt u de toets „START/ENTER“ langer ingedrukt (ca. 3 seconden). • Indien de instellingen verkeerd zijn resp. het laadapparaat een fout vaststelt, dan klinkt een waarschuwingssignaal en wordt de betreffende informatie op het display weergegeven.
  • Seite 178: C) Accu Ontladen („Discharge")

    c) Accu ontladen („DISCHARGE“) • Nadat u in het hoofdmenu met de toets „BATT TYPE/STOP“ het „Pb“-programma hebt geselecteerd en met de toets „START/ENTER“ hebt bevestigd, kunt u met de toets „INC“ resp. „DEC“ de ontlaadfunctie selecteren: Pb DISCHARGE 0.1A 12.0V(6P) De waarde links op de tweede regel geeft de ontlaadstroom aan;...
  • Seite 179: Accugegevens Opslaan

    14. ACCUGEGEVENS OPSLAAN Het laadapparaat heeft in totaal 10 geheugens waarin u accugegevens/instellingen kunt opslaan. • Selecteer in het hoofdmenu met de toets „BATT TYPE/STOP“ de functie „SAVE DATA“: PROGRAM SELECT SAVE DATA • Druk op de toets „START/ENTER“ en op het display verschijnt bijv. de volgende weergave, het geheugen „01“...
  • Seite 180 Let op: Als de toets „START/ENTER“ te lang wordt vastgehouden, verschijnt op het display „SAVE“ en worden de instellingen opgeslagen. Start dan de instelprocedure gewoon opnieuw. • Druk kort op de toets „START/ENTER“ en de stroomwaarde op de onderste regel knippert.
  • Seite 181: Accugegevens Laden

    15. ACCUGEGEVENS LADEN • Selecteer in het hoofdmenu met de toets „BATT TYPE/STOP“ de functie „LOAD DATA“: PROGRAM SELECT LOAD DATA • Druk op de toets „START/ENTER“ en op het display verschijnt bijv. de volgende weergave, het geheugen „01“ knippert: LOAD [01] LiPo 3.7V...
  • Seite 182: Diverse Basisinstellingen („User Set")

    16. DIVERSE BASISINSTELLINGEN („USER SET“) • Selecteer in het hoofdmenu met de toets „BATT TYPE/STOP“ het „USER“-menu. USER SET PROGRAM-> • Druk op de toets „START/ENTER“ en op het display verschijnt bijv. de volgende weergave: LiFe V.Type 3.3V Hier kan een van de drie lithium-accutypen worden geselecteerd die geschikt zijn voor het laadapparaat („LiPo“, „LiIo“, „LiFe“).
  • Seite 183 • Met de toets „INC“ gaat u naar de volgende instelling (resp. met de toets „DEC“ naar de voorafgaande instelling of met de toets „BATT TYPE/STOP“ gaat u terug naar het hoofdmenu). NiMH Sensitivity D.Peak 10mV/Cell Hier kan de gevoeligheid bij de Delta-U-herkenning van NiMH-accu’s worden ingesteld (spanningsverschil bij Delta-U-laadproces).
  • Seite 184 • Met de toets „INC“ gaat u naar de volgende instelling (resp. met de toets „DEC“ naar de voorafgaande instelling of met de toets „BATT TYPE/STOP“ gaat u terug naar het hoofdmenu). Temp Cut-Off 80C 176F In dit menu kan de temperatuurbewaking worden in-/uitgeschakeld samen met de betrokken temperatuur, waarbij het veiligheidsuitschakelen gebeurt.
  • Seite 185 • Met de toets „INC“ gaat u naar de volgende instelling (resp. met de toets „DEC“ naar de voorafgaande instelling of met de toets „BATT TYPE/STOP“ gaat u terug naar het hoofdmenu). NiMH/NiCd/PB Trickle 50mA Voor NiMH-, NiCd- of Pb-accu’s kan hier de zgn. onderhouds-laadstroom worden ingesteld.
  • Seite 186 Druk kort op de toets „START/ENTER“. Vervolgens knippert „ON“ (resp. „OFF“) op de onderste regel van het display. Met de toetsen „INC“ resp. „DEC“ kan tussen „ON“ (= veiligheidstimer geactiveerd) en „OFF“ (veiligheidstimer uitgeschakeld) worden gekozen. Sla de instelling op met de toets „START/ENTER“. Nu begint de tijd voor de veiligheidstimer (onderste regel, rechts) te knipperen.
  • Seite 187 Met de optie „Key Beep“ wordt de bevestigingstoon bij elke druk op een toets in- of uitgeschakeld. De optie „Buzzer“ schakelt het geluidssignaal bij diverse functies/waarschuwings- berichten uit. Druk kort op de toets „START/ENTER“. Vervolgens knippert „ON“ (resp. „OFF“) op de bovenste regel van het display.
  • Seite 188 • Met de toets „INC“ gaat u naar de volgende instelling (resp. met de toets „DEC“ naar de voorafgaande instelling of met de toets „BATT TYPE/STOP“ gaat u terug naar het hoofdmenu). Back-light 100% Hier kunt u de helderheid van de achtergrondverlichting van het display instellen. Druk kort op de toets „START/ENTER“.
  • Seite 189: Waarschuwingen Op Het Display

    17. WAARSCHUWINGEN OP HET DISPLAY REVERSE POLARITY De polariteit van de accuaansluitingen is omgedraaid. De verbinding met de accu is onderbroken, bijv. CONNECTION BREAK wanneer de accu tijdens het laadproces is losgekoppeld. SHORT ERR Er werd kortsluiting op de uitgang van het laadapparaat geconstateerd.
  • Seite 190 De spanning in een cel van een lithium-accu BATTERY VOLTAGE (LiPo, LiIon, LiFe) is te hoog. Dit kan voorkomen CELL HIGH VOL wanneer een meercellige accu eerder zonder balancer is geladen. De balancerkabel is verkeerd aangesloten of BATTERY VOLTAGE past niet bij de aansluitingen van het CELL CONNECT laadapparaat.
  • Seite 191: Informatie Van Het Laadapparaat

    18. INFORMATIE VAN HET LAADAPPARAAT Tijdens het laad-/ontlaadproces worden door meerdere keren te drukken op de toets „DEC“ diverse gegevens op het display weergegeven. End Voltage Spanning van de accu bij het einde laad-/ ontlaadproces 12.6V(3S) Capacity Cut-OFF Accucapaciteit voor veiligheidsuitschakeling 5000mAh Safety Timer Tijd voor veiligheidstimer...
  • Seite 192: Onderhoud En Reiniging

    19. ONDERHOUD EN REINIGING Het apparaat is nagenoeg onderhoudsvrij en mag absoluut niet worden geopend. Laat het apparaat uitsluitend door een deskundige of elektrotechnisch bedrijf repareren; anders bestaat het gevaar dat het product defect raakt en bovendien vervalt hierdoor de goedkeuring (CE) en de garantie.
  • Seite 193 • Dek het laadapparaat en de accu nooit af. Door een hittestuwing wordt niet alleen het laadapparaat beschadigd maar bestaat er ook brand- en explosiegevaar! • De apparaatvoetjes en de temperatuur van de behuizing kunnen op gevoelige oppervlakken afdrukken of verkleuringen veroorzaken. Hetzelfde geldt voor de accu.
  • Seite 194: Afvoer

    21. AFVOER a) Algemeen Verwijder het onbruikbaar geworden product volgens de geldende wettelijke voorschriften. b) Batterijen en accu´s U bent als eindverbruiker volgens de KCA-voorschriften wettelijk verplicht alle lege batterijen en accu’s in te leveren; verwijdering via het huisvuil is niet toegestaan! ...
  • Seite 195: Technische Gegevens

    22. TECHNISCHE GEGEVENS Voedingsspanning ......12 - 18 V/DC, gestabiliseerd Stroomopname ......Afhankelijk van laadstroom en accu (30 A-netdeel of KFZ-accu aanbevolen) Laadstroom ........0,1 A - 20,0 A instelbaar (max. laadvermogen 400 W) Ontlaadstroom ......0,1 A - 5,0 A instelbaar (max.
  • Seite 196 Max. laadstroom/max. ontlaadstroom bij LiPo-accu’s: Cellenaantal Spanning Laadstroom Ontlaadstroom 3,7 V/cel 20,0 20,0 11,1 20,0 14,8 20,0 18,5 20,0 22,2 19,0 Max. laadstroom/max. ontlaadstroom bij Lilon-accu’s: Cellenaantal Spanning Laadstroom Ontlaadstroom 3,6 V/cel 20,0 20,0 10,8 20,0 14,4 20,0 18,0 19,0 21,6 16,0 Max.
  • Seite 197 Max. laadstroom/max. ontlaadstroom bij NiCd-/NiMH-accu’s: Cellenaantal Spanning Laadstroom Ontlaadstroom 1,2 V/cel 20,0 20,0 20,0 20,0 20,0 20,0 20,0 20,0 10,8 20,0 12,0 20,0 13,2 20,0 14,4 20,0 15,6 20,0 16,8 19,0 18,0 18,0 Max. laadstroom/max. ontlaadstroom bij Pb-accu’s: Cellenaantal Spanning Laadstroom Ontlaadstroom 2 V/cel...
  • Seite 200: Legal Notice

     Information légales Ce mode d'emploi est une publication de la société Voltcraft®, Lindenweg 15, D-92242 Hirschau/Allemagne, Tél. +49 180/586 582 7 (www.voltcraft.de). Tous droits réservés, y compris de traduction. Toute reproduction, quelle qu'elle soit (p. ex. photocopie, microfilm, saisie dans des installations de traitement de données) nécessite une autorisation écrite de l'éditeur.

Inhaltsverzeichnis