
Verwandte Anleitungen für Truma CP plus VarioHeat


Inhaltszusammenfassung für Truma CP plus VarioHeat
-
Seite 1: Inhaltsverzeichnis
Truma CP plus VarioHeat Gebrauchsanweisung Seite Einbauanweisung Seite 19 Im Fahrzeug mitzuführen! Operating instructions Page 22 Installation instructions Page 39 To be kept in the vehicle! Mode d’emploi Page 42 Instructions de montage Page 60 À garder dans le véhicule ! Istruzioni per l’uso... - Seite 2 Wichtige Hinweise ............3 Fehlersuchanleitung Truma Klimasystem (A) ..... 18 Fehlersuchanleitung Truma E-Kit (E) ......18 Klimasysteme – gemeinsame Nutzung von IR-Fernbedienung und Bedienteil Truma CP plus VarioHeat ......3 Anzeige- / und Bedienelemente ........4 Dreh- / Drückknopf ............... 4 Einbauanweisung Zurück-Taste ................
-
Seite 3: Truma Cp Plus Varioheat
Heizung, zwingend erforderlich. Die „Kupplung Bedienteilkabel“ separat bestellen. Nicht in Verbindung mit Wech- selrichter TG 1000_sinus. – Auch nach Anschluss des Bedienteils Truma CP plus VarioHeat Ab Seriennummer 24084022 steht die IR-Fernbedienung zur Steuerung des Klimasystems zur Verfügung. Das Bedienteil Truma CP plus VarioHeat erkennt alle Einstellungen, die über die IR-Fernbedienung... -
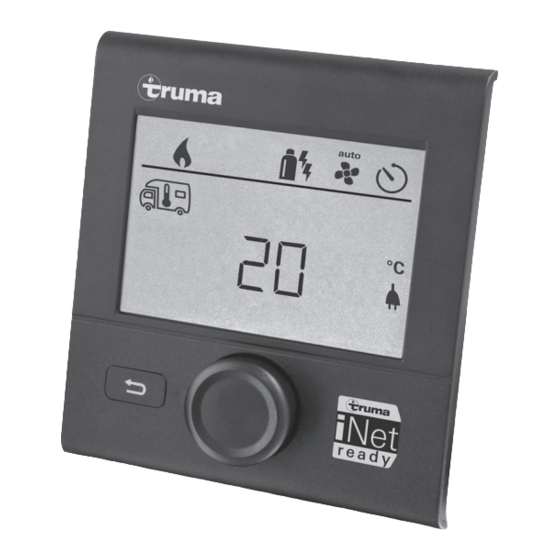
Seite 4: Anzeige- / Und Bedienelemente
5 = Anzeige Netzspannung 230 V (Landstrom) – Wurde bei der Gerätesuche eine 6 = Anzeige Zeitschaltuhr Truma iNet Box erkannt, so ändert sich 7 = Einstellungen / Werte die Funktion des Dreh- / Drückknopfs 8 = Dreh- / Drückknopf (siehe „APP Modus in Verbindung mit... -
Seite 5: Erstinbetriebnahme
Display „INIT ..“. Damit werden die gefundenen Geräte im Das Display zeigt die Einstellebene. Das erste Symbol blinkt. Bedienteil hinterlegt. Inbetriebnahme Start- / Stand-by-Bildschirm Nach dem Verbinden des Bedienteils Truma CP plus VarioHeat mit der Spannungsversorgung, wird nach wenigen Sekunden Bild 7 ein Startbildschirm angezeigt. Ein- / ausschalten Einschalten –... -
Seite 6: App Modus In Verbindung Mit Einer Inet Box
– wenn über die Truma App oder Infrarot Fernbedienung des Klimasystems neue Werte übermittelt werden. Um die Heizung abzuschalten, muss der Temperaturbe- – wenn das Bedienteil Truma CP plus VarioHeat durch Drü- reich unter 5 °C (OFF) gewählt werden. cken des Dreh- / Drückknopfs aufgeweckt wird. Die vor- her abgespeicherten Werte werden dann für den erneuten... -
Seite 7: Energieart Wählen
Gebläsestufe wählen Energieart wählen Bei angeschlossener Heizung / Klimasystem Wird nur angezeigt, wenn eine Truma VarioHeat zusam- men mit einem Truma E-Kit angeschlossen ist. – Mit Dreh- / Drückknopf das Symbol in Menüzeile (3) anwählen. – Durch Antippen in die Einstellebene wechseln. -
Seite 8: Zeitschaltuhr Einstellen
– Brennstoffzufuhr (Gas) zur Heizung absperren. Gebläsestufe „BOOST“ ist mit höherer Stromaufnahme, höherem Geräuschpegel und erhöhtem Motorverschleiß verbunden. – Schalten Sie das Bedienteil Truma CP plus VarioHeat aus, um ein Wiedereinschalten der Heizung durch die Sobald die Heizung eingeschaltet wird (Raumtempe- Truma App oder Zeitschaltuhr zu verhindern (siehe „Ein- /... - Seite 9 – Beim Betrieb von Klimasystemen nur die Zeitschaltuhr Endzeitpunkt eingeben des Bedienteils Truma CP plus VarioHeat verwenden, – Mit Dreh- / Drückknopf die Stunden, anschließend die um die Start- und Endzeit eines gewünschten Zeit- Minuten einstellen., raums eindeutig festzulegen. 24 h Modus 12 h Modus...
-
Seite 10: Beleuchtung Ein-/Ausschalten
– Mit Dreh- / Drückknopf gewünschte Gebläsestufe wählen. Bild 19 – Dreh- / Drückknopf zum Bestätigen des Werts antippen. Beleuchtung ein-/ausschalten Nur bei Dachklimasystemen Truma Aventa mit Luftverteiler Aventa (mit integrierter Beleuchtung). Bild 17 – Mit Dreh- / Drückknopf das Symbol in Menüzeile (4) anwählen. -
Seite 11: Uhrzeit Einstellen
Servicemenü 1. Raumtemperaturfühler der Heizung kalibrieren (OFFSET) Der Raumtemperaturfühler der angeschlossenen Heizung kann individuell an die Einbausituation des Fühlers angepasst werden. Die Einstellung ist in Schritten von 0,5 °C im Bereich Bild 20 von 5 °C bis -5 °C möglich. Beispiel: Uhrzeit einstellen Eingestellte Raumtemperatur 23 °C;... - Seite 12 – gut umströmt und nicht an der Fahrzeugdecke. viert, im Menü Raumtemperatur kann Klimaauto- matik AUTO gewählt werden. Truma Vertragshändler / Truma Partner sind für den richtigen – Im Servicemenü erscheint „AC SET“. Einbau der Klimaautomatik geschult. Sie finden unsere Ver- tragshändler/ Truma Partner unter www.truma.com.
-
Seite 13: Reset Durchführen
H = Truma VarioHeat T = Truma iNet Box E = Truma E-Kit 9. Voreinstellung (RESET) Die Reset-Funktion setzt das Bedienteil Truma CP plus VarioHeat auf die Werkseinstellung zurück. Alle Einstellungen werden damit gelöscht. Neu angeschlossene Geräte werden erkannt Bild 29 und im Bedienteil hinterlegt. -
Seite 14: Spezielle Anzeigen
Truma App mit iNet Box Bei Befehl über die Truma APP eines mobilen Endgeräts erscheint im Display „APP“. Externes Bedienteil (CI-BUS) Bild 31 Nach dem Bestätigen initialisiert sich das Bedienteil Bei Befehl über ein externes Bedienteil mit CI-BUS erscheint Truma CP plus VarioHeat. -
Seite 15: Warnung / Störung
A = Klimasystem E = Truma E-Kit Befindet sich ein Betriebsparameter außerhalb des Sollbereichs, springt das Bedienteil das Truma CP plus VarioHeat sofort in die Bild 35 Menüebene „Warnung / Störung“ und zeigt den Fehlercode der Warnung an. Mithilfe der Fehlersuchanleitungen (ab Seite Störung... -
Seite 16: Wartung
Betriebstemperaturbereich -25 °C bis +60 °C – Die Zurück-Taste drücken. Lagertemperaturbereich -25 °C bis +70 °C Schnittstellen In diesem Fall ist die Störung im Bedienteil Truma CP plus Truma CP plus VarioHeat VarioHeat nicht quittiert und das Warnsymbol (Bild 34 - 1) TIN-Bus Truma CP plus bleibt bestehen. -
Seite 17: Fehlersuchanleitung Truma Varioheat (H)
Fehlersuchanleitung Truma VarioHeat (H) Fehlercode Ursache Behebung E 2 H Flamme nicht erkannt: E 16 H – Gasflasche leer – Gasflasche wechseln – Gasflasche oder Schnellschlussventil in der – Gaszufuhr prüfen und Ventile öffnen Gaszuleitung geschlossen – Gasdruck-Regelanlage vereist – Reglerbeheizung EisEx verwenden –... -
Seite 18: Fehlersuchanleitung Truma Klimasystem (A)
– Keine Verbindung zwischen Truma E-Kit und – Verbindung zwischen Heizung und Bedienteil herstellen Bedienteil Sollten diese Maßnahmen nicht zur Störungsbehebung führen, oder Fehlercodes angezeigt werden, die Sie nicht in der Fehlersuchanleitung finden, wenden Sie sich bitte an den Truma Service. -
Seite 19: Einbauanweisung
/ oder Truma iNet Box verbunden. Das unab- des jeweiligen Verwendungslandes ent- hängig montierte Bedienteil Truma CP plus VarioHeat ist für sprechen (z. B. EN 1648, VDE 0100-721). die Wandmontage auf ebenem Untergrund geeignet. In anderen Ländern sind die jeweils gülti- gen Vorschriften zu beachten. -
Seite 20: Abmessungen
Abmessungen Platzwahl Das Bedienteil Truma CP plus VarioHeat an einer vor Feuchtig- keit und Nässe geschützten Stelle einbauen. Für eine optimale Lesbarkeit der Zeichen, das Bedienteil Truma CP plus VarioHeat auf Augenhöhe montieren. – Einbauöffnung herstellen. 3±1 11,5 11,5 Bild 37 – Maße in mm. Darstellung nicht maßstabsgetreu... -
Seite 21: Anschluss
+ = rot 12 V - = rot / schwarz Bild 39 – Ansicht von hinten Nur bei Variante Truma CP plus VarioHeat CI-BUS. Werkseitig ist ein externes Bedienteil (Master) angeschlossen. Bild 41 – Bedienteiloberteil und Dreh- / Drückknopf montieren... -
Seite 22: Operating Instructions
Troubleshooting guide, Truma air conditioning system (A) ................. 38 Air conditioning systems – shared use of IR remote control and Truma CP plus VarioHeat control panel ......23 Troubleshooting guide, Truma E-Kit (E) ....... 38 Display and control elements ........24 Rotary push button ............. 24 Back button ................. -
Seite 23: Operating Instructions
(no bidirectional communication). is in a technically perfect condition. – Only the time switch of the Truma CP plus VarioHeat control – Repairs must be carried out immediately. Only carry out panel may be used to clearly define the start and end time repairs yourself if the solution is described in the trouble- of a required period. -
Seite 24: Display And Control Elements
4 = Menu bar (lower) – Main switch function ON / OFF. 5 = 230 V mains supply indicator (power) – If an Truma iNet Box was recognised 6 = Time switch display while searching for an appliance, the 7 = Settings / Values... -
Seite 25: Initial Start-Up
– Switch on power supply. 12 V for Truma CP plus VarioHeat order. The operating parameters are shown on the status control panel, Truma VarioHeat and Truma E-Kit and 230 V bar (2) and on the displays (5, 6). for air conditioning systems and Truma E-Kit. -
Seite 26: App Mode In Conjunction With An Inet Box
(AC) using the rotary push button, depending on the – No operation of the air conditioning system. connected appliance. – No time switch function in the Truma CP plus VarioHeat – Tap rotary push button to confirm selection. control panel –... -
Seite 27: Select Energy Type
The Truma E-Kit heats with max. 1800 W. Select energy type Select fan level Is displayed only if a Truma VarioHeat and a Truma E-Kit are both connected. With connected heating / air conditioning system – Select icon in menu bar (3) with rotary push button. -
Seite 28: Set Time Switch
Fan level “BOOST” results in higher power consumption, higher noise level and increased motor wear. – Switch off the Truma CP plus VarioHeat control panel to prevent the heater being switched back on by the As soon as the heater is switched on (room temperature Truma App or the time switch (see “Switching on/off”). - Seite 29 – When air conditioning systems are being operated, use Entering the end time only the time switch of the Truma CP plus VarioHeat – Set the hours then the minutes with the rotary push button. control panel to clearly define the start and end time for 24 h mode...
-
Seite 30: Switch Lighting On / Off
– Tap the rotary push button to confirm the value. Fig. 19 Switch lighting on / off Only with Truma Aventa roof-mounted air conditioning sys- tems with Aventa air distributor (with integrated lighting). Fig. 17 – Select icon in menu bar (4) with rotary push button. -
Seite 31: Set Time
Service menu 1. Calibrating the room temperature sensor of the heater (OFFSET) The room temperature sensor of the heater can be individually adjusted to the sensor’s installation situation. The setting can be Fig. 20 made in increments of 0.5 °C within the range of 5 °C to -5 °C. Example: Set time Set room temperature 23 °C;... - Seite 32 – with good circulation and not on the vehicle ceiling. – “AC SET” appears in the Service menu. Truma dealers / Truma partners are trained in the correct in- – The automatic climate control function AUTO is stallation of the automatic climate control. You can find our blocked.
- Seite 33 8. Showing the version number Display time in 12 h (a. m., p. m.) / 24 h mode. Display the version number of the heater, air conditioning system, Truma iNet Box, and Truma CP plus VarioHeat con- trol panel. Example: H 1.20.01 -> H = Appliance; 1.20.01 = Version number Fig.
-
Seite 34: Special Displays
Truma App with iNet Box When a command is sent via the Truma APP from a mobile device, “APP” appears in the display. External control panel (CI-BUS) Fig. 31 After confirmation, the Truma CP plus VarioHeat control panel When a command is sent via an external control panel with initialises itself. -
Seite 35: Warning / Error
Error remedied with the aid of the troubleshooting guide (from page 37 and ff). In the event of an error, the Truma CP plus VarioHeat control Returning to the settings level panel immediately jumps to the “Warning/Error” menu level – Tap the rotary push button or press the Back button. If the and displays the respective fault code. -
Seite 36: Maintenance
– Press the Back button. range -25 °C to +60 °C Storage temperature range -25 °C to +70 °C In this case, the error in the Truma CP plus VarioHeat Interfaces control panel is not acknowledged and the warning Truma CP plus VarioHeat symbol (Figure 34 - 1) remains. The appliance remains in fault... -
Seite 37: Troubleshooting Guide, Truma Varioheat (H)
Troubleshooting guide, Truma VarioHeat (H) Fault code Cause Remedy E 2 H Flame not recognised: E 16 H – Gas cylinder empty – Replace gas cylinder – Gas cylinder or quick-acting valve in the gas – Check gas supply and open valves supply line closed –... -
Seite 38: Troubleshooting Guide, Truma Air Conditioning System (A)
W 104 E – 230 V fuse defective – Replace 230 V fuse – Truma E-Kit has no 12 V power supply – Ensure 12 V power supply W 255 E – No connection between Truma E-Kit and –... -
Seite 39: Installation Instructions Safety Instructions
National regulations and rules must be followed. And/or Truma CP plus VarioHeat CI-BUS for CI-BUS – not retrofittable. In combination with a Saphir compact, a “control panel cable coupling” is essential between the air conditioning system and the heater. -
Seite 40: Dimensions
Dimensions Selecting a location Install the Truma CP plus VarioHeat control panel in a location that is protected from moisture and humidity. Install the Truma CP plus VarioHeat control panel at eye height so that you can read the display easily. -
Seite 41: Connection
On no account pull on the connector cable when it is connected to the control panel. – Lay the connector cable (TIN bus) to the heater, air condi- tioning system and plug it into the Truma CP plus VarioHeat Figure 40 – Front view control panel. -
Seite 42: Mode D'emploi
Instructions de recherche de pannes système de Remarques importantes ..........43 climatisation Truma (A) ........... 59 Instructions de recherche de pannes Truma E-Kit (E) ... 59 Systèmes de climatisation – utilisation commune de télécommande IR et de pièce de commande Truma CP plus VarioHeat ............ -
Seite 43: Mode D'emploi
être réparée seulement par le fabricant ou son SAV. – Ne jamais utiliser les appareils à gaz liquéfié pendant le La pièce de commande Truma CP plus VarioHeat sert à piloter ravitaillement en carburant, dans les parkings fermés, les et surveiller le chauffage Truma VarioHeat, Truma E-Kit et/ou... -
Seite 44: Éléments D'affichage Et De Commande
– Fonction d’interrupteur principal 6 = Affichage minuterie MARCHE / ARRÊT. 7 = Réglages / valeurs – Si une Truma iNet Box a été détectée 8 = Bouton rotatif/poussoir lors de la recherche d’appareils, la 9 = Touche de retour fonction du bouton rotatif/poussoir change (voir « Mode APP en liaison... -
Seite 45: Touche De Retour
: – Mettre en marche l’alimentation en tension. 12 V pour la pièce de commande Truma CP plus VarioHeat, Truma VarioHeat Les fonctions dans les lignes de menu (3, 4) de la pièce de et Truma E-Kit et 230 V pour systèmes de climatisation et... -
Seite 46: Mise En Marche / Arrêt
L’opération d’arrêt de la pièce de commande – si la pièce de commande Truma CP plus VarioHeat est ré- Truma CP plus VarioHeat peut se retarder de quelques veillée en pressant le bouton rotatif/poussoir. Les valeurs minutes en raison des fonctionnements par inertie interne du préalablement enregistrées sont alors appliquées pour le... -
Seite 47: Sélectionner Le Type D'énergie
(dans l’écran de veille). Chauffage (CHAUF) plage de températures réglable de 5 à 30 °C (paliers de 1 °C) Affichage seulement si un Truma VarioHeat est raccordé a = Chauffage marche – symbole allumé, si la température en même temps qu’un Truma E-Kit. -
Seite 48: Choisir Le Palier De Ventilateur
AUTO Régulation automatique du Choisir le palier de ventilateur ventilateur en fonction de la puissance de chauffage / optimi- En cas de chauffage/système de climatisation raccordé sé sur la requête de chauffage actuelle – Avec le bouton rotatif/poussoir, sélectionner le symbole BOOST2 Chauffage de pièce rapide dans la ligne de menu (3). -
Seite 49: Régler La Minuterie
Choix automatique du palier de Truma CP plus VarioHeat afin d’empêcher une remise ventilateur. Non modifiable en sous tension du chauffage par la Truma App ou la minute- mode AUTO. rie (voir « Mise en marche / arrêt »). – En cas de fonctionnement de systèmes de climati- sation, utiliser seulement la minuterie de la pièce de... - Seite 50 Entrer le moment de début Régler la température ambiante – Avec le bouton rotatif/poussoir, régler les heures puis les – Selon l’appareil raccordé, choisir entre le chauffage (CHAUF), minutes. le système de climatisation (CLIMA) ou climatisation automa- tique (AUTO) à l’aide du bouton rotatif/poussoir (voir « Modi- Mode 24 h Mode 12 h fier la température ambiante »...
-
Seite 51: Allumer / Éteindre L'éclairage
Figure 19 Allumer / éteindre l'éclairage Figure 17 Seulement en cas de systèmes de climatisation de toit Truma Aventa avec distributeur d’air Aventa (avec éclairage intégré). Activer la minuterie (ON) – Activer la minuterie avec le bouton rotatif/poussoir (ON). -
Seite 52: Régler L'heure
Exemple : Régler l’heure Température ambiante réglée 23 °C ; OFFSET = -1 °C ; Affichage mode 24 h Affichage mode 12 h – Valeur de consigne pour chauffage = 22 °C Figure 23 Réglage par défaut : 0 °C (Celsius). 2. AC SET Lors du fonctionnement de la climatisation automatique, la = a. - Seite 53 Le fonctionnement de la climatisation automatique Figure 26 Truma dépend de son montage correct. Votre conces- sionnaire/partenaire Truma se fera un plaisir de vous conseiller Réglage par défaut : °C (Celsius). pour déterminer si votre véhicule est approprié. 5. Modifier le rétro-éclairage Conditions pour le fonctionnement de la climatisation auto- Modifier le rétro-éclairage de la pièce de commande...
- Seite 54 – Pour confirmer, appuyer sur le bouton rotatif/poussoir (8). 8. Afficher le numéro de version Afficher le numéro de version du chauffage, du système de climatisation, de la Truma iNet Box et de la pièce de com- mande Truma CP plus VarioHeat. Exemple : H 1.20.01 ->...
-
Seite 55: Affichages Spéciaux
En cas de commande via la télécommande infrarouge du sys- tème de climatisation, « IR » apparaît sur l’afficheur. Truma App avec iNet Box En cas de commande via Truma APP d’un terminal mobile, « APP » apparaît sur l’afficheur. Pièce de commande externe (CI-BUS) En cas de commande via une pièce de commande externe... -
Seite 56: Avertissement / Panne
42 = Code d’erreur Si un paramètre de fonctionnement se trouve hors de la zone H = Appareil nominale, la pièce de commande Truma CP plus VarioHeat H = Truma VarioHeat passe immédiatement au niveau de menu « Avertissement A = Système de climatisation / panne »... -
Seite 57: Maintenance
Dans ce cas, la panne dans la pièce de commande Dimensions (L x l x H) 92 x 103 x 40 mm Truma CP plus VarioHeat n’est pas acquittée et le symb- Plage de températures ole d’avertissement (figure 34 - 1) reste. L’appareil reste en de fonctionnement de -25 °C à... -
Seite 58: Instructions De Recherche De Pannes Truma Varioheat (H)
Instructions de recherche de pannes Truma VarioHeat (H) Code Cause Suppression d’erreur E 2 H Flamme non détectée : E 16 H – Bouteille de gaz vide – Changer la bouteille de gaz – La bouteille de gaz ou la vanne à fermeture rapide –... -
Seite 59: Instructions De Recherche De Pannes Système De Climatisation Truma (A)
– Établir la liaison entre le chauffage et la pièce de pièce de commande commande Si ces démarches ne permettent pas d’éliminer la défaillance, ou si des codes d’erreur que vous ne trouvez pas dans les instructions de recherche de pannes s’affichent, veuillez vous adresser au centre de SAV Truma. -
Seite 60: Instructions De Montage
Truma et / ou une Truma iNet Box. La (par exemple EN 1648, VDE 0100-721). pièce de commande Truma CP plus VarioHeat montée indépen- Hors Allemagne, les prescriptions en vi- damment se prête au montage mural sur un support plan. -
Seite 61: Dimensions
Dimensions Choix de l’emplacement Monter la pièce de commande Truma CP plus VarioHeat sur un endroit sec et protégé contre l’humidité. Pour une lisibilité optimale des caractères, monter la pièce de commande Truma CP plus VarioHeat à hauteur des yeux. -
Seite 62: Raccordement
- = rouge/noir Figure 39 – Vue de derrière Seulement en cas de variante Truma CP plus VarioHeat CI-BUS. Figure 41 – Monter la partie supérieure de pièce de comm- Une pièce de commande externe (maître) est raccordée en usine. -
Seite 63: Istruzioni Per L'uso
Manutenzione ..............78 Smaltimento ..............78 Istruzioni per l’uso Specifiche tecniche ............78 Istruzioni per la ricerca guasti Truma VarioHeat (H) .. 79 Scopo d’impiego .............. 64 Istruzioni per la ricerca guasti sistema di Avvertenze di sicurezza ..........64 condizionamento Truma (A) ........... 80 Avvertenze importanti ............ -
Seite 64: Istruzioni Per L'uso
– Non utilizzare mai apparecchi a gas liquido durante il ri- L’unità di comando Truma CP plus VarioHeat serve a gestire fornimento, in parcheggi a più piani, garage o traghetti. -
Seite 65: Elementi Di Comando E Di Visualizzazione
5 = indicazione tensione di rete di 230 V (rete locale) – Se la ricerca degli apparecchi rileva una 6 = indicazione temporizzatore Truma iNet Box, la funzione della ma- 7 = impostazioni / valori nopola / pulsante cambia (v. «Modalità... -
Seite 66: Prima Messa In Funzione
– Accendere l’alimentazione di tensione. 12 V per l’unità di sequenza desiderata. I parametri di esercizio vengono visualiz- comando Truma CP plus VarioHeat, Truma VarioHeat e il Truma zati nella riga di stato (2) o nelle visualizzazioni (5, 6). E-Kit e 230 V per i sistemi di condizionamento e il Truma E-Kit. -
Seite 67: Modalità App In Abbinamento A Una Inet Box
= riscaldamento ON – il simbolo è acceso; se la tempera- condizionamento tura ambiente non è ancora stata raggiunta, il simbolo – se si attiva l’unità di comando Truma CP plus VarioHeat lampeggia. premendo la manopola / pulsante. I valori memorizza-... -
Seite 68: Selezione Del Tipo Di Alimentazione
= COOL – il sistema di condizionamento è acceso c = AUTO – il sistema di condizionamento è impostato su Viene visualizzato solo se un Truma VarioHeat è collega- automatico to a un Truma E-Kit. d = HOT – il sistema di condizionamento è in modalità di riscaldamento –... -
Seite 69: Selezione Della Velocità Del Ventilatore
BOOST2 Riscaldamento veloce dell’am- Selezione della velocità del ventilatore biente Disponibile se la differenza tra Con riscaldamento / sistema di condizionamento collegato la temperatura ambiente sele- zionata e attuale è >10 °C. Non – Selezionare il simbolo nella riga di menu (3) con la disponibile in funzionamento manopola / pulsante. -
Seite 70: Impostazione Del Temporizzatore
AUTO Selezione automatica della velo- – spegnere l’unità di comando Truma CP plus VarioHeat cità del ventilatore. Non modifi- per impedire la riaccensione del riscaldamento trami- cabile in modalità AUTO. te la Truma App o il temporizzatore (v. «Accensione / spegnimento»). - Seite 71 Inserimento dell’ora di avvio Impostazione della temperatura ambiente – Impostare l’ora e poi i minuti con la manopola / pulsante. – A seconda dell’apparecchio collegato, con la manopola / pulsante selezionare riscaldamento (RISC), sistema di condi- Formato 24 h Formato 12 h zionamento (COND) o condizionamento automatico (AUTO) (v.
-
Seite 72: Accensione / Spegnimento Dell'illuminazione
Figura 19 Accensione / spegnimento dell’illuminazione Figura 17 Solo con sistemi di condizionamento a tetto Truma Aventa Attivazione del temporizzatore (ON) con distributore d’aria Aventa (con illuminazione integrata). – Attivare il temporizzatore (ON) con la manopola / pulsante – Toccare la manopola / pulsante per confermare il valore. -
Seite 73: Impostazione Dell'ora
Esempio: Impostazione dell’ora temperatura ambiente impostata 23 °C; OFFSET = -1 °C; Visualizzazione formato 24 h Visualizzazione formato 12 h – valore nominale per il riscaldamento = 22 °C Figura 23 Preimpostazione: 0 °C (Celsius). 2. AC SET = a. m. Nel funzionamento con condizionamento automatico, la tempe- ratura ambiente rilevata può... - Seite 74 – in un punto ben aerato e non sul soffitto del veicolo. – La funzione di condizionamento automatico «AUTO» viene bloccata. I rivenditori autorizzati / Truma Partner sono stati istruiti sul modo corretto di installare il condizionamento automatico. Un elenco dei rivenditori autorizzati / Truma Partner è disponibile sul sito www.truma.com.
- Seite 75 Tensione continua a 12 V per l’unità di comando italiano). Truma CP plus VarioHeat e Truma VarioHeat o tensione di re- te a 230 V con i sistemi di condizionamento e il Truma E-Kit. Esecuzione del reset – Selezionare «RESET» con la manopola / pulsante (8).
-
Seite 76: Visualizzazioni Speciali
Se un parametro di funzionamento non rientra nell’intervallo nominale, l’unità di comando Truma CP plus VarioHeat passa In caso di comando tramite Truma APP di un terminale mobile subito al livello menu «Avvertenza / guasto» e visualizza il co- sul display appare «APP». -
Seite 77: Guasto
L’apparecchio interessato rimane in funzione, se pos- sibile. Appena il parametro di esercizio si trova nuova- mente nell’intervallo nominale, questo simbolo scompare In caso di guasto, l’unità di comando Truma CP plus VarioHeat automaticamente. passa subito al livello menu «Avvertenza / guasto» e visualizza il codice di errore del guasto. -
Seite 78: Manutenzione
-25 °C a +70 °C Interfacce Manutenzione Truma CP plus VarioHeat TIN-Bus Truma CP plus L’unità di comando Truma CP plus VarioHeat non necessita di VarioHeat CI-BUS TIN-Bus, CI-BUS manutenzione. Per la pulizia della parte frontale utilizzare un Alimentazione di tensione 8 V – 16,5 V ... -
Seite 79: Istruzioni Per La Ricerca Guasti Truma Varioheat (H)
Istruzioni per la ricerca guasti Truma VarioHeat (H) Codice Causa Rimedio di errore E 2 H Fiamma non rilevata: E 16 H – Bombola del gas vuota – Sostituire la bombola del gas – La bombola del gas o la valvola a chiusura rapida –... -
Seite 80: Istruzioni Per La Ricerca Guasti Sistema Di Condizionamento Truma (A)
– Ripristinare il collegamento tra riscaldamento e unità di tà di comando comando Qualora queste misure non consentano di eliminare il guasto o nel caso in cui vengano visualizzati codici di errore non descritti nelle istruzioni per la ricerca guasti, rivolgersi al servizio di assistenza Truma. -
Seite 81: Istruzioni Di Montaggio
(TIN-Bus). L’unità di comando EN 1648, VDE 0100-721). Negli altri paesi, Truma CP plus VarioHeat montata a parte è adatta per il montag- osservare le rispettive disposizioni in vigo- gio a parete con fondo regolare. -
Seite 82: Dimensioni
Dimensioni Scelta della posizione Installare l’unità di comando Truma CP plus VarioHeat in un punto protetto dall’umidità e dal bagnato. Per una leggibilità ottimale dei simboli, montare l’unità di comando Truma CP plus VarioHeat all’altezza degli occhi. – Realizzare l’apertura di montaggio. -
Seite 83: Collegamento
12 V - = rosso / nero Figura 39 – Vista posteriore Solo con la variante Truma CP plus VarioHeat CI-BUS. Di fabbrica Figura 41 – Montaggio della parte superiore dell’unità di co- è collegata un’unità di comando esterna (master). - Seite 87 Truma eller Trumas serviceavdeling i landet ditt. Μπορείτε να ζητήσετε τις οδηγίες χρήσης και τοποθέτησης στη γλώσσα της χώρας σας από τον κατασκευαστή Truma ή από το σέρβις της Truma στη χώρα σας. Návod k použití a montážní návod si lze v řeči Vaší země...
- Seite 88 In order to avoid delays, please have the unit model and serial number ready (see type plate). Veuillez vous adresser au centre de SAV Truma ou à un de nos partenaires de SAV agréés en cas de dysfonctionnements (voir www.truma.com).