ASROCK 970 Pro3 R2.0 Bedienungsanleitung
Inhaltsverzeichnis
Copyright Notice:
No part of this installation guide may be reproduced, transcribed, transmitted, or trans-
lated in any language, in any form or by any means, except duplication of documentation
by the purchaser for backup purpose, without written consent of ASRock Inc.
Products and corporate names appearing in this guide may or may not be registered
trademarks or copyrights of their respective companies, and are used only for identifica-
tion or explanation and to the owners' benefit, without intent to infringe.
Disclaimer:
Specifications and information contained in this guide are furnished for informational use
only and subject to change without notice, and should not be constructed as a commit-
ment by ASRock. ASRock assumes no responsibility for any errors or omissions that may
appear in this guide.
With respect to the contents of this guide, ASRock does not provide warranty of any kind,
either expressed or implied, including but not limited to the implied warranties or condi-
tions of merchantability or fitness for a particular purpose. In no event shall ASRock, its
directors, officers, employees, or agents be liable for any indirect, special, incidental, or
consequential damages (including damages for loss of profits, loss of business, loss of
data, interruption of business and the like), even if ASRock has been advised of the pos-
sibility of such damages arising from any defect or error in the guide or product.
This device complies with Part 15 of the FCC Rules. Operation is subject to the following
two conditions:
(1) this device may not cause harmful interference, and
(2) this device must accept any interference received, including interference that
may cause undesired operation.
CALIFORNIA, USA ONLY
The Lithium battery adopted on this motherboard contains Perchlorate, a toxic substance
controlled in Perchlorate Best Management Practices (BMP) regulations passed by the
California Legislature. When you discard the Lithium battery in California, USA, please
follow the related regulations in advance.
"Perchlorate Material-special handling may apply, see
www.dtsc.ca.gov/hazardouswaste/perchlorate"
ASRock Website: http://www.asrock.com
Published September 2012
Copyright © 2012 ASRock INC. All rights reserved.
1
ASRock 970 Pro3 R2.0 Motherboard
Inhaltsverzeichnis

Verwandte Anleitungen für ASROCK 970 Pro3 R2.0


Inhaltszusammenfassung für ASROCK 970 Pro3 R2.0
- Seite 1 ASRock. ASRock assumes no responsibility for any errors or omissions that may appear in this guide. With respect to the contents of this guide, ASRock does not provide warranty of any kind, either expressed or implied, including but not limited to the implied warranties or condi- tions of merchantability or fitness for a particular purpose.
-
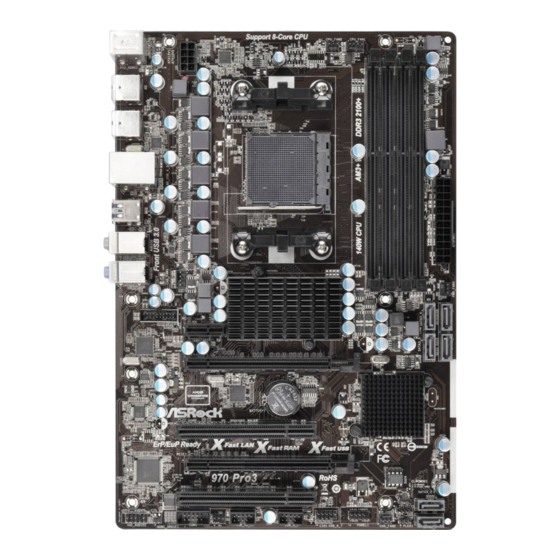
Seite 2: Motherboard-Layout
PCI Express 2.0 x16 Slot (PCIE2) SPI Flash Memory (32Mb) PCI Express 2.0 x1 Slot (PCIE1) Clear CMOS Jumper (CLRCMOS1) Northbridge Controller SATA3 Connector (SATA3_2) USB 3.0 Header (USB3_2_3) SATA3 Connector (SATA3_1) Chassis Fan Connector (CHA_FAN1) ASRock 970 Pro3 R2.0 Motherboard... - Seite 3 Choose “2CH”, “4CH”, “6CH”, or “8CH” and then you are allowed to select “Realtek HDA Pri- mary output” to use Rear Speaker, Central/Bass, and Front Speaker, or select “Realtek HDA Audio 2nd output” to use front panel audio. ASRock 970 Pro3 R2.0 Motherboard...
-
Seite 4: Package Contents
1. Introduction Thank you for purchasing ASRock 970 Pro3 R2.0 motherboard, a reliable moth- erboard produced under ASRock’s consistently stringent quality control. It delivers excellent performance with robust design conforming to ASRock’s commitment to quality and endurance. This Quick Installation Guide contains introduction of the motherboard and step-by- step installation guide. - Seite 5 - Premium Blu-ray audio support - Supports THX TruStudio - PCIE x1 Gigabit LAN 10/100/1000 Mb/s - Realtek RTL8111E - Supports Wake-On-LAN - Supports LAN Cable Detection - Supports Energy Efficient Ethernet 802.3az - Supports PXE ASRock 970 Pro3 R2.0 Motherboard...
- Seite 6 - ACPI 1.1 Compliance Wake Up Events - Supports jumperfree - SMBIOS 2.3.1 Support - CPU, VCCM, NB, SB Voltage Multi-adjustment Support CD - Drivers, Utilities, AntiVirus Software (Trial Version), CyberLink MediaEspresso 6.5 Trial, Google Chrome Browser and Toolbar ASRock 970 Pro3 R2.0 Motherboard...
- Seite 7 Certifications - FCC, CE, WHQL - ErP/EuP Ready (ErP/EuP ready power supply is required) * For detailed product information, please visit our website: http://www.asrock.com WARNING Please realize that there is a certain risk involved with overclocking, including adjusting the setting in the BIOS, applying Untied Overclocking Technology, or using third-party overclocking tools.
- Seite 8 ® ® der Windows 8 / 7 / Vista / XP. For Windows 64-bit OS with 64-bit CPU, there is no such limitation. You can use ASRock ® XFast RAM to utilize the memory that Windows cannot use. ® ®...
-
Seite 9: Unique Features
OS 32-bit CPU. ASRock Instant Boot ASRock Instant Boot allows you to turn on your PC in just a few seconds, provides a much more efficient way to save energy, time, money, and improves system running speed for your sys- tem. - Seite 10 ASRock XFast RAM ASRock XFast RAM is a new function that is included into AS- Rock Extreme Tuning Utility (AXTU). It fully utilizes the memory ® space that cannot be used under Windows OS 32-bit CPU.
- Seite 11 DHCP configured computer in order to enable this function. ASRock On/Off Play Technology ASRock On/Off Play Technology allows users to enjoy the great audio experience from the portable audio devices, such like MP3 player or mobile phone to your PC, even when the PC is turned off (or in ACPI S5 mode)! This motherboard also provides a free 3.5mm audio cable (optional) that ensures users the most...
- Seite 12 Function, the computer will power on automatically to dehumidi- fy the system after entering S4/S5 state. ASRock Fast Boot With ASRock’s exclusive Fast Boot technology, it takes less ® than 1.5 seconds to logon to Windows 8 from a cold boot. No more waiting! The speedy boot will completely change your user experience and behavior.
- Seite 13 ASRock Good Night LED ASRock Good Night LED technology can offer you a better environment by extinguishing the unessential LED. By enabling Good Night LED in BIOS, the Power / HDD / LAN LED will be switched off when system is on. Not only this, Good night LED will automatically switch off Power and Keyboard LED when the system enters into Standby / Hibernation mode as well.
- Seite 14 When placing screws into the screw holes to secure the mother- board to the chassis, please do not over-tighten the screws! Doing so may damage the motherboard. ASRock 970 Pro3 R2.0 Motherboard...
-
Seite 15: Cpu Installation
Then connect the CPU fan to the CPU FAN connector (CPU_FAN1, see Page 2, No. 5 or CPU_FAN2, see Page 2, No. 4). For proper installation, please kindly refer to the instruc- tion manuals of the CPU fan and the heatsink. ASRock 970 Pro3 R2.0 Motherboard... - Seite 16 It is not allowed to install a DDR or DDR2 memory module into DDR3 slot; otherwise, this motherboard and DIMM may be dam- aged. If you adopt DDR3 2100/1866/1800/1600 memory modules on this motherboard, it is recommended to install them on DDR3_A2 and DDR3_B2 slots. ASRock 970 Pro3 R2.0 Motherboard...
-
Seite 17: Installing A Dimm
DIMM if you force the DIMM into the slot at incorrect orientation. Step 3. Firmly insert the DIMM into the slot until the retaining clips at both ends fully snap back in place and the DIMM is properly seated. ASRock 970 Pro3 R2.0 Motherboard... -
Seite 18: Installing An Expansion Card
Align the card connector with the slot and press firmly until the card is completely seated on the slot. Step 5. Fasten the card to the chassis with screws. Step 6. Replace the system cover. ASRock 970 Pro3 R2.0 Motherboard... - Seite 19 AMD graphics card manuals for detailed installation guide. Step 1. Insert one Radeon graphics card into PCIE2 slot and the other Radeon graphics card to PCIE3 slot. Make sure that the cards are properly seated on the slots. ASRock 970 Pro3 R2.0 Motherboard...
- Seite 20 Connect the DVI monitor cable to the DVI connector on the Radeon graph- ics card on PCIE2 slot. (You may use the DVI to D-Sub adapter to convert the DVI connector to D-Sub interface, and then connect the D-Sub monitor cable to the DVI to D-Sub adapter.) ASRock 970 Pro3 R2.0 Motherboard...
- Seite 21 ATI Catalyst Control Center Step 6. Double-click “ATI Catalyst Control Center”. Click “View”, select “CrossFi- ”, and then check the item “Enable CrossFireX ”. Select “2 GPUs” and click “Apply” (if you install two Radeon graphics cards). ASRock 970 Pro3 R2.0 Motherboard...
- Seite 22 AMD Technologies Inc., and is used only for identification or explanation and to the owners’ benefit, without intent to infringe. * For further information of AMD CrossFireX technology, please check AMD website for updates and details. ASRock 970 Pro3 R2.0 Motherboard...
- Seite 23 Please be noted that the password, date, time, user default profile, 1394 GUID and MAC address will be cleared only if the CMOS battery is removed. ASRock 970 Pro3 R2.0 Motherboard...
- Seite 24 (see p.2 No. 23) this motherboard. Each USB 2.0 header can support two USB 2.0 ports. USB_PWR (9-pin USB_8_9) (see p.2 No. 25) DUMMY USB_PWR (9-pin USB_10_11) USB_PWR P-11 (see p.2 No. 26) P+11 DUMMY P+10 P-10 USB_PWR ASRock 970 Pro3 R2.0 Motherboard...
-
Seite 25: This Header Supports An Optional Wireless Transmitting
(see p.2 No. 22) Connect the power switch, reset switch and system status indicator on the chassis to this header according to the pin assignments below. Note the positive and negative pins before connecting the cables. ASRock 970 Pro3 R2.0 Motherboard... - Seite 26 Please connect the fan cables to the fan connectors and (4-pin CHA_FAN1) match the black wire to the (see p.2 No. 38) ground pin. (3-pin CHA_FAN2) (see p.2 No. 21) (3-pin PWR_FAN1) +12V (see p.2 No. 9) PWR_FAN_SPEED ASRock 970 Pro3 R2.0 Motherboard...
-
Seite 27: Atx Power Connector
4-pin ATX 12V power supply. To use the 4-pin ATX power supply, please plug your power supply along with Pin 1 and Pin 5. 4-Pin ATX 12V Power Supply Installation ASRock 970 Pro3 R2.0 Motherboard... - Seite 28 (19-pin USB3_2_3) IntA_P_D- one USB 3.0 header on this (see p.2 No. 37) IntA_P_SSTX+ IntA_P_SSTX- motherboard. This USB 3.0 IntA_P_SSRX+ IntA_P_SSRX- header can support two USB 3.0 Vbus ports. Vbus IntA_P_SSRX- IntA_P_SSRX+ IntA_P_SSTX- IntA_P_SSTX+ IntA_P_D- IntA_P_D+ ASRock 970 Pro3 R2.0 Motherboard...
-
Seite 29: Installing Windows
STEP 1: Set up UEFI. A. Enter UEFI SETUP UTILITY Advanced screen Storage Configuration. B. Set the “SATA Mode” option to [IDE]. ® STEP 2: Install Windows XP / XP 64-bit OS on your system. ASRock 970 Pro3 R2.0 Motherboard... - Seite 30 Advanced screen Storage Configuration. B. Set the “SATA Mode” option to [AHCI]. ® STEP 2: Install Windows 8 / 8 64-bit / 7 / 7 64-bit / Vista / Vista 64-bit OS on your system. ASRock 970 Pro3 R2.0 Motherboard...
- Seite 31 CD-ROM drive. It will display the Main Menu automatically if “AUTORUN” is enabled in your computer. If the Main Menu does not appear automatically, locate and double-click on the file “ASSETUP.EXE” from the BIN folder in the Support CD to display the menus. ASRock 970 Pro3 R2.0 Motherboard...
-
Seite 32: Einführung
1. Einführung Wir danken Ihnen für den Kauf des ASRock 970 Pro3 R2.0 Motherboard, ein zu- verlässiges Produkt, welches unter den ständigen, strengen Qualitätskontrollen von ASRock gefertigt wurde. Es bietet Ihnen exzellente Leistung und robustes Design, gemäß der Verpflichtung von ASRock zu Qualität und Halbarkeit. Diese Schnel- linstallationsanleitung führt in das Motherboard und die schrittweise Installation... -
Seite 33: Spezifikationen
- PCIE x1 Gigabit LAN 10/100/1000 Mb/s - Realtek RTL8111E - Unterstützt Wake-On-LAN - Unterstützt LAN-Kabelerkennung - Unterstützt energieeffizientes Ethernet 802.3az - Unterstützt PXE E/A-Anschlüsse I/O Panel an der - 1 x PS/2-Mausanschluss Rückseite - 1 x PS/2-Tastaturanschluss ASRock 970 Pro3 R2.0 Motherboard... - Seite 34 - Unterstützung für “Plug and Play” - ACPI 1.1-Weckfunktionen - JumperFree-Modus - SMBIOS 2.3.1 - CPU, VCCM, NB, SB Stromspannung Multianpassung Support-CD - Treiber, Dienstprogramme, Antivirussoftware (Probeversion), CyberLink MediaEspresso 6.5-Testversion, Google Chrome Browser und Toolbar ASRock 970 Pro3 R2.0 Motherboard...
- Seite 35 8 / 8 64-Bit / 7 / 7 64-Bit / Vista / Vista 64-Bit / XP / XP 64-Bit Zertifizierungen - FCC, CE, WHQL - Gemäß Ökodesign-Richtlinie (ErP/EuP) (Stromversorgung gemäß Ökodesign-Richtlinie (ErP/EuP) erforderlich) * Für die ausführliche Produktinformation, besuchen Sie bitte unsere Website: http://www.asrock.com ASRock 970 Pro3 R2.0 Motherboard...
-
Seite 36: Einstellung Der Jumper
CMOS gelöscht wurde. Bitte vergessen Sie nicht, den Jumper wieder zu entfernen, nachdem das CMOS gelöscht wurde. Wenn Sie den CMOS- Inhalt gleich nach dem Aktualisieren des BIOS löschen müssen, müssen Sie zuerst das System starten und dann wieder ausschalten, bevor Sie den CMOS-Inhalt löschen. ASRock 970 Pro3 R2.0 Motherboard... -
Seite 37: Anschlüsse
Anschlussleisten am Motherboard. Pro USB 2.0- USB_PWR Anschlussleiste werden zwei (9-pol. USB_8_9) USB 2.0-Ports unterstützt. (siehe S.2 - No. 25) DUMMY USB_PWR (9-pol. USB_10_11) USB_PWR P-11 (siehe S.2 - No. 26) P+11 DUMMY P+10 P-10 USB_PWR ASRock 970 Pro3 R2.0 Motherboard... -
Seite 38: Dieser Header Unterstützt Ein Optionales, Drahtloses Sende
/ Vista 64 Bit: Wählen Sie im Realtek-Bedienfeld die „FrontMic“ (Vorderes Mikrofon)- Registerkarte. Passen Sie die „Recording Volume“ (Aufnahmelautstärke) System Panel-Header Dieser Header unterstützt mehrere Funktion der (9-pin PANEL1) Systemvorderseite. (siehe S.2 - No. 22) ASRock 970 Pro3 R2.0 Motherboard... -
Seite 39: Gehäuselautsprecher-Header
Anzeige des (siehe S.2 - No. 19) PLED+ Systembetriebsstatus an diesem Header an. Die LED leuchtet, wenn das System in Betrieb ist. Die LED blinkt im S1-Zustand. Im S3-/S4- oder S5-Zustand (ausgeschaltet) leuchtet die LED nicht. ASRock 970 Pro3 R2.0 Motherboard... -
Seite 40: Verbinden Sie Die Lüfterkabel
Obwohl dieses Motherboard einen 24-pol. ATX- Stromanschluss bietet, kann es auch mit einem modifizierten traditionellen 20-pol. ATX-Netzteil verwendet werden. Um ein 20-pol. ATX-Netzteil zu verwenden, stecken Sie den Stecker mit Pin 1 und Pin 13 ein. Installation eines 20-pol. ATX-Netzteils ASRock 970 Pro3 R2.0 Motherboard... -
Seite 41: Com-Anschluss-Header
Audioausgang für eine HDMI- (siehe S.2 - No. 29) VGA-Karte zur Verfügung und ermöglicht den Anschluss von HDMI-Digitalgeräten wie Fernsehgeräten, Projektoren, LCD-Geräten an das System. Bitte verbinden Sie den HDMI_SPDIF-Anschluss der HDMI-VGA-Karte mit diesem Anschluss. ASRock 970 Pro3 R2.0 Motherboard... - Seite 42 ASSETUP.EXE im BIN-Verzeichnis der Support-CD, um die Menüs aufzurufen. Das Setup-Programm soll es Ihnen so leicht wie möglich machen. Es ist menüges- teuert, d.h. Sie können in den verschiedenen Untermenüs Ihre Auswahl treffen und die Programme werden dann automatisch installiert. ASRock 970 Pro3 R2.0 Motherboard...
-
Seite 43: Contenu Du Paquet
1. Introduction Merci pour votre achat d’une carte mère ASRock 970 Pro3 R2.0, une carte mère très fiable produite selon les critères de qualité rigoureux de ASRock. Elle offre des performances excellentes et une conception robuste conformément à l’engagement d’ASRock sur la qualité et la fiabilité au long terme. - Seite 44 - Realtek RTL8111E - Supporte du Wake-On-LAN - Prise en charge de la détection de câble LAN - Prend en charge la norme Energy Efficient Ethernet (Ethernet à efficacité énergétique) 802.3az - Support de PXE ASRock 970 Pro3 R2.0 Motherboard...
- Seite 45 - 32Mb AMI UEFI Legal BIOS avec support GUI - Support du “Plug and Play” - Compatible pour événements de réveil ACPI 1.1 - Gestion jumperless - Support SMBIOS 2.3.1 - CPU, VCCM, NB, SB Tension Multi-ajustement ASRock 970 Pro3 R2.0 Motherboard...
- Seite 46 64-bit / XP / XP 64-bit Certifications - FCC, CE, WHQL - Prêt pour ErP/EuP (alimentation Prêt pour ErP/EuP requise) * Pour de plus amples informations sur les produits, s’il vous plaît visitez notre site web: http://www.asrock.com ASRock 970 Pro3 R2.0 Motherboard...
- Seite 47 CMOS. Veuillez noter que le mot de passe, la date, l’heure, le profil par défaut de l’utilisateur, 1394 GUID et l’adresse MAC seront effacés seulement si la batterie du CMOS est enlevée. ASRock 970 Pro3 R2.0 Motherboard...
- Seite 48 2.0 sur cette carte mère. Chaque embase USB 2.0 peut prendre en charge 2 ports USB USB_PWR 2.0. (USB_8_9 br.9) (voir p.2 No. 25) DUMMY USB_PWR USB_PWR (USB_10_11 br.9) P-11 P+11 (voir p.2 No. 26) DUMMY P+10 P-10 USB_PWR ASRock 970 Pro3 R2.0 Motherboard...
- Seite 49 Allez sur l’onglet “FrontMic” (Micro avant) sur le Panneau de contrôle Realtek. Ajustez “Recording Volume” (Volume d’enregistrement). En-tête du panneau système Cet en-tête permet d’utiliser plusieurs fonctions du (PANEL1 br.9) panneau système frontal. (voir p.2 No. 22) ASRock 970 Pro3 R2.0 Motherboard...
- Seite 50 Il PLED+ (vedi p.2 Nr. 19) LED è acceso quando il sistema è in funzione. Il LED continua a lampeggiare in stato S1. Il LED è spento in stato S3/S4 o S5 (spegnimento). ASRock 970 Pro3 R2.0 Motherboard...
- Seite 51 ATX 24 broches, elle peut encore fonctionner si vous adopter une alimentation traditionnelle ATX 20 broches. Pour utiliser une alimentation ATX 20 broches, branchez à l’alimentation électrique ainsi qu’aux broches 1 et 13. 20-Installation de l’alimentation électrique ATX ASRock 970 Pro3 R2.0 Motherboard...
- Seite 52 E/S, il y a une barrette USB 3.0 (voir p.2 No. 37) IntA_P_SSTX- sur la carte mère. Cette barrette IntA_P_SSRX+ IntA_P_SSRX- USB 3.0 peut prendre en Vbus charge deux ports USB 3.0. Vbus IntA_P_SSRX- IntA_P_SSRX+ IntA_P_SSTX- IntA_P_SSTX+ IntA_P_D- IntA_P_D+ ASRock 970 Pro3 R2.0 Motherboard...
- Seite 53 CD-ROM. Le Menu principal s’affiche automatiquement si “AUTORUN” est activé dans votre ordinateur. Si le Menu principal n’apparaît pas automatiquement, localisez dans le CD technique le fichier “ASSETUP.EXE” dans le dossier BIN et double-cliquez dessus pour afficher les menus. ASRock 970 Pro3 R2.0 Motherboard...
-
Seite 54: Contenuto Della Confezione
1. Introduzione Grazie per aver scelto una scheda madre ASRock 970 Pro3 R2.0, una scheda madre affidabile prodotta secondo i severi criteri di qualità ASRock. Le prestazioni eccellenti e il design robusto si conformano all’impegno di ASRock nella ricerca della qualità e della resistenza. - Seite 55 - Supporta il rilevamento cavo LAN - Supporto di Energy Efficient Ethernet 802.3az - Supporta PXE Pannello I/O Panel posteriore I/O - 1 x porta PS/2 per mouse - 1 x porta PS/2 per tastiera ASRock 970 Pro3 R2.0 Motherboard...
- Seite 56 - Compatibile con ACPI 1.1 wake up events - Supporta jumperfree - Supporta SMBIOS 2.3.1 - Regolazione multi-voltaggio CPU, VCCM, NB, SB CD di - Driver, utilità, software antivirus (Versione dimostrativa), supporto CyberLink MediaEspresso 6.5 Trial, Google Chrome Browser e Toolbar ASRock 970 Pro3 R2.0 Motherboard...
- Seite 57 64 bit / XP / XP 64 bit Certificazioni - FCC, CE, WHQL - Predisposto ErP/EuP (è necessaria l’alimentazione predis posta per il sistema ErP/EuP) * Per ulteriori informazioni, prego visitare il nostro sito internet: http://www.asrock.com ASRock 970 Pro3 R2.0 Motherboard...
- Seite 58 CMOS. No- tare che password, data, ore, profilo utente predefinito, 1394 GUID e indirizzo MAC saranno cancellati solo se è rimossa la batteria della CMOS. ASRock 970 Pro3 R2.0 Motherboard...
- Seite 59 USB 2.0. Ciascuna intestazione USB 2.0 supporta due porte USB 2.0. USB_PWR (9-pin USB_8_9) DUMMY (vedi p.2 Nr. 25) USB_PWR (9-pin USB_10_11) USB_PWR P-11 (vedi p.2 Nr. 26) P+11 DUMMY P+10 P-10 USB_PWR ASRock 970 Pro3 R2.0 Motherboard...
- Seite 60 Andare alla scheda “FrontMic” (Microfono frontale) del pannello di controllo Realtek. Regolare la voce “Recording Volume” (Volume registrazione). Collettore pannello di sistema Questo collettore accomoda diverse funzioni di sistema (9-pin PANEL1) pannello frontale. (vedi p.2 Nr. 22) ASRock 970 Pro3 R2.0 Motherboard...
- Seite 61 Il (vedi p.2 Nr. 19) PLED+ PLED+ LED è acceso quando il sistema è in funzione. Il LED continua a lampeggiare in stato S1. Il LED è spento in stato S3/S4 o S5 (spegnimento). ASRock 970 Pro3 R2.0 Motherboard...
- Seite 62 ATX a 24 pin, ma può funzionare lo stesso se si adotta un alimentatore ATX a 20 pin. Per usare l’alimentatore ATX a 20 pin, collegare l’alimentatore con il Pin 1 e il Pin 13. Installazione dell’alimentatore ATX a 20 pin ASRock 970 Pro3 R2.0 Motherboard...
- Seite 63 (19-pin USB3_2_3) IntA_P_D- questa scheda madre è dotata IntA_P_SSTX+ (vedi p.2 Nr. 37) IntA_P_SSTX- di un header USB 3.0 che IntA_P_SSRX+ IntA_P_SSRX- supporta due porte USB 3.0. Vbus Vbus IntA_P_SSRX- IntA_P_SSRX+ IntA_P_SSTX- IntA_P_SSTX+ IntA_P_D- IntA_P_D+ ASRock 970 Pro3 R2.0 Motherboard...
- Seite 64 Inserire il CD di supporto nel lettore CD-ROM. Se la funzione “AUTORUN” è attivata nel computer, apparirà automaticamente il Menù principale. Se il Menù principale non appare automaticamente, posizionarsi sul file “ASSETUP.EXE” nel CESTINO del CD di supporto e cliccare due volte per visualizzare i menù. ASRock 970 Pro3 R2.0 Motherboard...
-
Seite 65: Contenido De La Caja
1. Introducción Gracias por su compra de ASRock 970 Pro3 R2.0 placa madre, una placa de con- fianza producida bajo el control de calidad estricto y persistente. La placa madre provee realización excelente con un diseño robusto conforme al compromiso de calidad y resistencia de ASRock. - Seite 66 - Soporta Wake-On-LAN - Admite detección de conexión de cable LAN - Compatible con Ethernet 802.3az de bajo consumo energético - Admite PXE Entrada/Salida I/O Panel de Panel Trasero - 1 x puerto de ratón PS/2 ASRock 970 Pro3 R2.0 Motherboard...
- Seite 67 - 32Mb AMI BIOS legal UEFI AMI compatible con GUI - Soporta “Plug and Play” - ACPI 1.1 compliance wake up events - Soporta “jumper free setup” - Soporta SMBIOS 2.3.1 - Múltiple ajuste de CPU, VCCM, NB, SB Voltage ASRock 970 Pro3 R2.0 Motherboard...
- Seite 68 - FCC, CE, WHQL - Cumple con la directiva ErP/EuP (se requiere una fuente de alimentación que cumpla con la directiva ErP/EuP) * Para más información sobre los productos, por favor visite nuestro sitio web: http://www.asrock.com ASRock 970 Pro3 R2.0 Motherboard...
- Seite 69 Tenga en cuenta que la contraseña, la fecha, la hora, el perfil predeterminado del usuario, el GUID 1394 y la dirección MAC solamente se borrará si la batería CMOS se quita. ASRock 970 Pro3 R2.0 Motherboard...
- Seite 70 Cada una de estas bases de conexiones admite dos puertos USB 2.0. USB_PWR (9-pin USB_8_9) (vea p.2, N. 25) DUMMY USB_PWR USB_PWR (9-pin USB_10_11) P-11 P+11 (vea p.2, N. 26) DUMMY P+10 P-10 USB_PWR ASRock 970 Pro3 R2.0 Motherboard...
- Seite 71 Acceda a la ficha “FrontMic” (Micrófono frontal) del panel de control Realtek. Ajuste la posición del control deslizante “Recording Volume” (Volumen de grabación). Cabezal de panel de sistema Este cabezar acomoda varias dunciones de panel frontal de (9-pin PANEL1) sistema. (vea p.2, N. 22) ASRock 970 Pro3 R2.0 Motherboard...
- Seite 72 El indicador LED se encenderá si el sistema se encuentra en funcionamiento. El indicador LED parpadeará en el estado S1. El indicador LED se apagará en los estados S3/S4 o S5 (apagado). ASRock 970 Pro3 R2.0 Motherboard...
- Seite 73 20 pins tradicional. Para usar una fuente de alimentación ATX de 20 pins, por favor, conecte su fuente de alimentación usando los Pins 1 y 13. Instalación de una Fuente de Alimentación ATX de 20 Pins ASRock 970 Pro3 R2.0 Motherboard...
- Seite 74 E/S, encontrará una (vea p.2, N. 37) IntA_P_SSTX- cabecera USB 3.0 en esta IntA_P_SSRX+ IntA_P_SSRX- Vbus placa base. Esta cabecera USB 3.0 admiten dos puertos USB 3.0. Vbus IntA_P_SSRX- IntA_P_SSRX+ IntA_P_SSTX- IntA_P_SSTX+ IntA_P_D- IntA_P_D+ ASRock 970 Pro3 R2.0 Motherboard...
- Seite 75 Para iniciar la instalación, ponga el CD en el lector de CD y se desplegará el Menú Principal automáticamente si «AUTORUN» está habilitado en su computadora. Si el Menú Principal no aparece automáticamente, localice y doble-pulse en el ar- chivo “ASSETUP.EXE” para iniciar la instalación. ASRock 970 Pro3 R2.0 Motherboard...
- Seite 76 1. Введение Благодарим вас за покупку материнской платы ASRock 970 Pro3 R2.0 надежной материнской платы, изготовленной в соответствии с постоянно предъявляемыми ASRock жесткими требованиями к качеству. Она обеспечивает превосходную производительность и отличается отличной конструкцией, которые отражают приверженность ASRock качеству и долговечности.
- Seite 77 - 2 x порта USB 3.0 на задней панели в стандартной конфигурации - Разъем 1 x RJ-45 LAN с светодиодным индикатором (индикатор ACT/LINK и индикатор SPEED) - Соединитель звуковой подсистемы: боковая колонка / тыльная колонка / центральная / субвуфер / линейный вход / передняя ASRock 970 Pro3 R2.0 Motherboard...
- Seite 78 8 / 8 64-bit / 7 / 7 64-bit / Vista / Поддержка 64-разрядной версии Vista / XP / XP 64-bit ные системы - FCC, CE, WHQL Сертификаты - Совместимость с ErP/EuP Ready (требуется блок питания совместимый с ErP/EuP) ASRock 970 Pro3 R2.0 Motherboard...
-
Seite 79: Установка
перед очисткой CMOS, необходимо сначала выполнить загрузку системы, а затем завершить ее работу. Примите во внимание, что пароль, дата, время, профиль пользователя по умолчанию, идентификатор 1394 GUID и MAC-адрес будут очищены только тогда, когда будет извлечена из своего гнезда батарейка CMOS. ASRock 970 Pro3 R2.0 Motherboard... - Seite 80 USB 2.0. Каждый разъем USB 2.0 поддерживает два порта USB 2.0. USB_PWR (9-контактный USB_8_9) (см. стр. 2, п. 25) DUMMY USB_PWR USB_PWR (9-контактный USB_10_11) P-11 P+11 (см. стр. 2, п. 26) DUMMY P+10 P-10 USB_PWR ASRock 970 Pro3 R2.0 Motherboard...
- Seite 81 Перейдите к вкладке «FrontMic» (Передний микрофон) в панели управления Realtek. Отрегулируйте уровень «Recording Volume» (Громкость записи). Колодка системной панели Данная колодка обеспечивает работу нескольких функций (9-контактный PANEL1) передней панели системы. (см. стр. 2, п. 22) ASRock 970 Pro3 R2.0 Motherboard...
- Seite 82 к этому разъему для отображения (3-контактный PLED1) статуса питания системы. Этот (см. стр. 2, п. 19) PLED- PLED+ PLED+ светодиод продолжит мигать в режиме S1. Светодиод будет выключен в режимах S3/S4 или S5 (система выключена). ASRock 970 Pro3 R2.0 Motherboard...
- Seite 83 ивает 24-штыревой разъем питания ATX, работа будет продолжаться, даже если адаптируется традиционный 20-штыревой разъем питания ATX. Для использования 20-штыревого разъема питания ATX вставьте источник питания вместе со штекером 1 и штекером 13. Установка 20-штыревого разъема питания ATX ASRock 970 Pro3 R2.0 Motherboard...
- Seite 84 вывода, на данной материнской (см. стр. 2, п. 37) IntA_P_SSTX+ IntA_P_SSTX- плате предусмотрен один разъем IntA_P_SSRX+ USB 3.0. Этот разъем USB 3.0 IntA_P_SSRX- Vbus поддерживает два порта USB 3.0. Vbus IntA_P_SSRX- IntA_P_SSRX+ IntA_P_SSTX- IntA_P_SSTX+ IntA_P_D- IntA_P_D+ ASRock 970 Pro3 R2.0 Motherboard...
- Seite 85 Если в вашем компьютере включена функция автозапуска (AUTORUN), то на экране автоматически появится главное меню компакт-диска (Main Menu). Если этого не произошло, найдите в папке BIN на компакт-диске поддержки файл ASSETUP.EXE и дважды щелкните на нем, чтобы открыть меню. ASRock 970 Pro3 R2.0 Motherboard...
- Seite 86 Gratos por comprar nossa placa–mãe 970 Pro3 R2.0 um produto confiável feito com ASRock um estrito controle de qualidade consistente. Com um excelente de- sempenho, essa placa é dotada de um projeto robusto que atende a ASRock de compromisso com a qualidade e durabilidade.
-
Seite 87: Especificações
- Suporta Detecção de cabo LAN - Suporta Ethernet com Eficiência Energética 802.3az - Suporta PXE Entrada/Saída I/O Panel pelo painel - 1 x porta para mouse PS/2 - 1 x porta para teclado PS/2 ASRock 970 Pro3 R2.0 Motherboard... - Seite 88 - Suporte para SMBIOS 2.3.1 - CPU, VCCM, NB, SB Voltage Multi-adjustment CD de suporte - Controladores, utilitários, software antivírus (Experimentacao Versao), CyberLink MediaEspresso 6.5 versão de demonstração, Navegador Google Chrome e Barra de Ferramentas ASRock 970 Pro3 R2.0 Motherboard...
- Seite 89 64 bits / XP / XP de 64 bits Certificações - FCC, CE, WHQL - “ErP/EuP Ready” (é necessária alimentação eléctrica “ErP/ EuP Ready”) * Para informações mais detalhadas por favor visite o nosso sítio Web: http://www.asrock.com ASRock 970 Pro3 R2.0 Motherboard...
- Seite 90 CMOS. Tenha em atenção que a palavra-passe, data, hora, perfil predefinido de utilizador, 1394 GUID e endereço MAC apenas serão limpos se a bateria do CMOS for retirada. ASRock 970 Pro3 R2.0 Motherboard...
- Seite 91 USB 2.0. USB_PWR (USB_8_9 de 9 pinos) (veja a folha 2, No. 25) DUMMY USB_PWR USB_PWR (USB_10_11 de 9 pinos) P-11 P+11 (veja a folha 2, No. 26) DUMMY P+10 P-10 USB_PWR ASRock 970 Pro3 R2.0 Motherboard...
- Seite 92 Aceda ao separador “Microfone frontal” no painel de Controlo Realtek. Ajuste o “Volume de gravação”. Conector do painel do sistema Este conector acomoda várias funções do painel frontal do (PANEL1 de 9 pinos) sistema. (veja a folha 2, No. 22) ASRock 970 Pro3 R2.0 Motherboard...
- Seite 93 (veja a folha 2, No. 19) PLED- PLED+ PLED+ do sistema. O LED ficará acesso quando o sistema estiver em funcionamento. O LED fica intermitente no estado S1. O LED fica desligado nos estados S3/S4 ou no estado S5 (desligado). ASRock 970 Pro3 R2.0 Motherboard...
- Seite 94 20 pinos. Para usar a fonte de alimentação de 20 pinos, por favor ligue a sua fonte de alimentação com o Pino 1 e o Pino 13. Instalação da Fonte de alimentação ATX de 20 Pinos ASRock 970 Pro3 R2.0 Motherboard...
- Seite 95 IntA_P_SSTX+ (veja a folha 2, No. 37) IntA_P_SSTX- USB 3.0 nesta placa-mãe. IntA_P_SSRX+ IntA_P_SSRX- Cada ligação USB 3.0 pode Vbus suportar dois portas USB 3.0. Vbus IntA_P_SSRX- IntA_P_SSRX+ IntA_P_SSTX- IntA_P_SSTX+ IntA_P_D- IntA_P_D+ ASRock 970 Pro3 R2.0 Motherboard...
- Seite 96 CD na leitora de CD-ROM do computador. Automaticamente iniciará o menu principal, casa o AUTORUN esteja ativado. Se o menu principal não aparecer automaticamente, explore o CD e execute o “ASSETUP.EXE” localizado na pasta BIN. ASRock 970 Pro3 R2.0 Motherboard...
- Seite 97 önceden haber verilmeksizin değişebilir. Bu belgede değişiklik yapılması durumun -da, güncelleştirilmiş sürüm ayrıca haber verilmeksizin ASRock web sitesinde sunulur. En son VGA kartlarını ve CPU destek listelerini de ASRock web sitesinde bulabilirsiniz. ASRock web sitesi http://www.asrock.com Bu anakartla ilgili teknik desteğe ihtiyacınız olursa, kullandığınız modele özel bilgiler için lütfen web sitemizi ziyaret edin.
- Seite 98 - LAN’da Uyan özelliğini destekler - LAN Kablo Algılama’yı destekler - Enerji Verimli Ethernet 802.3az desteği - PXE destekler Arka Panel G/З Paneli - 1 x PS/2 Fare Portu - 1 x PS/2 Klavye Portu ASRock 970 Pro3 R2.0 Motherboard...
- Seite 99 - Sürücüler, Yardımcı Programlar, AntiVirüs Yazılımı (Deneme Sürümü), CyberLink MediaEspresso 6.5 Deneme Sürümü, Google Chrome Browser ve Toolbar Donanım - CPU Sıcaklık Duyarlılığı Monitör - Kasa Sıcaklık Duyarlılığı - CPU/Kasa/Güç Fan Takometresi - CPU/Kasa Sessiz Fan - CPU/Kasa Fan Çoklu-Hız Kontrolü ASRock 970 Pro3 R2.0 Motherboard...
- Seite 100 64-bit / XP / XP 64-bit uyumlu Sertifikalar - FCC, CE, WHQL - ErP/EuP Hazır (ErP/EuP hazır güç kaynağı gerekli) * Ayrıntılı ürün bilgileri için lütfen web sitemizi ziyaret edin: http://www.asrock.com 1.3 Jumper'ların Ayarı Şekilde jumper'ların nasıl ayarlandıkları gösterilmektedir. Jumper kapağı pinler üzerine yerleştirildiğinde jumper "Kapalı"...
- Seite 101 (bkz. s.2 No. 23) bulunur. Her USB 2.0 fişi iki USB 2.0 portunu destekler. USB_PWR (9-pinli USB_8_9) (bkz. s.2 No. 25) DUMMY USB_PWR (9-pinli USB_10_11) USB_PWR P-11 (bkz. s.2 No. 26) P+11 DUMMY P+10 P-10 USB_PWR ASRock 970 Pro3 R2.0 Motherboard...
- Seite 102 Bu fiş, birçok sistem ön paneli işlevini barındırır. (9-pinli PANEL1) (bkz. s.2 No. 22) Kasa üzerindeki güç anahtarını, sıfırlama anahtarını ve sistem durumu göstergesini aşağıdaki pin atamalarına göre bu bağlantıya bağlayın. Kabloları bağlamadan önce pozitif ve negatif pinlere dikkat edin. ASRock 970 Pro3 R2.0 Motherboard...
- Seite 103 Kasa/güç Fan Konektörü Lütfen kasa fan kablolarını fanına bu konektöre bağlayın (4-pinli CHA_FAN1) ve siyah kabloyu toprak pinine (bkz. s.2 No. 38) bağlayın. (3-pinli CHA_FAN2) (bkz. s.2 No. 21) (3-pinli PWR_FAN1) +12V (bkz. s.2 No. 9) PWR_FAN_SPEED ASRock 970 Pro3 R2.0 Motherboard...
- Seite 104 Bu anakart 8-pinli ATX 12V güç konektörü sağlasa da geleneksel bir 4-pinli ATX 12V güç kaynağı bağlarsanız da çalışabilir. 4-pinli ATX güç kaynağını kullanmak için, lütfen güç kaynağınızı Pin 1 ve Pin 5'le birlikte takın. 4-Pinli ATX 12V Güç Kaynağını Takma ASRock 970 Pro3 R2.0 Motherboard...
- Seite 105 (bkz. s.2 No. 37) IntA_P_SSTX+ IntA_P_SSTX- kart üzerinde bir adet USB 3.0 IntA_P_SSRX+ IntA_P_SSRX- bağlantısı bulunur. Bu USB 3.0 Vbus bağlantısı iki adet USB 3.0 bağlantı noktasını Vbus destekleyebilir. IntA_P_SSRX- IntA_P_SSRX+ IntA_P_SSTX- IntA_P_SSTX+ IntA_P_D- IntA_P_D+ ASRock 970 Pro3 R2.0 Motherboard...
- Seite 106 Destek CD'sini kullanmaya başlamak için, CD'yi CDROM sürücünüze takın. Bilgisayarınızda "OTOMATİK KULLAN" özelliği etkinleştirilmişse, Ana Menüyü otomatik olarak görüntüler. Ana Menü otomatik olarak görüntülenmezse, menüleri görüntülemek için Destek CD'sinin “BIN” klasöründeki "ASSETUP.EXE" dosyasını bulun ve çift tıklatın. ASRock 970 Pro3 R2.0 Motherboard...
- Seite 107 1. 제품소개 ASRock 의 970 Pro3 R2.0 메인 보드를 구매하여 주신것에 대하여 감사 드립니다 . 이 메인보드는 엄격한 품질관리 하에 생산되어진 신뢰성 있는 메인보드 입니다 . 이 제품은 고 품격 디자인과 함께 ASRock 의 우수한 품질과 최고의 안정성을 자랑하고 있습니다 . 이 빠른 설치 안내서에는 마더보드에 대한 설명과 단계별 설치 방법이 실...
- Seite 108 - 웨이크 - 온 - 랜 지원 - LAN 케이블 감지 지원 - 절전형 이더넷 802.3az 지원 - PXE 지원 후면판 I/O I/O Panel - 1 개 PS/2 마우스 포트 - 1 개 PS/2 키보드 포트 ASRock 970 Pro3 R2.0 Motherboard...
- Seite 109 - CPU, VCCM, NB, SB 전압 멀티 조절 지원 CD - 드라이버 , 유틸리티 , 안티바이러스 소프트웨어 ( 시험판 ), CyberLink MediaEspresso 6.5 평가판 , Google Chrome Browser 및 Toolbar 하드웨어 모니터 - CPU 온도 감지 - 마더보드 온도 감지 ASRock 970 Pro3 R2.0 Motherboard...
- Seite 110 인증서 - FCC, CE, WHQL - ErP/EuP 지원 (ErP/EuP 지원 전원 공급기가 요구됨 ) * 상세한 제품정보는 당사의 웹사이트를 방문할수있습니다 . http://www.asrock.com 1.3 점퍼 셋팅 그림은 점퍼를 어떻게 셋업 하는지를 보여줍니다 . 점퍼 캡이 핀 위에 있을 때 , 점퍼는 “ 쇼트 ” 입니다 .
- Seite 111 할 수 있습니다 . USB_PWR (9 핀 USB_8_9) (2 페이지 , 25 번 항목 참조 ) DUMMY USB_PWR (9 핀 USB_10_11) USB_PWR P-11 (2 페이지 , 26 번 항목 참조 ) P+11 DUMMY P+10 P-10 USB_PWR ASRock 970 Pro3 R2.0 Motherboard...
- Seite 112 Realtek 제어판에서 “FrontMic” ( 앞면 마이크 ) 로 가서 “Recording Volume” ( 리코딩 볼륨 ) 을 조정합니다 . 시스템 콘넥터 이 콘넥터는 시스템 전면 패 널기능을 지원하기 위한 (9 핀 PANEL1) 것입니다 . (2 페이지 , 22 번 항목 참조 ) ASRock 970 Pro3 R2.0 Motherboard...
- Seite 113 (2 페이지 , 19 번 항목 참조 ) PLED+ 는 LED 에 전원이 켜져 있습니 다 . S1 상태에서는 LED 가 계 속 깜박입니다 . S3/S4 상태 또 는 S5 상태에서는 LED 가 꺼집 니다 ( 전원 꺼짐 ). ASRock 970 Pro3 R2.0 Motherboard...
- Seite 114 이 마더보드는 24 핀 ATX 전원 커넥터를 제공하지만 , 종래의 20 핀 ATX 전원 공급장치를 사용해도 작동이 가능합니다 . 20 핀 ATX 전원 공급장치를 사용하려면 , Pin 1 과 Pin 13 으로 전원공급장치를 연결하십시오 . 20 핀 ATX 전원 공급장치 설치 ASRock 970 Pro3 R2.0 Motherboard...
- Seite 115 (2 페이지 , 37 번 항목 참조 ) IntA_P_SSTX+ IntA_P_SSTX- 습니다 . 이 USB 3.0 헤더는 2 개 IntA_P_SSRX+ IntA_P_SSRX- 의 USB 3.0 포트를 지원할 수 있 Vbus 습니다 . Vbus IntA_P_SSRX- IntA_P_SSRX+ IntA_P_SSTX- IntA_P_SSTX+ IntA_P_D- IntA_P_D+ ASRock 970 Pro3 R2.0 Motherboard...
- Seite 116 으로 메인 메뉴를 모니터에 디스플레이 시켜 줄 것입니다 . 만일 자동으로 메인 메뉴 가 나타나지 않는다면 , 보조 CD 의 디스플레이 메뉴 안에 있는 BIN 폴더 ASSETUP. EXE 파일을 더블 클릭하여 주시기 바랍니다 . (D: \ BIN \ ASSETUP.EXE, D: 는 CD-ROM 드라이브 ) ASRock 970 Pro3 R2.0 Motherboard...
- Seite 117 このマザーボードに関連する技術サポートが必要な場合、当社の Web サイト にアクセスし、使用しているモデルについての特定情報を見つけてくださ い。 www.asrock.com/support/index.asp 1.1 パッケージ内容 ASRock 970 Pro3 R2.0 マザーボード (ATX フォームファクター ) ASRock 970 Pro3 R2.0 クイックインストレーションガイド ASRock 970 Pro3 R2.0 サポート CD 2 x シリアル ATA (SATA) データケーブル(オプション) 1 x I/O パネルシールド ASRockからのお知らせ ...
- Seite 118 - PCIE x1 Gigabit LAN 10/100/1000 Mb/s - Realtek RTL8111E - Wake-On-LAN をサポート - LAN ケーブル検出をサポート - Energy Efficient Ethernet 802.3az をサポート - PXE に対応 リアパネル I/O Panel - PS/2 マウスポート x 1 - PS/2 キーボードポート x 1 ASRock 970 Pro3 R2.0 Motherboard...
- Seite 119 - SMBIOS 2.3.1 サポート - CPU、VCCM、NB、SB ブリッジ電圧 サポート CD - ドライバー、ユーティリティ、アンチウィルスソフト ウェアハードウェア ( 体験版 )、 CyberLink MediaEspresso 6.5 試用版、 Google Chrome Browser および Toolbar モニター - CPU 温度検知 - マザーボード温度検知 - CPU/ シャーシ / 電源ファンタコメータ - CPU/ シャーシクワイエットファン ASRock 970 Pro3 R2.0 Motherboard...
- Seite 120 CMOS の消去 デフォルト設定 注 : CLRCMOS1 により、CMOS のデータをクリアできます。システムパラメータをクリアしデフォルト設定にリ セットするには、コンピュータの電源をオフにし、電源装置から電源コードを抜いてください。15 秒待って から、ジャンパキャップを使用して CLRCMOS1 のピン 2 とピン 3 を 5 秒間ショートしてください。ただし、 BIOS 更新の後すぐには CMOS をクリアしないでください。BIOS の更新の終了後直ちに CMOS をクリア する必要がある場合、まずシステムを起動してからシャットダウンし、その後クリア CMOS アクションを実 行する必要があります。パスワード、日付、時刻、ユーザーデフォルトのプロファイルを忘れずにメモして ください。1394 GUID と MAC アドレスは、CMOS バッテリを取り外した場合のみ消去されます。 ASRock 970 Pro3 R2.0 Motherboard...
- Seite 121 ヘッダが搭載されています。それ ぞれの USB 2.0 ヘッダは 2 つの USB 2.0 ポートをサポートできま す。 USB_PWR (9 ピン USB_8_9) ページ2, アイテム 25 を参照 DUMMY USB_PWR USB_PWR (9 ピン USB_10_11) P-11 P+11 ページ2, アイテム 26 を参照 DUMMY P+10 P-10 USB_PWR ASRock 970 Pro3 R2.0 Motherboard...
- Seite 122 64-bit OS の場合 : Realtek コントロールパネルから “ FrontMic ” ( フロントマイ ク ) タブを開きます。 “ Recording Volume ” ( 録音音量 ) を調 整します。 システムパネルコネクタ このコネクタは数種類のシステム フ ロントパネルの機能を提供しま (9 ピン PANEL1) す。 ページ2, アイテム 22 を参照 ASRock 970 Pro3 R2.0 Motherboard...
- Seite 123 ページ2, アイテム 19 を参照 PLED+ ステムが動作中の際にオンになりま す。S1 ステータスでは LED は点滅し 続けます。S3/S4 ステータス、または S5 ステータス ( 電源オフ ) の場合、 LED は消灯します。 シャーシおよび電源ファンコネクタ ファンケーブルをファンコネクタ に接続し、黒いワイヤをアースピ (4 ピン CHA_FAN1) ページ2, アイテム 38 を参照 ンに合わせてください。 (3 ピン CHA_FAN2) ページ2, アイテム 21 を参照 ASRock 970 Pro3 R2.0 Motherboard...
- Seite 124 従来の 20 ピン ATX 電源装置を採用している場合でも作動します。 20 ピン ATX 電源を使用するには、ピン 1 およびピン 13 と共に電源 装置にプラグを差し込みます。 20 ピン ATX 電源装置の取り付け ATX 12V コネクタ このコネクタには CPU に Vcore 電 源を供給できるように、ATX 12V (8 ピン ATX12V1) プラグを備えたサワーサプライを ページ2, アイテム 1 を参照 接続する必要があることに注意し てください。接続に問題があると、電源 は正しく供給されません。 ASRock 970 Pro3 R2.0 Motherboard...
- Seite 125 (19 ピン USB3_2_3) IntA_P_D- ードに 1 つの USB 3.0 ヘッダが搭載 ページ 2, アイテム 37 を参照 IntA_P_SSTX+ IntA_P_SSTX- されています。それぞれの USB 3.0 IntA_P_SSRX+ ヘッダは 2 つの USB 3.0 ポートをサ IntA_P_SSRX- Vbus ポートできます。 Vbus IntA_P_SSRX- IntA_P_SSRX+ IntA_P_SSTX- IntA_P_SSTX+ IntA_P_D- IntA_P_D+ ASRock 970 Pro3 R2.0 Motherboard...
- Seite 126 8 / 8 64-bit / 7 / 7 64-bit / Vista / Vista 64-bit / XP / XP 64-bit といった様々なマイクロソフト ウイン ドウズ オペレーティングシステムをサポートします。マザーボードに付属しているサポート CD はマザーボードの特徴を有効にするために必要なドライバやユーティリティを含んでい ます。サポート CD を使用するには、CDROM ドライブに CD を挿入してください。AUTORUN 機能が有効な場合、自動的にメインメニュウが立ち上がります。AUTORUN 機能が無効な 場合、サポート CD 内の BIN フォルダにある ASSETUP.EXE をダブルクリックすることによ り、メインメニュウが立ち上がります。 ASRock 970 Pro3 R2.0 Motherboard...
- Seite 127 1. 主板簡介 謝謝你采用了華擎 970 Pro3 R2.0 主板 , 本主板由華擎嚴格制造 , 質量可靠 , 穩定性 好 , 能夠獲得卓越的性能。本安裝指南介紹了安裝主板的步驟。更加詳細的主板信息 可參看驅動光盤的用戶手冊。 由于主板規格和 BIOS 軟件將不斷升級 , 本手冊之相關內容變更恕不另 行通知。請留意華擎网站上公布的升級版本。你也可以在華擎網站找 到最新的顯卡和 CPU 支持表。 華擎网址:http://www.asrock.com 如果您需要與此主板有關的技術支持 , 請參觀我們的網站以了解您使用機 種的規格信息。 www.asrock.com/support/index.asp 1.1 包裝盒內物品 華擎 970 Pro3 R2.0 主板 (ATX 規格 ) 華擎...
- Seite 128 - Realtek RTL8111E - 支持网路喚醒(Wake-On-LAN) - 支持網路線偵測功能 - 支持 Energy Efficient Ethernet 802.3az - 支持 PXE Rear Panel I/O 界面 I/O ( 后面板輸入 - 1 個 PS/2 鼠標接口 / 輸出接口 ) - 1 個 PS/2 鍵盤接口 ASRock 970 Pro3 R2.0 Motherboard...
- Seite 129 - 支持 SMBIOS 2.3.1 - CPU, VCCM, NB, SB 電壓多功能調節器 支持光盤 - 驅動程序、工具軟件、殺毒軟件(試用版 )、CyberLink MediaEspresso 6.5 試用版、Chrome 谷歌瀏覽器和工具欄 硬件監控器 - CPU 溫度偵測 - 主板溫度偵測 - CPU/ 機箱 / 電源風扇轉速計 - CPU/ 機箱靜音風扇 - CPU/ 機箱風扇多速控制 ASRock 970 Pro3 R2.0 Motherboard...
- Seite 130 線帽將 C L R C M O S1 上的插針 2 和插針 3 短接 5 秒。但是,請勿在更新 B I O S 后 立即清除 C M O S。如果需要在更新 B I O S 后立即清除 C M O S,必須在執行 C M O S 清除操作之前,先啟動然后關閉系統。請注意,只有取出 C M O S 電池,密碼、 日期、時間、用戶默認配置文件、1394 GUID 和 MAC 地址才會被清除。 ASRock 970 Pro3 R2.0 Motherboard...
- Seite 131 USB_PWR (9 針 USB_10_11) P-11 P+11 ( 見第 2 頁第 26 項 ) DUMMY P+10 P-10 USB_PWR 紅外線模塊接頭 這個接頭支持一個選配的無 IRTX +5VSB 線發送和接受紅外線的 (5 針 IR1) DUMMY 模塊。 ( 見第 2 頁第 27 項 ) IRRX ASRock 970 Pro3 R2.0 Motherboard...
- Seite 132 8 / 8 64 位元 / 7 / 7 64 位元 / Vista / Vista 位元操作系統中 : 在 Realtek 控制面板中點擊”FrontMic”。調節”Recording Volume”。 系統面板接頭 這個接頭提供數個系統前面 板功能。 (9 針 PANEL1) ( 見第 2 頁第 22 項 ) 根據下面的針腳說明連接機箱上的電源開關、重啟按鈕與系統狀態 指示燈到這個排針。根據之前請注意針腳的正負極。 PWRBTN( 電源開關 ): 連接機箱前面板的電源開關。您可以設置用電源鍵關閉系統的方式。 RESET( 重啟開關 ): 連接機箱前面板的重啟開關。當電腦死機且無法正常重新啟動時 , 可 按下重啟開關重新啟動電腦。 ASRock 970 Pro3 R2.0 Motherboard...
- Seite 133 (3 針 PWR_FAN1) ( 見第 2 頁第 9 項 ) +12V PWR_FAN_SPEED CPU 風扇接頭 請將 CPU 風扇連接線接到這個 FAN_SPEED_CONTROL CPU_FAN_SPEED 接頭,並讓黑線與接地的針腳 (4 針 CPU_FAN1) +12V 相接。 ( 見第 2 頁第 5 項 ) 1 2 3 4 ASRock 970 Pro3 R2.0 Motherboard...
- Seite 134 ATX 12V 電源。為了使用 4-pin ATX 12V 電源 , 請順著 Pin 1 和 Pin 5 插上電 源接頭。 4-Pin ATX 12V 電源安裝說明 串行接口連接器 這個 COM1 端口支持一個串行 接口的外設。 (9 針 COM1) ( 見第 2 頁第 28 項 ) ASRock 970 Pro3 R2.0 Motherboard...
- Seite 135 進行常規檢驗。如果你需要在開機自檢 ( P O S T ) 之后進入 B I O S 設置程序,請按下 <Ctrl>+<Alt>+<Delete> 鍵重新啟動電腦,或者按下系統面板上的重啟按鈕。有關 BIOS 設置的詳細信息,請查閱隨機支持光盤裡的用戶手冊 (PDF 文件 )。 3. 支持光盤信息 ® ® 本主板支持各種微軟視窗操作系統:Microsoft Windows 8/8 64 位元 /7/7 64 位元 /Vista /Vista 64 位元 /XP/XP 64 位元。主板隨機支持光盤包含各種有助于提高主 板效能的必要驅動和實用程序。請將隨機支持光盤放入光驅裡,如果電腦的“自動運 行”功能已啟用,屏幕將會自動顯示主菜單。如果主菜單不能自動顯示,請查找支持 光盤內 BIN 文件夾下的“ASSETUP.EXE”,并雙擊它,即可調出主菜單。 ASRock 970 Pro3 R2.0 Motherboard...
- Seite 136 有害物質或元素 部件名稱 鉛 (Pb) 鎘 (Cd) 汞 (Hg) 六价鉻 (Cr(VI)) 多溴聯苯 (PBB) 多溴二苯醚 (PBDE) 印刷電路板 及電子組件 外部信號連 接頭及線材 O: 表示該有毒有害物質在該部件所有均質材料中的含量均在 SJ/T 11363-2006 標準規定 的限量要求以下。 X: 表示該有毒有害物質至少在該部件的某一均質材料中的含量超出 SJ/T 11363-2006 標準 規定的限量要求,然該部件仍符合歐盟指令 2002/95/EC 的規範。 備註 : 此產品所標示之環保使用年限,系指在一般正常使用狀況下。 ASRock 970 Pro3 R2.0 Motherboard...
- Seite 137 1. 主機板簡介 謝謝你採用了華擎 970 Pro3 R2.0 主機板 , 本主機板由華擎嚴格製造 , 品質可靠 , 穩 定性好 , 能夠獲得卓越的性能。此快速安裝指南包括了主機板介紹和分步驟安裝指 導。您可以查看支持光碟裡的使用手冊了解更詳細的資料。 由於主機板規格和 BIOS 軟體將不斷更新 , 本手冊之相關內容變更恕不另 行通知。請留意華擎網站上公布的更新版本。你也可以在華擎網站找到最 新的顯示卡和 CPU 支援列表。 華擎網址:http://www.asrock.com 如果您需要與此主機板有關的技術支援 , 請參觀我們的網站以了解您使用 機種的規格訊息。 www.asrock.com/support/index.asp 1.1 包裝盒內物品 華擎 970 Pro3 R2.0 主機板 (ATX 規格 ) 華擎...
- Seite 138 - Realtek RTL8111E - 支援網路喚醒(Wake-On-LAN) - 支援網路線偵測功能 - 支援 Energy Efficient Ethernet 802.3az - 支援預先開機執行環境(PXE) Rear Panel I/O 界面 I/O ( 後背板輸入 - 1 個 PS/2 滑鼠接口 / 輸出接口 ) - 1 個 PS/2 鍵盤接口 ASRock 970 Pro3 R2.0 Motherboard...
- Seite 139 - 支援 jumperfree 免跳線模式 - 支援 SMBIOS 2.3.1 - CPU,VCCM,NB,SB 電壓多功能調節器 支援光碟 - 驅動程式、工具軟體、防毒軟體(試用版本 )、CyberLink MediaEspresso 6.5 試用版、Google Chrome Browser 和 Toolbar 硬體監控器 - CPU 溫度偵測 - 主板溫度偵測 - CPU/ 機箱 / 電源風扇轉速計 - CPU/ 機箱靜音風扇 ASRock 970 Pro3 R2.0 Motherboard...
- Seite 140 註: C L R C M O S1 可供您清除 C M O S 中的資料。若要清除及重設系統參數並恢復為預設設 定,請先關閉電腦電源,並從電源插座中拔下電源線,等待 15 秒鐘之後,使用跳 線帽使 CLRCMOS1 的 pin2 及 pin3 短路 5 秒的時間。但請勿於更新 BIOS 後立即清除 CMOS。如需於更新 BIOS 後立即清除 CMOS,您必須先開機再關機,然後再執行 CMOS 清除操作。請注意,只有在移除 C M O S 電池的情況下,密碼、日期、時間、使用者 預設設定檔、1394 GUID 及 MAC 位址才會清除。 ASRock 970 Pro3 R2.0 Motherboard...
- Seite 141 USB_PWR ( 見第 2 頁第 26 項 ) USB_PWR P-11 P+11 DUMMY P+10 P-10 USB_PWR 紅外線模組接頭 這個接頭支援一個選配的模 IRTX +5VSB 組 , 可用來無線傳輸和接收紅 (5 針 IR1) DUMMY 外線。 ( 見第 2 頁第 27 項 ) IRRX ASRock 970 Pro3 R2.0 Motherboard...
- Seite 142 8 / 8 64 位元 / 7 / 7 64 位元 / Vista / Vista 位元作業系統中 : 在 Realtek 控制面板中點選”FrontMic”。調整”Recording Volume”。 系統面板接頭 可接各種不同燈,電源開關及 重啟鍵等各種連線。 (9 針 PANEL1) ( 見第 2 頁第 22 項 ) 請根據下面的腳位說明連接機箱上的電源開關、重開按鈕與系統狀 態指示燈到這個接頭。請先注意針腳的正負極。 PWRBTN( 電源開關 ): 連接機箱前面板的電源開關。您可以設定用電源鍵關閉系統的方式。 RESET( 重開開關 ): 連接機箱前面板的重開開關。當電腦當機且無法正常重新啟動時 , 可 按下重開開關重新啟動電腦。 ASRock 970 Pro3 R2.0 Motherboard...
- Seite 143 (3 針 PWR_FAN1) +12V ( 見第 2 頁第 9 項 ) PWR_FAN_SPEED CPU 風扇接頭 請將 CPU 風扇連接線接到這個 FAN_SPEED_CONTROL 接頭,並讓黑線與接地的針腳 (4 針 CPU_FAN1) CPU_FAN_SPEED +12V 相接。 ( 見第 2 頁第 5 項 ) 1 2 3 4 ASRock 970 Pro3 R2.0 Motherboard...
- Seite 144 4-pin ATX 12V 電源。為了使用 4-pin ATX 12V 電源 , 請 順著 Pin 1 和 Pin 5 插上電源接頭。 4-Pin ATX 12V 電源安裝說明 序列埠 這個序列埠 COM1 支援一個序 列埠的裝置。 (9 針 COM1) ( 見第 2 頁第 28 項 ) ASRock 970 Pro3 R2.0 Motherboard...
- Seite 145 運行需要時,測試和初始化元件。有關 B I O S 設置的詳細訊息,請查閱隨機支援光碟 裡的使用手冊 (PDF 文件 )。 3. 支援光碟訊息 ® ® ® 本主板支援各種微軟 Windows 操作系統:Microsoft Windows 8/8 64 位元 /7/7 64 位元 /Vista /Vista 64 位元 /XP/XP 64 位元。主板附帶的支援光碟包含各種有助 於提高主板效能的必要驅動和實用程式。請將隨機支援光碟放入光碟機裡,如果系統 的“自動運行”功能已啟用,銀幕將會自動顯示主菜單。如果主菜單不能自動顯示, 請查閱支援光碟內 BIN 文件夾下的 ASSETUP.EXE 文件並雙點它,即可調出主菜單。 ASRock 970 Pro3 R2.0 Motherboard...
- Seite 146 Dalam kondisi terjadinya modifikasi buku pedoman ini, versi baru akan diperlihatkan dalam website ASRock tanpa peringatan lebih. Anda dapat mendapatkan kartu- kartu yang paling baru dan daftar bantuan CPU pada website ASRock. Website ASRock http://www.asrock.com 1.1 Isi Paket Papan Induk 970 Pro3 R2.0 ASRock (Faktor Form ATX)
- Seite 147 - Realtek RTL8111E - Menggunakan Wake-On-LAN - Mendukung Deteksi Kabel LAN - Mendukung Energy Efficient Ethernet 802.3az - Mendukung PXE Papan Belakang I/O Panel - 1 x Port Mouse PS/2 - 1 x Port Keyboard PS/2 ASRock 970 Pro3 R2.0 Motherboard...
-
Seite 148: Penghubung
- Penyesuaian berbagai tegangan CPU, VCCM, NB, SB Sokongan CD - Penggerak, kegunaan, Software AntiVirus (Versi Cobaan), CyberLink MediaEspresso 6.5 Trial, Google Chrome Browser dan Toolbar Penjaga - Perasa Suhu CPU Hardware - Perasa Suhu Casis - Pengukur Kipas CPU/casis/Power ASRock 970 Pro3 R2.0 Motherboard... - Seite 149 8 / 8 64-bit / 7 / 7 64-bit / Vista / Vista 64-bit / XP / XP 64-bit Sertifikasi - FCC, CE, WHQL - ErP/EuP Ready (memerlukan catu daya ErP/EuP ready) * Untuk informasi rinci, silakan kunjungi website kami: http://www.asrock.com ASRock 970 Pro3 R2.0 Motherboard...
- Seite 150 (“xxx” is the device which contains your Windows installation files. Normally it is an optical drive.) You can also press <F11> to launch boot menu at system POST and choose the item “UEFI:xxx“ to boot. ® 4. Start Windows installation. ASRock 970 Pro3 R2.0 Motherboard...
-
Seite 151: Installing Os On A Hdd Larger Than 2Tb In Raid Mode
4. Press <F11> to enter Boot Manual. Choose UEFI : Built - in EFI Shell. 5. Key in drvcfg, for example you will see below: Drv[4E] Ctrl[B5] Lang[eng] 6. Key in dh [Drv number], for example: key in dh 4E. ASRock 970 Pro3 R2.0 Motherboard... - Seite 152 For example: key in drvcfg –s 4E B5. 8. Choose Logical Drive Main Menu to set up Raid Drive. 9. Choose Logical Drive Create Menu to create a Raid Drive. 10. Choose Usable Physical Drive List to select Raid HDD. ASRock 970 Pro3 R2.0 Motherboard...
- Seite 153 14. Press <F10> to exit Utility. 15. During reboot, please press <F11> to enter Boot Manual. Choose UEFI: SCSI CD/DVD Drive. ® * This option only shows on Windows 8 64-bit, 7 64-bit and Vista 64-bit OS. ASRock 970 Pro3 R2.0 Motherboard...
- Seite 154 Microsoft suggested solution: A. Disable System Restore. a. Type “systempropertiesprotection” in the Start Menu. Then press "Enter". b. De-select Local Disks for System Restore. Then Click “Turn System Restore Off” to confirm. Then Press “Ok”. ASRock 970 Pro3 R2.0 Motherboard...
- Seite 155 B. Disable “Volume Shadow Copy” service. a. Type “computer management” in the Start Menu, then press “Enter”. b. Go to “Services and Applications>Services”; Then double click “Volume Shadow Copy”. c. Set “Startup type” to “Disable” then Click “OK”. ASRock 970 Pro3 R2.0 Motherboard...
- Seite 156 C. Reboot your system. (It may take about 5 mins to boot.) ® D. The Windows will install this hotfix then reboot by itself. E. Please start to install motherboard drivers and utilities. 17. Finish. ASRock 970 Pro3 R2.0 Motherboard...