Pullup & Dip FREESIXD Benutzerhandbuch
Sling- und widerstandstrainer
Inhaltsverzeichnis
Verfügbare Sprachen
Verfügbare Sprachen
Kapitel
Inhaltsverzeichnis

Verwandte Anleitungen für Pullup & Dip FREESIXD


Inhaltszusammenfassung für Pullup & Dip FREESIXD
- Seite 1 benutzerhandbuch user manual www.pullup-dip.com...
- Seite 2 Sehr geehrte Kundin, Sehr geehrter Kunde, wir freuen uns, dass Sie sich für FREESIXD von Pullup & Dip® entschieden haben! Pullup & Dip® ist eine Marke für Premium Calisthenics- und Bodyweight-Trainings- geräte, welche eine hohe Produktqualität und innovatives Produktdesign auszeichnet.
- Seite 3 Benutzerhandbuch Alle Übungen als Videos sowie Trainingspläne für Anfänger und Fortgeschrittene finden Sie auch im Mitgliederbereich unserer FREESIXD Video Library! Hier geht’s zur Video Library: ACHTUNG Das Nichtlesen und Nichtbeachten der in diesem Benutzerhandbuch aufgeführten Sicherheitsanweisungen können zu schweren Verletzungen und zum Tod führen! Werden die aufgeführten Hinweise missachtet,...
-
Seite 4: Inhaltsverzeichnis
7| montageanleitungen ................Seite 10 7.1| montage: Wand ................Seite 10 7.2| montage: türe .................Seite 15 7.3| montage Outdoor ................Seite 18 7.4| montage videos ................Seite 22 8| hinweise zur nutzung von freesixd ............Seite 23 9| Garantie und rückgaberecht..............seite 36 10| kontakt ......................Seite 37... -
Seite 5: Wichtige Sicherheitshinweise
1| wichtige sicherheitshinweise 1. Es ist wichtig, vor der Montage und Nutzung des Gerätes das gesamte Benutzerhand- buch zu lesen. Eine sichere und effiziente Nutzung kann nur erreicht werden, wenn das Gerät ordnungsgemäß montiert, gewartet und verwendet wird. Es liegt in Ihrer Verantwortung zu gewährleisten, dass alle Benutzer des Gerätes über alle Vorsichts- maßnahmen und Warnungen informiert sind. -
Seite 6: Was Ist „Freesixd
Gerät möglich, das in einer kleinen Tasche verstaut werden kann. FREESIXD ist viel mehr als nur ein kompakter, mobiler Sling-Trainer mit umfangreichem Zubehör, der Ihnen ermöglicht, Ihren ganzen Körper zu trainieren. Im Grunde ist FREESIXD eine Kombination aus Sling-Trainer, Widerstandsbändern und einer Trainingsstange, die Ihnen mehr Übungen in umfangreicheren Schwierigkeitsgraden bietet als ein Sling-... -
Seite 7: Allgemeine Sicherheitshinweise
3| Allgemeine sicherheitshinweise 1. Das Trainingsgerät ist sowohl für den Indoor-, als auch für den Outdoor-Bereich geeignet. Die MAXIMALE BELASTBARKEIT von 130 kg darf hierbei unter keinen Umständen überschritten werden! 2. Eine sichere Befestigung des Gerätes sowie aller Einzelteile muss vor Beginn des Trainings gewährleistet sein. -
Seite 8: Produktmerkmale Und Lieferumfang
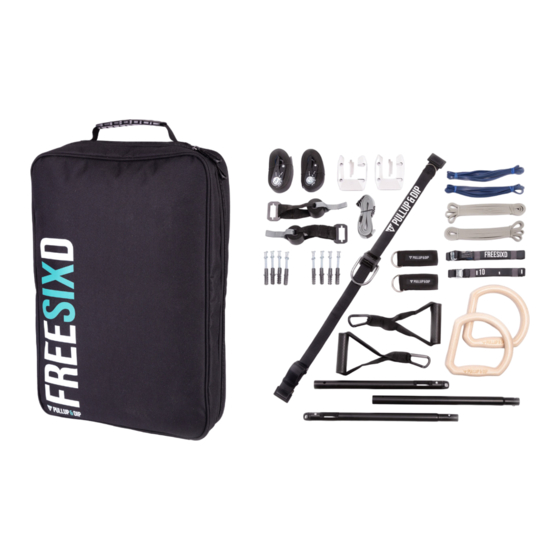
5| Produktmerkmale und lieferumfang lieferumfang - packages packages Door wall & wall & Door Door + Inhalt super belt portable organizer door attachment + travel bag resistance bands in 2 strengths ankle straps sling trainer straps handles Wall adapters + wall mounting material pluggable bar exercise e-book... -
Seite 9: Maße Gewicht
Freesixd zubehör artikel informationen maße gewicht zubehör artikel wall Kit: 1,1 kg scews: 8 80 mm wall adapters + anchors: 12 60 mM wall mounting material outdoor Kit: 1,6 KG outdoor adapters + Länge tension straps straps: 200 cm pluggable bar 1,9 kg Länge: 128 cm... -
Seite 10: Montagevarianten
6| montagevarianten Das Gerät darf ausschließlich an folgenden Gegenständen montiert werden: Wand Montage ausschließlich an Ziegel- oder Betonwände, 䕲 Montage an Stud-Wall nur mit einer Zusatzplatte möglich! Türe Keine Montage an Glastüren! Türen vor Montage stets auf deren 䕲 Stabilität prüfen! Die Türe sollte massiv sein und einen Türrahmen haben, in den sie hineingezogen werden kann. - Seite 11 oberer Wand Adapter max. Abstand 220 cm Superbelt unterer Wand Adapter Wichtig: Es wird nicht empfohlen, den oberen Wand Adapter höher als die zuvor aufge- 䕲 führte Faustformel zu montieren. Bei höherer Montage muss später beim Einhängen des Superbelts ggf. eine Trittleiter, ein Stuhl oder eine ähnliche Erhöhung verwendet werden, um den oberen Adapter noch erreichen zu können.
- Seite 12 7.1| Montage: wand Unterer Wand Adapter: Montieren Sie den unteren Wand Adapter so weit unten und nahe am Boden wie 䕲 möglich. Bspw. direkt oberhalb der Fußbodenleiste oder knapp oberhalb der Fußbo- denkante. Achten Sie hierbei besonders auf den Verlauf von Strom- und Wasserleitun- gen in der Wand! Achten Sie bei der Montage darauf, dass der untere und obere Wand Adapter parallel 䕲...
- Seite 13 7.1| Montage: wand Schritt 3: Nach der Setzung der Markierungen an der Wand, Wand Adapter entfernen und alle vier Bohrungen auf der Markierung mit dem 5 mm Bohrer vorbohren. Anschließend die Lö- cher mit dem 12 mm Bohrer auf Enddurchmesser bohren. Die Bohrtiefe sollte mindestens 90 mm betragen.
- Seite 14 7.1| Montage: wand Schritt 5: Die vier Kappen auf die Schraubenköpfe setzen. Schritt 6: Superbelt von vorne in der Verankerung des Adapters einhängen. Den Superbelt nach unten führen und in den unteren Wand Adapter einhängen. Zur geraden Ausrichtung des unteren Wand Adapters, die Wasserwaage an den Superbelt ansetzen. Schritt 7: Zur Befestigung des unteren Wand Adapters, die Schritte 1-5 beachten.
-
Seite 15: Montage: Türe
7.1| Montage: wand Stud-Wall Wenn Sie nur eine Stud-Wall/Rigipswand zu Hause haben und dennoch FREESIXD darauf installieren möchten, können Sie eine zusätzliche Holzplatte verwenden, die Sie zwischen zwei Stiften befestigen. Auf dieser Platte können Sie dann die Wandadapter anbringen (siehe Abbildung). - Seite 16 7.2| Montage indoor: türe montageschritte Schritt 1: Benötigtes Material Türsystem: Gurt 䕲 Türanker 䕲 Schritt 2: Das Einhakesystem des Gurtes mit der Schlaufe des Türankers verbinden. Schritt 3: Superbelt in die Verankerung des Türankers einhängen.
- Seite 17 7.2| Montage indoor: türe Schritt 4: Die eingehängte Kombination mittig über die geöffnete Tür legen. Das Türsystem mit Schaumstoffschutz soll dabei zur sich öffnenden Seite der Tür zeigen. Schritt 5: Superbelt unten in die Schlaufe des Türankers einhängen und unter der geöffneten Tür hindurch ziehen.
-
Seite 18: Montage Outdoor
7.3| Montage outdoor hinweise Unter den folgenden Voraussetzungen kann das Gerät an Bäumen oder Pfosten 䕲 befestigt werden: - Durchmesser Baum: mindestens 20,0 cm - Durchmesser Pfosten: mindestens 10,0 cm - Maximaler Durchmesser des Baumes oder Pfosten: 60,0 cm Stellen Sie sicher, dass ihr gewählter Befestigungsgegenstand (Baum oder Pfosten) in 䕲... - Seite 19 7.3| Montage outdoor montageschritte Schritt 1: Benötigtes Material: 2 Outdoor Adapter 䕲 2 Spanngurte 䕲 Schritt 2: Den Spanngurt in den Outdoor Adapter einfädeln: Von außen nach innen und wieder von innen nach außen. Beachten Sie, dass der Spanngurt so eingefädelt werden muss, dass die geöffnete Ratsche mit dem flachen Betätiger nach unten zeigt (s.
- Seite 20 7.3| Montage outdoor Schritt 5: Den Superbelt oben und unten in die Outdoor Adapter einhängen. Schritt 6: Den Superbelt festziehen und das Gurtende mit dem Klettverschluss befestigen. Hinweis: Das befestigte Ende des Superbelts darf nicht auf den Betätiger der Schnalle drücken. Das passiert, wenn der Klettverschluss zu stark angezogen wird und sich der restliche Gurt darüber befindet.
- Seite 21 7.3| Montage outdoor Verwendung der ratsche 1. Die beiden silbernen Hebel bis in die Verankerung auseinanderziehen. 2. Den Spanngurt von unten in die geöffnete Ratsche einführen. 3. Die Hebel erneut auseinanderziehen und aus der Verankerung lösen. 4. Das mehrmalige Zusammenführen und Öffnen der Ratsche spannt den Gurt. 5.
-
Seite 22: Montagevideos
7.4| Montagevideos Durch das Scannen der QR-Codes mit einem Smartphone oder Tablet, gelangen Sie zu den Montagevideos, in denen die einzelnen Montagevarianten für FREESIXD ausführlich gezeigt werden. Montage: Montage: Montage wand türe outdoor... -
Seite 23: Hinweise Zur Nutzung Von Freesixd
8| hinweise zur nutzung von freesixd übersicht Wand Adapter oberer D-Ring Superbelt Buckle Bügel Resistance Bands Karabiner Griffe unterer D-Ring Wand Adapter... - Seite 24 8| hinweise zur nutzung von freesixd 1. SUPERBELT in Adapter einhängen Das Einhakesystem am Ende des Superbelts wird von der Vorderseite in die dafür vor- gesehene Verankerung des Adapters eingeführt. Anschließend den Superbelt festziehen. Das freie Ende des Gurtes kann mit dem Klettverschlussband fixiert werden.
- Seite 25 8| hinweise zur nutzung von freesixd 2. verstellen der Buckle Durch das Zusammendrücken der Buckle von oben und von unten lässt diese sich beliebig weit nach oben und unten verschieben. Durch lösen des Drucks, bleibt die Buckle an der gewünschten Stelle.
- Seite 26 8| hinweise zur nutzung von freesixd 2. verstellen der Buckle Die Höhenverstellbarkeit der Buckle bietet Ihnen die Möglichkeit, den Widerstand wäh- rend Ihres Trainings zu variieren. Hier finden Sie ein Video zur Variation des Widerstandes mit Hilfe der Buckle:...
- Seite 27 8| hinweise zur nutzung von freesixd 3. Trainieren mit den Resistance Bands Maximaler Widerstand Resistance Band blau: 15 kg 䕲 Maximaler Widerstand Resistance Band grau: 30 kg 䕲 Maximale Dehnung der Resistance Bands: Wenn keine weitere Dehnung der Resis- 䕲...
- Seite 28 8| hinweise zur nutzung von freesixd 3. Trainieren mit den Resistance Bands Hinweise: Die Resistance Bands sind Verschleißartikel, die sich über längeren Zeitraum abnutzen 䕲 können. Durch regelmäßige Pflege kann die Lebensdauer der Resistance Bands verlängert wer- 䕲 den. Hierfür kann beispielsweise handelsübliches Babypuder verwendet werden.
- Seite 29 8| hinweise zur nutzung von freesixd 4. trainieren mit den Sling Trainer Straps Die beiden Sling Trainer Straps sind längenverstellbar. Achten Sie beim Training dar- 䕲 auf, dass die beiden Straps die gleiche Länge haben. Die Sling Trainer Straps haben eine Skala von: 25 - 20 - 15 - 10 - 5 - 1 Die Sling Trainer Straps werden für das Einhängen von den Griffen oder TRINGS ein-...
- Seite 30 8| hinweise zur nutzung von freesixd 5. Trainieren mit den Griffen (Handles) Im Lieferumfang sind zwei schwarze Griffe mit jeweils eingehängten Karabinern enthalten. Für die Griffe gibt es zwei Befestigungsmöglichkeiten: Befestigung über Karabiner an den Schlaufen der Resistance Bands 䕲...
- Seite 31 8| hinweise zur nutzung von freesixd 6. Trainieren mit den TRINGS (Triangle Rings) Die Geometrie der Holz-TRINGS ermöglicht Ihnen drei verschiedene Griffvarianten, sodass die TRINGS Ihnen eine vielseitigere Anwendung beim Training bieten. ergo ergo round round straight straight Für die TRINGS gibt es zwei Befestigungsmöglichkeiten: Befestigung über Schlaufenknoten an den Resistance Bands...
- Seite 32 8| hinweise zur nutzung von freesixd 6. Trainieren mit den TRINGS (Triangle Rings) Hinweise zur Befestigung der TRINGS an den Sling Trainer Straps 1. Drücken Sie die Schnellverschlussschnalle nach unten und führen Sie den Gurt von unten und von der Rückseite durch die Schnalle.
- Seite 33 8| hinweise zur nutzung von freesixd 7. Trainieren mit den Fußschlaufen Die Fußschlaufe öffnen und um das Fußgelenk legen. 䕲 Das Ende der Fußschlaufe durch den D-Ring der Fußschlaufe ziehen. 䕲 Die Fußschlaufe mit dem Klettverschluss verschließen. 䕲 Karabiner einhängen.
- Seite 34 8| hinweise zur nutzung von freesixd 8. Trainieren mit der pluggable bar Befestigung der Resistance Bands: Das Resistance Band am Ende der Bar durch die Öse führen und von oben über den Kopf der Bar legen und festziehen. Hinweis: Die Öse hat eine Breite von 37 mm. Somit können folgende Resistance Bands für...
- Seite 35 8| hinweise zur nutzung von freesixd 2. Freie Übungen mit der Bar zusammen mit Resistance Bands: Stehen Sie bei den freien Übungen mit den Füßen in die Schlaufen der 䕲 Resistance Bands. Achten Sie darauf, dass für diese Art von Übungen ein möglichst glatter Unter- 䕲...
-
Seite 36: Garantie Und Rückgaberecht
9| Garantie und Rückgaberecht Die Garantiezeit beträgt zwei Jahre und beginnt mit dem Tag des Rechnungsdatums. Bitte bewahren Sie die Rechnung als Nachweis für den Kauf und damit den Garantie- anspruch auf. Es gelten folgende Garantiebestimmungen: Der Hersteller garantiert kostenfreie Behebung von Mängeln, die auf Material- oder Fabrikationsfehler zurückzuführen sind. -
Seite 37: Kontakt
10| Kontakt fragen oder kommentare? Sollten Sie weitergehende Fragen zum Produkt oder Schwierigkeiten bei der Befestigung des Produktes haben, so können Sie uns gerne kontaktieren. Für Rückfragen oder techni- sche Auskünfte stehen wir Ihnen gerne zur Verfügung. @pullupanddipofficial facebook.com/pullupanddip youtube.com/pullupdip FT Fitness Technology GmbH Im Oberhof 4 88260 Argenbuehl... - Seite 39 user manual benutzerhandbuch www.pullup-dip.com...