Herunterladen Inhalt Inhalt Diese Seite drucken
Brita On Line Active Plus Gebrauchsanleitung
Vorschau ausblenden Andere Handbücher für On Line Active Plus:

Werbung

Verfügbare Sprachen
  • DE

Verfügbare Sprachen

  • DEUTSCH, seite 47
Instructions for use | Mode d'emploi
Manual de instrucciones
Instruções de utilização | Gebrauchsanleitung
Istruzioni per l'uso | Instrukcja obsługi
Gebruiksaanwijzing

Werbung

Inhaltsverzeichnis
loading

Inhaltszusammenfassung für Brita On Line Active Plus

  • Seite 1 Instructions for use | Mode d‘emploi Manual de instrucciones Instruções de utilização | Gebrauchsanleitung Istruzioni per l‘uso | Instrukcja obsługi Gebruiksaanwijzing...
  • Seite 2: Inhaltsverzeichnis

    I. Parabéns Página 36 II. Qualidade a partir do primeiro momento Página 39 – 44 III. Notas Importantes Página 45 IV. BRITA ao seu serviço e a pensar na sua total satisfação Página 46 I. Herzlichen Glückwunsch Seite DEUTSCH II. Für Qualität von Anfang an Seite 48 –...
  • Seite 3: English

    3.1. fi lter cartridge BRITA recommends you to change your fi lter cartridge every 6 months to ensure optimum fi ltration. Please don’t forget to take note of your BRITA exchange indicator with display on the fi lter cartridge. ENGLISH...
  • Seite 4: Quality From The Very Start

    Quality from the very start Terms of warranty The On Line Active Plus fi lter system is subject to the statutory guarantee of 2 years. A guarantee claim may be asserted only if all instructions in this handbook are followed and observed.
  • Seite 5 The fi lter head is set to “++” by default. To change the setting, use On Line Active Plus Kit – easy installation an Allen key (5 mm). Turn in the direction of the arrow until the “+” appears in the window. To set the fi lter head when using the Before starting, please check that you have all the components On Line Active A 1000 fi...
  • Seite 6: Technical Data

    – see Point B). G Installation You can fi x the electronic BRITA cartridge exchange indicator with display to a suitable, dry place using the supplied hook and loop fastener. We recommend installing it under the sink. Avoid contact...
  • Seite 7 BRITA water dispenser. Next, install the BRITA water dispenser (see illustration). Then put the base (2) over the hole and fi x the BRITA water 12 mm dispenser (1) in place using the supplied counter plate (4), the Drill gasket (3), the locking ring (5) and the hexagon nut (6).
  • Seite 8 Insert the small gasket (7/16") in the end of the hose (2). A a) Turn off the cold water supply c) Screw this end onto the installed BRITA water dispenser (see b) Put the hose (1) in place Step 3.3).
  • Seite 9 Step 5: Inserting the fi lter cartridge Step 6 (optional): Space-saving wall mount to install the cartridge under the sink A Remove the protective cap (1) (see fi g. 7). (see fi g. 8) B Insert the fi lter cartridge (5) vertically into the fi lter head (2). Make sure the head’s locking handle (3) is open.
  • Seite 10: Replacing The Fi Lter Cartridge

    Optional: Inserting the BRITA On Line Active A 1000 You can also use the On Line A Activated Carbon A 1000 fi lter cartridge with your BRITA On Line Active Plus Water Filter Kit. First, set the fi lter head to setting C.
  • Seite 11 Technical data of the On Line P 1000 cartridge Troubleshooting A No water fl ow Operating pressure 2 bar to max. 8.6 bar Cause: Water intake closed. Water intake temperature 4°C to 30°C Troubleshooting: Open the water intake at the upstream shut-off operation 4°C to 30°C valve or by closing the locking handle (3) on the...
  • Seite 12: Important Notes

    • BRITA recommends that the fi lter system is not left unused for direct sunlight and mechanical damage. Do not assemble near a long period. If the BRITA On Line Active Plus fi lter system is sources of heat and open fl ames. A stop valve must be installed not used for several days (2–3 days), we recommend that the...
  • Seite 13: Brita, Quality And Satisfaction Guaranteed

    The BRITA service hotline cares exchange indicator with display Do you have any questions about your BRITA product? Or on the sub- Every BRITA cartridge exchange indicator with ject of water fi ltration? Give us a call! You can fi nd the contact details display has a useful life of approx.
  • Seite 14: Français

    ® Nous vous félicitons pour l’achat de ce système BRITA Il vous permet d'obtenir de l'eau fi ltrée BRITA plus pure, plus claire, au goût agréable, directement à partir du distributeur BRITA. Ce système BRITA offre de nombreux avantages L'eau fi ltrée BRITA •...
  • Seite 15: La Qualité Dès Le Début

    Avant l'installation, vérifi ez que vous disposez d'un raccord d'ali- mentation en eau froide 3/8" ou 1/2" de manière à pouvoir raccorder le kit de fi ltration On Line Active Plus en supplément du distribu- teur d'eau. Si vous ne disposez pas d'un raccord d'alimentation en eau froide 3/8"...
  • Seite 16: A Mise En Service

    Attention : veuillez programmer l'indicateur électronique de chan- avec les valeurs du tableau. gement de cartouche BRITA® avec affi chage pendant la journée pour que le signal de remplacement commence à sonner de jour. Suivant la couleur de la bandelette, nous vous recommandons de régler la tête fi...
  • Seite 17: Caractéristiques Techniques

    e Pour activer le compteur 180 jours, appuyez brièvement sur jusqu'à 16 heures après épuisement total des piles. Ce délai DISPLAY puis sur le bouton START/RESET. écoulé, l'appareil revient aux réglages usine et doit être repro- grammé – voir point B). f Un point clignotant dans la partie inférieure gauche de l'affi...
  • Seite 18 BRITA. Installez ensuite le distributeur BRITA (voir l'illustration). Placez la base (2) sur l'orifi ce et fi xez le distributeur d'eau BRITA (1) à l'aide de la contre-plaque (4), du joint (3), de la bague de blocage (5) et de l'écrou hexagonal (6) fournis.
  • Seite 19 Si votre alimentation en eau froide ne convient pas au rac- de la garantie ! cord 3/8" du tuyau (1), utilisez l'adaptateur fourni. Le kit de fi ltration On Line Active Plus comprend un adaptateur 1/2". Si vous avez besoin d'autres adaptateurs, adressez-vous au fournisseur le plus proche.
  • Seite 20 Etape 5 : mise en place de la Etape 6 (facultative) : fi xation murale pour cartouche fi ltrante un montage peu encombrant de la cartouche sous l'évier (voir fi g. 8) A Enlevez le capuchon de protection (1) (voir fi g. 7). B Placez la cartouche fi...
  • Seite 21 Optionnel : mise en place de la cartouche fi ltrante BRITA On Line Active A 1000 Vous pouvez aussi utiliser la cartouche fi ltrante On Line A 1000 à charbon actif avec le kit BRITA On Line Active Plus. Réglez d'abord la tête fi ltrante sur C. FRANÇAIS...
  • Seite 22 Caractéristiques techniques de la cartouche Dépannage P 1000 A Absence d'eau Cause : Arrivée d'eau fermée. Pression de fonctionnement 2 bars à 8,6 bars maxi Solution : Ouvrez l'arrivée d'eau avec le robinet d'arrêt placé en Température de l'arrivée d'eau 4 °C à...
  • Seite 23: Important

    Important Important Utilisation optimale Evitez d'exposer le kit de fi ltration On Line Active Plus à un rayon- • BRITA recommande d'utiliser le système de fi ltration réguliè- nement solaire direct ou à des dommages mécaniques. Ne placez rement. En cas de non-utilisation du système BRITA On Line pas le système à...
  • Seite 24: Brita Et La Satisfaction Totale

    Satisfait ou remboursé : la garantie BRITA vous au feuillet inséré dans le kit de fi ltration On Line Active Plus. Nous sommes persuadés que ce produit BRITA vous donnera entière satisfaction. Si, toutefois, il ne devait pas répondre à...
  • Seite 25: Español

    ® Le felicitamos por su nuevo sistema BRITA Gracias por elegir la calidad de BRITA para obtener agua fi ltrada BRITA más limpia y con un sabor mucho más agradable directamente desde su grifo BRITA. El sistema BRITA le ofrece muchas ventajas El agua fi...
  • Seite 26: Calidad Desde El Principio

    Calidad desde el principio Condiciones de la garantía El sistema de fi ltro On Line Active Plus tiene una garantía legal de 2 años. Las reclamaciones en periodo de garantía serán válidas si se han seguido todas las instrucciones de este manual.
  • Seite 27 Advertencia: programe el indicador electrónico de cambio de • Pasado 1 minuto, compare el color del campo de reactivo con la cartucho con pantalla BRITA de día para que la alarma de cambio se tabla y consulte el ajuste apropiado.
  • Seite 28: Datos Técnicos

    e Para activar el temporizador de 180 días, pulse brevemente el G Instalación botón DISPLAY y, después, pulse START/RESET. Puede fi jar el indicador electrónico de cambio de cartucho con f La señal parpadeante de la parte inferior izquierda de la pantalla pantalla en un lugar seco utilizando el gancho y la cinta de velcro indica que el temporizador ya ha empezado a funcionar.
  • Seite 29 BRITA. Seguidamente, instale el grifo BRITA (consulte la ilustración). A continuación, ponga la base (2) en el orifi cio y fi je el grifo BRITA Broca de (1) con la contraplaca (4), la junta (3), el anillo de bloqueo (5) y la 12 mm tuerca hexagonal (6) suministrados.
  • Seite 30 Inserte la junta pequeña (7/16") en el extremo de la man- guera (2). b) Conecte la manguera (1). c) Atornille este extremo en el grifo BRITA instalado (consulte el c) Coloque las juntas intermedias (3/8") en las respectivas roscas paso 3.3).
  • Seite 31 Paso 5: Inserción del cartucho fi ltrante Paso 6 (opcional): Montaje mural para instalar el cartucho bajo el fregadero y A Quite la tapa protectora (1) (ver Fig. 7). ahorrar espacio (ver Fig. 8) B Inserte el cartucho fi ltrante (5) verticalmente en el cabezal del fi...
  • Seite 32 BRITA On Line Active A 1000 Puede usar el cartucho fi ltrante On Line Active A1000 con el set de fi ltros de agua BRITA On Line Active Plus. En primer lugar, ajuste el cabezal del fi ltro en C.
  • Seite 33: Solución De Problemas

    Datos técnicos del cartucho P 1000 Solución de problemas A El agua no fl uye de 2 bares a un máximo Presión de servicio Causa: Toma de agua cerrada. de 8,6 bares Solución del problema: Abra la toma de agua en la llave de paso o Temperatura de entrada de agua de 4 °C a 30 °C bien cierre la llave de cierre (3) del cabezal...
  • Seite 34: Notas Importantes

    Notas importantes Uso óptimo Proteja el set de fi ltros de agua de clase Premium On Line Active Plus • BRITA recomienda que el sistema de fi ltro no permanezca de la luz directa del sol y de daños mecánicos. No realice el montaje sin usarse durante períodos prolongados.
  • Seite 35: Brita A Su Servicio Para Una Satisfacción Total

    fi ltración de agua? ¡Llámenos! Encontrará los datos de contacto pantalla BRITA tienen una vida útil aproximada de del servicio de atención al cliente BRITA de su país en el reverso de 5 años. Pasado este tiempo, recuerde desecharlo este manual.
  • Seite 36: Português

    ® Parabéns pelo seu novo sistema BRITA Obrigado por ter escolhido a qualidade BRITA para água fi ltrada BRITA mais limpa, clara e com óptimo sabor directamente da sua torneira de água BRITA. O sistema BRITA proporciona diversas vantagens A água fi ltrada BRITA •...
  • Seite 37: Qualidade A Partir Do Primeiro Momento

    Qualidade a partir do primeiro momento Termos da garantia O sistema de fi ltração On Line Active Plus está sujeito a uma garantia estatutária de 2 anos. Só poderá apresentar um pedido de garantia caso todas as instruções existentes neste manual tenham sido seguidas e respeitadas.
  • Seite 38 A tira pode ser encontrada na embalagem exterior destas Instru- Atenção: assegure-se de que activa o indicador electrónico de ções de utilização. mudança de carga com display BRITA durante o dia para que o sinal Utilizar a tira de teste: de mudança possa começar durante o dia.
  • Seite 39: Dados Técnicos

    C Ler o estado do contador G Instalação Para activar o display durante a operação, prima por breves instan- Pode fi xar o indicador electrónico de mudança de carga com display tes o botão DISPLAY. num local seco e adequado, utilizando o velcro fornecido. Reco- mendamos a instalação por baixo do lava-loiça.
  • Seite 40 Certifi que-se de que a área por baixo da torneira é estável, Para instalar a torneira de água BRITA, certifi que-se primeiro de que especialmente caso a superfície de trabalho não seja feita de dispõe de todas as ferramentas necessárias (ver fi...
  • Seite 41 3/8" da tubagem (1), use o adaptador fornecido. O seu danifi cam as ligações da cabeça do fi ltro, invalidando assim conjunto On Line Active Plus é fornecido com um adaptador quaisquer reclamações de garantia! de 1/2". Desloque-se ao fornecedor mais próximo para obter adaptadores de outras dimensões.
  • Seite 42 Passo 5: Inserir a carga fi ltrante Passo 6 (opcional): suporte de parede economizador de espaço para instalar a A Retire a tampa protectora (1) (ver fi g. 7). carga sob o lava-loiça (ver fi g. 8) B Introduza a carga fi ltrante (5) verticalmente na cabeça do fi...
  • Seite 43 Também pode utilizar a carga fi ltrante On Line A Activated Carbon A 1000 com o conjunto de fi ltro de água On Line Active Plus da BRITA. Primeiro, regule a cabeça do fi ltro para a defi nição C.
  • Seite 44: Resolução De Problemas

    Dados técnicos da carga P 1000 Resolução de problemas A Sem fl uxo de água Pressão de funcionamento 2 bar a 8,6 bar no máx. Causa: Entrada da água fechada. Temperatura entrada de água 4°C a 30°C Solução: Abra a entrada da água na válvula de corte a montante ou funcionamento 4°C a 30°C feche o manípulo de fecho (3) na cabeça do fi...
  • Seite 45: Notas Importantes

    Notas importantes Utilização optimizada Proteja o conjunto de fi ltro de água premium On Line Active Plus • A BRITA recomenda a utilização frequente do sistema de fi ltra- da luz directa do sol e de danos mecânicos. Não efectue a mon- ção.
  • Seite 46: Brita Ao Seu Serviço E A Pensar Na Sua Total Satisfação

    Cada indicador de mudança de carga com display Tem dúvidas acerca do seu produto BRITA? Ou acerca do processo da BRITA tem uma vida útil aproximada de 5 anos. de fi ltração de água? Entre em contacto connosco! Pode encontrar as No fi...
  • Seite 47: Herzlichen Glückwunsch

    ® Herzlichen Glückwunsch zu Ihrem neuen BRITA System mit MAXTRA! Wir freuen uns, dass Sie sich für die Qualität von BRITA entschieden haben. Und damit für weiches und wohlschmeckendes, BRITA gefi lter- tes Wasser direkt aus Ihrer BRITA Küchenarmatur. Ihr BRITA System überzeugt durch viele Vorteile BRITA gefi...
  • Seite 48: Für Qualität Von Anfang An

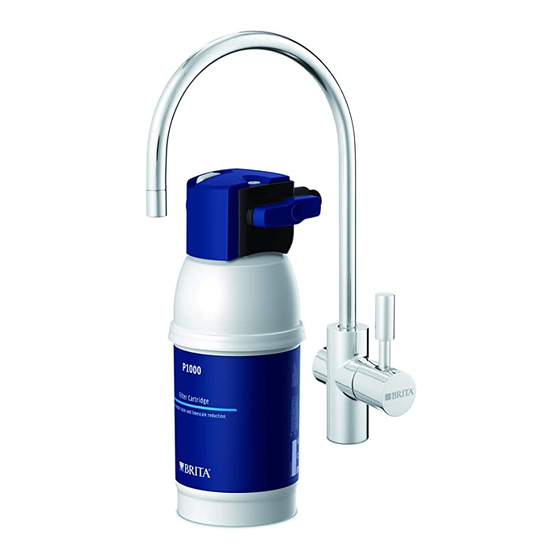
    Anleitung genau befolgt und beachtet werden. Inhalt des On Line Active Plus Sets Um sicherzugehen, dass Sie das beste Ergebnis mit Ihrem BRITA On Line Active Plus Wasserfi lter Set erzielen, folgen Sie bitte dieser Gebrauchsanweisung. Folgende Komponenten sind im On Line Active Plus Wasserfi...
  • Seite 49: Einfache Installation Des On Line Active Plus Sets

    Anwendung des Teststreifens: 180 Tage (bei der „+“ Einstellung). • Das rote Reaktionsfeld des Teststäbchens 1 Sekunde in ein Glas Achtung: Bitte achten Sie darauf, dass Sie die elektronische BRITA Ihres Leitungswassers eintauchen. Kartuschenwechselanzeige tagsüber aktivieren, damit der Start des •...
  • Seite 50: Technische Daten

    e Um die 180 Tage Zeitmessung zu aktivieren kurz auf DISPLAY Werkseinstellung zurück und eine Neuprogrammierung wird und abschließend die START/RESET Taste drücken. erforderlich – vgl. Punkt B). f Ein blinkender Punkt unten links im Display zeigt die aktivierte G Positionierung laufende Zeitmessung an Sie können die elektronische Kartuschenwechselanzeige unter Ver- C Timerstand ablesen...
  • Seite 51: Schritt 4: Anschließen Der Schläuche

    6. Sechskantmutter (7/16 Zoll) Zu Beginn bestimmen Sie einen geeigneten Platz für die Aufstel- lung der BRITA Küchenarmatur an Ihrer Spüle. Wir empfehlen, die Montage hinter der Spüle auf der Arbeitsplatte (neben der Haupt- küchenarmatur). Bitte beachten Sie, dass unterhalb der Spüle, bzw.
  • Seite 52 Verschrauben Sie nun dieses Ende an die bereits installierten b) Legen Sie Schlauch (1) bereit BRITA Küchenarmatur (vgl. Schritt 3.3). c) Legen Sie die mittelgroßen (3/8 Zoll) Flachdichtungen am Bitte das vorherige Einlegen der Flachdichtung, wie in Schritt A c) jeweiligen Innengewinde der beiden Schlauchenden ein.
  • Seite 53: Schritt 5: Einsetzen Der Filterkartusche

    Schritt 5: Einsetzen der Filterkartusche Schritt 6 (optional): Platzsparende Wandhalterung zur Montage der Kartusche A Schutzkappe (1) abziehen (vgl. Abb. 7). unter der Spüle (vgl. Abb. 8) B Filterkartusche (5) senkrecht in den Filterkopf (2) einsetzen. Auf geöffneten Verriegelungsgriff (3) am Kopf achten. (Abb.
  • Seite 54: Austausch Der Filterkartusche

    E Verriegelungsgriff (3) schließen. Optional: Einsetzen der BRITA On Line Active A 1000 Sie können in Ihr BRITA On Line Active Plus Wasserfi lter Set auch die On Line Aktivkohle Filterkartusche A 1000 einsetzen. Bitte stellen Sie zuerst den Filterkopf auf die Einstellung C.
  • Seite 55: Technische Daten Der P 1000 Kartusche

    Technische Daten der P 1000 Kartusche Fehlerbehebung A Kein Wasserfl uss Betriebsdruck 2 bar bis max. 8,6 bar Ursache: Wasserzufuhr geschlossen. Temperatur Eingangswasser 4 °C bis 30 °C Fehlerbehebung: Wasserzufuhr am vorgeschalteten Absperrventil Betrieb 4 °C bis 30 °C oder durch Schließen des Verriegelungsgriffs (3) Umgebungs- am Filterkopf (2) öffnen.
  • Seite 56: Wichtige Hinweise

    Zeitraum außer Betrieb zu nehmen. Sollte das BRITA Filtersystem von Hitzequellen und offenem Feuer montieren. Vor dem Eingangs- On Line Active Plus einige Tage nicht in Gebrauch sein (2–3 Tage), schlauch des Filtersystems muss ein Absperrventil installiert sein. empfehlen wir das Filtersystem mit dem in unten stehender Ist der Wasserdruck größer als 8,6 bar, muss ein Druckminderer...
  • Seite 57: Der Brita Service

    BRITA Service-Hotline Jede elektronische BRITA Kartuschenwechsel- Haben Sie Fragen zu Ihrem BRITA Produkt? Oder zum Thema anzeige hat eine Nutzungsdauer von ca. 5 Jahren. Wasserfi ltration? Rufen Sie einfach an! Die Kontaktdaten Ihres BRITA Denken Sie am Ende der Nutzungsdauer Ihrer Verbraucherservice fi...
  • Seite 58: Italiano

    ® Ci congratuliamo per l’acquisto del vostro nuovo sistema BRITA Vi ringraziamo per aver scelto la qualità BRITA per acqua fi ltrata BRITA dal gusto eccellente direttamente dal vostro rubinetto per acqua BRITA. Il vostro sistema BRITA offre numerosi vantaggi L'acqua fi...
  • Seite 59: Qualità Fi N Dall'inizio

    3/8" o 1/2" da collegare al kit di fi ltri per acqua On Line Active Plus oltre al rubinetto per acqua attualmente in uso. Se non si dispone di un attacco per la fornitura di acqua fredda da 3/8", contattare un esperto.
  • Seite 60: A Messa In Funzione

    Avvertenza: assicurarsi di attivare l'indicatore elettronico per la • Dopodiché, confrontare il colore della linguetta rilevatrice con i sostituzione del fi ltro BRITA con display durante il giorno in modo dati nella tabella e leggere l'impostazione appropriata. l'avviso di sostituzione venga riprodotto durante il giorno.
  • Seite 61: Dati Tecnici

    d Attendere fi no a quando l'indicatore smette di lampeggiare o allo completo delle batterie. Trascorso tale periodo, sul dispositivo spegnimento del display. vengono ripristinate le impostazioni di fabbrica ed è necessario eseguire nuovamente la programmazione – vedere il Punto B) e Per attivare il timer di 180 giorni, premere brevemente il pulsante DISPLAY e, successivamente, il pulsante START/RESET.
  • Seite 62 (vedere fi g. 5). e/o consultare un esperto. Eseguire un foro (con una punta da 12 mm) nella superfi cie di lavoro in cui si desidera installare il rubinetto per acqua BRITA. Successivamente, installare il rubinetto per acqua BRITA (vedere illustrazione).
  • Seite 63 3/8" sul tubo fl essibile (1), è necessario applicare della testa del fi ltro e rendono nulle le richieste di rimborso l'adattatore fornito. Con il set On Line Active Plus viene in garanzia. fornito un adattatore 1/2". Contattare il rivenditore locale per adattatori di altre dimensioni.
  • Seite 64 Fase 5: Inserimento del fi ltro Fase 6 (opzionale): fi ssaggio a parete salvaspazio per installare il fi ltro sotto il A Rimuovere il cappuccio protettivo (1) (vedere fi g. 7). lavello (vedere fi g. 8) B Inserire il fi ltro (5) in posizione verticale sulla testa del fi ltro (2). Il fi...
  • Seite 65: Fase 7: Messa In Funzione

    Si può anche utilizzare il fi ltro a carbone attivo On Line Active A 1000 in combinazione con il set di fi ltri per acqua On Line Active Plus BRITA. Innanzitutto, impostare la testa del fi ltro su C. ITALIANO...
  • Seite 66: Risoluzione Dei Problemi

    Dati tecnici della fi ltro P 1000 Risoluzione dei problemi A Nessun fl usso d'acqua Pressione d'esercizio Da 2 a 8,6 bar (max.) Causa: Tubazione di ingresso acqua chiusa. Temperatura di ingresso dell'acqua Da 4 °C a 30 °C Soluzione del problema: Aprire la tubazione di ingresso acqua in il funzionamento Da 4 °C a 30 °C corrispondenza della valvola d'arresto a...
  • Seite 67: Note Importanti

    Note importanti Note importanti Utilizzo ottimale Proteggere il set di fi ltri per acqua On Line Active Plus Premium dai • BRITA consiglia di non lasciare inutilizzato il sistema fi ltrante raggi solari diretti e da eventuali danni meccanici. Non assemblare per un periodo di tempo troppo lungo.
  • Seite 68: Brita Al Vostro Servizio Per Una Completa Soddisfazione

    Avete domande sul vostro prodotto BRITA? O sulla fi ltrazione con display dell'acqua? Contattateci! Troverete i dettagli di contatto del Servizio di assistenza alla clientela BRITA accanto al codice del vostro Paese sul Ogni indicatore elettronico per la sostituzione del retro del presente libretto.
  • Seite 69: Polski

    Więcej informacji na temat prawidłowych ustawień wkładu oraz testu twardości węglanowej jest dostępnych w rozdziale 3.1. W celu zapewnienia maksymalnej wydajności fi ltra fi rma BRITA zaleca wymieniać wkład fi ltrujący co 6 miesięcy. Pamiętaj o obser- wacji wskaźnika wymiany BRITA z wyświetlaczem znajdującego się...
  • Seite 70: Jakość Od Samego Początku

    Przed zainstalowaniem fi ltra należy upewnić się, że dostępny jest dopływ zimnej wody z gwintem 3/8" lub 1/2", do którego można podłączyć zestaw fi ltra do wody On Line Active Plus, bez potrzeby odłączania dotychczas stosowanego dozownika wody. W przypadku braku wolnego dopływu zimnej wody z gwintem 3/8"...
  • Seite 71 • Zanurz na 1 sekundę czerwoną część paska w szklance z wodą Uwaga: Należy pamiętać o włączaniu elektronicznego wskaźnika wodociągową. wymiany wkładu fi ltrującego BRITA w ciągu dnia, dzięki czemu • Po upływie minuty porównaj kolor pola próbnego z tabelą sygnał zmiany również będzie generowany w ciągu dnia.
  • Seite 72: Dane Techniczne

    e Aby uruchomić 180-dniowy licznik, naciśnij krótko przycisk ustawienia fabryczne urządzenia i będzie ono musiało być prze- DISPLAY, a następnie przycisk START/RESET. programowane – patrz punkt B). f Migający punkt w lewym dolnym rogu wyświetlacza oznacza G Instalacja włączenie licznika Elektroniczny wskaźnik wymiany wkładu fi...
  • Seite 73 fi ltra należy upewnić się, że dostępny jest dopływ zimnej wody z gwintem 3/8" lub 1/2", do którego można podłączyć zestaw fi ltra do wody On Line Active Plus, bez potrzeby odłączania dotychczas stosowanego dozownika wody. W przypadku braku wolnego dopływu zimnej wody z gwintem 3/8"...
  • Seite 74 A a) Odłącz dopływ zimnej wody. c) Przykręć końcówkę do zainstalowanego dozownika wody b) Przymocuj wąż (1). BRITA (zobacz Krok 3.3). c) Załóż średnie uszczelki (3/8") na odpowiednie żeńskie gwinty Należy pamiętać o tym, aby najpierw założyć uszczelkę, tak jak na dwóch końcówkach węża.
  • Seite 75 Krok 5: Instalacja wkładu fi ltrującego Krok 6 (opcjonalnie): Wygodny montaż wkładu na ścianie pod zlewem w celu A Zdejmij nakładkę ochronną (1) (patrz rys. 7). oszczędzenia miejsca (patrz rys. 8) B Wsuń wkład fi ltrujący (5) pionowo w głowicę fi ltra (2). Upewnij się, że uchwyt blokujący głowicy (3) jest otwarty.
  • Seite 76 Opcjonalnie: Instalacja wkładu BRITA On Line Active A 1000 Z zestawem fi ltra do wody BRITA On Line Active Plus można rów- nież używać wkład fi ltrujący On Line A Activated Carbon A 1000. Najpierw ustaw głowicę, tak jak opisano w punkcie C.
  • Seite 77: Rozwiązywanie Problemów

    Dane techniczne wkładu P 1000 Rozwiązywanie problemów A Brak przepływu wody Od 2 barów do maks. Ciśnienie robocze Przyczyna: Odcięty pobór wody. 8,6 barów Rozwiązanie: Otwórz dopływ wody, odkręcając zawór odcinający Temperatura pobieranej wody Od 4°C do 30°C lub zamykając uchwyt blokujący (3) znajdujący się na użytkowania Od 4°C do 30°C głowicy fi...
  • Seite 78: Ważne Informacje

    Ważne informacje Ważne informacje Optymalne wykorzystanie Zestaw fi ltra do wody On Line Active Plus Premium należy chronić • BRITA zaleca, aby fi ltr nie był pozostawiany przez dłuższy czas przed bezpośrednim nasłonecznieniem i uszkodzeniami mechanicz- bez użytku. Jeżeli system fi ltracyjny BRITA On Line Active Plus nymi.
  • Seite 79: Pełna Satysfakcja Dzięki Produktom Brita

    Szukasz najbliższego sprzedawcy BRITA? Chcesz uzyskać więcej infor- lizować go zgodnie ze wszystkimi obowiązującymi macji o produktach BRITA? Lub o fi rmie BRITA? Czy chcesz mieć dostęp przepisami i wymogami ustawowymi. do korzystnych ofert serwisowych BRITA? Aktualne informacje, porady dla klientów, konkursy sezonowe, przepisy na wspaniałą...
  • Seite 80: Nederlands

    Gefeliciteerd met de aanschaf van uw nieuwe BRITA waterfi ltersysteem Wij danken u voor de keuze van de BRITA kwaliteit voor fris en heerlijk zacht BRITA gefi lterd water direct uit uw BRITA waterdispenser. Uw BRITA systeem biedt tal van voordelen BRITA gefi...
  • Seite 81: Kwaliteit Vanaf Het Allereerste Begin

    Inhoud van de On Line Active Plus set Volg de aanwijzingen nauwkeurig op, zodat u er zeker van kunt zijn dat uw BRITA On Line Active Plus waterfi lterset het beste resultaat oplevert. Uw On Line Active Plus premium waterfi lterset omvat de volgende componenten: (zie fi...
  • Seite 82 „+”), afhankelijk van de instelling van de fi lterkop bij stap 1. Gebruik van de teststrip: Let op: Zorg ervoor dat u de elektronische BRITA fi ltervervangings- • Dompel de rode reactiezone van de strip gedurende 1 seconde indicator met display overdag programmeert, zodat het signaal voor in een glas kraanwater.
  • Seite 83: Technische Gegevens

    e Om de 180-dagen timer te activeren, drukt u kort op de c De resterende dagen na de laatste reset worden nu weerge- DISPLAY-knop en daarna op de START/RESET-knop. geven. (Let op: Dit kan tot uiterlijk 16 uur nadat de batterijen geheel leeg zijn.
  • Seite 84 (zie fi g. 5). boor en/of raadpleeg een vakspecialist. Boor een gat (met een 12-mm bit) in het werkvlak waar u de BRITA waterdispenser wilt installeren. Installeer daarna de BRITA waterdispenser (zie fi guur).
  • Seite 85 fi lterkopaansluitingen beschadigen. Garantieclaims vervallen Met de On Line Active Plus set is een 1/2" adapter meegele- indien andere aansluitingen worden gebruikt. verd. Zonodig kunt u bij uw lokale bouwmarkt ook adapters met andere maten aanschaffen.
  • Seite 86 Stap 5: Filterpatroon aanbrengen Stap 6 (optioneel): Ruimtebesparende muursteun voor installatie van de A Verwijder de beschermkap (1) (zie fi g. 7). fi lterpatroon onder de gootsteen (zie fi g. 8) B Koppel de fi lterpatroon (5) aan de fi lterkop (2). Zorg dat de vergrendeling (3) van de fi...
  • Seite 87 Optioneel: de BRITA On Line Active A 1000 plaatsen U kunt ook de On Line A Activated Carbon A 1000 fi lterpatroon gebruiken in combinatie met uw BRITA On Line Active Plus water- fi lterset. Stel eerst de fi lterkop in op C.
  • Seite 88 Technische gegevens van de P1000 Probleemoplossingen fi lterpatroon A Geen doorstromend water Probleem: Wateringang gesloten. Werkdruk 2 bar tot max. 8,6 bar Oplossing: Open de wateringang bij de stroomopwaarts geplaatste Wateringangstemperatuur 4°C tot 30°C afsluitklep of via het sluiten van vergrendeling (3) op fi...
  • Seite 89: Belangrijke Opmerkingen

    • BRITA raadt aan het fi ltersysteem niet voor langere tijd onge- direct zonlicht en mechanische schade. Monteer de waterfi lterset bruikt te laten. Als het BRITA On Line Active Plus waterfi ltersys- niet in de nabijheid van warmtebronnen en open vuur. Er moet een teem enkele dagen (2 tot 3 dagen) buiten gebruik is geweest, afsluitklep worden gemonteerd vóór de ingangslang van het fi...
  • Seite 90: Brita's Service

    De BRITA servicehotline staat voor u klaar display van de BRITA fi lterpatroon moet correct Hebt u nog vragen over uw BRITA product? Of wilt u meer weten over worden afgevoerd waterfi ltratie? Bel ons! De contactgegevens van de BRITA klantenser-...
  • Seite 92 Faks: +48 22 7517173 Tel.: 00800 14789632 Tel.: 0810 73 15 45 www.brita.pl www.brita.be www.brita.fr BRITA Wasser-Filter-Systeme AG BRITA Water Filter Systems Ltd. BRITA Iberia S.L.U. Gassmatt 6 BRITA House Rambla Cataluña CH-6025 Neudorf/LU 9 Granville Way 18 - 4º Izq.

Inhaltsverzeichnis