Parkside PKS 2200 A1 Originalbetriebsanleitung
Elektro-kettensäge
Vorschau ausblenden
Andere Handbücher für PKS 2200 A1:
- Originalbetriebsanleitung (216 Seiten) ,
- Originalbetriebsanleitung (196 Seiten) ,
- Originalbetriebsanleitung (92 Seiten)
Inhaltsverzeichnis
Werbung
Verfügbare Sprachen
Verfügbare Sprachen
Elektro-Kettensäge / Electric Chainsaw / Tronçonneuse
électrique PKS 2200 A1
Elektro-Kettensäge
Originalbetriebsanleitung
Tronçonneuse électrique
Traduction des instructions d'origine
Elektryczna piła łańcuchowa
Tłumaczenie oryginalnej instrukcji obsługi
Elektrická reťazová píla
Preklad originálneho návodu na obsluhu
IAN 324425_1904
Electric Chainsaw
Translation of the original instructions
Elektrische kettingzaag
Vertaling van de originele gebruiksaanwijzing
Elektrická řetězová pila
Překlad originálního provozního návodu
Werbung
Kapitel
Inhaltsverzeichnis
Fehlerbehebung

Verwandte Anleitungen für Parkside PKS 2200 A1


Inhaltszusammenfassung für Parkside PKS 2200 A1
- Seite 1 Elektro-Kettensäge / Electric Chainsaw / Tronçonneuse électrique PKS 2200 A1 Elektro-Kettensäge Electric Chainsaw Originalbetriebsanleitung Translation of the original instructions Tronçonneuse électrique Elektrische kettingzaag Traduction des instructions d‘origine Vertaling van de originele gebruiksaanwijzing Elektryczna piła łańcuchowa Elektrická řetězová pila Tłumaczenie oryginalnej instrukcji obsługi Překlad originálního provozního návodu...
- Seite 2 Klappen Sie vor dem Lesen die Seite mit den Abbildungen aus und machen Sie sich anschließend mit allen Funktionen des Gerätes vertraut. Before reading, unfold the page containing the illustrations and familiarise yourself with all functions of the device. Avant de lire le mode d‘emploi, ouvrez la page contenant les illustrations et familiarisez-vous ensuite avec toutes les fonctions de l‘appareil.
-
Seite 5: Inhaltsverzeichnis
Inhalt Einleitung ........5 Kettenschmierung prüfen ....19 Bestimmungsgemäße Schwert wechseln ......20 Verwendung ........6 Sägetechniken ......20 Allgemeine Beschreibung .....6 Allgemeines ........20 Lieferumfang ........6 Bäume fällen ........21 Funktionsbeschreibung ....... 6 Entasten ......... 22 Übersicht ......... 7 Ablängen ........23 Technische Daten ......7 Wartung und Reinigung .....24 Sicherheitshinweise ......8... -
Seite 6: Bestimmungsgemäße Verwendung
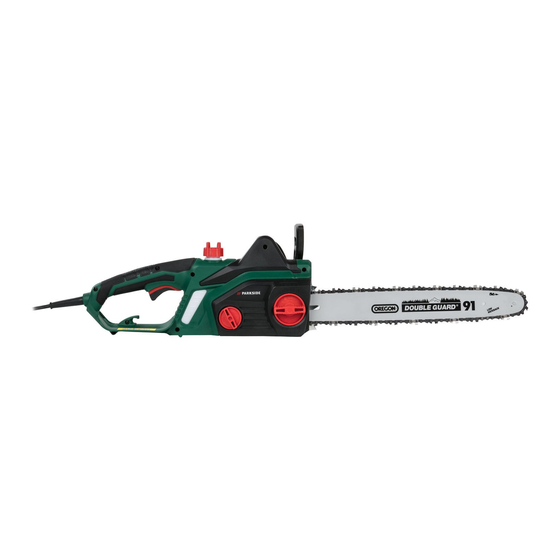
Bestimmungsgemäße Allgemeine Verwendung Beschreibung Die Elektrokettensäge ist nur zum Sägen Die Abbildung der wichtigsten Funktionsteile finden Sie auf von Holz konstruiert. Für alle anderen Anwendungsarten (z. B. Schneiden von der vorderen und hinteren Aus- Mauerwerk, Kunststoff oder Lebensmitteln) klappseite. ist das Gerät nicht vorgesehen. Lieferumfang Die Elektrokettensäge ist für den Einsatz im Heimwerkerbereich bestimmt. -
Seite 7: Übersicht
Der Schwingungsemissionswert kann sich während der tatsäch- Technische Daten lichen Benutzung des Elektro- werkzeugs von dem Angabewert Elektro-Kettensäge ....PKS 2200 A1 unterscheiden, abhängig von der Nenneingangs- Art und Weise, in der das Elektro- spannung U ....230-240 V~, 50 Hz werkzeug verwendet wird. -
Seite 8: Sicherheitshinweise
zu halten. Beispielhafte Maßnah- indem Sie den Bremshebel gegen men zur Verringerung der Vibrati- den vorderen Griff schieben. onsbelastung sind das Tragen von Handschuhen beim Gebrauch des Lesen und beachten Sie die zur Werkzeugs und die Begrenzung Maschine gehörende Betriebsanlei- der Arbeitszeit. -
Seite 9: Symbole In Der Betriebsanleitung
Symbole in der Bildzeichen auf dem Typenschild: Betriebsanleitung Elektrogeräte gehören nicht in den Hausmüll. Gefahrenzeichen mit Anga- ben zur Verhütung von Per- 460 mm Schwertlänge sonen- oder Sachschäden. Schutzklasse II (Doppelisolierung) Gefahrenzeichen mit Anga- ben zur Verhütung von Per- Bildzeichen unterhalb der sonenschäden durch einen Kettenradabdeckung: elektrischen Schlag. -
Seite 10: Allgemeine Sicherheitshinweise Für Elektrowerkzeuge
Achtung! Beim Gebrauch von Elek- zung des Elektrowerkzeuges trowerkzeugen sind zum Schutz fern. Bei Ablenkung können Sie die gegen elektrischen Schlag, Verlet- Kontrolle über das Gerät verlieren. zungs- und Brandgefahr folgende 2) Elektrische Sicherheit grundsätzliche Sicherheitsmaßnah- men zu beachten: Es besteht die Verletzungsgefahr. - Seite 11 reich geeigneten Verlängerungskabels d) Entfernen Sie Einstellwerkzeu- verringert das Risiko eines elektrischen ge oder Schraubenschlüssel, Schlages. bevor Sie das Elektrowerkzeug f) Wenn der Betrieb des Elektro- einschalten. Ein Werkzeug oder werkzeuges in feuchter Umge- Schlüssel, der sich in einem drehenden Geräteteil befindet, kann zu Verletzun- bung nicht vermeidbar ist, ver- wenden Sie einen RCD (Residual...
-
Seite 12: Sicherheitshinweise Für Kettensägen
Ein Elektrowerkzeug, das sich nicht de Tätigkeit. Der Gebrauch von mehr ein- oder ausschalten lässt, ist ge- Elektrowerkzeugen für andere als die fährlich und muss repariert werden. vorgesehenen Anwendungen kann zu c) Ziehen Sie den Stecker aus der gefährlichen Situationen führen. Steckdose, bevor Sie Geräteein- stellungen vornehmen, Zubehör- 5) Service... -
Seite 13: Ursachen Und Vermeidung Eines Rückschlags
Geräteteile unter Spannung setzen und abdeckung aufziehen. Sorgfältiger zu einem elektrischen Schlag führen. Umgang mit der Kettensäge verringert • Tragen Sie Schutzbrille und Ge- die Wahrscheinlichkeit einer versehent- hörschutz. Weitere Schutzaus- lichen Berührung mit der laufenden rüstung für Kopf, Hände, Beine Sägekette. -
Seite 14: Restrisiken
• Rückschlag kann auftreten, wenn die • Vermeiden Sie eine abnormale Spitze der Führungsschiene einen Ge- Körperhaltung und sägen Sie genstand berührt oder wenn das Holz nicht über Schulterhöhe. Dadurch sich biegt und die Sägekette im Schnitt wird ein unbeabsichtigtes Berühren mit festklemmt (s. -
Seite 15: Weiterführende Sicherheitshinweise
Um die Gefahr von ernsthaften im Freien bestimmt sind. Der Litzenquer- oder tödlichen Verletzungen zu schnitt des Netzkabels muss mindestens 2,5 mm verringern, empfehlen wir Personen betragen. Rollen Sie eine Ka- mit medizinischen Implantaten ihren beltrommel vor Gebrauch immer ganz Arzt und den Hersteller des medizi- ab. -
Seite 16: Sicherheitsfunktionen
Montage Sicherheitsfunktionen 1 Hinterer Griff mit Tragen Sie beim Arbeiten mit hinterem Handschutz (10) der Sägekette stets Schutz- handschuhe und verwenden schützt die Hand vor Ästen und Zweigen und bei abspringender Sie nur Originalteile. Ziehen Sägekette. Sie vor allen Arbeiten an 3 Kettenbremshebel/ der Elektrokettensäge den vorderer Handschutz... -
Seite 17: Sägekette Spannen
Sägekette spannen Es ist normal, wenn die Sägekette (5) durchhängt. 6. Spannen Sie die Sägekette (5) Das regelmäßige Spannen der Sägekette vor, indem Sie die Schraube für dient der Sicherheit des Benutzers und Ketten-Schnellspannsystem (9) im reduziert bzw. verhindert Verschleiß und Uhrzeigersinn drehen. -
Seite 18: Kettenschmierung
2. Lösen Sie die • Verwenden Sie Bio-Öl, das Zusätze zur Befestigungsschraube der Her absetzung von Reibung und Abnut- Kettenradabdeckung (7) zung enthält. Sie können es über unser Service-Center bestellen. 3. Zum Spannen der Sägekette dre- • Wenn Grizzly Bio-Öl nicht zur Ver- hen Sie die Schraube (9) für das fügung steht, verwenden Sie Ketten- Kettenschnellspann-System im... -
Seite 19: Einschalten
Einschalten 3. Lösen Sie die Kettenbremse, indem Sie den Kettenbremshebel (3) gegen den 1. Überprüfen Sie vor dem Starten, ob vorderen Griff (16) ziehen. sich genügend Kettenöl im Tank befin- 4. Halten Sie die Elektrokettensäge det und füllen Sie ggf. Kettenöl nach mit beiden Händen gut fest, mit der (siehe Kapitel „Kettenöl einfüllen“). -
Seite 20: Schwert Wechseln
Sägetechniken Wenn sich keine Ölspur zeigt, rei- nigen Sie eventuell den Öldurchlass Allgemeines oder lassen Sie die Elektroketten- säge von unserem Kundendienst reparieren. • Sie haben eine bessere Kontrolle, wenn Sie mit der Unterseite des Schwertes Reinigen Sie den Öldurchlass (26), (mit ziehender Sägekette) und nicht mit um ein störungsfreies, automati- der Oberseite des Schwertes (mit schie-... -
Seite 21: Bäume Fällen
oder Keil, um die Elektroket- len wahrscheinlich bergab rollen oder tensäge freizubekommen. rutschen wird. • Kleine Bäume mit einem Durchmesser Bäume fällen von 15-18 cm können gewöhnlich mit einem Schnitt abgesägt werden. Es ist viel Erfahrung erforder- • Bei Bäumen mit einem größeren Durch- lich, um Bäume zu fällen. -
Seite 22: Entasten
leichten Rückzug zu sichern. Der Bei Annäherung des Fällschnitts Fluchtbereich (1) sollte etwa um an den Steg sollte der Baum zu 45° versetzt hinter der geplanten fallen beginnen. Wenn sich zeigt, Fällrichtung (2) liegen. dass der Baum möglicherweise 3. Fallkerbe schneiden (A): nicht in die gewünschte Richtung Setzen Sie eine Fallkerbe in die fällt oder sich zurückneigt und... -
Seite 23: Ablängen
Viele Unfälle geschehen beim Entas- sein. Folgen Sie den einfachen Anwei- ten. Sägen Sie nie Äste ab, wenn sungen für leichtes Sägen. Sie auf dem Baumstamm stehen. Behalten Sie den Rückschlagbereich 1. Stamm liegt am Boden: im Auge, wenn Äste unter Spannung Sägen Sie von oben den Stamm stehen. -
Seite 24: Wartung Und Reinigung
Halten Sie den linken Arm so • Reinigen Sie nach jeder Benutzung die gerade wie möglich (2). Achten Sägekette. Benutzen Sie hierzu einen Sie auf den herabfallenden Pinsel oder Handfeger. Benutzen Sie Stamm. Stellen Sie sich so, dass zur Reinigung der Sägekette keine Flüs- der abgetrennte Stamm keine sigkeiten. -
Seite 25: Tabelle Wartungsintervalle
Tabelle Wartungsintervalle Vor jedem Nach 10 Be- Nach jedem Maschinenteil Aktion Gebrauch triebsstunden Gebrauch Komponenten der Prüfen, bei Bedarf ersetzen Kettenbremse Kettenritzel ( 24) Prüfen, bei Bedarf ersetzen Prüfen, ölen, bei Bedarf Sägekette ( nachschleifen oder ersetzen ... -
Seite 26: Kettenspannung Einstellen
Kettenspannung einstellen 1. Schalten Sie das Gerät aus und ziehen Sie den Netzstecker. 2. Zum Schärfen sollte die Sägekette Das Einstellen der Kettenspannung ist im straff gespannt sein, um ein richti- Kapitel „Montage - Sägekette spannen“ ges Schärfen zu ermöglichen. beschrieben. -
Seite 27: Schwert Umdrehen
Aufbewahrung 5. Montieren Sie Schwert (4), Sägekette (5) und Kettenradabdeckung (8) und spannen Sie die Elektrokettensäge. • Reinigen Sie das Gerät vor der Aufbe- wahrung. Bei optimalem Zustand des Öldurch- • Entleeren Sie den Öltank vor längeren lasses sprüht die Sägekette wenige Betriebspausen. -
Seite 28: Ersatzteile/Zubehör
Entleeren Sie den Öltank sorgfältig und geben Sie das Gerät an einer Verwertungs- stelle ab. Die verwendeten Kunststoff- und Metallteile können sortenrein getrennt werden und so einer Wiederverwertung zugeführt werden. Fragen Sie hierzu unser Service-Center. Ersatzteile/Zubehör Ersatzteile und Zubehör erhalten Sie unter www.grizzly-service.eu Sollten Sie Probleme mit dem Bestellvorgang haben, verwenden Sie bitte das Kontaktfor- mular. -
Seite 29: Fehlersuche
Fehlersuche Problem Mögliche Ursache Fehlerbehebung Kettenbremse überprüfen, evtl. Kettenbremse eingerastet Kettenbremse lösen Steckdose, Netzanschluss- leitung, Leitung, Netzstecker Netzspannung fehlt prüfen, ggf. Reparatur durch Haussicherung spricht an Elektrofachmann. Gerät startet nicht Haussicherung prüfen Ein-/Ausschalter ( 13) defekt Reparatur durch Kundendienst Kohlebürsten abgenutzt Reparatur durch Kundendienst Motor defekt Reparatur durch Kundendienst... -
Seite 30: Garantie
Garantie Garantieumfang Das Gerät wurde nach strengen Qualitäts- Sehr geehrte Kundin, sehr geehrter Kunde, richtlinien sorgfältig produziert und vor Sie erhalten auf dieses Gerät 3 Jahre Ga- Anlieferung gewissenhaft geprüft. rantie ab Kaufdatum. Im Falle von Mängeln dieses Gerätes Die Garantieleistung gilt für Material- oder stehen Ihnen gegen den Verkäufer des Fabrikationsfehler. -
Seite 31: Reparatur-Service
Service-Center Serviceabteilung telefonisch oder per E-Mail. Sie erhalten dann weitere In- formationen über die Abwicklung Ihrer Service Deutschland Reklamation. Tel.: 0800 54 35 111 • Ein als defekt erfasstes Gerät können E-Mail: grizzly@lidl.de IAN 324425_1904 Sie, nach Rücksprache mit unserem Kundenservice, unter Beifügung des Kaufbelegs (Kassenbons) und der Service Österreich... -
Seite 32: Introduction
Content Introduction .......32 Changing the saw bar .....45 Intended purpose .......33 Sawing techniques .....45 General description ....33 General .........45 Extent of the delivery .......33 Felling trees ........46 Overview ........33 Limbing ..........47 Function description ......34 Bucking .........48 Technical Data ......34 Maintenance and cleaning ..49 Notes on safety......34 Cleaning ........49 Symbols used on the saw ....35... -
Seite 33: Intended Purpose
Intended purpose Extent of the delivery The electric chainsaw is constructed for Carefully unpack the appliance and check sawing wood only. The saw is not de- that it is complete: signed for any other types of application Chainsaw (e.g. cutting of brickwork, plastic or food). Chain bar (guide rail) (already The chainsaw is designed for employment mounted) -
Seite 34: Function Description
Technical Data of measures to reduce vibration exposure are the wearing of gloves Electrical chainsaw ....PKS 2200 A1 when using the tool and limiting the Rated input voltage U .. 230-240 V~, 50 Hz working hours. For this purpose all Input power P ......2200 W... -
Seite 35: Symbols Used On The Saw
An electric chainsaw is a danger- Caution! Spring-back - Be careful of ous device, which can cause seri- spring-back of the machine during ous or even fatal injuries with incor- work. rect or careless use. Thus, for your own safety and the safety of others, Do not expose the unit to rain. -
Seite 36: Symbols Used In The Instructions
General notes on safety Graphical symbol on the oil tank cap: Saw chain lubrication. Before you do any work with the Graphical symbol on the fixing screw for electric chainsaw, make yourself the chain sprocket cover: familiar with all operating parts. Practise using the saw (sawing logs OPEN on a sawhorse) and get an experi-... - Seite 37 b) Do not operate power tools in f) If operating a power tool in a explosive atmospheres, such as damp location is unavoidable, in the presence of flammable use a RCD (Residual Current De- Iiquids, gases or dust. Power tools vice) protected supply.
-
Seite 38: Chain Saw Safety Warnings
f) Keep your hair, clothing and operation. If damaged, have the gloves away from moving power tool repaired before use. parts. Jewellery or long hair can be Many accidents are caused by poorly caught in moving parts. maintained power tools. g) If dust extraction and collection f) Keep cutting tools sharp and devices can be installed, make... -
Seite 39: Causes And Operator Prevention Of Kickback
• Hold the power tool only on the dling of the chain saw will reduce the insulated handle surfaces, as Iikelihood of accidentaI contact with the saw chain may come into the moving saw chain. contact with concealed power • Follow instructions for lubri- cables. -
Seite 40: Residual Risks
• Tip contact in some cases may cause instructions for the saw chain. a sudden reverse reaction, kicking the Decreasing the depth gauge height can guide bar up and back towards the lead to increased kickback. operator (cf. image 1/fig. A). Residual risks •... -
Seite 41: Safety Functions
• Lay the extension cable in such a way ways shut off the engine of the electric that it will not be caught by branches chain saw before switching between or similar during sawing. trees. • Use a RCD (Residual Current Device) •... -
Seite 42: Chain Catcher
14 Switch-on block 5. Place the chain bar (4) and saw chain The switch-on block must be released (5) on the bar bolts (23). When the for switching on the device. nose on the right below the bar bolt 18 Chain catcher (23) sits in the round recess on the Decreases the danger of injuries if the... -
Seite 43: Tensioning The Saw Chain
The oil tank 10 min holds about 250 ml of oil. • Use Parkside bio-oil; this product con- 1. Ensure that the chain brake has tains additives that reduce wear and been released, that is, that the... -
Seite 44: Operating The Chainsaw
• If you have no Grizzly bio-oil avail- 3. Connect the device to the mains volt- able, use chain lubrication oil with low age. adhesive additive content. 4. Release the chain brake, where you • Empty the oil tank before longer peri- shift the brake arm (3) back against the ods (6-8 weeks) of non-use. -
Seite 45: Checking The Chain Lubrication
rear handle (1) and the left hand on saw chain during operation. Use the front handle (16). Thumb and finger a brush or a cloth to help remove must close securely over the handles. residues from the oil passage. 6. Turn on the electric chainsaw. Changing the saw bar 7. -
Seite 46: Felling Trees
• For sowing work on hillsides, always • Note the felling direction: stand in the area above the log. The user must be able to move safely To keep total control while sawing near the felled tree, to saw off the tree through, reduce the pressure at the end easily and remove branches.It is to be of the cut without loosening your grip... -
Seite 47: Limbing
1. Removal of branches: The hinge prevents the tree from Remove hanging branches by turning and falling in the wrong positioning the cut from above direction. Do not cut through the the branch. With removal of hinge. branches, never work higher than When the felling cut nears the shoulder level. -
Seite 48: Bucking
Many accidents occur during the 1. Log is lying on the ground: removal of branches. Never cut tree Saw through the log completely limbs when you are standing on the from above and ensure at the log. Keep the spring-back area in end of the cut not to contact the mind if branches are under tension. -
Seite 49: Maintenance And Cleaning
Maintenance and • Clean the oil passages of the chain bar 26), in order to guarantee a cleaning trouble-free, automatic oiling of the saw Basically, carry out mainte- chain during operation. nance and cleaning works Maintenance intervals with switched-off motor and power plug removed. -
Seite 50: Maintenance Interval Table
Maintenance Interval Table Before After 10 After Machine part Action every hours of every operation Components of the chain brake Check, replace if required Sprocket chain wheel ( 24) Check, replace if required Check oil, regrind or re- ... -
Seite 51: Adjusting The Chain Tension
Adjusting the chain tension specialist or a specialist workshop. If you think yourself capable of sharpening the chain, you can acquire the special tools in The adjustment of the chain tension is de- the specialist trade. scribed in the chapter: Assembly, tension- ing chainsaw. -
Seite 52: Turn The Chain Bar
With the oil nozzles in good condi- • Attach the protective blade cover. tion and the oil regulator set cor- • Store the device in a dry and dustproof rectly, the saw chain will spray a location and out of reach of children. little oil off after starting. -
Seite 53: Replacement Parts/Accessories
Replacement parts/Accessories Spare parts and accessories can be obtained at www.grizzly-service.eu If you have issues ordering, please use the contact form. If you have any other questions, contact the ”Service-Center” (see page 56). Oil filler cap ...................75118246 Saw chain Oregon 91P057X ..............30091570 16“... -
Seite 54: Trouble Shooting
Trouble shooting Problem Possible cause Fault correction Chain brake locked into Check chain brake. place. Possibly release chain brake Mains voltage defective Check plug socket, cable, line and plug, where appropriate, repair by electrical specialist. House protection fuse acti- Check house protection fuse, Device does not start vated see note... -
Seite 55: Guarantee
Guarantee Guarantee Cover The equipment has been carefully pro- Dear Customer, duced in accordance with strict quality this equipment is provided with a 3-year guidelines and conscientiously checked guarantee from the date of purchase. In prior to delivery. case of defects, you have statutory rights The guarantee applies for all material and against the seller of the product. -
Seite 56: Repair Service
Service-Center • After consultation with our customer service, a product recorded as defec- tive can be sent postage paid to the Service Great Britain service address communicated to you, Tel.: 0800 404 7657 with the proof of purchase (receipt) and E-Mail: grizzly@lidl.co.uk specification of what constitutes the IAN 324425_1904... -
Seite 57: Introduction
Sommaire Introduction .......57 Contrôle de l’arrivée d’huile Fins d‘utilisation ......58 automatique ........71 Description générale ....58 Remplacement de la lame ....72 Volume de la livraison .....58 Techniques de coupe ....72 Aperçu ..........58 Généralités ........72 Description du fonctionnement ..59 Abattre des arbres ......73 Données techniques ....59 Emonder ........74 Conseils de sécurité... -
Seite 58: Fins D'utilisation
Description générale Conservez cette notice et remettez- la avec tous les documents si vous cédez le produit à un tiers. Vous trouverez les images cor- respondantes à l’arrière et à Fins d‘utilisation l’avant de ce document, sur la couverture. La tronçonneuse est conçue uniquement Volume de la livraison pour couper du bois. -
Seite 59: Description Du Fonctionnement
Données techniques sation de l’outil. Essayez de maintenir aussi faible Tronçonneuse électrique ..PKS 2200 A1 que possible la contrainte que Tension nominale constituent les vibrations. Mesures à l’entrée U ....230-240 V~, 50 Hz à... -
Seite 60: Conseils De Sécurité
de toutes les parties du cycle d‘ex- Portez un équipement de protection ploitation (par exemple les temps au individuelle. Porter une protection cours desquels l‘outil électroportatif visuelle et acoustique est éteint, et ceux au cours desquels il est certes allumé mais fonctionne Portez un casque! hors charge). -
Seite 61: Symboles Utilisés Dans Le Mode D'emploi
460 mm Symboles utilisés dans le Longueur de chaîne de scie mode d’emploi Outil de classe II (Double isolation) Signes de danger avec Symbole sous le capot de la roue dentée : conseils de prévention des accidents sur les personnes ou des dégâts matériels. -
Seite 62: Consignes De Sécurité Générales Pour Outils Électriques
Attention ! Lors de l‘utilisation c) Maintenir les enfants et les per- d‘outils électriques, les mesures de sonnes présentes à l’écart pen- sécurité fondamentales suivantes dant l’utilisation de l’outil. Les doivent être observées pour la distractions peuvent vous faire perdre protection contre le choc électrique, le contrôle de l’outil. - Seite 63 Si l’usage d’un outil dans un Ne pas se précipiter. Garder une emplacement humide est inévi- position et un équilibre adaptés table, utiliser une alimentation à tout moment. Cela permet un protégée par un RCD (Residual meilleur contrôle de l’outil dans des Current Device).
-
Seite 64: Avertissements De Sécurité De La Scie À Chaîne
Avertissements de sécurité Conserver les outils à l’arrêt de la scie à chaîne hors de la portée des enfants et ne pas permettre à des per- sonnes ne connaissant pas l’ou- • N’approchez aucune partie du til ou les présentes instructions corps de la chaîne coupante de le faire fonctionner. -
Seite 65: Causes De Rebonds Et Prévention Par L'opérateur
• Ne pas faire fonctionner une cation, de tension et de change- scie à chaîne dans un arbre. La ment de chaîne. Une chaÎne dont la tension et la lubrification sont incor- mise en marche d’une scie à chaÎne dans un arbre peut entraÎner un acci- rectes peut soit rompre soit accroÎtre le dent corporel. -
Seite 66: Autres Risques
resserre et pince la chaîne coupante la hauteur de l’épaule. Cela contri- dans la section de coupe (voir figure bue à empêcher les contacts d’extré- 1/Abb. b). mité involontaires et permet un meilleur • Le contact de l’extrémité peut dans contrôle de la scie à... -
Seite 67: Autres Consignes De Sécurité
nuer le risque de blessures graves section des torons du câble électrique ou mortelles, nous recommandons doit être de 2,5 mm² minimum. Dérou- aux personnes portant des implants lez toujours entièrement un dérouleur de câble avant utilisation. Vérifiez la médicaux de consulter leur médecin et le fabricant de l’implant médical présence de détériorations sur le câble avant d’utiliser cette machine. -
Seite 68: Dispositifs De Sécurité
Montage Dispositifs de sécurité 1 Poignée arrière avec protection Pour travailler avec la tron- pour les mains (10) çonneuse, portez toujours des gants de protection Elle protège la main des branches et ramifications au cas où la chaîne et utilisez uniquement les saute. -
Seite 69: Tension De La Chaîne
Tension de la chaîne 5. Placez le guide (4) et la chaîne de scie (5) sur les goupilles de guide (23). Lorsque les ergots, à droite sous les Le fait de tendre la chaîne régulièrement goupilles de guide (23), reposent dans améliore la sécurité... -
Seite 70: Lubrification De La Chaîne
1. Assûrez-vous que le frein de • Employez de l‘huile biologique Grizz- chaîne soit desserré, i.e. que le ly, qui contient des éléments additifs levier de frein (3) de chaîne soit réduisant le frottement et l’usure et ne poussé contre la poignée avant détériore pas le système de pompage. -
Seite 71: Mise En Marche
Mise en marche 3. Déverrouillez le frein de chaîne en poussant le levier de frein (3) contre la 1. Avant le démarrage, assurez-vous qu’il poignée avant (16). y ait assez d’huile dans le réservoir et 4. Tenez la tronçonneuse électrique ferme- remplissez le cas échéant (cf. -
Seite 72: Remplacement De La Lame
Techniques de coupe Si une trace d’huile se forme, la tronçon- neuse fonctionne impeccablement. Généralités S’il ne se forme pas de trace d’huile, nettoyez éventuellement le • Vous obtenez un meilleur contrôle si canal d’écoulement de l’huile ou vous sciez avec le côté inférieur du bien faites réparer la tronçonneuse guide (chaîne tirant ) et pas avec le par le service-après-vente. -
Seite 73: Abattre Des Arbres
Abattre des arbres • Les arbres d’un diamètre plus élevé doivent subir des entailles et une coupe Il faut posséder beaucoup d’abattage (cf. ci-dessus d’expérience pour abattre des arbres. Abattez des N’abattez jamais d’arbre par arbres seulement si vous êtes vent fort ou instable, quand sûr de savoir manipuler la il y a un risque d’endom-... -
Seite 74: Emonder
La profondeur de coupe doit fente de sciage et amener l’arbre faire environ 1/3 du diamètre sur la ligne de chute souhaitée, habituel. Effectuez maintenant enfoncez des coins en bois, en une coupe oblique avec un angle plastique ou en aluminium. d’attaque d’environ 45°, depuis 5. -
Seite 75: Scier
• Enlevez les branches porteuses seule- 2. Le tronc est soutenu à une ment après les avoir écourtées. extrémité: • Les branches sous tension doivent être Sciez tout d’abord 1/3 du dia- sciées du bas vers le haut afin d’éviter mètre du tronc du bas vers le que la tronçonneuse ne se coince. -
Seite 76: Nettoyage
Nettoyage • Nettoyez les fentes d’aération et la sur- face de la machine avec un pinceau, • Après chaque utilisation, nettoyez la une balayette ou un chiffon sec. N’utili- machine à fond. Vous prolongerez sa sez pas de liquides pour le nettoyage. •... -
Seite 77: Aiguiser La Chaîne
Aiguiser la chaîne Pour aiguiser la chaîne, des outils spéciaux garantissant que les couteaux sont aigui- Une chaîne mal aiguisée aug- sés à l’angle et à la profondeur corrects mente le danger de choc en sont nécessaires. Nous recommandons arrière! aux utilisateurs de tronçonneuses inexpé- Utilisez des gants protégeant rimentés de faire aiguiser la chaîne par... -
Seite 78: Réglage De La Tension De La Chaîne
8. Tous les trois aiguisages, il faut contrô- 1. Arrêtez la tronçonneuse et débranchez- ler la profondeur d’aiguisage (limite de profondeur) et limer à l’aide d’une 2. Enlevez la protection de la chaîne (8), lime plate. La limite de profondeur la chaîne (5) et le guide (4). -
Seite 79: Stockage
Sens de rotation de la Le recyclage aide à réduire la consomma- chaîne de coupe tion de matières premières et à soulager l‘environnement. Vous obtiendrez des infor- Pour déterminer le sens de la chaîne de mations sur l‘élimination et la localisation coupe (5), servez-vous du symbole sous de la déchetterie la plus proche auprès du le capot de la roue dentée (8) lorsque la... -
Seite 80: Pièces De Rechange/Accessoires
Pièces de rechange/Accessoires Vous obtiendrez des pièces de rechange et des accessoires à l’adresse www.grizzly-service.eu Si vous avez des problèmes lors du passage de la commande, merci d‘utiliser le formu- laire de contact. Pour toute autre question, adressez-vous au ”Service-Center” (voir page 83). -
Seite 81: Localisation D'erreur
Localisation d’erreur Problème Cause possible Elimination de l‘erreur Vérifier le frein de la chaîne, Frein de la chaîne enclen- desserrer éventuellement le frein ché de la chaîne Absence de tension Vérifier prise, câble, conduite, fiche et éventuellement répara- tion par un électricien. L‘appareil ne démarre pas Dispositif de sécurité... -
Seite 82: Garantie
Garantie l’expiration du délai de garantie les répa- rations occasionnelles sont à la charge de Chère cliente, cher client, l’acheteur. Ce produit bénéficie d’une garantie de 3 Volume de la garantie ans, valable à compter de la date d’achat. En cas de manques constatés sur ce L’appareil a été... -
Seite 83: Service Réparations
• Si des pannes de fonctionnement ou express ou avec toute autre taxe spéciale d’autres manques apparaissent, prenez ne seront pas acceptés. Nous exécutons d’abord contact, par téléphone ou par gratuitement la mise aux déchets de vos e-Mail, avec le service après-vente appareils défectueux renvoyés. -
Seite 84: Inleiding
Inhoud Kettingsmering kontroleren ....98 Inleiding ........84 Zwaard vervangen ......98 Gebruik ........85 Zaagtechnieken ......99 Algemene beschrijving ....85 Allgemeen ........99 Omvang van de levering ....85 Bomen vellen ........99 Overzicht ........85 Snoeien ........101 Functiebeschrijving ......86 Doorzagen ........ -
Seite 85: Nl Be
Gebruik Omvang van de levering De elektrische kettingzaag is enkel voor het Pak het apparaat uit en controleer, of de zagen van hout gekonstrueerd. Voor alle inhoud volledig is: andere toepassingen (bv. het snijden van Elektrische Kettingzaag metselwerk, kunststoffen of levensmiddelen) Zwaard (geleidingsrails) is de zaag niet geschikt. -
Seite 86: Functiebeschrijving
Technische gegevens verschillen. Probeer de belasting door trillingen zo gering mogelijk te houden. Voor- Elektrische kettingzaag ..PKS 2200 A1 Netspanning U ..230-240 V~, 50 Hz beeldmaatregelen voor de reduc- tie van trillingsbelasting zijn het Prestatievermogen P ....2200 Watt dragen van handschoenen bij het Veiligheidsklasse ...... -
Seite 87: Symbolen Op De Zaag
Een elektrische kettingzaag is een Werk nooit met één hand. gevaarlijke machine, die bij fout of slordig gebruik ernstige of zelfs dodelijke verwondingen kan ver- Opgepast! Terugslag – let op voor oorzaken. Let daarom op volgende terugslag van de machine richtlijnen voor zowel uw veiligheid als voor die van anderen en vraag Stel de machine niet bloot aan... -
Seite 88: Symbolen In De Handleiding
Algemene Pictogram op de olietankdop: veiligheidsrichtlijnen Zaagketting oliën Pictogram op de bevestigingsschroef voor Maakt u zich vooraleer u met de de kettingwielafdekking: elektronische kettingzaag gaat wer- ken met alle onderdelen vertrouwd. OPEN Oefen het hanteren van de zaag (doorzagen van rond hout op een DICHT zaagbok) en vraag uitleg aan een ervaren gebruiker of een vakman... - Seite 89 Het in de veiligheidsinstructies gebruikte Er bestaat een verhoogd risico door begrip „Elektrisch gereedschap“ heeft een elektrische schok als uw lichaam betrekking op elektrisch gereedschap met geaard is. netvoeding (met netsnoer) en op elektrisch c) Houd de elektrische ketting- gereedschap met batterijvoeding (zonder zaag op een veilige afstand van netsnoer).
- Seite 90 drugs, alcohol of medicijnen g) Wanneer stofafzuig- en op- staat. Eén moment van onoplettend- vangsystemen kunnen worden heid bij het gebruik van de elektrische gemonteerd, dient u zich ervan kettingzaag kan tot ernstige verwondin- te verzekeren dat deze aange- sloten zijn en correct worden gen leiden.
-
Seite 91: Veiligheidsinstructies Voor Kettingzagen
Veiligheidsinstructies voor of beweegbare onderdelen fout- kettingzagen loos functioneren en niet klem- men, of er onderdelen gebroken of zodanig beschadigd zijn, dat • Houd bij een draaiende zaag de werking van de elektrische alle lichaamsdelen op een vei- kettingzaag in negatieve zin be- lige afstand van de zaagket- invloed wordt. -
Seite 92: Veiligheidsmaatregelen Tegen Terugslag
een kettingzaag op een boom bestaat en leiden tot het verlies van de con- er gevaar voor verwondingen. trole. • Let altijd op een vaste stand en • Enkel hout zagen. De ketting- gebruik de kettingzaag enkel zaag niet gebruiken voor werk- wanneer u op een vaste, veilige zaamheden, waarvoor ze niet en effen grond staat. -
Seite 93: Restrisico's
• Het vastzitten van de kettingzaag aan reserverails en zaagkettingen kunnen de bovenkant van de geleiderail kan tot een scheur van de ketting en/of tot de rail fel in de richting van de opera- een terugslag leiden. • Houd u aan de aanwijzingen tor terugstoten. -
Seite 94: Verdergaande Veiligheidsinstructies
Verdergaande tieve of passieve medische implantaten veiligheidsinstructies negatief beïnvloeden. Om het risico op ernstige of dodelijke letsels te redu- ceren, adviseren wij personen met me- • Als het netsnoer van dit apparaat be- schadigd wordt, moet het vervangen dische implantaten om hun arts en de worden door een speciaal netsnoer, fabrikant van het medische implantaat dat via de fabrikant of via zijn klanten-... -
Seite 95: Montage
Veiligheidsvoorziening, die de ketting Vóór u de elektrische kettingzaag in ge- bij terugslag onmiddellijk stopzet; de bruik neemt, moet u: hendel is ook manueel te gebruiken; eventueel het zwaard, de zaagketting beschermt de linker hand van de ge- en de kettingafdekking monteren, bruiker als deze van het voorste hand- de zaagketting spannen, vat afglijdt. -
Seite 96: Ketting Aanspannen
Opgepast! De zaag kan olie verlie- De ketting niet aanspannen of ver- zen. vangen als deze nog heet is, omdat ze na het afkoelen opnieuw een beetje inkrimpt. Bij niet-naleving Let u alstublieft erop dat de zaag na ge- bruik kan naoliën of leeglopen, vooral als kan dit leiden tot schade aan de ze zijdelings of op kop wordt gelegerd. -
Seite 97: Kettingsmering
Bedienen van de Kettingsmering kettingzaag Zwaard en ketting mogen nooit zonder olie vallen. Gebruikt u Start de kettingzaag pas als het de elektrische kettingzaag met te zwaard, de ketting en de ketting- weinig olie, worden de prestaties wielbescherming juist gemonteerd zijn. -
Seite 98: Kettingrem Kontroleren
Kettingsmering kontroleren 7. De motorzaag stopt als u de aan- en uitschakelaar (13) weer loslaat. Een continu-schakeling is niet mogelijk. Kontroleer voor het starten het oliepeil en de kettingsmering. Kettingrem kontroleren • Start de kettingzaag en houdt ze boven De motor kan niet starten als de ket- een lichte ondergrond. -
Seite 99: Zaagtechnieken
5. Vervang het zwaard en monteer boom te trekken. Er bestaat zwaard en ketting zoals onder „Zaag- verwondingsgevaar. Zet de ketting en zwaard monteren“ beschre- motor af en gebruik een wig ven. of een hefboomarm om de elektrische kettingzaag los te krijgen. - Seite 100 ven de te kappen boom blijven, omdat traject (1) dient in ongeveer 45° de boom waarschijnlijk na het kappen te staan op de geplande valrich- zal rollen of naar beneden glijden. ting (2). • Kleine bomen met een diameter van 3.
-
Seite 101: Snoeien
Als blijkt dat de boom eventueel • Onder spanning staande takken moe- niet in de gewenste richting valt ten van onder naar boven gezaagd of terug neigt en de zaagketting worden om vastklemmen van de ket- klem komt te zitten, onderbreekt tingzaag te voorkomen. -
Seite 102: Onderhoud En Reiniging
door. Vervolgens draait u de stam motor en uitgetrokken stek- om en zaagt u de rest van boven ker uit. Verwondinggevaar! naar beneden door. Laat onderhoudswerkzaam- 2. Stam is aan 1 kant gestut heden die niet in deze hand- leiding worden genoemd Zaag de stam eerst van beneden naar boven (met de bovenkant door onze werkplaats uitvoe-... -
Seite 103: Onderhoudsintervallen
Onderhoudsintervallen Voer de in onderstaande tabel opgesomde onderhoudswerkzaamheden regelmatig uit. Door regelmatig onderhoud van uw zaag wordt haar levensduur verlengd. Bovendien kan u dan optimaal zagen en worden ongelukken vermeden. Tabel onderhoudsintervallen Voor elk Na 10 uur Na elk Machine-onderdeel Uit te voeren gebruik gebruik... -
Seite 104: Spanning Instellen
Voor het slijpen van de ketting zijn spe- behulp van een platte vijl aangepast ciale werktuigen noodzakelijk, waarvan worden. De dieptebegrenzing moet ca. 0,65 mm tegenover de zaagtand naar de messen de juiste hoek hebben en in de juiste diepte geslepen zijn. Onervaren achter geplaatst worden. -
Seite 105: Zwaard Omdraaien
olie op een milieuvriendelijke wijze Bi optimale oliedoorvoer en juist ingestelde olietoevoerknop sproeit (zie “Afvoer van afval/Milieubescher- de ketting enkele seconden automa- ming”). tisch een beetje olie nadat de zaag • Breng de zwaardbeschermer aan. wordt gestart • Bewaar het apparaat op een droge, stofvrije plek en buiten bereik van kin- Zwaard omdraaien deren. -
Seite 106: Reserveonderdelen / Accessoires
Reserveonderdelen / Accessoires Reserveonderdelen en accessoires verkrijgt u op www.grizzly-service.eu Ondervindt u problemen bij het orderproces, gebruik dan het contactformulier. Bij andere vragen neemt u contact op met het “Service-Center” (zie pag. 109). Olietankdop ................... 75118246 Oregon Kettingzaag 91P057X ..............30091570 16“... -
Seite 107: Foutmeldingen
Foutmeldingen Mogelijke oorzaak Probleem Oplossing Kettingrem controleren, evt. ket- Kettingrem vergrendeld tingrem loszetten Stopcontact, kabel, leiding, Geen stroom stekker kontroleren, indien no- dig reparatie door vakman. Zekering springt Zekering kontroleren, zie aan- Machine start wijzing Aan- en uitschakelaar Reparatie door klantendienst 13) is defekt Koolborstel is versleten Reparatie door klantendienst... -
Seite 108: Garantie
Garantie garantieperiode tot stand komende repara- ties worden tegen verplichte betaling van Geachte cliënte, geachte klant, de kosten uitgevoerd. U krijgt op dit apparaat 3 jaar garantie, te Omvang van de garantie rekenen vanaf de datum van aankoop. Ingeval van gebreken aan dit product heeft Het apparaat werd volgens strikte kwali- teitsrichtlijnen zorgvuldig geproduceerd en u tegenover de verkoper van het product... -
Seite 109: Reparatieservice
zendingswijze – ingezonden apparaten • Gelieve het artikelnummer uit het type- plaatje. worden niet geaccepteerd. • Indien er zich functiefouten of andere De afvalverwerking van uw defecte inge- zonden apparaten voeren wij gratis door. gebreken voordien, contacteert u in eerste instantie de hierna vernoemde Service-Center serviceafdeling telefonisch of per e- mail. -
Seite 110: Spis Tresci Wstęp
Spis tresci Wstęp ........110 Wymiana miecza ......125 Techniki piłowania ....125 Przeznaczenie ......111 Opis ogólny ......111 Informacje ogólne ......125 Zawartość opakowania ....111 Ścinanie drzew ......125 Przegląd ........111 Okrzesywanie ......127 Opis działania ......112 Przycinanie ......... -
Seite 111: Przeznaczenie
Opis ogólny Instrukcję należy przechowywać starannie, a w przypadku przeka- Ilustracje znajdują się na zania produktu osobom trzecim należy dostarczyć nabywcy kom- okładce przedniej i tylnej. pletną dokumentację. Zawartość opakowania Przeznaczenie Rozpakuj urządzenie i sprawdź, czy jest Elektryczna piła łańcuchowa jest przezna- ono kompletne. -
Seite 112: Opis Działania
Dane techniczne rzystania z urządzenia od podanej wartości, jest to zależne od sposo- Elektryczna piła łańcuchowa . PKS 2200 A1 bu używania urządzenia. Napięcie znamionowe Proszę spróbować maksymalnie wejścia U ....230-240 V~, 50 Hz ograniczyć... -
Seite 113: Zasady Bezpieczeństwa
Zasady bezpieczeństwa Używać odzieży ochronnej! Ten rozdział zawiera podstawowe zasady Noś osobiste wyposażenie ochron- bezpieczeństwa dotyczące pracy z elek- ne. Zasadniczo noś okulary ochron- tryczną piłą łańcuchową. ne, nauszniki. Elektryczna piła łańcuchowa Noś odporne na przecięcie rękawi- zalicza się do niebezpiecznych ce. -
Seite 114: Symbole Zawarte W Instrukcji
Symbol poniżej osłony koła łańcuchowego: Znaki nakazowe z informacjami dot. zapobiegania wypadkom. Przestrzegać kierunku biegu łańcucha. Noś rękawice ochronne, aby unik- Uwaga! Przeczytać instrukcję obsługi. nąć skaleczenia! Wskazówki zawierające informa- Symbol na mieczu: Kierunek biegu łańcucha cje dot. lepszego użytkowania urządzenia. -
Seite 115: Ogólne Zalecenia Bezpieczeństwa Dla Elektronarzędzi
2) Bezpieczeństwo elektryczne: Ogólne zalecenia bezpie- czeństwa dla elektronarzędzi a) Wtyczka pilarki elektrycznej OSTRZEŻENIE! Przeczytaj musi pasować do gniazdka. Wtyczki nie można w żaden wszystkie zasady i instrukcje bezpieczeństwa. Niedokładne sposób modyfikować. Nie uży- przestrzeganie zasad i instrukcji waj adapterów wtyczek razem z narzędziami elektrycznymi bezpieczeństwa może spowodo- posiadającymi zestyk ochronny... - Seite 116 3) Bezpieczeństwo osób: ubrań ani ozdób. Trzymaj wło- sy, części ubrania i rękawice z a) Zachowuj uwagę, uważaj na daleka od ruchomych części. Luź- to, co robisz i pracuj pilarką ne ubranie, ozdoby lub długie włosy elektryczną rozsądnie. Nie uży- mogą...
-
Seite 117: Zasady Bezpieczeństwa Dotyczące Pilarek Łańcuchowych
Zasady bezpieczeństwa doty- wskazówek. Narzędzia elektryczne czące pilarek łańcuchowych są niebezpieczne, jeżeli używają ich niedoświadczone osoby. e) Starannie pielęgnuj pilarkę • Trzymaj wszystkie części ciała elektryczną. Sprawdzaj, czy w bezpiecznej odległości pracu- ruchome części prawidłowo jącego łańcucha pilarki. Przed funkcjonują i nie są zablokowa- uruchomieniem pilarki upewnij ne, czy części nie są... -
Seite 118: Środki Ostrożności Przeciwko Odrzutom
łańcuchowej tylko stojąc na czona - przykład: Nie używaj pilarki łańcuchowej do piłowa- stabilnym, pewnym i równym podłożu. Śliskie podłoże lub niesta- nia tworzyw sztucznych, murów ani materiałów budowlanych bilna pozycja, np. na drabinie, mogą spowodować utratę równowagi lub nie wykonanych z drewna. Uży- kontroli nad pilarką. -
Seite 119: Zagrożenia Ogólne
Zagrożenia ogólne • Wskutek każdej z tych reakcji osoba obsługująca może stracić kontrolę nad pilarką i doznać ciężkiego zranienia. Nawet przy przepisowej obsłudze urzą- dzenia elektrycznego występują tzw. za- Nie polegaj tylko na zabezpiecze- grożenia ogólne. W związku z konstrukcją niach zainstalowanych w pilarce łańcuchowej. -
Seite 120: Funkcje Bezpieczeństwa
• W przypadku konieczności wymiany do obsługi maszyny przez osoby z przewodu przyłączeniowego, zaleca- implantami medycznymi zalecamy skonsultowanie się z lekarzem i produ- my zlecenie wymiany przewodu pro- ducentowi lub jego przedstawicielowi centem implantu. • Podczas cięcia na zboczu zawsze stój (np. -
Seite 121: Montaż
Łańcuch piły nie obraca się, gdy wlać olej do smarowania łańcuchów, jest zablokowany hamulec łańcu- sprawdzić działanie hamulca łańcucha i automatycznego układu smarowania. cha. 5 Niskoodbojowy łańcuch piły Montaż łańcucha piły i miecza pomaga w amortyzowaniu odbojów przy pomocy specjalnie zaprojektowa- nych elementów zabezpieczających. -
Seite 122: Napinanie Łańcucha Tnącego
proces smarowania i że może z niej wy- strzeganie tej wskazówki może być ciekać olej, jeśli położymy ją na boku lub przyczyną uszkodzenia prowadni- na głowicy. To jest normalne zjawisko, cy szynowej lub silnika przez zbyt mocno naprężony łańcuch. Stan uwarunkowane przez otwór wentylacyjny na górnej krawędzi zbiornika i nie stanowi naprężenia i nasmarowania łań-... -
Seite 123: Smarowanie Łańcucha
Smarowanie łańcucha 2. Wytrzyj ewentualne rozlane resztki oleju i zamknij pokrywę Szyna prowadząca i łańcuch nie zbiornika. mogą być nigdy pozbawione oleju. Przed rozpoczęciem nale- Jeżeli piła łańcuchowa jest eksploa- wania oleju należy zawsze towana ze zbyt małą ilością oleju, urządzenie wyłączyć... -
Seite 124: Sprawdzanie Hamulca Łańcucha
4. Zwolnij hamulec łańcucha (3), prze- cucha /przednią osłonę dłoni (3) od suwając dźwignię hamulca w stronę uchwytu przedniego (16). Łańcuch po- winien się nagle zatrzymać. przedniego uchwytu (16). 5. Dobrze chwyć piłę łańcuchową obu- 7. Eżeli hamulec łańcucha zadziałał pra- rącz, trzymając prawą... -
Seite 125: Wymiana Miecza
chowej. Zapewnij, aby łańcuch piły Wymiana miecza nie dotykał podłoża. Po zakończeniu 1. Wyłącz pilarkę i wyjmij wtyczkę kabla cięcia i przed wyjęciem piły pocze- prądowego z gniazdka. kaj, aż elektryczna piła łańcuchowa 2. Połóż pilarkę na płaskiej powierzchni. zatrzyma się. Zawsze wyłączaj silnik 3. - Seite 126 piłą o długości szyny prowadzącej Podczas powalania drzew należy dopilnować, by inne mniejszej od średnicy pnia. osoby nie zostały narażone na niebezpieczeństwo, by nie • Uważaj, by w pobliżu stanowiska uszkodzić linii energetycz- pracy nie przebywali ludzie ani zwie- nych i nie wyrządzić innych rzęta.
-
Seite 127: Okrzesywanie
6. Jeżeli średnica pnia jest większa szynowej podczas wykonywania drugiego wycięcia. od długości prowadnicy łańcu- cha, wykonaj dwa nacięcia. 7. Po wykonaniu nacięcia łamiące- Nigdy nie stawaj przed drze- wem, które zostało już nacię- go drzewo upada samo lub przy pomocy klina albo łomu. -
Seite 128: Przycinanie
3. Pień jest podparty na obu • Rozgałęzione konary należy przycinać końcach: pojedynczo. • Mniejsze gałęzie odetnij jednym cię- Przepiłuj najpierw z góry do dołu (dolną stroną miecza) 1/3 ciem zgodnie z ilustr. przekroju pnia. Następnie prze- piłuj pień z dołu do góry (górną Przycinanie stroną... -
Seite 129: Oczyszczanie
nalnych części zamiennych Czasokresy konserwacyjne firmy. Przed wszelkimi pracami konserwacyjnymi i Wykonuj regularnie wymienione w oczyszczaniem zaczekaj, aż poniższej tabeli prace konserwacyjne. Regularna konserwacja piły łańcuchowej maszyna ostygnie. Niebez- pieczeństwo zranienia! przedłuża jej żywotność eksploa-tacyjną i pozwala na uzyskanie optymalnej wydaj- ności cięcia oraz zapobiega wypadkom. -
Seite 130: Tabela Czasokresów Konserwacyjnych
Tabela czasokresów konserwacyjnych Po każ- Przed Po 10 go- Czynność każdym Element maszyny dzinach użyciem użyciu pracy Sprawdzić, w razie potrzeby Komponenty hamulca łańcucha wymienić Sprawdzić, w razie potrzeby Koło łańcuchowe ( wymienić Sprawdzić, naoliwić, w razie Łańcuch tnący ( ... -
Seite 131: Regulacja Naciągu Łańcucha
Regulacja naciągu łańcucha specjalistycznemu. Jeżeli jesteś zdania, że potrafisz samodzielnie naostrzyć łańcuch, nabądź potrzebne narzędzia specjalne w Regulacja naprężenia łańcucha jest opi- sana w rozdziale „Montaż - Napinanie handlu specjalistycznym. łańcucha tnącego“. 1. Wyłącz pilarkę i wyjmij wtyczkę kabla prądowego z gniazdka. Docieranie nowego łańcucha piły 2. -
Seite 132: Obracanie Miecza
Przechowywanie 5. Zamontuj szynę prowadzącą, łańcuch tnący i osłonę koła łańcuchowego i napnij łańcuch tnący. • Przed przechowaniem urządzenie na- leży oczyścić. • Przed dłuższą przerwą w pracy należy Gdy stan przepustów olejowych opróżnić zbiornik oleju. Zużyty olej zu- jest optymalny, a regulator oleju prawidłowo ustawiony, kilka se- tylizować... -
Seite 133: Części Zamienne / Akcesoria
Starannie opróżnij zbiornik oleju i oddaj piłę łańcuchową w punkcie recyklingu. Użyte w produkcji piły elementy z tworzyw sztu-cznych i metalu można od siebie oddzielić i poddać wybiórczej utylizacji. Spytaj w naszym Centrum Serwisowym. Części zamienne / Akcesoria Części zamienne i akcesoria można zakupić na www.grizzly-service.eu W przypadku problemów z zamawianiem należy skorzystać... -
Seite 134: Poszukiwanie Błędów
Poszukiwanie błędów Możliwa przyczyna Sposób usunięcia Problem Hamulec łańcucha zabloko- Sprawdzić hamulec łańcucha, ewent. odluźnić hamulec łańcucha wany Sprawdź gniazdko sieciowe, ka- bel, przewód, wtyczkę, w razie Brak napięcia sieciowego potrzeby zleć naprawę specjaliście Zadziałał bezpiecznik domo- elektrykowi Urządzenie nie wej sieci elektrycznej Sprawdź... -
Seite 135: Gwarancja
Gwarancja Zakres gwarancji Urządzenie wyprodukowano z zacho- waniem staranności zgodnie z surowymi Szanowna Klientko, Szanowny Kliencie, na zakupione urządzenie otrzymują Pań- normami jakościowymi i dokładnie spraw- dzono przed wysyłką. stwo 3 lata gwarancji od daty zakupu. W przypadku wad tego produktu przysłu- gują... -
Seite 136: Serwis Naprawczy
Service-Center się z wymienionym niżej działem ser- wisowym telefonicznie lub mailowo. Uzyskają Państwo wówczas szczegó- Serwis Polska łowe informacje na temat realizacji Tel.: 22 397 4996 reklamacji. E-Mail: grizzly@lidl.pl • Uszkodzony produkt mogą Państwo IAN 324425_1904 wysłać po skontaktowaniu się z naszym działem obsługi klienta, za- Importer łączając dowód zakupu (paragon) i... -
Seite 137: Úvod
Obsah Úvod........137 Kontrola olejové automatiky ..150 Účel použití ......138 Vyměnit čepel ......150 Techniky řezání ....... 150 Obecný popis ......138 Všeobecně ........150 Objem dodávky ......138 Přehled ........138 Kácení stromů ......151 Odřezávání větví ......153 Popis funkce ........ -
Seite 138: Účel Použití
Účel použití Řetězová pila Vodicí lišta (vodicí kolejnice) Elektrická řetězová pila je zkonstruována (již namontovaný) pouze pro řezání dřeva. Pro všechny Pilový řetěz (již namontovaný) ostatní druhy použití (např. řezání zdiva, Ochranná pochva čepele plastů nebo potravin) není pila vhodná. Olejová... -
Seite 139: Popis Funkce
Dle možnosti se snažte udržet co Technická data nejnižší zatížení, způsobené vibra- cemi. Příklady opatření ke snížení Elektrická řetězová pila ..PKS 2200 A1 zatížení, způsobeno vibracemi, je Jmenovité vstupní nošení rukavic při použití nástroje napětí U....230-240 V~, 50 Hz a omezení... -
Seite 140: Symboly Na Pile
Symboly na pile Hladina akustického výkonu Před započetím práce se dobře se- Značka minimálního stavu naplně- znamte se všemi ovládacími prvky. ní „MIN“ ukazatele stavu naplnění Cvičte zacházení s pilou a nechte oleje si vysvětlit funkci, účinek a techniku řezání odborníkem. Piktogram na typovém štítku: Řetěz se netočí, pokud je řetězová... -
Seite 141: Symboly V Návodu
Při kácení dřeva dodržujte ochranu Piktogram na šroubu rychloupínacího systému řetězu: proti hluku a místní předpisy. Na základě místních předpisů může být vyžadována zkouška způsobi- povolit losti.Na základě místních předpisů může být vyžadována zkouška upnout způsobilosti. Obraťte se naObraťte se na lesní správu. lesní správu. Symboly v návodu Označení... - Seite 142 nachází hořlavé tekutiny, plyny hran anebo od pohybujících se částí nástrojů. anebo prachy. Elektrické nástroje vy- tváří jiskry, které mohou zapálit prach Poškozené anebo zamotané kabely zvyšují riziko elektrického úderu. anebo páry. c) Během používání elektrické ře- e) Když pracujete s elektrickou ře- tězové...
- Seite 143 proudem, než ji zvednete anebo jete v udaném výkonovém rozsahu lépe nesete. Když při nošení elektrické a bezpečněji. b) Nepoužívejte žádné elektrické řetězové pily držíte prst na spínači ane- nářadí, jehož spínač je defektní. bo když tento nástroj v zapnutém stavu připojíte na napájení...
-
Seite 144: Bezpečnostní Pokyny Pro Řetězové Pily
má vykonávat. Používání elektrické pro hlavu, ruky, nohy a chodi- dla je předepsaná. Vhodný ochran- řetězové pily pro jiné účely, než pro které je určena, může vést k nebezpeč- ný oděv snižuje nebezpečí poranění ným situacím. skrze poletující třískový materiál a skr- ze náhodný... -
Seite 145: Preventivní Opatření Proti
• Udržujte rukojeti suché, čisté a • Každá z těchto reakcí může vést k prosté oleje a tuků. Zamaštěné, na- tomu, že ztratíte kontrolu nad pilou a olejované rukojetě jsou kluzké a vedou případně se těžce poraníte. ke ztrátě kontroly. Nespoléhejte se výlučně... -
Seite 146: Zbývající Rizika
Zbývající rizika • Postupujte pozorně podle pokynů k údržbě, kontrole a servisu v tomto ná- I když toto elektrické nářadí obsluhujete v vodu k obsluze. souladu s předpisy, stále existují zbývající Poškozená ochranná zařízení a díly je rizika. V souvislosti s technologií a kon- nutné... -
Seite 147: Bezpečnostní Funkce
14 Pojistka vypínače kameny, uvolněná kůra, hřebíky, skoby Před zapnutím přístroje musí být vypí- a drát. • Postupujte pozorně podle pokynů k nač odjištěn pojistkou. 18 Zachycovací čep řetězu údržbě, kontrole a servisu v tomto ná- snižuje nebezpečí zranění, když prask- vodu k obsluze. -
Seite 148: Napnutí Řetězu
5. Nasaďte vodicí lištu (4) a řetěz (5) na resp. zamezení opotřebení a poškození kolejnicový čep (23). Když nos sedí řetězu. Napnutí řetězu doporučujeme vpravo pod čepem (23) v dolním kru- zkontrolovat a v případě potřeby upravit hovém vyhloubení na vodicí liště, tak před započetím práce a poté... -
Seite 149: Mazání Řetězu
Před doplňováním řetězového 4. Upevňovací šroub (7) znovu utáh- oleje přístroj vždy vypněte a něte ( nechejte motor vychladnout. Při přetečení oleje vzniká ne- U nové řetězové pily musíte napnutí bezpečí požáru. řetězu následně nastavit po max. 5-ti řezech. Obsluha řetězové pily Mazání... -
Seite 150: Kontrola Řetězové Brzdy
Kontrola řetězové brzdy Jestliže se ukáže olejová stopa, pracuje mazání řetězu správně. Řetěz se netočí, pokud je řetězová Jestliže se žádná olejová skvrna brzda aktivována. neobjeví, vyčistěte případně pro- 1. Položte řetězovou pilu na pevnou a pust oleje nebo nechte elektrickou rovnou podložku. -
Seite 151: Kácení Stromů
stranou vodicí kolejnice (tlačnou větví Nezkušeným uživatelům nedoporu- řetězu). čujeme z bezpečnostních důvodů • Řetěz pily se při řezání anebo po jeho kácet stromy lištou, která je kratší ukončení nesmí dotknout ani země, ani než průměr káceného kmenu. jiného předmětu. •... - Seite 152 jecí vedení a aby se nezpů- vlevo od kmene a řežete tažnou sobily žádné hmotné škody. větví řetězu pily. Řežte plným vý- Pokud strom přesto dojde do konem a pomalu do kmene. Porá- styku s napájecím vedením, žecí řez musí probíhat vodorovně musí...
-
Seite 153: Odřezávání Větví
te motor, odložte řetězovou • Dbejte na to, aby se řetěz pily při řezá- pilu a opusťte pracoviště ní nedotkl země. ústupovou cestou. • Dbejte na pevný postoj a při řezání ve Je třeba dávat pozor na pa- svahu stůjte nad kmenem. dající... -
Seite 154: Údržba A Čištění
na padající strom. Postavte se • Vyčistěte vzduchové štěrbiny a povrchy tak, aby oddělený kmen nepřed- stroje štětcem, smetákem anebo suchým stavoval žádné nebezpečí. Dávej- hadrem. K čištění nepoužívejte žád- te pozor na své nohy. Oddělený ných kapalin. kmen může pří pádu způsobit •... -
Seite 155: Tabulka Intervalů Údržby
Tabulka intervalů údržby Před každým Po každém Po 10 provoz- Strojní součást Akce použitím použití ních hodinách Kontrolovat, v případě Komponenty brzdy řetězu potřeby nahradit Řetězové kolo Kontrolovat, v případě potřeby nahradit Kontrovat, olejovat, v příp. Řetěz pily ( ... -
Seite 156: Nastavení Napnutí Řetězu
Záběh nového řetězu pily 1. Pilu vypněte a vytáhněte síťovou zástrčku. 2. Sejměte pilový řetěz (viz kapi- U nového řetězu se po nějaké době sni- tola „Obsluha řetězové pily“). žuje Pro nabroušení by měl být řetěz jeho napětí. Proto musíte po prvních 5ti dobře napnutý, aby bylo možné... -
Seite 157: Zapnutí Lišty
Odklízení a Zapnutí lišty ochrana okolí Při manipulaci s řetězem anebo s vodicí lištou používejte ochranných Nelijte starý olej do kanalizace anebo do rukavic s ochranou proti pořezání. odtoku vody. Odkliďte starý olej způso- bem, odpovidajícím ochraně okolí – ode- Aby se umožnilo rovnoměrné opotřebení, vzdejte jej ve sběrně... -
Seite 158: Náhradní Díly
Náhradní díly Náhradní díly a příslušenství obdržíte na stránkách www.grizzly-service.eu Pokud máte problémy při objednávání, použijte prosím kontaktní formulář. V případě jakýchkoliv dalších dotazů se obraťte na servisní středisko / „Service-Center“ (viz strana 159). Zátka olejové nádrže ................75118246 Řetěz pily 91P057X ................30091570 Lišta .................... -
Seite 159: Opravna
Tato záruka neplatí, je-li výrobek poškozen zásilka nebyla odeslána nevyplaceně z důvodu neodborného používání, nebo jako nadměrné zboží, expres nebo pokud u něj nebyla prováděna údržba. jiný, zvláštní druh zásilky. Přístroj za- Pro odborné používání výrobku musí být šlete včetně všech částí příslušenství přesně... -
Seite 160: Hledání Závad
Hledání závad Možná příčina Odstranění závady Problém Zkontrolujte řetězovou brzdu, Zacvaknutá řetězová brzda případně řetězovou brzdu uvolněte. Zásuvku, kabel, vedení, zástrčku kontro- Chybí síťové napětí lovat, příp. oprava elektroodborníkem Přístroj nestar- Domovní pojistka vypíná Kontrola domovní pojistky, viz pokyn tuje Vadný... -
Seite 161: Úvod
Obsah Úvod........161 Výmena vodiacej lišty ....174 Použitie ........162 Techniky pílenia ...... 175 Všeobecný popis ..... 162 Všeobecné pokyny ....... 175 Stínanie stromov ......175 Objem dodávky ......162 Prehľad ........162 Odvetvovanie ......177 Popis funkcie ....... 163 Skracovanie ........ -
Seite 162: Použitie
Použitie Reťazová píla Lišta (vodiaca lišta) (už montovaný) Elektrická reťazová píla je skonštruovaná Reťaz píly (už montovaný) len na pílenie dreva. Na všetky ostatné Ochranný kryt lišty druhy použitia (napr. rezanie stien a mú- Fľaša oleja s 180 ml „Bio-olej“ rov, umelých hmôt alebo potravín) táto píla Návod na obsluhu nie je vhodná. -
Seite 163: Popis Funkcie
Technické údaje uvádzanej hodnoty, v závislosti od druhu a spôsobu, v akom sa elek- Elektrická reťazová píla ..PKS 2200 A1 trický prístroj používa. Zaťaženie spôsobené vibráciami Menovité vstupné sa pokúste udržať tak malé, ako Napätie U .... -
Seite 164: Obrázkové Znaky Na Píle
bezpečnosť ako i pre bezpečnosť Pílu nevystavujte dažďu. Nástroj iných vždy dodržujte nasledovné nesmie byť vlhký a ani nesmie byť bezpečnostné pokyny a v prípade prevádzkovaný vo vlhkom prostre- nejasností sa poraďte s odborní- dí. kom. Pozor! V prípade poškodenia alebo Obrázkové... -
Seite 165: Symboly V Návode
Znak na páke brzdy reťaze: vanie guľatiny na koze na pílenie) a nechajte si skúseným užívateľom brzda reťaze: VYP alebo odborníkom vysvetliť funkciu, spôsob činnosti, techniky pílenia a brzda reťaze: ZAP osobné ochranné vybavenie. Znak na skrutke pre reťazový rýchloupína- Dodržiavajte ochranu proti hluku a miestne predpisy pri rúbaní... - Seite 166 1) Bezpečnosť pracoviska: vytiahnutie zástrčky zo zásuv- ky. Udržujte kábel vzdialene od a) Udržujte svoj pracovný úsek čis- horúčavy, od oleja, od ostrých hrán alebo od pohybujúcich sa tý a dobre osvetlený. Neporiadok častí nástrojov. alebo neosvetlené pracovné oblasti môžu viesť k nehodám. Poškodené...
- Seite 167 d) Nepoužívajte kábel na iný účel, cujete v udanom výkonovom rozsahu lepšie a bezpečnejšie. ako je nosenie alebo zavesenie elektrickej reťazovej píly alebo b) Nepoužívajte žiadne elektrické vytiahnutie zástrčky zo zásuv- náradie, ktorého spínač je de- ky. Udržujte kábel vzdialene od fektný.
-
Seite 168: Bezpečnostné Pokyny Pre Reťazové Píly
činnosť, ktorá sa má vykonávať. ranenia. • Dbajte vždy na pevný postoj Používanie elektrickej reťazovej píly a používajte reťazovú pílu iba pre iné účely, než pre ktoré je určená, vtedy, keď stojíte na pevnom, môže viesť k nebezpečným situáciám. bezpečnom a rovnom podklade. Šmykľavý... -
Seite 169: Preventívne Opatrenia Proti Spätnému Nárazu
ktoré nie je určená - príklad: opatrenia zabudované do reťazovej nepoužívajte reťazovú pílu na píly. Ako používateľ reťazovej píly by ste mali učiniť rozličné opatrenia, aby rezanie plastov, muriva alebo ste mohli pracovať bez nehôd a bez stavebných materiálov, ktoré nie sú... -
Seite 170: Pokračujúce Bezpečnostné Pokyny
a) rezné poranenia, Poškodené ochranné zariadenia a die- b) poškodenie sluchu, ak nenosíte vhodnú ly musia sa odborne opraviť v našom servisnom stredisku alebo vymeniť, ochranu sluchu, pokiaľ v návode na obsluhu nie je uve- c) poškodenie zdravia, ktoré sú výsled- kom vibrácií... -
Seite 171: Bezpečnostné Funkcie
14 Poistka vypínača • Dôsledne dodržiavajte návody na údržbu, kontroly a servis v tomto Návo- Za účelom zapnutia prístroja treba poistku odistiť. de na prevádzku. 18 Zachytávací čap reťaze Poškodené ochranné zariadenia a die- ly musia sa odborne opraviť v našom znižuje nebezpečenstvo poranení... -
Seite 172: Napínanie Reťaze
Napínanie reťaze 5. Nasaďte lištu (4) a reťaz (5) na želez- ničnú skrutku (23). Keď výstupok, vpra- vo pod železničnou skrutkou (23), sedí Pravidelné napínanie reťaze prispieva k v dolnom pravom vybraní na lište, sedí bezpečnosti používateľa a znižuje resp. lišta správne. -
Seite 173: Mazanie Reťaze
3. Na upnutie pílovej reťaze ktorý obsahuje malé množstvo adhéz- otočte skrutku pre reťazový nych prísad. rýchloupínací systém (9) v • Pred dlhšími prevádzkovými prestáv- smere hodinových ručičiek. kami vyprázdnite olejovú nádrž (6-8 Na uvoľnenie napnutia týždňov). otočte skrutku pre reťazový rýchloupínací... -
Seite 174: Kontrola Reťazovej Brzdy
3. Pripojte pílu na sieťové napätie. 7. Keď reťazová brzda správne funguje, 4. Uvoľnite reťazovú brzdu tým, že páku pustite zapínač/vypínač a uvoľnite re- reťazovej brzdy zatlačíte proti prednej ťazovú brzdu. rukoväti. Keď reťazová brzda nefun- 5. Elektrickú reťazovú pílu držte pevne obidvomi rukami, pravou rukou za guje správne, nesmiete elek- trickú... -
Seite 175: Techniky Pílenia
Ak sa reťaz píly zasekne, ne- ťaze a odstránili kryt reťazového kolesa pokúšajte sa vytiahnuť elek- (8). trickú reťazovú pílu násilím. 4. Snímte vodiacu lištu a reťaz píly. Za Hrozí nebezpečenstvo úrazu. účelom demontáže držte lištu píly (4) v Odstavte motor a na uvoľ- uhle cca 45 stupňov natočenú... - Seite 176 v teréne nad padajúcim stromom, 3. Vrubový (smerový) zárez pretože strom po spadnutí bude prav- (A): depodobne rolovať alebo kĺzať dole Vrubový zárez preveďte na tej kopcom. strane, na ktorú má strom spad- núť. Začnite s dolným, horizontál- • Malé stromy o priemere 15-18 cm možno zvyčajne odpíliť...
-
Seite 177: Odvetvovanie
píle. Váha píly spočíva podľa možnosti zárezu predstavoval minimálne 1/10 priemeru kmeňa. Neprepí- na kmeni. lená časť kmeňa sa označuje ako • Aby ste mohli odpíliť konáre na druhej strane kmeňa, zmeňte stanovisko. nedorez. 5. Akonáhle to hĺbka rezu dovolí, •... -
Seite 178: Údržba A Čistenie
Čistenie 3. Kmeň je podopretý na obi- dvoch koncoch: Prepílte najskôr zhora nadol • Pílu po každom použití dôkladne vyčis- tite. Tým predĺžite jej životnosť a zabrá- (spodnou stranou lišty) 1/3 prie- meru kmeňa. Potom pílte zdola nite vzniku úrazov. •... -
Seite 179: Tabuľ Ka Intervalov Údržby
Tabuľ ka intervalov údržby pred po 10 časť stroja úkon každým každom hodinách použitím použití prevádzky skontrolovať, v prípade potreby komponenty reťazovej brzdy vymeniť reťazové skontrolovať, v prípade potreby vymeniť koleso ( skontrolovať, naolejovať, v prípade reťaz píly ( ... -
Seite 180: Nastavenie Napnutia Reťaze
Zabehávanie novej reťaze 1. Pílu vypnite a vytiahnite zástrčku zo zásuvky. 2. Snímte reťaz píly (viď kapitolu U novej reťaze sa po určitom čase znižuje „Obsluha reťazovej píly“). Za jej predpínacia sila. Preto musíte reťaz po účelom brúsenia by mala byť prvých 5-tich rezoch, najneskôr po 1 hodi- reťaz dobre napnutá, aby sa ne práce s pílou dotiahnuť. -
Seite 181: Otočenie Lišty
Otočenie lišty Odstránenie a ochrana životného prostredia Pri narábaní s reťazou alebo lištou používajte ochranné rukavice odol- Starý olej odstráňte spôsobom, ktorý zod- né voči prerezaniu. povedá požiadavkám ochrany životného prostredia – odovzdajte ho do špecializo- Po každých 10 hodinách prevádzky treba vanej zberne. -
Seite 182: Náhradné Diely/Príslušenstvo
Náhradné diely/Príslušenstvo Náhradné diely a príslušenstvo nájdete na strane www.grizzly-service.eu Ak by sa mali vyskytnúť problémy s procesom objednávky, použite, prosím, kontaktný for- mulár. Pri ďalších otázkach sa obráťte na „Service-Center“ (pozri stranu 185). Viečko olejovej nádržky ................75118246 Reťaz píly 91P057X ................30091570 Vodiaca lišta (16“, Oregon) .............. -
Seite 183: Zisťovanie Závad
Zisťovanie závad Možná príčina Problém Odstránenie poruchy Skontrolovať brzdu reťaze, príp. brzdu Zaskočená brzda reťaze reťaze uvoľniť skontrolujte zásuvku, kábel, el. vedenie, chýba sieťové napätie zástrčku, príp. nechajte previesť opravu odborníkom na elektrické prístroje. domová poistka vypína prístroj nechce skontrolujte domovú poistku, viď pokyn naštartovať... -
Seite 184: Záruka
Záruka Rozsah záruky Prístroj bol vyrobený podľa prísnych smer- Vážená zákazníčka, vážený zákazník, níc kvality a pred dodaním bol svedomite Pre tento prístroj platí záruka 3 roky od kontrolovaný. dátumu zakúpenia. Ak je prístroj poškodený, podľa zákona Záruka sa týka materiálových alebo výrob- máte právo ho reklamovať... -
Seite 185: Servisná Oprava
Service-Center • Produkt evidovaný ako poškodený mô- žete po dohode s našim zákazníckym servisom, s priloženým dokladom o za- Servis Slovensko kúpení (pokladničný doklad) a s údaj- Tel.: 0850 232001 mi, v čom chyba spočíva a kedy vznik- E-Mail: grizzly@lidl.sk la, zaslať... -
Seite 186: Original-Eg- Konformitätserklärung
Original EG-Konformitätserklärung Hiermit bestätigen wir, dass die Elektro-Kettensäge Modell PKS 2200 A1 Seriennummer 201910000001 - 201910058663 folgenden einschlägigen EU-Richtlinien in ihrer jeweils gültigen Fassung entspricht: 2006/42/EG • 2000/14/EG • 2005/88/EG • 2014/30/EU • 2011/65/EU* Um die Übereinstimmung zu gewährleisten, wurden folgende harmonisierte Normen sowie nationale Normen und Bestimmungen angewendet: EN 60745-1:2009/A11:2010 •... -
Seite 187: Translation Of The Original Ec Declaration Of Conformity
Translation of the original EC declaration of conformity We hereby confirm that the Electric Chainsaw Design Series PKS 2200 A1 Serial number 201910000001 - 201910058663 conforms with the following applicable relevant version of the EU guidelines : 2006/42/EC • 2000/14/EC • 2005/88/EC • 2014/30/EU • 2011/65/EU*... -
Seite 188: Traduction De La Déclaration De Conformité Ce Originale
Traduction de la déclaration de conformité CE originale Nous certifions par la présente que la Tronçonneuse électrique Série PKS 2200 A1 Numéro de série 201910000001 - 201910058663 est conforme aux directives UE actuellement en vigueur : 2006/42/EC • 2000/14/EC • 2005/88/EC • 2014/30/EU •... -
Seite 189: Vertaling Van De Originele Ce-Conformiteitsverklaring
Vertaling van de originele CE-conformiteitsverklaring Hiermede bevestigen wij dat de Elektrische kettingzaag bouwserie PKS 2200 A1 Serienummer 201910000001 - 201910058663 is overeenkomstig met de hierna volgende, van toepassing zijnde EU-richtlijnen: 2006/42/EC • 2000/14/EC • 2005/88/EC • 2014/30/EU • 2011/65/EU* Om de overeenstemming te waarborgen, werden de hierna volgende, in overeenstemming gebrachte normen en nationale normen en bepalingen toegepast: EN 60745-1:2009/A11:2010 •... -
Seite 190: Tłumaczenie Oryginalnej Deklaracji Zgodności We
Tłumaczenie oryginalnej deklaracji zgodności WE Niniejszym oświadczamy, że konstrukcja Elektryczna piła łańcuchowa typu PKS 2200 A1 Numer seryjny 201910000001 - 201910058663 spełnia wymogi odpowiednich Dyrektyw UE w ich aktualnie obowiązującym brzmieniu: 2006/42/EC • 2000/14/EC • 2005/88/EC • 2014/30/EU • 2011/65/EU* W celu zapewnienia zgodności z powyższymi dyrektywami zastosowano następujące... -
Seite 191: Překlad Originálního Prohlášení O Shodě Ce
Překlad originálního prohlášení o shodě CE Potvrzujeme tímto, že Elektrická řetězová pila konstrukční řady PKS 2200 A1 Pořadové číslo 201910000001 - 201910058663 odpovídá následujícím příslušným směrnicím EÚ v jejich právě platném znění: 2006/42/EC • 2000/14/EC • 2005/88/EC • 2014/30/EU • 2011/65/EU* Aby byl zaručen souhlas, byly použity následující... -
Seite 192: Preklad Originálneho Prehlásenia O Zhode Ce
Preklad originálneho prehlásenia o zhode CE Týmto potvrdzujeme, že Elektrická reťazová píla konštrukčnej rady PKS 2200 A1 Poradové číslo 201910000001 - 201910058663 zodpovedá nasledujúcim príslušným smerniciam EÚ v ich práve platnom znení: 2006/42/EC • 2000/14/EC • 2005/88/EC • 2014/30/EU • 2011/65/EU* Aby bola zaručená... -
Seite 193: Explosionszeichnung
Exploded Drawing ∙ Explosionszeichnung Vue éclatée ∙ Explosietekening Rysunki eksplozyjne ∙ Rozvinuté náčrtky Výkres náhradných dielov 20191008_rev02_mt... - Seite 194 0°- 45°...
- Seite 196 GRIZZLY TOOLS GMBH & CO. KG Stockstädter Straße 20 DE-63762 Großostheim GERMANY Stand der Informationen · Last Information Update · Version des informations · Stand van de informatie · Stan informacji · Stav informací · Stav informácií: 10/2019 Ident.-No.: 75018252102019-8 IAN 324425_1904...