Herunterladen Inhalt Inhalt Diese Seite drucken
Inhaltsverzeichnis

Werbung

Verfügbare Sprachen

Verfügbare Sprachen

Models Integrated with Support Surfaces:
2155/2156 InTouch CE with XPRT™ Support Surface
Modelle mit integrierter Auflagefläche:
2155/2156 InTouch CE mit XPRT™ Auflagefläche
Modellen met geïntegreerde matrasdragers:
2155/2156 InTouch CE met XPRT™-matrasdrager
Modelos integrados com superfícies de apoio:
2155/2156 InTouch CE com superfície de apoio XPRT™
For parts or technical assistance call:
Ersatzteile oder technische Unterstützung:
Voor onderdelen of technische bijstand belt u:
Para encomendar peças ou solicitar assistência técnica:
USA: 1-800-327-0770
2012/08 A.0
InTouch
InTouch
InTouch
Cama de cuidados intensivos InTouch
REF
FL27 (2151/2152/2153/2154/2155/2156) InTouch CE
outline with
White letters and
rectangle
transparent
Operations Manual
2151-109-005 REV A
®
Critical Care Bed
®
Intensivpflegebett
®
-bed voor kritieke zorg
Bedienungshandbuch
Gebruikshandleiding
Manual de utilização
www.stryker.com
®
Version 3
0086

Werbung

Inhaltsverzeichnis
loading

Inhaltszusammenfassung für Stryker FL27 2151 inTouch CE

  • Seite 1 2155/2156 InTouch CE com superfície de apoio XPRT™ For parts or technical assistance call: Ersatzteile oder technische Unterstützung: Voor onderdelen of technische bijstand belt u: Para encomendar peças ou solicitar assistência técnica: 0086 USA: 1-800-327-0770 2012/08 A.0 2151-109-005 REV A www.stryker.com...
  • Seite 3 FRANCE Stryker Portugal Produtos Stryker France S.A.S. Medicos, LTDA. EASTERN EUROPE ZAC - Avenue de Satolas Green Avenida Marechal Gomes Stryker SA - Export Business 69330 Pusignan da Costa, 35 Grand-Rue 90 France 1800-255 Lisboa P.O. Box 1567 Phone: 011-33-472-45-36-00...
  • Seite 5: Inhaltsverzeichnis

    Tare Button . . . . . . . . . . . . . . . . . . . . . . . . . . . . . . . . . . . . . . . . . . . . . . . . . . . . . . . . . . . . . . . . . . . . .1-33 www.stryker.com 2151-109-005 REV A...
  • Seite 6 Cleaning . . . . . . . . . . . . . . . . . . . . . . . . . . . . . . . . . . . . . . . . . . . . . . . . . . . . . . . . . . . . . . . . . . . . . . . . . . . . . . 1-70 2151-109-005 REV A www.stryker.com...
  • Seite 7 Damaged Merchandise . . . . . . . . . . . . . . . . . . . . . . . . . . . . . . . . . . . . . . . . . . . . . . . . . . . . . . . . . . . . . . . 1-76 www.stryker.com 2151-109-005 REV A...
  • Seite 8: Symbols And Definitions

    . Refer to your local distributor for return and/or collection systems available in your country . Model Number Measuring Device IIII Manufacturer Accuracy Class Batch Code Instructions for Use Return To Table of Contents 2151-109-005 REV A www.stryker.com...
  • Seite 9 . Note This provides special information to make maintenance easier or important instructions clearer . Return To Table of Contents www.stryker.com 2151-109-005 REV A...
  • Seite 10 . Stryker warrants to the original purchaser that the welds on its Bed products will be free from structural defects for the expected 10 year life of the Bed product as long as the original purchaser owns the products .
  • Seite 11: Product Illustration

    Control Panel InTouch ® Screen Siderail Release Levers Footboard CPR Emergency Release Pedal Foley Bag Manual ® Casters Hooks Zoom Drive Wheel Backup (Model 2152/2154/2156 only) (Under base - not shown) Return To Table of Contents www.stryker.com 2151-109-005 REV A...
  • Seite 12: Specifications

    15 seconds • Foot/Seat 60 seconds Drive System Speed (Optional Zoom ® Drive) • Forward 4 .8 km/h 2 .98 mph • Backwards 2 .88 km/h 1 . 7 9 mph Return To Table of Contents 2151-109-005 REV A www.stryker.com...
  • Seite 13 Coin Cell PC Battery Holder, Size 20 mm - MDP Int . BA2032 Stryker reserves the right to change specifications without notice. Specifications listed are approximate and may vary slightly from unit to unit or by power supply fluctuations .
  • Seite 14: Summary Of Safety Precautions

    . The Bed Exit system signals when a patient is about to exit the bed . • The Bed Exit system is not designed to be used with patients weighing less than 50 lbs (23 kg) . Return To Table of Contents 1-10 2151-109-005 REV A www.stryker.com...
  • Seite 15 • Improperly adjusted restraint straps can cause serious injury to a patient . It is the responsibility of the attending medical personnel to determine proper use of the restraint straps and restraint strap locations . Stryker is not responsible for the type and/or use of restraint straps on any of Stryker’s products .
  • Seite 16: Optional Zoom

    • Some cleaning products are corrosive in nature and may cause damage to the product if used improperly . If the products described above are used to clean Stryker patient care equipment, measures must be taken to ensure the beds are wiped with a damp cloth soaked in clean water and thoroughly dried following cleaning . Failure to properly rinse and dry the beds will leave a corrosive residue on the surface of the bed, possibly causing premature corrosion of critical components .
  • Seite 17: Setup Procedures

    Fowler fully up using the “Fowler Up” control . • Verify the following optional equipment for proper operation: 120V auxiliary outlet, night light, emergency crank operation, etc . Return To Table of Contents www.stryker.com 2151-109-005 REV A 1-13...
  • Seite 18: Optional Xprt™ Therapy Mattress

    • Do not attach the power cord to any moving parts of the bed frame . • The power cord could be pinched and may cause electrical shock if a bed extender is used . Return To Table of Contents 1-14 2151-109-005 REV A www.stryker.com...
  • Seite 19: Optional Zoom

    (2152/2154/2156 Model only) should now be engaged . Depress down fully on the center of the pedal until the letter N in BLUE is visible in the clear window . The Zoom ® drive should now be disengaged . Return To Table of Contents www.stryker.com 2151-109-005 REV A 1-15...
  • Seite 20: Modes Of Operation

    Mode if the batteries no longer have power and need to be recharged . The system then goes to the Initialization Mode which goes back to the Normal Mode . Note The time needed to charge both batteries completely is approximately 8 hours . Return To Table of Contents 1-16 2151-109-005 REV A www.stryker.com...
  • Seite 21: Base Operation Guide

    . • To avoid injury to the patient and/or user, do not attempt to move the bed laterally with the Drive mode activated; the Drive wheel cannot swivel . Return To Table of Contents www.stryker.com 2151-109-005 REV A 1-17...
  • Seite 22: Litter Operation Guide

    Improperly adjusted restraint straps can cause serious injury to a patient . It is the responsibility of the attending medical personnel to determine proper use of the restraint straps and restraint strap locations . Stryker is not responsible for the type and/or use of restraint straps on any of Stryker’s products .
  • Seite 23: Nurse Call Usage

    The auxiliary power outlet provides the nursing staff with a convenient power source for accessories authorized by Stryker only; 120V plug Type B only . The outlet is located on the left side at the foot end of the bed . A 5A breaker is integrated to the power outlet .
  • Seite 24: Positioning The Siderails

    • Pull on the siderail until it is locked in the fully raised position; a “click” will be heard to indicate it is locked (see figure below) . Figure 1.0 Return To Table of Contents 1-20 2151-109-005 REV A www.stryker.com...
  • Seite 25: Bed Positioning

    These positions can be achieved by pressing their respective buttons on the “Nurse Control” (see page 1-22) . OPTIONAL BED EXTENDER The bed can be expanded using a Bed Extender . For further information see page 1-56 . Return To Table of Contents www.stryker.com 2151-109-005 REV A 1-21...
  • Seite 26: Siderail Operation Guide

    Press on this button to raise the height of the bed to the desired Bed Height Up level . Press on this button to lower the height of the bed to the desired Bed Height Down level . Return To Table of Contents 1-22 2151-109-005 REV A www.stryker.com...
  • Seite 27: Bed Positioning Descriptions

    • A minimum clearance of 20 inches is required to allow the Trendelenburg and Reverse Trendelenburg positions to be executed . • These positions cannot be executed when one or more locks is activated . Return To Table of Contents www.stryker.com 2151-109-005 REV A 1-23...
  • Seite 28: Siderail Brake/Motion Control Panel, Nurse Control

    Press this button to start a treatment with the bed in the HOB HOB 30 Degree Position 30 Degree position . Note The brake can also be set manually . See page 1-17 for more information . Return To Table of Contents 1-24 2151-109-005 REV A www.stryker.com...
  • Seite 29: Optional Pendant Control

    Press this button to raise the Gatch section of the bed to the Gatch Up desired angle . Press this button to lower the Gatch section of the bed to the Gatch Down desired angle . Return To Table of Contents www.stryker.com 2151-109-005 REV A 1-25...
  • Seite 30: Footboard Operation Guide

    . Brake Off Press this button to activate the Brake Off system . This button Activation/Indicator is illuminated when the system is activated . Return To Table of Contents 1-26 2151-109-005 REV A www.stryker.com...
  • Seite 31: System Message Indicator Lights

    If there is no activity on the touchscreen after 4 minutes, the LCD will shut off completely (4 minutes = 2 minutes at 100% intensity + 2 minutes at 10% intensity) . Return To Table of Contents www.stryker.com 2151-109-005 REV A 1-27...
  • Seite 32: Main Menu: Patient Information

    • Unit/Room : pressing on the pencil tool icon in the bottom left of the Patient Information screen allows the operator to enter the unit and room number that the patient is in . Copyright . Barbara Braden and Nancy Bergstrom, 1988 . Reprinted with permission . Figure 6.0 Return To Table of Contents 1-28 2151-109-005 REV A www.stryker.com...
  • Seite 33: Patient Information, New Patient

    BMI, displaying the patient’s ID and displaying the last Braden Scale score . Copyright . Barbara Braden and Nancy Figure 6.2 Bergstrom, 1988 . Reprinted with permission . Return To Table of Contents www.stryker.com 2151-109-005 REV A 1-29...
  • Seite 34: Main Menu: Bed Controls

    This indicator shows the actual height of the bed . Bed Height Indicator Note • When pressed the buttons turn grey . • The bed height is actually the distance between the floor and the bed support mattress . Return To Table of Contents 1-30 2151-109-005 REV A www.stryker.com...
  • Seite 35: Main Menu: Scale

    Scale Last Zero zero operation of the scale . This will give information about the date and time of the last Scale Last Tare tare operation of the scale . Return To Table of Contents www.stryker.com 2151-109-005 REV A 1-31...
  • Seite 36: Zero Button

    The “Zero” function will reset all the values for the different patient’s weights . All the data stored in the touch screen concerning the weight of the patient will be lost . Figure 8.1f - Zero Complete Return To Table of Contents 1-32 2151-109-005 REV A www.stryker.com...
  • Seite 37: Footboard Operation Guide (Continued)

    The “Tare” function will reset all the values for the different patient’s weights . All the data stored in the touch screen concerning the weight of the patient will be lost . Figure 8.2d - Tare Complete Return To Table of Contents www.stryker.com 2151-109-005 REV A 1-33...
  • Seite 38: Net Weight History Button

    The system can keep a maximum of fifty (50) entries in memory . Any new value added after the 50 entry will have the first value deleted following the “First In, First Out” rule . Return To Table of Contents 1-34 2151-109-005 REV A www.stryker.com...
  • Seite 39: Main Menu: Bed Exit

    • The blue color on one of the zones indicates that this is the zone which is actually activated . • When the zone color turns red, it means that there is a Bed Exit Alarm . In that case the Event Manager window will appear . Return To Table of Contents www.stryker.com 2151-109-005 REV A 1-35...
  • Seite 40: Alarm Settings

    When the volume or tone is changed from its current setting, Test Volume / Tone you may press the test button to hear the new tone setting or the new volume adjustment . Return To Table of Contents 1-36 2151-109-005 REV A www.stryker.com...
  • Seite 41: Main Menu: Support Surface

    . If one of the siderails is unlocked during a rotation therapy (ex .: rotation and vibration is being executed simultaneously), both therapies will stop instantly . Return To Table of Contents www.stryker.com 2151-109-005 REV A 1-37...
  • Seite 42: Main Menu: Options

    Each battery block indicates 25 percent of the power . Maintenance Press this button to access the Maintenance menu . Advanced Options Press this button to access the Advanced Options menu . Return To Table of Contents 1-38 2151-109-005 REV A www.stryker.com...
  • Seite 43: Time Setup Button

    Figure 11.2 Language Button When the “Language” button is pressed on the Options screen, Figure 11 .3 will be displayed . You can now select the desired language . Figure 11.3 Return To Table of Contents www.stryker.com 2151-109-005 REV A 1-39...
  • Seite 44: Advanced Options Button

    Zoom ® is activated . If the Awareness and/or Reminder options are selected, the alarms will be sent through the bed Nurse Call signal . Figure 11.4 Return To Table of Contents 1-40 2151-109-005 REV A www.stryker.com...
  • Seite 45: History Button

    When the “Angle History” button is pressed, on the Head of Bed screen, Figure 11 . 7 will be displayed . Note The maximum time frame for angle position is 30 days . Figure 11.7 Return To Table of Contents www.stryker.com 2151-109-005 REV A 1-41...
  • Seite 46 24 hours . If the Bed Height History needs to be reset, press the “Reset” button . Figure 11.9 Return To Table of Contents 1-42 2151-109-005 REV A www.stryker.com...
  • Seite 47: Nurse Control Backlight Button

    . Input Boards States Note Refer to the Maintenance Manual for further details Close on Buttons Pressed, Boards and Bed Informations . Figure 11.11 Figure 11.12 Figure 11.13 Return To Table of Contents www.stryker.com 2151-109-005 REV A 1-43...
  • Seite 48: Main Menu: Lockouts

    • If the bed is in Trendelenburg or Reverse Trendelenburg the bed will be locked in this position . • When one of the locks is enabled, the indicator on the footboard will turn on so the user is aware that some motion may not be activated . Return To Table of Contents 1-44 2151-109-005 REV A www.stryker.com...
  • Seite 49: Main Menu: Ibed

    . If the touch screen is inactivated for 60 seconds without correcting the conditions, it goes automatically back to the “Smart Bed Figure 13.2 Position” screen until the corrections are made . Return To Table of Contents www.stryker.com 2151-109-005 REV A 1-45...
  • Seite 50: Ibed, Protocol Reminder

    Figure 13 .5 . Note The default screen is the one-time reminder, but the user can change it to “Repeated Task” by pressing on the “Repeated Task” button . Figure 13.5 Return To Table of Contents 1-46 2151-109-005 REV A www.stryker.com...
  • Seite 51 Reminder screen, Figure 13 . 7 will be displayed . Figure 13.7 When the View Reminder’s Log button is pressed on the Reminder screen, Figure 13 .8 will be displayed . Figure 13.8 Return To Table of Contents www.stryker.com 2151-109-005 REV A 1-47...
  • Seite 52: Ibed, Head Of Bed (Hob) History

    24 hours . If the Bed Height History needs to be reset, press the “Reset” button . Figure 13.12 Return To Table of Contents 1-48 2151-109-005 REV A www.stryker.com...
  • Seite 53: Ibed, Calculator

    Figure 13 . 1 4 will be displayed . When the operator completes their conversions, they may switch back to the “Calculator” by pressing on the “Calcul” button . Figure 13.14 Return To Table of Contents www.stryker.com 2151-109-005 REV A 1-49...
  • Seite 54: Ibed, Translations

    “-” button . Note If the iAudio option is not equipped on your bed, then the audio controls buttons will not be displayed in Figure 13 . 1 5 . Return To Table of Contents 1-50 2151-109-005 REV A www.stryker.com...
  • Seite 55: Ibed, Documentation

    . Press the View button and a log will be displayed for that date . You may view specific logged information by pressing either the Bed Exit, Reminder, Scale, iBed Pos . or System buttons . Figure 13.16 Return To Table of Contents www.stryker.com 2151-109-005 REV A 1-51...
  • Seite 56: Ibed, The Braden Scale For Predicting Pressure Sore Risk

    . The display of this score on the main screen can be enable or disabled . Figure 13.18 Copyright . Barbara Braden and Nancy Bergstrom, 1988 . Reprinted with permission . Figure 13.19 Return To Table of Contents 1-52 2151-109-005 REV A www.stryker.com...
  • Seite 57: Ibed, Sound Therapy

    . Note The “Music Note” icon will continue to be displayed on all menu screens if Sound Therapy™ is playing . Figure 13.21 Music Note Icon Return To Table of Contents www.stryker.com 2151-109-005 REV A 1-53...
  • Seite 58: Zoom ® Drive Operations (Model 2152/2154/2156)

    . Note The speed of the bed’s movement will change according to the strength used to push or pull . Figure 17 - Head End of Bed Return To Table of Contents 1-54 2151-109-005 REV A www.stryker.com...
  • Seite 59: Optional Bed Accessories

    Traction Sleeve 4” x 3/4” FA64216-XXX Traction Sleeve 8” x 1/2” FA64217-XXX See page 1-68 Traction Sleeve 8” x 3/4” FA64218-XXX Traction Sleeve 6-1/2” x 3/4” FA64219-XXX X-Ray Cassette Holder FA64205-XXX See page 1-69 Return To Table of Contents www.stryker.com 2151-109-005 REV A 1-55...
  • Seite 60: Bed Extender - Fa64234-Xxx

    • Ensure connector ‘A’ is securely fixed (see Figure B) . • Do not sit on the bed extender . This may cause the bed to flip . Section 2 Connector A Section 1 Figure B Return To Table of Contents 1-56 2151-109-005 REV A www.stryker.com...
  • Seite 61: Bed Extender Pad With Xprt™ - Dm64197-Xxx

    Bed Extender Pad with XPRT™ - DM64197-XXX 35” 5-1/2” 6” Return To Table of Contents www.stryker.com 2151-109-005 REV A 1-57...
  • Seite 62: Permanent I.v. Pole - Fa64221-Xxx / Fa64238-Xxx

    Note: The bolt used is coated with “Scotch Grip”. This type of bolt must be replaced by a new identical bolt if it is removed following a first installation. FA64221-XXX - Left FA64238-XXX - Right Return To Table of Contents 1-58 2151-109-005 REV A www.stryker.com...
  • Seite 63 . CAUTION The weight of the I . V . bags should not exceed 22 lbs (10 kg) . Return To Table of Contents www.stryker.com 2151-109-005 REV A 1-59...
  • Seite 64: Dual Head End Permanent I.v. Pole - Fa64202-Xxx

    . Note: The bolt used is coated with “Scotch Grip”. This type of bolt must be replaced by a new identical bolt if it is removed following a first installation. Return To Table of Contents 1-60 2151-109-005 REV A www.stryker.com...
  • Seite 65 . CAUTION The weight of the I . V . bags should not exceed 22 lbs (10 kg) . Return To Table of Contents www.stryker.com 2151-109-005 REV A 1-61...
  • Seite 66: Line Management System (Accessory Clip) - Fa64210-Xxx

    • Do not use with tubing of a diameter greater than 0 . 7 5” (19 mm) . • Sterilize accessory after each use (see procedure in Maintenance Manual) • Make sure that the clip is stable when installing . Return To Table of Contents 1-62 2151-109-005 REV A www.stryker.com...
  • Seite 67: Monitor Tray - Fa64214-Xxx

    Figure C - bracket mounted (back) Figure D - bracket mounted (front) Figure B - foot end Figure E - secure bracket Figure F - install tray with screw knob Return To Table of Contents www.stryker.com 2151-109-005 REV A 1-63...
  • Seite 68 WARNING • The maximum load capacity of the tray is 40 lbs (18 kg) . • The maximum load capacity of the tubular support is 150 lbs (68 kg) . Return To Table of Contents 1-64 2151-109-005 REV A www.stryker.com...
  • Seite 69: Upright Oxygen Bottle Holder - Fa64187-Xxx

    Secure the Support Bar to the head end of the bed by inserting the security chain through the Support Bar hole located at the end of the Support Bar . Support Bar Support Bar Hole Security Chain Return To Table of Contents www.stryker.com 2151-109-005 REV A 1-65...
  • Seite 70: Pendant With Motion Control Only - Fa64228-Xxx

    Install the removable pendant on the right foot siderail . Insert the removable pendant in this space. Slide it until it clips. Note: Illustration may differ according to bed model. Return To Table of Contents 1-66 2151-109-005 REV A www.stryker.com...
  • Seite 71: Pendant Clip - Fa64186-Xxx

    The Optional Pendant Clip was designed to support the removable pendant (FA64228-XXX) . INSTALLATION Required Tools: None Raise the clip prong (A) and install the clip on the bed at a safe and useful location . Return To Table of Contents www.stryker.com 2151-109-005 REV A 1-67...
  • Seite 72: Traction Sleeve - Fa64215-Xxx Through Fa64219-Xxx

    Note: The bolt used at step 2 is coated with “Scotch Grip”. This type of bolt must be replaced by a new identical bolt if it is removed following a first installation. Return To Table of Contents 1-68 2151-109-005 REV A www.stryker.com...
  • Seite 73: X-Ray Cassette Holder - Fa64205-Xxx

    Note: Make sure to close the X-ray cassette holder support after using it to avoid damaging it when there is a movement of the fowler section or of the list system. Return To Table of Contents www.stryker.com 2151-109-005 REV A 1-69...
  • Seite 74: Cleaning

    Some cleaning products are corrosive in nature and may cause damage to the product if used improperly . If the products described above are used to clean Stryker patient care equipment, measures must be taken to ensure the beds are wiped with a damp cloth soaked in clean water and thoroughly dried following cleaning .
  • Seite 75: Preventative Maintenance

    _____ Ensure calibration of the touch screen is accurate . _____ Ensure calibration of the bed is accurate . Bed Serial Number: ________________________ ________________________ ________________________ ________________________ ________________________ ________________________ ________________________ ________________________ Completed by: ___________________________________________ Date: _________________ Return To Table of Contents www.stryker.com 2151-109-005 REV A 1-71...
  • Seite 76: Emc Information

    IEC 61000-4-8 characteristic typical location in a typical commercial and/or hospital environment . Note: U is the a .c . mains voltage prior to applications of the test level . Return To Table of Contents 1-72 2151-109-005 REV A www.stryker.com...
  • Seite 77 At 80 MHz and 800 MHz, the separation distance for the higher frequency range applies . Note 2 These guidelines may not apply in all situations . Electromagnetic propagation is affected by absorption and reflection from structures, objects and people . Return To Table of Contents www.stryker.com 2151-109-005 REV A 1-73...
  • Seite 78 . If abnormal performance is observed, additional measures may be necessary, such as reorienting or relocating the InTouch® Critical Care Bed . Over the frequency range 150 kHz to 80 MHz, field strengths are less than 3 V/m . Return To Table of Contents 1-74 2151-109-005 REV A www.stryker.com...
  • Seite 79 Class A IEC 61000-3-2 connected to the public low voltage power supply network that supplies buildings used for domestic purposes . Voltage Fluctuations Flicker Emissions Complies IEC 61000-3-3 Return To Table of Contents www.stryker.com 2151-109-005 REV A 1-75...
  • Seite 80: Warranty

    Stryker, found to be defective . If requested by Stryker, products or parts for which a warranty claim is made shall be returned prepaid to the factory .
  • Seite 83 Taste „Tare“ (Tara) . . . . . . . . . . . . . . . . . . . . . . . . . . . . . . . . . . . . . . . . . . . . . . . . . . . . . . . . . . . . . . 2-34 www.stryker.com 2151-109-005 REV A...
  • Seite 84 Halterung für Röntgenkassette - FA64205-XXX . . . . . . . . . . . . . . . . . . . . . . . . . . . . . . . . . . . . . . . . . . . . . .2-70 2151-109-005 REV A www.stryker.com...
  • Seite 85 Beschädigte Artikel . . . . . . . . . . . . . . . . . . . . . . . . . . . . . . . . . . . . . . . . . . . . . . . . . . . . . . . . . . . . . . . . . .2-77 www.stryker.com 2151-109-005 REV A...
  • Seite 86: Symbole Und Definitionen

    . Wenden Sie sich an Ihren Händler, um Auskunft über die Rückgabe- und/oder Sammelsysteme für Ihr Land zu erhalten . Modellnummer Messgerät IIII Hersteller Genauigkeitsklasse Chargenbezeichnung Bedienungsanleitung Zurück zum Inhaltsverzeichnis 2151-109-005 REV A www.stryker.com...
  • Seite 87: Definition Der Begriffe Warnung / Vorsicht / Hinweis

    Geräts und die nötigen Vorsichtsmaßnahmen, um Beschädigungen des Geräts zu vermeiden, die als Ergebnis des Gebrauchs oder der unsachgemäßen Benutzung auftreten könnten . Hinweis Hinweise enthalten Informationen, die die Wartung erleichtern oder wichtige Anweisungen verdeutlichen . Zurück zum Inhaltsverzeichnis www.stryker.com 2151-109-005 REV A...
  • Seite 88: Einführung

    Seitengitter verwenden dürfen, sowie geschulte Techniker für Installation, Service und Kalibrierung . BESTIMMUNGSGEMÄSSE VERWENDUNGSBEDINGUNGEN UND ERWARTETE NUTZUNGSDAUER: Bettprodukte von Stryker Medical wurden für eine erwartete Nutzungsdauer von 10 Jahren entwickelt, unter der Voraussetzung, dass sie unter normalen Bedingungen verwendet werden und angemessene regelmäßige Wartung, wie im Wartungshandbuch für jedes Gerät beschrieben, durchgeführt wird .
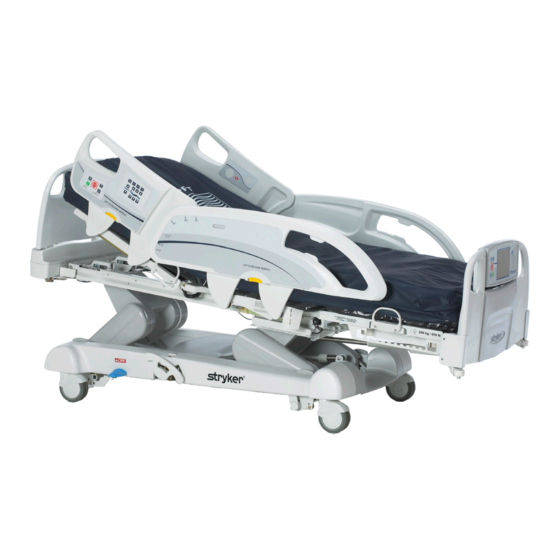
  • Seite 89: Produktabbildung

    InTouch ® Bildschirm Hebel zur Entriegelung der Seitensicherung Pedal für die Fußende Notentriegelung zur Herz-Lungen- Wiederbelebung Haken für Manuelle Zoom ® -Antriebsrad Foley-Katheter Laufrollen Ersatzbremse (nur Modelle 2152/2154/2156) (Unter Grundgestell – nicht dargestellt) Zurück zum Inhaltsverzeichnis www.stryker.com 2151-109-005 REV A...
  • Seite 90: Technische Daten

    Geschwindigkeit für ebene Bettposition aus Herz-Lungen- beliebiger Position Wiederbelebung • Fowler-Position 15 Sekunden • Fuß-/Sitzbereich 60 Sekunden Antriebsystem Geschwindigkeit (Optionaler Zoom ® -Antrieb) • Vorwärts 4,8 km/h 2,98 mph • Rückwärts 2,88 km/h 1,79 mph Zurück zum Inhaltsverzeichnis 2151-109-005 REV A www.stryker.com...
  • Seite 91 Lithiumbatterie Größe 20 mm, 3,0 V, 220 mAh - Varta Int . CR2032 Knopfzellen-PC-Batteriehalter, Größe 20 mm - MDP Int . BA2032 Stryker behält sich das Recht vor, technische Daten ohne Vorankündigung zu ändern. Die aufgeführten technischen Daten sind Näherungswerte und können von Produkt zu Produkt oder bei Schwankungen in der Stromzufuhr leicht variieren .
  • Seite 92: Zusammenfassung Der Sicherheitsvorkehrungen

    Position befindet und die Seitensicherungen vollständig ausgefahren und arretiert sind, um das Verletzungsrisiko zu reduzieren . • Zur Vermeidung von Verletzungen des Patienten und/oder Benutzers nicht versuchen, das Bett mit eingeschaltetem Lenkmodus seitwärts zu bewegen . Das Lenkrad ist nicht schwenkbar . Zurück zum Inhaltsverzeichnis 2-10 2151-109-005 REV A www.stryker.com...
  • Seite 93 • Unsachgemäß eingestellte Fixiergurte können schwere Verletzung eines Patienten verursachen . Es liegt in der Verantwortung des betreuenden medizinischen Personals die ordnungsgemäße Verwendung der Fixiergurte und Fixiergurtpunkte festzulegen . Stryker übernimmt keine Verantwortung für die Art und/oder Verwendung von Fixiergurten an Stryker-Produkten .
  • Seite 94 Batterien sich nicht mehr voll aufladen lassen, müssen sie unverzüglich ausgetauscht werden . • Beim Austausch der Batterien dürfen nur von Stryker zugelassene Batterien verwendet werden . Die Verwendung von nicht von Stryker stammenden Batterien kann zu nicht vorhersehbarem Systemverhalten führen .
  • Seite 95: Antriebsystem (Nur Modelle 2152/2154/2156)

    • Das Bett InTouch® Modell 2152/2154/2156 nicht modifizieren . Das Modifizieren der Einheit kann zu unvorhergesehenem Betrieb führen und somit Verletzungen von Patient oder Benutzer verursachen . Das Modifizieren der Einheit führt außerdem zum Erlöschen der Garantie . Zurück zum Inhaltsverzeichnis www.stryker.com 2151-109-005 REV A 2-13...
  • Seite 96: Einsatzvorbereitung

    Aufrichten der Rückenlehne mithilfe der Bedienungsfunktion „Fowler-Rückenlehne nach oben“ tatsächlich zurückgesetzt wurde . • Die folgenden optionalen Geräte auf ordnungsgemäßen Betrieb prüfen: 120-V-Zusatzsteckdose, Nachtbeleuchtung, Bedienung der Notfallkurbel, usw . Zurück zum Inhaltsverzeichnis 2-14 2151-109-005 REV A www.stryker.com...
  • Seite 97: Optionale Xprt™ Therapiematratze

    • Das Stromkabel darf nicht zwischen Matratze und Bettrahmen verlegt werden . • Das Stromkabel nicht an den beweglichen Teilen des Bettrahmens befestigen . • Das Stromkabel könnte eingeklemmt werden und Stromschlag verursachen, wenn eine Bettverlängerung benutzt wird . Zurück zum Inhaltsverzeichnis www.stryker.com 2151-109-005 REV A 2-15...
  • Seite 98: Optionales Zoom

    -Antrieb (nur Modelle 2152/2154/2156) müsste nun eingeschaltet sein . Das Pedal in der Mitte vollständig nach unten drücken, bis in dem durchsichtigen Fenster der Buchstabe N in BLAUER Farbe sichtbar ist . Der Zoom ® -Antrieb müsste nun ausgeschaltet sein . Zurück zum Inhaltsverzeichnis 2-16 2151-109-005 REV A www.stryker.com...
  • Seite 99: Betriebsmodi

    Einschaltmodus um, wenn die Batterien leer sind und aufgeladen werden müssen . In diesem Fall stellt sich das System auf den Initialisierungsmodus um, der in den Normalmodus zurück geht . Hinweis Das vollständige Aufladen der beiden Batterien dauert etwa 8 Stunden . Zurück zum Inhaltsverzeichnis www.stryker.com 2151-109-005 REV A 2-17...
  • Seite 100: Bedienungsanleitung Für Basisgestell

    Position befindet und die Seitensicherungen vollständig ausgefahren und arretiert sind, um das Verletzungsrisiko zu reduzieren . • Zur Vermeidung von Verletzungen des Patienten und/oder Benutzers nicht versuchen, das Bett bei eingeschaltetem Antriebsmodus seitwärts zu bewegen . Das Antriebsrad ist nicht schwenkbar . Zurück zum Inhaltsverzeichnis 2-18 2151-109-005 REV A www.stryker.com...
  • Seite 101: Bedienungsanleitung Für Die Liegefläche

    Unsachgemäß eingestellte Fixiergurte können schwere Verletzung eines Patienten verursachen . Es liegt in der Verantwortung des betreuenden medizinischen Personals die ordnungsgemäße Verwendung der Fixiergurte und Fixiergurtpunkte festzulegen . Stryker übernimmt keine Verantwortung für die Art und/oder Verwendung von Fixiergurten an Stryker-Produkten .
  • Seite 102: Betrieb Des Schwesternrufs

    Kommunikationskabels des Schwesternrufs unterbrochen worden ist . VERWENDUNG DER ZUSATZSTECKDOSE Die Zusatzsteckdose bietet dem Pflegepersonal eine praktische Stromquelle nur für von Stryker genehmigtes Zubehör; nur für 120-V-Stecker vom Typ B . Die Steckdose befindet sich auf der linken Seite am Fußende des Bettes . Die Steckdose verfügt über einen integrierten 5-A-Schalter .
  • Seite 103: Anbringen Der Seitensicherung

    Abbildung) . Anheben der Seitengitter (Abbildung 1.0) • Das Seitengitter hochziehen, bis es in vollständig angehobener Position verriegelt ist; ein hörbares „Klicken“ zeigt die Verriegelung an (siehe nachfolgende Abbildung) . Abbildung 1.0 Zurück zum Inhaltsverzeichnis www.stryker.com 2151-109-005 REV A 2-21...
  • Seite 104: Aufstellen Des Bettes

    Trendelenburg . Diese Positionen können durch Drücken der jeweiligen Tasten auf der „Kontrollkonsole für Pflegepersonal“ eingestellt werden (siehe Seite 2-23) . Deutsch OPTIONALE BETTVERLÄNGERUNG Das Bett kann unter Verwendung einer Bettverlängerung verlängert werden . Weitere Informationen finden Sie Seite 2-57 . Zurück zum Inhaltsverzeichnis 2-22 2151-109-005 REV A www.stryker.com...
  • Seite 105: Bedienungsanleitung Für Die Seitengitter

    Winkel abzusenken . Betthöhe nach oben Diese Taste drücken, um die Betthöhe auf das gewünschte Niveau zu erhöhen . Betthöhe nach unten Diese Taste drücken, um die Betthöhe auf das gewünschte Niveau abzusenken . Zurück zum Inhaltsverzeichnis www.stryker.com 2151-109-005 REV A 2-23...
  • Seite 106: Beschreibungen Der Bettpositionen

    • Damit die Trendelenburg- und Anti-Trendelenburg-Positionen durchgeführt werden können, ist ein Mindestabstand von 50,8 cm erforderlich . • Diese Positionen können nicht durchgeführt werden, wenn eine oder mehrere Sperren aktiviert sind . Zurück zum Inhaltsverzeichnis 2-24 2151-109-005 REV A www.stryker.com...
  • Seite 107: Seitensicherungsbremse / Kontrollkonsole Für Die Bewegung, Kontrollkonsole Für Pflegepersonal

    Diese Taste vor einer Behandlung in vaskulärer Position des Bettes Position) drücken . Diese Taste vor einer Behandlung in 30-Grad-Position des Kopfteils 30-Grad-HOB-Position drücken . Hinweis Die Bremse kann auch manuell eingestellt werden . Für weitere Informationen siehe Seite 2-18 . Zurück zum Inhaltsverzeichnis www.stryker.com 2151-109-005 REV A 2-25...
  • Seite 108: Optionale Handbedienung

    Fußteilverstellung nach oben Diese Taste drücken, um den Fußteilverstellung-Bereich des Bettes bis zum gewünschten Winkel anzuheben . Fußteilverstellung nach Diese Taste drücken, um den Fußteilverstellung-Bereich des Bettes unten bis zum gewünschten Winkel abzusenken . Zurück zum Inhaltsverzeichnis 2-26 2151-109-005 REV A www.stryker.com...
  • Seite 109: Bedienungsanleitung Für Das Fußende

    . Diese Taste leuchtet, wenn das System aktiviert ist . Brake off (Aktivierung/ Diese Taste drücken, um das System „Bremse Aus“ zu aktivieren . Anzeige „Bremse aus“) Diese Taste leuchtet, wenn das System aktiviert ist . Zurück zum Inhaltsverzeichnis www.stryker.com 2151-109-005 REV A 2-27...
  • Seite 110: Kontrollleuchten Für Systemnachrichten

    Wird der Berührungsbildschirm nach 4 Minuten nicht betätigt, schaltet sich die LCD vollständig aus (4 Minuten = 2 Minuten mit einer Intensität von 100% + 2 Minuten mit einer Intensität von 10%) . Zurück zum Inhaltsverzeichnis 2-28 2151-109-005 REV A www.stryker.com...
  • Seite 111: Hauptmenü: Patient Information (Patientendaten)

    • Unit/Room (Station/Zimmer): Durch Drücken auf das Stift-Symbol unten links auf dem Bildschirm „Patient Information“ (Patientendaten) kann der Benutzer die Stations- und Zimmernummer des Patienten eingeben . Copyright . Barbara Braden und Nancy Bergstrom, 1988 . Genehmigter Abdruck . Abbildung 6.0 Zurück zum Inhaltsverzeichnis www.stryker.com 2151-109-005 REV A 2-29...
  • Seite 112: Patient Information, New Patient (Patientendaten, Neuer Patient)

    Optionen zur Verfügung, darunter die Berechnung des BMI des Patienten, die Anzeige der Patienten-ID und des neuesten Braden-Skala -Werts . Copyright . Barbara Braden und Nancy Bergstrom, 1988 . Genehmigter Abdruck . Abbildung 6.2 Zurück zum Inhaltsverzeichnis 2-30 2151-109-005 REV A www.stryker.com...
  • Seite 113: Hauptmenü: Bed Controls (Bettsteuerung)

    Diese Anzeige zeigt die tatsächliche Betthöhe an . Hinweis • Wenn die Tasten gedrückt werden, wechselt ihre Farbe zu grau . • Die Betthöhe ist der tatsächliche Abstand zwischen Fußboden und Matratzenauflagefläche . Zurück zum Inhaltsverzeichnis www.stryker.com 2151-109-005 REV A 2-31...
  • Seite 114: Hauptmenü: Scale (Waage)

    Informiert über Datum und Uhrzeit der letzten Nullung des Nullung des Wiegesystems) Wiegesystems . „Scale Last Tare“ (Letzte Informiert über Datum und Uhrzeit der letzten Tarierung des Tarierung des Wiegesystems) Wiegesystems . Zurück zum Inhaltsverzeichnis 2-32 2151-109-005 REV A www.stryker.com...
  • Seite 115: Taste „Zero" (Zurücks.)

    0 kg +/- 0,5 kg beträgt . Hinweis Funktion „Zero“ (Zurücks . ) setzt alle Werte für Abbildung 8.1f – Zurücksetzen verschiedenen Patientengewichte zurück . Alle beendet Berührungsbildschirm abgespeicherten Daten bezüglich des Gewichts des Patienten gehen verloren . Zurück zum Inhaltsverzeichnis www.stryker.com 2151-109-005 REV A 2-33...
  • Seite 116: Taste „Tare" (Tara)

    Hinweis Abbildung 8.2d – Tara beendet Die Funktion „Tare“ (Tara) setzt alle Werte für die verschiedenen Patientengewichte zurück . Alle im Berührungsbildschirm abgespeicherten Daten bezüglich des Gewichts des Patienten gehen verloren . Zurück zum Inhaltsverzeichnis 2-34 2151-109-005 REV A www.stryker.com...
  • Seite 117: Taste „Net Weight History" (Nettogewichtsverlauf)

    Hinweis Das System kann maximal fünfzig (50) Eingaben speichern . Mit jedem nach der 50 . Eingabe hinzukommenden neuen Wert wird dem FIFO-Prinzip (ältester Eintrag zuerst) folgend der älteste Wert gelöscht . Zurück zum Inhaltsverzeichnis www.stryker.com 2151-109-005 REV A 2-35...
  • Seite 118: Hauptmenü: Bed Exit (Bettenausstieg)

    • Die blaue Kennzeichnung eines der Bereiche zeigt den gegenwärtig aktivierten Bereich an . • Wenn die Farbe des Bereichs auf Rot wechselt, liegt ein Bettenausstiegalarm vor . In diesem Fall erscheint auf dem Fenster der „Event Manager“ (Ereignis-Manager) . Zurück zum Inhaltsverzeichnis 2-36 2151-109-005 REV A www.stryker.com...
  • Seite 119: Alarm Settings

    Toneinstellung zu prüfen . Wenn die momentane Einstellung für Lautstärke / Ton testen Lautstärke oder Ton verändert wird, kann die Testtaste gedrückt werden, um die neue Ton- oder Lautstärkeeinstellung akustisch zu prüfen . Zurück zum Inhaltsverzeichnis www.stryker.com 2151-109-005 REV A 2-37...
  • Seite 120: Hauptmenü: Support Surface (Auflageflächen)

    Therapien eine Seitensicherung entriegelt wird, werden sie automatisch abgebrochen . Wird eine der Seitensicherungen während einer Drehtherapie entriegelt (z . B . bei gleichzeitigem Drehen und Vibrieren), werden beide Therapien sofort abgebrochen . Zurück zum Inhaltsverzeichnis 2-38 2151-109-005 REV A www.stryker.com...
  • Seite 121: Hauptmenü: Options (Optionen)

    Batterieblock zeigt 25 % der Energie an . Diese Taste drücken, um das Maintenance-Menü (Wartungsmenü) Maintenance (Wartung) aufzurufen . Advanced Options Diese Taste drücken, um das Menü „Advanced Options“ (Erweiterte (Erweiterte Optionen) Optionen) aufzurufen . Zurück zum Inhaltsverzeichnis www.stryker.com 2151-109-005 REV A 2-39...
  • Seite 122: Time Setup-Taste (Taste Für Zeiteinstellung)

    Abbildung 11.2 Language-Taste (Taste für Sprache) Bei Drücken der Taste „Language“ (Sprache) auf dem Bildschirm „Options“ (Optionen) wird Abbildung 11 .3 angezeigt . Nun kann die gewünschte Sprache gewählt werden . Abbildung 11.3 Zurück zum Inhaltsverzeichnis 2-40 2151-109-005 REV A www.stryker.com...
  • Seite 123: Taste „Advanced Options" (Erweiterte Optionen)

    Ton durch die Lautsprecher abgespielt, sofern Abbildung 11.4 Zoom ® aktiviert ist . Werden die Optionen Awareness (Aufmerksamkeit) und/oder Reminder (Erinnerung) ausgewählt, werden die Alarmmeldungen durch das Schwesternrufsignal des Bettes gesendet . Zurück zum Inhaltsverzeichnis www.stryker.com 2151-109-005 REV A 2-41...
  • Seite 124: History-Taste (Verlauf-Taste)

    Drücken Taste „Angle History“ (Winkelverlauf) auf dem Bildschirm „Head of Bed“ (Kopfteil des Bettes) wird Abbildung 11 . 7 angezeigt . Hinweis Die maximale Zeitrahmen für Winkelposition 30 Tage . Abbildung 11.7 Zurück zum Inhaltsverzeichnis 2-42 2151-109-005 REV A www.stryker.com...
  • Seite 125 Benutzer Auskunft über die gegenwärtige Betthöhe sowie über die Betthöhe während der letzten 24 Stunden . Wenn „Bed Height History“ (Verlauf Betthöhe) neu gestartet werden muss, die Taste „Reset“ (Neustart) drücken . Abbildung 11.9 Zurück zum Inhaltsverzeichnis www.stryker.com 2151-109-005 REV A 2-43...
  • Seite 126: Taste „Nurse Control Backlight" (Hintergrundbeleuchtung Der Kontrollkonsole Für Pflegepersonal)

    Anzeige gibt Aufschluss über den Sensorstatus . Hinweis Close Im Wartungshandbuch finden Sie weitere Details über „Buttons Pressed“ (gedrückte Tasten), „Boards“ Abbildung 11.11 (Platinen) und „Bed Informations“ (Informationen zum Bett) . Abbildung 11.12 Abbildung 11.13 Zurück zum Inhaltsverzeichnis 2-44 2151-109-005 REV A www.stryker.com...
  • Seite 127: Hauptmenü: Lockouts (Sperren)

    • Befindet sich das Bett in der Trendelenburg oder Anti-Trendelenburg-Position, wird es in dieser Position arretiert . • Wenn eine der Arretierungen aktiviert ist, schaltet sich die Anzeige am Fußende ein, was dem Benutzer anzeigt, dass einige Bewegungen nicht aktiviert werden können . Zurück zum Inhaltsverzeichnis www.stryker.com 2151-109-005 REV A 2-45...
  • Seite 128: Hauptmenü: Ibed

    Menü des Bettes zu blättern . Wenn der Berührungsbildschirm 60 Sekunden lang deaktiviert ist, ohne dass die Auslöser behoben wurden, wechselt er automatisch zum Bildschirm „Smart bed position“ (Intelligente Bettposition), bis die Korrekturen vorgenommen wurden . Zurück zum Inhaltsverzeichnis 2-46 2151-109-005 REV A www.stryker.com...
  • Seite 129: Ibed, Protocol Reminder™ (Protokollerinnerung)

    Werkseitig ist der Bildschirm auf die einmalige Erinnerung eingestellt; der Benutzer kann sie jedoch durch Drücken der Taste „Repeated Task“ (Wiederholte Aufgabe) in eine „Repeated Task“ (Wiederholte Aufgabe) ändern . Abbildung 13.5 Zurück zum Inhaltsverzeichnis www.stryker.com 2151-109-005 REV A 2-47...
  • Seite 130 (Erinnerungsliste ansehen) auf dem Bildschirm „Reminder“ (Erinnerung) wird Abbildung 13 . 7 angezeigt . Abbildung 13.7 Drücken Taste „View Reminder’s Log“ (Erinnerungsprotokoll ansehen) auf dem Bildschirm „Reminder“ (Erinnerung) wird Abbildung 13 .8 angezeigt . Abbildung 13.8 Zurück zum Inhaltsverzeichnis 2-48 2151-109-005 REV A www.stryker.com...
  • Seite 131: Ibed, Head Of Bed (Hob) History (Verlauf-Anzeige Für Kopfteil Des Bettes)

    Benutzer Auskunft über die gegenwärtige Betthöhe sowie über die Betthöhe während der letzten 24 Stunden . Wenn „Bed Height History“ (Verlauf Betthöhe) neu gestartet werden muss, die Taste „Reset“ (Neustart) drücken . Abbildung 13.12 Zurück zum Inhaltsverzeichnis www.stryker.com 2151-109-005 REV A 2-49...
  • Seite 132: Ibed, Calculator (Rechner)

    Bildschirm iBed wird Abbildung 13 . 1 4 angezeigt . Nachdem der Benutzer die Umrechnungen abgeschlossen hat, kann er durch Drücken der Taste „Calcul“ (Rechner) wieder zurück zum Rechner wechseln . Abbildung 13.14 Zurück zum Inhaltsverzeichnis 2-50 2151-109-005 REV A www.stryker.com...
  • Seite 133: Ibed, Translations (Übersetzungen)

    Audiowiedergabe lauter zu stellen . Die Taste „-“ drücken, um die Audiowiedergabe leiser zu stellen . Hinweis: Falls das Bett nicht mit der iAudio-Funktion ausgestattet ist, werden die Audio-Steuertasten in Abbildung 13 . 1 5 nicht angezeigt . Zurück zum Inhaltsverzeichnis www.stryker.com 2151-109-005 REV A 2-51...
  • Seite 134: Ibed, Documentation (Dokumentation)

    Datum angezeigt . Durch Drücken einer der Tasten „Bed Exit“ (Bettenausstieg), „Reminder“ (Erinnerung), „Scale“ (Wiegesystem), „iBed Pos . “ oder „System“ können bestimmte protokollierte Informationen angezeigt werden . Abbildung 13.16 Zurück zum Inhaltsverzeichnis 2-52 2151-109-005 REV A www.stryker.com...
  • Seite 135: Pressure Sore Risk (Braden-Skala Zur Einschätzung Des Dekubitusrisikos)

    Hauptbildschirm angezeigt . Die Anzeige dieses Punktwerts auf der Hauptbildschirmseite kann aktiviert oder unterdrückt werden . Abbildung 13.18 Copyright . Barbara Braden und Nancy Bergstrom, 1988 . Genehmigter Abdruck . Abbildung 13.19 Zurück zum Inhaltsverzeichnis www.stryker.com 2151-109-005 REV A 2-53...
  • Seite 136: Ibed, Sound Therapy™ (Schalltherapie)

    Wenn die Schalltherapie abgespielt wird, erscheint im unteren Teil der Hauptmenüleiste neben dem Datum ein Notensymbol . Hinweis: Notensymbol wird allen Menübildschirmen weiterhin angezeigt, solange die Abbildung 13.21 Schalltherapie abgespielt wird . Notensymbol Zurück zum Inhaltsverzeichnis 2-54 2151-109-005 REV A www.stryker.com...
  • Seite 137: Betrieb Des Zoom

    Bett nicht mehr schieben bzw . ziehen . Hinweis Die Geschwindigkeit der Bettbewegung ändert sich entsprechend für Drücken bzw . Ziehen aufgewandten Kraft . Abbildung 17 - Kopfende des Betts Zurück zum Inhaltsverzeichnis www.stryker.com 2151-109-005 REV A 2-55...
  • Seite 138: Optionales Bettenzubehör

    Traktionsschiene - 20,3 cm x 12,7 mm FA64217-XXX Siehe Seite 2-69 Traktionsschiene - 20,3 cm x 19 mm FA64218-XXX Traktionsschiene - 16,5 cm x 19 mm FA64219-XXX Halterung für Röntgenkassette FA64205-XXX Siehe Seite 2-70 Zurück zum Inhaltsverzeichnis 2-56 2151-109-005 REV A www.stryker.com...
  • Seite 139: Bettverlängerung - Fa64234-Xxx

    • Prüfen, ob Anschluss A sicher befestigt ist (siehe Abbildung B) . • Nicht auf die Bettverlängerung setzen . Dadurch kann das Bett kippen . Abschnitt 2 Section 2 Anschluss A Connector A Abschnitt 1 Section 1 Abbildung B Zurück zum Inhaltsverzeichnis www.stryker.com 2151-109-005 REV A 2-57...
  • Seite 140: Bettverlängerungspolster Mit Xprt™ - Dm64197-Xxx

    Bettverlängerungspolster mit XPRT™ - DM64197-XXX 88,9 cm Deutsch 14 cm 15,2 cm Zurück zum Inhaltsverzeichnis 2-58 2151-109-005 REV A www.stryker.com...
  • Seite 141: Dauerinfusionsstativ - Fa64221-Xxx / Fa64238-Xxx

    Hinweis: Der verwendete Bolzen ist mit „Scotch Grip“ beschichtet. Diese Bolzenart muss durch einen identischen Bolzen ersetzt werden, wenn er nach einer ersten Installation entfernt wird. FA64221-XXX - Links FA64238-XXX - Rechts Zurück zum Inhaltsverzeichnis www.stryker.com 2151-109-005 REV A 2-59...
  • Seite 142: Betrieb

    Das Stativ nach oben ziehen, um es von seiner Halterung zu nehmen, dann zusammenklappen und auf der Konsole verstauen . VORSICHT Das Gewicht der Infusionsbeutel sollte 10 kg nicht überschreiten . DARSTELLUNG DER VERRIEGELUNG DES INFUSIONSSTÄNDERS Zurück zum Inhaltsverzeichnis 2-60 2151-109-005 REV A www.stryker.com...
  • Seite 143: Doppelstativ Für Dauerinfusion Am Kopfteil - Fa64202-Xxx

    Öffnung auf der rechten Seite des Bettenkopfteils befestigen . Hinweis: Der verwendete Bolzen ist mit „Scotch Grip“ beschichtet. Diese Bolzenart muss durch einen identischen Bolzen ersetzt werden, wenn er nach einer ersten Installation entfernt wird. Zurück zum Inhaltsverzeichnis www.stryker.com 2151-109-005 REV A 2-61...
  • Seite 144 Das Stativ nach oben ziehen, um es von seiner Halterung zu nehmen, dann zusammenklappen und auf der Konsole verstauen . VORSICHT Das Gewicht der Infusionsbeutel sollte 10 kg nicht überschreiten . DARSTELLUNG DER VERRIEGELUNG DES INFUSIONSSTÄNDERS Zurück zum Inhaltsverzeichnis 2-62 2151-109-005 REV A www.stryker.com...
  • Seite 145: Schlauchmanagementsystem (Zubehörklemme) - Fa64210-Xxx

    • Nicht für Schläuche mit einem größeren Durchmesser als 19 mm verwenden . • Zubehör nach jedem Gebrauch sterilisieren (siehe Vorgehensweise im Wartungshandbuch) • Bei der Montage prüfen, ob die Klemme stabil ist . Zurück zum Inhaltsverzeichnis www.stryker.com 2151-109-005 REV A 2-63...
  • Seite 146: Monitorablage - Fa64214-Xxx

    Abbildung A Abbildung C – Montierte Konsole Abbildung D – Montierte Konsole Abbildung B – Fußende (Rückseite) (Vorderseite) Abbildung E – Befestigen der Konsole Abbildung F – Montage der Ablage mit Schraubenknopf Zurück zum Inhaltsverzeichnis 2-64 2151-109-005 REV A www.stryker.com...
  • Seite 147 Abbildung K – Befestigung mit Gurten Abbildung L – Befestigung mit Gurten WARNUNG • Die maximale Belastung der Ablage beträgt 18 kg . • Die maximale Belastung der röhrenförmigen Halterung beträgt 68 kg . Zurück zum Inhaltsverzeichnis www.stryker.com 2151-109-005 REV A 2-65...
  • Seite 148: Senkrechte Halterung Für Sauerstoffflasche - Fa64187-Xxx

    Haltevorrichtung in die mittlere Bohrung auf der rechten oder linken Seite des Kopfendes des Bettes einführen . Haltevorrichtung am Kopfende des Bettes befestigen, indem die Sicherungskette durch die Bohrung der Haltevorrichtung am Ende der Haltevorrichtung eingeführt wird . Haltevorrichtung Bohrung für Haltevorrichtung Sicherungskette Zurück zum Inhaltsverzeichnis 2-66 2151-109-005 REV A www.stryker.com...
  • Seite 149: Handbedienung Nur Mit Bedienungsfunktion Für Bewegung

    Den Kabelstecker in den Stecker (A) auf dem rechten oberen Rahmen stecken . Den abnehmbaren Handschalter auf die rechte Seitensicherung des Fußteils montieren . Die abnehmbare Handbedienung in diese Stelle einschieben . Einrasten lassen . Hinweis: Die Darstellung kann je nach Bettenmodell abweichen . Zurück zum Inhaltsverzeichnis www.stryker.com 2151-109-005 REV A 2-67...
  • Seite 150: Clip Für Handbedienung - Fa64186-Xxx

    Der optionale Handschalter-Clip ist als Halterung für den abnehmbaren Handschalter (FA64228-XXX) vorgesehen . INSTALLATION Erforderliche Werkzeuge: Keines Deutsch Klemmbacke (A) aufziehen und den Clip an einer sicheren und zweckdienlichen Stelle am Bett anbringen . Zurück zum Inhaltsverzeichnis 2-68 2151-109-005 REV A www.stryker.com...
  • Seite 151: Traktionsschiene - Fa64215-Xxx Bis Fa64219-Xxx

    Unter Verwendung der mitgelieferten Unterlegscheiben (B) und Bolzen (C) befestigen . Hinweis: Der in Schritt 2 verwendete Bolzen ist mit „Scotch Grip“ beschichtet. Diese Bolzenart muss durch einen identischen Bolzen ersetzt werden, wenn er nach einer ersten Installation entfernt wird. Zurück zum Inhaltsverzeichnis www.stryker.com 2151-109-005 REV A 2-69...
  • Seite 152: Halterung Für Röntgenkassette - Fa64205-Xxx

    3/4 Zoll (E) und zwei Abstandhaltern (D) in die Schwenkkonsolen der Kassettenhalterung (B) montieren . Hinweis: Sicherstellen, dass die Haltevorrichtung für Röntgenkassetten nach der Verwendung geschlossen wird, um Beschädigung bei Bewegung der Fowler-Rückenlehne oder des Liftsystems zu vermeiden. Zurück zum Inhaltsverzeichnis 2-70 2151-109-005 REV A www.stryker.com...
  • Seite 153: Reinigung

    Einige reinigungsmittel wirken korrodierend und können das produkt bei unsachgemässer anwendung beschädigen . Sollten die oben beschriebenen Produkte zur Reinigung von Stryker-Ausstattungen zur Patientenversorgung angewendet werden, müssen Maßnahmen getroffen werden, um sicherzustellen, dass die Betten mit einem in sauberem Wasser getränkten Tuch abgewischt und nach der Reinigung gründlich getrocknet werden .
  • Seite 154: Vorbeugende Wartung

    _____ Die korrekte Kalibrierung des Berührungsbildschirms überprüfen . _____ Die korrekte Kalibrierung des Bettes überprüfen . Seriennummer des Bettes: ________________________ ________________________ ________________________ ________________________ ________________________ ________________________ ________________________ ________________________ Durchgeführt von: ___________________________________________ Datum: __________________ Zurück zum Inhaltsverzeichnis 2-72 2151-109-005 REV A www.stryker.com...
  • Seite 155: Emv-Informationen

    Netzfrequenz IEC 61000-4-8 sollte die übliche Stärke an einem typischen Ort in einer typischen kommerziellen und/ oder Krankenhaus-Umgebung nicht überschreiten . Hinweis: U ist die Wechselstrom-Netzspannung vor Anwendung des Testpegels . Zurück zum Inhaltsverzeichnis www.stryker.com 2151-109-005 REV A 2-73...
  • Seite 156 Bei 80 MHz und 800 MHz sollte der Trennabstand für den höheren Frequenzbereich verwendet werden . Hinweis 2 Diese Richtlinien treffen eventuell nicht in allen Situationen zu . Elektromagnetische Ausbreitung wird durch Absorption und Reflexion an Gebäuden, Gegenständen und Personen beeinflusst . Zurück zum Inhaltsverzeichnis 2-74 2151-109-005 REV A www.stryker.com...
  • Seite 157 Intensivpflegebettes überprüft werden . Falls ein anomales Verhalten festgestellt wird, können zusätzliche Maßnahmen erforderlich sein, beispielsweise eine Neuausrichtung oder Umpositionierung des InTouch® Intensivpflegebettes . Im Frequenzbereich von 150 kHz bis 80 MHz darf die Feldstärke maximal 3 V/m betragen . Zurück zum Inhaltsverzeichnis www.stryker.com 2151-109-005 REV A 2-75...
  • Seite 158 Gebrauch in allen Einrichtungen, außer Privatwohnungen Emission von Oberwellen Klasse A und Einrichtungen mit direktem Anschluss an das IEC 61000-3-2 öffentliche Niederspannungsstromnetz zur Versorgung von Wohngebäuden . Spannungsschwankungen Störimpulse Erfüllt IEC 61000-3-3 Zurück zum Inhaltsverzeichnis 2-76 2151-109-005 REV A www.stryker.com...
  • Seite 159: Herstellergarantie

    Bereitstellung von Ersatzteilen und Arbeitskräften für – nach seiner Wahl – ein Produkt oder das Austauschen eines Deutsch Produktes, das Stryker nach alleinigem Ermessen für defekt befindet . Auf Ersuchen von Stryker müssen Produkte bzw . Teile, für die ein Garantieanspruch erhoben wird, auf eigene Kosten an das Werk zurückgeschickt werden . Missbräuchliche Verwendung des Produktes oder Änderungen bzw .
  • Seite 161 “Tare” (Tarra)-toets . . . . . . . . . . . . . . . . . . . . . . . . . . . . . . . . . . . . . . . . . . . . . . . . . . . . . . . . . . . . . . 3-33 www.stryker.com 2151-109-005 REV A...
  • Seite 162 Röntgencassettehouder - FA64205-XXX . . . . . . . . . . . . . . . . . . . . . . . . . . . . . . . . . . . . . . . . . . . . . . . . . . 3-69 2151-109-005 REV A www.stryker.com...
  • Seite 163 Beschadigde goederen . . . . . . . . . . . . . . . . . . . . . . . . . . . . . . . . . . . . . . . . . . . . . . . . . . . . . . . . . . . . . . .3-76 www.stryker.com 2151-109-005 REV A...
  • Seite 164: Symbolen En Definities

    . Informeer bij uw plaatselijke distributeur naar de beschikbare retour- en/of inzamelsystemen in uw land . Modelnummer Meetinstrument IIII Fabrikant Nauwkeurigheidsklasse Partijcode Gebruiksaanwijzing Terugkeren naar de inhoudsopgave 2151-109-005 REV A www.stryker.com...
  • Seite 165: Definitie Van Waarschuwing / Let Op / Opmerking

    . Opmerking Een opmerking geeft speciale informatie die het onderhoud vergemakkelijkt of belangrijke instructies verduidelijkt . Terugkeren naar de inhoudsopgave www.stryker.com 2151-109-005 REV A...
  • Seite 166: Inleiding

    Inleiding BEOOGD GEBRUIK Deze handleiding is ontwikkeld om u te helpen bij het gebruik van het Stryker InTouch ® -bed voor kritieke zorg, model FL27 (2151/2152, 2153/2154, 2155/2156) . Lees deze handleiding zorgvuldig door voordat u de apparatuur gebruikt of er onderhoud aan verricht .
  • Seite 167: Afbeelding Van Het Product

    Hoofdbord Nederlands Bedieningspaneel voetbord InTouch ® scherm Ontgrendelingshendels onrusthekken Voetbord Ontgrendelingspedaal voor reanimatie in een noodgeval Haken Foley- Handrem Zoom ® -aandrijfwiel zakken Zwenkwielen (alleen model 2152/2154/2156) (onder onderstel – niet afgebeeld) Terugkeren naar de inhoudsopgave www.stryker.com 2151-109-005 REV A...
  • Seite 168: Specificaties

    Reanimatiesysteem Tijd om het bed vlak te maken vanuit elke stand • Fowler 15 seconden • Voet/Stoel 60 seconden Aandrijfsysteem Snelheid (optionele Zoom -aandrijving) ® • Vooruit 4,8 km/u 2,98 mijl/u • Achteruit 2,88 km/u 1,79 mijl/u Terugkeren naar de inhoudsopgave 2151-109-005 REV A www.stryker.com...
  • Seite 169 Houder voor pc-knoopcelbatterij, grootte 20 mm - MDP Int . BA2032 Stryker behoudt zich het recht voor om de specificaties zonder kennisgeving te wijzigen. De opgegeven specificaties zijn benaderend en kunnen enigszins variëren van bed tot bed of als gevolg van schommelingen in de stroomvoorziening .
  • Seite 170: Samenvatting Van De Veiligheidsmaatregelen

    . Het Patiënt-uit-bed-systeem signaleert wanneer een patiënt op het punt staat uit bed te stappen . • Het Patiënt-uit-bed-systeem is niet bedoeld voor gebruik met patiënten die minder wegen dan 23 kg . Terugkeren naar de inhoudsopgave 3-10 2151-109-005 REV A www.stryker.com...
  • Seite 171 • Verkeerd ingestelde onrustbanden kunnen de patiënt ernstig letsel toebrengen . Het is de verantwoordelijkheid van het dienstdoende medische personeel om het juiste gebruik van de onrustbanden en de plaats waar deze worden aangebracht te bepalen . Stryker is niet verantwoordelijk voor het soort en/of het gebruik van onrustbanden op welk Stryker-product dan ook .
  • Seite 172 Samenvatting van de veiligheidsmaatregelen LET OP (VERVOLG) • Gebruik uitsluitend door Stryker erkende accu’s wanneer u de accu’s vervangt . Gebruik van accu’s van een ander merk dan Stryker kan tot onvoorspelbare systeemprestaties leiden . • Bij een alarm voor “Battery Low” (batterij bijna leeg) (betreffende led op het voetbord brandt en/of er is een hoorbare pieptoon) stop dan het gebruik van de Zoom ®...
  • Seite 173: Installatieprocedures

    Fowler-rugsteun volledig omhoog te brengen met behulp van de toets “Fowler Up” (Fowler-rugsteun omhoog) . • Controleer of de volgende optionele apparatuur goed werkt: 120 V hulpstopcontact, nachtlampje, noodslinger enzovoort . Terugkeren naar de inhoudsopgave www.stryker.com 2151-109-005 REV A 3-13...
  • Seite 174: Optionele Xprt™-Therapiematras

    • Maak het netsnoer niet vast aan bewegende delen van het frame van het bed . • Hierdoor kan het netsnoer bekneld raken en een elektrische schok veroorzaken als er een bedverlengstuk wordt gebruikt . Terugkeren naar de inhoudsopgave 3-14 2151-109-005 REV A www.stryker.com...
  • Seite 175 . Duw het midden van de pedaal volledig omlaag tot de letter N (neutraal) in het BLAUW zichtbaar is in het doorzichtige venster . De Zoom ® -aandrijving dient nu los te staan . Terugkeren naar de inhoudsopgave www.stryker.com 2151-109-005 REV A 3-15...
  • Seite 176: Stroomvoorziening Van Het Bed

    Doodmodus naar de Opstartmodus als de accu’s leeg zijn en opnieuw geladen moeten worden . Het systeem schakelt vervolgens over naar de Initialisatiemodus gevolgd door de Normale modus . Opmerking Het volledig opladen van beide accu’s duurt ongeveer 8 uur . Terugkeren naar de inhoudsopgave 3-16 2151-109-005 REV A www.stryker.com...
  • Seite 177: Gebruikshandleiding Onderstel

    . • Om letsel bij de patiënt en/of gebruiker te voorkomen, mag u niet proberen het bed zijwaarts te verplaatsen wanneer de Aandrijfmodus geactiveerd is; het aandrijfwiel kan niet zwenken . Terugkeren naar de inhoudsopgave www.stryker.com 2151-109-005 REV A 3-17...
  • Seite 178: Gebruikshandleiding Bed

    Verkeerd ingestelde onrustbanden kunnen de patiënt ernstig letsel toebrengen . Het is de verantwoordelijkheid van het dienstdoende medische personeel om het juiste gebruik van de onrustbanden en de plaats waar deze worden aangebracht te bepalen . Stryker is niet verantwoordelijk voor het soort en/of het gebruik van onrustbanden op welk Stryker-product dan ook .
  • Seite 179: Gebruik Oproepen Verpleegkundige

    Oproepen verpleegkundige-communicatie . GEBRUIK HULPSTOPCONTACT Het hulpstopcontact biedt het verpleegkundige personeel een handige stroombron voor uitsluitend door Stryker goedgekeurde accessoires; alleen 120 V stekker type B . Het stopcontact bevindt zich aan de linkerkant van het voeteneinde van het bed .
  • Seite 180: Onrusthekken In De Gewenste Stand Plaatsen

    De onrusthekken omhoog brengen (afbeelding 1.0) • Trek aan het onrusthek tot het in de hoogste stand vergrendeld is; u hoort een klik die aangeeft dat het vergrendeld is (zie onderstaande afbeelding) . Afbeelding 1.0 Terugkeren naar de inhoudsopgave 3-20 2151-109-005 REV A www.stryker.com...
  • Seite 181: Bed In De Gewenste Stand Plaatsen

    “Nurse Control” (Bedieningspaneel verpleegkundige) te drukken (zie pagina 3-22) . OPTIONEEL BEDVERLENGSTUK Het bed kan worden verlengd met behulp van een bedverlengstuk . Zie de pagina 3-56 voor verdere informatie . Nederlands Terugkeren naar de inhoudsopgave www.stryker.com 2151-109-005 REV A 3-21...
  • Seite 182: Gebruikshandleiding Onrusthekken

    Druk op deze toets om de hoogte van het bed omhoog te brengen Bedhoogte omhoog tot de gewenste hoogte . Druk op deze toets om de hoogte van het bed omlaag te brengen Bedhoogte omlaag tot de gewenste hoogte . Terugkeren naar de inhoudsopgave 3-22 2151-109-005 REV A www.stryker.com...
  • Seite 183: Beschrijving Van De Standen Van Het Bed

    • Er is minimaal een ruimte van 50,8 cm nodig om de Trendelenburg- en anti-Trendelenburg-stand uit te voeren . • Deze standen kunnen niet worden uitgevoerd wanneer er een of meer vergrendelingen ingeschakeld zijn . Terugkeren naar de inhoudsopgave www.stryker.com 2151-109-005 REV A 3-23...
  • Seite 184: Bedieningspaneel Rem/Beweging, Bedieningspaneel Verpleegkundige, Op Het Onrusthek

    Druk op deze toets om een behandeling te beginnen met het bed 30 graden”-stand in de “HOB (Hoofdeinde bed) 30 graden”-stand . Opmerking De rem kan ook handmatig worden vastgezet . Zie pagina 3-17 voor meer informatie . Terugkeren naar de inhoudsopgave 3-24 2151-109-005 REV A www.stryker.com...
  • Seite 185: Optioneel Verwijderbaar Bedieningspaneel

    Druk op deze toets om het knieknik-gedeelte van het bed omhoog Knieknik omhoog te brengen tot de gewenste hoek . Druk op deze toets om het knieknik-gedeelte van het bed omlaag Knieknik omlaag te brengen tot de gewenste hoek . Terugkeren naar de inhoudsopgave www.stryker.com 2151-109-005 REV A 3-25...
  • Seite 186: Gebruikshandleiding Voetbord

    Deze toets licht op wanneer het systeem wordt ingeschakeld . “Brake Off” (Activering/ Druk op deze toets om het rem-los-systeem te activeren . Deze indicator Rem los) toets licht op wanneer het systeem wordt ingeschakeld . Terugkeren naar de inhoudsopgave 3-26 2151-109-005 REV A www.stryker.com...
  • Seite 187: Indicatorlampjes Systeemberichten

    Als er na 4 minuten geen activiteit op het aanraakscherm is, gaat het lcd-scherm geheel uit (4 minuten = 2 minuten op 100% intensiteit + 2 minuten op 10% intensiteit) . Terugkeren naar de inhoudsopgave www.stryker.com 2151-109-005 REV A 3-27...
  • Seite 188: Hoofdmenu: "Patient Information" (Informatie Patiënt)

    . Auteursrecht . Barbara Braden en Nancy Bergstrom, 1988 . Met toestemming herdrukt . Afbeelding 6.0 Terugkeren naar de inhoudsopgave 3-28 2151-109-005 REV A www.stryker.com...
  • Seite 189: Patient Information" (Informatie Patiënt), "New Patient" (Nieuwe Patiënt)

    BMI van de patiënt, het weergeven van de patiënt-ID en het weergeven van de laatste score op de Braden-schaal . Auteursrecht . Barbara Braden en Nancy Bergstrom, 1988 . Met toestemming herdrukt . Afbeelding 6.2 Terugkeren naar de inhoudsopgave www.stryker.com 2151-109-005 REV A 3-29...
  • Seite 190: Hoofdmenu: "Bed Controls" (Besturingselementen Bed)

    Deze indicator toont de werkelijke hoogte van het bed . Opmerking • Wanneer op de toetsen wordt gedrukt, worden deze grijs . • De hoogte van het bed is in feite de afstand tussen de vloer en de matrasdrager . Terugkeren naar de inhoudsopgave 3-30 2151-109-005 REV A www.stryker.com...
  • Seite 191: Hoofdmenu: "Scale" (Weegschaal)

    . “Scale Last Tare” (Laatste Dit geeft u informatie over de datum en tijd van de laatste tarrering van de weegschaal) tarrering van de schaal . Terugkeren naar de inhoudsopgave www.stryker.com 2151-109-005 REV A 3-31...
  • Seite 192: Zero" (Nulstelling)-Toets

    De “Zero” (Nulstelling)-functie reset alle waarden voor de gewichten van de verschillende patiënten . Alle gegevens opgeslagen in het aanraakscherm met betrekking tot het Afbeelding 8.1f – nulstelling voltooid gewicht van de patiënt gaan daarbij verloren . Terugkeren naar de inhoudsopgave 3-32 2151-109-005 REV A www.stryker.com...
  • Seite 193: Tare" (Tarra)-Toets

    De “Tare” (Tarra)-functie reset alle waarden voor de gewichten van de verschillende patiënten . Alle gegevens opgeslagen in het aanraakscherm met betrekking tot het gewicht van de patiënt gaan daarbij verloren . Terugkeren naar de inhoudsopgave www.stryker.com 2151-109-005 REV A 3-33...
  • Seite 194: De Toets "Net Weight History" (Geschiedenis Netto Gewicht)

    Het systeem kan maximaal vijftig (50) ingevoerde gegevens in het geheugen bewaren . Als er een nieuwe waarde wordt toegevoegd na de 50e invoer, wordt de eerste waarde gewist volgens het FIFO-principe (First In, First Out) . Terugkeren naar de inhoudsopgave 3-34 2151-109-005 REV A www.stryker.com...
  • Seite 195: Hoofdmenu: "Bed Exit" (Patiënt-Uit-Bed)

    • De blauwe kleur op een van de zones geeft aan dat dit de geactiveerde zone is . • Wanneer de kleur van de zone rood wordt, betekent dit dat er een Patiënt-uit-bed-alarm is . In dit geval verschijnt het venster “Event Manager” (Voorvalbeheer) . Terugkeren naar de inhoudsopgave www.stryker.com 2151-109-005 REV A 3-35...
  • Seite 196: Alarm Settings

    Volume / toon testen van de huidige instelling kunt u op de toets “Test” drukken om de nieuwe instelling van de toon of de nieuwe aanpassing van het volume te horen . Terugkeren naar de inhoudsopgave 3-36 2151-109-005 REV A www.stryker.com...
  • Seite 197: Hoofdmenu: "Support Surface" (Matrasdrager)

    . Als een van de onrusthekken is losgezet tijdens een rotatiebehandeling (bv . rotatie en vibratie worden tegelijk uitgevoerd), stoppen beide behandelingen onmiddellijk . Terugkeren naar de inhoudsopgave www.stryker.com 2151-109-005 REV A 3-37...
  • Seite 198: Hoofdmenu: "Options" (Opties)

    Druk op deze toets om het menu Maintenance (Onderhoud) te “Maintenance” (Onderhoud) openen . “Advanced Options” Druk op deze toets om het menu Advanced Options (Geavanceerde (Geavanceerde opties) opties) te openen . Terugkeren naar de inhoudsopgave 3-38 2151-109-005 REV A www.stryker.com...
  • Seite 199: Time Setup" (Tijd Instellen)-Toets

    “Language” (Taal)-toets Wanneer er op de toets “Language” (Taal) op het scherm Options (Opties) wordt gedrukt, wordt afbeelding 11 .3 weergegeven . U kunt nu de gewenste taal selecteren . Afbeelding 11.3 Terugkeren naar de inhoudsopgave www.stryker.com 2151-109-005 REV A 3-39...
  • Seite 200: Toets "Advanced Options" (Geavanceerde Opties)

    Zoom ® geactiveerd is . Als de opties Awareness (Functie-informatie) en/of Reminder Afbeelding 11.4 (Herinnering) zijn geselecteerd, worden de alarmen via het signaal Oproepen verpleegkundige van het bed gestuurd . Terugkeren naar de inhoudsopgave 3-40 2151-109-005 REV A www.stryker.com...
  • Seite 201: History" (Geschiedenis)-Toets

    Wanneer er op de toets “Angle History” (Hoekgeschiedenis) op het scherm Head of Bed (Hoofdeinde) wordt gedrukt, wordt afbeelding 11 . 7 weergegeven . Opmerking De maximale tijd voor hoek positie is 30 dagen . Afbeelding 11.7 Terugkeren naar de inhoudsopgave www.stryker.com 2151-109-005 REV A 3-41...
  • Seite 202 24 uur . Als de Bed Height History (Geschiedenis bedhoogte) moet worden gereset, drukt u op de toets “Reset” . Afbeelding 11.9 Terugkeren naar de inhoudsopgave 3-42 2151-109-005 REV A www.stryker.com...
  • Seite 203: Toets "Nurse Control Backlight" (Achtergrondverlichting Bedieningspaneel Verpleegkundige)

    . Close Opmerking Zie de Onderhoudshandleiding voor nadere gegevens Afbeelding 11.11 over Buttons Pressed (Ingedrukte toetsen), Boards (Borden) en Bed Informations (Informatie bed) . Afbeelding 11.12 Afbeelding 11.13 Terugkeren naar de inhoudsopgave www.stryker.com 2151-109-005 REV A 3-43...
  • Seite 204: Hoofdmenu: "Lockouts" (Vergrendelingen)

    • Als het bed in Trendelenburg- of anti-Trendelenburg staat, wordt het bed in deze stand vergrendeld . • Wanneer een van de vergrendelingen wordt ingeschakeld, licht de indicator op het voetbord op, zodat de gebruiker weet dat bepaalde bewegingen niet kunnen worden ingeschakeld . Terugkeren naar de inhoudsopgave 3-44 2151-109-005 REV A www.stryker.com...
  • Seite 205: Hoofdmenu: Ibed

    60 seconden uitgeschakeld is zonder dat de alarmcondities worden verholpen, keert het automatisch terug naar het scherm “Smart bed position” Afbeelding 13.2 (Stand intelligent bed) tot de correcties worden uitgevoerd . Terugkeren naar de inhoudsopgave www.stryker.com 2151-109-005 REV A 3-45...
  • Seite 206: Ibed, "Protocol Reminder™" (Herinnering Protocol)

    13 .5 . Opmerking Het standaardscherm is de eenmalige herinnering, maar de gebruiker kan dit wijzigen in herhaalde herinnering door op de toets “Repeated Task” (Herhaalde taak) te drukken . Afbeelding 13.5 Terugkeren naar de inhoudsopgave 3-46 2151-109-005 REV A www.stryker.com...
  • Seite 207 (Herinnering) wordt gedrukt, wordt afbeelding 13 . 7 weergegeven . Afbeelding 13.7 Wanneer er op de toets “View Reminder’s Log” (Log herinneringen weergeven) op het scherm Reminder (Herinnering) wordt gedrukt, wordt afbeelding 13 .8 weergegeven . Afbeelding 13.8 Terugkeren naar de inhoudsopgave www.stryker.com 2151-109-005 REV A 3-47...
  • Seite 208: Ibed, "Head Of Bed (Hob) History" (Geschiedenis Hoofdeinde Bed)

    24 uur . Als de Bed Height History (Geschiedenis bedhoogte) moet worden gereset, drukt u op de toets “Reset” . Afbeelding 13.12 Terugkeren naar de inhoudsopgave 3-48 2151-109-005 REV A www.stryker.com...
  • Seite 209: Ibed, "Calculator" (Rekenapparaat)

    13 . 1 4 weergegeven . Wanneer de gebruiker klaar is met omrekenen, kan deze terugschakelen naar “Calculator” (Rekenapparaat) door op de toets “Calcul” (Rekenapparaat) te drukken . Afbeelding 13.14 Terugkeren naar de inhoudsopgave www.stryker.com 2151-109-005 REV A 3-49...
  • Seite 210: Ibed, "Translations" (Vertalingen)

    “-”-toets . Opmerking: Als uw bed niet met de optie iAudio is uitgerust, worden de toetsen voor de geluidsbediening niet in afbeelding 13 . 1 5 weergegeven . Terugkeren naar de inhoudsopgave 3-50 2151-109-005 REV A www.stryker.com...
  • Seite 211: Ibed, "Documentation" (Documentatie)

    . U kunt specifieke gelogde informatie bekijken door op een van de volgende toetsen te drukken: “Bed Exit” (Patiënt-uit-bed), “Reminder” (Herinnering), “Scale” (Weegschaal), “iBed Pos . ” (Stand) of “System” (Systeem) . Nederlands Afbeelding 13.16 Terugkeren naar de inhoudsopgave www.stryker.com 2151-109-005 REV A 3-51...
  • Seite 212: Ibed, The Braden Scale For Predicting Pressure Sore Risk

    . Het weergeven van deze score op het hoofdscherm kan worden in- of uitgeschakeld . Afbeelding 13.18 Auteursrecht . Barbara Braden en Nancy Bergstrom, 1988 . Met toestemming herdrukt . Afbeelding 13.19 Terugkeren naar de inhoudsopgave 3-52 2151-109-005 REV A www.stryker.com...
  • Seite 213: Ibed, "Sound Therapy™" (Geluidstherapie)

    Als geluidstherapie wordt afgespeeld, wordt een muzieknootpictogram naast de datum onderin de hoofdmenubalk weergegeven . Opmerking: Het muzieknootpictogram wordt verder alle menuschermen weergegeven zolang geluidstherapie wordt afgespeeld . Afbeelding 13.21 Muzieknootpictogram Terugkeren naar de inhoudsopgave www.stryker.com 2151-109-005 REV A 3-53...
  • Seite 214: De Werking Van Zoom ® -Aandrijving (Model 2152/2154/2156)

    . Opmerking De snelheid waarmee het bed wordt verplaatst, verandert afhankelijk van de kracht waarmee geduwd of getrokken wordt . Afbeelding 17 - Hoofdeinde van bed Terugkeren naar de inhoudsopgave 3-54 2151-109-005 REV A www.stryker.com...
  • Seite 215: Optionele Accessoires Voor Het Bed

    Zie pagina 3-68 Tractiebus – 20,3 cm x 12,7 mm FA64217-XXX Tractiebus – 20,3 cm x 19 mm FA64218-XXX Tractiebus – 16,5 cm x 19 mm FA64219-XXX Röntgencassettehouder FA64205-XXX Zie pagina 3-69 Terugkeren naar de inhoudsopgave www.stryker.com 2151-109-005 REV A 3-55...
  • Seite 216: Bedverlengstuk - Fa64234-Xxx

    • Controleer of connector A stevig vastzit (zie afbeelding B) . • Niet op het bed verlengstuk zitten . Hierdoor kan het bed omkantelen . Sectie 2 Section 2 Connector A Connector A Sectie 1 Section 1 Afbeelding B Terugkeren naar de inhoudsopgave 3-56 2151-109-005 REV A www.stryker.com...
  • Seite 217: Bed Verlengstuk Kussen Met Xprt™ - Dm64197-Xxx

    Bed verlengstuk kussen met XPRT™ - DM64197-XXX 88,9 cm Nederlands 14 cm 15,2 cm Terugkeren naar de inhoudsopgave www.stryker.com 2151-109-005 REV A 3-57...
  • Seite 218: Permanente Infuuspaal - Fa64221-Xxx / Fa64238-Xxx

    Opmerking: De gebruikte bout is voorzien van een “Scotch Grip”-coating. Dit type bout moet worden vervangen door een nieuwe, identieke bout als deze wordt verwijderd na de eerste installatie. FA64221-XXX - Links FA64238-XXX - Rechts Terugkeren naar de inhoudsopgave 3-58 2151-109-005 REV A www.stryker.com...
  • Seite 219 . LET OP Nederlands Het gewicht van de infuuszakken mag niet hoger zijn dan 10 kg . DETAIL VAN INFUUSPAALVERGRENDELING Terugkeren naar de inhoudsopgave www.stryker.com 2151-109-005 REV A 3-59...
  • Seite 220: Dubbele Permanente Infuuspaal Hoofdeinde - Fa64202-Xxx

    . Opmerking: De gebruikte bout is voorzien van een ‘Scotch Grip’-coating. Dit type bout moet worden vervangen door een nieuwe, identieke bout als deze wordt verwijderd na de eerste installatie. Terugkeren naar de inhoudsopgave 3-60 2151-109-005 REV A www.stryker.com...
  • Seite 221 . LET OP Nederlands Het gewicht van de infuuszakken mag niet hoger zijn dan 10 kg . DETAIL VAN INFUUSPAALVERGRENDELING Terugkeren naar de inhoudsopgave www.stryker.com 2151-109-005 REV A 3-61...
  • Seite 222: Leidingbeheersysteem (Hulpklem) - Fa64210-Xxx

    • Gebruik geen slangen met een diameter groter dan 19 mm . • Steriliseer het accessoire na elk gebruik (zie de procedure in de Onderhoudshandleiding) . • Controleer of de klem goed vastzit wanneer u deze aanbrengt . Terugkeren naar de inhoudsopgave 3-62 2151-109-005 REV A www.stryker.com...
  • Seite 223: Monitordrager - Fa64214-Xxx

    Afbeelding C – gemonteerde steun Afbeelding D – gemonteerde steun Afbeelding B – voeteneinde (achterkant) (voorkant) Afbeelding E – draai de steun vast Afbeelding F – installeer de drager met de schroefknop Terugkeren naar de inhoudsopgave www.stryker.com 2151-109-005 REV A 3-63...
  • Seite 224 Afbeelding J – stabiliseer de drager riemen riemen WAARSCHUWING • De drager kan met maximaal 18 kg worden belast . • De buisvormige steun kan met maximaal 68 kg worden belast . Terugkeren naar de inhoudsopgave 3-64 2151-109-005 REV A www.stryker.com...
  • Seite 225: Verticale Zuurstoffleshouder - Fa64187-Xxx

    Bevestig de steunstang aan het hoofdeinde van het bed door de veiligheidsketting door de opening in de steunstang te trekken die zich aan het uiteinde van de steunstang bevindt . Nederlands Steunstang Opening in steunstang Veiligheidsketting Terugkeren naar de inhoudsopgave www.stryker.com 2151-109-005 REV A 3-65...
  • Seite 226: Verwijderbaar Bedieningspaneel Met Alleen Bewegingsregeling - Fa64228-Xxx

    Installeer het verwijderbare bedieningspaneel op het onrusthek bij de rechtervoet . Plaats het verwijderbare bedieningspaneel in deze opening . Schuif tot het vastklikt . Opmerking: De afbeelding kan verschillen afhankelijk van het model bed . Terugkeren naar de inhoudsopgave 3-66 2151-109-005 REV A www.stryker.com...
  • Seite 227: Klem Verwijderbaar Bedieningspaneel - Fa64186-Xxx

    (FA64228-XXX) . INSTALLATIE Benodigd gereedschap: Geen Til het uitstekende gedeelte van de klem (A) op en breng de klem op het bed aan op een veilige en handige plaats . Nederlands Terugkeren naar de inhoudsopgave www.stryker.com 2151-109-005 REV A 3-67...
  • Seite 228: Tractiebus - Fa64215-Xxx Tot En Met Fa64219-Xxx

    Opmerking: De in stap 2 gebruikte bout is voorzien van een ‘Scotch Grip’-coating. Dit type bout moet worden vervangen door een nieuwe, identieke bout als deze wordt verwijderd na de eerste installatie. Terugkeren naar de inhoudsopgave 3-68 2151-109-005 REV A www.stryker.com...
  • Seite 229: Röntgencassettehouder - Fa64205-Xxx

    (B) met twee tapschroeven no 10 van 3/4 inch (E) en twee passingen (D) . Opmerking: Denk eraan de steun van de röntgencassettehouder na gebruik te sluiten om te voorkomen dat deze schade oploopt bij de beweging van het Fowler-gedeelte of van het hefsysteem. Terugkeren naar de inhoudsopgave www.stryker.com 2151-109-005 REV A 3-69...
  • Seite 230 Sommige reinigingsmiddelen zijn corrosief en kunnen bij verkeerd gebruik schade aan het product veroorzaken . Als de hierboven beschreven producten worden gebruikt voor het schoonmaken van Stryker -zorgapparatuur moeten er maatregelen worden genomen om te zorgen dat de bedden worden afgenomen met een vochtige doek gedrenkt in schoon water en na schoonmaken grondig worden gedroogd .
  • Seite 231: Preventief Onderhoud

    _____ Controleer of het aanraakscherm ijken nauwkeurig is . _____ Controleer of het bed ijken nauwkeurig is . Serienummer bed: ________________________ ________________________ ________________________ ________________________ ________________________ ________________________ ________________________ ________________________ Ingevuld door: ______________________________________________ Datum: ___________________ Terugkeren naar de inhoudsopgave www.stryker.com 2151-109-005 REV A 3-71...
  • Seite 232: Informatie Over Elektromagnetische Compatibiliteit

    IEC 61000-4-8 hebben dat kenmerkend is voor een normale locatie in een typische handels- en/of ziekenhuisomgeving . Opmerking: U is de spanning van de wisselstroomnet vóór toepassing van het testniveau . Terugkeren naar de inhoudsopgave 3-72 2151-109-005 REV A www.stryker.com...
  • Seite 233 Bij 80 MHz en 800 MHz is de scheidingsafstand voor het hogere frequentiebereik van toepassing . Opmerking 2 Deze richtlijnen zijn mogelijk niet van toepassing op alle situaties . De voortplanting van elektromagnetische straling wordt beïnvloed door absorptie en reflectie door gebouwen, voorwerpen en mensen . Terugkeren naar de inhoudsopgave www.stryker.com 2151-109-005 REV A 3-73...
  • Seite 234 InTouch -bed voor kritieke zorg of de oriëntatie daarvan aanpassen . ® Over het frequentiebereik van 150 kHz tot 80 MHz bedragen de veldsterktes minder dan 3 V/m . Terugkeren naar de inhoudsopgave 3-74 2151-109-005 REV A www.stryker.com...
  • Seite 235 Klasse A IEC 61000-3-2 de inrichtingen die direct zijn aangesloten op het openbare laagspanningselektriciteitsnet voor woonhuizen . Spanningsvariaties Flikkeremissies Voldoet aan de norm IEC 61000-3-3 Terugkeren naar de inhoudsopgave www.stryker.com 2151-109-005 REV A 3-75...
  • Seite 236: Beperkte Garantie

    Stryker vervangen van, elk product dat uitsluitend naar het oordeel van Stryker defect is gebleken . Als Stryker daarom vraagt, dienen producten of onderdelen waarvoor een beroep op de garantie wordt gedaan franco te worden geretourneerd aan de fabriek . Elk verkeerd gebruik of wijzigingen of reparatie door derden op een wijze die naar het oordeel van Stryker een wezenlijke en negatieve invloed heeft op het product leidt tot vervallen van deze garantie .
  • Seite 239 Botão Tare (Tara) . . . . . . . . . . . . . . . . . . . . . . . . . . . . . . . . . . . . . . . . . . . . . . . . . . . . . . . . . . . . . . . 4-33 www.stryker.com 2151-109-005 REV A...
  • Seite 240 Suporte para cassete de raios X - FA64205-XXX . . . . . . . . . . . . . . . . . . . . . . . . . . . . . . . . . . . . . . . . . . . 4-69 2151-109-005 REV A www.stryker.com...
  • Seite 241 Mercadoria danificada . . . . . . . . . . . . . . . . . . . . . . . . . . . . . . . . . . . . . . . . . . . . . . . . . . . . . . . . . . . . . . . .4-76 Português www.stryker.com 2151-109-005 REV A...
  • Seite 242: Símbolos E Definições

    . Consulte o distribuidor local para saber quais os sistemas de devolução e/ou recolha disponíveis no país . Número do modelo Dispositivo de medição IIII Fabricante Classe de precisão Código do lote Instruções de utilização Voltar ao índice 2151-109-005 REV A www.stryker.com...
  • Seite 243: Definição De Advertência/Precaução/Nota

    . Português Nota Fornece informações especiais, que se destinam a facilitar a manutenção ou a explicar instruções importantes . Voltar ao índice www.stryker.com 2151-109-005 REV A...
  • Seite 244: Introdução

    . CONDIÇÃO DE UTILIZAÇÃO A QUE SE DESTINA E VIDA ÚTIL: As camas da Stryker Medical são concebidas para uma vida útil prevista de 10 anos, em condições de utilização normal e com manutenção periódica apropriada, conforme descrito no manual de manutenção de cada dispositivo .
  • Seite 245: Ilustração Do Produto

    Protecção dos pés Pedal de libertação para reanimação cardiopulmonar Ganchos para Reserva de emergência Roda propulsora Zoom ® Rodízios sacos Foley manual (modelo 2152/2154/2156 apenas) (sob a base - não mostrada) Voltar ao índice www.stryker.com 2151-109-005 REV A...
  • Seite 246: Especificações

    • Cabeceira Fowler 15 segundos • Pés/Assento 60 segundos Sistema Velocidade (roda propulsora Zoom ® opcional) de roda • Frente 4,8 km/h 2,98 mph propulsora • Trás 2,88 km/h 1,79 mph Voltar ao índice 2151-109-005 REV A www.stryker.com...
  • Seite 247 Suporte para bateria PC tipo moeda, tamanho 20 mm - MDP Int . BA2032 A Stryker reserva-se o direito de alterar as especificações sem aviso prévio. As especificações presentes na lista são aproximadas e podem variar ligeiramente de unidade para unidade ou de acordo com as flutuações do fornecimento de energia .
  • Seite 248: Resumo Das Precauções De Segurança

    • O sistema de Saída da cama visa somente prestar assistência na detecção da saída de um doente da cama . Não visa substituir o protocolo de vigilância do doente . O sistema de Saída da cama emite um sinal quando um doente está prestes a sair da cama . Voltar ao índice 4-10 2151-109-005 REV A www.stryker.com...
  • Seite 249 . A Stryker não é responsável pelo tipo e/ou utilização de cintas de retenção em qualquer um dos produtos da Stryker .
  • Seite 250: Sistema Da Roda Propulsora Zoom

    • Se observar que as baterias apresentam corrosão nos terminais, fissuras, expansão ou protrusão nos lados, ou que já não conseguem manter uma carga completa, devem ser imediatamente substituídas . • Ao substituir as baterias, utilize apenas baterias autorizadas pela Stryker . A utilização de baterias de outras marcas poderá originar um desempenho imprevisível do sistema .
  • Seite 251: Procedimentos De Preparação

    Fowler na sua totalidade, utilizando o comando “Para subir” da cabeceira . • Verifique o seguinte equipamento opcional para uma utilização adequada: tomada auxiliar de 120 V, lâmpada de luz nocturna, utilização da manivela de emergência, etc . Voltar ao índice www.stryker.com 2151-109-005 REV A 4-13...
  • Seite 252: Colchão De Terapia Xprt™ Opcional

    • Não prenda o cabo de alimentação a quaisquer peças em movimento da estrutura da cama . • O cabo de alimentação pode ficar entalado e causar um choque eléctrico no caso da utilização de um extensor de cama . Voltar ao índice 4-14 2151-109-005 REV A www.stryker.com...
  • Seite 253: Sistema Da Roda Propulsora Zoom

    (modelo 2152/2154/2156 apenas) deve, agora, ser engatada . Pressione totalmente para baixo no centro do pedal até a letra N a AZUL ficar visível na janela transparente . A roda propulsora Zoom deve, agora, ser desengatada . ® Português Voltar ao índice www.stryker.com 2151-109-005 REV A 4-15...
  • Seite 254: Modos De Funcionamento

    . O sistema entra, então, no Modo de Inicialização, que leva de volta para o Modo Normal . Nota O tempo necessário para carregar as duas baterias na íntegra é de cerca de 8 horas . Voltar ao índice 4-16 2151-109-005 REV A www.stryker.com...
  • Seite 255: Guia De Utilização Básica

    . • Para evitar lesões no doente e/ou utilizador, não tente mover a cama lateralmente com o modo da roda activado; a roda propulsora não gira . Voltar ao índice www.stryker.com 2151-109-005 REV A 4-17...
  • Seite 256: Guia De Utilização Da Maca

    . A Stryker não é responsável pelo tipo e/ou utilização de cintas de retenção em qualquer um dos produtos da Stryker .
  • Seite 257: Utilização Da Ligação Com A Equipa De Enfermagem

    A tomada eléctrica auxiliar proporciona à equipa de enfermagem uma fonte de alimentação conveniente apenas para acessórios autorizados pela Stryker; ficha de 120 V tipo B apenas . A tomada eléctrica está situada no lado esquerdo na extremidade dos pés da cama . A tomada eléctrica integra um disjuntor de 5 ampéres .
  • Seite 258: Posicionamento Das Grades Laterais

    Para levantar as grades laterais (Figura 1.0) • Puxe a grade lateral até ficar bloqueada na posição totalmente elevada; escuta-se um “clic” que indica que o bloqueio foi accionado (ver figura abaixo) . Figura 1.0 Voltar ao índice 4-20 2151-109-005 REV A www.stryker.com...
  • Seite 259: Posicionamento Da Cama

    Estas posições podem ser alcançadas premindo os respectivos botões no “Comando da equipa de enfermagem” (consultar página 4-22) . EXTENSOR DE CAMA OPCIONAL A cama pode ser expandida com um extensor de cama . Para obter informações adicionais, consulte página 4-56 . Português Voltar ao índice www.stryker.com 2151-109-005 REV A 4-21...
  • Seite 260: Guia De Utilização Da Grade Lateral

    Prima este botão para elevar a altura da cama para o nível Altura da cama para cima pretendido . Prima este botão para baixar a altura da cama para o nível Altura da cama para baixo pretendido . Voltar ao índice 4-22 2151-109-005 REV A www.stryker.com...
  • Seite 261: Descrições Do Posicionamento Da Cama

    • É necessário um espaço livre mínimo de 50,8 cm para permitir a execução das posições Trendelenburg e Anti-Trendelenburg . • Estas posições não podem ser executadas aquando da activação de um ou mais bloqueios . Voltar ao índice www.stryker.com 2151-109-005 REV A 4-23...
  • Seite 262: Painel De Comando De Travão/Movimento Da Grade Lateral, Comando Da Equipa De Enfermagem

    Prima este botão para iniciar um tratamento com a cama na Posição Cabeceira da cama 30 graus posição Cabeceira da cama 30 graus . Nota O travão pode também ser engatado manualmente . Consulte a página 4-17 para obter mais informações . Voltar ao índice 4-24 2151-109-005 REV A www.stryker.com...
  • Seite 263: Controlo Remoto Opcional

    Prima este botão para elevar a secção da plataforma articulada cima da cama para o ângulo pretendido . Plataforma articulada para Prima este botão para baixar a secção da plataforma articulada baixo da cama para o ângulo pretendido . Voltar ao índice www.stryker.com 2151-109-005 REV A 4-25...
  • Seite 264: Guia De Utilização Da Protecção Dos Pés

    Este botão acende-se quando o sistema é activado . Prima este botão para desactivar o sistema de travão . Este Activação/indicador de travão desligado botão acende-se quando o sistema é activado . Voltar ao índice 4-26 2151-109-005 REV A www.stryker.com...
  • Seite 265: Luzes Indicadoras De Mensagens Do Sistema

    No caso de nenhuma actividade no ecrã táctil depois de 4 minutos, o LCD desliga-se por completo (4 minutos = 2 minutos a 100% da intensidade + 2 minutos a 10% da intensidade) . Voltar ao índice www.stryker.com 2151-109-005 REV A 4-27...
  • Seite 266: Menu Principal: Informações Do Doente

    Information” (Informações do doente) para permitir que o operador introduza o número da unidade e da sala onde se encontra o doente . Português Copyright . Barbara Braden e Nancy Bergstrom, 1988 . Reimpresso com autorização . Figura 6.0 Voltar ao índice 4-28 2151-109-005 REV A www.stryker.com...
  • Seite 267: Informações Do Doente, Novo Doente

    IMC do doente, a apresentação da ID do doente e a apresentação da última pontuação na Escala Braden . Figura 6.2 Copyright . Barbara Braden e Nancy Bergstrom, 1988 . Reimpresso com autorização . Voltar ao índice www.stryker.com 2151-109-005 REV A 4-29...
  • Seite 268: Menu Principal: Comandos Da Cama

    Este indicador mostra a altura real da cama . Nota • Quando são pressionados, os botões ficam cinzentos . • A altura da cama é, na realidade, a distância entre o chão e o colchão de apoio da cama . Voltar ao índice 4-30 2151-109-005 REV A www.stryker.com...
  • Seite 269: Menu Principal: Balança

    Fornece informações sobre a data e hora da última operação da balança) de zero da balança . Scale Last Tare (Última tara Fornece informações sobre a data e hora da última operação da balança) de tara da balança . Voltar ao índice www.stryker.com 2151-109-005 REV A 4-31...
  • Seite 270: Botão Zero

    A função “Zero” repõe todos os valores para os diferentes pesos do doente . Perdem-se todos os dados armazenados no Figura 8.1f - Zero completo ecrã táctil referente ao peso do doente . Voltar ao índice 4-32 2151-109-005 REV A www.stryker.com...
  • Seite 271: Botão Tare (Tara)

    A função “Tare” (Tara) repõe todos os valores para os diferentes Figura 8.2d - Tara completa pesos do doente . Perdem-se todos os dados armazenados no ecrã táctil referente ao peso do doente . Voltar ao índice www.stryker.com 2151-109-005 REV A 4-33...
  • Seite 272: Botão Net Weight History (Histórico Do Peso Líquido)

    O sistema consegue manter um máximo de cinquenta (50) entradas na memória . Qualquer novo valor adicionado depois da 50 .ª entrada fará com que o primeiro valor detectado seja eliminado de acordo com a regra “Primeiro a entrar, primeiro a sair” . Voltar ao índice 4-34 2151-109-005 REV A www.stryker.com...
  • Seite 273: Menu Principal: Saída Da Cama

    • A cor azul numa das zonas indica que esta é a zona realmente activada . • Quando a cor da zona passa a vermelho, isso significa que existe um alarme de saída da cama . Nesse caso, é apresentada a janela Gestor de eventos . Voltar ao índice www.stryker.com 2151-109-005 REV A 4-35...
  • Seite 274 . Quando o volume ou toque é alterado a partir da sua Testar volume / toque definição actual, pode premir o botão de teste para ouvir a definição do novo toque ou o novo ajustamento do volume . Voltar ao índice 4-36 2151-109-005 REV A www.stryker.com...
  • Seite 275: Menu Principal: Superfície De Apoio

    . Se uma das grades laterais for desbloqueada durante a terapia de rotação (por exemplo, rotação e vibração executadas em simultâneo), ambas as terapias serão paradas de imediato . Voltar ao índice www.stryker.com 2151-109-005 REV A 4-37...
  • Seite 276: Menu Principal: Opções

    25 por cento da carga . Maintenance (Manutenção) Prima este botão para aceder ao menu Manutenção . Advanced Options Prima este botão para aceder ao menu Opções avançadas . (Opções avançadas) Voltar ao índice 4-38 2151-109-005 REV A www.stryker.com...
  • Seite 277: Botão Time Setup (Configuração Da Hora)

    Cancel Figura 11.2 Botão Language (Idioma) Quando o botão “Language” (Idioma) é premido no ecrã Opções, é apresentada a Figura 11 .3 . Pode, agora, seleccionar o idioma pretendido . Figura 11.3 Voltar ao índice www.stryker.com 2151-109-005 REV A 4-39...
  • Seite 278: Botão Advanced Options (Opções Avançadas)

    ® é activada . Se as opções Aviso e/ou Lembrete forem seleccionados, os alarmes serão enviados através do sinal da ligação com a equipa de enfermagem da cama . Figura 11.4 Português Voltar ao índice 4-40 2151-109-005 REV A www.stryker.com...
  • Seite 279: Português

    é premido no ecrã Cabeceira da cama, é apresentada a Figura 11 . 7 . Nota O prazo máximo para a posição do ângulo é de 30 dias . Figura 11.7 Voltar ao índice www.stryker.com 2151-109-005 REV A 4-41...
  • Seite 280 últimas 24 horas . Se for necessário reiniciar o Histórico da altura da cama, prima o botão “Reset” (Reiniciar) . Figura 11.9 Voltar ao índice 4-42 2151-109-005 REV A www.stryker.com...
  • Seite 281: Botão Nurse Control Backlight (Luz De Fundo Do Comando Da Equipa De Enfermagem)

    Nota Close Consulte o manual de manutenção para obter Figura 11.11 pormenores adicionais sobre Buttons Pressed (Botões premidos), Boards (Quadros) e Bed Informations (Informações sobre a cama) . Figura 11.12 Figura 11.13 Voltar ao índice www.stryker.com 2151-109-005 REV A 4-43...
  • Seite 282: Menu Principal: Lockouts (Bloqueios)

    • Se a cama estiver na posição Trendelenburg ou Anti-Trendelenburg, a cama é bloqueada nesta posição . • Quando um dos bloqueios é accionado, o indicador na protecção dos pés é ligado, avisando o utilizador de que algum movimento pode não ser activado . Voltar ao índice 4-44 2151-109-005 REV A www.stryker.com...
  • Seite 283: Menu Principal: Ibed

    . Se o ecrã táctil permanecer inactivado durante 60 segundos sem correcção das condições, o ecrã volta automaticamente para o ecrã “Smart Bed Position” (Posição da cama Figura 13.2 Smart) até as correcções serem feitas . Voltar ao índice www.stryker.com 2151-109-005 REV A 4-45...
  • Seite 284: Ibed, Protocol Reminder™ (Lembrete Do Protocolo)

    Figura 13 .5 . Nota O ecrã predefinido é o lembrete de uma hora mas o utilizador pode alterá-lo para “Tarefa repetida” premindo o botão “Repeated Task” (Tarefa repetida) . Figura 13.5 Voltar ao índice 4-46 2151-109-005 REV A www.stryker.com...
  • Seite 285 Figura 13 . 7 . Figura 13.7 Quando o botão “View Reminder’s Log” (Visualizar registro de lembretes) é premido no ecrã Lembrete, é apresentada a Figura 13 .8 . Figura 13.8 Voltar ao índice www.stryker.com 2151-109-005 REV A 4-47...
  • Seite 286: Ibed, Head Of Bed (Hob) History (Histórico Da Cabeceira Da Cama [Hob])

    últimas 24 horas . Se for necessário reiniciar o Histórico da altura da cama, prima o botão “Reset” (Reiniciar) . Figura 13.12 Voltar ao índice 4-48 2151-109-005 REV A www.stryker.com...
  • Seite 287: Ibed, Calculator (Calculadora)

    Quando o botão “Conversions” (Conversões) é premido no ecrã iBed, é apresentada a Figura 13 . 1 4 . Quando termina as conversões, o operador pode voltar para a Calculadora premindo o botão “Calcul” (Calculadora) . Figura 13.14 Voltar ao índice www.stryker.com 2151-109-005 REV A 4-49...
  • Seite 288: Ibed, Translations (Traduções)

    áudio, prima o botão “-” . Nota: Se a sua cama não possuir a opção iAudio, os botões de comando do áudio não são apresentados na Figura 13 . 1 5 . Voltar ao índice 4-50 2151-109-005 REV A www.stryker.com...
  • Seite 289: Ibed, Documentation (Documentação)

    . Pode visualizar informações registadas específicas premindo os botões Bed Exit (Saída da cama), Reminder (Lembrete), Scale (Balança), iBed Pos . (Posição da iBed) ou System (Sistema) . Português Figura 13.16 Voltar ao índice www.stryker.com 2151-109-005 REV A 4-51...
  • Seite 290: Ibed, The Braden Scale For Predicting Pressure Sore Risk

    . A apresentação desta pontuação no ecrã principal pode ser activada ou Figura 13.18 desactivada . Copyright . Barbara Braden e Nancy Bergstrom, 1988 . Reimpresso com autorização . Figura 13.19 Voltar ao índice 4-52 2151-109-005 REV A www.stryker.com...
  • Seite 291: Ibed, Sound Therapy™ (Terapia Sonora)

    Principal ao lado da data . Nota: O ícone “Nota de música” continua a ser Figura 13.21 apresentado em todos os ecrãs do menu se a terapia sonora estiver em curso . Ícone Nota de música Voltar ao índice www.stryker.com 2151-109-005 REV A 4-53...
  • Seite 292: Operações Da Roda Propulsora Zoom

    . Nota Figura 17 - Cabeceira da camad A velocidade do movimento da cama muda de acordo com a força usada para empurrar ou puxar . Voltar ao índice 4-54 2151-109-005 REV A www.stryker.com...
  • Seite 293: Acessórios Opcionais Da Cama

    Manga de tracção 20,3 cm x 12,7 mm FA64217-XXX Manga de tracção 20,3 cm x 19 mm FA64218-XXX Manga de tracção 16,5 cm x 19 mm FA64219-XXX Consulte a página 4-69 Suporte para cassete de raios X FA64205-XXX Voltar ao índice www.stryker.com 2151-109-005 REV A 4-55...
  • Seite 294: Extensor De Cama - Fa64234-Xxx

    • Não se sente no extensor de cama . Tal pode fazer com que a cama fique inclinada . Secção 2 Section 2 Connector A Conector A Secção 1 Section 1 Figura B Voltar ao índice 4-56 2151-109-005 REV A www.stryker.com...
  • Seite 295: Almofada Do Extensor De Cama Com Xprt™ - Dm64197-Xxx

    Almofada do extensor de cama com XPRT™ - DM64197-XXX 88,9 cm Português 14 cm 15,2 cm Voltar ao índice www.stryker.com 2151-109-005 REV A 4-57...
  • Seite 296: Suporte De Soros Permanente - Fa64221-Xxx / Fa64238-Xxx

    Nota: O parafuso está revestido com “Scotch Grip”. Este tipo de parafuso deve ser substituído por um parafuso novo idêntico no caso de ser retirado depois de uma primeira instalação. FA64221-XXX – Esquerda FA64238-XXX – Direita Voltar ao índice 4-58 2151-109-005 REV A www.stryker.com...
  • Seite 297 Levante o suporte para retirá-lo do receptáculo, dobre-o e guarde-o na base . PRECAUÇÃO O peso dos sacos de terapia IV não deverá ultrapassar os 10 kg . Português PORMENOR DO MECANISMO DE FIXAÇÃO DO SUPORTE DE SOROS Voltar ao índice www.stryker.com 2151-109-005 REV A 4-59...
  • Seite 298: Suporte De Soros Duplo Permanente Da Cabeceira Da Cama - Fa64202-Xxx

    . Nota: O parafuso está revestido com “Scotch Grip”. Este tipo de parafuso deve ser substituído por um parafuso novo idêntico no caso de ser retirado depois de uma primeira instalação. Voltar ao índice 4-60 2151-109-005 REV A www.stryker.com...
  • Seite 299 Levante o suporte para retirá-lo do receptáculo, dobre-o e guarde-o na base . PRECAUÇÃO O peso dos sacos de terapia IV não deverá ultrapassar os 10 kg . Português PORMENOR DO MECANISMO DE FIXAÇÃO DO SUPORTE DE SOROS Voltar ao índice www.stryker.com 2151-109-005 REV A 4-61...
  • Seite 300: Sistema De Gestão De Linha (Clip De Acessórios) - Fa64210-Xxx

    • Não utilize com tubagens de diâmetro superior a 19 mm de imediato . • Esterilize o acessório depois de cada utilização (consulte o procedimento no manual de manutenção) . • Certifique-se da estabilidade do clip ao instalá-lo . Voltar ao índice 4-62 2151-109-005 REV A www.stryker.com...
  • Seite 301: Tabuleiro Para Monitor - Fa64214-Xxx

    Figura C - base montada (trás) Figura D - base montada (frente) Figura B - extremidade dos pés Figura E - fixar base com Figura F - instalar tabuleiro botão de parafuso Voltar ao índice www.stryker.com 2151-109-005 REV A 4-63...
  • Seite 302 Figura L - fixar com braçadeiras ADVERTÊNCIA • A capacidade de carga máxima do tabuleiro é de 18 kg . • A capacidade de carga máxima do suporte tubular é de 68 kg . Voltar ao índice 4-64 2151-109-005 REV A www.stryker.com...
  • Seite 303: Suporte Vertical Da Botija De Oxigénio - Fa64187-Xxx

    Fixe a barra de apoio à extremidade da cabeceira da cama inserindo a correia de segurança através do orifício da barra de apoio localizado na extremidade da barra de apoio . Português Barra de apoio Orifício da barra de apoio Correia de segurança Voltar ao índice www.stryker.com 2151-109-005 REV A 4-65...
  • Seite 304: Controlo Remoto Com Comando De Movimento Apenas - Fa64228-Xxx

    Instale o controlo remoto amovível na grade lateral dos pés da direita . Insira o controlo remoto amovível neste espaço . Faça-o deslizar até encaixar . Nota: A ilustração pode ser diferente de acordo com o modelo da cama . Voltar ao índice 4-66 2151-109-005 REV A www.stryker.com...
  • Seite 305: Clip Do Controlo Remoto - Fa64186-Xxx

    O clip opcional do controlo remoto foi concebido para suportar o controlo remoto amovível (FA64228-XXX) . INSTALAÇÃO Ferramentas necessárias: Nenhuma Levante o dente do clip (A) e instale o clip na cama, numa localização segura e útil . Português Voltar ao índice www.stryker.com 2151-109-005 REV A 4-67...
  • Seite 306: Manga De Tracção - Fa64215-Xxx A Fa64219-Xxx

    Nota: O parafuso utilizado no passo 2 está revestido com “Scotch Grip”. Este tipo de parafuso deve ser substituído por um parafuso novo idêntico no caso de ser retirado depois de uma primeira instalação. Voltar ao índice 4-68 2151-109-005 REV A www.stryker.com...
  • Seite 307: Suporte Para Cassete De Raios X - Fa64205-Xxx

    .º 10 x 3/4 pol . (E) e dois espaçadores (D) . Nota: Certifique-se de que fecha o suporte para cassete de raios X para evitar danificá-lo quando se verifica movimento da secção da cabeceira Fowler ou do sistema da lista. Voltar ao índice www.stryker.com 2151-109-005 REV A 4-69...
  • Seite 308 Alguns produtos de limpeza são de natureza corrosiva e poderão danificar o produto se utilizados de forma incorrecta . Se os produtos acima descritos forem utilizados para limpar equipamento da Stryker envolvido nos cuidados com doentes, devem ser tomadas medidas para garantir que as camas são limpas com um pano humedecido em água limpa e totalmente secas após a limpeza .
  • Seite 309: Manutenção Preventiva

    _____ Certifique-se de que a calibração do ecrã táctil é exacta . _____ Certifique-se de que a calibração da cama é exacta . Número de série da cama: ________________________ ________________________ ________________________ ________________________ ________________________ ________________________ ________________________ ________________________ Preenchido por: ____________________________________________________ Data: _________________________ Voltar ao índice www.stryker.com 2151-109-005 REV A 4-71...
  • Seite 310 IEC 61000-4-8 em níveis característicos de ambientes comerciais e/ou hospitalares normais . Nota: U é a tensão da corrente eléctrica CA antes de aplicações do nível de teste . Voltar ao índice 4-72 2151-109-005 REV A www.stryker.com...
  • Seite 311 A 80 MHz e 800 MHz aplica-se a distância de separação para o intervalo de frequência mais elevado . Nota 2 Estas orientações poderão não se aplicar a todas as situações . A propagação electromagnética é afectada pela absorção e reflexão de estruturas, objectos e pessoas . Voltar ao índice www.stryker.com 2151-109-005 REV A 4-73...
  • Seite 312 Cama de cuidados intensivos InTouch™ . No intervalo de frequência entre 150 kHz e 80 MHz, as intensidades de campo são inferiores a 3 V/m . Voltar ao índice 4-74 2151-109-005 REV A www.stryker.com...
  • Seite 313 Classe A e instalações ligadas directamente à rede eléctrica pública IEC 61000-3-2 de baixa tensão que fornece energia a edifícios de habitação . Flutuações da tensão Emissões oscilantes Em conformidade IEC 61000-3-3 Voltar ao índice www.stryker.com 2151-109-005 REV A 4-75...
  • Seite 314: Garantia Limitada

    Caso seja solicitado pela Stryker, os produtos ou peças relativamente às quais seja apresentada uma reclamação da garantia devem ser devolvidos, com o custo do transporte previamente pago, à fábrica da Stryker . Esta garantia é anulada por qualquer utilização incorrecta, alteração ou reparação efectuadas por outras pessoas de tal modo que, segundo avaliação da Stryker, afectem adversamente e de forma significativa o produto .
  • Seite 317 27-2287/27-2228 (27-2287 shown) QDF27-1097 QDF27-1099 www.stryker.com 2151-109-005 REV A...
  • Seite 318 OL270236 QDF27-1429 QDF75-0600 2151-109-005 REV A www.stryker.com...
  • Seite 319 OL270232 QDF2060 www.stryker.com 2151-109-005 REV A...
  • Seite 320 OL270060-XXX QDF27-1562 2151-109-005 REV A www.stryker.com...
  • Seite 321 OL270318-XXX QDF27-1099 www.stryker.com 2151-109-005 REV A...
  • Seite 322 27-2547-XXX 27-2548 QDF9136 2151-109-005 REV A www.stryker.com...
  • Seite 323 OL270323-XXX QDF27-1562 www.stryker.com 2151-109-005 REV A...
  • Seite 324 OL270324-XXX QDF75-0010 QDF27-1097 QDF75-0290 2151-109-005 REV A www.stryker.com...
  • Seite 325 L27-056 27-2477 www.stryker.com 2151-109-005 REV A...
  • Seite 326 L27-056 27-2477 5-10 2151-109-005 REV A www.stryker.com...
  • Seite 327 27-2688 27-2477 www.stryker.com 2151-109-005 REV A 5-11...
  • Seite 328 L27-043 27-2477 5-12 2151-109-005 REV A www.stryker.com...
  • Seite 329 L27-046 27-2477 www.stryker.com 2151-109-005 REV A 5-13...
  • Seite 330 27-2688 QDF75-0440 QDF9188 5-14 2151-109-005 REV A www.stryker.com...
  • Seite 331 27-2546 QDF27-1430 QDF75-0240 www.stryker.com 2151-109-005 REV A 5-15...
  • Seite 332 L27-055 QDF27-1372 5-16 2151-109-005 REV A www.stryker.com...
  • Seite 335 Manufactured For UNITED STATES Stryker Medical 3800 E. Centre Ave., Portage, Michigan USA 49002 Stryker France S.A.S. ZAC – Avenue de Satolas Green 69881 MEYZIEU Cedex France 2012/08 2151-109-005 REV A www.stryker.com...

Inhaltsverzeichnis