Herunterladen Inhalt Inhalt Diese Seite drucken
Inhaltsverzeichnis

Werbung

Verfügbare Sprachen

Verfügbare Sprachen

Bedienungsanleitung
Elektro Quadrocopter
„Blackster R6 Pro FPV WiFi" RtF
Best.-Nr. 1576770
Operating Instructions
Electric Quadrocopter
„Blackster R6 Pro FPV WiFi" RtF
Item No. 1576770

Werbung

Kapitel

Inhaltsverzeichnis
loading

Inhaltszusammenfassung für Reely 1576770

  • Seite 1 Bedienungsanleitung Elektro Quadrocopter „Blackster R6 Pro FPV WiFi“ RtF Best.-Nr. 1576770 Operating Instructions Electric Quadrocopter „Blackster R6 Pro FPV WiFi“ RtF Item No. 1576770...
  • Seite 2: Inhaltsverzeichnis

    Inhaltsverzeichnis Seite Einführung ................................4 Symbol-Erklärung ..............................4 Bestimmungsgemäße Verwendung ........................5 Lieferumfang ................................5 Produktbeschreibung ............................6 Sicherheitshinweise .............................7 a) Allgemein ...............................7 b) Vor der Inbetriebnahme ..........................8 c) Während des Betriebs ...........................8 Batterie- und Akkuhinweise ..........................9 Bedienelemente des Senders ..........................11 Inbetriebnahme des Senders ..........................12 a) Einlegen der Batterien ..........................12 b) Einschalten des Senders ..........................13 10.
  • Seite 3 Seite 15. Inbetriebnahme der eingebauten HD-Kamera ....................33 a) Einlegen/Entfernen der Speicherkarte ......................33 b) Videos aufnehmen ............................34 c) Fotos aufnehmen ............................34 d) Videos und Fotos auslesen .........................35 16. Kalibrierung der Lagesensoren ..........................36 17. FPV-Betrieb ...............................37 a) Allgemeine Informationen ..........................37 b) App laden ..............................37 c) Aufrufen der App ............................38 d) Smartphone als Kameramonitor nutzen ......................40 18. Wartung und Pflege ............................42...
  • Seite 4: Einführung

    1. Einführung Sehr geehrte Kundin, sehr geehrter Kunde, wir bedanken uns für den Kauf dieses Produkts. Dieses Produkt entspricht den gesetzlichen, nationalen und europäischen Anforderungen. Um diesen Zustand zu erhalten und einen gefahrlosen Betrieb sicherzustellen, müssen Sie als Anwender diese Bedienungsanleitung beachten! Diese Bedienungsanleitung gehört zu diesem Produkt.
  • Seite 5: Bestimmungsgemäße Verwendung

    3. Bestimmungsgemäße Verwendung Der Elektro-Quadrocopter „Blackster R6 Pro FPV WiFi“ ist ein elektrisch angetriebenes hubschrauberähnliches Mo- dell, das mit Hilfe der beiliegenden Funk-Fernsteueranlage oder einem geeigneten Smartphone (nicht im Lieferum- fang) drahtlos gesteuert wird. Der Quadrocopter ist ausschließlich für den privaten Einsatz im Modellbaubereich mit den damit verbundenen Betriebszeiten ausgelegt.
  • Seite 6: Produktbeschreibung

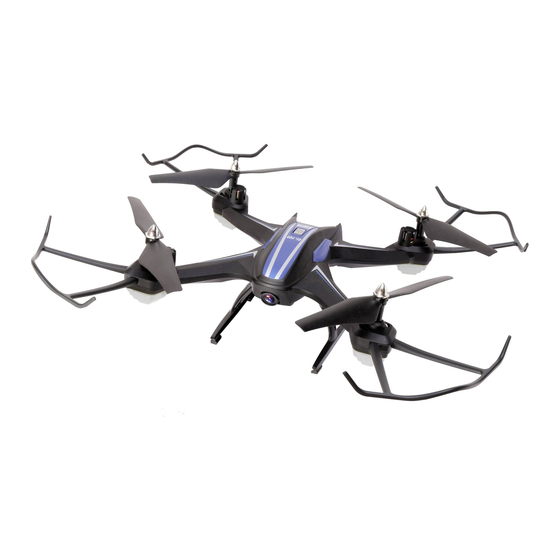
    5. Produktbeschreibung Der flugfertig aufgebaute Quadrocopter „Blackster R6 Pro FPV WiFi“ verfügt über 4 getrennt voneinander angesteuer- te Motoren, die jeweils einen eigenen Propeller antreiben. Durch das gleichzeitige Beschleunigen aller Propeller kann der Quadrocopter vom Boden abheben und bei entsprechenden Propellerdrehzahlen stabil in der Luft schweben. Für die Stabilisierung im Flug verfügt der Quadrocopter über eine aufwändige Elektronik mit Lage- und Beschleu- nigungs-Sensoren (6-Achsen-Gyro), die in der Lage ist, ungesteuerte Bewegungen des Modells zu erkennen und unverzüglich auszugleichen.
  • Seite 7: Sicherheitshinweise

    6. Sicherheitshinweise Bei Schäden, die durch Nichtbeachtung dieser Bedienungsanleitung verursacht werden, erlischt die Gewährleistung/Garantie. Für Folgeschäden übernehmen wir keine Haftung! Bei Sach- oder Personenschäden, die durch unsachgemäße Handhabung oder Nichtbeachten der Sicherheitshinweise verursacht werden, übernehmen wir keine Haftung! In solchen Fällen erlischt die Gewährleistung/Garantie.
  • Seite 8: B) Vor Der Inbetriebnahme

    • Sollten sich Fragen ergeben, die nicht mit Hilfe der Bedienungsanleitung abgeklärt werden können, so setzen Sie sich bitte mit uns (Kontaktinformationen siehe Kapitel 1) oder einem anderen Fachmann in Verbindung. • Die Bedienung und der Betrieb von ferngesteuerten Quadrocoptern muss erlernt werden! Wenn Sie noch nie ein solches Modell gesteuert haben, so beginnen Sie besonders vorsichtig und machen Sie sich erst mit den Reaktionen des Modells auf die Fernsteuerbefehle vertraut.
  • Seite 9: Batterie- Und Akkuhinweise

    • Sowohl die Motoren, die Motorregler und der Flugakku können sich beim Betrieb erhitzen. Machen Sie aus diesem Grund eine Pause von 5 - 10 Minuten, bevor Sie den Flugakku wieder laden. • Lassen Sie die Fernsteuerung (Sender) immer eingeschaltet, solange das Modell in Betrieb ist. Schalten Sie nach der Landung immer zuerst den Quadrocopter aus, bevor Sie die Fernsteuerung ausschalten.
  • Seite 10 • Mischen Sie niemals Batterien mit Akkus! Verwenden Sie für den Fernsteuersender ausschließlich Bat- terien. • Bei längerem Nichtgebrauch (z.B. bei Lagerung) entnehmen Sie die in der Fernsteuerung eingelegten Batterien, um Schäden durch auslaufende Batterien zu vermeiden. • Schalten Sie nach dem Flug den Quadrocopter aus und nehmen Sie den Flugakku aus dem Quad- rocopter.
  • Seite 11: Bedienelemente Des Senders

    8. Bedienelemente des Senders Ansicht Vorderseite: Bild 1 1 Senderantenne 8 Drucktaste für die automatische Landung 2 Drucktaste für die Flip-Funktion 9 Drucktaste für die Video-/Foto-Funktion 3 Steuerknüppel für die Nick- und Roll-Funktion 10 Ein-/Aus-Schalter 4 Trimmtaste für die Nick-Funktion 11 Trimmtaste (bei diesem Modell ohne Funktion) 5 Trimmtaste für die Roll-Funktion 12 Drucktaste für die WiFi-/Licht-Funktion...
  • Seite 12: Inbetriebnahme Des Senders

    9. Inbetriebnahme des Senders Im weiteren Verlauf der Anleitung beziehen sich die Ziffern im Text immer auf das nebenstehende Bild bzw. auf die Bilder innerhalb des Abschnittes. Querverweise zu anderen Bildern werden mit der entsprechenden Bildnummer angegeben. a) Einlegen der Batterien Zur Stromversorgung des Senders benötigen Sie 4 AA/Mignon-Batterien (z.B.
  • Seite 13: Einschalten Des Senders

    b) Einschalten des Senders Schieben Sie den Ein-/Aus-Schalter (siehe auch Bild 1, Pos. 10) von der unteren Schalterstellung (Aus) in die obere Stellung (Ein). Der Sender gibt zwei kurze Signaltöne ab und die LED- Anzeige (siehe auch Bild 1, Pos. 15) beginnt zu blinken. Schieben Sie danach den Steuerknüppel für die Pitch- und Gier-Funktion (siehe auch Bild 1, Pos.
  • Seite 14: Inbetriebnahme Des Quadrocopters

    10. Inbetriebnahme des Quadrocopters a) Laden des Flugakkus Der Flugakku wird mit Hilfe des beiliegenden USB-Ladekabels geladen. Aus fototechnischen Gründen ist das Ladekabel in Bild 4 im aufgewickelten Zustand zu sehen. Vor dem ersten Einsatz sollte der Kabelbinder geöffnet und das Ladekabel auf seine komplette Länge abgewickelt werden.
  • Seite 15: Montage Der Landebeine

    b) Montage der Landebeine Für die beiden Landebeine (1) befinden sich an der Unter- seite des Quadrocopters zwei Schächte (2). Stecken Sie die Landebeine entsprechend der nebenste- henden Abbildung in die Schächte und sichern Sie die La- debeine mit jeweils einer der beiliegenden Schrauben (3). Benutzen Sie dazu den mitgelieferten Schraubendreher. Bild 5 c) Montage der Propellerschutzbügel Zum Schutz vor den drehenden Propellern wird der Quad-...
  • Seite 16: Überprüfen Des Antriebs

    d) Überprüfen des Antriebs Bevor Sie den Quadrocopter in Betrieb nehmen, ist es er- forderlich den Antrieb zu überprüfen. Nur wenn alle vier Propeller leichtgängig und absolut rund laufen, kann das Modell mit geringstem Energieaufwand fliegen. Aus die- sem Grund sollten Sie die Funktion der Antriebspropeller vor jedem Flug kurz prüfen.
  • Seite 17: Einsetzen Des Flugakkus

    e) Einsetzen des Flugakkus Der Flugakku (1) wird entsprechend der nebenstehenden Abbildung von hinten in den Akkuschacht eingeschoben. Achten Sie dabei darauf, dass Sie den Akku nicht verkan- ten und schieben Sie den Akku soweit ein, dass die obere Verriegelung (2) und die untere Verriegelung (3) sauber einrasten.
  • Seite 18: Einschalten Des Quadrocopters

    f) Einschalten des Quadrocopters Damit der Empfänger im Quadrocopter auf die Sendersignale reagieren kann, müssen Empfänger und Sender die gleiche digitale Codierung (Bindung) aufweisen. Aus diesem Grund ist es wichtig, dass Sie den Einschaltvorgang entsprechend der nachfolgenden Beschreibung durchführen. Schieben Sie zuerst den geladenen Flugakku entsprechend der vorherigen Beschreibung in den Quadrocopter und stellen Sie den Quadrocopter auf einen ebenen Untergrund.
  • Seite 19 Achtung! Der Quadrocopter verfügt an der Unterseite noch über zwei weitere LED-Anzeigen. Wenn der Quadrocopter eingeschaltet ist, signalisiert eine rote LED (1) die Stromversorgung des Ka- meramoduls. Werden Daten auf die Speicherkarte geschrie- ben oder wenn eine Datenverbindung zu einem Smartphone besteht, blinkt unmittelbar neben der roten LED eine blaue LED.
  • Seite 20: Grundsätzliche Informationen Zum Steuern Von Quadrocoptern

    g) Grundsätzliche Informationen zum Steuern von Quadrocoptern Bevor Sie Ihr Modell in Betrieb nehmen, sollten Sie zuerst die Ihnen zur Verfügung stehenden Steuermöglichkeiten kennenlernen, um das Modell sicher kontrollieren zu können. Der symmetrische Aufbau des Modells macht die Zuordnung der Ausrichtung (vorne/hinten) sehr schwierig. Deshalb sind unter den beiden vorderen Propellern rote LEDs angebracht und unter den beiden hinteren Propellern gelbe LEDs.
  • Seite 21 Gier-Funktion Durch die zwei rechtsdrehenden und die zwei linksdrehenden Propeller sind die Drehmomente, die auf das Modell einwirken, ausgeglichen und der Quadrocopter schwebt stabil in der Luft. Wird der Steuerknüppel für die Gier-Funktion (siehe auch Bild 1, Pos. 13) nach links bewegt, erhöht die Elektronik im Modell die Drehzahl der von oben gesehen nach rechts (im Uhrzeigersinn) drehenden Propeller und verringert gleich- zeitig die Drehzahl der nach links (entgegen dem Uhrzeigersinn) drehenden Propeller.
  • Seite 22 Nick-Funktion Mit Hilfe der Nick-Funktion können Sie den Quadrocopter nach vorne und nach hinten bewegen (siehe Bild 14). Die Steuerung erfolgt ebenfalls mit dem rechten Steuerknüppel (siehe auch Bild 1, Pos. 3). Wird der Knüppel leicht nach vorne gedrückt, werden von der Elektronik im Quadrocopter die Propellerdrehzahlen so verändert, dass sich das Modell leicht nach vorne neigt und somit auch nach vorne fliegt.
  • Seite 23: Praktische Flugtipps Für Den Ersten Start

    h) Praktische Flugtipps für den ersten Start Auch wenn das Modell später auf engstem Raum geflogen werden kann, empfehlen wir Ihnen für die ersten Flugver- suche eine freie Fläche von ca. 5 x 5 m auszusuchen. Wenn Sie den ersten Flug im Freien durchführen, sollte absolute Windstille herrschen. Stellen Sie sich genau hinter Ihren Quadrocopter. Denn solange die beiden Propeller mit den gelben LEDs zu Ihnen zeigen und Sie somit Ihr Modell von hinten sehen, reagiert Ihr Modell auf die Steuerbefehle rechts, links, vorwärts und rückwärts genauso wie Sie am Sender steuern.
  • Seite 24: Starten Des Quadrocopters

    i) Starten des Quadrocopters Um den Quadrocopter zu starten, stehen Ihnen zwei Methoden zur Verfügung: Manuelle Methode: Schalten Sie den Fernsteuersender und den Quadrocopter wie zuvor beschrieben ein. Die LEDs am Quadrocopter müssen dauerhaft leuchten. Bewegen Sie den linken Steuerknüppel (13) in die linke untere Ecke und den rechten Steuerknüppel (3) in die rechte untere Ecke (siehe helle Pfeile in Bild 15) und hal- ten Sie die beiden Knüppel in dieser Position fest, bis die...
  • Seite 25: Trimmen Des Quadrocopters

    j) Trimmen des Quadrocopters Nehmen Sie zunächst den Sender und anschließend das Modell in Betrieb. Betätigen Sie die Starttaste, damit der Quadrocopter automatisch in eine ausreichende Flughöhe aufsteigt. Wenn Sie dann feststellen, dass der Quadrocopter auch ohne Steuerbefehl am Sender in eine bestimmte Richtung fliegen will, korrigieren Sie das Flugverhalten mit der Trimmung.
  • Seite 26 Nick-Trimmung: Will der Quadrocopter nach vorne driften, so nehmen Sie die Drehzahl zurück, bis der Quadrocopter wieder sicher auf den Landefüßen steht. Betätigen Sie die Trimmtaste für die Nick-Funktion (siehe auch Bild 1, Pos. 4) mehrmals nach unten. Schieben Sie dann den Pitch-Knüppel wieder vorsichtig nach vorne und überprüfen, ob die Korrektur ausreichend war.
  • Seite 27: Landen Des Quadrocopters

    k) Landen des Quadrocopters Um den Quadrocopter zu landen, stehen Ihnen zwei Methoden zur Verfügung: Methode 1: Wenn der Quadrocopter sich im Schwebeflug befindet, reduzieren Sie mit dem linken Steuerknüppel (siehe Bild 1, Pos. 13) vorsichtig die Flughöhe, bis der Quadrocopter wieder sicher auf den Landebeinen steht. Wenn der Quadrocopter gelandet ist, bewegen Sie den linken Steuerknüppel in die unterste Position und halten ihn in dieser Stellung fest, bis die Propeller stehen bleiben.
  • Seite 28: Dual Rate-Umschaltung

    11. Dual Rate-Umschaltung Die Fernsteuerung bietet Ihnen mit Hilfe der Dual Rate-Funktion die Möglichkeit, die Steuerempfindlichkeit des Qua- drocopters individuell einzustellen. Folgende drei Modi stehen Ihnen zur Verfügung: Beginner-Modus Nach dem Einschalten des Fernsteuersenders ist automatisch der Beginner-Modus aktiviert. In diesem Flugmodus reagiert der Quadrocopter eher träge auf die Steuerbefehle des Senders und lässt sich somit sehr feinfühlig steuern. Dieser Modus ist ideal für Einsteiger geeignet, die den Quadrocopter zum ersten Mal fliegen.
  • Seite 29: Flip-Funktion

    12. Flip-Funktion Der Quadrocopter ist in der Lage, bei Bedarf auch Überschläge (Flips) zu fliegen. Die ersten Flips sollten Sie bei Windstille im Außenbereich fliegen. Lassen Sie dazu den Quadrocopter auf ca. 2 - 3 m Sicherheitshöhe aufsteigen und anschließend auf der Stelle schweben. Um den Sender in den Flip-Modus zu schalten, betätigen Sie die Drucktaste (2) für den Flip-Modus. Zum Zeichen, dass der Sender in den Flip-Modus geschaltet hat, gibt er kontinuierlich kurze Signaltöne ab. Bewegen Sie nun den Steuerknüppel für die Nick- und Roll-Funktion (siehe Bild 1, Pos.
  • Seite 30: Fliegen Im Headless-Mode

    13. Fliegen im Headless-Mode Die Bewegungsrichtung des Quadrocopters ist immer davon abhängig, in welche Richtung das Modell zum Piloten ausgerichtet ist bzw. von welcher Seite der Pilot den Quadrocopter betrachtet. Man kann sich also sehr schnell ver- steuern, wenn man das Modell nicht von hinten, sondern von der Seite oder von vorne sieht. Aus diesem Grund wurde der Quadrocopter mit dem Headless-Mode ausgestattet.
  • Seite 31 Um den Headless-Mode einzuschalten, betätigen Sie kurz die Drucktaste (14) für die Headless-/Return-Funktion. Als Zeichen für den aktivierten Headless-Mode gibt der Sender kontinuierlich Signaltöne im 3er-Rhythmus ab und die roten und gelben LEDs im Quadrocopter blinken kon- tinuierlich. Der Quadrocopter fliegt nun im Headless-Mode. Um den Headless-Mode wieder abzuschalten, drücken Sie erneut die Drucktaste (14) für die Headless-/Return- Funktion.
  • Seite 32: Return-Funktion

    14. Return-Funktion Der Quadrocopter verfügt über eine Return-Funktion, bei der er selbsttätig rückwärts fliegt - also genau in die ent- gegengesetzte Richtung, die beim Einschalten als Vorwärtsrichtung (siehe weißer Pfeil in Bild 23, Abb. A) festgelegt wurde. Dabei spielt es ebenso wie beim Headless-Mode keine Rolle, in welche Richtung die Vorderseite des Quadro- copters momentan ausgerichtet ist (siehe Bild 23, Abb. B). Wichtig! Die Return-Funktion sollte nur dann aktiviert werden, wenn sich der Quadrocopter zu weit in der zuvor festgelegten Vorwärtsrichtung vom Piloten entfernt hat und der Pilot mit dem Quadrocopter eine Linie in...
  • Seite 33: Inbetriebnahme Der Eingebauten Hd-Kamera

    15. Inbetriebnahme der eingebauten HD-Kamera Der Quadrocopter verfügt über eine eingebaute HD-Kamera, die in Flugrichtung nach vorne ausgerichtet ist. Mit Hilfe dieser Kamera können Videos oder auch Fotos während des Fluges auf eine MicroSD-Speicherkarte (nicht im Lieferumfang, separat bestellbar) aufgezeichnet werden. Das Starten und Stoppen der Videoaufzeichnung bzw. die Aufnahme eines Fotos erfolgt mit Hilfe der Drucktaste für die Video-/Foto-Funktion (siehe Bild 1, Pos.
  • Seite 34: Videos Aufnehmen

    b) Videos aufnehmen Schalten Sie den Quadrocopter aus und legen Sie eine MicroSD-Karte (max. 128 GByte) mit ausreichend freiem Speicherplatz in den Quadrocopter ein. Nehmen Sie danach den Quadrocopter in Betrieb. Um ein Video aufzuzeichnen, drücken und halten Sie die Drucktaste (9) für die Video-/Foto-Funktion.
  • Seite 35: D) Videos Und Fotos Auslesen

    d) Videos und Fotos auslesen Schalten Sie nach der Landung den Quadrocopter aus und entnehmen Sie die Speicherkarte aus dem Kar tenschacht. Die Foto- und Videodaten können anschließend mit Hilfe eines geeigneten Speicherkartenlesers auf einem Notebook oder einem PC ausgelesen werden. Die Fotos und die Videos werden jeweils in separaten Ordnern auf der Speicher- karte gespeichert.
  • Seite 36: Kalibrierung Der Lagesensoren

    16. Kalibrierung der Lagesensoren Sollte der Quadrocopter nicht ruhig auf der Stelle schweben, sondern ständig in eine Richtung fliegen, kann das mit der Trimmung korrigiert werden. Muss dazu die Trimmung aber sehr weit verstellt werden, kann es erforderlich werden, die Lagesensoren im Modell neu zu kalibrieren. Gehen Sie dazu wie folgt vor: Schalten Sie zunächst den Sender und anschließend den Quadrocopter ein.
  • Seite 37: Fpv-Betrieb

    17. FPV-Betrieb a) Allgemeine Informationen Der Quadrocopter ist serienmäßig mit einer HD-Kamera ausgerüstet, die per Funk ein Video zu einem geeigneten Smart phone (nicht im Lieferumfang) live überträgt. Die Aufnahme von Bildern oder Videos, als auch die Steuerung der Kamera werden von einer auf dem Smartphone installierten App gesteuert. Bilder bzw. Videos können auf dem Smartphone gespei chert und von dort aus weiter bearbeitet werden.
  • Seite 38: Aufrufen Der App

    c) Aufrufen der App Nachdem Sie die App erfolgreich auf Ihrem Smartphone installiert haben, können Sie die App aufrufen. In Bild 28 sehen Sie die Startseite der App. Dort gibt es drei Auswahlmöglichkeiten: 1 Zahnrad-Symbol = Einstellungen vornehmen 2 Symbol „Play“ = App starten 3 Fragezeichen-Symbol = Hilfe aufrufen Bild 28 Zahnrad-Symbol...
  • Seite 39 Symbol „Play“ Wählen Sie „Play“ an, so öffnet sich die nachfolgende Bedienoberfläche: Bild 29 Die in Bild 29 gezeigten Symbole haben folgende Funktion: 1 Zurück zur Startanzeige der App 2 Virtuelle Steuerknüppel inkl. Trimmanzeige ein- oder ausblenden 3 Dual Rate-Umschaltung (Reaktion des Quadrocopters auf die Steuerung 30%, 60% und 100%) 4 Video mit der Quadrocopter-Kamera erstellen (die Speicherung erfolgt auf dem Smartphone) 5 Foto mit der Quadrocopter-Kamera erstellen (die Speicherung erfolgt auf dem Smartphone) 6 Gespeicherte Videos und Fotos am Smartphone betrachten...
  • Seite 40: Smartphone Als Kameramonitor Nutzen

    d) Smartphone als Kameramonitor nutzen Um das Smartphone als Kameramonitor zum FPV-Fliegen nutzen zu können, muss zunächst der Smartphone-Halter am Sender montiert werden. Schieben Sie dazu die Klemmvorrichtung des Smartpho- ne-Halters (1) bis zum Anschlag über die Senderantenne und drehen die Befestigungsschraube (2) gefühlvoll fest. Die obere Haltezange (3) kann von Hand weiter nach oben aus dem Halter gezogen werden, damit Smartphones mit unterschiedlichen Abmessungen eingesetzt werden.
  • Seite 41 e) Das Smartphone als Fernsteuerung nutzen Neben der FPV-Funktion kann das Smartphone auch direkt zur Steuerung des Quadrocopters genutzt werden. Achtung, wichtiger Hinweis! Die Steuerung des Quadrocopters per Smartphone ist deutlich träger, als die Steuerung über den mitgelie- ferten Fernsteuersender. Es bedarf deshalb etwas Übung, bis man sich an die Steuerung gewöhnt hat. Tipp aus der Praxis: Damit der Quadrocopter besser auf die Bewegungen der virtuellen Steuerknüppel reagiert, sollten Sie mit Hilfe der Schaltfläche für die Dual Rate-Umschaltung (siehe Bild 29, Pos. 3) die Steuerempfindlichkeit auf...
  • Seite 42: Wartung Und Pflege

    18. Wartung und Pflege a) Allgemein Äußerlich darf das Modell und die Fernsteuerung nur mit einem weichen, trockenen Tuch oder Pinsel gereinigt wer- den. Verwenden Sie auf keinen Fall aggressive Reinigungsmittel oder chemische Lösungen, da sonst die Oberflä- chen der Gehäuse beschädigt werden könnten. Die Propeller müssen sich leichtgängig bewegen lassen und Motorwellen dürfen weder krumm sein noch dürfen sie ein Spiel in der Lagerung aufweisen.
  • Seite 43: Beheben Von Störungen

    19. Beheben von Störungen Auch wenn das Modell und die Fernsteueranlage nach dem heutigen Stand der Technik gebaut wurden, kann es den- noch zu Fehlfunktionen oder Störungen kommen. Aus diesem Grund möchten wir Ihnen zeigen, wie Sie eventuelle Störungen beseitigen können. Problem Abhilfe Der Sender reagiert nicht.
  • Seite 44: Entsorgung

    20. Entsorgung a) Produkt Elektronische Geräte sind Wertstoffe und gehören nicht in den Hausmüll. Entsorgen Sie das Produkt am Ende seiner Lebensdauer gemäß den geltenden gesetzlichen Bestimmungen. Entnehmen Sie evtl. eingelegte Batterien/Akkus und entsorgen Sie diese getrennt vom Produkt. b) Batterien/Akkus Sie als Endverbraucher sind gesetzlich (Batterieverordnung) zur Rückgabe aller gebrauchten Batterien/Akkus ver- pflichtet; eine Entsorgung über den Hausmüll ist untersagt.
  • Seite 45: Technische Daten

    22. Technische Daten a) Sender Frequenzbereich ..........2,460 - 2,480 GHz Kanalzahl ............4 Sendeleistung ...........< 20dBm Senderreichweite ..........ca. 45 m Betriebsspannung ..........6 V/DC über 4 AA/Mignon-Batterien Abmessungen (B x H x T) ........140 x 185 x 70 mm (ohne Smartphonehalter) Spannweite Smartphonehalter ......max. 83 mm Gewicht inkl.
  • Seite 46 Table of contents Page Introduction ................................48 Explanation of symbols ............................48 Intended use ..............................49 Delivery content ..............................49 Product description ............................50 Safety instructions .............................51 a) General information .............................51 b) Before first use ............................52 c) During use ..............................52 Battery safety information ..........................53 Using the transmitter ............................55 Getting started with the transmitter ........................56 a) Inserting batteries ............................56 b) Switching on the transmitter ........................57...
  • Seite 47 Page 15. Start-up of the built-in HD camera ........................77 a) Inserting/removing the memory card ......................77 b) Recording videos ............................78 c) Taking photos ..............................78 d) Reading videos and photos .........................79 16. Calibration of position sensors ...........................80 17. FPV operation ..............................81 a) General information .............................81 b) Loading the app ............................81 c) Opening the app ............................82 d) Use your smartphone as a camera monitor ....................84...
  • Seite 48: Introduction

    1. Introduction Dear customer, Thank you for purchasing this product. This product complies with statutory national and European requirements. To maintain this condition and to ensure safe operation, the user should always follow the instructions in this manual. These operating instructions are part of this product. They contain important information on setting up and using the product.
  • Seite 49: Intended Use

    3. Intended use The "Blackster R6 Pro FPV WiFi" electro quadrocopter is an electrically powered helicopter-like model, which is wirelessly controlled using the wireless remote control system included or a suitable smartphone (not included). The quadrocopter is solely designed for private use in the field of model construction with the associated operating times. A built-in camera can record videos or photos onto a microSD memory card (not included); it is also possible to trans- mit videos to a suitable smartphone via WiFi.
  • Seite 50: Product Description

    5. Product description The "Blackster R6 Pro FPV WiFi" ready-to-fly quadrocopter has 4 separately controlled motors, which each drive their own specific propeller. Using the simultaneous acceleration of all propellers, the quadrocopter can lift off from the ground and, at appropriate propeller speeds, hover steadily in the air. For stabilisation in flight, the quadrocopter has a sophisticated system of electronics with position and acceleration sensors (6 axis gyro) that is designed to detect uncontrolled movements of the model and immediately compensate for them. The quadrocopter is equipped with an air pressure sensor so that it can stabilise its flight altitude itself. For flight in a given direction, the electronics in the model detect the control impulses of the transmitter and alter the speeds of the individual motors accordingly. The quadrocopter thus tilts in the desired direction and the lift thereby also acts as thrust. The quadrocopter flies in the respective direction.
  • Seite 51: Safety Instructions

    6. Safety instructions Damage caused due to failure to observe these instructions will void the warranty. We shall not be liable for any consequential damages. We shall not be liable for damage to property or personal injury caused by incorrect handling or failure to observe the safety information! Such cases will void the warranty/guarantee.
  • Seite 52: Before First Use

    b) Before first use • Select an appropriate site for the operation of your model. • To operate the model, first switch on the transmitter and then the quadrocopter. This is the only way to tune the transmitter and receiver, so that your model will react reliably to the control commands of your transmitter. • Make sure that no other models are being operated on the same 2.4 GHz band (transmitter frequency) within the range of the remote control.
  • Seite 53: Battery Safety Information

    • In the event of a crash you must immediately switch off the rotor motors. Rotating rotors may be dam- aged if they come into contact with obstructions or in the event of impacts. Before flying again, they must be checked for possible cracks or breakages! • To avoid damaging the model in a crash caused by undervoltage or by a deep discharge of the battery, we recommend observing the undervoltage light signals at all times when flying the model.
  • Seite 54 • Never damage the external casing of the flight battery, do not tear the foil cover, do not prick into the rechargeable battery with sharp objects. This may cause a fire or explosion! • Never recharge the flight battery unattended. • When charging the battery, leave it on a fire-proof surface (e.g. a plate). Keep the battery away from flammable objects. • As the charger and the LiPo rechargeable flight battery heat up during the charging procedure, it is necessary to ensure sufficient ventilation. Never cover the charger and the rechargeable flight battery! • Disconnect the flight battery from the charging cable when the battery is fully charged. • Do not expose the charger or battery to extremely high/low temperatures or direct sunlight.
  • Seite 55: Using The Transmitter

    8. Using the transmitter Front view: Figure 1 1 Sender antenna 8 Push button for automatic landing 2 Push button for the flip function 9 Push button for the video/photo function 3 Joystick for the bob and roll function 10 On/Off switch 4 Trim button for the bob function 11 Trim button (no function on this model) 5 Trim button for the roll function 12 Push button for the WiFi/light function...
  • Seite 56: Getting Started With The Transmitter

    9. Getting started with the transmitter The numbers used in these instructions refer to the illustration alongside the text or the illustrations within the respective section. Cross references to other figures are indicated with the corresponding number. a) Inserting batteries For the power supply to the transmitter, you will need 4 AA/Mignon batteries (e.g. Conrad item no. 652504, 4 pack, order 1x).
  • Seite 57: Switching On The Transmitter

    b) Switching on the transmitter Slide the on/off switch (see Figure 1, no. 10) from the bot- tom position (off) to the top position (on). The transmitter emits two short beeps and the LED display (see Figure 1, no. 15) starts to flash. Then push the joystick for the pitch and yaw function (see Figure 1, no.
  • Seite 58: Getting Started With The Quadrocopter

    10. Getting started with the quadrocopter a) Flight battery charging The flight battery is charged using the supplied USB charging cable. For illustrative purposes, the charging cable is shown wound-up in Figure 4. Before the first use, the cable tie should be opened and the cable unwound to its full length. Charging: Connect the reverse polarity-protected microUSB plug (1) on the charging cable to the charging socket on the flight battery (2). As soon as the USB plug on the charging cable (3) is con- nected to a USB port on a computer/notebook or to a USB charger plug, charging begins automatically.
  • Seite 59: B) Attaching The Landing Legs

    b) Attaching the landing legs There are two bays (2) on the underside of the quadrocop- ter for the two landing legs (1). Plug the landing legs into the bays as shown in the adja- cent photograph and secure each landing leg with one of the included screws (3).
  • Seite 60: D) Checking The Drive

    d) Checking the drive Before starting the quadrocopter, you have to test the drive. Only when all four propellers run smoothly and in a perfect circle can the model be flown with the minimum energy consumption. For this reason, you should check the function of the drive propellers before each flight. To do this, turn each individual propeller carefully with your finger and check the concentricity and the ease of move- ment.
  • Seite 61: E) Inserting The Flight Battery

    e) Inserting the flight battery The flight battery (1) is slid into the battery bay from behind as shown in the adjacent photograph. Make sure that you do not tilt the battery and slide the bat- tery in far enough for the upper latch (2) and the lower latch (3) to cleanly snap into place. When correctly installed, there is no gap between the bat- tery and the quadrocopter's housing.
  • Seite 62: F) Switching The Quadrocopter On

    f) Switching the quadrocopter on So that the receiver in the quadrocopter can react to the signal transmitted, the receiver and the transmitter must have the same digital coding (binding). For this reason it is important that you switch on the quadrocopter as described below.
  • Seite 63 Attention! The quadrocopter has two additional LED indi- cators on the underside. If the quadrocopter is switched on, a red LED (1) indicates that there is a power supply to the camera module. If data are written to the memory card or if there is a data connection to a smartphone, a blue LED flashes right next to the red LED.
  • Seite 64: G) Basic Information On Steering Quadrocopters

    g) Basic information on steering quadrocopters Before you fly your model, you should first familiarize yourself with the control possibilities open to you and thereby be able to fly safely. The symmetrical design of the model makes the allocation of the direction (front/back) very difficult. Therefore, there are red LEDs under the two front propellers and yellow LEDs under the two rear propellers. The quadrocopter is controlled via the two joysticks on the remote control transmitter. The following functions are available: Pitch function With the pitch function you can control the flying height of the helicopter (see Figure 11). Steering is done with the left...
  • Seite 65 Yaw Function The torques that act on the model are balanced by the two right-turning and the two left-turning propellers, and the quadrocopter hovers steadily in the air. If you move the joystick for the yaw function (see also Figure 1, no. 13) to the left, the electronics in the model increase the speed of the propellers to the right (clockwise, as seen from above) and at the same time reduce the speed of the propellers turning to the left (anti-clockwise).
  • Seite 66 Bob function The bob function allows you to move your model helicopter forward and backward (see Figure 14). Steering likewise occurs with the right joystick (see also Figure 1, no. 3). If you push the stick forward slightly, the electronics in the quadrocopter change the propeller speeds so that the model tilts slightly to the front and thus also flies forward.
  • Seite 67: Practical Flight Tips For The First Start

    h) Practical flight tips for the first start Even though the model can fly in the narrowest spaces, for the first test flights, we recommend using a free space of about 5 x 5 m. When flying the quadrocopter outdoors for the first time, there should be absolutely no wind. Place yourself directly behind your quadrocopter. As long as the two propellers with the yellow LEDs pointing towards you and you are therefore seeing your model from behind, the model will react to the control commands "right, left, forward and backward"...
  • Seite 68: I) Starting The Quadrocopter

    i) Starting the quadrocopter There are two ways to start the quadrocopter: Manual method: Switch the remote control transmitter and the quadrocopter on as described above. The LEDs on the quadrocopter must remain lit. Move the left joystick (13) to the lower left corner and the right joystick (3) in the lower right corner (see light arrows in Figure 15) and hold the two levers in this position until the propellers start up and rotate at low speed.
  • Seite 69: Trimming The Quadrocopter

    j) Trimming the quadrocopter Start up the transmitter first, then the model. Press the start button so that the quadrocopter climbs to a sufficient height. If you then realize that the quadrocopter wants to fly in a particular direction without any command from the transmit- ter, correct the flight behaviour by trimming. Every time a trim button is pushed, the trim is adjusted by one step and the adjustment confirmed by a short beep. When the button is pressed down for more time, the transmitter emits a quick sequence of beeps, and thus indicates the step-by-step adjustment of the trim. Once the trim's end position is reached, no more beeps are emitted by the transmitter. The trim's centre position is indicated acoustically by a longer beep.
  • Seite 70 Nod trimming: If the quadrocopter drifts forward, reduce the speed until the quadrocopter once more stands safely on its landing feet. Now press the trim button for the nod function (see Figure 1, no. 4) to the left several times. Then carefully push the pitch joystick forward again and check whether the adjustment was sufficient. Repeat the procedure until the model does not show any tendency to drift forward.
  • Seite 71: K) Landing The Quadrocopter

    k) Landing the quadrocopter There are two ways to land the quadrocopter: Method 1: If the quadrocopter is in hover flight mode, carefully lower the flight altitude with the left joystick (see Figure 1 no. 13), until the quadrocopter is safely on its landing legs again. Once the quadrocopter has landed, move the left joystick to the lowest position and hold it in this position until the propellers have come to a standstill.
  • Seite 72: Dual Rate Switching

    11. Dual rate switching Through the dual rate function, the remote control offers you the ability to individually adjust the quadrocopter's sensitivity control. The following three modes are available: Beginner mode Beginner mode is automatically activated when the remote control transmitter is switched on. In this flight mode, the quadrocopter reacts fairly slowly to the steering commands from the transmitter and can therefore be controlled very delicately. This mode is ideal for beginners flying the quadrocopter for the first time.
  • Seite 73: Flip Capabilities

    12. Flip capabilities The quadrocopter is also designed to fly roll-overs (flips) if desired. You should fly the first flips outside when there is absolutely no wind. To do this, let the quadrocopter climb to a safe altitude of approx. 2 - 3 m and then hover in position. To switch the transmitter to flip mode, press the push but- ton (2) for flip mode. To indicate that the transmitter has switched to flip mode, it emits short beeps continuously. Now move the joystick for the bob and roll function (see Figure 1, no.
  • Seite 74: Flying In Headless Mode

    13. Flying in headless mode The quadrocopter's direction of movement is always dependent on the direction in which the model is oriented with respect to the pilot or the side from which the pilot is looking at the quadrocopter. Therefore, you will quickly find it very difficult if you are not looking at the model from behind, and are instead looking at it from the side or the front. For this reason, the quadrocopter has been equipped with headless mode. However, to be able to use headless mode effectively, the quadrocopter must be oriented with the two front propellers (the ones with the red LEDs) pointing in the desired forwards direction before the pitch joystick is moved backwards and forwards (see white arrow in Figure 21, Diagram A).
  • Seite 75 To switch headless mode on, briefly press the push button (14) for the headless/return function. To show that headless mode has been activated, the trans- mitter continuously beeps in a 3-beat rhythm and the red and yellow LEDs in the quadrocopter flash continuously. The quadrocopter is now flying in headless mode. To switch headless mode off, briefly press the push but- ton (14) for the headless/return home function again. The transmitter's beeps stop and the LEDs on the quadrocop- ter remain permanently on.
  • Seite 76: Return Home Function

    14. Return home function The quadrocopter has a return home function in which it automatically flies backwards - i.e. in exactly the opposite direction to the one established as forwards when it was turned on (see white arrow in Figure 23, Diagram A). As with the headless mode, the direction the front of the quadrocopter is facing at the time is not a factor (see Figure 23, Diagram B).
  • Seite 77: Start-Up Of The Built-In Hd Camera

    15. Start-up of the built-in HD camera The quadrocopter has a built-in HD camera, which is aligned forwards in the direction of flight. Using this camera, you can save videos and photos on a microSD memory card (not included; can be ordered separately) during flight. To start and stop video recording or the taking of photographs, press the push button for the video/photo function (see Figure 1, no. 9). a) Inserting/removing the memory card First switch off the quadrocopter. Turn the quadrocopter onto its back and push the memory card (1) into the card slot on the underside of the quadro- copter (2), as seen in the adjacent diagram.
  • Seite 78: Recording Videos

    b) Recording videos Switch off the quadrocopter and insert a microSD card (max. 128 GB) with enough free space into the quadrocopter. Then, start up the quadrocopter. To record a video, press and hold the push button (9) for the video/photo function. The transmitter emits two short beeps and the two yellow LEDs on the rear propeller flash slowly.
  • Seite 79: D) Reading Videos And Photos

    d) Reading videos and photos After landing, switch the quadrocopter off and remove the memory card from the card slot. The photo and video data can then be read using a suitable memory card reader on a notebook or a PC. Photos and videos are stored in separate folders on the memory card.
  • Seite 80: Calibration Of Position Sensors

    16. Calibration of position sensors If the quadrocopter does not hover steadily in one spot but is always flying in one direction, the trim may need cor- recting. However, if the trim has to be adjusted significantly, it may be necessary to re-calibrate the position sensors in the model. Proceed as follows: First, switch on the transmitter and then the quadrocopter. The trims must all be set to the middle position. Then place the quadrocopter on a flat, horizontal surface. Move the two joysticks on the transmitter (see Figure 26, no.
  • Seite 81: Fpv Operation

    17. FPV operation a) General information The quadrocopter is equipped as standard with a HD camera, which can transmit live video to a suitable smartphone (not included in delivery). The recording of images or videos, as well as the control of the camera, is controlled by an app installed on your smartphone.
  • Seite 82: C) Opening The App

    c) Opening the app Once the app has been successfully installed on your smartphone, you can open the app. In Figure 28 you can see the app's home page. There are three choices there: 1 Cog icon = Adjust settings 2 "Play"...
  • Seite 83 "Play" icon Select "play" to open the following user interface: Figure 29 The icons shown in Figure 29 have the following function: 1 Return to the app’s start page 2 Show/hide the virtual joystick including trim display 3 Dual rate switching (reaction of the quadrocopter to commands 30 %, 60 % and 100 %) 4 Create video with the quadrocopter camera (the video is stored on the smartphone) 5 Create photo with the quadrocopter camera (the video is stored on the smartphone) 6 View saved videos and photos on your smartphone...
  • Seite 84: D) Use Your Smartphone As A Camera Monitor

    d) Use your smartphone as a camera monitor To use the smartphone as the camera monitor for FPV flight, the smartphone holder first has to be attached to the transmitter. To do this, slide the clamp mechanism on the smartphone holder (1) over the transmitter antenna until it clicks into place and turn the fastening screw (2) gently. The upper holding claw (3) can be moved upwards away from the holder so that smartphones of different sizes can be used.
  • Seite 85 e) Using the smartphone as a remote control In addition to FPV function, the smartphone can also be used to directly control the quadrocopter. Caution, safety hazard! The quadrocopter's steering is significantly more sluggish when it is controlled by smartphone compared to when the supplied remote control transmitter is used. Therefore it requires some practice until you get used to the steering.
  • Seite 86: Maintenance And Cleaning

    18. Maintenance and cleaning a) General information Clean the exterior of the model and the remote control with a soft, dry cloth or brush only. Never use abrasive cleaning agents or chemical solutions, as these may damage the surface of the housing. The propellers must be moved smoothly and motor shafts should not be bent or have any play in the bearing.
  • Seite 87: Troubleshooting

    19. Troubleshooting Even though the model and the remote control system were built to the latest available technology, there can still be malfunctions or faults. This is why we would like to show you how to correct possible faults. Problem Remedy Transmitter doesn’t respond.
  • Seite 88: Disposal

    20. Disposal a) Product Electronic devices are recyclable waste and must not be placed in household waste. Always dispose of the product according to the relevant statutory regulations. Remove any inserted batteries and dispose of them separately from the product. b) Batteries As the end user, you are required by law to return all used batteries (Battery Directive).
  • Seite 89: Technical Data

    22. Technical data a) Remote control Frequency range ..........2.460 – 2.480 GHz Number of channels .........4 Transmission power..........< 20 dBm Transmission range ..........approx. 45 m Operating voltage ..........6 V/DC via 4 AA/Mignon batteries Dimensions (W x H x D) ........140 x 185 x 70 mm (without smartphone holder) Smartphone holder span ........max.
  • Seite 92 Dies ist eine Publikation der Conrad Electronic SE, Klaus-Conrad-Str. 1, D-92240 Hirschau (www.conrad.com). Alle Rechte einschließlich Übersetzung vorbehalten. Reproduktionen jeder Art, z. B. Fotokopie, Mikroverfilmung, oder die Erfassung in elektronischen Datenverarbeitungsanlagen, bedürfen der schriftlichen Genehmigung des Herausgebers. Nachdruck, auch auszugsweise, verboten. Die Publikation entspricht dem technischen Stand bei Drucklegung. Copyright 2017 by Conrad Electronic SE.

Diese Anleitung auch für:

Blackster r6 pro fpv wifi

Inhaltsverzeichnis