Herunterladen Diese Seite drucken

Werbung

Verfügbare Sprachen
  • DE

Verfügbare Sprachen

  • DEUTSCH, seite 36
DE
Kurzanleitung
EN
Quick Guide
FR
Guide abrégé
NL
Korte handleiding
IT
Guida breve
DK
Kort vejledning
SE
Snabbguide
BS21.990601
25.01.2024
Digital SmartHandle AX
Downward installation

Werbung

loading

Inhaltszusammenfassung für Simons Voss Technologies Digital SmartHandle AX Downward installation

  • Seite 1 Kurzanleitung Digital SmartHandle AX Quick Guide Downward installation Guide abrégé Korte handleiding Guida breve Kort vejledning Snabbguide BS21.990601 25.01.2024...
  • Seite 2 Digital SmartHandle AX Downward installation Abbildungen/Images ..........deutsch ................ english ................français ................ nederlands ..............italiano ................. dansk ................svensk................2 / 88...
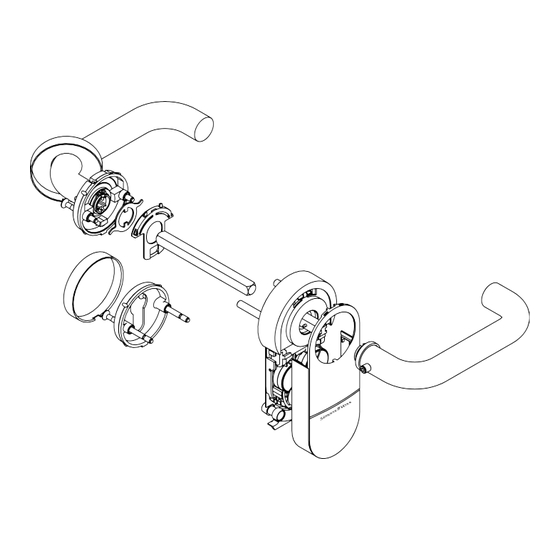
  • Seite 3 5. Design Digital SmartHandle AX Downward installation 5. Design Inside Outside Abbildungen/Images 3 / 88...
  • Seite 4 6. Prepare door (drilling template) Digital SmartHandle AX Downward installation 6. Prepare door (drilling template) Ø8.5 4 / 88 Abbildungen/Images...
  • Seite 5 6. Prepare door (drilling template) Digital SmartHandle AX Downward installation Abbildungen/Images 5 / 88...
  • Seite 6 6. Prepare door (drilling template) Digital SmartHandle AX Downward installation 6 / 88 Abbildungen/Images...
  • Seite 7 6. Prepare door (drilling template) Digital SmartHandle AX Downward installation Abbildungen/Images 7 / 88...
  • Seite 8 6. Prepare door (drilling template) Digital SmartHandle AX Downward installation 8 / 88 Abbildungen/Images...
  • Seite 9 6. Prepare door (drilling template) Digital SmartHandle AX Downward installation Ø8.5 Abbildungen/Images 9 / 88...
  • Seite 10 7. For door thickness X: prepare threaded rods and spindle Digital SmartHandle AX Downward installation 7. For door thickness X: prepare threaded rods and spindle 2× L1: door thickness - 8 mm (±3 mm) 2× L2: door thickness + 8 mm (±3 mm) 10 / 88...
  • Seite 11 8. Programming the fitting Digital SmartHandle AX Downward installation Door thickness + 37 mm (±4 mm) 8. Programming the fitting *System3060 Abbildungen/Images 11 / 88...
  • Seite 12 8. Programming the fitting Digital SmartHandle AX Downward installation *SI-WO *SI-VCN 12 / 88 Abbildungen/Images...
  • Seite 13 9. Installing the fitting Digital SmartHandle AX Downward installation 9. Installing the fitting TX15 *S/M/L *S/M/L 2× L1: door thickness - 8 mm (±3 mm) *S/M/L 2× L2: door thickness + 8 mm (±3 mm) Abbildungen/Images 13 / 88...
  • Seite 14 9. Installing the fitting Digital SmartHandle AX Downward installation *S/M/L *7 mm 14 / 88 Abbildungen/Images...
  • Seite 15 9. Installing the fitting Digital SmartHandle AX Downward installation *CW (clockwise) *CCW (counter-clockwise) Abbildungen/Images 15 / 88...
  • Seite 16 9. Installing the fitting Digital SmartHandle AX Downward installation *CW (clockwise) *CCW (counter-clockwise) 16 / 88 Abbildungen/Images...
  • Seite 17 9. Installing the fitting Digital SmartHandle AX Downward installation Abbildungen/Images 17 / 88...
  • Seite 18 9. Installing the fitting Digital SmartHandle AX Downward installation 18 / 88 Abbildungen/Images...
  • Seite 19 9. Installing the fitting Digital SmartHandle AX Downward installation *7 mm Abbildungen/Images 19 / 88...
  • Seite 20 9. Installing the fitting Digital SmartHandle AX Downward installation *8,5 mm/10 mm *8,5 mm/10 mm 20 / 88 Abbildungen/Images...
  • Seite 21 9. Installing the fitting Digital SmartHandle AX Downward installation 1.1 Nm ±10% Abbildungen/Images 21 / 88...
  • Seite 22 9. Installing the fitting Digital SmartHandle AX Downward installation 1.1 Nm ±10% 22 / 88 Abbildungen/Images...
  • Seite 23 9. Installing the fitting Digital SmartHandle AX Downward installation 1.1 Nm ±10% Abbildungen/Images 23 / 88...
  • Seite 24 9. Installing the fitting Digital SmartHandle AX Downward installation TX15 5.0 Nm ±20% 24 / 88 Abbildungen/Images...
  • Seite 25 9. Installing the fitting Digital SmartHandle AX Downward installation TX15 5.0 Nm ±20% Abbildungen/Images 25 / 88...
  • Seite 26 10. Removing the fitting Digital SmartHandle AX Downward installation 10. Removing the fitting SW1.5 SW1.5 26 / 88 Abbildungen/Images...
  • Seite 27 10. Removing the fitting Digital SmartHandle AX Downward installation SW1.5 Abbildungen/Images 27 / 88...
  • Seite 28 11. Replacing the batteries Digital SmartHandle AX Downward installation 11. Replacing the batteries 28 / 88 Abbildungen/Images...
  • Seite 29 11. Replacing the batteries Digital SmartHandle AX Downward installation Abbildungen/Images 29 / 88...
  • Seite 30 11. Replacing the batteries Digital SmartHandle AX Downward installation 30 / 88 Abbildungen/Images...
  • Seite 31 11. Replacing the batteries Digital SmartHandle AX Downward installation Abbildungen/Images 31 / 88...
  • Seite 32 11. Replacing the batteries Digital SmartHandle AX Downward installation 32 / 88 Abbildungen/Images...
  • Seite 33 11. Replacing the batteries Digital SmartHandle AX Downward installation Abbildungen/Images 33 / 88...
  • Seite 34 11. Replacing the batteries Digital SmartHandle AX Downward installation 34 / 88 Abbildungen/Images...
  • Seite 35 14. Help and other information Digital SmartHandle AX Downward installation 14. Help and other information Abbildungen/Images 35 / 88...
  • Seite 36 Inhaltsverzeichnis Digital SmartHandle AX Downward installation Inhaltsverzeichnis Bestimmungsgemäßer Gebrauch ...... 37 Allgemeine Sicherheitshinweise...... 37 Produktspezifische Sicherheitshinweise...  38 Lieferumfang ..............  39 Aufbau ................ 39 Tür vorbereiten (Bohrschablone)...... 39 Für Türdicke X: Gewindestangen und Vierkant vorbereiten .............. 40 Beschlag programmieren........ 40 Beschlag montieren .......... 40 10.
  • Seite 37 1. Bestimmungsgemäßer Gebrauch Digital SmartHandle AX Downward installation 1. Bestimmungsgemäßer Ge- Batterie nicht einnehmen. Verbrennungsgefahr durch gefährliche Stoffe brauch Dieses Produkt enthält Lithium-Knopfzellen. Wenn die Bei den Produkten der SmartHandle AX-Serie handelt Knopfzelle verschluckt wird, können schwere innere es sich um elektronische Türbeschläge. Mithilfe eines Verbrennungen innerhalb von gerade einmal zwei Stunden auftreten und zum Tode führen.
  • Seite 38 3. Produktspezifische Sicherheitshinweise Digital SmartHandle AX Downward installation Beschädigung durch aggressive Reinigungsmittel Funktionsstörungen durch schlechten Kontakt oder unterschiedliche Entladung Die Oberfläche dieses Produkts kann durch ungeeigne- te Reinigungsmittel beschädigt werden. Zu kleine/verunreinigte Kontaktflächen oder unter- schiedliche entladene Batterien können zu Funktions- Verwenden Sie ausschließlich Reinigungsmittel, die...
  • Seite 39 4. Lieferumfang Digital SmartHandle AX Downward installation Beschädigung durch ungeeignetes Werkzeug Verschluss der Rosettenöffnung Wenn Sie versuchen, das Gehäuse mit ungeeignetem Eine ggfs. vorhandene Rosettenöffnung kann für Mani- Werkzeug zu öffnen, dann kann das Gehäuse beschä- pulationen genutzt werden. digt werden.
  • Seite 40 7. Für Türdicke X: Gewindestangen und Vierkant vorbereiten Digital SmartHandle AX Downward installation 8. Markieren Sie die zu bohrenden Punkte auf der Tür. ü TX15-Schraubendreher vorhanden. ü Messschieber vorhanden. 9. Entfernen Sie die Bohrschablone. ü Kneifzange vorhanden. 1. Für S, M und L: Messen Sie die Türdicke.
  • Seite 41 10. Beschlag demontieren Digital SmartHandle AX Downward installation 12. Für 8,5-mm- und 10-mm-Vierkant: Schieben Sie Beschlag ist fertig montiert. die Adapterhülse in die Mitte des Vierkants. Machen 10. Beschlag demontieren Sie mit Körner und Hammer eine Vertiefung in die Adapterhülse, um das Verrutschen zu verhindern.
  • Seite 42 12. Technische Daten Digital SmartHandle AX Downward installation 13. Konformitätserklärung 4. Öffnen Sie die Batterieklammer. Hiermit erklärt die SimonsVoss Technologies GmbH , 5. Ziehen Sie die Batterieklammer heraus. dass die Artikel (SV-S2.*A*, SV-S2.*AM*, SV-S2.*LN*, SI-S2.*M.WO*, SI-S2.*M.VCN*) folgenden Richtlinien 6. Entnehmen Sie die alten Batterien.
  • Seite 43 14. Hilfe und weitere Informationen Digital SmartHandle AX Downward installation E-Mail support-simonsvoss@allegion.com si-support-simonsvoss@allegion.com SimonsVoss Technologies GmbH, Feringastr. 4, D-85774 Unterfoehring, Deutschland 43 / 88...
  • Seite 44 Contents Digital SmartHandle AX Downward installation Contents Intended use ...............  45 General safety instructions........ 45 Product-specific safety instructions .... 46 Scope of delivery............ 47 Design ................ 47 Prepare door (drilling template)...... 47 For door thickness X: prepare threaded rods and spindle ................ 47 Programming the fitting .........  48 Installing the fitting ..........
  • Seite 45 1. Intended use Digital SmartHandle AX Downward installation 1. Intended use Risk of explosion due to incorrect battery type Inserting the wrong type of battery can cause an ex- Products in the SmartHandle AX range consist of plosion. electronic door fittings. Users can engage Only use the batteries specified in the technical ...
  • Seite 46 3. Product-specific safety instructions Digital SmartHandle AX Downward installation Damage due to polarity reversal Modifications or further technical developments can- not be excluded and may be implemented without no- This product contains electronic components that tice. may be damaged by reverse polarity of the power source.
  • Seite 47 4. Scope of delivery Digital SmartHandle AX Downward installation Locking and insurances ü PH2 screwdriver at hand. Insurance companies place increased demands on a 1. Remove the mortise lock (PH2). closure. 1. If you want to lock the door under insurance law, 2.
  • Seite 48 8. Programming the fitting Digital SmartHandle AX Downward installation 8. At the same time, hook the spring plate tabs into the slot in the inner handle. 4. For X: use a suitable saw to cut the threaded rods and spindle.
  • Seite 49 10. Removing the fitting Digital SmartHandle AX Downward installation 18. Fasten the set screw on the inner handle firmly 1. Insert the special tool into the fitting’s cover inlay. (TX15, torque 5.0 Nm). 2. Remove the cover with the tool.
  • Seite 50 13. Declaration of conformity Digital SmartHandle AX Downward installation Recycle defective or used batteries in line with  13.560006 MHz - 1.04 dBµA/m (3 m dis- European Directive 2006/66/EC. 13.560780 MHz tance) Observe local regulations on separate disposal of 868.000 MHz - 868.600 ...
  • Seite 51 Tables des matières Digital SmartHandle AX Downward installation Tables des matières Utilisation conforme .......... 52 Consignes de sécurité générales ...... 52 Consignes de sécurité spécifiques au produit .................. 54 Contenu de la livraison.......... 54 Construction ...............  54 Préparation de la porte (gabarit de perçage) ..................
  • Seite 52 1. Utilisation conforme Digital SmartHandle AX Downward installation 1. Utilisation conforme Ne pas saisir la pile. Risque de brûlures dues à des substances dangereuses Les produits de la série SmartHandle AX sont des Ce produit contient des piles au lithium. En cas d'in- béquilles électroniques.
  • Seite 53 2. Consignes de sécurité générales Digital SmartHandle AX Downward installation Endommagement lié à des liquides NOTE Ce produit contient des composants électroniques et/ ou mécaniques susceptibles d’être endommagés par tout type de liquide. Utilisation conforme aux dispositions Tenez les liquides à l’écart du système électro- ...
  • Seite 54 3. Consignes de sécurité spécifiques au produit Digital SmartHandle AX Downward installation 3. Consignes de sécurité spéci- SmartHandle avec serrure antipanique autoblo- quante fiques au produit Le SmartHandle AX offre uniquement une fonctionna- lité complète avec une serrure antipanique autoblo- ATTENTION quante.
  • Seite 55 7. Pour épaisseur de porte X : Préparer les tiges filetées et le carré Digital SmartHandle AX Downward installation 8. Programmation de la ferrure 2. Mesurez la distance verticale entre les centres des trous de fixation. Programmez la ferrure avant le montage. En fonction de la famille de produits, vous pouvez utiliser différents...
  • Seite 56 10. Démontage de la ferrure Digital SmartHandle AX Downward installation 8. Accrochez simultanément les panetons de la 17. Pour FH : Vissez le cylindre borgne (PH2, couple de plaque à ressort dans le logement de la béquille in- serrage : 1,1 Nm).
  • Seite 57 12. Données techniques Digital SmartHandle AX Downward installation ü Gants présents. Émissions de radio 1. Insérez l’outil spécial dans l’inlay du cache de pro- 15,24 kHz - 72,03 kHz tection de la ferrure. Seulement pour les nu- 10 dBµA/m (3 m dis- méros d'article : SV-...
  • Seite 58 14. Aide et autres informations Digital SmartHandle AX Downward installation Informations sur l'elimination Ne jetez pas l’appareil (SV-S2.*A*, SV-S2.*AM*,  SV-S2.*LN*, SI-S2.*M.WO*, SI-S2.*M.VCN*) avec vos ordures ménagères mais dans un point de collecte communal pour appareils électriques et appareils spéciaux conformément à la directive européenne 2012/19/UE.
  • Seite 59 Inhoudsopgave Digital SmartHandle AX Downward installation Inhoudsopgave Beoogd gebruik............ 60 Algemene veiligheidsinstructies ...... 60 Specifieke veiligheidsinstructies per product .................. 61 Leveromvang..............  62 Opbouw ...............  62 Deur voorbereiden (boormal).......  62 Voor deurdikte X: schroefdraadstangen en vier- kant voorbereiden.............  63 Beslag programmeren.......... 63 Beslag monteren............
  • Seite 60 1. Beoogd gebruik Digital SmartHandle AX Downward installation 1. Beoogd gebruik Batterijen niet inslikken. Verbrandingsgevaar door gevaarlijke stoffen Bij de producten uit de SmartHandle AX-serie gaat het Dit product bevat lithium-knoopcellen. Als de knoop- om elektronische deurbeslagen. Met behulp van een...
  • Seite 61 3. Specifieke veiligheidsinstructies per product Digital SmartHandle AX Downward installation Beschadiging door bijtende reinigingsmiddelen Storingen door slecht contact of verschillende ontla- dingen Het oppervlak van dit product kan worden beschadigd door ongeschikte reinigingsmiddelen. Contactoppervlakken die te klein/vervuild zijn of ver- schillende ontladen accu's kunnen leiden tot storingen.
  • Seite 62 4. Leveromvang Digital SmartHandle AX Downward installation Verlies van precisie bij het bedienen van de deurkruk Speciaal gereedschap  De montage kan bij insteeksloten met klem een beetje Korte handleiding  moeilijk zijn. Afhankelijk van de variant: Bewerk de klem niet mechanisch. Anders functio- ...
  • Seite 63 7. Voor deurdikte X: schroefdraadstangen en vierkant voorbereiden Digital SmartHandle AX Downward installation 13. Bouw het insteekslot in (PH2). 3. Voor S, M en L: kort de inkortschroeven L1 en L2 in. 4. Voor 7 mm vierkant: plaats de adapterhuls in de 7.
  • Seite 64 10. Beslag demonteren Digital SmartHandle AX Downward installation 11. Batterijen vervangen 15. Schroef met de L1-schroeven de binnenklink vast (PH2, draaimoment 1,1 Nm). OPMERKING 16. Voor FH: breng de blinde cilinder aan. OPMERKING Storingen door slecht contact of verschillende ontla-...
  • Seite 65 12. Technische gegevens Digital SmartHandle AX Downward installation De batterijen zijn vervangen. De volledige tekst van de UK-conformiteitsverklaring is www.si- beschikbaar op het volgende internetadres: 12. Technische gegevens mons-voss.com/nl/certificaten.html Temperatuurbereik (be- 14. Hulp en verdere informatie -25°C tot +50°C drijf)
  • Seite 66 Sommario Digital SmartHandle AX Downward installation Sommario Uso conforme.............. 67 Avvisi di sicurezza generali........ 67 Avvertenze di sicurezza specifiche del prodotto .................. 68 Oggetto di fornitura.......... 69 Struttura .............. 69 Preparazione della porta (maschera di foratura) .................. 69 Per lo spessore della porta X: preparazione delle aste filettate e del quadro maniglia..... 70...
  • Seite 67 1. Uso conforme Digital SmartHandle AX Downward installation 1. Uso conforme Non ingerire la batteria. Pericolo di ustioni dovute a sostanze pericolose I prodotti della serie SmartHandle AX sono maniglie Questo prodotto contiene batterie a bottone al litio. Se elettroniche. Con l’ausilio di un mezzo di identificazione la batteria a bottone viene inghiottita, possono verifi- autorizzato SmartHandle AX può...
  • Seite 68 3. Avvertenze di sicurezza specifiche del prodotto Digital SmartHandle AX Downward installation Danni dovuti a detergenti aggressivi Malfunzionamenti dovuti a contatto insufficiente o a scarichi diversi La superficie di questo prodotto può essere danneg- giata da detergenti non idonei. Superfici di contatto troppo piccole/contaminate o di-...
  • Seite 69 4. Oggetto di fornitura Digital SmartHandle AX Downward installation La maniglia non ha più una guida precisa Chiusura dell’apertura delle rosette In caso di serrature ad incasso dotate di perno di ri- Per le manipolazioni è possibile utilizzare l'apertura scontro, il montaggio della SmartHandle può risultare delle rosette ev.
  • Seite 70 7. Per lo spessore della porta X: preparazione delle aste filettate e Digital SmartHandle AX Downward installation del quadro maniglia 9. Montaggio della maniglia 7. Determinare i punti da forare con l’ausilio della di- stanza precedentemente misurata. Porta già forata.
  • Seite 71 10. Smontaggio della maniglia Digital SmartHandle AX Downward installation 11. Applicare il quadro maniglia con il lato pin nella 21. Avvitare saldamente la vite senza testa della mani- maniglia. glia esterna (TX15, coppia: 5,0 Nm). Il pin si chiude a scatto nell’alloggiamento.
  • Seite 72 12. Dati tecnici Digital SmartHandle AX Downward installation 3. Piegare con cautela il morsetto della batteria verso 868,000 MHz - 868,600 l’interno, per sganciarlo. <25 mW ERP Solo per i codici articolo: SV-S2.*LN*, SI- S2.*M.WO* 4. Aprire il morsetto della batteria.
  • Seite 73 14. Supporto e ulteriori informazioni Digital SmartHandle AX Downward installation Riciclare le batterie guaste o esauste ai sensi della  Direttiva Europea 2006/66/CE. Osservare le disposizioni locali in materia di  smaltimento speciale delle batterie. Conferire l’imballaggio presso un punto di raccolta ...
  • Seite 74 Indholdsfortegnelse Digital SmartHandle AX Downward installation Indholdsfortegnelse Anvendelsesområder .......... 75 Generelle sikkerhedshenvisninger...... 75 Produktspecifikke sikkerhedsanvisninger.. 76 Leveringsomfang ............ 77 Montering .............. 77 Forbered døren (boreskabelon)...... 77 Til dørtykkelse X: forbered gevindstænger og fir- kant.................  77 Programmering af beslag........ 78 Monter beslaget ............ 78 10.
  • Seite 75 1. Anvendelsesområder Digital SmartHandle AX Downward installation 1. Anvendelsesområder Eksplosionsfare på grund af forkert batteritype Isætning af den forkerte batteritype kan resultere i en Ved SmartHandle AX-seriens produkter drejer det sig eksplosion. om elektroniske dørbeslag. SmartHandle AX kan koble Brug kun de batterier, der er specificeret i de tekni- ...
  • Seite 76 3. Produktspecifikke sikkerhedsanvisninger Digital SmartHandle AX Downward installation Beskadigelse på grund af fejltilslutning Den tyske sprogversion er den originale brugsanvisning. Andre sprog (udkast på kontraktsproget) er oversæt- Dette produkt indeholder elektroniske komponenter, telser af de originale instruktioner. som kan blive beskadiget på grund af fejltilslutning af spændingskilden.
  • Seite 77 4. Leveringsomfang Digital SmartHandle AX Downward installation SmartHandle AX med selvlåsende paniklås 2. Mål den lodrette afstand mellem midten af fastgø- relseshullerne. SmartHandle AX tilbyder kun fuld funktionalitet med en selvlåsende paniklås. 1. Kombiner SmartHandle AX med en selvlåsende 3. Monter indstikslåsen (PH2).
  • Seite 78 8. Programmering af beslag Digital SmartHandle AX Downward installation 8. Programmering af beslag 10. For 7 mm firkant: Sæt adaptertyllen på siden af fir- Programmér beslaget før montering. Afhængigt af kanten med en stift. produktfamilien kan du bruge forskellige programmeringsenheder.
  • Seite 79 10. Afmontering af beslag Digital SmartHandle AX Downward installation 21. Spænd gevindskruen på det udvendige håndtag 4. Åbn batteriklemmen. (TX15, drejningsmoment: 5,0 Nm). 5. Træk batteriklemmen ud. Beslaget er færdigmonteret. 6. Tag de gamle batterier ud. 10. Afmontering af beslag 7.
  • Seite 80 13. Overensstemmelseserklæring Digital SmartHandle AX Downward installation 13. Overensstemmelseserklæring si-support-simonsvoss@allegion.com SimonsVoss Technologies GmbH, Feringastr. 4, Hermed erklærer SimonsVoss Technologies GmbH at D-85774 Unterföhring, Tyskland varen (SV-S2.*A*, SV-S2.*AM*, SV-S2.*LN*, SI- S2.*M.WO*, SI-S2.*M.VCN*) overholder følgende ret- ningslinjer: 2014/53/EU -RED-  eller for Storbritannien: UK lovbekendtgørelse 2017 nr.
  • Seite 81 Innehållsförteckning Digital SmartHandle AX Downward installation Innehållsförteckning Avsedd användning.......... 82 Allmänna säkerhetsanvisningar ...... 82 Produktspecifika säkerhetsanvisningar ....  83 Leveransomfång ............ 84 Uppbyggnad ...............  84 Förbereda dörr (borrschablon) ...... 84 För dörrtjocklek X: Förbereda gängstänger och fyrkant ................ 85 Programmera handtag.......... 85 Montera handtag ............
  • Seite 82 1. Avsedd användning Digital SmartHandle AX Downward installation 1. Avsedd användning Svälj inte batteriet. Risk för brännskador på grund av farliga ämnen. Produkterna i SmartHandle AX-serien gäller Den här produkten innehåller litiumknappcellsbatteri- elektroniska dörrhandtag. Med hjälp av ett behörigt er. Om man råkar svälja ett knappcellsbatteri kan all- identifikationsmedium kan man aktivera SmartHandle varliga inre brännskador uppstå...
  • Seite 83 3. Produktspecifika säkerhetsanvisningar Digital SmartHandle AX Downward installation Skada på grund av aggressiva rengöringsmedel Funktionsstörningar på grund av dålig dålig kontakt eller annan urladdning Ytan på den här produkten kan skadas om olämpliga rengöringsmedel används. För små / kontaminerade kontaktytor eller olika urlad- dade batterier kan leda till funktionsstörningar.
  • Seite 84 4. Leveransomfång Digital SmartHandle AX Downward installation Förlust av exakt handtagsstyrning Adaptersats 7 mm-fyrkant  Hos instickslås med klämhylsa kan monteringen vara Adapterhylsa 8,5 mm-fyrkant  trög. Adapterhylsa 10 mm-fyrkant  Bearbeta inte klämhylsan mekaniskt. Handtaget  förlorar då sin exakta styrning.
  • Seite 85 7. För dörrtjocklek X: Förbereda gängstänger och fyrkant Digital SmartHandle AX Downward installation 7. För dörrtjocklek X: Förbereda 4. För 7 mm-fyrkant: Sätt i adapterhylsan i fyrkants- fästet så att ursparningen är vänd mot stoppskru- gängstänger och fyrkant ven. Såg finns.
  • Seite 86 10. Demontera handtag Digital SmartHandle AX Downward installation 11. Byt batterier. INFO INFO För in blindcylindern i hålet med skruvmejseln. Särskilt om dörrarna är tjocka är det svårt att positio- Funktionsstörningar på grund av dålig dålig kontakt nera blindcylindern korrekt.
  • Seite 87 12. Tekniska data Digital SmartHandle AX Downward installation 12. Tekniska data Den fullständiga texten till UK-försäkran om överens- stämmelse finns på följande internetadress: Temperaturområde www.simons-voss.com/se/certifikat.html –25 °C till +50 °C (drift) 14. Hjälp och ytterligare informa- Batterityp 4× CR2450 (3V) tion Murata ...
  • Seite 88 © 2024, SimonsVoss Technologies GmbH, Unterföhring All rights are reserved. Text, images and diagrams are protected under copyright law. The content of this document must not be copied, distributed or modified. You can find more information on our website. Subject to technical changes. SimonsVoss and MobileKey are registered brands belonging to SimonsVoss.