Herunterladen Inhalt Inhalt Diese Seite drucken
Vorschau ausblenden Andere Handbücher für PegaSys 2.1:
Inhaltsverzeichnis

Werbung

Verfügbare Sprachen

Verfügbare Sprachen

DE
Kurzanleitung
EN
Quick Guide
FR
Guide abrégé
NL
Korte handleiding
8216031003
31.05.2023
Electronic door fitting Pe-
gaSys 2.1 and 4.1
Surface-mounted

Werbung

Inhaltsverzeichnis
loading

Inhaltszusammenfassung für Simons Voss Technologies PegaSys 2.1

  • Seite 1 Kurzanleitung Electronic door fitting Pe- Quick Guide gaSys 2.1 and 4.1 Guide abrégé Surface-mounted Korte handleiding 8216031003 31.05.2023...
  • Seite 2 Electronic door fitting PegaSys 2.1 and 4.1 Surface- mounted Abbildungen/Images ..........deutsch ................ english ................français ................ nederlands ..............2 / 40...
  • Seite 3 Electronic door fitting PegaSys 2.1 and 4.1 Surface- 3. Exploded view of surface-mounted installation mounted Exploded view of surface-mounted installation Preparing the cylinder for PegaSys 2.1 Abbildungen/Images 3 / 40...
  • Seite 4 Electronic door fitting PegaSys 2.1 and 4.1 Surface- 7. Mounting the fitting on the surface mounted Mounting the fitting on the surface TX25 STX20 *no WP 4 / 40 Abbildungen/Images...
  • Seite 5 Electronic door fitting PegaSys 2.1 and 4.1 Surface- 7. Mounting the fitting on the surface mounted TX25 Abbildungen/Images 5 / 40...
  • Seite 6 Electronic door fitting PegaSys 2.1 and 4.1 Surface- 7. Mounting the fitting on the surface mounted STX20 6 / 40 Abbildungen/Images...
  • Seite 7 Electronic door fitting PegaSys 2.1 and 4.1 Surface- 7. Mounting the fitting on the surface mounted TX25 Abbildungen/Images 7 / 40...
  • Seite 8 Electronic door fitting PegaSys 2.1 and 4.1 Surface- 7. Mounting the fitting on the surface mounted *WPSC TX25 8 / 40 Abbildungen/Images...
  • Seite 9 Electronic door fitting PegaSys 2.1 and 4.1 Surface- 8. Replacing the battery (integrated battery compartment) mounted Replacing the battery (integrated battery compartment) Abbildungen/Images 9 / 40...
  • Seite 10 9. Battery replacement (battery compartment screwed on the Electronic door fitting PegaSys 2.1 and 4.1 Surface- inside) mounted Battery replacement (battery compartment screwed on the inside) TX25 TX25 10 / 40 Abbildungen/Images...
  • Seite 11 Electronic door fitting PegaSys 2.1 and 4.1 Surface- 12. Help and other information mounted Help and other information Abbildungen/Images 11 / 40...
  • Seite 12: Inhaltsverzeichnis

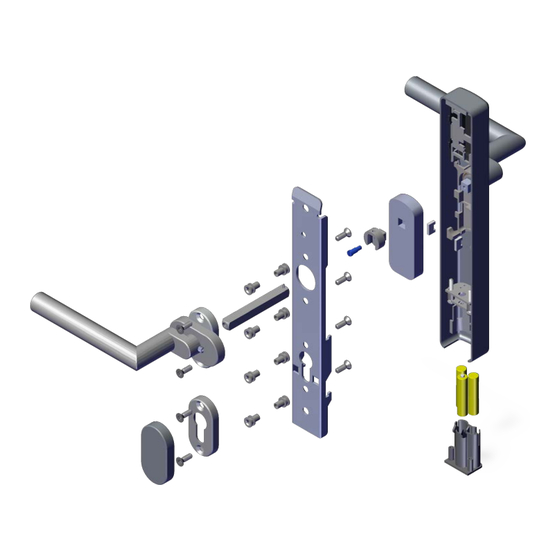
    Electronic door fitting PegaSys 2.1 and 4.1 Surface- Inhaltsverzeichnis mounted Inhaltsverzeichnis Allgemeine Sicherheitshinweise...... 13 Einleitung / Bestimmungsgemäßer Gebrauch .................. 14 Ausnahme: PegaSys PIN-Code ..... 14 Explosionszeichnung anschraubende Montage .................. 14 Hinweise zur Montage im Außenbereich ....  14 Zylinder vorbereiten für PegaSys 2.1..... 15 Rohrrahmentüren vorbereiten (Blindnietmuttern...
  • Seite 13: Allgemeine Sicherheitshinweise

    Electronic door fitting PegaSys 2.1 and 4.1 Surface- 1. Allgemeine Sicherheitshinweise mounted 1. Allgemeine Sicherheits- ACHTUNG hinweise Beschädigung durch elektrostatische Entladung (ESD) Signalwörter (ANSI Z535.6) Dieses Produkt enthält elektronische Bauteile, die Gefahr: Tod oder schwere Verletzung durch elektrostatische Entladungen beschädigt wer- (wahrscheinlich), Warnung: Tod oder schwere den können.
  • Seite 14: Einleitung / Bestimmungsgemäßer Gebrauch

    Electronic door fitting PegaSys 2.1 and 4.1 Surface- 2. Einleitung / Bestimmungsgemäßer Gebrauch mounted Störung der Kommunikation durch metallische 2. Einleitung / Bestim- Oberflächen mungsgemäßer Ge- Dieses Produkt kommuniziert drahtlos. Metallische brauch Oberflächen können die Reichweite des Produkts er- heblich reduzieren.
  • Seite 15: Zylinder Vorbereiten Für Pegasys 2.1

    Electronic door fitting PegaSys 2.1 and 4.1 Surface- 5. Zylinder vorbereiten für PegaSys 2.1 mounted 7. Beschlag anschraubend Generelle Hinweise zur Montage im Außenbereich montieren ACHTUNG Ggfs. Schließzylinder mit max. 4 mm Überstand ü Batteriefach nicht wassergeschützt ü Tür vorgebohrt. Das Batteriefach selbst ist nicht gegen eindringendes ü...
  • Seite 16: Batteriewechsel (Integriertes Batteriefach)

    Electronic door fitting PegaSys 2.1 and 4.1 Surface- 8. Batteriewechsel (Integriertes Batteriefach) mounted 8. Batteriewechsel (Inte- HINWEIS griertes Batteriefach) 1. Stecken Sie den Batteriewechselschlüssel in den Zylinderöffnung bei F9-Varianten Beschlag. Die Schließzylinder-Öffnung muss bei feuerhemmen- den Ausführungen (F9) verschlossen sein.
  • Seite 17: Konformitätserklärung

    Electronic door fitting PegaSys 2.1 and 4.1 Surface- 11. Konformitätserklärung mounted 2011/65/EU -RoHS-  Bis zu 50.000 Öffnungszyklen (ab- bzw. für UK: Rechtsverordnung 2012 Nr. 3032 hängig von folgenden Faktoren:) -RoHS- Eingesetztes Leseverfahren  Batteriele- Bauart bensdauer  Installationsbedingungen ...
  • Seite 18 Electronic door fitting PegaSys 2.1 and 4.1 Surface- 12. Hilfe und weitere Informationen mounted SimonsVoss Technologies GmbH, Feringastr. 4, D-85774 Unterfoehring, Deutschland 18 / 40...
  • Seite 19 Electronic door fitting PegaSys 2.1 and 4.1 Surface- Contents mounted Contents General safety instructions........ 20 Introduction | Intended use........ 21 Exception: PegaSys PIN Code ...... 21 Exploded view of surface-mounted installation .................. 21 Instructions for outdoor installation..... 21 Preparing the cylinder for PegaSys 2.1 .... 21 Preparing metal frame doors (positioning blind rivet nuts) .............. 22...
  • Seite 20: General Safety Instructions

    Electronic door fitting PegaSys 2.1 and 4.1 Surface- 1. General safety instructions mounted 1. General safety instruc- IMPORTANT tions Damage resulting from electrostatic discharge (ESD) Signal words (ANSI Z535.6) This product contains electronic components that DANGER: Death or serious injury (likely), WARNING: may be damaged by electrostatic discharges.
  • Seite 21: Introduction | Intended Use

    Electronic door fitting PegaSys 2.1 and 4.1 Surface- 2. Introduction | Intended use mounted You can enter a specific code to unlock the door when NOTE it is in service, for example. Please refer to a separate quick guide for more details on the PegaSys PIN code.
  • Seite 22: Preparing Metal Frame Doors (Positioning Blind Rivet Nuts)

    Electronic door fitting PegaSys 2.1 and 4.1 Surface- 6. Preparing metal frame doors (positioning blind rivet nuts) mounted 6. Preparing metal frame 5. Attach the fitting to the spindle (opening in the lockbox points towards the cylinder). doors (positioning blind rivet nuts) 6.
  • Seite 23: Replacing The Battery (Integrated Battery Com- Partment)

    Electronic door fitting PegaSys 2.1 and 4.1 Surface- 8. Replacing the battery (integrated battery compartment) mounted 19. Open the fitting with an authorised card (e.g. a 9. Fasten the battery compartment and the cover demo card set). back onto the door.
  • Seite 24: Declaration Of Conformity

    Electronic door fitting PegaSys 2.1 and 4.1 Surface- 11. Declaration of conformity mounted 11. Declaration of conformity Take the packaging to an environmentally  responsible recycling point. The company SimonsVoss Technologies GmbH hereby declares that the articles (NC.PG.ET.*, PG.ET.*M*, PG.ET.BrPn*, PG.ET.*L*) comply with the...
  • Seite 25 Electronic door fitting PegaSys 2.1 and 4.1 Surface- Tables des matières mounted Tables des matières Consignes de sécurité générales ...... 26 Introduction/utilisation conforme aux disposi- tions................ 27 Exception : Code PIN PegaSys ....... 27 Vue éclatée du montage par vis...... 27 Consignes pour un montage à l'extérieur .. 27 Préparer les cylindres pour PegaSys 2.1 ....
  • Seite 26: Consignes De Sécurité Générales

    Electronic door fitting PegaSys 2.1 and 4.1 Surface- 1. Consignes de sécurité générales mounted 1. Consignes de sécurité gé- ATTENTION nérales Endommagement lié à une décharge électrostatique (DES) Mots indicateurs (ANSI Z535.6) Ce produit contient des composants électroniques DANGER: Mort ou blessure grave (probable), susceptibles d’être endommagés par des décharges...
  • Seite 27: Introduction/Utilisation Conforme Aux Disposi- Tions

    Electronic door fitting PegaSys 2.1 and 4.1 Surface- 2. Introduction/utilisation conforme aux dispositions mounted Défaillance de la communication liée à des surfaces 2. Introduction/utilisation métalliques conforme aux disposi- Ce produit communique sans fil. Les surfaces métal- tions liques peuvent réduire considérablement le rayon d’action du produit.
  • Seite 28: Préparer Les Cylindres Pour Pegasys 2.1

    Electronic door fitting PegaSys 2.1 and 4.1 Surface- 5. Préparer les cylindres pour PegaSys 2.1 mounted Consignes générales pour un montage à l'extérieur Outre les écrous borgnes à riveter, vous pouvez également utiliser une vis à tôle pour la fixation. Pour ce faire, un autre trou (Ø...
  • Seite 29: Remplacement Des Piles (Compartiment À Piles Intégré)

    Electronic door fitting PegaSys 2.1 and 4.1 Surface- 8. Remplacement des piles (compartiment à piles intégré) mounted 8. Remplacement des piles REMARQUE (compartiment à piles in- tégré) Ouverture du cylindre dans le cas de versions F9 1. Placez la clé de remplacement des piles dans la L'ouverture du cylindre de fermeture doit être fermée...
  • Seite 30: Caractéristiques Techniques

    Electronic door fitting PegaSys 2.1 and 4.1 Surface- 10. Caractéristiques techniques mounted 10. Caractéristiques tech- 11. Déclaration de conformi- niques té La société SimonsVoss Technologies GmbH déclare Alimentation en tension par la présente que les articles (NC.PG.ET.*, PegaSys B 2.1 : 3× piles alcalines PG.ET.*M*, PG.ET.BrPn*, PG.ET.*L*) est conforme aux...
  • Seite 31 Electronic door fitting PegaSys 2.1 and 4.1 Surface- 12. Aide et autres informations mounted Recyclez les piles défectueuses ou usées  conformément à la directive européenne 2006/66/CE. Veuillez tenir compte des dispositions locales  applicables concernant la collecte séparée des piles.
  • Seite 32 Electronic door fitting PegaSys 2.1 and 4.1 Surface- Inhoudsopgave mounted Inhoudsopgave Algemene veiligheidsinstructies ...... 33 Inleiding / Voorgeschreven gebruik.....  34 Uitzondering: PegaSys-pincode .... 34 Opengewerkte tekening opschroefmontage...  34 Aanwijzingen voor montage in de open lucht .................. 34 Cilinder voorbereiden voor PegaSys 2.1 .... 35 Buisframedeuren voorbereiden (blindklinkmoe- ren plaatsen) ............... 35...
  • Seite 33: Algemene Veiligheidsinstructies

    Electronic door fitting PegaSys 2.1 and 4.1 Surface- 1. Algemene veiligheidsinstructies mounted 1. Algemene veiligheidsin- LET OP structies Beschadiging door elektrostatische ontlading (ESD) Dit product heeft elektronische componenten die kun- Signaalwoorden (ANSI Z535.6) nen worden beschadigd door een elektrostatische ont- GEVAAR: Dood of ernstig letsel (waarschijnlijk), lading.
  • Seite 34: Inleiding / Voorgeschreven Gebruik

    Electronic door fitting PegaSys 2.1 and 4.1 Surface- 2. Inleiding / Voorgeschreven gebruik mounted Storing van de communicatie door metalen opper- beveiligde deur kunt u pas openen wanneer u zich met vlakken een geldige legitimatie als bevoegde persoon identificeert. Dit product communiceert draadloos. Metalen opper- vlakken kunnen het zendbereik van het product aan- 2.1.
  • Seite 35: Cilinder Voorbereiden Voor Pegasys 2.1

    Electronic door fitting PegaSys 2.1 and 4.1 Surface- 5. Cilinder voorbereiden voor PegaSys 2.1 mounted 5. Cilinder voorbereiden 3. Steek de vierkantstift van de buitenkant van de deur in het insteekslot (gat in de vierkantstift wijst voor PegaSys 2.1 naar de schoot toe).
  • Seite 36: Batterijvervanging (Geïntegreerd Batterijvak)

    Electronic door fitting PegaSys 2.1 and 4.1 Surface- 8. Batterijvervanging (geïntegreerd batterijvak) mounted 16. Controleer de spleet tussen de stolp en de plaat 6. Haak het deksel vast. (2-5 mm). 7. Klap het deksel dicht en trek het iets opzij.
  • Seite 37: Verklaring Van Overeenstemming

    Electronic door fitting PegaSys 2.1 and 4.1 Surface- 11. Verklaring van overeenstemming mounted Informatie over verwijdering 2.400 GHz - 2.4835 GHz Voer het apparaat (NC.PG.ET.*, PG.ET.*M*,  PG.ET.BrPn*, PG.ET.*L*) niet af als huishoudelijk Alleen voor ar- < 10 mW afval, maar overeenkomstig de Europese Richtlijn...
  • Seite 38 Electronic door fitting PegaSys 2.1 and 4.1 Surface- 12. Hulp en verdere informatie mounted 38 / 40...
  • Seite 39 Electronic door fitting PegaSys 2.1 and 4.1 Surface- 12. Hulp en verdere informatie mounted 39 / 40...
  • Seite 40 © 2023, SimonsVoss Technologies GmbH, Unterföhring All rights are reserved. Text, images and diagrams are protected under copyright law. The content of this document must not be copied, distributed or modified. You can find more information on our website. Subject to technical changes. SimonsVoss and MobileKey are registered brands belonging to SimonsVoss.

Diese Anleitung auch für:

Pegasys 4.1

Inhaltsverzeichnis