
Verwandte Anleitungen für Simons Voss Technologies PegaSys Door Handle 4.1 PAS24


Inhaltszusammenfassung für Simons Voss Technologies PegaSys Door Handle 4.1 PAS24
- Seite 1 Kurzanleitung PegaSys Door Handle 4.1 Quick Guide PAS24 Guide abrégé Korte handleiding 8216031026 17.11.2023...
- Seite 2 PegaSys Door Handle 4.1 PAS24 Abbildungen/Images ..........deutsch ................ english ................français ................ nederlands ..............2 / 64...
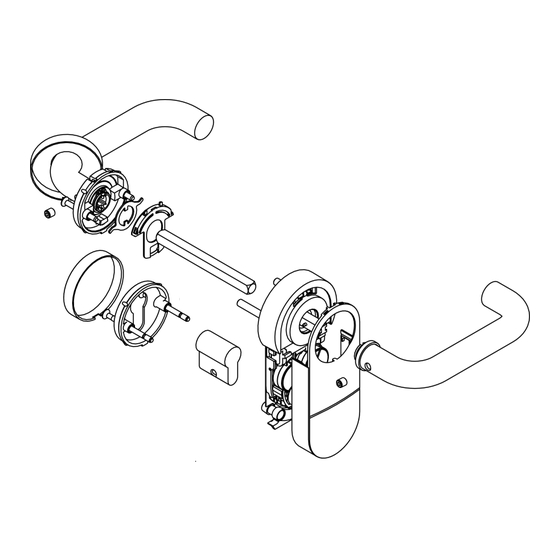
- Seite 3 5. Structure PegaSys Door Handle 4.1 PAS24 5. Structure Inside Outside Abbildungen/Images 3 / 64...
- Seite 4 6. Prepare door (drilling template) PegaSys Door Handle 4.1 PAS24 6. Prepare door (drilling template) Ø8.5 4 / 64 Abbildungen/Images...
- Seite 5 6. Prepare door (drilling template) PegaSys Door Handle 4.1 PAS24 Abbildungen/Images 5 / 64...
- Seite 6 6. Prepare door (drilling template) PegaSys Door Handle 4.1 PAS24 6 / 64 Abbildungen/Images...
- Seite 7 6. Prepare door (drilling template) PegaSys Door Handle 4.1 PAS24 Abbildungen/Images 7 / 64...
- Seite 8 6. Prepare door (drilling template) PegaSys Door Handle 4.1 PAS24 8 / 64 Abbildungen/Images...
- Seite 9 6. Prepare door (drilling template) PegaSys Door Handle 4.1 PAS24 Ø8.5 Abbildungen/Images 9 / 64...
- Seite 10 7. Programming the fitting PegaSys Door Handle 4.1 PAS24 7. Programming the fitting 10 / 64 Abbildungen/Images...
- Seite 11 8. Installing the fitting PegaSys Door Handle 4.1 PAS24 8. Installing the fitting TX15 Size Door thickness (mm) Screws (M4) 38 – 50 49 – 60 59 – 70 69 – 80 79 – 90 89 – 100 *S min.
- Seite 12 8. Installing the fitting PegaSys Door Handle 4.1 PAS24 *M min. M4x53 *M max. M4x63 *L min. M4x73 *L max. M4x83 2× L2: door thickness + 8 mm (±3 mm) 12 / 64 Abbildungen/Images...
- Seite 13 8. Installing the fitting PegaSys Door Handle 4.1 PAS24 *7 mm *CW (clockwise) Abbildungen/Images 13 / 64...
- Seite 14 8. Installing the fitting PegaSys Door Handle 4.1 PAS24 *CCW (counter-clockwise) *CW (clockwise) 14 / 64 Abbildungen/Images...
- Seite 15 8. Installing the fitting PegaSys Door Handle 4.1 PAS24 *CCW (counter-clockwise) Abbildungen/Images 15 / 64...
- Seite 16 8. Installing the fitting PegaSys Door Handle 4.1 PAS24 16 / 64 Abbildungen/Images...
- Seite 17 8. Installing the fitting PegaSys Door Handle 4.1 PAS24 *7 mm Abbildungen/Images 17 / 64...
- Seite 18 8. Installing the fitting PegaSys Door Handle 4.1 PAS24 *8,5 mm/10 mm 18 / 64 Abbildungen/Images...
- Seite 19 8. Installing the fitting PegaSys Door Handle 4.1 PAS24 *8,5 mm/10 mm Abbildungen/Images 19 / 64...
- Seite 20 8. Installing the fitting PegaSys Door Handle 4.1 PAS24 1.1 Nm ±10% 1.1 Nm ±10% 20 / 64 Abbildungen/Images...
- Seite 21 8. Installing the fitting PegaSys Door Handle 4.1 PAS24 Abbildungen/Images 21 / 64...
- Seite 22 8. Installing the fitting PegaSys Door Handle 4.1 PAS24 1.1 Nm ±10% TX15 5.0 Nm ±20% 22 / 64 Abbildungen/Images...
- Seite 23 8. Installing the fitting PegaSys Door Handle 4.1 PAS24 Abbildungen/Images 23 / 64...
- Seite 24 8. Installing the fitting PegaSys Door Handle 4.1 PAS24 TX15 5.0 Nm ±20% 24 / 64 Abbildungen/Images...
- Seite 25 9. Removing the fitting PegaSys Door Handle 4.1 PAS24 9. Removing the fitting SW1.5 SW1.5 Abbildungen/Images 25 / 64...
- Seite 26 9. Removing the fitting PegaSys Door Handle 4.1 PAS24 SW1.5 26 / 64 Abbildungen/Images...
- Seite 27 10. Replacing the batteries PegaSys Door Handle 4.1 PAS24 10. Replacing the batteries Abbildungen/Images 27 / 64...
- Seite 28 10. Replacing the batteries PegaSys Door Handle 4.1 PAS24 28 / 64 Abbildungen/Images...
- Seite 29 10. Replacing the batteries PegaSys Door Handle 4.1 PAS24 Abbildungen/Images 29 / 64...
- Seite 30 10. Replacing the batteries PegaSys Door Handle 4.1 PAS24 30 / 64 Abbildungen/Images...
- Seite 31 10. Replacing the batteries PegaSys Door Handle 4.1 PAS24 Abbildungen/Images 31 / 64...
- Seite 32 10. Replacing the batteries PegaSys Door Handle 4.1 PAS24 32 / 64 Abbildungen/Images...
- Seite 33 10. Replacing the batteries PegaSys Door Handle 4.1 PAS24 Abbildungen/Images 33 / 64...
- Seite 34 13. Help and other information PegaSys Door Handle 4.1 PAS24 13. Help and other information 34 / 64 Abbildungen/Images...
- Seite 35 Inhaltsverzeichnis PegaSys Door Handle 4.1 PAS24 Inhaltsverzeichnis Bestimmungsgemäßer Gebrauch ....... 36 Allgemeine Sicherheitshinweise...... 36 Produktspezifische Sicherheitshinweise.... 37 Lieferumfang .............. 38 Aufbau ................ 38 Tür vorbereiten (Bohrschablone)...... 38 Beschlag programmieren........ 39 Beschlag montieren .......... 39 Beschlag demontieren .......... 40 10. Batterien wechseln .......... 40 11.
- Seite 36 1. Bestimmungsgemäßer Gebrauch PegaSys Door Handle 4.1 PAS24 1. Bestimmungsgemäßer Ge- Batterie nicht einnehmen. Verbrennungsgefahr durch gefährliche Stoffe brauch Dieses Produkt enthält Lithium-Knopfzellen. Wenn die Bei den Produkten der PegaSys DoorHandle 4.1-Serie Knopfzelle verschluckt wird, können schwere innere handelt es sich um elektronische Türbeschläge.
- Seite 37 3. Produktspezifische Sicherheitshinweise PegaSys Door Handle 4.1 PAS24 Beschädigung durch aggressive Reinigungsmittel Funktionsstörungen durch schlechten Kontakt oder unterschiedliche Entladung Die Oberfläche dieses Produkts kann durch ungeeigne- te Reinigungsmittel beschädigt werden. Zu kleine/verunreinigte Kontaktflächen oder unter- schiedliche entladene Batterien können zu Funktions- Verwenden Sie ausschließlich Reinigungsmittel, die...
- Seite 38 4. Lieferumfang PegaSys Door Handle 4.1 PAS24 Verlust der präzisen Führung des Drückers 4. Lieferumfang Die Montage kann bei Einsteckschlössern mit Klemm- PegaSys DoorHandle 4.1 (hängende Montage für nuss schwergängig sein. PAS24) Bearbeiten Sie die Klemmnuss nicht mechanisch. ...
- Seite 39 7. Beschlag programmieren PegaSys Door Handle 4.1 PAS24 11. Bauen Sie das Einsteckschloss aus (PH2). 3. Bestimmen Sie die Trennstellen an den Absatz- schrauben L2. 12. Bohren Sie die benötigten Löcher. 4. Kürzen Sie die Absatzschrauben L2. 13. Bauen Sie das Einsteckschloss ein (PH2).
- Seite 40 9. Beschlag demontieren PegaSys Door Handle 4.1 PAS24 14. Stecken Sie den Beschlag mit dem Vierkant in die 2. Stecken Sie einen 1,5-mm-Sechskantschlüssel in Tür. das Loch der Vierkantaufnahme im Beschlag. 15. Schrauben Sie mit den L2-Schrauben die Roset- 3. Biegen Sie den Sechskantschlüssel auf die Seite, tenbasis an der Schließzylinder-Öffnung fest (PH2,...
- Seite 41 11. Technische Daten PegaSys Door Handle 4.1 PAS24 7. Setzen Sie die neuen Batterien mit sich berühren- Der vollständige Text der UK-Konformitätserklärung den Pluspolen ein (Typ CR2450). ist unter der folgenden Internetadresse verfügbar: gasys.allegion.com/infocenter/zertifikate/ 8. Setzen Sie die Batterieklammer wieder ein.
- Seite 42 Contents PegaSys Door Handle 4.1 PAS24 Contents Intended use ............... 43 General safety instructions........ 43 Product-specific safety instructions .... 44 Scope of delivery............ 45 Structure.............. 45 Prepare door (drilling template)...... 45 Programming the fitting ......... 45 Installing the fitting .......... 45 Removing the fitting .......... 47...
- Seite 43 1. Intended use PegaSys Door Handle 4.1 PAS24 1. Intended use Risk of explosion due to incorrect battery type Inserting the wrong type of battery can cause an ex- Products in the PegaSys DoorHandle 4.1 range consist plosion. of electronic door fittings. Users can engage PegaSys Only use the batteries specified in the technical ...
- Seite 44 3. Product-specific safety instructions PegaSys Door Handle 4.1 PAS24 Damage due to polarity reversal The German language version is the original instruction manual. Other languages (drafting in the contract lan- This product contains electronic components that guage) are translations of the original instructions.
- Seite 45 4. Scope of delivery PegaSys Door Handle 4.1 PAS24 PegaSys DoorHandle 4.1 with self-locking panic lock 2. Measure the distance (= vertical gap between the centres of the fastening holes). The PegaSys DoorHandle 4.1 only offers full function- ality with a self-locking panic lock.
- Seite 46 8. Installing the fitting PegaSys Door Handle 4.1 PAS24 8. Press the spring plate on one side against the inter- Door thickness Size Screws (M4) changeable plate so that the spring is compressed. (mm) 38 – 50 9. At the same time, hook the spring plate tabs into 49 –...
- Seite 47 9. Removing the fitting PegaSys Door Handle 4.1 PAS24 18. For FH: screw the dummy cylinder firmly into place ü Special tool at hand. (PH2, torque 1.1 Nm). ü Gloves at hand. 1. Insert the special tool into the fitting’s cover inlay.
- Seite 48 12. Declaration of conformity PegaSys Door Handle 4.1 PAS24 12. Declaration of conformity The company SimonsVoss Technologies GmbH hereby declares that the articles (PG-S2.*) comply with the following guidelines: 2014/53/EU -RED- or for the UK: UK statutory 2017 No. 1206 -Radio...
- Seite 49 Tables des matières PegaSys Door Handle 4.1 PAS24 Tables des matières Utilisation conforme .......... 50 Consignes de sécurité générales ...... 50 Consignes de sécurité propres au produit .. 51 Fourniture .............. 52 Structure............... 52 Préparation de la porte (gabarit de perçage) .................. 52 Programmation de la ferrure........ 53 Monter la garniture ............ 53...
- Seite 50 1. Utilisation conforme PegaSys Door Handle 4.1 PAS24 1. Utilisation conforme Ne pas saisir la pile. Risque de brûlures dues à des substances dangereuses Les produits de la série PegaSys DoorHandle 4.1 sont Ce produit contient des piles au lithium. En cas d'in- des béquilles électroniques.
- Seite 51 3. Consignes de sécurité propres au produit PegaSys Door Handle 4.1 PAS24 Endommagement lié à des liquides NOTE Ce produit contient des composants électroniques et/ ou mécaniques susceptibles d’être endommagés par tout type de liquide. Utilisation conforme aux dispositions Tenez les liquides à l’écart du système électro- ...
- Seite 52 4. Fourniture PegaSys Door Handle 4.1 PAS24 Dommages causés par des outils inadaptés Fermeture de l’ouverture de la rosace Si vous essayez d'ouvrir le boîtier avec des outils inap- Une ouverture de rosace éventuellement existante propriés, le boîtier peut être endommagé.
- Seite 53 7. Programmation de la ferrure PegaSys Door Handle 4.1 PAS24 7. Déterminez les points à percer à l’aide de la dis- NOTE tance mesurée précédemment. 8. Marquez les points à percer sur la porte. Classe de résistance ≥ 8.8 9. Enlevez le gabarit de perçage.
- Seite 54 9. Démontage de la ferrure PegaSys Door Handle 4.1 PAS24 13. Pour carrés de 8,5 mm et 10 mm : Faites glisser la Le montage de la ferrure est terminé. douille de l’adaptateur au centre du carré. À l’aide 9. Démontage de la ferrure d’un pointeau et d’un marteau, faites un creux dans...
- Seite 55 11. Données techniques PegaSys Door Handle 4.1 PAS24 5. Retirez le clip de la pile. 6. Retirez les piles usagées. Le texte intégral de la déclaration de conformité CE pega- est disponible à l'adresse Internet suivante : 7. Mettez les piles neuves en place avec les pôles po- sys.allegion.com/infocenter/zertifikate/...
- Seite 56 Inhoudsopgave PegaSys Door Handle 4.1 PAS24 Inhoudsopgave Beoogd gebruik............ 57 Algemene veiligheidsinstructies ...... 57 Specifieke veiligheidsinstructies per product .................. 58 Leveromvang.............. 59 Opbouw ............... 59 Deur voorbereiden (boormal)....... 59 Beslag programmeren.......... 60 Beslag monteren............ 60 Beslag demonteren........... 61 10. Batterijen vervangen.......... 61 11.
- Seite 57 1. Beoogd gebruik PegaSys Door Handle 4.1 PAS24 1. Beoogd gebruik Batterijen niet inslikken. Verbrandingsgevaar door gevaarlijke stoffen Bij de producten uit de PegaSys DoorHandle 4.1-serie Dit product bevat lithium-knoopcellen. Als de knoop- gaat het om elektronische deurbeslagen. Met behulp...
- Seite 58 3. Specifieke veiligheidsinstructies per product PegaSys Door Handle 4.1 PAS24 Beschadiging door bijtende reinigingsmiddelen Storingen door slecht contact of verschillende ontla- dingen Het oppervlak van dit product kan worden beschadigd door ongeschikte reinigingsmiddelen. Contactoppervlakken die te klein/vervuild zijn of ver- schillende ontladen accu's kunnen leiden tot storingen.
- Seite 59 4. Leveromvang PegaSys Door Handle 4.1 PAS24 Moeilijke montage door onnauwkeurige boringen adapterset 7 mm vierkant Het beslag is niet monteerbaar wanneer de bevesti- adapterhuls 8,5 mm vierkant gingsgaten en het vierkant niet bij elkaar passen. adapterhuls 10 mm vierkant ...
- Seite 60 7. Beslag programmeren PegaSys Door Handle 4.1 PAS24 7. Beslag programmeren 5. Voor 7 mm vierkant: plaats de adapterhuls in de vierkante houder van de binnenklink, zodat de uit- sparing naar de stifttap is gericht. 8. Beslag monteren 6. Bepaal de draairichting van uw binnenklink van bin- Deur voorgeboord.
- Seite 61 9. Beslag demonteren PegaSys Door Handle 4.1 PAS24 10. Batterijen vervangen OPMERKING OPMERKING Blinde cilinder met schroevendraaier in het gat leiden In het bijzonder bij dikke deuren is het moeilijk om de Storingen door slecht contact of verschillende ontla- blinde cilinder correct te positioneren.
- Seite 62 11. Technische gegevens PegaSys Door Handle 4.1 PAS24 De batterijen zijn vervangen. Conformiteitsverklaringen https://www.pegasys.allegion.com/de/infocenter/ 11. Technische gegevens zertifikate.html Temperatuurbereik (be- Informatie over verwijdering -25°C tot +50°C drijf) Voer het apparaat (PG-S2.*) niet af als Soort batterij 4× CR2450 (3V)
- Seite 63 13. Hulp en verdere informatie PegaSys Door Handle 4.1 PAS24 63 / 64...
- Seite 64 © 2023, SimonsVoss Technologies GmbH, Unterföhring All rights are reserved. Text, images and diagrams are protected under copyright law. The content of this document must not be copied, distributed or modified. You can find more information on our website. Subject to technical changes. SimonsVoss and MobileKey are registered brands belonging to SimonsVoss.