Herunterladen Inhalt Inhalt Diese Seite drucken
Inhaltsverzeichnis

Werbung

Verfügbare Sprachen
  • DE

Verfügbare Sprachen

  • DEUTSCH, seite 1
FX3 Pro
Laufband
1
DE
EN
ES
FR
IT
NL

Werbung

Inhaltsverzeichnis
loading

Inhaltszusammenfassung für SPORTSTECH FX3 Pro

  • Seite 1 FX3 Pro Laufband...
  • Seite 3 Sehr geehrter Kunde wir freuen uns, dass Sie sich für ein Gerät aus der SPORTSTECH Produktpalette entschieden haben. SPORTSTECH Sport- geräte bieten Ihnen hohe Qualität und neue Technologie. Um die Leistungsfähigkeit des Gerätes voll nutzen zu können und viele Jahre Freude an Ihrem Gerät zu haben, lesen Sie bitte vor der Inbetriebnahme und dem Beginn des Trainings dieses Benutzerhandbuch sorgfältig durch und verwenden...
  • Seite 4: Video Tutorials

    Aufbau, Benutzung, Abbau. 1. QR-Code scannen 2. Videos anschauen 3. Schnell und sicher starten Link zu den Videos: https://service.innovamaxx.de/fx3pro_video Uns gibt es auch auf Social Media! Hol dir die neuesten Produktinfos, Trainingsinhalte uvm. auf unserer: Instagram-Seite Facebook-Seite https://www.instagram.com/sportstech.de https://www.facebook.com/sportstech.de...
  • Seite 5: Inhaltsverzeichnis

    INHALTSVERZEICHNIS WICHTIGE SICHERHEITSHINWEISE ................6 AUFSTELLUNG DES GERÄTS ..................8 EXPLOSIONSZEICHNUNG/ERSATZTEILLISTE ..............8 PRODUKTÜBERSICHT ....................9 AUFBAUANLEITUNG ....................10 KLAPPMECHANISMUS / TRANSPORT ................11 AUFSTELLEN / LAGERUNG ..................12 KONSOLE ........................13 LAUFPROGRAMME ..................... 14 NUTZUNG DES PULSGURTES ..................14 FEHLERMELDUNGEN / DISPLAYANZEIGEN ..............
  • Seite 6: Wichtige Sicherheitshinweise

    WICHTIGE SICHERHEITSHINWEISE Diese allgemeinen Sicherheitsinformationen müssen unbedingt für die Benutzung dieses Produkts beachtet werden. Lesen Sie alle Hinweise, bevor Sie das Produkt in Benutzung nehmen. ACHTUNG: Um die Gefahr eines Stromschlags zu reduzieren, ziehen Sie den Stromstecker des Produkts nach der Benutzung, beim Auf- oder Abbau und für Wartungs- oder Reinigungszwecke.
  • Seite 7 • Gegenstände während des Betriebs nicht unter den Laufgurt am hinteren Ende des Geräts geraten, um möglicher- weise schwerwiegende Verletzungen oder Schäden am Gerät zu vermeiden. • Steigen Sie niemals vom Gerät, während sich der Laufgurt bewegt. Schalten Sie das Gerät zuvor ab und halten Sie sich beim Abstieg am seitlichen Handlauf fest.
  • Seite 8: Aufstellung Des Geräts

    AUFSTELLUNG DES GERÄTS Stellen Sie das Gerät auf einer ebenen Fläche auf und achten Sie auf die Abstände: 0,3 m 1. Am hinteren Ende des Geräts muss sich ein Freiraum von mindestens 2 Metern befinden. 2. Auf beiden Seiten des Geräts muss der Freiraum mindestens 1 Meter betragen. 3.
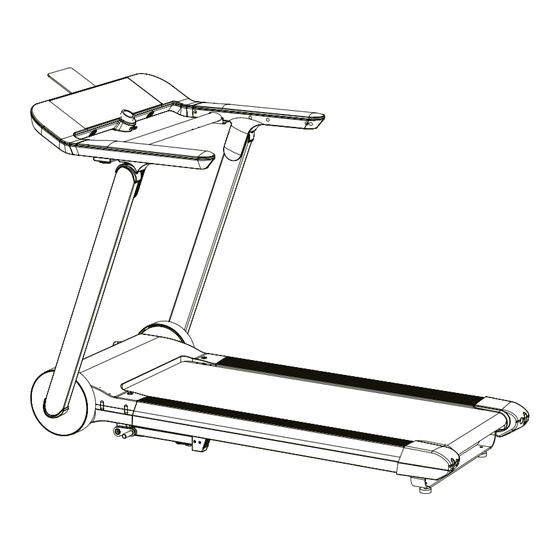
  • Seite 9: Produktübersicht

    Standfüße Sicherung Stabilisierungs- füße Transportrollen Netzkabelanschluss Netzschalter Stellschrauben für Laufbandspannung Lieferumfang Produktname Sportstech FX3 Pro Laufband • Sicherheitsschlüssel 1710 x 830 x 1137 mm Aufbaumaße (LxBxH) Faltmaß 1710 x 830 x 332 mm • Netzkabel Geschwindigkeit: 1 -20 km/h Netzspannung: 220-240 V / 50/60 Hz •...
  • Seite 10: Aufbauanleitung

    AUFBAUANLEITUNG Schritt 1 • Öffnen Sie die Verpackung und entnehmen Sie den Inhalt. Stellen Sie das Gerät auf eine ebene Fläche. Stellen Sie sicher, dass Ihr Aufstellort sauber ist und Sie genügend Platz haben. • Stecken Sie die Handyhalterung oben an das Display und legen Sie die Haftauflage darauf, um eine bessere Haftung für Ihr Mobilgerät zu erreichen.
  • Seite 11: Klappmechanismus / Transport

    KLAPPMECHANISMUS / TRANSPORT Vor dem Transport oder dem Zusammenklappen ist das Gerät vom Strom zu trennen und Kabel sind vom Gerät zu entfernen! Zusammenklappen 1. Die Faltknöpfe sind unter den Handläufen. Drücken Sie beide Handläufe erst leicht nach unten und ziehen Sie gleichzeitig die Knöpfe mit den Fingern zu sich ran, bevor Sie die Handläufe nach oben drücken, um die Konso- len mit den Handgriffen nach hinten zu klappen.
  • Seite 12: Aufstellen / Lagerung

    AUFSTELLEN / LAGERUNG Aufstellen Zum Aufrechtstellen des Gerätes greifen Sie hinten an das Gerät, am Ende der unteren Stützarme, und heben es nach oben, sodass Sie das Gerät auf den vorderen Rollen transportieren können. Heben Sie das Gerät am Aufstellort soweit senkrecht nach oben, sodass Sie die Stützfüße einmal komplett nach unten klappen können.
  • Seite 13: Konsole

    KONSOLE Programm / Geschwindigkeit Distanz Bluetooth Herzfrequenz Ermüdungstaste Kalorien Sicherheits- Drehknopf Zeit sperre Schalten Sie das Gerät mit dem Stromschutzschalter auf der Rückseite an, indem Sie diesen in die Position “ON” stellen. Bevor Sie mit dem Training beginnen stellen Sie sicher, dass der Sicherheitsclip angelegt wurde und sich im Steckplatz auf der Konsole befindet.
  • Seite 14: Laufprogramme

    LAUFPROGRAMME Das Laufband besitzt 10 voreingestellte Laufprogramme mit variablen Geschwindigkeiten. Die Standard-Übungszeit beträgt jeweils 30 Minuten (Änderungen können manuell vorgenommen werden). Jedes Programm (P1-P10) durchläuft 10 Geschwindigkeitssegmente. Es müssen keine manuellen Einstellungen vorgenommen werden. PROGRAMM AUSWÄHLEN: 1. Wird im Display „P1-P10, +Reziproker Modus“ anzeigt, befindet sich das Gerät im Stand- by-Modus.
  • Seite 15: Fehlermeldungen / Displayanzeigen

    FEHLERMELDUNGEN / DISPLAYANZEIGEN Anzeige Mögliche Ursache Lösungsvorschläge Display 1. Prüfen Sie, ob sich der Sicherheitsschalter in der Der Sicherheitsschlüssel wurde aus vorgesehenen Position befindet. der Sicherheitssperre entfernt. 2. Prüfen Sie, ob der Stecker des Sicherheitsschalters lose ist oder abgefallen ist. Fehler in der unteren Steuerung Offener Stromkreis in der Schaltröhre 1.
  • Seite 16 Motorblockade Prüfen/Ersetzen Sie den Motor. Überhitzung des Leistungsmoduls Prüfen/Ersetzen Sie den Controller. 1. Prüfen/Ersetzen Sie die Schaltknöpfe. 2. Prüfen/Ersetzen Sie die Konsole. Einige oder alle Knöpfe 3. Entfernen SIe die Konsolenhaube um die Knöpfe zu funktionieren nicht. testen. 4. Prüfen Sie, ob die Knöpfe funktionieren nachdem Sie das Netzkabel wieder angeschlossen haben.
  • Seite 17: Wartung Und Pflege

    WARTUNG UND PFLEGE Allgemeine Wartung und Pflege helfen, die Lebensdauer und Leistung Ihres Gerätes zu erhalten. Halten Sie das Gerät sauber, indem Sie die Komponenten regelmäßig abstauben. Reinigen Sie beide Seiten des Gerätes, damit sich kein Staub unter dem Band ansammelt. Halten Sie Ihre Laufschuhe sauber, damit die Lauffläche und der Gurt nicht ver- schmutzen.
  • Seite 18: Schmieren Des Laufgurts

    SCHMIEREN DES LAUFGURTS ARBEITSSCHRITTE: EINFÜLLEN DES SILIKONÖLS • Schrauben Sie den Deckel von der Silikonöl-Flasche und entfernen Sie das innere Dichtungspapier. • Schrauben Sie den Deckel wieder auf die Flasche und entfernen Sie die Düsenkappe. • Schneiden Sie ungefähr 5mm von der Spitze ab. Benutzen Sie dafür z.B. ein scharfes Messer. Öl-Einfüllöffnung links rechts...
  • Seite 19: Gerät-Straffung

    GERÄT-STRAFFUNG EINSTELLEN DER STRAFFHEIT Das Gerät ist bereits vormontiert und richtig eingestellt. Nach der erstmaligen Installation/Montage zu Hause oder nach einer gewissen Nutzungszeit kann sich das rotierende Laufband lockern. Die Straffheit nimmt ab. Zeichen dafür können z.B. ein plötzliches Pausieren des Gerätes beim Laufen oder ein Verrutschen des rotierenden Laufbandes sein.
  • Seite 20: Laufgurt-Zentrierung

    LAUFGURT-ZENTRIERUNG ZENTRIERUNG DES LAUFGURTES Stellen Sie das Gerät auf ebenen Untergrund und stellen Sie es auf maximal 3,5km/h ein, um zu prüfen, ob das rotierende Laufgurt verrutscht. Nehmen SIe die erforderlichen Einstellungen an den Stellschrau- ben für Laufgurtausrichtung (am hinteren Ende des Gerätes) vor. Siehe Abbildung 3: Teile und Bedienelemente.
  • Seite 21: Dehnungsübungen

    DEHNUNGSÜBUNGEN Vor jedem Training sollten Sie Ihre Muskeln mindestens 5-10 Minuten lang dehnen, um sie ausreichend aufzuwärmen. Wiederholen Sie die nachfolgenden Dehnungsübungen daher fünf Mal. Das Dehnen vor dem Training trägt zur Verbesserung der Flexibilität bei und verringert das Verletzungsrisiko. MIT DEM KOPF ROLLEN Drehen Sie den Kopf nach rechts für eine Sekunde, fühlen Sie die Streckung auf der linken Seite des Nackens, dann drehen Sie den Kopf zurück für eine Sekunde, recken Sie Ihr Kinn nach oben und lassen...
  • Seite 22: Anwendungssoftware (App)

    Android Kinomap Hinweise zur Nutzung der App: Sie sollten nur Apps installieren, deren Quellen Sie vertrauen. Sportstech Brands Holding kann keine Haftung für Software übernehmen, die von Drittanbietern bereitgestellt wird. Bitte denken Sie daran, die Bluetooth-Funktion auf Ihrem Gerät einzuschalten.
  • Seite 23 Recyclingkreislauf Verpackungsmaterialien können wieder dem Rohstoffkreislauf zugeführt werden. Entsorgen Sie die Verpackung gemäß den aktuellen Bestimmungen. Informationen erhalten Sie bei den Rückgabe- und Sammelsystemen Ihrer Gemeinde. Hinweise zum Elektro- und Elektronikgerätegesetz (ElektroG) Wir weisen Besitzer von Elektro- und Elektronikaltgeräten darauf hin, dass Elektroaltgeräte gemäß den geltenden gesetzlichen Vorschriften, einer vom Siedlungsabfall getrennten Erfassung zuzuführen sind.
  • Seite 25 Dear customer, We are pleased you chose a device from the SPORTSTECH product range. SPORTSTECH sports equipment offers you high quality and new technology. In order to fully use the potential of your device and be able to enjoy it for many years, please read this manual carefully before starting up and beginning of training, and use the device according to the instructions.
  • Seite 26 1. Scan the QR code 2. Watch videos 3. Start fast and safely Link to the videos: https://service.innovamaxx.de/fx3pro_video We are also on social media! Get the latest product information, training content and much more on our: Instagram-page Facebook-page https://www.instagram.com/sportstech.de https://www.facebook.com/sportstech.de...
  • Seite 27 INDEX IMPORTANT SAFETY INSTRUCTIONS ................28 SETTING UP THE DEVICE ..................... 30 EXPLODED DRAWING/SPARE PARTS LIST ..............30 PRODUCT OVERVIEW ....................31 ASSEMBLY INSTRUCTIONS ..................32 FOLDING MECHANISM / TRANSPORT ................33 INSTALLATION / STORAGE ................... 34 CONSOLE ........................35 RUNNING PROGRAMS ....................
  • Seite 28: Important Safety Instructions

    IMPORTANT SAFETY INSTRUCTIONS It is essential to fully observe this safety information when using this product. Read all instructions thoroughly before using the product. DANGER: To reduce the risk of electric shock, unplug the product after use, during assembly or disassembly, and for maintenance or cleaning purposes.
  • Seite 29 • WARNING: Consult a doctor before exercising. This note must be observed by the elderly or people with limited health. Read all the safety instructions in this manual carefully before using the device. • The use of the device under the influence of alcohol, drugs or narcotics is strictly prohibited. •...
  • Seite 30: Setting Up The Device

    SETTING UP THE DEVICE Set up the device on a level surface and pay attention to the surroun- ding clear space: 0,3 m 1. There must be at least 2 meters of free space at the rear of the device. 2.
  • Seite 31: Product Overview

    Transport wheels Power cord connection Power switch Adjusting screws for treadmill tension Scope of delivery Product name Sportstech FX3 Pro Laufband • Security key 1710 x 830 x 1137 mm Assembly dimensions (LxWxH) Folding size 1710 x 830 x 332 mm •...
  • Seite 32: Assembly Instructions

    ASSEMBLY INSTRUCTIONS Step 1 Open the packaging and remove the contents. Place the treadmill on a flat surface. Make sure that your assembly area is clean and that you have enough space. Position the mobile phone holder on the top of the display and then place the adhesive pad on it to ensure greater adhesion for your mobile device.
  • Seite 33: Folding Mechanism / Transport

    FOLDING MECHANISM / TRANSPORT Before transport or folding, the device must be disconnected from the power and cables must be removed from the device! Set up 1. The folding buttons are under the handrails. First press both handrails down slightly and at the same time pull the buttons towards you with your fingers before pushing up the handrails to fold the brackets backwards with the handles.
  • Seite 34: Installation / Storage

    INSTALLATION / STORAGE Set up To stand the treadmill upright, hold the treadmill at the end of the lower support arms and lift it up so that you can transport the device on the front wheels. Once you can fold the support feet completely down, hold the support feet with one foot and slowly lower the treadmill in your direction.
  • Seite 35: Console

    CONSOLE Program / speed distance Bluetooth Heart rate Fatigue button Calories Security lock Rotary knob time Turn on the treadmill with the power switch on the back by turning it to the ON "position. Before you start exercising, make sure that the safety clip has been put on and is in the slot on the console. QUICK START Press the START button on the console to start training.
  • Seite 36: Running Programs

    RUNNING PROGRAMS The treadmill has 10 preset running programs with variable speeds. The standard practice time is 30 minutes (changes can be made manually). Each program (P1-P10) runs through 10 speed segments. No manual settings needs to be made. SELECT PROGRAM: 1.
  • Seite 37: Error Messages / Display Messages

    ERROR MESSAGES / DISPLAY MESSAGES Visible Possible cause Proposed solutions display 1. Check whether the safety switch is in the intended The security key has been removed position. 2. Check whether the safety switch connector is loose from the security lock. or has fallen off.
  • Seite 38 Engine blockage Check / replace the motor. Overheating of the power module Check / replace the controller. 1. Check / replace the buttons. 2. Check / replace the console. Some or all of the buttons 3. Remove the console hood to test the buttons. don't work.
  • Seite 39: Maintenance And Care

    MAINTENANCE AND CARE General maintenance and care help to maintain the life and performance of your treadmill. Keep the device clean by dusting the components regularly. Clean both sides of the treadmill to prevent dust from collecting under the belt. Keep your running shoes clean so that the tread and the parts do not get dirty.
  • Seite 40: Lubricate The Tread

    LUBRICATE THE TREAD WORKING STEPS: FILLING THE SILICONE OIL • Unscrew the cap from the silicone oil bottle and remove the • inner sealing paper. • Screw the cap back onto the bottle and remove the nozzle cap. • Cut off at about 5mm from the tip. Use e.g. a sharp knife. Oil filler opening Left Right...
  • Seite 41: Treadmill Tightening

    TREADMILL TIGHTENING ADJUSTING THE TIGHTNESS The treadmill is pre-assembled at the factory and set correctly. After the initial installation / assembly at home or after a certain period of use, the rotating treadmill can become loose. The tightness decreases. Signs of this can be e.g. a sudden pause of the device while running or a slipping of the rotating treadmill.
  • Seite 42: Treadmill Centering

    TREADMILL CENTERING CENTERING THE TREADMILL Place the treadmill on a level surface and set it to a maximum of 3.5 km/h to check if the rotating treadmill is slipping. Make the necessary settings on the adjusting screws for treadmill align- ment (at the rear end of the device).
  • Seite 43: Stretch Exercise

    STRETCH EXERCISE Before each workout you should stretch your muscles for at least 5-10 minutes to warm them up sufficiently. Repeat the following stretching exercises five times. Stretching before training helps improve flexibility and reduces the risk of injury. HEAD ROLLS Rotate your head to the right for one count, feeling the stretch up the left side of your neck, then rotate your head back for one count, stretching your chin to the ceiling and letting your mouth open.
  • Seite 44: Application Software (App)

    Android Kinomap Notes on using the App: You should only install apps from sources you trust. Sportstech Brands Holding cannot accept any liability for software provided by third parties. Please remember to turn on the Bluetooth feature on your device.
  • Seite 45 Recycling loop Packaging material can be conveyed back to the raw material cycle. Dispose of packaging material in accordance with legal provisions. Information can be retrieved from the return or collections systems of your community. Notes on the Electrical and Electronic Equipment Act (ElektroG) We would like to point out to owners of electrical and electronic equipment that, according to the applicable legal regulations, electrical devices must be disposed of separately from municipal waste.
  • Seite 47 Estimado cliente, Nos complace que haya elegido un dispositivo de la línea de productos SPORTSTECH. Las máquinas de deporte de SPORTSTECH ofrecen una gran calidad y una tecnología innovadora. Con el fin de usar todo el potencial de su dispositivo y para que pueda disfrutarlo durante muchos años, por favor lea este manual cuidadosamente antes de comenzar a ejercitarse, y use el dispositivo de acuerdo a las instrucciones.
  • Seite 48 Montaje, Utilizar, Desmontaje. 1. Escanear el código QR 2. Ver vídeos 3. Comienza rápido y seguro Enlace a los videos: https://service.innovamaxx.de/fx3pro_video ¡También estamos en redes sociales! Obtenga la última información sobre nuestros productos, entrenamientos y mucho más aquí: Instagram Facebook https://www.instagram.com/sportstech.de https://www.facebook.com/sportstech.de...
  • Seite 49 ÍNDICE INSTRUCCIONES DE SEGURIDAD IMPORTANTES ............50 INSTALACIÓN DEL APARATO ..................52 DIBUJO DE EXPLSOIÓN/LISTA DE REPUESTOS .............. 52 DESCRIPCIÓN DEL PRODUCTO ..................53 INSTRUCCIONES DE MONTAJE ..................54 MECANISMO DE PLEGADO / TRANSPORTE ..............55 INSTALACIÓN / ALMACENAMIENTO ................56 CONSOLA ........................
  • Seite 50: Instrucciones De Seguridad Importantes

    INSTRUCCIONES DE SEGURIDAD IMPORTANTES Siga estos consejos de seguridad cada vez que utilice este producto. Lea todas las instrucciones antes de utilizarlo. ATENCIÓN: Para reducir el riesgo de descarga eléctrica, desenchufe el producto de la toma de corriente después de usarlo, al montarlo y desmontarlo y cuando vaya a limpiarlo. Ignorar este aviso puede provocar daños a su persona o al producto.
  • Seite 51 • lación y agárrese al pasamanos lateral cuando descienda. • No coloque el aparato sobre una alfombra que sea más alta que la superficie de rodadura o el mecanismo de plegado. • PELIGRO: Consulte a un médico antes de hacer ejercicio. Esta observación es especialmente relevante para per- sonas mayores o con problemas de salud.
  • Seite 52: Instalación Del Aparato

    INSTALACIÓN DEL APARATO Coloque el aparato en una superficie plana y preste atención a las distancias: 0,3 m 1. Debe haber un espacio libre de al menos 2 metros libre detrás del aparato. 2. Debe haber un espacio libre de al menos 21 metro libre a ambos lados del aparato.
  • Seite 53: Descripción Del Producto

    Interruptor de Tornillos para ajustar la tensión de la cinta Entrada de alimentación de correr Alcance de entrega Nombre del producto Sportstech FX3 Pro Laufband • Cerradura de segu- ridad 1710 x 830 x 1137 mm Dimensiones (LxAxA) Medidas plegadas 1710 x 830 x 332 mm •...
  • Seite 54: Instrucciones De Montaje

    INSTRUCCIONES DE MONTAJE Paso 1 Abra el paquete y saque el contenido. Coloque la cinta de correr sobre una superficie nivelada. Asegúrese de que la superficie es lo suficientemente grande y está limpia. Coloque el soporte del teléfono móvil en la parte superior de la pantalla y coloque la almohadilla adhesiva encima para que el teléfono se adhiera mejor.
  • Seite 55: Mecanismo De Plegado / Transporte

    MECANISMO DE PLEGADO / TRANSPORTE Antes de transportar o doblar la unidad, desconéctela de la fuente de alimentación y retire todos los cables. Plegado 1. Los botones para plegar están debajo de los pasamanos. Primero presiona ambos pasamanos ligeramente hacia abajo y al mismo tiempo tira de los botones hacia ti con los dedos antes de empujar los pasamanos hacia arriba para plegar la consola y las asas.
  • Seite 56: Instalación / Almacenamiento

    INSTALACIÓN / ALMACENAMIENTO INSTALACIÓN Para colocarla en posición vertical, tome la parte trasera de la cinta, al final de la estructura inferior y levántela para poder transportar la unidad sobre las ruedas delanteras. En el lugar de la instalación, levante la cinta de correr verticalmente para que los pies de apoyo se puedan desplegar completamente.
  • Seite 57: Consola

    CONSOLA Programa / Velocidad Distancia Bluetooth Frecuencia cardíaca Botón de fatiga Calorías Cierre de Botón giratorio Tiempo seguridad Encienda la cinta poniendo el interruptor en la parte trasera de la cinta en la posición "ON". Antes de empezar a hacer ejercicio, asegúrese de que la llave de seguridad se ha puesto y está...
  • Seite 58: Programas De Carrera

    PROGRAMAS DE CARRERA La cinta tiene 10 programas de carrera preestablecidos con velocidades variables. El tiempo estándar de ejercicio es de 30 minutos cada uno (los cambios se pueden hacer manualmente). Cada programa (P1-P10) se ejecuta a través de 10 segmentos de velocidad. No es necesario hacer ajustes manuales.
  • Seite 59: Mensajes De Error / Indicaciones De La Pantalla

    MENSAJES DE ERROR / INDICACIONES DE LA PANTALLA Pantalla Posible causa Soluciones propuestas 1. Compruebe que el interruptor de seguridad está en La llave de seguridad ha sido retira- la posición correcta. 2. Compruebe si el enchufe del interruptor de seguri- da de la cerradura de seguridad.
  • Seite 60 Bloqueo del motor Revise / reemplace el motor. Sobrecalentamiento del módulo de Revise / reemplace el controlador. potencia 1. Compruebe / sustituya los interruptores. 2. Compruebe / sustituya la consola Alguno o todos los botones 3. Retire la cubierta de la consola para probar los no funcionan.
  • Seite 61: Mantenimiento Y Cuidado

    MANTENIMIENTO Y CUIDADO El mantenimiento y el cuidado general ayudarán a aumentar la vida útil y el rendimiento de la cinta de correr. Limpie la unidad regularmente. Limpie ambos lados de la cinta para evitar que el polvo se acumule bajo ella. Mantenga sus zapatillas limpias para que la superficie de correr y la banda no se ensucien.
  • Seite 62: Lubricar La Superficie De Rodadura

    LUBRICAR LA SUPERFICIE DE RODADURA PASOS DE MANTENIMIENTO LLENANDO CON ACEITE DE SILICONA • Desenrosque el tapón de la botella de aceite de silicona y retire el papel de sellado interior. • Vuelva a enroscar el tapón de la botella y quite la tapa de la boquilla. •...
  • Seite 63: Apriete De La Banda De Rodadura

    APRIETE DE LA BANDA DE RODADURA. AJUSTAR LA TENSIÓN La cinta de correr está premontada y se ajusta correctamente en la fábrica. Después de la instalación/montaje inicial en casa o después de un cierto período de uso, la cinta puede aflojarse. La tensión disminuye.
  • Seite 64: Centrado De La Cinta De Correr

    CENTRADO DE LA CINTA DE CORRER CENTRAR LA CINTA DE CORRER Coloque la cinta de correr sobre una superficie plana y póngala a una velocidad máxima de 3.5km/h, para comprobar si la banda de rodadura se está deslizando. Realice los ajustes necesarios en los tornillos de ajuste de la alineación de la banda de rodadura (situados en la parte posterior de la unidad).
  • Seite 65: Ejercicios De Estiramiento

    EJERCICIOS DE ESTIRAMIENTO Antes de cada entrenamiento debes estirar tus músculos durante al menos 5-10 minutos para calentarlos lo suficiente. Repita los siguientes ejercicios de estiramiento cinco veces. El estiramiento antes del entrenamiento ayuda a mejorar la flexibilidad y reduce el riesgo de lesiones. GIROS CON LA CABEZA Gire su cabeza hacia la derecha por un segundo, sienta como se estira el lado izquierdo de su cuello, luego gire su cabeza hacia tras por un segundo, estirando su barbilla hacia el techo y dejando su boca...
  • Seite 66: Software (Aplicación)

    Android Kinomap Consejos para el uso de las aplicaciones: Instale solo aplicaciones de fuentes de confianza. Sportstech Brands Holding no se hace responsab- le de softwares proporcionados por terceros. Por favor, recuerde activar la función Bluetooth en su dispositivo. El código QR al principio del manual le llevará varios tutoriales en YouTube. Allí encontrará más información sobre la aplicación y el dispositivo.
  • Seite 67 Reciclaje loop El material de empaque puede trasladarse de nuevo al ciclo de materias primas. Deshágase del material de empaque de acuerdo a las normativas legales. Puede encontrar información en los sistemas de recolección de su comunidad. Notas sobre la Ley sobre aparatos eléctricos y electrónicos (ElektroG) Quisiéramos señalar a los propietarios de aparatos eléctricos y electrónicos viejos que éstos deben desecarse por separado de los residuos municipales de conformidad con las normas legales aplicables.
  • Seite 69 FRANÇAIS Cher client, Nous sommes ravis que vous ayez choisi un appareil de la gamme de produits SPORTSTECH. Les équipements sportifs SPORTSTECH vous offrent une qualité élevée et une technologie innovante. Afin d'utiliser pleinement le potentiel de votre appareil et de pouvoir l'apprécier pendant de nombreuses années, lisez atten- tivement ce manuel avant l'utilisation et le début de votre entraînement et utilisez l'appareil conformément aux instructions.
  • Seite 70 3. Démarrez rapidement et en toute sécurité Lien vers les vidéos: https://service.innovamaxx.de/fx3pro_video Vous pouvez aussi nous trouver sur les réseaux sociaux! Retrouve les dernières informations sur les produits, le contenu des entraînements et bien plus encore sur notre: la page Instagram la page Facebook https://www.instagram.com/sportstech.de https://www.facebook.com/sportstech.de...
  • Seite 71 SOMMAIRE DES INFORMATIONS DE SÉCURITÉ IMPORTANTES ............72 INSTALLATION DE L‘APPAREIL ..................74 DESSIN ÉCLATÉ/LISTE DES PIÈCES DE RECHANGE ............74 APERÇU DU PRODUIT ....................75 INSTRUCTIONS DE MONTAGE ..................76 MÉCANISME DE PLIAGE / TRANSPORT ................. 77 INSTALLATION / STOCKAGE ..................78 CONSOLE ........................
  • Seite 72: Des Informations De Sécurité Importantes

    DES INFORMATIONS DE SÉCURITÉ IMPORTANTES Ces informations générales de sécurité doivent impérativement être respectées lors de l‘utilisation de ce produit. Lisez toutes les indications avant de mettre le produit en service. ATTENTION : Pour réduire le risque d‘électrocution, débranchez le produit après utilisation, lors de l‘assemblage ou du démontage, en cas de maintenance ou si vous souhaitez le nettoyer.
  • Seite 73 • Ne descendez jamais de l‘appareil lorsque la bande de course est en mouvement. Éteignez l‘appareil au préalable et tenez-vous à la main courante latérale lorsque vous descendez. • Ne placez pas l‘appareil sur un tapis dont les poils sont plus hauts que la bande de course ou le mécanisme de pliage.
  • Seite 74: Installation De L'appareil

    INSTALLATION DE L‘APPAREIL Placez l‘appareil sur une surface plane et faites attention aux dégagements : 0,3 m 1. À l‘extrémité arrière de l‘appareil, l’espace restant libre doit être d‘au moins 2 mètres. 2. Des deux côtés de l‘appareil, cet espace doit être d‘au moins 1 mètre. 3.
  • Seite 75: Aperçu Du Produit

    Vis de réglage de la tension du tapis de mentation course Contenu de la livraison Nom du produit Sportstech FX3 Pro Laufband • Clé de sécurité 1710 x 830 x 1137 mm Dimensions du châssis (L x l x h) Dimensions si replié...
  • Seite 76: Instructions De Montage

    INSTRUCTIONS DE MONTAGE Étape 1 Ouvrez l'emballage et retirez le contenu. Placez le tapis de course sur une surface plane. Assurez-vous que l'empla- cement choisi soit propre et que vous disposez de suffisamment d'espace. Fixez le support du téléphone portable sur le haut de l'écran et placez-y le coussinet adhésif afin d'obtenir une meilleure adhérence pour votre appareil mobile.
  • Seite 77: Mécanisme De Pliage / Transport

    MÉCANISME DE PLIAGE / TRANSPORT Avant de transporter ou de replier l'appareil, débranchez-le de l'alimentation électrique et retirez les câbles de l'appareil ! Repliage 1. Les boutons du mécanisme de pliage se trouvent sous les mains courantes. Appuyez d'abord légèrement sur les deux mains courantes en les poussant vers le bas.
  • Seite 78: Installation / Stockage

    INSTALLATION / STOCKAGE Installation Pour mettre le tapis de course à la verticale, saisissez-le à l'arrière, à l'extrémité des bras d'appui inférieurs. Puis soulevez le tapis de course afin de pouvoir le transporter sur les roues avant. À l'endroit de son installation, soulevez le tapis de course suffisamment à...
  • Seite 79: Console

    CONSOLE Programme / Vitesse Distance Bluetooth Rythme cardiaque Touche fatigue Calories Dispositif de Bouton Temps verrouillage Allumez le tapis de course à l'aide de l'interrupteur situé sur le panneau arrière en le mettant en position "ON". Avant de commencer l'entraînement, assurez-vous que le clip de sécurité soit bien inséré dans l’emplacement prévu sur la console.
  • Seite 80: Programme De Course

    PROGRAMME DE COURSE Le tapis dispose de 10 programmes de course préconfigurés à des vitesses variables. La durée standard d'un exercice est de 30 minutes (des modifications peuvent être effectuées manu- ellement). Chaque programme (P1 à P10) passe par 10 segments de vitesse. Aucun réglage manuel n'est nécessaire.
  • Seite 81: Messages D'erreur / Écran D'affichage

    MESSAGES D'ERREUR / ÉCRAN D’AFFICHAGE Écran d’af- Cause possible Solutions proposées fichage 1. Vérifiez que l'interrupteur de sécurité soit dans la La clé de sécurité a été retirée du position prévue. 2. Vérifiez si la fiche de l'interrupteur de sécurité est dispositif de verrouillage.
  • Seite 82 Arrêt du moteur Vérifiez / Remplacez le moteur. Surchauffe du module de puissance Vérifiez / Remplacer le contrôleur. 1. Vérifiez / Remplacez les boutons. 2. Vérifiez / Remplacez la console. Certains ou tous les boutons 3. Retirez le couvercle de la console pour tester les ne fonctionnent pas boutons.
  • Seite 83: Maintenance Et Entretien

    MAINTENANCE ET ENTRETIEN La maintenance et l'entretien général contribueront à préserver la longévité et les performances de votre tapis de course. Gardez l'appareil propre en dépoussiérant régulièrement ses composants. Nettoyez les deux côtés de la surface de course afin d'éviter que la poussière ne s'accumule sous la bande. Gardez vos chaussures de course propres pour éviter de salir la surface de course et la bande.
  • Seite 84: Lubrification De La Surface De Course

    LUBRIFICATION DE LA SURFACE DE COURSE ÉTAPES DE TRAVAIL : REMPLISSAGE AVEC L'HUILE DE SILICONE • Dévissez le bouchon de la bouteille d'huile de silicone et retirez le papier de scellement à l'intérieur. • Revissez le bouchon sur la bouteille et retirez le capuchon de l'embout. •...
  • Seite 85: Tension Du Tapis De Course

    TENSION DU TAPIS DE COURSE AJUSTEZ L'ÉTANCHÉITÉ Le tapis de course est préassemblé et correctement réglé à l'usine. Après la première installation ou le montage initial à la maison, ou après une certaine période d'utilisation, la bande rotative du tapis de course peut se distendre. La tension diminue. Les signes de ce problème peuvent, par exemple, être un arrêt soudain de l'appareil ou un déplacement de la surface de course en rotation.
  • Seite 86: Centrage De La Surface De Course

    CENTRAGE DE LA SURFACE DE COURSE CENTRAGE DE LA SURFACE DE COURSE Placez le tapis de course sur un sol plat et réglez-le à une vitesse maximale de 3,5 km/h afin de vérifier que la surface de course en rotation ne glisse pas. Effectuez les réglages nécessaires sur les vis de réglage de l'alignement du tapis de course (situées à...
  • Seite 87: Excercice D'étirement

    EXCERCICE D'ÉTIREMENT Avant chaque séance d'entraînement, vous devez étirer vos muscles pendant au moins 5 à 10 minutes pour les réchauffer suffisamment. Répétez les exercices d'étirement suivants cinq fois. Les étirements avant l'entraînement permettent d'améliorer la flexibilité et de réduire le risque de blessure. ROULER LA TÊTE Tournez la tête vers la droite une fois, en étirant le côté...
  • Seite 88: Logiciel D'application (App)

    Kinomap Informations sur l’utilisation de l’application : Vous ne devriez installer que des applications pour lesquelles vous êtes sûr des sources. Sportstech Brands Holdingne peut accepter aucune responsabilité pour les logiciels fournis par des tiers. N’oubliez pas d’activer la fonction Bluetooth de votre appareil.
  • Seite 89 Chaîne du recyclage Les matériaux d‘emballage peuvent être transportés vers le cycle des matières premières. La disposition des matériaux d‘emballage, conformément aux dispositions légales. Les informations peuvent être récupérées à partir des systèmes de retour ou de collections. Information relative à la législation sur les équipements électriques et électroniques (ElektroG) Nous tenons à...
  • Seite 91 ITALIANO Gentile cliente Siamo lieti che abbiate scelto un dispositivo della gamma SPORTSTECH. L'attrezzatura sportiva SPORTSTECH ti offre alta qualità e tecnologia innovativa. Per sfruttare a pieno il potenziale del dispositivo e poterlo utilizzare per molti anni, raccomandiamo di leggere attentamente questo manuale prima di iniziare l’allenamento e di utilizzare il dispositivo seguendo le istruzioni.
  • Seite 92 2. Guarda il video 3. Inizia ad allenarti veloce e sicuro Link per il Video: https://service.innovamaxx.de/fx3pro_video Ci siamo anche sui social! Scopri le ultime novità sui prodotti, contenuti per l'allenamento e molto altro ancora sul nostro: pagina Instagram pagina Facebook https://www.instagram.com/sportstech.de https://www.facebook.com/sportstech.de...
  • Seite 93 INDICE INHALT IMPORTANTI ISTRUZIONI DI SICUREZZA ................ 94 IMPOSTAZIONE DELL‘APPARECCHIO ................96 DISEGNO ESPLOSO/LISTA DEI PEZZI DI RICAMBIO ............96 PANORAMICA DEL PRODOTTO ..................97 ISTRUZIONI DI MONTAGGIO ..................98 MECCANISMO DI CHIUSURA A RIBALTINA / TRASPORTO ..........99 INSTALLAZIONE / STOCCAGGIO ................... 100 CONSOLE ........................
  • Seite 94: Importanti Istruzioni Di Sicurezza

    IMPORTANTI ISTRUZIONI DI SICUREZZA È essenziale seguire queste informazioni generali di sicurezza quando si usa questo prodotto. Leggere tutte le istruzioni prima di utilizzare il prodotto. ATTENZIONE: Per ridurre il rischio di scosse elettriche, scollegare questo prodotto dopo l‘uso, quando si monta o si smonta, e per la manutenzione o la pulizia. Ignorare questo avviso può...
  • Seite 95 • anticipo e tenersi al corrimano laterale durante la discesa. • Non posizionare l‘apparecchio su un tappeto più alto del battistrada o del meccanismo di piegatura. • ATTENZIONE: Consultare un medico prima di fare esercizio. Questa avvertenza deve essere osservata dalle perso- ne anziane o con problemi di salute.
  • Seite 96: Impostazione Dell'apparecchio

    IMPOSTAZIONE DELL‘APPARECCHIO Posizionare l‘apparecchio su una superficie piana e fare attenzione alle distanze: 0,3 m 1. Ci deve essere uno spazio libero di almeno 2 metri all‘estremità posteriore de- ll‘apparecchio. 2. Ci deve essere almeno 1 metro di spazio libero su entrambi i lati dell‘unità. 3.
  • Seite 97: Panoramica Del Prodotto

    Collegamento del cavo di alimentazione Dotazione di fornitura Nome prodotto Sportstech FX3 Pro Laufband • Chiave di sicurezza 1710 x 830 x 1137 mm Dimensioni montato (LxBxH) Dimensioni chiuso 1710 x 830 x 332 mm •...
  • Seite 98: Istruzioni Di Montaggio

    ISTRUZIONI DI MONTAGGIO Passo 1 Aprire la confezione e rimuovere il contenuto. Posizionare il tapis roulant su una superficie piana. Assicurarsi che il luo- go in cui viene installato sia pulito e che si disponga di spazio sufficiente. Infilate il supporto per il cellulare nel display sopra e mettetelo sull'adesivo per migliorare l'aderenza del vostro telefonino al dispositivo.
  • Seite 99: Meccanismo Di Chiusura A Ribaltina / Trasporto

    MECCANISMO DI CHIUSURA A RIBALTINA / TRASPORTO Prima del trasporto o della chiusura, il tapis roulant deve essere scollegato dall'alimentazione e i cavi devono essere rimossi dal dispositivo! Chiusura a ribaltina 1. "I pulsanti per piegare il tapis roulant si trovano sotto i corrimano. Innanzitutto, premere leggermente entrambi i corrimano verso il basso e contemporaneamente tirare i pulsanti verso di sé...
  • Seite 100: Installazione / Stoccaggio

    INSTALLAZIONE / STOCCAGGIO Installazione Per posizionare il tapis roulant in posizione verticale, afferrare l'estremità dei bracci di supporto inferiori e sollevarlo in modo da poter trasportare il dispositivo sulle sue ruote anteriori. Giunti nel luogo di installazione, sollevare il tapis roulant verticalmente in modo da poter ripiegare comple- tamente i piedini di supporto.
  • Seite 101: Console

    CONSOLE programma/fre- velocità distanza Bluetooth Pulsante di affatica- quenza cardiaca mento calorie Blocco di Manopola tempo sicurezza Attivare il tapis roulant posizionando l'interruttore di alimentazione su “ON”. Prima di iniziare l'allenamento, assicurarsi che la clip di sicurezza sia stata posizionata correttamente nell'apposito spazio della console. AVVIO RAPIDO: Premi il pulsante START sulla console per iniziare l'allenamento.
  • Seite 102: Programmi Di Corsa

    PROGRAMMI DI CORSA Il tapis roulant ha 10 programmi di corsa preimpostati con velocità variabile. Il tempo di esercizio standard è di 30 minuti (le modifiche possono essere fatte manualmente). Ogni programma (P1- P10) passa attraverso 10 segmenti di velocità. Non è necessario effettuare impostazioni manuali. SELEZIONARE IL PROGRAMMA: 1.
  • Seite 103: Errore/Icone Sul Display

    ERRORE/ICONE SUL DISPLAY icona sul possibile causa proposte di soluzione display 1. Controllare se l'interruttore di sicurezza è nella La chiave di sicurezza è stata rimos- posizione prevista. 2. Controllare se il connettore dell'interruttore di sicu- sa dal blocco di sicurezza. rezza è...
  • Seite 104 blocco motore Controllare / sostituire il motore. Surriscaldamento del modulo di Controllare / sostituire il controller. potenza 1. Controllare / sostituire i pulsanti. 2. Controllare / sostituire la console. Alcuni o tutti i pulsanti 3. Rimuovere il cofano della console per verificare il non funzionano.
  • Seite 105: Manutenzione E Cura

    MANUTENZIONE E CURA La manutenzione e l'assistenza generali aiutano a mantenere la longevità e le prestazioni del tapis roulant. Mantenere pulito il dispositivo spolverando regolarmente i componenti. Pulire entrambi i lati del tapis roulant per evitare che la pol- vere si accumuli sotto la cintura. Pulire le scarpe da corsa in modo che la superficie da corsa e il nastro non si sporchino. Pulire la superficie del tapis roulant con un panno pulito e umido.
  • Seite 106: Lubrificazione Della Superficie Da Corsa

    LUBRIFICAZIONE DELLA SUPERFICIE DA CORSA PASSAGGI DI LAVORO: RIEMPIMENTO DELL'OLIO DI SILICONE • Svitare il tappo dalla bottiglia di olio di silicone e rimuovere la carta sigillante interna. • Riavvitare il tappo sul flacone e rimuovere il tappo dell'ugello. • Tagliare circa 5 mm dalla punta. Utilizzare ad es. un coltello affilato. Apertura di riempimento de- ll'olio sinistra...
  • Seite 107: Regolazione Tenuta

    REGOLAZIONE TENUTA REGOLARE LA TENUTA Il tapis roulant è pre-assemblato in fabbrica e impostato correttamente. Dopo l'installazione / assemblaggio iniziale a casa o dopo un certo periodo di utilizzo, il tapis roulant può allentarsi. La tenuta diminuisce. Può quindi succedere che il dispositivo si interrompa bruscamente durante la corsa o che l'utente possa scivolare.
  • Seite 108: Centraggio Del Tapis Roulant

    CENTRAGGIO DEL TAPIS ROULANT CENTRAGGIO DEL TAPIS ROULANT Posizionare il tapis roulant su una superficie piana e impostarlo su un massimo di 3,5 km / h, per verificare se il nastro scivola. Regolare le viti per allinearlo (all'estremità posteriore del dispositivo). Vedere la Figura 3: parti ed elementi di controllo.
  • Seite 109: Esercizi Di Stretching

    ESERCIZI DI STRETCHING Prima di ogni allenamento si dovrebbe allungare i muscoli per almeno 5-10 minuti per riscaldarli a sufficienza. Ripetere i seguenti esercizi di stretching per cinque volte. Lo stretching prima dell'allenamento aiuta a migliorare la flessibilità e riduce il rischio di lesioni. RULLI PER LA TESTA Ruotare la testa a destra, fino a sentir allungare il lato sinistro del collo, poi ruotare la testa indietro, allungando il mento verso il soffitto e aprendo la bocca.
  • Seite 110: Software Di Utilizzo (App)

    Android Kinomap Note sull'uso dell'app: Si dovrebbero installare solo le applicazioni da una fonte affidabile. Sportstech Brands Holding non si assume alcuna responsabilità per software forniti da terzi. Ricordarsi di attivare la funzionalità Bluetooth sul dispositivo. Il codice QR all'inizio del manuale ti guiderà a vari tutorial di YouTube. Lì otterrai maggiori informa- zioni sull'app e sul dispositivo.
  • Seite 111 Riciclaggio dei rifiuti Il materiale di imballaggio può essere trasportato di nuovo al ciclo delle materie prime. Smaltire il materiale di imballaggio in conformità alle disposizioni di legge. Le informazioni possono essere recuperate dai sistemi di ritorno o di raccolta della vostra comunità. Avviso sulla legge degli apparecchi elettrici ed elettronici (ElektroG) Desideriamo far notare ai proprietari di vecchie apparecchiature elettriche ed elettroniche che le apparecchiature elettriche devono essere raccolte separa- tamente dai rifiuti urbani, in conformità...
  • Seite 113 NEDERLANDS Geachte klant, We zijn blij dat je een apparaat uit het SPORTSTECH-assortiment hebt gekozen. De sportuitrusting van SPORTSTECH brengt hoogwaardige apparaten met nieuwe technologieën. Lees vóór gebruik deze gebruikershandleiding aandachtig door en gebruik het apparaat zoals aangegeven. Zo zul je ten volle van de prestaties van het apparaat kunnen profiteren en er vele jaren geniet van hebben.
  • Seite 114 1. Scan de QR-code 2. Bekijk video‘s 3. Begin snel en veilig Link naar de video's: https://service.innovamaxx.de/fx3pro_video We zijn ook actief op social media! Raadpleeg voor de meest recente productinformatie, trainingen en nog veel meer, onze: Instagram-pagina Facebook-pagina https://www.instagram.com/sportstech.de https://www.facebook.com/sportstech.de...
  • Seite 115 INHOUD BELANGRIJKE VEILIGHEIDSINSTRUCTIES ............... 116 OPSTELLIG VAN HET APARAAT..................118 EXPLOSIETEKENING/ONDERDELENLIJST ............... 118 PRODUCTOVERZICHT ....................119 MONTAGE-INSTRUCTIES....................120 OPKLAPMECHANISME/TRANSPORT ................121 OPSTELLEN/OPSLAG ....................122 CONSOLE ........................123 LOOPPROGRAMMA'S ....................124 GEBRUIK VAN DE HARTSLAGMETER ................124 FOUTMELDINGEN/DISPLAYWEERGAVE ................125 ONDERHOUD EN ZORG ....................127 SMEREN VAN HET LOOPVLAK ..................
  • Seite 116: Belangrijke Veiligheidsinstructies

    BELANGRIJKE VEILIGHEIDSINSTRUCTIES Deze algemene veiligheidsinformatie moet bij het gebruik van dit apparaat strikt worden nageleefd. Lees alle instructies voordat je het apparaat gebruikt. LET OP: Trek de stekker uit het apparaat na gebruik, tijdens montage of demontage en voor onderhouds- of reinigingsdoeleinden om het risico op elektrische schokken te verminderen.
  • Seite 117 • Plaats het apparaat niet op een tapijt dat hoger is dan het loopvlak of het opklapmechanisme. • WAARSCHUWING: Raadpleeg een arts voordat je gaat sporten. Deze opmerking moet in acht worden genomen voor ouderen of personen met een beperkte gezondheidstoestand. Lees alle veiligheidsinstructies in deze handlei- ding zorgvuldig door voordat je het apparaat gebruikt.
  • Seite 118: Opstellig Van Het Aparaat

    OPSTELLING VAN HET APPARAAT Plaats het apparaat op een vlakke ondergrond en let op de afstanden: 0,3 m 1. Er moet een vrije ruimte van minstens 2 meter zijn aan de achterkant van het apparaat. 2. Er moet minstens 1 meter vrije ruimte zijn aan weerszijden van het apparaat. 3.
  • Seite 119: Productoverzicht

    Transportwielen Stroomscha- Verstelschroeven voor de loopbandspan- Aansluiting van het netsnoer kelaar ning Leveringsomvang Productnaam Sportstech FX3 Pro Laufband • Veiligheidssleutel 1710 x 830 x 1137 mm Opbouwafmetingen (lxbxh) Opklapafmetingen 1710 x 830 x 332 mm • Netsnoer Snelheid: 1 -20 km/h...
  • Seite 120: Montage-Instructies

    MONTAGE-INSTRUCTIES Stap 1 Open de verpakking en haal er het apparaat uit. Plaats de loopband op een vlakke ondergrond. Zorg ervoor dat de plaats van opstelling schoon is en dat je genoeg ruimte hebt. Bevestig de smartphonehouder aan de bovenkant van het display en plaats het hechtende pad erop voor een betere hechting van je mobiele apparaat.
  • Seite 121: Opklapmechanisme/Transport

    OPKLAPMECHANISME/TRANSPORT Voordat je het apparaat transporteert of opklapt, moet je het van de stroom loskoppelen en de kabels van het apparaat verwijderen! Opklappen 1. De knoppen om op te klappen bevinden zich onder de leuningen. Druk beide leuningen eerst iets naar beneden en trek tegelijkertijd de knoppen met je vingers naar je toe voordat je de leuningen omhoog duwt om de console met de handgrepen naar achteren te klappen.
  • Seite 122: Opstellen/Opslag

    OPSTELLEN/OPSLAG Opstellen Om de loopband rechtop te zetten, neem je de achterkant van de loop- band aan het einde van de onderste steunarmen vast en til je hem op zodat je het apparaat op de voorwielen kunt verplaatsen. Op de plaats van opstelling moet de loopband verticaal omhoog worden getild, zodat de steunvoeten in een keer volledig kunnen worden neergeklapt.
  • Seite 123: Console

    CONSOLE Programma/ Snelheid Afstand Bluetooth hartfrequentie Vermoeidheidsknop Calorieën Beveiliging Draaiknop Tijd Schakel de loopband in met de stroomonderbreker aan de achterkant door deze in de stand “ON” te zetten. Contro- leer voordat je met de training begint of de beveiligingsclip is aangesloten en in de sleuf op de console zit. SNELLE START: Druk op de START-knop van de console om met je training te beginnen.
  • Seite 124: Loopprogramma's

    LOOPPROGRAMMA'S De loopband heeft 10 vooraf ingestelde loopprogramma's met variabele snelheden. De standaard trainingstijd is telkens 30 minuten (wijzigingen kunnen handmatig worden aangebracht). Elk programma (P1-P10) heeft 10 snelheidssegmenten. Er hoeven geen handmatige instellingen te worden uitgevoerd. PROGRAMMA SELECTEREN: 1. Als op het display “P1-P10, + inverse modus” wordt weergegeven, bevindt het apparaat zich in de stand-by modus.
  • Seite 125: Foutmeldingen/Displayweergave

    FOUTMELDINGEN/DISPLAYWEERGAVE Weergave Mogelijke oorzaak Voorgestelde oplossingen display 1. Controleer of de veiligheidsschakelaar in de juiste De beveiligingssleutel is uit de bevei- stand staat. 2. Controleer of de stekker van de veiligheidsschake- ligingsvergrendeling verwijderd. laar los zit of is verwijderd. Fout in de onderliggende bestu- Open circuit in de schakelbuis ring 1.
  • Seite 126 Motor geblokkeerd Controleer/vervang de motor. Oververhitting van de vermogens- Controleer/vervang de controller. module 1. Controleer/vervang de schakelknoppen. 2. Controleer/vervang de console. Sommige of alle knoppen 3. Verwijder de consolekap om de knoppen te testen. werken niet. 4. Controleer of de knoppen werken nadat je het netsnoer weer hebt aangesloten.
  • Seite 127: Onderhoud En Zorg

    ONDERHOUD EN ZORG Algemeen onderhoud en zorg helpen de levensduur en prestaties van je loopband te behouden. Houd het apparaat schoon door de componenten regelmatig af te stoffen. Reinig beide zijden van de loopband, zodat er zich geen stof onder de band ophoopt. Houd je sportschoenen schoon zodat het loopvlak en de band niet vuil worden. Reinig het oppervlak van de loopband met een schone, vochtige doek.
  • Seite 128: Smeren Van Het Loopvlak

    SMEREN VAN HET LOOPVLAK HANDELINGEN: SILICONENOLIE BIJVULLEN • Schroef de dop van de siliconenoliefles en verwijder het binnenste afsluitpapier. • Schroef de dop weer op de fles en verwijder het dopje van het mondstuk. • Snijd ongeveer 5 mm van de punt af. Gebruik hiervoor bijvoorbeeld een scherp mes. Olievulopening links rechts...
  • Seite 129: Loopband Aanspannen

    LOOPBAND AANSPANNEN DE SPANNING AFSTELLEN De loopband is in de fabriek vooraf gemonteerd en correct afgesteld. Na de eerste installatie/montage thuis of na een bepaalde werkingstijd kan de roterende loopband losraken. De span- ning neemt af. Aanwijzingen hiervoor zijn bijvoorbeeld een plotselinge stilstand van het apparaat tijdens het lopen of het wegglijden van de roterende loopband.
  • Seite 130: De Loopband Centreren

    DE LOOPBAND CENTREREN DE LOOPBAND CENTREREN Plaats de loopband op een vlakke ondergrond en stel hem in op een maximale snelheid van 3,5 km/u om te contro- leren of de roterende loopband wegglijdt. Voer de nodige afstellingen aan de verstelschroeven uit voor de uitlijning van de loopband (aan de achterkant van het apparaat).
  • Seite 131: Stretchoefeningen

    STRETCHOEFENINGEN Voor elke training moet u uw spieren minstens 5-10 minuten strekken om ze voldoende op te warmen. Herhaal de volgende stretchoefeningen vijf keer. Rekken voor de training helpt de flexibiliteit te verbeteren en vermindert het risico op letsel. MET JE HOOFD ROLLEN Draai je hoofd een seconde naar rechts, voel de stretch aan de linkerkant van je nek, draai dan je hoofd een seconde terug, strek je kin omhoog en laat je mond open.
  • Seite 132: Applicatiesoftware (App)

    Kinomap Opmerkingen over het gebruik van de app: Installeer alleen apps waarvan je de bronnen vertrouwt. Sportstech Brands Holding kan geen aan- sprakelijkheid aanvaarden voor software die door derden wordt geleverd. Vergeet niet om de Bluetooth-functie op je apparaat in te schakelen.
  • Seite 133 Recyclingcyclus Verpakkingsmaterialen kunnen worden teruggebracht in de grondstoffenkringloop. Voer de verpakking af volgens de geldende voorschriften. Informatie kan worden verkregen uit de retournerings- en ophaalsystemen van je gemeente. Informatie volgens de wet op elektrische en elektronische apparatuur (ElektroG - Duitse norm) We wijzen de eigenaren van elektrische en elektronische apparatuur erop dat oude elektrische apparatuur gescheiden van het gemeentelijk afval moet worden ingezameld volgens de geldende wettelijke voorschriften.
  • Seite 134: Declaration Of Conformity

    Harmonisierte Normen nach der Richtlinie 2014/35/EU (Niederspannungs-Richtlinie) o EN 60335-1:2012 /A13:2017/A14+A1+A2:2019 o EN 62233:2008/AC:2008 • Harmonisierte Normen und Prüfnormen nach der Richtlinie 2011/65/EU (RoHS-Richtlinie) o EN 50581:2012 Berlin,05.01.2021 Unterzeichnet für und im Namen der Sportstech Brands Holding GmbH von: Ali Ahmad (Geschäftsführer) Unterschrift...
  • Seite 136 Verkauf durch / Distributed by / Distribuido por / Distribué / Distribuito da / Verkoop via Sportstech Brands Holding GmbH Potsdamer Platz 11 10785 Berlin +49 30 220 663 520 www.sportstech.de...

Inhaltsverzeichnis