VESTEL EVC04 Serie Installationsanleitung
Vorschau ausblenden
Andere Handbücher für EVC04 Serie:
- Benutzerhandbuch (107 Seiten) ,
- Bedienungsanleitung (71 Seiten) ,
- Installationsanleitung (49 Seiten)

Verwandte Anleitungen für VESTEL EVC04 Serie


Inhaltszusammenfassung für VESTEL EVC04 Serie
- Seite 1 ELECTRIC VEHICLE CHARGER EVC04 Series Installation Guideline Installationsanleitung...
-
Seite 2: Inhaltsverzeichnis
2.6.3 - LOCKED CABLE FUNCTION (Model with Socket)....25 2.6.4 - POWER OPTIMIZER (REQUIRES OPTIONAL ACCESSORIES)..............26 2.7 - LOAD SHEDDING..................29 2.8 - MONITORING OF WELDED RELAY CONTACTS FAILURE.......30 IG v7.3.0 2021 © 2021 Vestel - All rights reserved English - 1... - Seite 3 6.5 - CHANGE STANDALONE MODE SETTINGS OF THE DEVICE.....46 6.6 - MAKING SYSTEM MAINTANENCE OF THE DEVICE........47 FIRMWARE UPDATE SCREEN FLOW (With Display Models)............49 1st LEVEL CONTACT INFORMATION TABLE..................52 IG v7.3.0 2021 © 2021 Vestel - All rights reserved English - 2...
-
Seite 4: Safety Information
It should not be located in a recessed area or below floor level. • This device is intended only for charging vehicles not requiring ventilation during charging. IG v7.3.0 2021 © 2021 Vestel - All rights reserved English - 3... -
Seite 5: Ground Connection Warnings
IP rating on the unit. IG v7.3.0 2021 © 2021 Vestel - All rights reserved English - 4... -
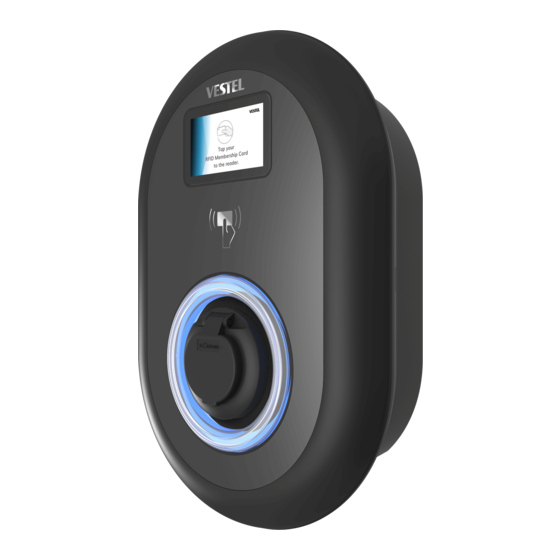
Seite 6: Description
M: Charging unit with MID Meter 5th Asterisk (*) can be one of the following: S : Case-B Connection with normal socket C : Case-C Connection with Type-2 plug Cabinet EVC04 Table-1 IG v7.3.0 2021 © 2021 Vestel - All rights reserved English - 5... - Seite 7 2 - MODEL REFERENCES Model reference table does not include all model variants of EVC04. EVC04-E11-W-S EVC04-E11-W-C EVC04-E11-WDM-S EVC04-E11-WDM-C EVC04-E22-WLDM-S EVC04-E22-WLDM-C EVC04-E22-WLPDM-S EVC04-E22-WLPDM-C Table-2 IG v7.3.0 2021 © 2021 Vestel - All rights reserved English - 6...
-
Seite 8: General Information
Charging station Charging station communication cable gland nut communication cable gland nut Charging station supply inlet Charging station supply inlet gland nut gland nut IG v7.3.0 2021 © 2021 Vestel - All rights reserved English - 7... -
Seite 9: Dimensional Drawings
2 - DIMENSIONAL DRAWINGS 2.1 - Without Display Model 135.0 315.0 177.5 460.0 101.0 181.0 Figure-2 2.2 - With Display Model 135.0 315.0 177.5 460.0 101.0 181.0 Figure-3 IG v7.3.0 2021 © 2021 Vestel - All rights reserved English - 8... -
Seite 10: Required Equipment, Tools And Accessories
Screwdriver Flathead Screwdriver (Tip Right Angle Screwdriver Adapter / Pointed Spudger width 2.00-2.5 mm) Torx T20 Security Bit Cat5e or cat6 ethernet RJ45 Crimping Tool cable Table-4 IG v7.3.0 2021 © 2021 Vestel - All rights reserved English - 9... -
Seite 11: Technical Specifications
OTHER FEATURES (Connected Models) Diagnostics Diagnostics over OCPP WebconfigUI Software Update Remote software update over OCPP WebconfigUI update Remote software update with server AUTHORIZATION RFID ISO-14443A/B and ISO-15693 IG v7.3.0 2021 © 2021 Vestel - All rights reserved English - 10... -
Seite 12: Mechanic Specifications
IK10 (Optional display have IK08 protection) Usage Conditions Temperature -35 °C to 55 °C (without direct sunlight) Humidity 5% - 95% (relative humidity, no dewilation) Altitude 0 - 4,000m IG v7.3.0 2021 © 2021 Vestel - All rights reserved English - 11... -
Seite 13: Installing Charge Station
Wall. IP for screws which are used for Torx T20 Security L-Wrench mounting charging station to the Wall. Disassembling and fastening the cable Wrench glands IG v7.3.0 2021 © 2021 Vestel - All rights reserved English - 12... - Seite 14 Local RFID List Installation Guide Installation Manual 1 Set ELECTRIC VEHICLE CHARGER EVC04 Series Instruction Book User Manual 1 Set ELECTRIC VEHICLE CHARGER EVC04 Series Table-3 IG v7.3.0 2021 © 2021 Vestel - All rights reserved English - 13...
-
Seite 15: Product Installation Steps
Please power off the charging station mains supply Remove the cover screws with Torx T20 security L-Wrench or Right Angle Screwdriver Adapter using Torx T20 Security Bit. Open the cover. IG v7.3.0 2021 © 2021 Vestel - All rights reserved English - 14... -
Seite 16: Wall Mount Installation
Mounting the charging station on the wall is finished. Before next step (7), Please check the instructions for Single Phase or Three Phase cable connections in sections 2.3 or 2.4. Figure-5 IG v7.3.0 2021 © 2021 Vestel - All rights reserved English - 15... - Seite 17 Figure-6 AC Mains Wrench Cable Wrench Data cable Figure-7 IG v7.3.0 2021 © 2021 Vestel - All rights reserved English - 16...
- Seite 18 Before closing the cover of the charging station, check instructions in sections 2.6 and 2.7 if any function related to these sections are used. Figure-8 IG v7.3.0 2021 © 2021 Vestel - All rights reserved English - 17...
-
Seite 19: Single Phase Charging Station Ac Mains Connection
Tighten the screws on the terminal block as shown in the image with the tightening tourqe of 2.5Nm. Electric Terminal AC Cable Color AC L1 (Brown) AC Neutral (Blue) Earth (Green-Yellow) Table-5 IG v7.3.0 2021 © 2021 Vestel - All rights reserved English - 18... -
Seite 20: Three Phase Charging Station Ac Mains Connection
If the three phase charging station is requested to be installed as single phase, phase cable connection should be done to L1 terminal as shown in figure-9. IG v7.3.0 2021 © 2021 Vestel - All rights reserved English - 19... -
Seite 21: Adjusting Current Limiter
30 A 40 A 32 A 40 A Table-8 10 A 10 A 16 A 16 A 20 A Phase 25 A 30 A 32 A Table-7 IG v7.3.0 2021 © 2021 Vestel - All rights reserved English - 20... -
Seite 22: Dip Switch Settings
Brief descriptions of the DIP switch pin settings can be found in below table. Pin Number Description Pin-1 Reserved Pin-2 External Enable Input Functionality Pin-3 Locked Cable Function (only for socket models) Pin-4-5-6 Power Optimizer (Requires Optional Accessories) Table-9 IG v7.3.0 2021 © 2021 Vestel - All rights reserved English - 21... -
Seite 23: Data Cable Connection
Power optimizer measurement cable c. Ethernet daisy chain connection cables (Optional) d. Load shedding triggering signal cable e. Shunt trip module control signal cable for welded relay contact failure Figure-13 IG v7.3.0 2021 © 2021 Vestel - All rights reserved English - 22... -
Seite 24: External Enable Input Functionality
If the external relay (RL) is in non-conducting (open), the charging station will not be not be able to charge the electric vehicle. You can connect potential free input signals as shown in above circuitry (see figure-15). See section 2.6.1-Data Cable Connection. IG v7.3.0 2021 © 2021 Vestel - All rights reserved English - 23... - Seite 25 Figure-16 Cable Terminal Cable Color 1 (CN2-1) Green 2 (CN2-2) Green + White Green Table-10 IG v7.3.0 2021 © 2021 Vestel - All rights reserved English - 24...
-
Seite 26: Locked Cable Function (Model With Socket)
Turn on the power to your charging station. The the charging cable to the socket outlet. cable becomes locked and the charging station starts behaving as a cable model. Table-11 IG v7.3.0 2021 © 2021 Vestel - All rights reserved English - 25... -
Seite 27: Power Optimizer
When 4, 5, 6 pins are in OFF position, power optimizer functionality is disabled. DIP Switch Positions Current Limit Value Power Optimizer Disabled Table-12 IG v7.3.0 2021 © 2021 Vestel - All rights reserved English - 26... - Seite 28 10-11: A-B (COM) Modbus connection over RS485 for single phase charging station models. (See section 2.6.2- STP Connection) Related board wiring of Power Optimizer connections can be made as shown below: IG v7.3.0 2021 © 2021 Vestel - All rights reserved English - 27...
- Seite 29 Figure-20 Cable Terminal Cable Color Description 6 (CN20-2) White Blue A (COM) 5 (CN20-1) Blue B (COM) Table-13 IG v7.3.0 2021 © 2021 Vestel - All rights reserved English - 28...
-
Seite 30: Load Shedding
Load Shedding Input + Load shedding Input – Table-14 Load Shedding Input State Behaviour Opened Contact Charge with max. available current Closed Contact Charge with 8A Table-15 IG v7.3.0 2021 © 2021 Vestel - All rights reserved English - 29... -
Seite 31: Monitoring Of Welded Relay Contacts Failure
The circuitry block diagram that must be used at the fuse box of the charging station is shown below. RCBB SHUNT EVSE TRIP 230V L1_W CN33 Figure-22 See section 2.6.1- Data Cable Connection CN33 Figure-23 IG v7.3.0 2021 © 2021 Vestel - All rights reserved English - 30... -
Seite 32: Factory Reset
The first RFID card which is registered within this 60 seconds of duration will be the new master RFID card. Please follow instructions to register RFID user card which is used during charging process. IG v7.3.0 2021 © 2021 Vestel - All rights reserved English - 31... -
Seite 33: Setting Ethernet Port Of Charger To Static Ip In Standalone Usage Mode
28. • If you want to disable the web configuration interface, third position of DIP switch should be in “ON“ position as shown in figure 28. Figure.28 IG v7.3.0 2021 © 2021 Vestel - All rights reserved English - 32... -
Seite 34: Ocpp Connection
Strip off approximately 1 inch of the cable’s cable you’re terminating, to ensure that the jacket, using a modular crimping tool or a ends of the conducting wires are even. UTP cable stripper. IG v7.3.0 2021 © 2021 Vestel - All rights reserved English - 33... - Seite 35 Termination is complete. IG v7.3.0 2021 © 2021 Vestel - All rights reserved English - 34...
-
Seite 36: Commissioning
OCPP Settings : OCPP Connection,OCPP Version,Connection Settings,OCPP Configuration Parameters • Network Interface Settings:Cellular,Ethernet,Wi-Fi • Standalone mode settings • System Maintanence: • Log Files,Firmware Updates,Configuration BackUp&Restore,System Reset,Administration Password,Factory Default Configuration IG v7.3.0 2021 © 2021 Vestel - All rights reserved English - 35... -
Seite 37: Connect Pc To The Same Network With Smart Board
Default username = admin Default password = eon01 You can change password with Change Password Button in login page or Administration Password section in the System Maintanence tab. IG v7.3.0 2021 © 2021 Vestel - All rights reserved English - 36... - Seite 38 After submitting this page you will be redirected to login page. Also if you don’t want to change the password you can turn back the login page with “Back To Login”. Changing password is important for your security. Figure.33 IG v7.3.0 2021 © 2021 Vestel - All rights reserved English - 37...
-
Seite 39: 5- Product Variants
The product models and general features are as shown in table below: EVC04-E11-WDM-S EVC04-E11-WDM-C EVC04-E22-WLDM-S EVC04-E22-WLDM-C EVC04-E22-WLPDM-S EVC04-E22-WLPDM-C Default factory preset is “E.ON auto-detect”. Preset availibility and selections are shown in figure 35 for E.ON Auto-detect product family. IG v7.3.0 2021 © 2021 Vestel - All rights reserved English - 38... -
Seite 40: Web Configuration Interface
The following languages are available: German, Turkish, French, English, Italian, Spanish, Romanian, Danish, Norwagian, Swedish, Czech, Slovakian, Polish, Hungarian. The boxes are configured in English by default. Main Page of Standalone variants: Figure.36 IG v7.3.0 2021 © 2021 Vestel - All rights reserved English - 39... -
Seite 41: Preset Selection
In this preset, it is possible to use factory registered master RFID card for adding/deleting user RFID cards to the local list of charging station. By adding user RFID cards IG v7.3.0 2021 © 2021 Vestel - All rights reserved English - 40... -
Seite 42: Change General Settings Of The Device
Technician can select display language from the general settings page. Available languages for display language are as shown in figure below for now. After selecting the language, user can save selection by “Save Button”. Figure.39 IG v7.3.0 2021 © 2021 Vestel - All rights reserved English - 41... -
Seite 43: Display Backlight Settings
6.2.4 - Logo Settings: Technician can change the display logo of the station from the logo settings by uploading the required logo. The new logo should be in 40x40 pixels and .png format. IG v7.3.0 2021 © 2021 Vestel - All rights reserved English - 42... -
Seite 44: Change Ocpp Settings Of The Device
You can select the OCPP settings type you want from the menu which is at the left side of the page. For example OCPP Connection,OCPP Version,Connection Settings and OCPP Configuration Parameters. Then, click “Save” button. IG v7.3.0 2021 © 2021 Vestel - All rights reserved English - 43... -
Seite 45: Change Network Interfaces Settings Of The Device
Gateway” and “Primary DNS” spaces are mandatory. If you set Wi-Fi as enabled, “SSID”, “Password” and “Security” are mandatory. You should fill all spaces in suitable formats. IG v7.3.0 2021 © 2021 Vestel - All rights reserved English - 44... - Seite 46 CELLULAR Figure.46 Figure.47 IG v7.3.0 2021 © 2021 Vestel - All rights reserved English - 45...
-
Seite 47: Change Standalone Mode Settings Of The Device
Select “Autostart” mode to allow charging without the need for authorization. It will be enough to plug to start charging. Select “Smart” mode to activate smart mode. If you are done with mode selection, click “Save” button and reboot the device. Figure.49 IG v7.3.0 2021 © 2021 Vestel - All rights reserved English - 46... -
Seite 48: Making System Maintanence Of The Device
In FIRMWIRE UPDATE Page, you can upload the firmware update file from your PC by clicking “Upload” button. After the file is uploaded, you can click “Update” button to start the firmware update. IG v7.3.0 2021 © 2021 Vestel - All rights reserved English - 47... - Seite 49 After the firmware update is finished, your charger will restart automatically. You can see the latest firmware version of your charger from webconfig UI in main page. Figure.53 IG v7.3.0 2021 © 2021 Vestel - All rights reserved English - 48...
-
Seite 50: Firmware Update Screen Flow (With Display Models)
In CONFIGURATION AND BACKUP Page, you can backup of the sytem. If you want to restore you can click the Restore Config File button and upload the backup file. The system only accepts the .bak files. Figure.55 IG v7.3.0 2021 © 2021 Vestel - All rights reserved English - 49... - Seite 51 In ADMINISTRATION PASSWORD Page, you can change the web config’s login password. New password must contain at least 1 lowercase letter, 1 uppercase letter, 1 numeric character and minimum 6 characters. All spaces are mandatory. Figure.57 IG v7.3.0 2021 © 2021 Vestel - All rights reserved English - 50...
- Seite 52 In FACTORY DEFAULT CONFIGURATION Page you can make factory reset to the device. Figure.58 IG v7.3.0 2021 © 2021 Vestel - All rights reserved English - 51...
- Seite 53 2.6.2 - EXTERNE AKTIVIERUNG DER EINGABEFUNKTION.....23 2.6.3 - VERRIEGELTE KABELFUNKTION (Modell mit Steckdose)...25 2.6.4 - LEISTUNGSOPTIMIERER (ERFORDERT OPTIONALES ZUBEHÖR)................26 2.7 - LASTABWURF....................29 2.8 - ÜBERWACHUNG DES AUSFALLS DER SCHWEISSRELAISKONTAKTE..30 IG v7.3.0 2021 © 2021 Vestel - Alle Rechte vorbehalten Deutsch - 1...
- Seite 54 6.4 - ÄNDERUNG DER NETZSCHNITTSTELLEN EINSTELLUNGEN DES GERÄTS....................45 6.5 - ÄNDERUNG DER EINSTELLUNGEN DES GERÄTS IM STANDARDMODUS.................47 6.6 - SYSTEMWARTUNG DES GERÄTS............48 BILDSCHIRMABLAUF FÜR FIRMWARE-UPDATES (mit Display-Modelle)........50 IG v7.3.0 2021 © 2021 Vestel - Alle Rechte vorbehalten Deutsch - 2...
-
Seite 55: Sicherheitsinformationen
Weiterhin darf die Ladestation nicht verschütteten oder spritzenden Flüssigkeiten ausgesetzt werden. • Berühren Sie die Endklemmen, den elektrischen Fahrzeugstecker und alle sonstigen stromführenden Teile der Ladestation nicht mit scharfen Metallgegenständen. IG v7.3.0 2021 © 2021 Vestel - Alle Rechte vorbehalten Deutsch - 3... -
Seite 56: Warnungen Zur Erdungsanlage
Achten Sie darauf, dass das Ladekabel so positioniert, dass niemand darauf treten bzw. darüber stolpern kann und es weder beschädigt oder überdehnt. • Ziehen Sie niemals gewaltsam am Ladekabel und beschädigen Sie es nicht mit scharfen Objekten. IG v7.3.0 2021 © 2021 Vestel - Alle Rechte vorbehalten Deutsch - 4... -
Seite 57: Warnhinweise Zur Wandmontage
M: Ladegerät mit MID Meter 5. Sternchen (*) kann einer der folgenden sein: S : Fall-B Anschluss mit normaler Steckdose C : Fall-C Verbindung mit Typ-2-Stecker Gehäuse EVC04 Tabelle-1 IG v7.3.0 2021 © 2021 Vestel - Alle Rechte vorbehalten Deutsch - 5... - Seite 58 2 - MODELL REFERENZEN Die Modellreferenztabelle enthält nicht alle Modellvarianten von EVC04. EVC04-E11-W-S EVC04-E11-W-C EVC04-E11-WDM-S EVC04-E11-WDM-C EVC04-E22-WLDM-S EVC04-E22-WLDM-C EVC04-E22-WLPDM-S EVC04-E22-WLPDM-C Tabelle-2 IG v7.3.0 2021 © 2021 Vestel - Alle Rechte vorbehalten Deutsch - 6...
-
Seite 59: Allgemeine Informationen
MID Meter Anzeige (Optional) MID Meter Anzeige (Optional) Steckdose Blindbuchse Produktetikett Ladestecker Ladestation Produktetikett Kommunikationskabel Ladekabel Stopfbuchsenmutter Ladestation Ladestation Kommunikationskabel Kommunikationskabel Stopfbuchsenmutter Stopfbuchsenmutter Ladestation Zulauf Ladestation Zulauf Stopfbuchsenmutter IG v7.3.0 2021 © 2021 Vestel - Alle Rechte vorbehalten Deutsch - 7... -
Seite 60: Masszeichnungen
2 - MASSZEICHNUNGEN 2.1 - Ohne Displaymodell 135.0 315.0 177.5 460.0 101.0 181.0 Abbildung-2 2.2 - Mit Displaymodell 135.0 315.0 177.5 460.0 101.0 181.0 Abbildung-3 IG v7.3.0 2021 © 2021 Vestel - Alle Rechte vorbehalten Deutsch - 8... -
Seite 61: Erforderliche Ausrüstung, Werkzeuge Und Zubehör
ERFORDERLICHE AUSRÜSTUNG, WERKZEUGE und ZUBEHÖR EMPFOHLENE WERKZEUGE Bohrer 8mm Schlagbohrmaschine Torx T25 Sicherheits- Volt-Anzeige Wasserwaage schraubendreher Winkelschraubendreheradapter / Spitzer Spreizer Torx T20 Sicherheitsbit Cat5e- oder Cat6-Ether- RJ45 Crimpwerkzeug net-Kabel Tabelle-4 IG v7.3.0 2021 © 2021 Vestel - Alle Rechte vorbehalten Deutsch - 9... -
Seite 62: Technische Spezifikationen
GSM: B3 (1800 MHz), B8 (900 MHz) SONSTIGE EIGENSCHAFTEN (Verbundene Modelle) Diagnostik Diagnostik über OCPP WebconfigUI Softwareaktualisierung Remote Softwareaktualisierung über OCPP WebconfigUI Aktualisierung Software Fernaktualisierung mit Server IG v7.3.0 2021 © 2021 Vestel - Alle Rechte vorbehalten Deutsch - 10... -
Seite 63: Autorisierung
IK10 (Optionale Anzeige mit IK08 Schutz) Aufprallschutz Nutzungsbedingungen Temperatur -35 °C bis 55 °C (ohne direkte Sonneneinstrah- Luftfeuchtigkeit lung) Höhe 5% - 95% (relative Luftfeuchtigkeit, kein Tau) 0 - 4.000m IG v7.3.0 2021 © 2021 Vestel - Alle Rechte vorbehalten Deutsch - 11... -
Seite 64: Ladestation Installien
Dichtung für Schraube 6x75 für Ladestation an der Wand montieren IP für Schrauben, die zur Montage der Torx T20 Sicherheits-Win- Ladestation an der Wand verwendet kelschlüssel werden. IG v7.3.0 2021 © 2021 Vestel - Alle Rechte vorbehalten Deutsch - 12... - Seite 65 Hinzufügen und Entfernen der Benut- Master-RFID-Karte zer-RFID-Karten zur lokalen RFID-Liste Installationsanleitung Installationsanleitung 1 Set ELECTRIC VEHICLE CHARGER EVC04 Series Handbuch Bedienungsanleitung 1 Set ELECTRIC VEHICLE CHARGER EVC04 Series Tabelle-3 IG v7.3.0 2021 © 2021 Vestel - Alle Rechte vorbehalten Deutsch - 13...
-
Seite 66: Produktinstallationsschritte
Bitte schalten Sie die Ladestation aus Entfernen Sie die Deckelschrauben mit dem Torx T20-Sicher- heits-Winkelschlüssel oder dem rechtwinkligen Schraubendrehe- radapter mit dem Torx T20-Sicherheitsbit. Öffnen Sie die Abdeckung. IG v7.3.0 2021 © 2021 Vestel - Alle Rechte vorbehalten Deutsch - 14... -
Seite 67: Wandmontage
Um den Deckel der Ladestation zu schließen, ziehen Sie die Deckelschrauben, die Sie mit Torx T20 Security L-Wrench oder Winkelschraubendreher-Adapter mit Torx T20 Security Bit entfernt haben, fest. Die Montage der Ladestation an der Wand ist abgeschlossen. IG v7.3.0 2021 © 2021 Vestel - Alle Rechte vorbehalten Deutsch - 15... - Seite 68 Lesen Sie vor dem nächsten Schritt (7) die Anweisungen für einphasige oder dreiphasige Kabelverbindungen in den Abschnitten 2.3 oder 2.4. Abbildung-5 Abbildung-6 IG v7.3.0 2021 © 2021 Vestel - Alle Rechte vorbehalten Deutsch - 16...
- Seite 69 Befolgen Sie vor dem Schließen der Abdeckung der La- destation, die Anweisungen in den Abschnitten 2.6 und 2.7, wenn Funktionen in Bezug auf diese Abschnitte verwendet Abbildung-8 IG v7.3.0 2021 © 2021 Vestel - Alle Rechte vorbehalten Deutsch - 17...
-
Seite 70: Einphasenladestation Ac Netzanschluss
Ziehen Sie die Schrauben an der Klemmenleiste wie in der Abbildung gezeigt mit einem Anzugsdrehmoment von 2,5 Nm an. Elektrische Anschlussklemme AC-Kabelfarbe AC L1 (Braun) AC Nullleiter (Blau) Erde (Grün-Gelb) Tabelle-5 IG v7.3.0 2021 © 2021 Vestel - Alle Rechte vorbehalten Deutsch - 18... -
Seite 71: Dreiphasenladestation Ac Netzanschluss
AC Nullleiter (Blau) Erde (Grün-Gelb) Tabelle-6 Wenn die dreiphasige Ladestation als einphasig installiert werden soll, sollte der Phasenkabelanschluss an die L1-Klemme erfolgen, wie in Abbildung 9 gezeigt. IG v7.3.0 2021 © 2021 Vestel - Alle Rechte vorbehalten Deutsch - 19... -
Seite 72: Einstellung Des Strombegrenzers
30 A 40 A 32 A 40 A 10 A 10 A Tabelle-8 16 A 16 A 20 A Phase 25 A 30 A 32 A Tabelle-7 IG v7.3.0 2021 © 2021 Vestel - Alle Rechte vorbehalten Deutsch - 20... -
Seite 73: Dip-Schalter Einstellungen
Kurze Beschreibungen der DIP-Schalter-Pin-Einstellungen finden Sie in der folgenden Tabelle. PIN Nummer Beschreibung Pin -1 Reserviert Pin -2 Externe Eingabefunktion aktivieren Pin -3 Kabelverriegelungsfunktion (nur für Steckdosenmodelle) Pin-4-5-6 Leistungsoptimierung (erfordert optionales Zubehör) Tabelle-9 IG v7.3.0 2021 © 2021 Vestel - Alle Rechte vorbehalten Deutsch - 21... -
Seite 74: Datenkabelanschluss
HINWEIS: Unterhalb der Datenverbindungskabel können durch die Kabellöcher eingeführt werden; a. Externes Freigabekabel b. Leistungsoptimierungs-Messkabel c. Ethernet-Daisy-Chain-Verbindungskabel (optional) d. Auslösesignalkabel für Lastabwurf e. Steuersignalkabel des Shunt-Auslösemoduls bei Ausfall des geschweißten Relaiskontakts Abbildung-13 IG v7.3.0 2021 © 2021 Vestel - Alle Rechte vorbehalten Deutsch - 22... -
Seite 75: Externe Aktivierung Der Eingabefunktion
Wenn das externe Relais (RL) nichtleitend (offen) ist, kann die Ladestation das Elektrofahrzeug nicht laden. Sie können potentialfreie Eingangssignale wie oben gezeigt anschließen (siehe Abbildung-15). Siehe Abschnitt 2.6.1 - Datenkabelverbindung. IG v7.3.0 2021 © 2021 Vestel - Alle Rechte vorbehalten Deutsch - 23... - Seite 76 Abbildung-16 Kabelansch- Kabelfarbe luss 1 (CN2-1) Grün 2 (CN2-2) Grün + Weiß grün Tabelle-10 IG v7.3.0 2021 © 2021 Vestel - Alle Rechte vorbehalten Deutsch - 24...
-
Seite 77: Verriegelte Kabelfunktion (Modell Mit Steckdose)
Öffnen Sie die vordere Abdeckung der Steckdose Schalten Sie die Ladestation ein. Das Kabel wird und stecken Sie das Ladekabel in die Steckdose. gesperrt und die Ladestation verhält sich wie ein Kabelmodell. Tabelle-11 IG v7.3.0 2021 © 2021 Vestel - Alle Rechte vorbehalten Deutsch - 25... -
Seite 78: Leistungsoptimierer (Erfordert Optionales Zubehör)
Die letzten 3 DIP-Schalterstifte (4,5,6) entsprechen Binärziffern des maximalen Stromwerts, wie in der folgenden Tabelle 12 gezeigt. Wenn sich 4, 5, 6 Pins in der AUS-Position befinden, ist die Leistungsoptimiererfunktion deaktiviert. DIP-Schalterpositionen Stromgrenzwert Leistungsoptimierer deaktiviert Tabelle-12 IG v7.3.0 2021 © 2021 Vestel - Alle Rechte vorbehalten Deutsch - 26... - Seite 79 Abschnitt 2.6.2 - STP-Verbindung. 10-11: A-B (COM) Modbus-Verbindung über RS485 für einhasige Ladestationsmodelle. Siehe Abschnitt 2.6.2 - STP-Verbindung. Die entsprechende Platinenverdrahtung der Leistungsoptimierer-Verbindungen kann wie folgt vorgenommen werden: IG v7.3.0 2021 © 2021 Vestel - Alle Rechte vorbehalten Deutsch - 27...
-
Seite 80: Kabelanschluss
Abbildung-20 Kabelansch- Kabelfarbe Beschreibung luss 6 (CN20-2) Weiß Blau A (COM) 5 (CN20-1) Blau B (COM) Tabelle-13 IG v7.3.0 2021 © 2021 Vestel - Alle Rechte vorbehalten Deutsch - 28... -
Seite 81: Lastabwurf
Siehe Abbildung-21, Tabelle-14 und Tabelle-15. Abbildung-21 Kabelansch- Eingang luss Lastabwurfseingang + Lastabwurfseingang - Tabelle-14 Lastabwurfseingangsstatus Verhalten Geöffneter Kontakt Ladung mit max. verfügbarer Strom Geschlossener Kontakt Laden mit 8A Tabelle-15 IG v7.3.0 2021 © 2021 Vestel - Alle Rechte vorbehalten Deutsch - 29... -
Seite 82: Überwachung Des Ausfalls Der Schweissrelaiskontakte
Das Blockschaltbild, das am Sicherungskasten der Ladestation verwendet werden muss, ist unten dargestellt. SHUNT TRIP RCBB oder EVSE 230V L1_W CN33 Abbildung-22 Siehe Abschnitt 2.6.1 - Datenkabelverbindung. CN33 Abbildung-23 IG v7.3.0 2021 © 2021 Vestel - Alle Rechte vorbehalten Deutsch - 30... -
Seite 83: Zurück Auf Werkseinstellungen
Wenn das Ladegerät wieder eingeschaltet wird, beachten Sie bitte Folgendes; • Zuvor gespeicherte Master Karte und Benutzerkartenliste, falls vorhanden, beim Eintritt in den Konfigurationsmodus aus der Ladestation gelöscht werden. Im Konfigurationsmodus blinkt die Ladeanzeige-LED rot. IG v7.3.0 2021 © 2021 Vestel - Alle Rechte vorbehalten Deutsch - 31... -
Seite 84: Einstellung Des Ethernet Anschlusses Des Ladegeräts Auf Statische Ip Im Standalone Nutzungsmodus
Schalters in der Position „OFF“ befinden, wie in Abbildung 28 gezeigt. • Wenn Sie die Web-Konfigurationsoberfläche deaktivieren möchten, sollte die dritte Position des DIP- Schalters auf „ON“ stehen, wie in Abbildung 28 gezeigt. IG v7.3.0 2021 © 2021 Vestel - Alle Rechte vorbehalten Deutsch - 32... -
Seite 85: Occp-Verbindung
Stellen Sie sicher, dass die Ladestation ausgeschaltet ist. 3.1 - OCPP ÜBER ZELLULARES NETZWERK ANSCHLIESSEN (Optional) Legen Sie die Micro-SIM-Karte in den SIM-Kartensteckplatz des Mobilfunkmoduls ein, wie in der folgenden Abbildung gezeigt. Abbildung-29 IG v7.3.0 2021 © 2021 Vestel - Alle Rechte vorbehalten Deutsch - 33... -
Seite 86: Ocpp Über Ethernet Verbinden
Sie 8 einzelne Adern haben. ten Anordnung in der folgenden Reihenfolge an: weiß/orange, durchgehend orange, weiß/ grün, durchgehend blau, weiß/blau, durchge- hend grün, weiß/braun, festes braun. IG v7.3.0 2021 © 2021 Vestel - Alle Rechte vorbehalten Deutsch - 34... - Seite 87 Drahtenden gekürzt sind, desto besser wird ordnungsgemäße Crimpung sicherzustellen. Ihre endgültige Steckverbindung. Die Beendigung ist abgeschlossen. Stecken Sie den RJ45-Stecker wie in der folgenden Abbildung gezeigt in die Buchse. CN13 Tabelle-15 IG v7.3.0 2021 © 2021 Vestel - Alle Rechte vorbehalten Deutsch - 35...
-
Seite 88: Inbetriebnahme
4.1 - PC MIT SMARTKARTE AN DASSELBE NETZWERK ANSCHLIESSEN Um auf die Web-Konfigurationsschnittstelle zuzugreifen, müssen Sie zuerst Ihren PC und das EV-Ladegerät an denselben Ethernet-Switch oder das EV-Ladegerät direkt an Ihren PC anschlie- ßen. Figure.30 IG v7.3.0 2021 © 2021 Vestel - Alle Rechte vorbehalten Deutsch - 36... -
Seite 89: Öffnen Der Web-Konfigurationsschnittstelle Mit
Webbrowser normalerweise einige Informationen von Websites in ihrem Cache und in Cookies. Das Erzwingen der Aktualisierung oder des Löschens (je nach Betriebssystem und Browser) behebt bestimmte Probleme, z.B. Probleme beim Laden oder Formatieren von Webseiten. Figure.32 IG v7.3.0 2021 © 2021 Vestel - Alle Rechte vorbehalten Deutsch - 37... -
Seite 90: 5- Produktvarianten
Es gibt zwei Hauptproduktvarianten, die sich in ihren Voreinstellungen unterscheiden. 5.1 - Standardeinstellung „Standalone“ EVC04-E11-W-S EVC04-E11-W-C Die werkseitige Voreinstellung ist „Standalone“. Voreingestellte Verfügbarkeit und Auswahlmöglichkeiten sind in Abbildung 34 für die Standalone-Produktfamilie dargestellt. IG v7.3.0 2021 © 2021 Vestel - Alle Rechte vorbehalten Deutsch - 38... -
Seite 91: Standardeinstellung „E.on Auto-Erkennung
LAN mit der Nein Verbinden Verbinden Auswählen Wählen Sie E.ON Wählen Sie WLAN- Auswählen LAN_WAN Automatische Voreinstellung Standalone Erkennung Voreinstellung Mobile net- LAN_APN work_APN Verbinden Verbinden Verbinden Verbinden Abbildung-35 IG v7.3.0 2021 © 2021 Vestel - Alle Rechte vorbehalten Deutsch - 39... -
Seite 92: Web-Konfigurationsschnittstelle
Folgende Sprachen stehen zur Verfügung: Deutsch, Türkisch, Französisch, Englisch, Italienisch, Spanisch, Rumänisch, Dänisch, Norwegisch, Schwedisch, Tschechisch, Slowakisch, Polnisch, Ungarisch. Die Boxen sind standardmäßig in Englisch konfiguriert. Hauptseite der Standalone-Varianten: Abbildung.36 Hauptseite der E.ON Auto-Erkennung-Varianten: Abbildung.37 IG v7.3.0 2021 © 2021 Vestel - Alle Rechte vorbehalten Deutsch - 40... -
Seite 93: Voreingestellte Auswahl
OCPP-Zentralsystem verbindet. WLAN-Konfigurationen wie SSID und Passwort sollten vom Techniker während der Installation über die Web-Konfigurationsoberfläche (beschrieben in Abschnitt 4.7. Die Ladestation ist standardmäßig als plug&charge vorkonfiguriert. Um den IG v7.3.0 2021 © 2021 Vestel - Alle Rechte vorbehalten Deutsch - 41... -
Seite 94: Änderung Der Allgemeinen Einstellungen Des Geräts
Option im Dropdown-Menü auswählt. Wenn der Techniker die Hintergrundbeleuchtungsstufe als „zeitbasiert“ auswählt, wird die Auswahl der Sonnenaufgangs- und Sonnenuntergangszeit angezeigt und kann konfiguriert werden. „Sonnenaufgangszeit“ IG v7.3.0 2021 © 2021 Vestel - Alle Rechte vorbehalten Deutsch - 42... - Seite 95 6.2.4 - Logoeinstellungen: Der Techniker kann das Anzeigelogo der Station in den Logoeinstellungen ändern, indem er das erforderliche Logo hochlädt. Das neue Logo sollte in 40x40 Pixeln und im PNG-Format vorliegen. IG v7.3.0 2021 © 2021 Vestel - Alle Rechte vorbehalten Deutsch - 43...
-
Seite 96: Änderung Der Ocp-Einstellungen Des Geräts
Sie können den gewünschten OCPP Einstellungstyp aus dem Menü am linken Rand der Seite auswählen. Zum Beispiel OCPP-Verbindung,OCPP-Version,Verbindungseinstellungen und OCPP Konfigurationsparameter. Klicken Sie dann auf die Schaltfläche "Speichern". IG v7.3.0 2021 © 2021 Vestel - Alle Rechte vorbehalten Deutsch - 44... -
Seite 97: Änderung Der Netzschnittstellen Einstellungen Des
Wenn Sie Ethernet oder Wi-Fi IP Einstellungen als " Static" wählen, sind die Felder "IP Address", "Network Mask", "Default Gateway" und "Primary DNS" obligatorisch. Wenn Sie WLAN als aktiviert festlegen, sind "SSID", "Passwort" und "Sicherheit" obligatorisch. IG v7.3.0 2021 © 2021 Vestel - Alle Rechte vorbehalten Deutsch - 45... - Seite 98 Sie sollten alle Felder in geeigneten Formaten ausfüllen. Mobiltelefon Abbildung.46 Figure.47 IG v7.3.0 2021 © 2021 Vestel - Alle Rechte vorbehalten Deutsch - 46...
-
Seite 99: Änderung Der Einstellungen Des Geräts Im Standardmodus
Wählen Sie den Modus "Smart", um den Smart Modus zu aktivieren. Wenn Sie mit der Modusauswahl fertig sind, klicken Sie auf die Schaltfläche „Speichern“ und starten Sie das Gerät neu. IG v7.3.0 2021 © 2021 Vestel - Alle Rechte vorbehalten Deutsch - 47... -
Seite 100: Systemwartung Des Geräts
6.6 - SYSTEMWARTUNG DES GERÄTS Auf der Seite LOG FILES, Können Sie OCPP oder HMI Protokolle durch Anklicken von Schaltflä- chen herunterladen. Die Download Protokolldateien werden nach einigen Sekunden angezeigt. IG v7.3.0 2021 © 2021 Vestel - Alle Rechte vorbehalten Deutsch - 48... - Seite 101 Wenn die Aktualisierung gestartet wird, leuchtet die LED Anzeige Ihres Ladegeräts konstant grün. Wenn Ihr Ladegerät eine Anzeige hat, können Sie den Firmware Update Bildschirm im Display sehen. Sie- he Firmware Uptade Abschnitt Screen Flow. IG v7.3.0 2021 © 2021 Vestel - Alle Rechte vorbehalten Deutsch - 49...
-
Seite 102: Bildschirmablauf Für Firmware-Updates (Mit Display-Modelle)
Nach Abschluss des Firmware Aktualisierung wird Ihr Ladegerät automatisch neu gestartet. Sie können den neueste Firmware Version Ihres Ladegeräts über die UI Webconfig Benutzeroberfläche auf der Hauptseite. Abbildung.53 BILDSCHIRMABLAUF FÜR FIRMWARE-UPDATES (mit Display-Modelle) Figure.54 IG v7.3.0 2021 © 2021 Vestel - Alle Rechte vorbehalten Deutsch - 50... - Seite 103 File klicken und die Sicherungsdatei hochladen. Das System akzeptiert nur die .bak Dateien. Figure.55 In SYSTEM RESET Seite, können Sie Soft Reset und Hard Reset durchführen, indem Sie auf die Schaltflächen klicken. Figure.56 IG v7.3.0 2021 © 2021 Vestel - Alle Rechte vorbehalten Deutsch - 51...
- Seite 104 Das neue Passwort muss mindestens 1 Kleinbuchstaben, 1 Großbuchstaben, 1 numerisches Zeichen und mindestens 6 Zeichen enthalten. Alle Angaben sind obligatorisch. Abbildung.57 In FACTORY DEFAULT CONFIGURATION Seite, können Sie das Gerät auf die Werkseinstellungen zurücksetzen. Figure.58 IG v7.3.0 2021 © 2021 Vestel - Alle Rechte vorbehalten Deutsch - 52...
- Seite 105 50609945 Im Service- oder Garantiefall kontaktieren Sie uns bitte über: In case of a service or guarantee, please contact: Region Name of company Phone eMail Availability Germany Charge-ON GmbH 0800 121 89 555 kundenservice@eon-drive.de 24/7/365 für technische Störungen E.ON Sweden +46 (0)771-707700 emobility@eon.se Mon-Fri : 08:30 - 16:30 Energilösningar AB...