SEH ISD300 Kurzanleitung Zur Installation
Intelligent spooling device
Inhaltsverzeichnis
Verfügbare Sprachen
Verfügbare Sprachen
Quicklinks
Overview [en]
This Quick Installation Guide provides
a brief description of the installation
of the ISD300. It contains the
following information:
General Information
Safety Regulations
First Steps
ISD Quick Setup
ISD Software Package
Please note the table of contents on
page 3. Should you have any further
questions, please contact our support
hotline.
Monday - Thursday
Friday
℡
+49 (0)521 94226-44
@
support@seh.de
Quick Installation Guide
Intelligent Spooling Device
ISD300
Quick Installation Guide
Überblick [de]
Dieser Quick Installation Guide be-
inhaltet eine kurze Beschreibung der
ISD300 Installation. Sie erhalten die
folgenden Informationen:
Allgemeine Information
Sicherheitsvorschriften
Erste Schritte
ISD Quick Setup
ISD-Softwarepaket
Beachten Sie das Inhaltsverzeichnis
auf Seite 19. Falls Sie noch Fragen
haben,
Support-Hotline.
8:00 a.m. to 4:45 p.m. and
8:00 a.m. to 3:15 p.m. (CET)
kontaktieren
Sie
unsere
1
Kapitel
Inhaltsverzeichnis

Verwandte Anleitungen für SEH ISD300


Inhaltszusammenfassung für SEH ISD300
- Seite 19 2 Erste Schritte ......25 ISD300 anschließen ......25 ISD300 ein-/ausschalten .
-
Seite 20: Allgemeine Informationen
Allgemeine Informationen Verwendungszweck Das ISD300 wurde für das Spoolen und Managen von Druckaufträgen sowie die Verwaltung von Druckerwarteschlangen (Queues) entwickelt. Das ISD300 trägt in komplexen Netzwerken mit hohen Datenaufkommen oder weitläufigen Strukturen zu einer starken Entlastung des Servers und ggf. des Datennetzes bei. -
Seite 21: Lieferumfang
Service-Area Die Service-Area ist ein definierter Speicherbereich auf der ISD- Festplatte. Die Service-Area beinhaltet: - Benutzerdokumentation ISD300 - Quick Installation Guide ISD300 (dieses Dokument) - SEH ISD Manager - SEH Print Monitor - ISD Printer Driver Wizard - Driver Wizard Plugin 'CSR DLL' Service-Area anzeigen Die Service-Area kann über das ISD Control Center angezeigt werden. -
Seite 22: Technische Daten
Technische Daten Eigenschaften Werte Netzwerkanschluss logisch: - 10BaseT Ethernet (IEEE 802.3) - 100BaseTX Fast Ethernet (IEEE 802.3) - 1000BaseT Gigabit Ethernet Ethernet (IEEE 802.3) physisch: - RJ-45 (STP Cat. 5) Schnittstellen 2 x USB 2.0 HS Druckprotokolle - LPD, SMB, Socket, IPP, ThinPrint® Client ISD: - LPD, Socket, IPP... -
Seite 23: Sicherheitsvorschriften
Das ISD300 darf nur von qualifiziertem Fachpersonal angeschlossen und mit dem Netzwerk verbunden werden. Öffnen Sie nicht das Gehäuse des Gerätes. Das ISD300 darf nur bei ungeöffnetem Gehäuse und in unversehrtem Zustand angeschlossen und betrieben werden. Stellen Sie keine Gegenstände auf das Gehäuse. - Seite 24 Ein beschädigtes Netzkabel muss sofort ersetzt werden. Fragen Sie hierzu Ihren Fachhändler. Das ISD300 muss an eine Steckdose mit Schutzkontakt angeschlossen werden. Schließen Sie keine Telefonleitungen an dem RJ-45-Stecker an. An diesen darf nur Sicherheitskleinspannung angeschlossen werden. Verwenden Sie für den Anschluss an den RJ-45-Stecker nur STP-Kabel (Kategorie 5 oder besser).
-
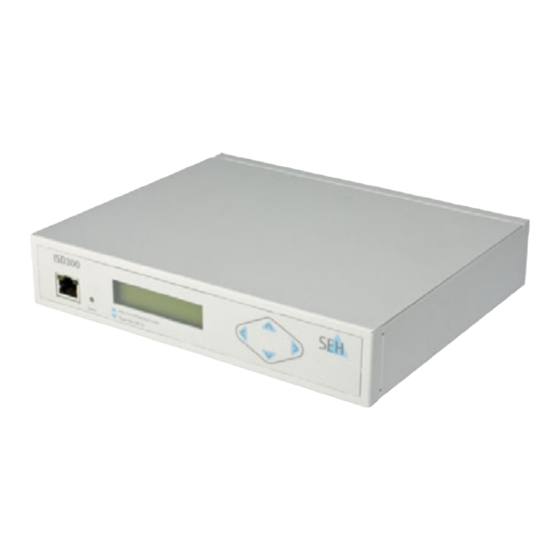
Seite 25: Erste Schritte
Erste Schritte ISD300 anschließen Gehen Sie wie folgt vor: 1. Verbinden Sie das Netzwerkkabel (RJ-45) mit dem Netzwerkanschluss (2). 2. Verbinden Sie das Netzkabel mit der Stromversorgung (8). 1) Netzwerk-Aktivität-LED (gelb): 1234 Die LED signalisiert den Austausch von Netzwerkdatenpakten. 2) Netzwerkanschluss (RJ-45-Stecker) 3) Link-LED (grün):... -
Seite 26: Isd300 Ein-/Ausschalten
ISD300 ein-/ausschalten Gerät einschalten Gehen Sie wie folgt vor: 1. Betätigen Sie den Netzschalter. Die ISD300-Systemsoftware fährt automatisch hoch, nachdem das Gerät mit Strom versorgt wird. Gerät ausschalten Druckaufträge, die während des Ausschaltvorgangs bearbeitet werden, können nicht fertiggestellt werden. Die Bearbeitung der in der Warteschlange gespeicherten Druckaufträge wird fortgesetzt, sobald die Systemsoftware wieder... -
Seite 27: Isd300 Tcp/Ip-Parameter Zuweisen
ISD300 TCP/IP-Parameter zuweisen Im Rahmen des TCP/IP-Netzwerkprotokolls ist es erforderlich, eine IP-Adresse im ISD zu speichern, damit das Gerät im Netzwerk angesprochen und über das ISD Control Center konfiguriert werden kann. Sie können die Parameter sowohl manuell zuweisen als auch automatisch über das DHCP (Dynamic Host Configuration Protocol) zuweisen lassen. - Seite 28 9. Bestätigen Sie mit . Das Display zeigt: > Apply < Back 10. Bestätigen Sie mit . Das Display zeigt: Applying Network Settings ... Die Einstellungen werden gespeichert. TCP/IP-Parameter automatisch zuweisen (DHCP) Stellen Sie folgende Punkte sicher: - Ein aktiver DHCP-Server ist im Netzwerk vorhanden. Betätigen Sie zur Eingabe die Navigationstasten an der Gerätefront, um die TCP/IP-Parameter über DHCP zuzuweisen.
-
Seite 29: Isd Control Center Verwenden
ISD Control Center verwenden Das ISD Control Center ist eine Benutzeroberfläche zur Administration des ISD. Das ISD Control Center ist in dem ISD gespeichert und kann auf einem Client mit einem Internet-Browser (Internet Explorer, Firefox, Safari) dargestellt werden. Stellen Sie folgende Punkte sicher: - Das ISD ist an das Netzwerk angeschlossen und hochgefahren. - Seite 30 - Installation, Konfiguration und Wartung des ISD Der Ablauf beschreibt den Zugang zum Benutzerprofil 'Admin' mit dem Standard- Passwort (Werkseinstellung). Ändern Sie das Standard-Passwort, sobald Sie das ISD in einer Live-Umgebung einsetzen; siehe: ISD300-Benutzerdokumentation. Gehen Sie wie folgt vor: 1. Starten Sie das ISD Control Center.
-
Seite 31: Isd Quick Setup
ISD Quick Setup Bei der Erstkonfiguration unterstützt Sie das 'Quick Setup'. Das Quick Setup besteht aus vier Schritten: dem Konfigurieren von Hostname und Gerätezeit, dem Konfigurieren von TCP/IPv4-Parametern und DNS-Server, der Suche nach im Netzwerk vorhandenen Druckern sowie dem Einrichten von Queues. Gehen Sie wie folgt vor: 1. - Seite 32 11. Wählen Sie die Schaltfläche Installieren an. Die Namen der Queues werden in der Spalte Queue-Name angezeigt. 12. Bestätigen Sie mit Setup beenden. Die Einstellungen werden gespeichert. In der ISD300-Benutzerdokumentation erhalten Sie weiterführende Information zur Konfiguration und Administration. [de] Quick Installation Guide...
-
Seite 33: Isd-Softwarepaket
Druckdienst eines Windows-Betriebssystems. Die Software ermöglicht die Übertragung von unverschlüsselten und verschlüsselten (SSL/TLS) Druckdaten vom Client zum ISD über direkte TCP/IP-Ports. Der SEH Print Monitor kann auf jedem Client, von dem aus gedruckt werden soll, installiert werden. Der ISD Printer Driver Wizard unterstützt Sie bei der Installation von Druckertreibern auf das ISD.