Herunterladen Inhalt Inhalt Diese Seite drucken
Inhaltsverzeichnis

Werbung

Verfügbare Sprachen

Verfügbare Sprachen

Bedienungsanleitung
RUCD-1804 Autoradio
Best.-Nr. 1456212
Operating Instructions
RUCD-1804 car radio
Item No. 1456212
Notice d´emploi
RUCD-1804 autoradio
N° de commande 1456212
Gebruiksaanwijzing
RUCD-1804 autoradio
Bestelnr. 1456212
Seite 2 - 25
Page 26 - 49
Page 50 - 73
Pagina 74 - 97

Werbung

Inhaltsverzeichnis
loading

Inhaltszusammenfassung für Renkforce RUCD-1804

  • Seite 1 Bedienungsanleitung RUCD-1804 Autoradio Best.-Nr. 1456212 Seite 2 - 25 Operating Instructions RUCD-1804 car radio Item No. 1456212 Page 26 - 49 Notice d´emploi RUCD-1804 autoradio N° de commande 1456212 Page 50 - 73 Gebruiksaanwijzing RUCD-1804 autoradio Bestelnr. 1456212 Pagina 74 - 97...
  • Seite 2: Inhaltsverzeichnis

    Inhaltsverzeichnis Seite Einführung .................................3 Symbolerklärung ..............................3 Bestimmungsgemäße Verwendung ........................4 Lieferumfang ..............................4 Merkmale und Funktionen ..........................5 Sicherheitshinweise ............................6 Bedienelemente ..............................7 Mechanischer Einbau ............................8 a) Abnehmen und Anbringen des Frontbedienteils ..................8 b) Einbau in den Radioschacht ........................9 c) Ausbau ...............................10 Elektrischer Anschluss ............................10 a) Anschluss der Antenne ..........................11 b) Anschluss der LINE-Ausgänge ........................11 c) Anschluss AUX ............................11...
  • Seite 3: Einführung

    1. Einführung Sehr geehrte Kundin, sehr geehrter Kunde, wir bedanken uns für den Kauf dieses Produkts. Dieses Produkt entspricht den gesetzlichen, nationalen und europäischen Anforderungen. Um diesen Zustand zu erhalten und einen gefahrlosen Betrieb sicherzustellen, müssen Sie als Anwender diese Bedienungsanleitung beachten! Diese Bedienungsanleitung gehört zu diesem Produkt.
  • Seite 4: Bestimmungsgemäße Verwendung

    3. Bestimmungsgemäße Verwendung Das Renkforce Autoradio dient dazu, Radiosender in Fahrzeugen zu empfangen, Audiodaten von passenden Spei- chermedien wiederzugeben und die so gewonnenen Audiosignale zu verstärken und wiederzugeben. Das Gerät muss zur Wiedergabe an Lautsprecher angeschlossen werden. Dieses Produkt ist nur für den Anschluss an ein 12 V-Gleichspannungsbordnetz mit negativem Pol der Fahrzeugbat- terie an Karosserie zugelassen.
  • Seite 5: Merkmale Und Funktionen

    5. Merkmale und Funktionen • UKW-Radioteil mit RDS-Funktion • Abnehmbares Bedienteil • USB- und SD-Schnittstelle • CD-Laufwerk • Hohe Ausgangsleistung (4 x 40 W max.) • Vorverstärkerausgang zum Anschluss eines Leistungsverstärkers • Anschluss für externe Audioquellen am Bedienteil • Elektronische Lautstärke-, Tiefen-, Höhen-, Fader- und Balance-Regelung • Digitaler Signalprozessor zur Anpassung der Klangcharakteristik an verschiedene Musikrichtungen • Loudness-Schaltung • Genaues elektronisches Abstimmen der Sender durch PLL-Tuner • 18 programmierbare Stationsspeicher • Manueller und automatischer Sendersuchlauf in beide Suchrichtungen • Automatische Senderspeicherung • ID3-Tag-Anzeige bei MP3-Wiedergabe • Uhrzeiteinstellung über RDS-System • ISO-Anschlussterminal...
  • Seite 6: Sicherheitshinweise

    6. Sicherheitshinweise Lesen Sie sich die Bedienungsanleitung aufmerksam durch und beachten Sie insbesondere die Sicherheitshinweise. Falls Sie die Sicherheitshinweise und die Angaben zur sachgemäßen Handhabung in dieser Bedienungsanleitung nicht befolgen, übernehmen wir für dadurch resultierende Personen-/Sachschäden keine Haftung. Außerdem erlischt in solchen Fällen die Gewährleistung/Garantie.
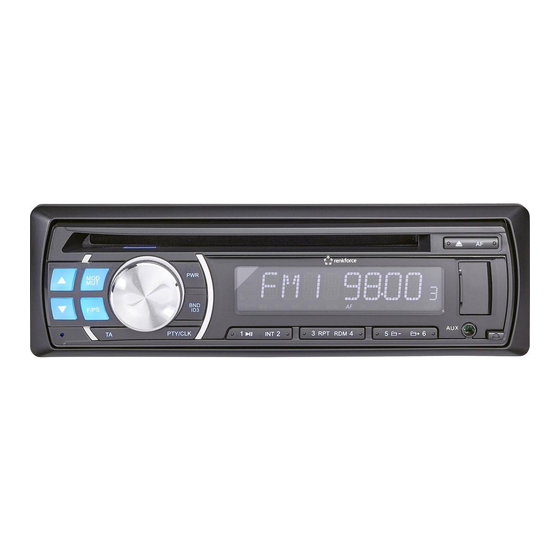
  • Seite 7: Bedienelemente

    7. Bedienelemente F/PS PTY/CLK 11 12 13 14 15 16 17 18 Taste Taste 1 / Taste MOD / MUT Taste 2 / INT Taste PWR Taste 3 / RPT Display Taste 4 / RDM Taste Taste 5 / Taste AF Taste 6 / Taste Anschluss AUX...
  • Seite 8: Mechanischer Einbau

    8. Mechanischer Einbau In den meisten Kfz ist vom Hersteller ein Einbauplatz für das Autoradio vorgesehen. Die Wahl des Einbauplatzes er- folgte aus sicherheitstechnischen Gesichtspunkten. Es ist deshalb anzuraten, das Autoradio in diesen vorgesehenen Bereich einzubauen. Das Gerät benötigt einen DIN-Einbauausschnitt mit den Abmessungen 182 x 53 mm, diese Einbaumaße sind ge- normt und werden üblicherweise von allen Kfz-Herstellern eingehalten. Sollte kein Einbauausschnitt vorgesehen sein, so informieren Sie sich bitte bei Ihrem Autohändler über den korrekten Einbauort für das Autoradio.
  • Seite 9: Einbau In Den Radioschacht

    b) Einbau in den Radioschacht • Nehmen Sie das Frontbedienteil ab. • Lösen Sie vorsichtig den Kunststoffrahmen an der Gerätefront, indem Sie ihn leicht nach außen biegen und vom Gerät abziehen. • Entfernen Sie die beiden Sicherungsschrauben des CD-Laufwerks (Bild1, Punkt1). • Entriegeln Sie den Einbaurahmen mit den beiden Entriegelungsschlüsseln (Bild1, Punkt2). • Ziehen Sie den Einbaurahmen nach hinten vom Gerät ab (Bild1, Punkt3). • Schieben Sie den Einbaurahmen in den Einbauausschnitt des Fahrzeugs (Bild2). • Biegen Sie einige der Haltelaschen am Einbaurahmen um, bis der Rahmen sicher in der Einbauöffnung fixiert ist (Bild3). • Nachdem Sie alle elektrischen Verbindungen hergestellt haben (siehe „Elektrischer Anschluss“) schieben Sie das Gerät in den Einbaurahmen, bis es sicher einrastet (Bild4). Achten Sie dabei darauf, das Gerät richtig herum in den Einbaurahmen einzuschieben (die Kontakte für das Frontbedienteil müssen unten liegen).
  • Seite 10: C) Ausbau

    c) Ausbau • Nehmen Sie das Frontbedienteil ab. • Lösen Sie vorsichtig den Kunststoffrahmen an der Gerätefront, indem Sie ihn leicht nach außen biegen und vom Gerät abziehen. • Stecken Sie die beiden Entriegelungsschlüssel in die seitlichen Schlitze im Einbaurahmen, bis das Gerät entriegelt ist. • Lösen Sie, falls erforderlich, den Schraubzapfen an der Geräterückseite. • Ziehen Sie das Autoradio an den Entriegelungsschlüsseln vorsichtig aus dem Einbaurahmen. • Lösen Sie alle Steckverbindungen an der Geräterückseite. 9. Elektrischer Anschluss Der elektrische Anschluss sollte nur von einer Fachkraft durchgeführt werden. Um Kurzschlüsse und daraus resultierende Beschädigungen des Gerätes zu vermeiden, muss während des Anschlusses der Minuspol (Masse) der Fahrzeugbatterie abgeklemmt werden.
  • Seite 11: Anschluss Der Antenne

    Die Anschlusskabel der Lautsprecher sind im Normalfall codiert: Einige Lautsprecherhersteller markieren die (+)-Leitung mit einem zusätzlichen Farbstreifen, andere wiederum verwenden eine geriffelte Leitung für den (+)-Pol, für den (-)-Pol hingegen eine glatte Leitung. Das Gerät wurde für den Betrieb an Lautsprecherimpedanzen von mindestens 4 Ohm entwickelt. Schließen Sie auf keinen Fall Lautsprecher mit einer geringeren Impedanz an.
  • Seite 12: Anschluss Der Lautsprecher Und Der Stromversorgung

    d) Anschluss der Lautsprecher und der Stromversorgung Fahrzeuge, die mit einem ISO-Systemstecker ausgerüstet sind, können bei gleicher Steckerbelegung (bitte vorher überprüfen!) direkt mit dem ISO Anschlussterminal verbunden werden. Bei abweichender Steckerbelegung erfolgt der Anschluss über einen fahrzeugspezifischen Adapter, den Sie im Handel erhalten. Die Kontaktbelegung der ISO-Anschlussbuchse des Autoradios entnehmen Sie bitte den nachfolgenden Bildern. Die jeweilige Belegung Ihres Kfz Systemsteckers erfahren Sie bei Ihrem Kfz Händler.
  • Seite 13: Bedienung

    10. Bedienung Nehmen Sie das Gerät nur dann in Betrieb, wenn Sie sich mit den Funktionen und mit dieser Bedie- nungsanleitung vertraut gemacht haben. Überprüfen Sie alle Anschlüsse nochmals auf ihre Richtigkeit. Klemmen Sie nach der Überprüfung den Minuspol der Bordbatterie wieder an. a) Allgemeine Bedienung Taste PWR (3) • Mit dieser Taste wird das Gerät ein- bzw. ausgeschaltet.
  • Seite 14: B) Menü-Einstellungen

    Einstellung der Uhrzeit • Halten Sie die Taste PTY/CLK (11) gedrückt, bis die Uhrzeit im Display angezeigt wird und die Stundenanzeige blinkt. • Stellen Sie die Stunden durch Drehen des Drehreglers (10) ein. Drücken Sie den Drehregler (10) und stellen Sie die Minuten durch Drehen des Drehreglers (10) ein. • Drücken Sie die Taste PTY/CLK (11), um die Einstellung zu speichern. Taste OPEN (20) • Drücken Sie diese Taste, um das Bedienteil zu entriegeln. RESET-Funktion • Diese Funktion setzt alle Einstellungen auf die werksseitig vorgegebenen Werte zurück. • Drücken Sie die Taste RESET (22) mit einem spitzen Gegenstand (z.B. einer aufgebogenen Büroklammer) in folgenden Fällen: - nach Abschluss der Einbau- und Anschlussarbeiten - wenn das Gerät nicht mehr auf Tastenbetätigungen reagiert...
  • Seite 15 • LOUD ON/OFF LOUD ON: Die Loudness-Schaltung ist aktiviert. LOUD OFF: Die Loudness-Schaltung ist abgeschaltet. Der Klang wird nicht beeinflusst. Das menschliche Ohr nimmt tiefe und hohe Töne bei geringen Lautstärken schlechter wahr. Durch eine Anhebung dieser Frequenzbereiche bei geringen Lautstärken (Loudness-Korrektur) wird diesem Effekt entgegengewirkt und die Musikwiedergabe klingt natürlicher. • EQ - EQUALIZER EQ OFF Equalizer ausgeschaltet...
  • Seite 16: Radiobetrieb

    Das Kürzel RDS steht für Radio Daten System, d.h. es werden unhörbare, codierte Zusatzinformationen über den UKW RDS Sender mit ausgestrahlt. Sie besitzen mit dem Renkforce Autoradio ein Gerät, das in der Lage ist diese codierten Daten, die von fast allen Sendeanstalten mit ausgestrahlt werden auszuwerten.
  • Seite 17 Programm Identifikation (PI) Diese Daten helfen dem Empfänger einen Sender eindeutig zu identifizieren. Sie ermöglichen dem Radio zwischen Gebieten zu unterscheiden in denen das gleiche Programm ausgestrahlt wird. Das Autoradio schaltet also bei schwä- cher werdendem Empfang nur auf einen stärkeren Sender um, der die gleiche Programm Identifikation ausstrahlt. Verkehrsfunk-Kennung (TP) Durch dieses Signal erkennt der Empfänger, dass ein Sender mit Verkehrsfunkinformationen empfangen wird. Verkehrsdurchsage-Kennung (TA) Durch dieses Signal kann der Sender eine Verkehrsfunkdurchsage erkennen und gegebenenfalls die laufende Wie- dergabe einer anderen Quelle unterbrechen.
  • Seite 18 Funktion der einzelnen Tasten Taste BND / ID3 (12) • Durch Drücken dieser Taste wird der Bandbereich des Radioteils gewählt. • Es stehen 3 UKW-Bereiche zur Verfügung: FM1 > FM2 > FM3 Auf jedem der drei Bandbereiche können 6 Sender auf den Stationstasten 1-6 (13-18) abgespeichert wer- den. Tasten (1) und • Mit diesen Tasten wird die Empfangsfrequenz geändert, um Sender im Radiobetrieb einzustellen. • Kurzes Drücken einer Taste startet den automatischen Sendersuchlauf. • Der Suchlauf hält erst beim nächsten, gut zu empfangenden Sender an.
  • Seite 19 Taste AF (6) • Drücken Sie diese Taste, um die AF-Funktion ein- bzw. auszuschalten. • Die Funktion AF aktiviert die automatische Sendernachführung (siehe „RDS als Empfangskonzept“). • Im Display erscheint die Anzeige AF. Wird ein schwacher oder kein RDS Sender empfangen, blinkt die Anzeige. Bei einem gut zu empfangenden Sender erscheint das Symbol ständig. • Nur mit aktivierter AF Funktion kann das Gerät beim Verlassen des Sendegebietes selbstständig auf einen besse- ren Sender umschalten. Taste TA (9) • Drücken Sie diese Taste, um die TA-Funktion ein- bzw. auszuschalten. • Wird ein Verkehrsfunksender empfangen, so erscheint im Display die Anzeige TP = Traffic Programm. • Bei aktivierter TA-Funktion erscheint zusätzlich das Kürzel TA im Display. • Bei laufender Wiedergabe einer anderen Quelle (z.B. SD-Wiedergabe) wird das Programm für die Dauer der Ver- kehrsfunkdurchsage stummgeschaltet. • Wird eine laufende Rundfunksendung sehr leise gehört, erhöht sich die Lautstärke der Verkehrsfunkdurchsage automatisch auf die im Menü eingestellte Mindestlautstärke (TAVOL). PTY-Suchlauf Der PTY-Suchlauf ist ein Sendersuchlauf, der nur Sender mit einer vorgegebenen Programmtyp-Kennung (PTY) empfängt.
  • Seite 20: D) Cd-Betrieb

    d) CD-Betrieb • Legen Sie eine CD (Audio-CD oder MP3-CD) in das CD-Laufwerk ein. • Das Gerät schaltet automatisch auf die CD-Wiedergabe um. Die CD muss immer mit der beschrifteten Seite nach oben eingeschoben werden. Taste Drücken Sie diese Taste, um eine eingelegte CD auszuwerfen. Taste 1 / (13) • Drücken Sie diese Taste, um die Wiedergabe kurzzeitig zu unterbrechen. • Bei erneuter Betätigung setzt die Wiedergabe an der Stelle wieder ein, an der sie vorher unterbrochen wurde. Tasten (1) und Diese Tasten dienen zur Auswahl der einzelnen Tracks bzw. zum Suchen eines bestimmten Abschnitts innerhalb eines Tracks.
  • Seite 21: E) Usb-/Speicherkartenbetrieb

    Taste 4 / RDM (16) • Drücken Sie diese Taste, um alle Tracks in zufälliger Reihenfolge abzuspielen. • Um diese Funktion wieder abzuschalten, drücken Sie die Taste erneut. Die Wiedergabe erfolgt ab dieser Stelle wieder in normaler Reihenfolge. Suchfunktion • Drücken Sie die Taste F/PS (8), um die Suchfunktion zu aktivieren. • Wählen Sie mit dem Drehregler (10) die gewünschten Tracknummer. Wenn die Tracknummer mehrstellig ist, drücken Sie den Drehregler (10), um weitere Stellen einzugeben. • Drücken Sie den Drehregler (10), um den gewählten Track abzuspielen. Abruf von Informationen zum aktuell gespielten Titel • Während der Wiedergabe eines MP3-Titels zeigt das Display automatisch im Wechsel die ID3-Tag-Informationen • Drücken Sie die Taste BND / ID3 (12), um zwischen ID3-Tag-Anzeigen umzuschalten.
  • Seite 22: Handhabung

    11. Handhabung • Eine zu hohe Lautstärke im Kfz-Innenraum hat zur Folge, dass akustische Warnsignale nicht mehr wahrgenommen werden können. Dadurch werden Sie und andere Verkehrsteilnehmer gefährdet. Achten Sie deshalb auf eine ange- passte Lautstärke. • Unachtsamkeit im Straßenverkehr kann zu schwerwiegenden Unfällen führen. Eine Bedienung der HiFi-Anlage darf deshalb immer nur dann erfolgen, wenn es die Verkehrssituation erlaubt und Sie durch die Bedienung der Anlage nicht vom Verkehrsgeschehen abgelenkt werden.
  • Seite 23: Behebung Von Störungen

    13. Behebung von Störungen Mit dem Renkforce Autoradio haben Sie ein Produkt erworben, welches nach dem Stand der Technik gebaut wurde und betriebssicher ist. Dennoch kann es zu Problemen oder Störungen kommen. Deshalb möchten wir Ihnen hier beschreiben, wie Sie mögliche Störungen beheben können:...
  • Seite 24: Konformitätserklärung (Doc)

    Das Gerät reagiert nicht mehr auf Tastenbefehle oder zeigt wirre Zeichen im Display an: • Setzen Sie das Gerät mit der Taste RESET (22) auf die Werkseinstellungen zurück. Andere Reparaturen als zuvor beschrieben sind ausschließlich durch einen autorisierten Fach- mann durchzuführen. 14. Konformitätserklärung (DOC) Hiermit erklärt Conrad Electronic SE, Klaus-Conrad-Straße 1, D-92240 Hirschau, dass dieses Produkt der Richtlinie 2014/53/EU entspricht.
  • Seite 25: Technische Daten

    16. Technische Daten Betriebsspannung ..............12 V/DC Sicherung ................Kfz-Flachsicherung 10 A Ausgangsleistung ..............4 x 40 W (max.) Lautsprecherimpedanz ............4 - 8 Ohm Empfangsbereich ..............87,5 - 108,0 MHz (Europe) 87,5 - 107,9 MHz (USA) Stationsspeicher ..............18 (3 x 6) Schnittstellen ...............USB und SD-Card Abspielbare Medien .............CD, CD-R, CD-RW, USB, SD Abspielbare Dateiformate ............CD-Audio, MP3 Strombelastbarkeit USB-Schnittstelle ........max. 500 mA Speicherkartengröße ............max. 32 GB...
  • Seite 26 Table of Contents Page Introduction ...............................27 2. Explanation of Symbols ............................27 Intended Use ..............................28 Scope of Delivery ..............................28 Features and Functions ............................29 Safety Notes ..............................30 Operating Elements ............................31 Mechanical Installation .............................32 a) Removing and Replacing the Front Control Panel ..................32 b) Installation in the Radio Slot ........................33 c) Disassembly ...............................34 Electric Connection ............................34 a) Connecting the Aerial ..........................35...
  • Seite 27: Introduction

    1. Introduction Dear Customer, thank you for purchasing this product. This product complies with the statutory national and European specifications. To maintain this status and to ensure safe operation, you as the user must observe these operating instructions! These operating instructions are part of this product. They contain important notes on commissioning and handling. Also consider this if you pass on the product to any third party. Therefore, retain these operating instructions for reference! If there are any technical questions, please contact: International:...
  • Seite 28: Intended Use

    3. Intended Use The Renkforce car radio, you can receive radio programmes in vehicles and play back audio data from suitable media, amplify and play back the audio signals received in this manner. The device must be connected to speakers.
  • Seite 29: Features And Functions

    5. Features and Functions • FM radio unit with RDS-function • Removable control panel • USB and SD interface • CD drive • High output (4 x 40 W max.) • Preamp output for the connection of a power amplifier • Connection for external audio sources at the control panel • Electronic volume, bass, treble, fader and balance control • Digital signal processor for the adaptation of the sound characteristics to various music styles • Loudness correction • Exact electronic tuning of the stations with a PLL-tuner • 18 programmable station memories • Manual and automatic station scan in both directions • Automatic station storage • ID3-tag display for MP3-playback • Time setting by means of the RDS system • ISO terminal...
  • Seite 30: Safety Notes

    6. Safety Notes Read the operating instructions attentively and particularly observe the safety notes. If the safety notes and the information in these operating instructions regarding proper handling are not observed, we assume no liability for any resulting injury/property damage. In such cases, the warranty/guarantee will also lapse.
  • Seite 31: Operating Elements

    7. Operating Elements F/PS PTY/CLK 11 12 13 14 15 16 17 18 button Button 1 / MOD / MUT button Button 2 / INT PWR button Button 3 / RPT Display Button 4 / RDM button Button 5 / AF button Button 6 / Button...
  • Seite 32: Mechanical Installation

    8. Mechanical Installation In most vehicles the producers plan an installation cut-out for the car radio. The choice of the location depends on safety aspects. Therefore we recommend that you actually install the radio in this place. The device requires a DIN installation cut-out with the dimensions 182 x 53 mm; these dimensions are standardized and usually the vehicle manufacturers comply with them. Should there be no slot, please ask your car dealer about the correct place of installation for your car radio.
  • Seite 33: Installation In The Radio Slot

    b) Installation in the Radio Slot • Remove the front control panel. • Carefully remove the plastic frame in the front of the system by bending it slightly to the outside and pulling it off from the unit. • Remove the two locking screws of the CD drive (fig. 1, no. 1). • Unlock the installation frame with the two unlocking keys (fig. 1, item 2). • Remove the installation frame towards the back of the system (fig. 1, item 3). • Insert the frame into the respective cut-out in the vehicle (figure 2). • Bend down some clips in the installation frame until the frame is securely fastened in the recess (figure 3). • When you have made all the electrical contacts (see "Electric Connection") insert the device into the frame until it locks in (figure 4). Ensure that the device is pushed into the installation frame the right away around (the contacts for the front control panel must be at the bottom). • Push the plastic frame at the device front onto the device again. Keep the two unlocking keys. You will need them for a later removal of the device. • Additionally protect the device from vibrations with the enclosed bolt, which you can attach to the back of the unit.
  • Seite 34: C) Disassembly

    c) Disassembly • Remove the front control panel. • Carefully remove the plastic frame in the front of the system by bending it slightly to the outside and pulling it off from the unit. • Insert the two unlocking keys into the lateral slots in the installation frame until the device unlocks. • Loosen the screw pin at the back of the device if required. • Carefully pull out the radio with the unlocking keys from the installation frame. • Remove all plug connections at the back of the unit. 9. Electric Connection The electric connection should be made by a specialist. To avoid short circuits and resulting damage to the device, the negative pole (ground) of the vehi- cle battery must be disconnected during connection.
  • Seite 35: Connecting The Aerial

    In most vehicles, the cables for the electric connection and the connection of the speakers have been laid directly to the slot. If this is not the case, please make sure that any cables placed later are secured by the respective on-board fuses (see vehicle operation manual).
  • Seite 36: Connection Of The Speakers And The Power Supply

    d) Connection of the Speakers and the Power Supply Vehicles equipped with an ISO plug can be connected directly to the ISO connection terminal if the plug assignment is the same (please check beforehand!). If the plug assignment differs, use a vehicle-specific adapter from a vendor for connection. Please refer to the following figures for the contact assignment of the ISO connection socket of the car radio. Please ask your car dealer for the respective assignment of your vehicle system plug. System connector B (speaker connection) (1) Speaker rear right (+) (2) Speaker rear right (-) (3) Speaker front right (+) (4) Speaker front right (-) (5) Speaker front left (+)
  • Seite 37: Operation

    10. Operation Only take the device into operation after familiarising yourself with its functions and these operat- ing instructions. Check all the connections again. When you have done so, reconnect the negative pole of the car battery. a) General Operation PWR button (3) • This button switches the radio on and off.
  • Seite 38: Menu Settings

    Setting the Time • Keep the button PTY/CLK (11) pushed until the time is displayed and the hours flash. • Set the hours by turning the rotary control (10). Push the rotary control (10) and adjust the minutes by turning the rotary control (10). • Push the PTY/CLK button (11) to save the settings. OPEN button (20) • Press this button to unlatch the control panel. RESET function • This function resets all settings to factory settings. • Push the button RESET (22) with a pointy object (e.g. a straightened paper clip) in the following cases: - when you have completed the installation and connection - when the device does not react to the operation of buttons any more - when the display shows undefined characters b) Menu Settings To select the menu settings, push the rotary control (10) briefly or for a longer time to call the two levels of the menus.
  • Seite 39 • LOUD ON/OFF LOUD ON: The loudness function is active. LOUD OFF: The loudness function is inactive. The sound is not influenced. At low volumes the human ear does not perceive very low and very high sounds well. An increase of the frequency range for low volume (loudness correction) counteracts this effect and the music replay sounds more natural. • EQ - EQUALIZER EQ OFF Equalizer off Pre-setting for pop music ROCK Pre-setting for rock music CLASSIC...
  • Seite 40: Radio Operation

    The abbreviation RDS stands for Radio Data System, i.e. inaudible, additional information codes are transmitted by the FM RDS station. With the Renkforce car radio, you have a device that is able to evaluate these coded data that are transmitted by most of the radio stations.
  • Seite 41: Alternative Frequencies (Af)

    Program Identification (PI) This information helps the receiver to identify a station. It enables the radio to differentiate between areas where the same programme is transmitted. The car radio only switches to a stronger station when the reception grows weaker if the stronger station transmits the same programme identification.
  • Seite 42: Button Functions

    Button functions BND / ID3 button (12) • Push this button to select the band range of the radio unit. • There are 3 FM ranges: FM1 > FM2 > FM3 On each of the three band ranges, 6 stations can be stored on the station button 1-6 (13-18). Buttons (1) and • With these buttons the receiving frequency can be changed to adjust stations in radio operation. • Briefly pushing a button starts the automatic station search. • The auto-scan only stops at the next station that can be received well.
  • Seite 43 AF button (6) • Press this button to switch the AF function on or off. • The AF function activates automatic station tracking (see "RDS as reception concept"). • AF will be displayed. If the reception of an RDS transmitter station gets weaker or the radio does not receive and RDS station at all, the display flashes. When a station can be received well, the symbol is displayed continuously. • When you leave a transmission area, the radio can only switch to a better station when the AF function is activated. TA button (9) • Press this button to switch the TA function on or off. • When you receive a traffic programme station, the display shows TP = traffic programme. • With the TA-function active, TA appears in the display as well. • If a different source is being played (e.g. SD playback), the programme is set to mute during the traffic announce- ment. • When you listen to a radio programme at a very low volume, the volume is automatically increased to the minimum volume set in the menu (TAVOL). PTY search The PTY scan is a station scan that will only receive stations with a specified programme type ID (PTY). • Push the button PTY/CLK (11) repeatedly until the display shows a programme type from the following list. • Push the button PTY/CLK (11) again to switch between the programme types music or speech. • Push one of the station radio station buttons 1-6 (13-18) to select the desired programme type. To switch to the second or third programme type from the following list, push the respective radio station button again.
  • Seite 44: D) Cd Operation

    d) CD Operation • Insert a CD (audio CD or MP3 CD) into the CD drive. • The device automatically switches to CD playback. Always insert the CD with the printed side up. Button Press this button to eject a CD. Button 1 / (13) • Push this button to interrupt the playback briefly. • When you confirm the button again, playback will begin at the point where it was interrupted. Buttons (1) and With these buttons you can select individual tracks or search for a specific section within one track. The arrows on the buttons indicate the search direction (up or down). • Only push the buttons briefly to jump to the next or previous track.
  • Seite 45: Search Function

    Button 4 / RDM (16) • Push this button to play all tracks at random order. • To de-activate this function, push the button again. Playback continues in normal order from here. Search function • Push the button F/PS (8) to activate the search function. • Select the desired track number with the rotary control (10). If the track number has several digits, push the rotary control (10) to enter more digits. • Push the rotary control (10) to play back the desired track. Calling information on the currently played title • During playback of an MP3 title, the display will automatically show the ID3-tag information alternatingly.
  • Seite 46: Handling

    11. Handling • If the volume inside your car is too high, you will not hear any acoustic warning signals. This constitutes a danger to yourself and other road users. Therefore, make sure the volume is at a suitable level. • Inattentiveness on the road may cause serious accidents. Operation of the hi-fi system may therefore only take place if the traffic situation permits and you are not unduly distracted by operating the system. • Do not listen to excessively loud music over an extended period of time. This may damage your hearing. 12. Care and Cleaning Check the technical safety of the car radio regularly, e.g. for damage to the connection cables or to the casing. If it can be assumed that safe operation is no longer possible, the device must be turned off and precautions are to be taken to ensure that it is not used unintentionally.
  • Seite 47: Troubleshooting

    13. Troubleshooting With the Renkforce car radio, you have purchased a product built to the state of the art and operationally safe. Nevertheless, problems or errors may occur. Therefore, we would like to describe how to eliminate possible errors here:...
  • Seite 48: Declaration Of Conformity (Doc)

    The device no longer responds to button commands or displays weird characters: • Reset the device to factory settings with the RESET (22) button. Repairs other than those described above must only be carried out by an authorised specialist. 14. Declaration of Conformity (DOC) Conrad Electronic SE, Klaus-Conrad-Straße 1, D-92240 Hirschau, hereby declares that this product complies with directive 2014/53/EU.
  • Seite 49: Technical Data

    16. Technical Data Operating voltage ..............12 V/DC Fuse ..................Vehicle flat fuse 10 A Output power ...............4 x 40 W (max.) Speaker impedance .............4 - 8 Ohm Reception range ..............87.5 - 108 MHz (Europe) 87.5 - 107.9 MHz (USA) Station memory ..............18 (3 x 6) Interfaces ................USB and SD-card Admissible media ..............CD, CD-R, CD-RW, USB, SD Playable file formats ............CD-audio, MP3 Current load capacity USB interface ........max. 500 mA Memory card size ..............max. 32 GB...
  • Seite 50 Table des matières Page Introduction ...............................51 2. Explication des symboles ..........................51 Utilisation conforme ............................52 Contenu de la livraison .............................52 5. Caractéristiques et fonctions ..........................53 Consignes de sécurité ............................54 Éléments de commande ...........................55 8. Montage mécanique ............................56 a) Retrait et mise en place de la façade ......................56 b) Montage dans la baie radio ........................57 c) Démontage ..............................58 9. Raccordement électrique ..........................58...
  • Seite 51: Introduction

    1. Introduction Chère cliente, chere client, Nous vous remercions pour l’achat de ce produit. Le produit est conforme aux exigences des directives européennes et nationales en vigueur. Afin de maintenir le produit en bon état et de garantir un fonctionnement sans danger, l’utilisateur doit impérativement respecter le présent mode d’emploi ! Le présent mode d’emploi fait partie intégrante de ce produit. Il contient des remarques importantes à propos de la mise en service et de la manipulation du produit. Observez ces remarques, même en cas de cession de ce produit à des tiers. Conservez donc le présent mode d’emploi afin de pouvoir le consulter à...
  • Seite 52: Utilisation Conforme

    3. Utilisation conforme L’autoradio Renkforce permet de recevoir les stations de radio dans les véhicules, de rendre les données audio de supports de mémoire adaptés et d’amplifier ou rendre les signaux audio obtenus. Pour la lecture, l’appareil doit être raccordé à des haut-parleurs. Ce produit est exclusivement homologué pour le raccordement à un réseau de bord à tension continue 12 V avec pôle négatif de la batterie du véhicule sur la carrosserie. L’autoradio ne doit être monté et mis en service que dans les véhicules utilisant ce type de tension de bord. Lors du montage, l’utilisateur doit veiller à ce que l’appareil ne prenne ni l’humidité ni l’eau. Éviter impérativement tout contact avec l'humidité. Pour des raisons de sécurité vous ne devez pas transformer et/ou modifier le produit. Toute utilisation du produit autre que celle précédemment décrite peut l'endommager. De plus, une utilisation non conforme peut entraîner des dangers tels que court-circuit, incendie etc. Lisez attentivement l’intégrité de la notice d’utilisation et conservez-la. En cas de remise du produit à un tiers, il doit toujours être accompagné de son mode d’emploi.
  • Seite 53: Caractéristiques Et Fonctions

    5. Caractéristiques et fonctions • Radio FM avec fonction RDS • Unité de commande amovible • Interfaces USB et SD • Lecteur CD • Puissance de sortie élevée (max. 4 x 40 W) • Sortie de préamplificateur pour le raccordement d’un amplificateur de sortie • Connexion pour sources audio externes à l'élément de commande • Réglage électronique du volume, des basses, des aigus, du fader et de la balance • Processeur de signaux numériques pour l’adaptation de la caractéristique sonore aux différents styles de musique • Circuit Loudness • Syntonisation électronique précise des stations au moyen d’un syntoniseur PLL • 18 stations radio programmables • Recherche manuelle et automatique des stations dans les deux sens de recherche • Mémorisation automatique des stations • Affichage des métadonnées ID3 durant la lecture MP3 • Réglage de l’heure via le système RDS • Terminal de connexion ISO...
  • Seite 54: Consignes De Sécurité

    6. Consignes de sécurité Lisez attentivement le mode d’emploi et observez notamment les consignes de sécurité. En cas de non-respect des consignes de sécurité et des informations à propos de la manipulation correcte contenues dans le présent mode d’emploi, nous déclinons toute responsabilité pour les dommages corporels et matériels pouvant en résulter.
  • Seite 55: Éléments De Commande

    7. Éléments de commande F/PS PTY/CLK 11 12 13 14 15 16 17 18 Touche Touche 1 / Touche MOD / MUT Touche 2 / INT Touche PWR Touche 3 / RPT Affichage Touche 4 / RDM Touche Touche 5 / Touche AF Touche 6 / Touche...
  • Seite 56: Montage Mécanique

    8. Montage mécanique Les constructeurs prévoient un emplacement pour le montage de l’autoradio dans la plupart des véhicules. L’empla- cement de montage est défini en tenant compte des aspects de sécurité. Pour cette raison, il est conseillé de monter l’autoradio à l’emplacement prévu à cet effet. L’appareil doit être installé dans une baie de montage DIN aux dimensions 182 x 53 mm. Ces dimensions de montage sont normalisées et sont généralement respectées par tous les constructeurs automobiles. Si aucune baie de montage n’est prévue, veuillez consulter votre concessionnaire automobile qui vous indiquera l’emplacement prévu pour le montage de l’autoradio.
  • Seite 57: Montage Dans La Baie Radio

    b) Montage dans la baie radio • Retirez la façade. • Dégagez avec précaution le cadre en plastique de la façade de l’appareil en le pliant légèrement vers l’extérieur et retirez-le. • Dévissez les deux vis de retenue du lecteur de CD (figure 1, point 1). • Déverrouillez le cadre encastrable à l'aide des deux clés de déblocage (figure 1, point 2). • Enlevez le cadre encastrable en le retirant vers l'arrière (figure 1, point 3). • Introduisez le cadre de montage dans la baie de montage du véhicule (figure 2). • Pliez quelques-uns des colliers de fixation du cadre de montage jusqu’à ce que le cadre soit correctement fixé dans la baie de montage (figure 3). • Après avoir raccordé tous les câbles électriques (voir « Raccordement électrique »), glissez l’appareil dans le cadre de montage jusqu’à ce qu’il s’y enclenche correctement (figure 4). Veillez à glisser l’appareil correctement dans le cadre d’installation (les contacts de la façade doivent être en dessous). • Replacez à nouveau le cadre en plastique de l’avant de l’appareil sur l’appareil. Gardez bien les deux clés de déblocage. Le cas échéant, vous en aurez besoin pour démonter l’appareil. • Fixez de plus l ‘appareil contre les vibrations avec le tenon à vis joint que vous pouvez fixer à la partie arrière de l’appareil. • Une telle protection est déjà prévue dans la plupart des véhicules. Le cas contraire, fixez l’appareil à l’aide d’une bande de tôle perforée. Pour la fixation, procédez de la manière indiquée sur la figure suivante :...
  • Seite 58: C) Démontage

    c) Démontage • Retirez la façade. • Dégagez avec précaution le cadre en plastique de la façade de l’appareil en le pliant légèrement vers l’extérieur et retirez-le. • Enfoncez les deux clés de déblocage dans les fentes latérales du cadre de montage jusqu’à ce que l’appareil soit déverrouillé. • Le cas échéant, desserrez la vis sans tête au dos de l’appareil. • Retirez avec précaution l’autoradio du cadre de montage en le tenant par les clés de déblocage. • Débranchez tous raccords enfichables au dos de l’appareil. 9. Raccordement électrique Le raccordement électrique est réservé aux techniciens qualifiés. Afin d’éviter les courts-circuits et les endommagements qui pourraient en découler, le pôle négatif (masse) de la batterie du véhicule doit être déconnecté...
  • Seite 59: Branchement De L'antenne

    Les câbles de raccordement des haut-parleurs sont habituellement codés : certains fabricants de haut-parleurs marquent le câble (+) avec une bande colorée supplémentaire, d’autres utilisent un câble cannelé pour le pôle (+) et un câble lisse pour le pôle (-). L’appareil a été...
  • Seite 60: Branchement Des Haut-Parleurs Et De L'alimentation Électrique

    d) Branchement des haut-parleurs et de l’alimentation électrique Lorsque l’affectation des connecteurs modulaires est identique (à contrôler au préalable !), les véhicules équipés de connecteurs ISO peuvent directement être raccordés au terminal de connexion ISO. En cas d’affectation différente des connecteurs, effectuez le raccordement à l’aide d’un adaptateur spécifique au véhicule disponible dans le com- merce. L’affectation des contacts de la prise femelle de raccordement de l’autoradio est indiquée sur les figures suivantes. Pour connaître l’affectation du connecteur modulaire de votre véhicule, adressez-vous à votre concessionnaire au- tomobile. Connecteur modulaire B (raccordement des haut-parleurs) (1) Haut-parleur arrière droit (+) (2) Haut-parleur arrière droit (-) (3) Haut-parleur avant droit (+) (4) Haut-parleur avant droit (-) (5) Haut-parleur avant gauche (+) (6) Haut-parleur avant gauche (-) (7) Haut-parleur arrière gauche (+)
  • Seite 61: Utilisation

    10. Utilisation Ne mettez l'appareil en service qu'après vous être familiarisé avec les fonctions et le présent mode d'emploi. Contrôlez encore une fois si tous les raccordements ont correctement été effectués. Après ce contrôle, reconnectez le pôle négatif de la batterie de bord. a) Utilisation générale Touche PWR (3) • Cette touche permet d’allumer ou d’éteindre l’appareil.
  • Seite 62: Configuration Du Menu

    Réglage de l’heure • Maintenez la touche PTY/CLK (11) enfoncée jusqu’à ce que l’heure s'affiche à l’écran et que l'affichage des heures clignote. • Réglez les heures en tournant le bouton rotatif (10). Appuyez sur le bouton rotatif (10) et réglez les minutes en tournant le bouton rotatif (10). • Appuyez sur la touche PTY/CLK (11) pour enregistrer les réglages. Touche OPEN (20) • Appuyez sur cette touche pour déverrouiller la façade. Fonction RESET • Cette fonction permet de rétablir la configuration d’origine pour tous les réglages. • Appuyez sur la touche RESET (22) avec un objet pointu (p. ex. un trombone de bureau déplié) dans les cas sui- vants : - à la fin des travaux d’installation et de raccordement - si l’appareil ne réagit plus aux pressions sur les touches - lorsque l’écran n’affiche que des caractères incompréhensibles b) Configuration du menu Pour choisir les paramètres du menu appuyez sur le bouton rotatif (10) brièvement ou longuement pour appeler les deux niveaux de menu. Le premier niveau sert au réglage des fonctions utilisées régulièrement, à lors que le deu- xième niveau dispose des fonctions rarement utilisées.
  • Seite 63 • LOUD ON/OFF LOUD ON : le circuit Loudness est activé. LOUD OFF : le circuit Loudness est désactivé. Le son n’est pas modulé. La perception des sons aigus et graves par l'oreille humaine est plus faible quand le volume diminue. Grâce à un renforcement de ces portées de fréquences au cas où le volume serait faible (correction Loudness), il est possible de parer à cet effet et d’obtenir une restitution audio plus naturelle.
  • Seite 64: Mode Radio

    • TAVOL Réglez ici avec le bouton rotatif (10) la puissance minimale pour les annonces infos trafic. c) Mode radio Le concept de réception RDS Le sigle RDS signifie Radio Data System (système de données radio). Cela signifie que des informations supplémen- taires inaudibles codées sont émises par la station RDS FM. Avec l’autoradio Renkforce, vous possédez un appareil capable d’évaluer ces données codées qui sont diffusées par presque tous les radio diffuseurs. Les informations supplémentaires suivantes sont diffusées : - Identification du programme (PI) - Identifiant des annonces routières (TP) - Identifiant d’annonces routières (TA) - Nom de service du programme (PS) - Fréquences alternatives (AF)
  • Seite 65 Identification du programme (PI) Ces informations permettent au récepteur d’identifier une station de façon univoque. Elles permettent à la radio de discerner les zones dans lesquelles le même programme est émis. Dès qu’il capte des signaux faibles, l’autoradio s’accorde sur une station plus forte diffusant la même identification du programme. Identifiant des annonces routières (TP) Grâce à ce signal, le récepteur détecte que la station écoutée diffuse des annonces routières. Identifiant d’annonces routières (TA) Ce signal indique la diffusion d’une annonce routière et permet, le cas échéant, d’interrompre la lecture en cours à partir d’une autre source. Nom de service du programme (PS) Cette information indique au récepteur le nom de la station qu’il capte. Le nom est directement affiché sur l’écran de l’autoradio, par ex. RTL. Fréquences alternatives (AF) Une liste avec les fréquences alternatives diffusant pour le même programme est transmise. Si la station reçue de- vient trop faible, le récepteur détecte, à l’aide du signal AF, les fréquences sur lesquelles il doit chercher une station dont la réception est meilleure. Type de programme (PTY) Ce code fournit au récepteur les informations concernant le type du programme en cours de réception (par ex. sport, musique classique, actualités, etc.). Cela permet à l’auditeur de rechercher, de manière ciblée, le programme de son...
  • Seite 66 Fonctions des différentes touches Touche BND / ID3 (12) • Une pression sur cette touche permet de sélectionner la gamme de fréquences de la radio. • 3 plages FM sont disponibles : FM1 > FM2 > FM3 6 stations peuvent être mémorisées sur les touches de recherche des stations 1 à 6 (13 à 18) sur chacune des trois bandes passantes. Touches (1) et • Ces touches permettent de changer la fréquence de réception pour le réglage des stations en mode radio. • Une pression brève sur une touche lance la recherche automatique des stations. • La recherche ne s’arrête qu’à la prochaine station avec une bonne réception. • Si vous maintenez la touche enfoncée, la recherche manuelle des stations est activée. • L’indication MANUAL s’affiche sur l’écran. • Dans ce mode, la fréquence change jusqu’à ce que vous relâchiez la touche correspondante. Une brève pression permet de changer progressivement la fréquence. Lorsque les touches ne sont pas activées pendant un moment long, l'appareil repasse en recherche auto- matique d'émetteur. L’indication AUTO s’affiche brièvement sur l’écran.
  • Seite 67 Touche AF (6) • Appuyez sur cette touche pour activer ou désactiver la fonction AF. • La fonction AF active l’ajustement automatique des stations (voir « Le concept de réception RDS »). • L’indication AF s’affiche sur l’écran. L’affichage clignote lorsque la radio capte une station RDS faible ou ne capte aucune station RDS. Le symbole reste affiché en permanence lorsque la qualité de réception de la station est bonne. • La fonction AF doit être activée afin que l’appareil puisse sélectionner automatiquement une meilleure station en cas de sortie de la zone de réception. Touche TA (9) • Appuyez sur cette touche pour activer ou désactiver la fonction TA. • Lors de la réception d'une station de radioguidage, TP = Traffic Programm est affiché sur l'écran. • Lorsque la fonction TA est activée, le sigle TA s’affiche également sur l’écran. • Lors de la restitution d’une autre source (par ex. lecture SD), la fonction Muet est activée pour la station en cours d’écoute pendant la réception de l’annonce routière. • Si une émission de radio en cours est écoutée à faible volume, le volume des annonces de trafic s’augmente automatiquement sur le volume minimal réglé dans le menu (TAVOL).
  • Seite 68: D) Mode Cd

    d) Mode CD • Insérez un CD (CD audio ou CD MP3) dans le lecteur de CD. • L’appareil bascule automatiquement sur la lecture CD. Le CD doit toujours être inséré face imprimée vers le haut. Touche Appuyez sur cette touche pour éjecter un CD inséré. Touche 1 / (13) • Appuyez sur cette touche pour interrompre brièvement la lecture. • Une nouvelle pression sur cette touche permet de reprendre la lecture au point où elle a précédemment été inter- rompue. Touches (1) et Ces touches permettent de sélectionner les différentes pistes ou de rechercher un passage précis d’une piste. Les flèches sur les touches indiquent le sens de recherche (vers le haut et vers le bas).
  • Seite 69: Mode Usb / Carte Mémoire

    Touche 4 / RDM (16) • Appuyez sur cette touche pour activer la lecture aléatoire des pistes. • Pour désactiver cette fonction, appuyez encore une fois sur la touche. La lecture s’effectue de nouveau dans l’ordre normal à partir de cet emplacement. Fonction de recherche • Appuyez sur la touche F/PS (8) pour activer la fonction de recherche. • Sélectionnez le numéro de la piste correspondante en tournant le bouton rotatif (10). Si le numéro de piste a plusieurs chiffres, appuyer plusieurs fois sur le bouton rotatif (10) pour saisir d’autres chiffres. • Appuyez sur le bouton rotatif (10) pour lire la piste sélectionnée. Appel d’informations sur le titre en cours de lecture • Pendant la diffusion d’un titre MP3 l’écran change automatiquement les informations ID3 tag.
  • Seite 70: Manipulation

    11. Manipulation • Un volume sonore trop élevé à l’intérieur du véhicule peut gêner la perception des avertissements acoustiques. Cela représente un danger pour vous ainsi que pour les autres usagers de la route. Veillez donc à un réglage approprié du volume. • L’inattention sur la route peut provoquer de graves accidents. Veuillez donc procéder à la commande de la chaîne hi-fi uniquement lorsque la circulation le permet. Ne vous laissez pas distraire par son maniement et restez attentif à la circulation. • Il est déconseillé d’écouter de la musique de manière prolongée à un volume sonore excessif. Cela peut occasion- ner des troubles auditifs. 12. Entretien et nettoyage Contrôlez régulièrement la sécurité technique de l’autoradio. Assurez-vous notamment régulièrement que les câbles de raccordement et le boîtier ne soient pas endommagés. S’il est probable qu’une utilisation sans danger ne soit plus possible, le produit doit être mis hors service puis sécurisé afin d’éviter toute utilisation accidentelle. Débranchez le réseau de bord ! a) Remplacement du fusible Si un remplacement des fusibles s’avère nécessaire, veillez à n’utiliser que des fusibles de rechange du type et au courant nominal spécifiés (voir « Données techniques »). Il est interdit de réparer les fusibles usagés ou de ponter le porte-fusible. • Débranchez l’appareil de l’alimentation électrique (débrancher le connecteur ISO !) puis retirez avec précaution le fusible du porte-fusible à côté du connecteur ISO.
  • Seite 71: Dépannage

    13. Dépannage En optant pour l’autoradio Renkforce, vous avez acquis un produit à la pointe du progrès technique et offrant une grande sécurité de fonctionnement. Il est toutefois possible que des problèmes ou des pannes surviennent. Vous trouverez ci-après plusieurs procédures vous permettant, le cas échéant, d’effectuer un dépannage : Respectez impérativement les consignes de sécurité ! La lecture ne fonctionne pas, l’affichage et l’éclairage ne s’allument pas : • Fusible du véhicule défectueux. À l’aide du mode d’emploi de votre véhicule, recherchez l’emplacement du fusible...
  • Seite 72: Déclaration De Conformité (Doc)

    L’appareil ne réagit plus correctement aux pressions sur les touches, des caractères incompréhensibles s’affichent sur l’écran : • Réinitialisez l’appareil aux paramètres usine avec la touche RESET (22). Les réparations autres que celles précédemment décrites doivent uniquement être exécutées par un technicien qualifié et agréé. 14. Déclaration de conformité (DOC) Par la présente Conrad Electronic SE, Klaus-Conrad-Straße 1, D-92240 Hirschau, Allemagne déclare que ce produit est conforme à la directive 2014/53/UE.
  • Seite 73: Données Techniques

    16. Données techniques Tension de service ...............12 V/CC Fusible .................fusible automobile plat 10 A Puissance de sortie .............4 x 40 W (max.) Impédance des haut-parleurs ..........4 à 8 ohms Gamme de fréquences ............87,5 - 108,0 MHz (Europe) 87,5 - 107,9 MHz (États-Unis) Mémoire des stations ............18 (3 x 6) Interfaces ................USB et carte SD Supports compatibles ............CD, CD-R, CD-RW, USB, SD Formats de fichier compatibles ..........CD audio, MP3 Intensité maximale admissible port USB ......max. 500 mA...
  • Seite 74 Inhoudsopgave Pagina Inleiding ................................75 Verklaring van symbolen ...........................75 Voorgeschreven gebruik ...........................76 Leveringsomvang .............................76 Kenmerken en functies .............................77 Veiligheidsvoorschriften ............................78 Bedieningselementen ............................79 Mechanische inbouw ............................80 a) Afnemen en aanbrengen van het frontpaneel ....................80 b) Inbouw in de radioschacht ..........................81 c) Uitbouw ...............................82 Elektrische aansluiting ............................82 a) Aansluiting van de antenne ........................83 b) Aansluiting van de LINE-uitgangen ......................83...
  • Seite 75: Inleiding

    1. Inleiding Geachte klant, Hartelijk dank voor de aanschaf van dit product. Dit product voldoet aan de voorwaarden van de nationale en Europese wetgeving. Volg de instructies van de gebruik- saanwijzing op om deze status van het apparaat te handhaven en een ongevaarlijke werking te garanderen! Deze gebruiksaanwijzing hoort bij dit product.
  • Seite 76: Voorgeschreven Gebruik

    3. Voorgeschreven gebruik De Renkforce autoradio dient om radiozenders in voertuigen te ontvangen, audiogegevens van de passende geheu- genmedia weer te geven en de op die manier verkregen audiosignalen af te spelen. Het apparaat moet voor het afspelen op luidsprekers worden aangesloten.
  • Seite 77: Kenmerken En Functies

    5. Kenmerken en functies • UKW-radiogedeelte met RDS-functie • Afneembaar bedieningspaneel • USB- en SD-interface • CD-drive • Hoog uitgangsvermogen (4 x 40 W max.) • Voorversterkeruitgang voor de aansluiting van een vermogenversterker • Aansluiting voor externe audiobronnen aan het bedieningspaneel • Elektronische regeling van volume, lage tonen, hoge tonen, fader en balance • Digitale signaalprocessor voor de aanpassing van de klankkarakteristiek aan verschillende muziekgenres • Loudness-schakeling • Nauwkeurige elektronische afstemming van de zenders door PLL-tuner • 18 programmeerbare stationgeheugens • Handmatig en automatisch zoeken naar zenders in beide richtingen • Automatische zenderopslag • ID3-tag-weergave bij afspelen van MP3's • Tijdinstelling via het RDS-systeem • ISO-aansluitterminal...
  • Seite 78: Veiligheidsvoorschriften

    6. Veiligheidsvoorschriften Lees aandachtig de gebruiksaanwijzing en let in het bijzonder op de veiligheidsvoorschriften. Als u de veiligheidsvoorschriften en de informatie met betrekking tot het correct gebruik in deze gebruiksaanwijzing niet volgt, zijn wij niet aansprakelijk voor de resulterende persoonlijke letsels/ materiële schade.
  • Seite 79: Bedieningselementen

    7. Bedieningselementen F/PS PTY/CLK 11 12 13 14 15 16 17 18 Toets Toets 1 / Toets MOD / MUT Toets 2 / INT Toets PWR Toets 3 / RPT Scherm Toets 4 / RDM Toets Toets 5 / Toets AF Toets 6 / Toets Aansluiting AUX...
  • Seite 80: Mechanische Inbouw

    8. Mechanische inbouw In de meeste auto´s is af fabriek een inbouwplaats voor de autoradio aanwezig. De keuze voor deze inbouwplaats is vanuit veiligheidstechnisch oogpunt gemaakt. Daarom is het verstandig de autoradio op deze plek in te bouwen. Het toestel heeft een DIN-montageopening met de afmetingen 182 x 53 mm nodig. Deze afmetingen zijn genormeerd en worden normaal gesproken door alle autofabrikanten aangehouden. Wanneer geen inbouwuitsparing aanwezig is, vraag dan uw dealer naar de beste montageplaats voor de autoradio.
  • Seite 81: Inbouw In De Radioschacht

    b) Inbouw in de radioschacht • Neem het frontpaneel af. • Maak het kunststof frame aan de voorkant van het apparaat voorzichtig los door het iets naar buiten te buigen en van het apparaat te trekken. • Verwijder de twee borgmoeren van de CD-drive (afb. 1, punt 1). • Ontgrendel het inbouwframe met de twee ontgrendelingssleutels (afb. 1, punt 2). • Trek het inbouwframe naar achteren van het apparaat af (afb. 1, punt 3). • Schuif het inbouwframe in de inbouwopening van het voertuig (afb. 2). • Verbuig een paar van de sluitklemmen van het inbouwframe tot het frame goed in de inbouwopening is gefixeerd (afb. 3). • Nadat u alle elektrische verbindingen tot stand heeft gebracht (zie "Elektrische aansluiting"), schuift u het apparaat in het inbouwframe tot het veilig vastklikt (afb. 4). Let daarbij op om het apparaat correct in de inbouwframe te schuiven (de contacten voor het frontpaneel moeten onderaan liggen).
  • Seite 82: C) Uitbouw

    c) Uitbouw • Neem het frontpaneel af. • Maak het kunststof frame aan de voorkant van het apparaat voorzichtig los door het iets naar buiten te buigen en van het apparaat te trekken. • Steek de twee ontgrendelingssleutels in de sleuven aan de zijkant in het inbouwframe, tot het apparaat los is. • Draai, indien nodig, de schroefpennen aan de achterkant van het apparaat los. • Trek de autoradio aan de ontgrendelingssleutels voorzichtig uit het inbouwframe. • Draai alle steekverbindingen aan de achterkant van het apparaat los. 9. Elektrische aansluiting De elektrische aansluiting mag uitsluitend door een deskundige worden uitgevoerd. Om kortsluiting en daaruit voortkomende schade aan het apparaat te voorkomen, moet tijdens het aansluiten de negatieve pool (massa) van de accu worden afgeklemd.
  • Seite 83: Aansluiting Van De Antenne

    De aansluitkabels van de luidsprekers zijn normaliter gecodeerd: Sommige luidsprekerfabrikanten markeren de (+)-kabel met een extra gekleurde streep, andere gebruiken echter een geribbelde kabel voor de (+)-pool en voor de (-)-pool daarentegen een gladde kabel. Het apparaat is ontwikkeld voor gebruik met luidsprekerimpedanties van minimaal 4 ohm. Sluit in geen geval luidsprekers met een lagere impedantie aan.
  • Seite 84: Aansluiting Van De Luidsprekers En De Stroomvoorziening

    d) Aansluiting van de luidsprekers en de stroomvoorziening Voertuigen die met een ISO-systeemstekker zijn uitgevoerd, kunnen bij een gelijke stekkerbezetting (vooraf con- troleren!) rechtstreeks met de ISO-aansluitterminal worden verbonden. Bij afwijkende stekkerbezetting gebeurt de aansluiting via een voertuigspecifieke adapter die in de handel verkrijgbaar is. De contactbezetting van de ISO-aansluitbus van de autoradio wordt weergegeven op de volgende afbeelding. De betreffende bezetting van de systeemstekker van uw auto kunt u bij uw dealer navragen.
  • Seite 85: Bediening

    10. Bediening Neem het apparaat pas in gebruik wanneer u zich met de functies en met deze gebruiksaanwijzing vertrouwd hebt gemaakt. Controleer nog een keer of alle aansluitingen correct zijn. Klem na de controle de minpool van de boordaccu weer aan. a) Algemene bediening Toets PWR (3) • Met deze toets wordt het apparaat in- en uitgeschakeld.
  • Seite 86: Menu-Instellingen

    Instellen van de tijd • Houd knop PTY/CLK (11) ingedrukt tot het uur op het scherm wordt weergegeven en de uuraanduiding knippert. • Stel de uren in door aan de draaiknop VOLUME (10) te draaien. Druk op de draaiknop (10) en stel de minuten in door de aan de draaiknop (10) te draaien. • Druk op de toets PTY/CLK (11) om de instelling op te slaan. Toets OPEN (20) • Druk op deze toets om het bedieningspaneel te ontgrendelen. RESET-functie • Deze functie zet alle instellingen op de in de fabriek ingestelde waarden terug. • Druk in de volgende gevallen met een puntig voorwerp (bv. een geplooid nietje) op de knop RESET (22): - na voltooiing van de inbouw- en aansluitwerkzaamheden - wanneer het apparaat niet meer op toetsbedieningen reageert - wanneer op het scherm ondefinieerbare tekens worden weergegeven b) Menu-instellingen Om de menu-instellingen te selecteren, drukt u kort of lang op de draaiknop (10) om de twee niveaus van het menu...
  • Seite 87 • LOUD ON/OFF LOUD ON: De loudness-schakeling is geactiveerd. LOUD OFF: De loudness-schakeling is uitgeschakeld. De klank wordt niet beïnvloed. Het menselijk oor hoort de lage en hoge tonen bij een lager geluidsvolume slechter. Door een stijging van deze frequentiebereiken bij lage geluidsvolumes (loudness-correctie) wordt dit effect tegengegaan en de muziekweergave klinkt natuurlijker. • EQ - EQUALIZER EQ OFF Equalizer uitgeschakeld...
  • Seite 88: Radiomodus

    Radiomodus RDS als ontvangstconcept De afkorting RDS betekent Radio Data Systeem, d.w.z. dat er onhoorbare, gecodeerde extra informatie via de UKW RDS zender wordt meegestuurd. U bent met de Renkforce autoradio in het bezit van een apparaat dat in staat is deze gecodeerde gegevens die door bijna alle zendstations worden uitgezonden, te verwerken. De volgende belangrijke extra informatie wordt uitgezonden: - programma identificatie (PI)
  • Seite 89 Programma Identificatie (PI) Deze gegevens helpen de ontvanger om een zender duidelijk te identificeren. Ze maken het de radio mogelijk om tussen regio´s te onderscheiden waarin hetzelfde programma wordt uitgezonden. De autoradio schakelt dus bij een zwakker wordende ontvangst alleen om naar een sterkere zender die dezelfde programma-identificatie uitzendt. Verkeersbericht-code (TP) Door dit signaal herkent de ontvanger dat een zender met verkeersinformatie wordt ontvangen. Verkeersbericht wordt uitgezonden (TA) Door dit signaal kan de zender een uitgezonden verkeersbericht herkennen en indien nodig de lopende weergave van een andere bron onderbreken.
  • Seite 90 Functie van de afzonderlijke toetsen Toets BND / ID3 (12) • Door op deze toets te drukken, wordt het bandbereik van het radiogedeelte gekozen. • Er staan 3 UKW-bereiken ter beschikking: FM1 > FM2 > FM3 Op elk van de drie bandbereiken kunnen 6 zenders op de stationtoetsen 1-6 (13-18) worden opgeslagen. Toetsen (1) en • Met deze toetsen wordt de ontvangstfrequentie gewijzigd om zenders in de radiomodus in te stellen. • Door kort te drukken op een toets start het automatisch zoeken naar zenders.
  • Seite 91 Toets AF (6) • Druk op deze toets om de AF-functie in, resp. uit te schakelen. • De AF-functie activeert het automatisch volgen van zenders (zie "RDS als ontvangstconcept"). • Op het scherm verschijnt de weergave AF. Wanneer er een zwakke of helemaal geen RDS-zender wordt ontvan- gen, knippert de indicator. Bij een goed te ontvangen zender verschijnt het symbool continu. • Alleen met een geactiveerde AF-functie kan het apparaat bij het verlaten van het zendgebied zelfstandig naar een betere zender omschakelen. Toets TA (9) • Druk op deze toets om de TA-functie in, resp. uit te schakelen. • Wanneer een zender met verkeersbericht wordt ontvangen, wordt op de display TP = Traffic Program weergege- ven. • Bij een geactiveerde TA-functie verschijnt bovendien de afkorting TA op het display. • Bij het afspelen van een andere bron (bijv. SD) wordt het programma voor de duur van het verkeersbericht stil geschakeld.
  • Seite 92: D) Cd-Modus

    d) Cd-modus • Plaats een cd (audio-cd of MP3-cd) in de cd-lade. • Het apparaat schakelt automatisch naar de cd over en speelt deze af. De cd moet altijd met de beschreven kant naar boven worden geplaatst. Toets Druk op deze toets om een geplaatste cd uit te werpen. Toets 1 / (13) • Druk op deze toets om het afspelen kort te onderbreken. • Door nogmaals te drukken, begint het afspelen weer op de plaats waar was gestopt. Toetsen (1) en Deze toetsen dienen voor de keuze van de afzonderlijke nummers resp.
  • Seite 93: E) Usb/Geheugenkaart-Modus

    Toets 4 / RDM (16) • Druk op deze toets om alle tracks in willekeurige volgorde af te spelen. • Druk nogmaals op deze toets om de functie weer uit te schakelen. De weergave wordt vanaf hier opnieuw in de normaal volgorde uitgevoerd. Zoekfunctie • Druk op knop F/PS (8) om het zoeken te activeren. • Kies met de draaiknop (10) het gewenste tracknummer. Wanneer een tracknummer meer dan een cijfer heeft, drukt u op de draaiknop (10) om verdere cijfers in te voeren. • Druk op de draaiknop (10) om de geselecteerde track af te spelen. Oproepen van informatie in verband met het huidig afgespeelde nummer • Tijdens het afspelen van een MP3-nummer geeft het scherm automatisch bij het wisselen de ID3-tag-informatie weer.
  • Seite 94: Instandhouding

    11. Instandhouding • Een te hoog volume in de auto heeft tot gevolg, dat akoestische waarschuwingssignalen niet meer kunnen worden waargenomen. Hierdoor brengt u uzelf en andere weggebruikers in gevaar. Let daarom op dat het volume niet te hard staat. • Onachtzaamheid in het verkeer kan leiden tot ernstige ongelukken. De hifi-installatie mag dientengevolge uitslui- tend worden bediend als de verkeerssituatie het toelaat. U dient er bovendien zorg voor te dragen dat uw aandacht door het bedienen van de installatie niet van het verkeer wordt afgeleid.
  • Seite 95: Verhelpen Van Storingen

    13. Verhelpen van storingen U heeft met de Renkforce autoradio een product aangeschaft dat volgens de nieuwste stand der techniek is ontwik- keld en veilig is in het gebruik. Toch kunnen zich enkele problemen of fouten voordoen. Daarom willen wij hier beschrijven hoe u mogelijke storingen kunt verhelpen:...
  • Seite 96: Verklaring Van Conformiteit (Doc)

    Het apparaat reageert niet meer op de toetsbevelen of geeft vreemde tekens op het scherm weer: • Zet de fabrieksinstellingen van het apparaat met de knop RESET (22) terug. Andere reparaties zoals hiervoor omschreven mogen alleen door een geautoriseerde vakman wor- den uitgevoerd. 14. Verklaring van conformiteit (DOC) Hiermee verklaart Conrad Electronic SE, Klaus-Conrad-Straße 1, D-92240 Hirschau, dat dit product met richtlijn 2014/53/EU overeenstemt.
  • Seite 97: Technische Gegevens

    16. Technische gegevens Bedrijfsspanning ..............12 V/DC Zekering ................Vlakke autozekering 10 A Uitgangsvermogen ..............4 x 40 W (max.) Luidsprekerimpedantie ............4 - 8 ohm Ontvangstbereik ..............87,5 - 108,0 MHz (Europa) 87,5 - 107,9 MHz (VS) Stationgeheugens ..............18 (3 x 6) Interfaces ................USB en SD-card Afspeelbare media ...............CD, CD-R, CD-RW, USB, SD Afspeelbare bestandsformaten ..........CD-Audio, MP3 Stroombelastbaarheid USB-interface ........max. 500 mA Geheugenkaartgrootte ............max. 32 GB...
  • Seite 100 Impressum Dies ist eine Publikation der Conrad Electronic SE, Klaus-Conrad-Str. 1, D-92240 Hirschau (www.conrad.com). Alle Rechte einschließlich Übersetzung vorbehalten. Reproduktionen jeder Art, z. B. Fotokopie, Mikroverfilmung, oder die Er- fassung in elektronischen Datenverarbeitungsanlagen, bedürfen der schriftlichen Genehmigung des Herausgebers. Nachdruck, auch auszugsweise, verboten. Die Publikation entspricht dem technischen Stand bei Drucklegung. © Copyright 2016 by Conrad Electronic SE. Legal notice This is a publication by Conrad Electronic SE, Klaus-Conrad-Str.

Inhaltsverzeichnis