Separ Filter LKF-Automotive Originalbetriebsanleitung
Koaleszenzfilter
Inhaltsverzeichnis
Verfügbare Sprachen
Verfügbare Sprachen
Kapitel
Inhaltsverzeichnis

Verwandte Anleitungen für Separ Filter LKF-Automotive


Inhaltszusammenfassung für Separ Filter LKF-Automotive
- Seite 43 LKF-Automotive Accessories D10107-EN-R05 35/35...
- Seite 45 LKF-Automotive Koaleszenzfilter Originalbetriebsanleitung D10107-DE-R05...
- Seite 46 LKF-Automotive Impressum Impressum Willibrord Lösing Filterproduktion GmbH Am Walzwerk 2 45527 Hattingen Deutschland Telefon +49 2324 9460-0 Telefax +49 2324 40842 E-Mail info@loesing-filter.de Internet www.separ.de Inhaber Ingeborg Lösing Prokuristen Boris Lösing Marcus Hahne Thomas Held Handelsregister Amtsgericht Essen Registernummer HRB 15543...
- Seite 47 LKF-Automotive Inhalt Inhalt Impressum ............. II Inhalt .
- Seite 48 LKF-Automotive Inhalt Sichtkontrolle ............. . .24 Zerlegten Filter zusammenbauen .
- Seite 49 LKF-Automotive Abbildungsverzeichnis Abbildungsverzeichnis LKF-Schlüssel, Aufbau ..............7 Abmessungen .
- Seite 50 LKF-Automotive Abbildungsverzeichnis D10107-DE-R05...
- Seite 51 LKF-Automotive Tabellenverzeichnis Tabellenverzeichnis Erklärung der Symbole auf dem Typschild ..........10 Ersatzteile .
- Seite 52 LKF-Automotive Tabellenverzeichnis VIII D10107-DE-R05...
-
Seite 53: Informationen Zu Dieser Anleitung
LKF-Automotive Informationen zu dieser Anleitung 1 Informationen zu dieser Anleitung Diese Anleitung enthält Informationen für den Lebenszyklus des Produkts. Sie richtet sich an Fachpersonal, das das Produkt händelt, installiert und wartet. Jeder Übersetzung dieser Anleitung ist ein Exemplar in der Erstellungssprache beigefügt. -
Seite 54: Sicherheitshinweise
LKF-Automotive Informationen zu dieser Anleitung 1.5.1 Sicherheitshinweise Sicherheitshinweise machen auf Gesundheitsgefahren aufmerksam. Das allgemeine Sicher- heitszeichen in den nachfolgenden Beispielen kann in konkreten Sicherheitshinweisen durch ein gefahrspezifisches Symbol ersetzt werden. GEFAHR Art und Quelle der Gefahr Durch Nichtbeachtung der Verhaltensregel können schwerste Körperschäden oder der Tod eintreten! Verhaltensregel. -
Seite 55: Eingebettete Hinweise
LKF-Automotive Informationen zu dieser Anleitung 1.5.3 Eingebettete Hinweise Wenn bei Arbeiten gefährliche Situationen eintreten können oder Fehlverhalten möglich ist, wird in Handlungsanweisungen durch eingebettete Hinweise darauf aufmerksam gemacht: 1. Handlungsschritt GEFAHR Art und Quelle der Gefahr! Verhaltensregel. 2. Handlungsschritt WARNUNG Art und Quelle der Gefahr! Verhaltensregel. -
Seite 56: Sicherheitsinformationen
LKF-Automotive Sicherheitsinformationen 2 Sicherheitsinformationen Die Sicherheitsinformationen sind bei allen Arbeiten zu beachten. 2.1 Bestimmungsgemäße Verwendung Der Filter ist zur Reinigung und Entwässerung von leichten Dieselkraftstoffen gemäß DIN EN 590 geeignet. Er wird in die Vorlaufleitung des Kraftstoffkreislaufs eingebaut. 2.1.1 Einbausituation Wenn der Zulauf des Filters unterhalb des maximalen Füllstands im Tank liegt, muss zwi-... -
Seite 57: Unsachgemäße Handhabung
LKF-Automotive Sicherheitsinformationen 2.1.4 Unsachgemäße Handhabung Der Container ist durch einen Ring mit Bajonettverriegelung gesichert. Die beiden Verrie- gelungen befinden sich diametral angeordnet auf der Montageseite und der Frontseite des Filters. Eine unsachgemäße Handhabung der Verriegelung kann zur Beschädigung des Filters füh- ren und als Folgen daraus Betriebsstörungen und Umweltschäden verursachen. -
Seite 58: Korrektes Schließen Der Bajonettverriegelung
LKF-Automotive Sicherheitsinformationen 2.1.4.2 Korrektes Schließen der Bajonettverriegelung Die Abbildung zeigt die Ansicht von der linken Seite auf den Filter. Den Ring von unten über den Container auf- schieben. Dabei den Ring so drehen, dass die Führungsnase ungefähr in der Mitte des Filters steht. -
Seite 59: Anwendung Des Lkf-Schlüssels
LKF-Automotive Sicherheitsinformationen 2.1.4.3 Anwendung des LKF-Schlüssels Abbildung 1: LKF-Schlüssel, Aufbau 1 Handgriff 3 Führungszapfen 2 Drehzapfen Der Bajonettring des Filters ist an seiner Unter- seite in 12 Sektionen unterteilt. Der LKF-Schlüssel kann dort in Schritten von ca. 30° um die Mittelachse des Bajonettrings einge- setzt werden. -
Seite 60: Grundlegende Sicherheitshinweise
LKF-Automotive Sicherheitsinformationen 2.2 Grundlegende Sicherheitshinweise VORSICHT Haut- und Augenreizung! Bei Kontakt mit Dieselkraftstoff können Haut und Augen gereizt werden! Bei Arbeiten mit Kraftstoffen ist grundsätzlich zu beachten: 1. Ggf. Schutzhandschuhe tragen, die gegen Dieselkraftstoff schützen. 2. Ggf. Augenschutz tragen. 3. Bei Hautkontakt die betroffenen Stellen gründlich waschen und Haut- schutzsalbe auftragen. -
Seite 61: Technische Daten
LKF-Automotive Technische Daten 3 Technische Daten Der Hersteller behält sich vor, die technischen Eigenschaften durch Produktverbesserungen ohne besondere Ankündigung zu ändern. 3.1 Lieferumfang Filter, wahlweise mit • 4 Verschlussstopfen M14×1,5 und 1 Verschlussstopfen PG7 • 4 Verschlussstopfen M14×1,5 und Wassersensor 3.2 Mechanische Daten... -
Seite 62: Leistungsdaten
LKF-Automotive Technische Daten 3.3 Leistungsdaten Leistungsdaten sind Grenzwerte. Durch die Integration des Filters in eine bestehende Infra- struktur können die angegebenen Leistungsdaten unter Umständen eingeschränkt wer- den. Volumenstrom ......≤3 l/min Betriebsdruck (bezogen auf Umgebungsdruck) Dauerdruck . -
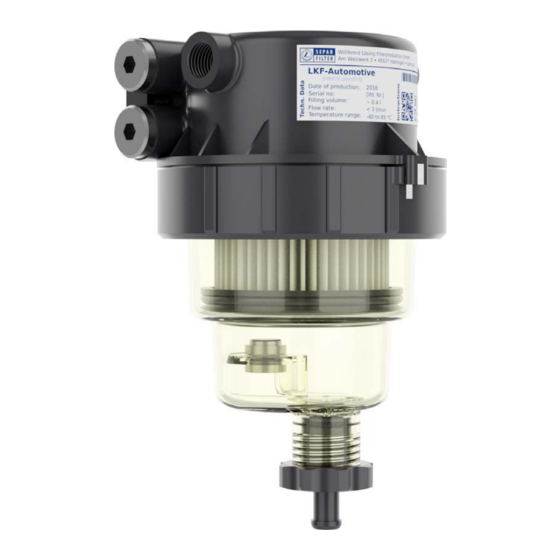
Seite 63: Aufbau
LKF-Automotive Technische Daten 3.5 Aufbau Abbildung 4: Einzelteile des Filters 1 Filtergehäuse mit Mediumanschlüssen 9 O-Dichtring Ablassventil/Container 2 O-Dichtring Filterelement/Filtergehäuse 10 Ablassventil 3 Filterelement 11 Verschlussstopfen PG7 für Einschraubge- winde Wassersensor 4 O-Dichtring Filterelement/Container 12 Verschlussstopfen M14×1,5 5 O-Dichtring Container/Filtergehäuse 13 Verschlussstopfen M14×1,5... -
Seite 64: Mechanische Anschlüsse
LKF-Automotive Funktion 3.6 Mechanische Anschlüsse Abbildung 5: Mechanische Anschlüsse 1 Für zukünftige Erweiterung 5 Stutzen für Ablaufschlauch 2 Mediumzulauf rechts 6 Mediumablauf links 3 Mediumablauf rechts 7 Mediumzulauf links 4 Einschraubgewinde für Wassersensor 8 Für zukünftige Erweiterung 4 Funktion Das von der Kraftstoffpumpe geförderte Medium strömt in den Filter. Durch ein patentier- tes, mehrstufiges Verfahren werden zunächst Partikel und Schwebstoffe mechanisch... -
Seite 65: Installation
LKF-Automotive Installation 7 Installation HINWEIS Transportschäden! Ein beschädigter Filter kann zu Folgeschäden durch austretendes Medium führen! Vor der Installation 1. den Filter auf sichtbare Beschädigungen prüfen. 2. den Packungsinhalt auf Vollständigkeit prüfen. 3. ggf. beschädigte Teile ersetzen bzw. verlorengegangene Teile ergänzen oder einen neuen Filter verwenden. -
Seite 66: Werkzeuge
LKF-Automotive Installation 7.3 Werkzeuge Drehmomentschlüssel ....SW13 Bohrmaschine Bohrer........8,5 mm oder 9 mm 7.4 Montage... -
Seite 67: Anschluss
LKF-Automotive Installation 7.5 Anschluss Die Mediumanschlüsse sind als Gewindebohrungen gemäß ISO 9974-1 ausgeführt. In sie können Verschlussstopfen oder Anschlussteile geschraubt werden, die ISO 9974-2 ent- sprechen. Abbildung 7: Anschlussmaße D10107-DE-R05 15/35... -
Seite 68: Mechanische Anschlüsse
LKF-Automotive Installation Abbildung 8: Mechanische Anschlüsse 1 Für zukünftige Erweiterung 5 Stutzen für Ablaufschlauch 2 Mediumzulauf rechts 6 Mediumablauf links 3 Mediumablauf rechts 7 Mediumzulauf links 4 Einschraubgewinde für Wassersensor 8 Für zukünftige Erweiterung Mediumzulauf Anschluss für die Kraftstoffleitung vom tiefsten Punkt des Tanks. -
Seite 69: Anschlussbeispiel 1: Zulauf Linke Seite Und Ablauf Rechte Seite
LKF-Automotive Installation 7.5.1 Anschlussbeispiel 1: Zulauf linke Seite und Ablauf rechte Seite Abbildung 9: Anschlussbeispiel: Zulauf linke Seite und Ablauf rechte Seite ► Der Filter ist montiert. 1. Die Leitung vom Tank (IN) an den Mediumzulauf auf der linken Seite des Fil- ters anschließen. -
Seite 70: Anschlussbeispiel 3: Zulauf Und Ablauf An Einer Seite
LKF-Automotive Installation 7.5.3 Anschlussbeispiel 3: Zulauf und Ablauf an einer Seite Abbildung 11: Anschlussbeispiel: Zulauf und Ablauf an einer Seite ► Der Filter ist montiert. 1. Die Leitung vom Tank (IN) an den Mediumzulauf auf der linken (rechten) Seite des Filters anschließen. -
Seite 71: Erstinbetriebnahme
LKF-Automotive Erstinbetriebnahme 8 Erstinbetriebnahme Vor der ersten Inbetriebnahme müssen ggf. noch ein Wassersensor montiert bzw. der Con- tainer in eine andere Position gedreht werden. 8.1 Container demontieren Abbildung 12: Container demontieren ► Der Filter ist montiert. ► Ein Wassersensor soll montiert und/oder der Container soll gedreht werden. -
Seite 72: Wassersensor Montieren
LKF-Automotive Erstinbetriebnahme 8.2 Wassersensor montieren Abbildung 13: Einschraubgewinde für den Wassersensor 1. Den Verschlussstopfen aus dem Container entfernen und aufbewahren. 2. Die Dichtung des Wassersensors auf korrekten Sitz prüfen. 3. Die Dichtfläche am Container mit einem weichen Tuch reinigen. 4. Den Wassersensor vorsichtig von Hand in das Gewinde im Container eindre- hen und handfest anziehen, bis der Anschlag erreicht ist. -
Seite 73: Container Montieren
LKF-Automotive Erstinbetriebnahme 8.4 Container montieren Abbildung 15: Container montieren ► Das Filterelement ist korrekt in den Container eingesetzt. ► Die Dichtflächen am Container und im Filtergehäuse sind gereinigt. 1. Den Container um seine Längsachse drehen, um ihn in die ungefähre Monta- geposition zu bekommen. -
Seite 74: Filter Befüllen
LKF-Automotive Erstinbetriebnahme 8.5 Filter befüllen An den Anschluss für den Mediumablauf muss eine geeignete Pumpe angeschlossen wer- den, mit der Kraftstoff aus dem Tank angesaugt werden kann. Wir empfehlen, die als Zube- hör erhältliche Handpumpe SEPAR HFP nach dem Filter in die Kraftstoffleitung zu integrieren. -
Seite 75: Instandhaltung
LKF-Automotive Instandhaltung 9 Instandhaltung Eine regelmäßige Inspektion des Filters stellt seine dauerhafte Funktion sicher und schützt den Motor vor Schäden. HINWEIS Fehlfunktion! Instandhaltungsarbeiten an einem Filter im aktiven Kraftstoffkreislauf können zu Fehlfunktionen und als Folge daraus auch zu Umweltschäden führen! Bei Instandhaltungsarbeiten ist grundsätzlich zu beachten:... -
Seite 76: Sichtkontrolle
LKF-Automotive Instandhaltung 9.2 Sichtkontrolle Der Zeitabstand zwischen Sichtkontrollen hängt von den Einsatzbedingungen ab. Fol- gende Bedingungen verkürzen diese Zeitabstände, insbesondere dann, wenn sie in Kombi- nation auftreten: • Hohe Umgebungstemperatur • Starke Vibration bzw. Erschütterung • Schlechte Kraftstoffqualität Folgende Punkte sind bei einer Sichtkontrolle zu prüfen: 1. -
Seite 77: Zerlegten Filter Zusammenbauen
LKF-Automotive Instandhaltung 9.3 Zerlegten Filter zusammenbauen Abbildung 17: Einzelteile des Filters 1 Filtergehäuse mit Mediumanschlüssen 9 O-Dichtring Ablassventil/Container 2 O-Dichtring Filterelement/Filtergehäuse 10 Ablassventil 3 Filterelement 11 Verschlussstopfen PG7 für Einschraubge- winde Wassersensor 4 O-Dichtring Filterelement/Container 12 Verschlussstopfen M14×1,5 5 O-Dichtring Container/Filtergehäuse 13 Verschlussstopfen M14×1,5... -
Seite 78: Ablassventil Komplettieren
LKF-Automotive Instandhaltung 9.3.1 Ablassventil komplettieren 9.3.2 Container komplettieren 9.3.3 Filterelement komplettieren 26/35 D10107-DE-R05... -
Seite 79: Filterelement In Den Container Einsetzen
LKF-Automotive Instandhaltung 9.3.4 Filterelement in den Container einsetzen 9.3.5 Container montieren D10107-DE-R05 27/35... -
Seite 80: Filter Entwässern
LKF-Automotive Instandhaltung 9.4 Filter entwässern Ein Filter muss umgehend entwässert werden, wenn • er mit einem Wassersensor bestückt ist und der Maximalwasserstand gemeldet wird. • bei der Sichtkontrolle ein zu hoher Wasserstand festgestellt wurde. Abbildung 18: Zulässiger Maximalwasserstand 1 Maschine stoppen bzw. Zulei- 2 Ablassventil lösen und ca. -
Seite 81: Filter Entleeren
LKF-Automotive Instandhaltung 9.5 Filter entleeren Für Arbeiten am Filter muss er vollständig entleert werden. 1 Maschine stoppen bzw. Zulei- 2 Ablassventil lösen und ca. eine 3 Einen Verschlussstopfen oder tung schließen. halbe Umdrehung öffnen. einen Leitungsanschluss lösen und ca. eine Umdrehung öffnen. - Seite 82 LKF-Automotive Instandhaltung 1 Maschine stoppen bzw. Zulei- 2 Ablassventil lösen und ca. eine 3 Einen Verschlussstopfen oder tung schließen. halbe Umdrehung öffnen. einen Leitungsanschluss lösen und ca. eine Umdrehung öffnen. 4 Filter entleeren. 5 Container demontieren. 6 Gebrauchtes Filterelement aus dem Container entfernen und umweltgerecht entsorgen.
-
Seite 83: Container Reinigen
LKF-Automotive Entsorgung 9.7 Container reinigen Die Reinigung des Containers ist grundsätzlich bei jedem Wechsel des Filterelements durchzuführen. HINWEIS Keine alkoholhaltigen Reiniger verwenden! Alkohol verändert die Materialeigenschaften des Containers! 1. Zum Reinigen ausschließlich sauberen Dieselkraftstoff verwenden. 2. Keine harten oder scharfkantigen Gegenstände benutzen. -
Seite 84: Ersatzteile
LKF-Automotive, Dichtungssatz, bestehend aus 06 3746 × O-Dichtring für Ablassventil (Material NBR) 1 × O-Dichtring für Container (Material FVMQ) 5, 6, 8, 9, 10 LKF-Automotive, Container mit Ablassventil und Dich- 06 3748 tungssatz LKF-Automotive, Bajonettring 06 3664 Verschlussstopfen PG7 mit O-Dichtring... -
Seite 85: Zubehör
LKF-Automotive Zubehör 12 Zubehör Tabelle 3: Zubehör Abbildung Beschreibung LKF-Schlüssel 06 3819 Anschlussstecker für Wassersensor WSA 06 1834 Wassersensor WSA 06 1381 Handentlüftungspumpe HFP 06 3880 D10107-DE-R05 33/35... - Seite 86 LKF-Automotive Zubehör 34/35 D10107-DE-R05...
- Seite 87 LKF-Automotive Zubehör D10107-DE-R05 35/35...