Herunterladen Inhalt Inhalt Diese Seite drucken
Inhaltsverzeichnis

Werbung

Verfügbare Sprachen
  • DE

Verfügbare Sprachen

  • DEUTSCH, seite 1
MINI-KOMPRESSOR / MINI COMPRESSOR / MINI-COMPRESSEUR UMK 10 C2
MINI-KOMPRESSOR
Bedienungs- und Sicherheitshinweise
Originalbetriebsanleitung
MINICOMPRESSOR
Bedienings- en veiligheidsinstructies
Vertaling van de oorspronkelijke gebruiksaanwijzing
MINI KOMPRESOR
Pokyny pre obsluhu a bezpečnostné pokyny
Preklad pôvodného návodu na použitie
IAN 340574_1910
MINI COMPRESSOR
Operation and safety notes
Translation of the original instructions
MINI-KOMPRESOR
Wskazówki dotyczące obsługi i bezpieczeństwa
Tłumaczenie oryginalnej instrukcji obsługi
MINI-COMPRESSEUR
Instructions d'utilisation et consignes de sécurité
Traduction de la notice originale
MINI KOMPRESOR
Pokyny pro obsluhu a bezpečnostní pokyny
Překlad původního návodu k používání

Werbung

Inhaltsverzeichnis
loading

Inhaltszusammenfassung für ULTIMATE SPEED UMK 10 C2

  • Seite 1 MINI-KOMPRESSOR / MINI COMPRESSOR / MINI-COMPRESSEUR UMK 10 C2 MINI-KOMPRESSOR MINI COMPRESSOR MINI-COMPRESSEUR Bedienungs- und Sicherheitshinweise Operation and safety notes Instructions d‘utilisation et consignes de sécurité Originalbetriebsanleitung Translation of the original instructions Traduction de la notice originale MINICOMPRESSOR MINI KOMPRESOR...
  • Seite 2 DE / AT / CH Bedienungs- und Sicherheitshinweise Seite GB / IE Operation and safety notes Page FR / BE Instructions d‘utilisation et consignes de sécurité Page NL / BE Bedienings- en veiligheidsinstructies Pagina Wskazówki dotyczące obsługi i bezpieczeństwa Strona Pokyny pro obsluhu a bezpečnostní...
  • Seite 5: Inhaltsverzeichnis

    Legende der verwendeten Piktogramme ..................Seite Einleitung ..................................Seite Bestimmungsgemäße Verwendung ..........................Seite Lieferumfang / Zubehör ..............................Seite Übersicht .................................... Seite Technische Daten ................................Seite Allgemeine Sicherheitshinweise ........................ Seite Bedienung ..................................Seite 12 Inbetriebnahme ................................. Seite 12 Arbeitshinweise ................................. Seite 14 Luftdruck prüfen .................................
  • Seite 6: Legende Der Verwendeten Piktogramme

    Gehörschutz tragen! Kompressoranlage kann ohne Warnung anlaufen. Brandgefahr! Schutzklasse III Mini-Kompressor UMK 10 C2 Einsatzbereiche. Händigen Sie alle Unterlagen bei Weiter- gabe des Produkts an Dritte mit aus. Einleitung Bestimmungsgemäße Verwendung Wir beglückwünschen Sie zum Kauf Ihres neuen Produkts. Sie haben sich damit für ein hochwertiges Produkt entschieden.
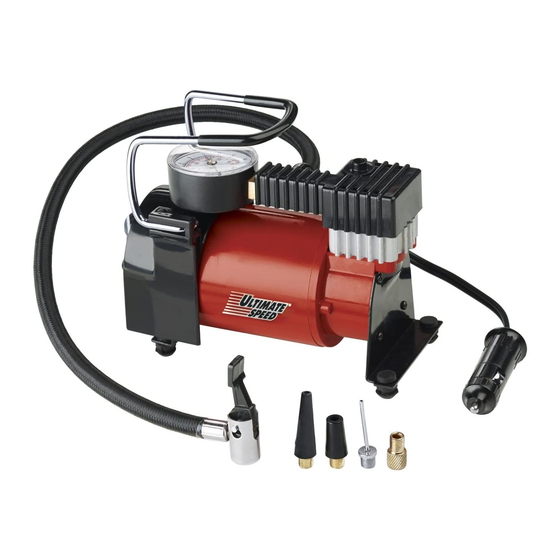
  • Seite 7: Lieferumfang / Zubehör

    1 Minikompressor and oder Dunlop) 4 Ventiladapter Austauschbare Überlastsicherung 1 Betriebsanleitung Technische Daten Entsorgen Sie das Verpackungsmaterial ordnungsgemäß. Mini-Kompressor: UMK 10 C2 Übersicht Bemessungsspannung: 12 V Nennleistung: 108 W Tragegriff Max. Stromaufnahme: 14 A Manometer mit Luftdruckanzeige (nicht geeicht) Maximaler Druck:...
  • Seite 8: Geräuschemissionswert

    Allgemeine Sicherheitshinweise Gewicht: ca. 1,64 kg Netzkabellänge: Maximale Drehzahl Dieser Abschnitt behandelt die grundle- max: 3200 min genden Sicherheitsvorschriften bei der Geräuschemissionswert: Arbeit mit dem Gerät. Der Geräuschemissionswert wird in Übereinstimmung mit EN ISO 2151:2008 bestimmt. Der A-bewertete Geräuschpegel Sicherheit von Personen: beträgt typischerweise: Schalldruckpegel: 76,6 dB(A)
  • Seite 9: Arbeiten Mit Dem Gerät

    tung dürfen nicht von Kindern ohne Lassen Sie das Gerät nicht unbeauf- Beaufsichtigung durchgeführt werden. sichtigt laufen und beachten Sie die Kinder sollten beaufsichtigt werden, Füllhinweise des Aufblasartikels. Der um sicherzustellen, dass sie nicht mit Aufblasartikel kann platzen und dem Gerät spielen. schwere Verletzungen hervorrufen.
  • Seite 10 Prüfen Sie das Gerät vor Inbetriebnahme Gerät könnte irreparabel beschädigt auf Beschädigungen und benutzen Sie werden. es nur in einwandfreiem Zustand. Das Gerät wird im Betrieb warm. Es Setzen Sie das Gerät weder Regen noch besteht Verbrennungsgefahr bei Berüh- feuchter Witterung aus und lassen Sie es rung der heißen Flächen.
  • Seite 11: Elektrische Sicherheit

    - wenn Sie das Gerät nicht benutzen; VORSICHT: - wenn Sie das Gerät unbeaufsichtigt So vermeiden Sie Unfälle und lassen; Verletzungen durch elektrischen - wenn Sie Reinigungs- oder Wartungs- Schlag: arbeiten vornehmen; - wenn das Anschlusskabel beschädigt Elektrische Sicherheit: ist; Benutzen Sie das Gerät nicht, wenn - nach dem Eindringen von Fremdkörpern sich der Schalter nicht ein- und aus-...
  • Seite 12: Bedienung

    Schließen Sie das Anschlusskabel nur Bedienung an den Zigarettenanzünder im Fahr- Inbetriebnahme zeug an. Beachten Sie Hinweise Ihres Fahrzeug- Stellen Sie das Produkt auf einem ebenen, nicht brennbaren Untergrund auf. Bedecken Sie nicht die Lüftungsöffnungen. herstellers zum Gebrauch des Zigaretten- Betreiben Sie das Gerät nicht in staubiger Umgebung.
  • Seite 13: Anschlussventil 7 Anschließen

    Ein- / Ausschalten: Stecken Sie den Zigarettenanzünder-Stecker in die 12 V-Steckdose des Zigarettenanzünders. Schalten Sie das Gerät ein, indem Sie den Ein- / Aus- schalter in Stellung „I“ bringen. Anschlussventil anschließen: Wenn der gewünschte Fülldruck erreicht ist, schalten Sie Öffnen Sie das Anschlussventil : Spannhebel das Gerät ab, indem Sie den Ein- / Ausschalter senkrecht nach oben (s.
  • Seite 14: Arbeitshinweise

    Arbeitshinweise Überlastsicherung Nicht für den Dauerbetrieb geeignet. Das Produkt wurde zur Bei Überbeanspruchung oder Fehlfunktion löst die Überlast- Erzeugung von Luftdruck, nicht von Luftvolumen entwickelt. sicherung im Zigarettenanzünder-Stecker zum Schutz Bitte benutzen Sie das Produkt nicht länger als 5 Minuten des Gerätes aus.
  • Seite 15: Wartung

    Entsorgung Lüftungsöffnungen und das Gehäuse des Gerätes immer sauber halten. Zum Reinigen ein feuchtes Tuch oder eine Bürste ver- Die Verpackung besteht aus umweltfreundlichen Materialien, wenden. die Sie über die örtlichen Recyclingstellen entsorgen können. Beachten Sie die Kennzeichnung der Verpackungs- Wartung materialien bei der Abfalltrennung, diese sind ge- kennzeichnet mit Abkürzungen (a) und Nummern...
  • Seite 16: Garantie

    deren Öffnungszeiten können Sie sich bei Ihrer Die Garantieleistung gilt für Material- oder Fabrikationsfehler. zuständigen Verwaltung informieren. Diese Garantie erstreckt sich nicht auf Produktteile, die normaler Abnutzung ausgesetzt sind (z. B. Batterien) und daher als Verschleißteile angesehen werden können oder Garantie Beschädigungen an zerbrechlichen Teilen, z.
  • Seite 17: Service

    Mangel besteht und wann er aufgetreten ist, für Sie portofrei an die Ihnen mitgeteilte Service-Anschrift übersenden. Service Service Deutschland Tel.: 0800 5435 111 (kostenfrei aus dem dt. Festnetz / Mobilfunknetz) E-Mail: owim@lidl.de Service Österreich Tel.: 0820 201 222 (0,15 EUR / Min.) E-Mail: owim@lidl.at Service Schweiz Tel.:...
  • Seite 18 List of pictograms used ............................Page 19 Introduction ................................. Page 19 Intended use ..................................Page 19 Contents / Accessories ..............................Page 20 Overview ................................... Page 20 Technical data ................................... Page 20 General safety information ........................... Page 21 Operation ..................................Page 24 Initial use ....................................
  • Seite 19: List Of Pictograms Used

    Warning: Hearing protection must be worn Compressor unit may start without warning. Fire hazard Class III Mini Compressor UMK 10 C2 on to anyone else, please ensure that you also pass on all the documentation with it. Introduction Intended use We congratulate you on the purchase of your new product.
  • Seite 20: Contents / Accessories

    1 Mini compressor Dunlop) 4 Valve adapters Replaceable overload fuse 1 Instructions for use Technical data Dispose of packaging material properly. Mini Compressor: UMK 10 C2 Overview Rated voltage range: 12 V Rated power: 108 W Carrying handle Max. current draw:...
  • Seite 21: General Safety Information

    General safety information Weight: approx. 1.64 kg Power cord length: Maximum rotational This section covers the basic safety in- shaft speed max: 3200 min structions for working with the device. Noise emission value: Noise measurement value determined in accordance with Personal safety: EN ISO 2151:2008.
  • Seite 22: Using The Device

    Within the work area the user is respon- Using the device: sible for damages incurred by third Do not use the device whilst driving. party caused by the use of this device. Check the device for damage before Never aim the device at yourself or use and only use in good working others during use, particularly eyes condition.
  • Seite 23: Electrical Safety

    The device will heat up during operation. - if foreign objects enter the device or Touching hot surfaces poses a risk of you notice unusual noise. burns. Only use accessories supplied and Do not allow sand, dust or other small recommended by the manufacturer.
  • Seite 24: Operation

    cable. Protect the cable from heat, oil Operation and sharp edges. Initial use Only connect the connection cable to the cigarette lighter socket in the car. Place the product on a level, non-flammable surface. Do not cover the vents. Do not operate the device in dusty Follow the instructions of your automaker environments.
  • Seite 25: Connection Valve

    Connecting the connection valve Removing the connetion valve: Open the connection valve : clamping lever vertical Connecting without valve adapter : Open the clamp- (see Fig. B). ing lever for the connection valve and remove Connecting without valve adapter from the valve of the inflatable. - Insert the open connection valve into the valve of Connecting with valve adapter...
  • Seite 26: Checking The Air Pressure

    device. Afterwards allow to cool for a minimum of Unscrew the tip of the cigarette lighter plug 20 minutes. remove the overload fuse Insert the new overload fuse and screw the tip of the cigarette lighter plug back on. Checking the air pressure Never use a fuse with a higher tripping current.
  • Seite 27: Maintenance

    Maintenance Observe the marking of the packaging materials for waste separation, which are marked with The product is maintenance-free. abbreviations (a) and numbers (b) with following Before and after each use, check the product and ac- meaning: 1–7: plastics / 20–22: paper and fibre- cessories (e.g.
  • Seite 28: Warranty

    Warranty or for damage to fragile parts, e.g. switches, rechargeable batteries or glass parts. The product has been manufactured to strict quality guidelines and meticulously examined before delivery. In the event of Warranty claim procedure product defects you have legal rights against the retailer of this product.
  • Seite 29: Service

    Service Service Great Britain Tel.: 0800 404 7657 E-Mail: owim@lidl.co.uk Service Ireland Tel.: 1890 930 034 (0,08 EUR / Min., (peak)) (0,06 EUR / Min., (off peak)) E-Mail: owim@lidl.ie GB/IE...
  • Seite 30 Légende des pictogrammes utilisés ......................Page 31 Introduction ................................. Page 31 Utilisation conforme ................................Page 31 Contenu de la livraison / Accessoires ..........................Page 32 Vue d‘ensemble ................................. Page 32 Caractéristiques techniques .............................. Page 32 Instructions générales de sécurité ......................Page 33 Utilisation ..................................
  • Seite 31: Légende Des Pictogrammes Utilisés

    Porter une protection auditive ! Le compresseur peut se mettre en route intempesti- vement. Risque d'incendie ! Classe de protection III Mini-compresseur UMK 10 C2 dans les domaines d‘application spécifiés. Lors d‘une cession à tiers, veuillez également remettre tous les documents. Introduction Utilisation conforme Nous vous félicitons pour l‘achat de votre nouveau produit.
  • Seite 32: Umk 10 C2

    4 adaptateurs de soupape Fusible de surcharge interchangeable 1 notice d‘utilisation Caractéristiques techniques Éliminez les matériaux d‘emballage de manière appropriée. Mini compresseur : UMK 10 C2 Vue d‘ensemble Tension nominale : 12 V Puissance nominale : 108 W Poignée de transport Intensité...
  • Seite 33: 35 L / Min

    Instructions générales Débit d‘air : 35 l / min de sécurité Poids : env. 1,64 kg Longueur du câble réseau : Nombre de rotations max : 3200 min Cette section traite des règles de sécurité Valeurs d‘émission sonore : fondamentales à respecter lors de l‘utili- Les valeurs d‘émission sonore sont déterminées en conformité...
  • Seite 34 ne doivent pas jouer avec ce produit. Le des yeux et des oreilles. Il existe un nettoyage et la maintenance domestique risque de blessures ! de l’appareil ne doivent pas être effec- Ne laissez pas l‘appareil fonctionner tués par un enfant sans surveillance. sans surveillance et respectez les consignes Il convient de surveiller les enfants de de remplissage de l‘article gonflable.
  • Seite 35: Travailler Avec L'appareil

    Travailler avec l‘appareil : Ne laissez pas l‘appareil dans la voi- ture lorsqu‘il fait très chaud. L‘appareil N‘utilisez pas l‘appareil pendant le pourrait être endommage de façon ir- trajet. réparable. Vérifiez avant chaque utilisation que L‘appareil chauffe pendant son utilisation. l‘appareil n‘est pas endommagé...
  • Seite 36: Sécurité Électrique

    Éteignez l‘appareil et débranchez le ATTENTION : câble électrique de la prise de l‘allume- vous éviterez ainsi les accidents et cigare : les blessures par électrocution : - lorsque vous n‘utilisez pas l‘appareil ; - lorsque vous laissez l‘appareil sans Sécurité...
  • Seite 37: Utilisation

    Respectez les consignes du fabricant du Pour les articles gonflables avec contre-pression : allu- véhicule pour l‘utilisation de l‘allume- mez d‘abord le produit avant de relier la soupape de raccordement au pneu. cigare. Indication : Selon les articles gonflables, vous pouvez Si le câble est endommagé, retirez im- utiliser la soupape de raccordement directement ou...
  • Seite 38 Enlever la soupape de raccordement : - Fermez la soupape de raccordement en la maintenant appuyée : poussez le levier de serrage en direction Branchement sans adaptateur de soupape : ouvrez de la soupape de raccordement le levier de serrage de la soupape de raccordement et retirez-le de la soupape de l‘article gonflable.
  • Seite 39: Instructions De Travail

    Instructions de travail Sécurité anti-surcharge L‘appareil n‘est pas adapté à une utilisation continue. L‘ap- En cas de sollicitation trop importante ou de dysfonctionne- pareil a été développé pour générer une pression d‘air, pas ment, le fusible anti-surcharge se déclenche dans la fiche un volume d‘air.
  • Seite 40: Maintenance

    Mise au rebut Maintenez les ouvertures d‘aération et le boîtier de l‘appareil propres. Utilisez un chiffon humide ou une brosse pour le net- L’emballage se compose de matières recyclables pouvant toyage. être mises au rebut dans les déchetteries locales. Veuillez respecter l‘identification des matériaux Maintenance d‘emballage pour le tri sélectif, ils sont identifiés avec des abbréviations (a) et des chiffres (b)
  • Seite 41: Garantie

    Article L217-4 du Code de la consommation manière appropriée. Pour obtenir des renseigne- ments concernant les points de collecte et leurs Le vendeur livre un bien conforme au contrat et répond des horaires d’ouverture, vous pouvez contacter votre défauts de conformité existant lors de la délivrance. municipalité.
  • Seite 42 Article L217-12 du Code de la consommation Ce produit bénéficie d‘une garantie de 3 ans à compter de L‘action résultant du défaut de conformité se prescrit par sa date d’achat. La durée de garantie débute à la date deux ans à compter de la délivrance du bien. d’achat.
  • Seite 43: Faire Valoir Sa Garantie

    Faire valoir sa garantie Service après-vente Pour garantir la rapidité d’exécution de la procédure de Service après-vente France garantie, veuillez respecter les indications suivantes : Tél. : 0800 919270 E-Mail : owim@lidl.fr Veuillez conserver le ticket de caisse et la référence du pro- Service après-vente Belgique duit (par ex.
  • Seite 44 Legenda van de gebruikte pictogrammen ..................Pagina 45 Inleiding ..................................Pagina 45 Correct gebruik ................................Pagina 45 Omvang van de levering / Accessoires ........................Pagina 46 Overzicht ..................................Pagina 46 Technische gegevens ..............................Pagina 46 Algemene veiligheidsinstructies ......................Pagina 47 Bediening ...................................Pagina 51 Ingebruikname ................................Pagina 51 Werkinstructies ................................Pagina 52 Luchtdruk controleren ..............................Pagina 53 Overbelastingszekering ..............................Pagina 53 Reiniging...
  • Seite 45: Legenda Van De Gebruikte Pictogrammen

    Waarschuwing: Gehoorbescherming dragen! Compressor kan zonder waarschuwing starten. Brandgevaar! Beschermingsklasse III Minicompressor UMK 10 C2 aangegeven toepassingsgebieden. Overhandig alle docu- menten bij doorgifte van het product aan derden. Inleiding Correct gebruik Hartelijk gefeliciteerd met de aankoop van uw nieuwe pro- duct.
  • Seite 46: Omvang Van De Levering / Accessoires

    (sclaverand 1 mini-compressor of dunlop) 4 ventiel-adapters Vervangbare overbelastingszekering 1 gebruiksaanwijzing Technische gegevens Verwijder het verpakkingsmateriaal op een correcte wijze. Mini-compressor: UMK 10 C2 Overzicht Nominale spanning: 12 V Nominaal vermogen: 108 W Draaggreep Max. stroomopname: 14 A...
  • Seite 47: Algemene Veiligheidsinstructies

    Algemene veiligheidsinstructies Gewicht: ca. 1,64 kg Lengte van de stroomkabel: 3 m Maximaal toerental max: 3200 min Deze alinea bespreekt alle principiële veiligheidsvoorschriften tijdens werkzaam- Geluidsemissiewaarde: De geluidsemissiewaarde is in overeenstemming met heden met het apparaat. EN ISO 2151:2008 bepaald. Het A-gewogen geluidsniveau bedraagt: Veiligheid van personen: Geluidsdrukniveau:...
  • Seite 48: Werken Met Het Apparaat

    niet door kinderen zonder toezicht van het opblaasbare artikel. Het op- worden uitgevoerd. blaasbare artikel kan exploderen en Kinderen dienen in de gaten te worden zwaar letsel veroorzaken. gehouden om te voorkomen dat ze Bewaar het apparaat op een droge met het apparaat spelen.
  • Seite 49 het alleen als het zich in een feilloze Het apparaat wordt warm tijdens gebruik. toestand bevindt. Er bestaat kans op brandwonden in ge- Stel het apparaat niet bloot aan regen val van contact met hete oppervlakken. of vochtige weersomstandigheden en Let erop dat er geen zand, stof of an- laat het niet in contact komen met water.
  • Seite 50: Elektrische Veiligheid

    - als u reinigings- of onderhoudswerk- Elektrische veiligheid: zaamheden uitvoert; Gebruik het apparaat niet als u de - als de aansluitkabel beschadigd is; schakelaar niet aan en uit kunt schakelen. - na het binnendringen van vreemde Laat de beschadigde schakelaar ver- voorwerpen of in geval van abnormale vangen.
  • Seite 51: Bediening

    Trek in geval van beschadiging van de Apparaat aansluiten op de sigarettenaansteker: kabel de stekker direct uit de sigaret- Opmerking: controleer of het stopcontact van de sigaret- tenaansteker in uw voertuig voldoende is beveiligd. tenaansteker. De aansluitkabel van dit apparaat kan Zorg ervoor dat het product is uitgeschakeld: Aan- / uit- schakelaar op stand ‚0‘.
  • Seite 52: Werkinstructies

    Opmerking: tijdens het losmaken van het aansluitventiel - fixeer de ventieladapter in het aansluitventiel : span- hendel in de richting van het aansluitventiel (z. afb. kan er lucht uit het ventiel van het opblaasbare artikel C) drukken. ontsnappen. Zorg ervoor dat u het aansluitventiel niet te - steek de ventieladapter in het ventiel van het opblaas-...
  • Seite 53: Luchtdruk Controleren

    Luchtdruk controleren Plaats de nieuwe overbelastingszekering en schroef de punt van de stekker voor de sigarettenaansteker Opmerking: om de luchtdruk te meten, hoeft het apparaat weer vast. niet op de sigarettenaansteker aan te sluiten. Plaats nooit een zekering met een hogere activerings- Sluit het aansluitventiel aan (zie „Ingebruikname“).
  • Seite 54: Onderhoud

    Onderhoud Neem de aanduiding van de verpakkingsmaterialen voor de afvalscheiding in acht. Deze zijn gemar- Het product is onderhoudsvrij. keerd met de afkortingen (a) en een cijfers (b) Controleer het product en de accessoires (bijv. bijbehorend met de volgende betekenis: 1–7: kunststoffen / gereedschap) voor en na elk gebruik op slijtage en be- 20–22: papier en vezelplaten / 80–98: compo- schadigingen.
  • Seite 55: Garantie

    Garantie slijtage onderhevige onderdelen gelden (bijv. batterijen) of voor beschadigingen aan breekbare onderdelen, zoals bijv. Het product wordt volgens strenge kwaliteitsrichtlijnen zorg- schakelaars, accu’s of dergelijke onderdelen, die gemaakt vuldig geproduceerd en voor levering grondig getest. In geval zijn van glas. van schade aan het product kunt u rechtmatig beroep doen op de verkoper van het product.
  • Seite 56: Service

    Service Service Nederland Tel.: 0900 0400 223 (0,10 EUR / Min.) E-Mail: owim@lidl.nl Service Belgiё Tel.: 070 270 171 (0,15 EUR / Min.) E-Mail: owim@lidl.be 56 NL/BE...
  • Seite 57 Legenda zastosowanych piktogramów ..................Strona 58 Wstęp .....................................Strona 58 Zastosowanie zgodne z przeznaczeniem ........................Strona 58 Zakres dostawy / akcesoria ............................Strona 59 Przegląd ..................................Strona 59 Dane techniczne ................................Strona 60 Ogólne wskazówki bezpieczeństwa ....................Strona 60 Obsługa ..................................Strona 64 Uruchomienie ..................................Strona 64 Wskazówki dotyczące pracy............................Strona 66 Sprawdzanie ciśnienia powietrza..........................Strona 66 Bezpiecznik przeciążeniowy............................Strona 67 Czyszczenie...
  • Seite 58: Legenda Zastosowanych Piktogramów

    Gorące powierzchnie! Ostrzeżenie: Zakładać ochraniacze na uszy! Kompresor może zacząć działać bez ostrzeżenia. Niebezpieczeństwo pożaru! Klasa ochrony III Mini-kompresor UMK 10 C2 przekazania produktu innej osobie należy dołączyć do niego całą jego dokumentację. Wstęp Zastosowanie zgodne z przeznaczeniem Gratulujemy Państwu zakupu nowego produktu. Tym samym zdecydowali się...
  • Seite 59: Zakres Dostawy / Akcesoria

    Przegląd Każde inne zastosowanie może prowadzić do uszkodzenia urządzenia i stanowić poważne zagrożenie dla użytkownika. Producent nie odpowiada za szkody, które zostały spowo- Uchwyt dowane niezgodnym z przeznaczeniem zastosowaniem lub Manometr ze wskaźnikiem sprężonego powietrza niewłaściwą obsługą. (nieskalibrowany) Urządzenie nie jest przeznaczone do użytku komercyjnego. - w barach: czarna skala W przypadku zastosowania komercyjnego gwarancja wy- - w psi: czerwona skala...
  • Seite 60: Dane Techniczne

    Dane techniczne * Maksymalny czas pracy: urządzenia nie należy używać nieprzerwanie dłużej niż 5 minut; po tym czasie należy zro- Mini kompresor: UMK 10 C2 bić 20 minut przerwy. Napięcie znamionowe: 12 V Moc znamionowa: 108 W W trakcie dalszego rozwoju mogą zostać podjęte niezapo- Maks.
  • Seite 61: Bezpieczeństwo Osób

    Bezpieczeństwo osób: Urządzenie należy trzymać poza zasięgiem innych osób - przede wszyst- Niniejsze urządzenie może być używane kim dzieci - i zwierząt domowych. przez dzieci od lat 8 oraz przez osoby W obszarze pracy za szkody wobec z obniżonymi zdolnościami fizycznymi, osób trzecich, spowodowane wskutek sensorycznymi lub mentalnymi lub bra- użycia urządzenia, odpowiada użyt-...
  • Seite 62: Praca Z Urządzeniem

    artykuł może ulec pęknięciu i spowo- używać go wyłącznie wówczas, jeśli dować poważne obrażenia. jest w nienagannym stanie. Urządzenie należy przechowywać w Nie należy narażać urządzenia na suchym i chronionym i niedostępnym deszcz lub wilgotne warunki pogodowe dla dzieci miejscu. ani dopuszczać...
  • Seite 63 Urządzenie nagrzewa się w czasie - jeśli urządzenie jest pozostawione pracy. Istnieje niebezpieczeństwo opa- bez nadzoru; rzenia się w razie kontaktu z gorącymi - podczas podejmowania się czyszcze- powierzchniami. nia lub prac konserwacyjnych; Należy uważać na to, aby do otworu - jeśli kabel przyłączeniowy jest uszko- wlotu lub wylotu powietrza nie dostał...
  • Seite 64: Bezpieczeństwo Elektryczne

    elektrycznycm można uniknąć Należy przestrzegać zaleceń produ- w następujący sposób: centa pojazdu dotyczących stosowania zapalniczki. Bezpieczeństwo elektryczne: W razie uszkodzenia kabla należy na- Urządzenia nie należy używać, jeśli tychmiast wyjąć wtyczkę z zapalniczki. nie można włączyć lub wyłączyć prze- Nie można wymienić kabla zasilającego łącznika.
  • Seite 65 Najpierw włączyć produkt, podłączony zostanie zawór - Trzymać wciśnięty zawór przyłączeniowy i zamknąć przyłączeniowy przy oponie. go: dźwignię mocującą wcisnąć w kierunku zaworu Wskazówka: Zaworu przyłączeniowego przyłączeniowego zależności od pompowanego artykułu - należy używać bezpośrednio lub w połączeniu z dołączonymi adapte- Przyłączanie z adapterami do wentyli rami do wentyli (patrz rys.
  • Seite 66: Wskazówki Dotyczące Pracy

    Wskazówki dotyczące pracy Usuwanie zaworu przyłączeniowego: Przyłączenie bez adaptera do wentyli : otworzyć dźwignię mocującą zaworu przyłączeniowego Nie nadaje się się do pracy ciągłej. Produkt został zaprojek- zdjąć go z wentyla pompowanego artykułu. towany do wytwarzania ciśnienia powietrza, a nie objętości Przyłączenie z adapterem do wentyli : zdjąć...
  • Seite 67: Bezpiecznik Przeciążeniowy

    Bezpiecznik przeciążeniowy Otwory wentylacyjne i obudowę urządzenia zawsze utrzymywać w czystości. W razie przeciążenia lub niewłaściwego działania wyzwala Do czyszczenia używać wilgotnej szmatki lub szczotki. się bezpiecznik przeciążeniowy we wtyczce do zapalniczki w celu ochrony urządzenia. Po usunięciu przyczyny wy- Konserwacja mienić...
  • Seite 68: Utylizacja

    Utylizacja Z uwagi na ochronę środowiska nie wyrzucać urządzenia po zakończeniu eksploatacji do od- Opakowanie wykonane jest z materiałów przyjaznych dla padów domowych, lecz prawidłowo zutylizować. środowiska, które można przekazać do utylizacji w lokalnym Informacji o punktach zbiorczych i ich godzinach punkcie przetwarzania surowców wtórnych.
  • Seite 69: Sposób Postępowania W Przypadku Naprawy Gwarancyjnej

    Świadczenie gwarancyjne obejmuje wady materiałowe i W razie wystąpienia błędów w działaniu lub innych wad, fabryczne. Gwarancja nie obejmuje części produktu ulega- należy skontaktować się najpierw z wymienionym poniżej jących normalnemu zużyciu, uznawanych za części zuży- działem serwisowym telefonicznie lub pocztą elektroniczną. walne (np.
  • Seite 70 Legenda použitých piktogramů ......................Strana 71 Úvod ....................................Strana 71 Použití ke stanovenému účelu............................Strana 71 Obsah dodávky a příslušenství ............................Strana 72 Přehled .....................................Strana 72 Technické údaje ................................Strana 72 Všeobecná bezpečnostní upozornění ....................Strana 73 Obsluha ..................................Strana 76 Uvedení do provozu ...............................Strana 76 Pracovní pokyny ................................Strana 78 Zkoušení...
  • Seite 71: Legenda Použitých Piktogramů

    Kompresorové zařízení se může bez varování rozběhnout. Nebezpečí požáru! Ochranná třída III Mini kompresor UMK 10 C2 Použití ke stanovenému účelu Výrobek je určen k pumpování pneumatik (např. automobilo- Úvod vých a jízdního kola), míčů a jiných nafukovacích artiklů s malým objemem.
  • Seite 72: Obsah Dodávky A Příslušenství

    (Sclaverand nebo Dunlop) 4 ventilové adaptéry Vyměnitelná pojistka přetížení 1 návod k obsluze Technické údaje Obalový materiál odstraňte do odpadu správným způsobem. Miniaturní kompresor: UMK 10 C2 Přehled Jmenovité napětí: 12 V Jmenovitý příkon: 108 W Držadlo na nošení maximální proud: 14 A Manometr (nekalibrovaný)
  • Seite 73: Všeobecná Bezpečnostní Upozornění

    Všeobecná bezpečnostní Hodnota emise hluku: upozornění Hodnota emisí hluku je stanovena v souladu s EN ISO 2151:2008. Typická hladina hluku s hodnotou A: Hladina akustického tlaku: 76,6 dB(A) Tento odstavec se zabývá základními Nejistota měření: 3,11 dB Hladina akustického výkonu: 87,6 dB(A) bezpečnostními předpisy platnými při Nejistota měření: 3,11 dB práci s výrobkem.
  • Seite 74 výrobkem si děti nesmí hrát. Děti nesmí Skladujte výrobek na suchém místě a provádět čištění a údržbu bez dohledu. mimo dosah dětí. Děti mají být pod dozorem, aby si s přístrojem nehrály. POZOR: Držte výrobek mimo dosah osob - Takto zabráníte poškození výrobku především dětí...
  • Seite 75 Za provozu udržujte všechny otvory Vypněte výrobek a vytáhněte zástrčku výrobku průchodné. Nezakrývejte ze zásuvky cigaretového zapalovače: otvory rukama nebo prsty a výrobek - když výrobek nepoužíváte; ničím nepřikrývejte. Hrozí nebezpečí - když necháváte výrobek bez dohledu; přehřátí! - při čištění a údržbě; Při vysokých venkovních teplotách - po poškození...
  • Seite 76: Elektrická Bezpečnost

    Elektrická bezpečnost: Přívodní kabel tohoto přístroje nelze vyměnit. Při poškození kabelu musíte Nepoužívejte výrobek s nefungujícím přístroj zlikvidovat. vypínačem. Nechte poškozený vypínač vyměnit. Nenoste výrobek za kabel. Nevytahujte Obsluha zástrčku ze zásuvky cigaretového vypí- Uvedení do provozu nače tahem za kabel. Chraňte kabel před horkem, olejem a ostrými hranami.
  • Seite 77 Zapínání / vypínání: Přesvědčte se, že je výrobek vypnutý: vypínač v po- loze „0“. Zapněte výrobek přestavením vypínače do polohy Zastrčte zástrčku do zásuvky na 12 V cigaretového „I“. zapalovače. Po dosažení požadovaného tlaku výrobek vypněte pře- stavením vypínače do polohy „0“. Připojení...
  • Seite 78: Pracovní Pokyny

    Pracovní pokyny Pojistka proti přetížení Nevhodné pro trvalý provoz. Výrobek je koncipovaný k vy- Při přetížení nebo chybné funkci zapůsobí pojistka proti přetí- tvoření tlaku, není vhodný k vytvoření objemu vzduchu. žení v zástrčce pro zásuvku cigaretového zapalovače. Prosíme, nepoužívejte výrobek déle než 5 minut bez Po opravě...
  • Seite 79: Údržba

    Údržba Při třídění odpadu se řiďte podle označení obalo- vých materiálů zkratkami (a) a čísly (b), s násle- Výrobek nevyžaduje údržbu. dujícím významem: 1–7: umělé hmoty / 20–22: Před a po každém použití zkontrolujte výrobek a příslu- papír a lepenka / 80–98: složené látky. šenství...
  • Seite 80: Záruka

    Záruka Postup v případě uplatňování záruky Výrobek byl vyroben s nejvyšší pečlivostí podle přísných kva- Pro zajištění rychlého zpracování Vašeho případu se řiďte litativních směrnic a před odesláním prošel výstupní kontrolou. následujícími pokyny: V případě závad máte možnost uplatnění zákonných práv vůči prodejci.
  • Seite 81 Legenda použitých piktogramov ......................Strana 82 Úvod ....................................Strana 82 Používanie v súlade s určeným účelom .........................Strana 82 Rozsah dodávky / príslušenstvo .............................Strana 83 Prehľad ....................................Strana 83 Technické údaje ................................Strana 84 Všeobecné bezpečnostné upozornenia ....................Strana 84 Obsluha ..................................Strana 88 Uvedenie do prevádzky ..............................Strana 88 Pracovné...
  • Seite 82: Legenda Použitých Piktogramov

    Horúce povrchy! Varovanie: Noste ochranu sluchu! Kompresor sa môže spustiť bez varovania. Nebezpečenstvo požiaru! Trieda ochrany III Mini kompresor UMK 10 C2 postúpenia výrobku ďalším osobám odovzdajte aj všetky dokumenty patriace k výrobku. Úvod Používanie v súlade s určeným účelom Blahoželáme Vám ku kúpe Vášho nového výrobku.
  • Seite 83: Rozsah Dodávky / Príslušenstvo

    Prehľad Každé iné používanie môže viesť k poškodeniu prístroja a znamenať vážne nebezpečenstvo pre jeho používateľa. Výrobca neručí za škody, ktoré vznikli v dôsledku používania, Rukoväť ktoré nie je v súlade s určeným účelom, alebo nesprávneho Manometer s ukazovateľom tlaku vzduchu ovládania.
  • Seite 84: Technické Údaje

    Technické údaje Technické a optické zmeny môžu byť vrámci ďalšieho vývoja uskutočňované bez ohlásenia. Mini kompresor: UMK 10 C2 Všetky rozmery, pokyny a údaje v tomto návode na použí- Dimenzačné napätie: 12 V vanie sú preto bez záruky. Menovitý výkon: 108 W Právne nároky, ktoré...
  • Seite 85 duševnými schopnosťami alebo s ne- Prístroj počas prevádzky nikdy nenas- dostatkom skúseností a vedomostí, ak merujte na samých seba alebo na iné sú pod dozorom, alebo ak boli pou- osoby, najmä nie na oči a uši. Existuje čené ohľadom bezpečného používa- nebezpečenstvo poranenia! nia prístroja, a ak porozumeli Nenechávajte prístroj bežať...
  • Seite 86: Práca S Prístrojom

    Práca s prístrojom: Prístroj sa počas prevádzky zahreje. Pri kontakte s horúcimi plochami vzniká Prístroj nepoužívajte počas jazdy. nebezpečenstvo popálenia. Pred uvedením do prevádzky prístroj Dbajte na to, aby sa do otvorov pre skontrolujte a používajte ho iba v bez- prívod a odvod vzduchu nedostal pie- chybnom stave.
  • Seite 87: Elektrická Bezpečnosť

    - keď je pripojovací kábel poškodený; Prístroj nenoste uchopený za kábel. - pri preniknutí cudzích telies alebo pri Nepoužívajte kábel na vyťahovanie abnormálnych zvukoch. zástrčky zo zásuvky cigaretového Používajte iba príslušenstvo, ktoré zapaľovača. Chráňte kábel pred horú- dodáva a odporúča výrobca. čavou, olejom a ostrými hranami.
  • Seite 88: Obsluha

    Obsluha Zapojenie pripojovacieho ventilu Otvorte pripojovací ventil : Upínaciu páku zvisle Uvedenie do prevádzky smerom hore (p. obr. B). Zapojenie bez ventilového adaptéra Umiestnite výrobok na rovnom, nehorľavom podklade. - Otvorený pripojovací ventil zasuňte do ventilu nafu- Neprikrývajte vetracie otvory. Neprevádzkujte prístroj v kovaného výrobku (príp.
  • Seite 89: Pracovné Pokyny

    Pracovné pokyny Keď je dosiahnutý želaný plniaci tlak, vypnete prístroj tak, že za- / vypínač umiestnite do polohy „0“. Odstráňte zástrčku cigaretového zapaľovača Nevhodné pre trvalú prevádzku. Výrobok bol konštruovaný pre vytváranie pneumatického tlaku, nie objemu vzduchu. Odstránenie pripojovacieho ventila: Výrobok prosím nepoužívajte dlhšie ako 5 minút bez Pripojenie bez ventilového adaptéra : Otvorte upínaciu...
  • Seite 90: Poistka Proti Preťaženiu

    Poistka proti preťaženiu Údržba Pri preťažení alebo chybnej funkcii sa aktivuje poistka proti Výrobok si nevyžaduje údržbu. preťaženiu v zástrčke cigaretového zapaľovača Pred a po každom použití skontrolujte produkt a príslu- ochranu prístroja. Po odstránení príčiny aktivovania vymeňte šenstvo (napr. nástroje príslušenstva) ohľadom opotrebo- poistku (p.
  • Seite 91: Záruka

    Záruka Všímajte si prosím označenie obalových materiá- lov pre triedenie odpadu, sú označené skratkami (a) a číslami (b) s nasledujúcim významom: 1–7: Tento výrobok bol dôkladne vyrobený podľa prísnych akost- Plasty / 20–22: Papier a kartón / 80–98: Spojené ných smerníc a pred dodaním svedomito testovaný. V prípade látky.
  • Seite 92: Postup V Prípade Poškodenia V Záruke

    Servis akumulátorových batériach alebo častiach, ktoré sú zhoto- vené zo skla. Servis Slovensko Tel.: 0850 232001 Postup v prípade poškodenia v záruke E-pošta: owim@lidl.sk Pre zaručenie rýchleho spracovania Vašej požiadavky do- držte prosím nasledujúce pokyny: Pre všetky otázky majte pripravený pokladničný doklad a číslo výrobku (napr.
  • Seite 93 OWIM GmbH & Co. KG Stiftsbergstraße 1 74167 Neckarsulm GERMANY Model-No.: HG02325 Version: 03 / 2020 Stand der Informationen · Last Information Update Version des informations · Stand van de informatie Stan informacji · Stav informací · Stav informácií 03 / 2020 · Ident.-No.: HG02325032020-8 IAN 340574_1910...

Diese Anleitung auch für:

Ian 340574_1910

Inhaltsverzeichnis