Gemü 567 BioStar control Betriebsanleitung
Manuell betätigtes regelventil
Vorschau ausblenden
Andere Handbücher für 567 BioStar control:
- Betriebsanleitung (92 Seiten) ,
- Original einbau- und montageanleitung (68 Seiten) ,
- Handbuch (4 Seiten)

Verwandte Anleitungen für Gemü 567 BioStar control


Inhaltszusammenfassung für Gemü 567 BioStar control
- Seite 1 GEMÜ 567 BioStar control Manuell betätigtes Regelventil Manually operated control valve Betriebsanleitung Operating instructions Weitere Informationen Webcode: GW-567...
- Seite 2 Alle Rechte wie Urheberrechte oder gewerbliche Schutzrechte werden ausdrücklich vorbehalten. All rights including copyrights or industrial property rights are expressly reserved. Dokument zum künftigen Nachschlagen aufbewahren. Keep the document for future reference. © GEMÜ Gebr. Müller Apparatebau GmbH & Co. KG 24.04.2020 2 / 88 GEMÜ...
-
Seite 3: Inhaltsverzeichnis
Inhaltsverzeichnis 1 Allgemeines .............. Hinweise ............. Verwendete Symbole ......... Begriffsbestimmungen ........Warnhinweise ............. 2 Sicherheitshinweise ..........3 Produktbeschreibung ..........4 Bestimmungsgemäße Verwendung ......5 Bestelldaten .............. 6 Technische Daten ............. 10 7 Abmessungen ............13 8 Herstellerangaben ............. 29 Lieferung ............. 29 Verpackung ............ -
Seite 4: Allgemeines
1 Allgemeines 1 Allgemeines 1.4 Warnhinweise Warnhinweise sind, soweit möglich, nach folgendem Schema 1.1 Hinweise gegliedert: – Beschreibungen und Instruktionen beziehen sich auf SIGNALWORT Standardausführungen. Für Sonderausführungen, die in diesem Dokument nicht beschrieben sind, gelten Art und Quelle der Gefahr Mögliches die grundsätzlichen Angaben in diesem Dokument in gefahren-... -
Seite 5: Sicherheitshinweise
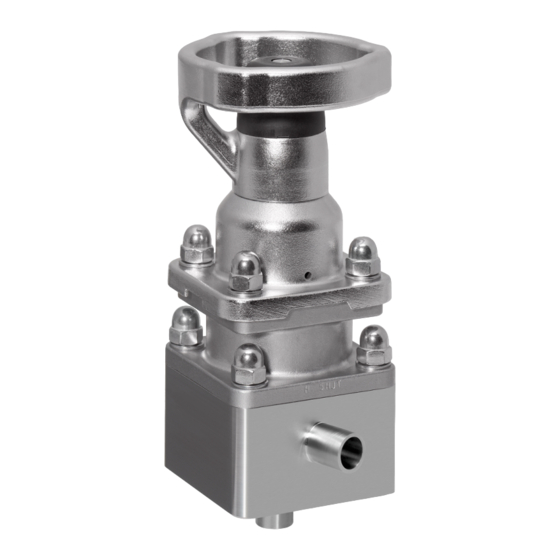
3.2 Beschreibung 3. Installation und Inbetriebnahme durch eingewiesenes Fachpersonal durchführen. Das 2/2-Wege-Membransitzventil GEMÜ 567 BioStar control 4. Montage- und Betriebspersonal ausreichend schulen. ist für den Einsatz in sterilen Anwendungsbereichen konzi- piert. Je nach Ausführung sind Durchflussmengen von 80 l/h 5. -
Seite 6: Durchflussrichtung
4 Bestimmungsgemäße Verwendung 4 Bestimmungsgemäße Verwendung Position Benennung O-Ring GEFAHR Regelkegel Explosionsgefahr Membrane Bypass Ventil ▶ Gefahr von Tod oder schwersten Ver- Ohne Bypass letzungen. Das Produkt nicht in explosionsge- ● fährdeten Zonen verwenden. WARNUNG Nicht bestimmungsgemäße Verwendung des Produkts ▶... -
Seite 7: Bestelldaten
5 Bestelldaten 5 Bestelldaten Die Bestelldaten stellen eine Übersicht der Standard-Konfigurationen dar. Vor Bestellung die Verfügbarkeit prüfen. Weitere Konfigurationen auf Anfrage. Bestellcodes 1 Typ Code 7 Steuerfunktion Code Regelventil Manuell betätigt (MA) 2 DN Code 8 Antriebsausführung Code Edelstahlhandrad DN 8 Antriebsgröße 2 DN 10 DN 15... -
Seite 8: Bestellbeispiel Ohne Bypass
5 Bestelldaten 8 Fortsetzung von Antriebsausführung Code 10 Fortsetzung von Kv-Wert Code Antriebsgröße 2, 630 l/h Kunststoffhandrad, 1,0 m³/h Mit Schließ- und Hubbegrenzung 1,6 m³/h Antriebsgröße 2, 2,6 m³/h Kunststoffhandrad, 4,1 m³/h Mit Schließ- und Hubbegrenzung, Verriegelung gegen Öffnen/Schließen, 8,0 m³/h Anbaumöglichkeit Näherungsinitiatoren M 8x1 12,5 m³/h Antriebsgröße 2,... -
Seite 9: Bestellbeispiel Mit Bypass
5 Bestelldaten Bestelloption Code Beschreibung 4 Anschlussart Stutzen EN 10357 Serie A (ehemals DIN 11850 Reihe 2) / DIN 11866 Reihe A 5 Werkstoff Ventilkörper 1.4435 (316L), Vollmaterial 6 Dichtwerkstoff Antriebsabdichtung PTFE / Sitzabdichtung PTFE 7 Steuerfunktion Manuell betätigt (MA) 8 Antriebsausführung Antriebsgröße 2, Edelstahlhandrad,... -
Seite 10: Technische Daten
6 Technische Daten 6 Technische Daten 6.1 Medium Betriebsmedium: Aggressive, neutrale, gasförmige und flüssige Medien, die die physikalischen und chemischen Ei- genschaften des jeweiligen Gehäuse- und Membranwerkstoffes nicht negativ beeinflussen. 6.2 Temperatur Medientemperatur: Ohne Bypass -10 bis 160 °C Mit Bypass -10 bis 100 °C Sterilisationstemperatur: Sitzabdichtung FKM ohne Bypass, (Code 4) - Seite 11 6 Technische Daten Kv-Werte: Hub [%] Gleichprozentig (außer Code 59) / Linear (außer Code 59) Regelkurve Kv-Wert DN 8 DN 10 DN 15 DN 20 DN 25 GAA, LAA 80 l/h GAB, LAB 100 l/h GBC, LBC 160 l/h GBD, LBD 250 l/h GBE, LBE 400 l/h...
-
Seite 12: Mechanische Daten
6 Technische Daten 6.4 Produktkonformitäten Maschinenrichtlinie: 2006/42/EU EMV-Richtlinie: 2014/30/EU Lebensmittel: USP Class VI Verordnung (EG) Nr. 1935/2004 Verordnung (EG) Nr. 10/2011 6.5 Mechanische Daten Gewicht: Antriebsausführung 2 2,4 kg Antriebsausführung 3 7,8 kg 12 / 88 GEMÜ 567 www.gemu-group.com... -
Seite 13: Abmessungen
7 Abmessungen 7 Abmessungen 7.1 Antriebsmaße ØB Antriebsgröße ØB 8, 10, 15, 20 135,0 90,0 20, 25 193,0 114,0 Maße in mm * CT = A + H1 (siehe Körpermaße) 13 / 88 www.gemu-group.com GEMÜ 567... -
Seite 14: Körpermaße
7 Abmessungen 7.2 Körpermaße 7.2.1 Stutzen ohne Bypass Code 0 Anschlussarten Code 0 Werkstoffe Code 41, 43 Sitz- □ E Ø z Ø d größe (Code) 47,5 17,5 40,5 47,5 17,5 39,5 47,5 17,5 38,5 44,0 21,0 40,5 44,0 21,0 39,5 44,0 21,0... - Seite 15 7 Abmessungen Anschlussarten Code 0 Werkstoffe Code 41, 43 Sitz- □ E Ø z Ø d größe (Code) 52,5 27,6 47,5 Maße in mm 1) Anschlussart Code 0: Stutzen DIN 2) Werkstoff Ventilkörper Code 41: 1.4435 (316L), Vollmaterial Code 43: 1.4435 (BN2), Vollmaterial, Δ Fe < 0,5 % 7.2.2 Stutzen ohne Bypass Code 17 Anschlussarten Code 17 Werkstoffe Code 41, 43...
- Seite 16 7 Abmessungen Anschlussarten Code 17 Werkstoffe Code 41, 43 Sitz- □ E Ø z Ø d größe (Code) 43,5 21,5 40,5 43,5 21,5 38,0 55,0 25,1 47,5 52,0 28,1 50,5 52,0 28,1 48,0 Maße in mm 1) Anschlussart Code 17: Stutzen EN 10357 Serie A (ehemals DIN 11850 Reihe 2) / DIN 11866 Reihe A 2) Werkstoff Ventilkörper Code 41: 1.4435 (316L), Vollmaterial Code 43: 1.4435 (BN2), Vollmaterial, Δ...
- Seite 17 7 Abmessungen Anschlussarten Code 59 Werkstoffe Code 41, 43 Sitz- □ E Ø z Ø d größe (Code) 43,6 21,4 41,38 3,88 19,05 1,65 43,6 21,4 40,38 2,88 19,05 1,65 43,6 21,4 37,88 0,38 19,05 1,65 53,8 26,3 48,60 1,10 25,40 1,70 Maße in mm...
- Seite 18 7 Abmessungen Anschlussarten Code 60 Werkstoffe Code 41, 43 Sitz- □ E Ø z Ø d größe (Code) 42,4 22,6 44,55 7,05 21,3 42,4 22,6 43,55 6,05 21,3 42,4 22,6 42,55 5,05 21,3 42,4 22,6 41,55 4,05 21,3 42,4 22,6 39,05 1,55 21,3...
- Seite 19 7 Abmessungen Anschlussarten Code 0 Werkstoffe Code 41, 43 Sitz- □ E Ø z Ø d größe (Code) 52,0 21,0 41,0 52,0 21,0 40,0 52,0 21,0 37,5 Maße in mm 1) Anschlussart Code 0: Stutzen DIN 2) Werkstoff Ventilkörper Code 41: 1.4435 (316L), Vollmaterial Code 43: 1.4435 (BN2), Vollmaterial, Δ...
- Seite 20 7 Abmessungen Anschlussarten Code 17 Werkstoffe Code 41, 43 Sitz- □ E Ø z Ø d größe (Code) 51,5 21,5 40,5 51,5 21,5 38,0 Maße in mm 1) Anschlussart Code 17: Stutzen EN 10357 Serie A (ehemals DIN 11850 Reihe 2) / DIN 11866 Reihe A 2) Werkstoff Ventilkörper Code 41: 1.4435 (316L), Vollmaterial Code 43: 1.4435 (BN2), Vollmaterial, Δ...
- Seite 21 7 Abmessungen Anschlussarten Code 59 Werkstoffe Code 41, 43 Sitz- □ E Ø z Ø d größe (Code) 51,6 21,4 37,88 0,38 19,05 1,65 Maße in mm 1) Anschlussart Code 59: Stutzen ASME BPE / DIN 11866 Reihe C 2) Werkstoff Ventilkörper Code 41: 1.4435 (316L), Vollmaterial Code 43: 1.4435 (BN2), Vollmaterial, Δ...
- Seite 22 7 Abmessungen Anschlussarten Code 60 Werkstoffe Code 41, 43 Sitz- □ E Ø z Ø d größe (Code) 50,4 22,6 39,05 1,55 21,3 Maße in mm 1) Anschlussart Code 60: Stutzen ISO 1127 / EN 10357 Serie C / DIN 11866 Reihe B 2) Werkstoff Ventilkörper Code 41: 1.4435 (316L), Vollmaterial Code 43: 1.4435 (BN2), Vollmaterial, Δ...
- Seite 23 7 Abmessungen Anschlussarten Code 82 Werkstoffe Code 41, 43 Sitz- □ E Ø z Ø d1 Ø d3 größe (Code) 55,4 72,05 22,6 39,05 1,55 18,1 50,5 66,0 87,40 27,0 49,40 1,90 19,0 50,5 62,6 90,40 30,4 52,40 4,90 25,0 50,5 62,6 87,90...
- Seite 24 7 Abmessungen Anschlussarten Code 86 Werkstoffe Code 41, 43 Sitz- □ E Ø z Ø d1 Ø d3 größe (Code) 56,5 75,5 21,5 42,5 16,0 34,0 56,5 74,5 21,5 41,5 16,0 34,0 56,5 73,5 21,5 40,5 16,0 34,0 56,5 71,0 21,5 38,0 16,0...
- Seite 25 7 Abmessungen 7.2.11 Clamp ohne Bypass Code 88 Anschlussarten Code 88 Werkstoffe Code 41, 43 Sitz- □ E Ø z Ø d1 Ø d3 größe (Code) 59,8 74,20 18,2 41,20 3,70 9,40 25,0 59,8 73,20 18,2 40,20 2,70 9,40 25,0 59,8 72,20 18,2...
- Seite 26 7 Abmessungen 7.2.12 Clamp mit Bypass Code 82 Anschlussarten Code 82 Werkstoffe Code 41, 43 Sitz- □ E Ø z Ø d1 Ø d3 größe (Code) 67,3 74,65 18,7 41,65 4,15 10,3 25,4 67,3 73,65 18,7 40,65 3,15 10,3 25,4 67,3 72,65 18,7...
- Seite 27 7 Abmessungen 7.2.13 Clamp mit Bypass Code 86 Anschlussarten Code 86 Werkstoffe Code 41, 43 Sitz- □ E Ø z Ø d1 Ø d3 größe (Code) 68,5 73,5 17,5 40,5 68,5 72,5 17,5 39,5 68,5 71,5 17,5 38,5 67,5 74,5 18,5 41,5 67,5...
- Seite 28 7 Abmessungen 7.2.14 Clamp mit Bypass Code 88 Anschlussarten Code 88 Werkstoffe Code 41, 43 Sitz- □ E Ø z Ø d1 Ø d3 größe (Code) 67,8 74,20 18,2 41,20 3,70 9,40 67,8 73,20 18,2 40,20 2,70 9,40 67,8 72,20 18,2 39,20 1,70...
-
Seite 29: Herstellerangaben
9 Einbau in Rohrleitung 8 Herstellerangaben 9 Einbau in Rohrleitung Der für den Betrieb des Ventils benötigte Controller ist nicht 9.1 Installationsort im Lieferumfang enthalten! VORSICHT 8.1 Lieferung Ventil äußerlich nicht stark beanspruchen. ● ● Ware unverzüglich bei Erhalt auf Vollständigkeit und Un- Installationsort so wählen, dass Ventil nicht als Steighilfe ●... -
Seite 30: Einbau Mit Clampanschluss
9 Einbau in Rohrleitung 9.3 Einbau mit Clampanschluss VORSICHT Verwendung als Trittstufe! ▶ Beschädigung des Produkts. ▶ Gefahr des Abrutschens. Installationsort so wählen, dass das Produkt nicht als ● Steighilfe genutzt werden kann. Das Produkt nicht als Trittstufe oder Steighilfe benutzen. ●... -
Seite 31: Montage
10 Montage 10 Montage Antrieb und Zwischenstück montieren: Antrieb auf Zwischenstück montieren: 5. Antrieb A und Zwischenstück 11 auf Ventilkörper 1 auf- 1. Antrieb A in Offen-Position bringen. setzen. 2. Antrieb A auf Zwischenstück 11 aufsetzen. 6. Unterlegscheiben 17 und Hutmuttern 18 auf Stiftschrau- ben 16 legen und von Hand ansetzen. -
Seite 32: Antrieb Montieren
10 Montage HINWEIS ▶ Wichtig: Membranen setzen sich im Laufe der Zeit. Nach Demontage / Montage des Ventils Schrauben und Mut- tern körperseitig auf festen Sitz überprüfen und wenn nötig nachziehen (spätestens nach dem ersten Sterilisa- tionsprozess). Membrane zum Einknüpfen: Pos. -
Seite 33: Fehlerbehebung
11 Fehlerbehebung 11 Fehlerbehebung Fehler Fehlerursache Fehlerbehebung Betriebsmedium entweicht aus Konus-Membrane defekt Konus-Membrane auf Beschädigungen Leckagebohrung prüfen, ggf. Konus-Membrane tauschen Das Produkt öffnet nicht bzw. nicht Antrieb defekt Antriebspatrone austauschen, ggf. vollständig Antrieb austauschen Konus-Membrane nicht korrekt montiert Antrieb demontieren, Montage der Konus-Membrane prüfen, ggf. -
Seite 34: Inspektion Und Wartung
12 Inspektion und Wartung 12 Inspektion und Wartung HINWEIS Wichtig: HINWEIS ▶ Nach Demontage alle Teile von Verschmutzungen reini- Außergewöhnliche Wartungsarbeiten! gen. Teile dabei nicht beschädigen. Danach Teile auf Be- ▶ Beschädigungen des GEMÜ Produkts. schädigung prüfen. Wenn Teile beschädigt sind, diese Wartungsarbeiten bzw. -
Seite 35: Antrieb Auf Zwischenstück Montieren
12 Inspektion und Wartung 12.1.2 Antrieb auf Zwischenstück montieren 1. Antrieb A in Offen-Position bringen. 2. Antrieb A auf Zwischenstück 11 aufsetzen. 3. Unterlegscheiben 17 und Hutmuttern 18 auf Stiftschrau- ben 16 legen und von Hand ansetzen. 4. Hutmuttern 18 über Kreuz festziehen (Anzugsdrehmo- ment: 16-20 Nm). -
Seite 36: Regelkegel Austauschen
12 Inspektion und Wartung 12.2 Regelkegel austauschen 12.2.1 Regelkegel demontieren 7. Stützring 20 festhalten und Regelkegel 3 mit Montage- werkzeug lösen. Regelkegeloberfläche dabei nicht be- schädigen. 1. Antrieb demontieren (siehe Kapitel " Antrieb von Zwi- schenstück demontieren“). 2. Hutmuttern 18 von Stiftschrauben 16 lösen. 3. -
Seite 37: Regelkegel Montieren
12 Inspektion und Wartung 12.2.2 Regelkegel montieren 4. Stützring 20 festhalten und Regelkegel 3 mit Montage- werkzeug kontern und handfest anziehen. ð Regelkegeloberfläche dabei nicht beschädigen. Sollten sich bei der Demontage des Regelkegels 3 die Konus- Membrane 2, die Spannmutter 5 und die Tellerfedern 9 lösen, müssen diese vor der Montage des Regelkegels 3 wieder lagerichtig positioniert werden! 5. -
Seite 38: Konus-Membrane (Code 4) Wechseln
12 Inspektion und Wartung 12.3 Konus-Membrane (Code 4) wechseln 12.4 Konus-Membrane (Code 5) wechseln 12.3.1 Konus-Membrane demontieren 12.4.1 Konus-Membrane demontieren VORSICHT VORSICHT Verwendung falscher Ersatzteile! Verwendung falscher Ersatzteile! ▶ Beschädigung des GEMÜ Produkts. ▶ Beschädigung des GEMÜ Produkts. ▶ Herstellerhaftung und Gewährleistungsanspruch erlö- ▶... -
Seite 39: Membrane Montieren
12 Inspektion und Wartung 12.4.2 Konus-Membrane montieren 12.5.3 Membrane montieren HINWEIS ▶ Wichtig: Für Ventil passende Membrane einbauen (ge- eignet für Medium, Mediumkonzentration, Temperatur und Druck). Die Absperrmembrane ist ein Verschleißteil. Vor Inbetriebnahme und über gesamte Einsatzdauer des Membranventils technischen Zustand und Funktion überprüfen. -
Seite 40: Reinigung Des Produkts
12 Inspektion und Wartung 12.5.4 Antrieb montieren 1. Antrieb in Offen-Position bringen. 2. Antrieb mit montierter Membrane auf Ventilkörper aufset- ð auf Übereinstimmung von Druckstücksteg und Ventil- körpersteg achten (Membrangröße 8). 3. Befestigungselemente handfest montieren. 4. Antrieb in Geschlossen-Position bringen. 5. -
Seite 41: Ersatzteile
12 Inspektion und Wartung 12.7 Ersatzteile 12.7.1 Dichtwerkstoff Code 4, 43, 45. 47 Pos. Benennung Bestellbezeichnung Antrieb 9567 Ventilkörper K567 Konus-Membrane 567 SVS… O-Ring Konus-Membrane 567 SVM... O-Ring Montagewerkzeug Konus-Membrane 567 SRK 4... Regelkegel O-Ring Montagewerkzeug Schraubenset (88491207) 567 S30E 41 2 41 / 88 www.gemu-group.com GEMÜ... - Seite 42 12 Inspektion und Wartung 12.7.2 Dichtwerkstoff Code 5, 55 Pos. Benennung Bestellbezeichnung Antrieb 9567 Ventilkörper K567 Konus-Membrane mit Regelkegel 567 SRK 5… Schraubenset (88491207) 567 S30E 41 2 42 / 88 GEMÜ 567 www.gemu-group.com...
-
Seite 43: Ausbau Aus Rohrleitung
15 Rücksendung 13 Ausbau aus Rohrleitung 15 Rücksendung 1. Den Ausbau von Clamp- oder Schraubverbindungen in Aufgrund gesetzlicher Bestimmungen zum Schutz der Um- umgekehrter Reihenfolge wie den Einbau durchführen. welt und des Personals ist es erforderlich, dass die Rücksen- deerklärung vollständig ausgefüllt und unterschrieben den 2.