Inhaltsverzeichnis
Werbung
Verfügbare Sprachen
Verfügbare Sprachen
Sumario
Recomendaciones de seguridad .................................................................. 3
Generalidades ............................................................................................... 3
Recomendaciones relativas a la batería.......................................................... 3
Limpieza ....................................................................................................... 3
Ámbito de aplicación .................................................................................. 4
Puesta en funcionamiento........................................................................... 4
Introducción de las baterías .......................................................................... 4
Configuración tras el cambio de baterías ...................................................... 4
Protección ante la fuga no intencionada de la batería ................................... 5
Vista general del aparato............................................................................. 5
La pantalla ................................................................................................... 7
Generalidades ............................................................................................... 7
Indicativos estándar en pantalla .................................................................... 7
Pantalla básica - Hora............................................................................... 7
Fecha........................................................................................................ 7
Seleccionar modo o aparato ..................................................................... 7
Navegar en el menú .................................................................................... 8
Interrupción del proceso............................................................................... 8
Configuración de hora y fecha ...................................................................... 9
Ajuste de la hora ........................................................................................... 9
Configuración de la fecha ........................................................................... 10
Iluminación del fondo ............................................................................... 10
RESET - Configuración de fábrica.............................................................. 11
Programación del código del aparato ....................................................... 12
Tipos de aparatos y grupos de códigos ....................................................... 12
Clasificación en grupos de códigos......................................................... 13
Posibilidades de programación ................................................................... 13
Aparición del modo de programación......................................................... 13
Seleccionar el código del aparato en la pantalla .......................................... 14
Introducir el código del aparato según la lista de códigos ........................... 15
Búsqueda manual de código....................................................................... 15
Búsqueda de código por nombre comercial................................................ 16
Identificación del código ............................................................................. 17
Funcionamiento normal ............................................................................ 18
Utilización de un único aparato................................................................... 18
Función SHIFT ............................................................................................. 18
Grabaciones ................................................................................................ 18
EPG - Programa electrónico........................................................................ 19
Utilización de aparatos combinados............................................................ 19
Aparatos combinados con dos códigos de aparato................................. 19
Aparatos combinados con un único código de aparato .......................... 19
Función APAGAR TODO .............................................................................. 20
1
Werbung
Kapitel
Inhaltsverzeichnis

Verwandte Anleitungen für Medion MD 82467


Inhaltszusammenfassung für Medion MD 82467
-
Seite 1: Inhaltsverzeichnis
Sumario Recomendaciones de seguridad ..............3 Generalidades ....................3 Recomendaciones relativas a la batería............3 Limpieza ....................... 3 Ámbito de aplicación .................. 4 Puesta en funcionamiento................4 Introducción de las baterías ................4 Configuración tras el cambio de baterías ............4 Protección ante la fuga no intencionada de la batería ........ - Seite 2 Ajuste del temporizador ................21 Sleeptimer TV....................21 Ajuste del Sleeptimer................21 Ajuste del Temporizador............... 21 Afinador de órdenes..................22 Programación del afinador de órdenes ........... 22 Borrar el afinado de órdenes..............23 Función de aprendizaje ................24 Recomendaciones sobre la función de memoria ......... 24 Programación de órdenes ................
-
Seite 3: Recomendaciones De Seguridad
Recomendaciones de seguridad Antes de poner en funcionamiento el mando a distancia, le invitamos a que lea con atención estas instrucciones completas. Mantenga las instrucciones en buen estado para su consulta posterior o por si tuviera que cedérselas a un tercero. Generalidades •... -
Seite 4: Ámbito De Aplicación
Ámbito de aplicación Este mando a distancia universal dispone de ocho botones y puede realizar por lo tanto hasta ocho funciones normales de un mando a distancia ("Función 8- en-1"). Esto pueden ser los mandos a distancia de casi cualquier forma de mantenimiento electrónico a distancia (véase también la lista de código adjunta). -
Seite 5: Protección Ante La Fuga No Intencionada De La Batería
Protección ante la fuga no intencionada de la batería Si se presiona accidentalmente una tecla (por ejemplo, porque se ha puesto un objeto sobre el mando a distancia), el mando a distancia envía una señal infrarroja de 255 (correspondiente a aprox. 30 segundos) y se detiene la transmisión. - Seite 6 Vista general del aparato...
-
Seite 7: La Pantalla
La pantalla Generalidades Indicativos estándar en pantalla Pantalla básica – Hora En la pantalla básica aparece • en la primera fila del modo activo (tipo de aparato) • en la segunda fila, día de la semana y hora. Fecha Tras pulsar brevemente la tecla SETUP aparece: •... -
Seite 8: Navegar En El Menú
Navegar en el menú Para abrir el menú Configuración, mantenga pulsada la tecla SETUP hasta CODE SETUP que aparezca en pantalla la entrada con la adición „ “. CODE SETUP Cuando aparezca en pantalla , pulse de nuevo la tecla SETUP para que aparezcan los demás menús: CODE SETUP SYSTEM SETUP... -
Seite 9: Configuración De Hora Y Fecha
Configuración de hora y fecha La pantalla básica muestra en la fila inferior el día de la semana y la hora. Pulsando brevemente la tecla SETUP, aparece en la fila inferior durante unos 30 segundos la fecha. Ajuste de la hora 1. -
Seite 10: Configuración De La Fecha
Configuración de la fecha SYSTEM 1. Haga aparece como se describe en „Configuración de la hora“ la SETUP VOL/MUTE SETUP 2. Confirme con OK. Aparece la 3. Seleccione con la tecla de dirección (dos veces) la DATE SETUP y confirme con OK. 4. -
Seite 11: Reset - Configuración De Fábrica
RESET – Configuración de fábrica Con un Reset, fijará las configuraciones del aparato devolviéndolas a los valores establecidos en fábrica. Los códigos programados, las funciones de aprendizaje y los macros también serán borrados. 1. Mantenga pulsada la tecla SETUP durante aprox. tres CODE segundos, hasta que se encienda el indicativo SETUP. -
Seite 12: Programación Del Código Del Aparato
La tecla TV sólo puede ser utilizada con los códigos del aparato de TV. Su mando a distancia universal esté preprogramado con códigos propios de aparatos de la marca Medion y puede ser utilizado en sus funciones más importantes sin programación en algunos aparatos Medion. -
Seite 13: Clasificación En Grupos De Códigos
Clasificación en grupos de códigos Cada tipo de aparato está clasificad en un grupo de códigos de aparatos. Si selecciona un tipo de aparato, se buscará un código de aparatos en el grupo de código correspondiente. Los tipos de aparatos están organizados como sigue: Tipo de aparato Grupo de código VCR, LD, DVD, DVR, HDD, HTIB... -
Seite 14: Seleccionar El Código Del Aparato En La Pantalla
Seleccionar el código del aparato en la pantalla 1. Encienda el aparato que desea utilizar. 2. Mantenga pulsada la tecla SETUP durante aprox. tres segundos, CODE SETUP hasta que se encienda el indicativo LIST CODES 3. Pulse OK. Aparece el menú (hacer aparecer la lista de códigos). -
Seite 15: Introducir El Código Del Aparato Según La Lista De Códigos
Introducir el código del aparato según la lista de códigos Los códigos de los aparatos correspondientes se encuentran en la lista de códigos que se incluyen en este manual de utilización. 1. Encienda el aparato que desea utilizar. 2. Mantenga pulsada la tecla SETUP durante aprox. tres CODE segundos, hasta que se encienda el indicativo SETUP. -
Seite 16: Búsqueda De Código Por Nombre Comercial
7. Seleccione con las teclas de dirección el tipo de aparato que desea programa con esta tecla fuente. (Al seleccionar „TV“ no es posible elegir ningún tipo de aparato, porque en la tecla fuente TV sólo se pueden programas códigos de TV.) Preste atención a la lista y a la tabla en la página 13. -
Seite 17: Identificación Del Código
Fabricante?). 9. Pulse una tecla numérica para un fabricante deseado de acuerdo con lo siguiente: Tecla 1 = Medion, Tevion, Lifetec, Micromaxx, Microstar, Viden, TCM, General Technic, Innovation, Magnum Tecla 2 = Philips, Erres, Pye, Philco, Radiola Tecla 3 = Sony, Akai, Panasonic, Sharp, Toshiba, JVC, Daewoo... -
Seite 18: Funcionamiento Normal
Funcionamiento normal Utilización de un único aparato Tras haber realizado la programación de su mando a distancia para los aparatos de sonido e imagen, el mando a distancia funciona en las funciones principales comunes tal y como el mando a distancia original del correspondiente aparato. -
Seite 19: Epg - Programa Electrónico
EPG – Programa electrónico La tecla EPG („EPG“ = „Guía de programa electrónico“) tiene distintas funciones según las cuales se utiliza un código diferente: • En los códigos de TV y satélite (p.ej. en SAT-TV o DVB-T), la tecla inicia el programa de televisión electrónica. -
Seite 20: Función Apagar Todo
Función APAGAR TODO Puede apagar a la vez todos los aparatos preprogramados. Realice los pasos siguientes: 1. Pulse brevemente dos veces una tras otra la tecla ALL OFF y mantenga pulsada la tecla la segunda vez durante unos tres segundos. ALL OFF 2. -
Seite 21: Ajuste Del Temporizador
Ajuste del temporizador El mando a distancia universal dispone de dos funciones de Temporizador: • un temporizador de apagado para el televisor (apagado automático tras uno a 90 minutos); en la pantalla, aparece „Zzz“;: • cuatro temporizadores más para órdenes autodefinidas (p. -
Seite 22: Afinador De Órdenes
Afinador de órdenes Para utilizar este temporizador, debe ajustarse la hora. Con el afinador de órdenes, puede programar una función para que se active en un determinado momento en un plazo máximo de las próximas 24 horas. La cadena de órdenes puede estar compuesta de hasta cuatro órdenes, siendo la primera siempre la selección de una tecla fuente. -
Seite 23: Borrar El Afinado De Órdenes
TIMER 1 KEY2 11. Aparece el indicativo . Indique ahora la segunda orden. En nuestro ejemplo: Pulse la tecla de Grabación. Tras la TIMER 1 KEY3 segunda orden, aparece En nuestro ejemplo, pulse la tecla de Grabación una segunda vez. SUCCESS 12. -
Seite 24: Función De Aprendizaje
Función de aprendizaje Puede guardar manualmente funciones de un mando a distancia original en su mando a distancia universal. La orden será guardada en la tecla fuente en la que haya sido programado el mando a distancia original. El mando a distancia universal puede „memorizar“ hasta 150 órdenes. Recomendaciones sobre la función de memoria •... -
Seite 25: Programación De Órdenes
Programación de órdenes Para la programación, siga los pasos siguientes: 1. Coloque sobre una mesa ambos mandos a distancia con diodos infrarrojos uno junto a otro con una distancia de entre 15 y 50 mm. Los diodos infrarrojos deben estar uno junto a otro. 2. -
Seite 26: Borrar Órdenes
Borrar órdenes Borrar órdenes sólo para una tecla fuente Haga aparecer el modo Memoria como se describe en la sección anterior, pasos 2 a 4. Continúe como sigue: Seleccione con la tecla de dirección el modo Borrar (MODE CLEAR) y pulse OK. 2. -
Seite 27: Macros
Macros Con una macro puede guardar cadenas de órdenes, y aplicar varias funciones una tras otra. Puede programar tres macros y distribuirlas en las teclas numéricas 1, 2 y 3. Estas tres cifras numéricas tienen dibujos adicionales TV, VCR, DVD, para poder clasificar las macros como corresponde. -
Seite 28: Incorporación De Retrasos
Incorporación de retrasos Puede ser interesante incorporar un retraso en una orden para, por ejemplo, tener en cuenta un precalentamiento para el televisor. El retraso normal entre señales infrarrojos es de medio segundo. 1. Al introducir el paso (ver punto 7 arriba) pulse la tecla PAUSE en el punto en el que desea insertar el retraso. -
Seite 29: Funciones Universales („Punch Through")
Funciones universales („Punch Through”) Las funciones universales (también conocidas como funciones „Punch Through“) le permiten introducir determinadas funciones en otros tipos de aparatos. Se trata de las funciones volumen, silencio y reproducción. Funciones de reproducción Si el mando a distancia está en funcionamiento TV, SAT o cable (aparatos sin funciones de reproducción propias), las teclas PLAY, STOP, PAUSA, ADELANTO/RETRASO RÁPIDOS y GRABACIÓN controlan una grabadora de vídeo o reproductor de DVD conectados. -
Seite 30: Programar Las Funciones Universales Vol/Mute En Otro Tipo De Aparato
Programar las funciones universales VOL/MUTE en otro tipo de aparato Puede configurar el mando a distancia de tal modo que las funciones VOL/MUTE universales no se controlen en el televisor sino en otro tipo de aparato. Este aparato debe por supuesto disponer también de un regulador de volumen. -
Seite 31: Apagar La Función Universal Vol/Mute En Un Determinado Aparato
Apagar la función universal VOL/MUTE en un determinado aparato Puede configurar el mando a distancia universal de tal modo que sólo utilice en un determinado aparato determinadas funciones VOL/MUTE. La función „Punch-Through“ se apaga para ello. Para el modo TV, no debe apagar la función universal. En el caso de haber seleccionado, como se describe en el capítulo anterior, otro modo para la función universal VOL/MUTE, tampoco debe apagar para este modo la función universal. -
Seite 32: Hacer Reset En La Función Universal Vol/Mute Para Volver A Los Valores De Fábrica
Hacer RESET en la función universal VOL/MUTE para volver a los valores de fábrica VOL/MUTE En el caso de haber modificado las funciones universales como se describe en los dos apartados anteriores, puede volver a ponerlas en los valores de fábrica con la siguiente programación. 1. -
Seite 33: Resolución De Fallos
Resolución de fallos La pantalla permanece oscura: • Verifique si las pilas que lleva el mando a distancia están cargadas y correctamente colocados los polos +/-. • Si las baterías están muy bajas, sustitúyelas por otras nuevas. El mando a distancia no funciona: •... -
Seite 34: Eliminación
Eliminación Embalaje El mando a distancia universal está en un embalaje que lo protege de los daños de transporte. Los embalajes son reutilizables y pueden ser reutilizados o ser reciclados. Aparato No tire nunca el mando a distancia al final de su vida junto con el resto de la basura doméstica. - Seite 35 Índice Indicações de segurança ..............5 Generalidades ....................5 Indicações relativas à bateria ................. 5 Limpeza ......................5 Área de aplicação ................6 Colocação em funcionamento............6 Colocar baterias .................... 6 Configurações após a substituição das pilhas ..........6 Protecção contra a descarga involuntária das pilhas ........6 Vista geral do aparelho ..............
- Seite 36 Função de programação ..............27 Indicações relativas à função de programação ..........27 Programar comandos.................. 28 Eliminar comandos ..................29 Apagar ordens para apenas um botão de selecção ......... 29 Macros ..................... 30 Programar macros..................30 Introduzir retardamento ................. 31 Executar macros..................
-
Seite 37: Indicações De Segurança
Indicações de segurança Antes de colocar o telecomando em funcionamento, leia estas instruções. Guarde bem estas instruções para consultas posteriores ou uma eventual entrega a terceiros. Generalidades • Não tente reparar o telecomando de forma individual. • O telecomando universal é composto por díodos infravermelhos de laser da classe 1. -
Seite 38: Área De Aplicação
Área de aplicação Este telecomando universal possui mais de 8 botões de selecção e pode substituir 8 telecomandos normais ("função 8 em 1"). Estes podem ser telecomandos para qualquer tipo de sistemas electrónicos de entretenimento telecomandados (comp. Também a lista de códigos fornecida) . As designações nos botões de selecção “TV“, “VCR“, "DVD", "CD", "ASAT", "CBL", "AUX", "DSAT"... -
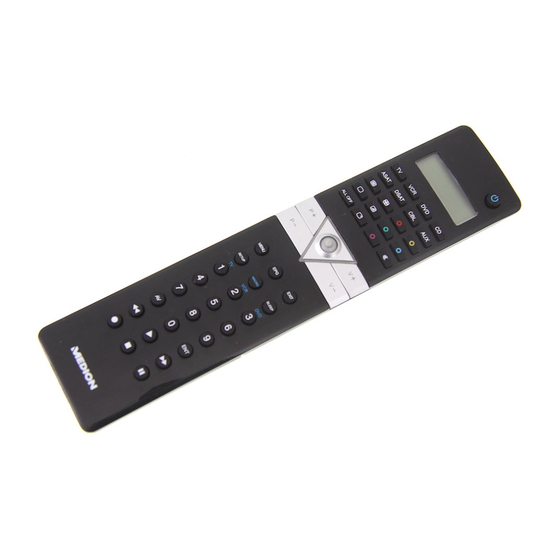
Seite 39: Vista Geral Do Aparelho
Vista geral do aparelho... - Seite 40 Vista geral do aparelho...
-
Seite 41: O Visor
O visor Vista geral Indicações padrão no visor Visor base – hora No visor base surge • na primeira linha o modo activo (tipo de aparelho) • na segunda linha o dia da semana e a hora. Data Após premir por breves momentos o botão SETUP surge: •... -
Seite 42: Navegar No Menu
Navegar no menu Para abrir o menu Setup, mantenha o botão SETUP premido até que CODE SETUP apareça no visor o registo com a adição " “. CODE SETUP prima o botão SETUP repetidamente para Se o visor indicar consultar os seguintes menus: CODE SETUP SYSTEM SETUP TIMER SETUP LEARN SETUP... -
Seite 43: Interromper Processo
Interromper processo Se desejar interromper um processo, aguarde aprox. 30 segundos. O menu Setup fecha-se automaticamente e surge por breves instantes a TIMEOUT indicação Configurar a data e a hora O visor base indica na linha inferior o dia da semana e a hora. Ao premir durante breves instantes o botão SETUP ocorre na linha inferior por aprox 30 segundos a data. -
Seite 44: Regular Data
Regular data SYSTEM SETUP 1. Consulte como descrito em "configurar hora“ o 2. Confirme com OK. Ocorre o VOL/MUTE SETUP 3. Seleccione com a seta de direcção (duas vezes) o DATE SETUP e confirme com OK. 4. O ano pisca. Seleccione com as setas de direcção o ano e confirme com OK. -
Seite 45: Iluminação De Fundo Verde
Iluminação de fundo verde Em cada activação do botão liga-se a iluminação de fundo do visor. No ajuste de fábrica a iluminação mantém se acesa durante 10 segundos. Pode desligar a iluminação de fundo ou prolongar para 60 segundos. Tenha em atenção, que a iluminação de fundo necessita de capacidade de pilhas adicional. -
Seite 46: Reset - Ajustes De Fábrica
O botão TV pode ser ocupado apenas com um código TV. O seu telecomando universal está pré-programado com alguns códigos de aparelhos da marca Medion e pode ser utilizado nas funções mais importantes sem programação num aparelho Medion. RESET – Ajustes de fábrica... -
Seite 47: Tipos De Aparelhos E Grupos De Códigos
Tipos de aparelhos e grupos de códigos Ao programar os códigos pode escolher entre os seguintes tipos de aparelhos: televisor, projector, plasma, LCD; VCR: gravador vídeo; Leitor de disco Laser; DVD: leitor DVD; DVR: gravador de vídeo digital; HDD: gravador de placa rígida ("Hard disc drive“) SAT: receptor de satélites (analógico, digital);... -
Seite 48: Atribuição Aos Grupos De Códigos
Atribuição aos grupos de códigos Cada tipo de aparelho está atribuído a um grupo de códigos do aparelho. Quando seleccionar um tipo de aparelho é procurado um código do aparelho no respectivo grupo de códigos. Os tipos de aparelhos devem ser atribuídos da seguinte forma: Tipo de aparelho Grupo de códigos... -
Seite 49: Seleccionar O Código Do Aparelho Através Do Visor
Seleccionar o código do aparelho através do visor 1. Ligue o aparelho a ser comandado. 2. Mantenha o botão SETUP premido durante 3 segundos até que ocorra a CODE SETUP indicação 3. Prima OK. Surge o menu LIST CODES (consultar a lista de códigos). -
Seite 50: Introduzir Código Do Aparelho De Acordo Com Lista De Códigos
Introduzir código do aparelho de acordo com lista de códigos Os códigos dos respectivos aparelhos podem ser consultados na lista de códigos, que se encontra incluída neste manual de instruções. 1. Ligue o aparelho a ser comandado. 2. Mantenha o botão SETUP premido durante 3 CODE SETUP segundos até... -
Seite 51: Localização De Código Pelo Nome Do Fabricante
Para isso tenho em atenção a lista e as tabelas na página 15. 8. Prima OK. Surge a indicação SEARCH KEY (busca – botão?). 9. Efectue agora o teste de funcionalidade, premindo várias vezes seguidas (ate 350 vezes) os botões P+, ou PLAY (apenas em gravadores de vídeo) até... -
Seite 52: Identificação Do Código
9. Prima um botão numérico para um fabricante desejado de acordo com a seguinte vista geral: Botão 1 = Medion, Tevion, Lifetec, Micromaxx, Microstar, Viden, TCM, General Technic, Innovation, Magnum Botão 2 = Philips, Erres, Pye, Philco, Radiola Botão 3 = Sony, Akai, Panasonic, Sharp, Toshiba, JVC, Daewoo Botão 4 = Thomson, Brandt... -
Seite 53: Funcionamento Normal
Funcionamento normal Comandar aparelhos individuais Depois de ter efectuado a programação do seu telecomando para os seus aparelhos de áudio/vídeo, o telecomando trabalha com as funções principais mais utilizadas no telecomando original do respectivo aparelho. Direccione o seu telecomando para o aparelho pretendido e pressione o respectivo botão de selecção. -
Seite 54: Programa Electrónico Epg
Programa electrónico EPG O botão EPG(“EPG” = “Electronic Program Guide”) tem diferentes funções dependendo do código em que é utilizada: • Em códigos para televisores e satélites (por ex. TV satélite ou DVB-T), o botão abre o canal de televisão electrónico. •... -
Seite 55: Função "Tudo Desligado
Função “Tudo desligado” Pode desligar todos os aparelhos pré-programados simultaneamente. Proceda da seguinte forma: 1. Volte a premir imediatamente o botão ALL OFF e mantenha-o premido durante 3 segundos. ALL OFF 2. Quando soltar o botão surge e os aparelhos desligam-se. -
Seite 56: Ajustar O Temporizador
Ajustar o temporizador O telecomando universal possui duas funções temporizador: • Um temporizador sleep para o aparelho televisivo (desconexão automática após 1 a 90 minutos); no visor surge "Zzz“;: • Mais quatro temporizadores para comandos auto- definidos (p.ex. a comutação para outro programa); no visor surge o símbolo do sino. -
Seite 57: Temporizador De Comando
Temporizador de comando Para este temporizador tem de estar configurada a hora. Com o temporizador de comando pode programar uma função, que é executada automaticamente numa determinada altura nas próximas 24 horas. A cadeia de comandos pode ter até quatro comandos, tendo de ser o primeiro comando sempre a selecção de um botão de selecção. -
Seite 58: Apagar O Temporizador De Comando
TIMER 1 KEY2 11. Surge a indicação . Introduza o segundo comando. No nosso exemplo: Prima o botão gravação. Após o TIMER 1 KEY3 segundo comando ocorre No nosso exemplo prima o botão gravação uma segunda vez. 12. Após o terceiro comando surge a mensagem de SUCCESS confirmação com o símbolo do sino. -
Seite 59: Função De Programação
Função de programação Podem memorizar manualmente funções do telecomando original no telecomando universal. Os comandos são gravados sob um botão de selecção, na qual o aparelho do telecomando original foi programado. O telecomando universal pode “aprender” até 150 ordens. Indicações relativas à função de programação •... -
Seite 60: Programar Comandos
Programar comandos Para a programação prossiga do seguinte modo: 1. Direccione os díodos de infravermelhos dos dois telecomandos um para o outro a uma distância entre os 15 e 50 mm sobre a mesa. Os díodos de infravermelhos devem estar direccionados exactamente uns para os outros. 2. -
Seite 61: Eliminar Comandos
Eliminar comandos Apagar ordens para apenas um botão de selecção Consulte o modo de programação, como descrito no capítulo anterior, passo 2 a 4. Proceda da seguinte forma: 1. Seleccione com as seta de direcção o modo de MODE CLEAR ) e prima OK. -
Seite 62: Macros
Macros Com uma macro é possível memorizar cadeias de ordens, ou seja, permitir a execução sequencial de várias funções. Pode programar três macros e colocá-las nos botões numéricos 1, 2 e 3. Estes três botões numéricos possuem a designação adicional TV, VCR, DVD de forma a poder atribuir correctamente os macros. -
Seite 63: Introduzir Retardamento
Introduzir retardamento Pode justificar-se um retardamento temporal no passo de uma ordem para, p. ex., ter em consideração a fase de aquecimento do televisor. O retardamento padrão entre os sinais infravermelhos é de meia hora. 1. Ao introduzir os passos (ver ponto 7 acima), pressione a tecla PAUSE no local onde o retardamento deve ser DELAY TIME? introduzido. -
Seite 64: Funções Universais ("Punch Through")
Funções universais (“Punch Through”) As funções universais (também designadas funções “Punch Through”) permitem-lhe executar determinadas funções noutro tipo de aparelho do que as configuradas. Estas funções são o volume, o modo silencioso assim como as funções de reprodução. Funções de reprodução Quando o telecomando está... -
Seite 65: Programar Funções Universais Vol/Mute Em Outro Tipo De Aparelho
Programar funções universais VOL/MUTE em outro tipo de aparelho Pode configurar o telecomando de forma a que as funções universais VOL/MUTE não comandem o televisor mas sim um outro tipo de aparelho. Este aparelho deve possuir naturalmente um regulador de volume. 1. -
Seite 66: Desconectar Função Universal Vol/Mute Para Um Determinado Aparelho
Desconectar função universal VOL/MUTE para um determinado aparelho Pode ajustar o comando universal de modo a que este utilize as suas próprias funções VOL/MUTE num determinado aparelho. A função "Punch-Through“ está desligada neste aparelho. Para o modo TV não pode desligar a função universal. Se seleccionou um outro modo para a função universal VOL/MUTE como descrito no capítulo anterior também não pode desconectar a função universal neste modo. -
Seite 67: Repor A Função Universal Vol/Mute Para O Ajuste De Fábrica
Repor a função universal VOL/MUTE para o ajuste de fábrica Se tiver alterado as funções universais de volume e modo silencioso tal como descrito nos dois capítulos anteriores, poderá repor novamente as funções para o ajuste de fábrica com a seguinte programação. 1. -
Seite 68: Reparação De Avarias
Reparação de avarias O aparelho permanece escuro • Verifique se as pilhas do telecomando estão colocadas correctamente e se a polaridade +/– corresponde. • Se as pilhas estiverem demasiado fracas, substitua-as por novas. O telecomando não funciona: • Verifique se os seus aparelhos estão conectados e ligados correctamente. São apresentados vários códigos de aparelhos para a marca do meu aparelho. -
Seite 69: Eliminação
Eliminação Embalagem O seu telecomando universal encontra-se numa embalagem para ficar protegido de danos de transporte. As embalagens são de materiais reutilizáveis ou podem ser entregues na reciclagem de matéria-prima. Aparelho Nunca coloque o telecomando universal no lixo doméstico no final da sua vida útil. - Seite 70 Dados técnicos...
- Seite 71 Contents Safety instructions ..................3 General information ..................3 Battery instructions ..................3 Cleaning ......................3 Product description..................4 Operation ....................4 Inserting batteries ..................4 Settings after battery replacement..............4 Protection against unexpected battery discharging ........4 Overview ..................... 5 Overview .......................
- Seite 72 Operating combined devices ............... 19 Combined devices with two device codes ..........19 Combined devices with one device code ..........19 ALL OFF function..................20 Set timer....................21 TV sleep-timer ....................21 Set sleep-timer..................21 Switch off sleep-timer ................21 Command timer...................
-
Seite 73: Safety Instructions
Safety instructions Please read these instructions carefully before operating the remote control. Keep the instructions in a safe place for future reference or in case you need to pass them on to someone else. General information • Do not attempt to repair the remote control yourself. •... -
Seite 74: Product Description
Product description This universal remote control has eight mode keys and therefore can replace up to eight normal remote controls ("8 in 1 function“). These may be remote controls for practically every type of remote-controlled consumer electronics (see the supplied code list). The labels "TV"... -
Seite 75: Overview
Overview... -
Seite 77: Default Readouts In The Display
The display Overview Default readouts in the display Standard display – time In the standard display: • the active mode appears in the first column (device type). • the day of the week and time appears in the second column. Date Press the SETUP key briefly to show:... -
Seite 78: Navigating The Menus
Navigating the menus CODE SETUP To open the Setup menu, press and hold the SETUP key until appears along with the " " symbol in the display. CODE SETUP If the display shows continue to press the SETUP key to access the other menus: CODE SETUP SYSTEM SETUP... -
Seite 79: Setting Time And Date
Setting time and date In the standard display, the day and time appear in the lower column. Press the SETUP key briefly to show the date in the lower column for approx. 30 seconds. Setting clock time Keep the Setup key pressed down for approx. 3 CODE SETUP seconds, until appears. -
Seite 80: Setting The Date
Setting the date SYSTEM SETUP Open as described in "Setting clock time". VOL/MUTE SETUP Confirm with OK. The displayed. DATE SETUP Use the arrows to select (press twice) and confirm with OK. The year flashes. Use the arrows to select the year and confirm by pressing OK. -
Seite 81: Reset - Factory Settings
RESET – factory settings Use Reset to restore all device settings to the factory settings. Codes that have been programmed in, learn functions and macros are therefore deleted. Keep the SETUP key pressed down for approx. 3 CODE SETUP seconds, until appears. -
Seite 82: Programming Device Codes
Programming device codes For every device that you would like to operate using the universal remote control, you must program a four-digit device code to a mode key (TV, VCR, DVD, CD, ASAT, CBL, AUX, DSAT). The names on the keys are only for reminder purposes. -
Seite 83: Assigment To Code Groups
Assigment to code groups Each type of device is assigned to a group of device codes. When you select a device type, the appropriate code group is searched to find a device code. Device types are assigned as follows: Device type Code group VCR, LD, DVD, DVR, HDD, HTIB VCR/DVD... -
Seite 84: Select Device Code In The Display
Select device code in the display Switch on the device to be controlled. Keep the SETUP key pressed down for approx. 3 CODE SETUP seconds, until appears. LIST CODES Press OK. The menu is displayed. MODE KEY Press OK. The display appears. -
Seite 85: Entering The Device Code According To The Code List
Entering the device code according to the code list The codes of the corresponding devices can be found in the code list enclosed with these operating instructions. Switch on the device to be controlled. Keep the SETUP key pressed down for approx. 3 CODE SETUP seconds, until appears. -
Seite 86: Code Searching By Brand Name
be programmed on this mode key. (If you select " " it is not possible to select a device type because only TV codes can be programmed on the TV mode key.) Please refer to the list and table on page 13. SEARCH KEY Press OK. -
Seite 87: Code Identification
Press a number key for a required manufacturer according to the following overview: Key 1 = Medion, Tevion, Lifetec, Micromaxx, Microstar, Viden, TCM, General Technic, Innovation, Magnum Key 2 = Philips, Erres, Pye, Philco, Radiola Key 3 = Sony, Akai, Panasonic, Sharp, Toshiba, JVC, Daewoo... -
Seite 88: Normal Operation
Normal operation Operating individual devices After you have finished programming your remote control for your audio/video devices, the remote control will work in the common main functions just like the original remote control for the respective device. Point your remote control at the desired device and press the relevant mode key. -
Seite 89: Epg - Electronic Programme Guide
EPG – Electronic Programme Guide The EPG ("Electronic Programme Guide") key has various functions depending on which code has been used: • For TV and satellite codes (e.g. SAT-TV or DVB-T), the button opens the electronic programme guide. • For DVD codes the button opens the title menu. •... -
Seite 90: All Off Function
ALL OFF function You can switch off all pre-programmed devices at the same time. This is done as follows: Press the ALL OFF key twice in rapid succession and keep it pressed down after the second time for approx. 3 seconds. -
Seite 91: Set Timer
Set timer The universal remote control has two timer functions: • a sleep-timer for the TV (automatic switch off after 1 to 90 minutes); "Zzz" appears in the display: • four additional times for customisable commands (e.g. switching to another programme); the bell symbol appears in the display. -
Seite 92: Command Timer
Command timer The clock must be set for this timer. You can use the command timer to program a function that is to run automatically at a particular time within the next 24 hours. The command series can contain up to four commands, the first command must always be the selection of a mode key. -
Seite 93: Delete Command Timer
In our example: Press the Record key. TIMER 1 KEY3 display appears after the second command. In our example, press the Record key again. SUCCESS 12. The confirmation message appears along with the bell symbol after the third command. 13. Lay the universal remote control down so that it is pointing towards the device and is not obstructed. -
Seite 94: Learn Function
Learn function You can manually save the functions of an original remote control to your universal remote control. Commands are saved to the mode key on which the device of the original remote control was programmed. The universal remote control can “learn” up to 150 commands. Notes on learn function •... -
Seite 95: Program Commands
Program commands To programme, proceed as follows: Place the remote controls with the infrared diodes facing each other spaced 15 to 50 mm apart on the table. The infrared diodes must be pointing directly at each other. Keep the SETUP key pressed for approx. 3 CODE SETUP seconds until appears. -
Seite 96: Delete Commands
Delete commands Deleting commands for only one mode key Open the learn mode as described in the previous section, steps 2 to 4. Proceed as follows: Use the arrows to select the delete mode and press OK. Now select the mode key whose commands are to be deleted. -
Seite 97: Macros
Macros Using a macro, you can save a chain of commands, meaning that several functions can be executed consecutively. You can program three macros and store them on the number keys 1, 2 and 3. These three number keys have the additional labels TV, VCR, DVD, so that you can assign macros accordingly. -
Seite 98: Incorporating Delays
Incorporating delays It can be useful to incorporate a time delay before a command step in order to take the warm-up phase of the TV set into consideration, for example. The standard delay between the infrared signals is equal to half a second. -
Seite 99: Universal Functions ("Punch Through")
Universal functions (“Punch Through”) The universal functions (also called “Punch Through” functions) enable you to carry out certain functions on a different device type than the programmed one. These are the volume, mute and playback functions. Playback functions If the remote control is in TV, SAT or cable mode (devices without playback function), the PLAY, STOP, PAUSE, FAST FORWARD/BACK, and in some cases RECORD keys will control a connected video recorder, DVD player or video recorder. -
Seite 100: Programming The Vol/Mute Universal Functions To Another Device Type
Programming the VOL/MUTE universal functions to another device type You can program the remote control so that the universal functions VOL/MUTEwill control a device type other than the TV set. Of course this device must have a volume control. Keep the SETUP key pressed down for approx. CODE SETUP 3 seconds, until appears. -
Seite 101: Switching Off The Vol/Mute Universal Function For A Specific Device
Switching off the VOL/MUTE universal function for a specific device You can program the universal remote control in such a way that it will use only that particular device’s own VOL/MUTE functions. The "Punch Through" function for this device is therefore switched off. The universal function cannot be switched off for the TV mode. -
Seite 102: Restoring The Vol/Mute Universal Function Factory Settings
Restoring the VOL/MUTE universal function factory settings If you have changed the universal VOL/MUTE functions as described in the previous two sections, you can reset the functions to the factory settings. Keep the SETUP key pressed down for approx. 3 CODE SETUP seconds, until appears. -
Seite 103: Error Recovery
Error recovery The display remains dark: • Check whether the remote control batteries have been correctly inserted and have matching +/– polarity. • If the batteries are too weak then replace them with new ones. The remote control does not work: •... -
Seite 104: Disposal
Disposal Packaging Your universal remote control is wrapped in packaging to protect it against transportation damage. Packaging is raw material and can be reused or added to the recycling system. Device At the end of its life, the universal remote control should not be disposed of in household rubbish. - Seite 105 Inhaltsverzeichnis Sicherheitshinweise................3 Allgemeines ....................3 Batteriehinweise.................... 3 Reinigung ..................... 3 Anwendungsumfang ................. 4 Inbetriebnahme ................4 Batterien einsetzen..................4 Einstellungen nach Batteriewechsel .............. 4 Schutz vor unabsichtlicher Batterieentleerung ..........4 Geräteübersicht................. 5 Das Display ..................7 Übersicht ...................... 7 Standardanzeigen im Display................
- Seite 106 Timer einstellen................21 Sleeptimer TV....................21 Sleeptimer einstellen ................21 Sleeptimer ausstellen ................21 Befehlstimer ....................22 Befehlstimer programmieren..............22 Befehlstimer löschen ................23 Lernfunktion ................... 24 Hinweise zur Lernfunktion ................24 Befehle programmieren ................25 Befehle löschen ................... 26 Befehle für nur eine Quellentaste löschen..........
-
Seite 107: Sicherheitshinweise
Sicherheitshinweise Bevor Sie die Fernbedienung in Betrieb nehmen, lesen Sie bitte diese Anleitung ausführlich durch. Bewahren Sie die Anleitung zum Nachschlagen oder zur evtl. Weitergabe an Dritte gut auf. Allgemeines • Versuchen Sie nicht, die Fernbedienung selbst zu reparieren. • Die Universal-Fernbedienung besitzt eine Infrarot-Diode der Laserklasse 1. -
Seite 108: Anwendungsumfang
Anwendungsumfang Diese Universal-Fernbedienung verfügt über acht Quellentasten und kann dadurch bis zu acht normale Fernbedienungen ersetzen („8-in-1-Funktion“). Dies können Fernbedienungen für praktisch jede Art von ferngesteuerter Unterhaltungselektronik sein (vgl. auch die mitgelieferte Code-Liste) . Die Bezeichnungen „TV“, „VCR“, „DVD“, „CD“, „ASAT“, „CBL“, „AUX“, „DSAT“ auf den Quellentasten dienen der Übersichtlichkeit. -
Seite 109: Geräteübersicht
Geräteübersicht... - Seite 110 Geräteübersicht...
-
Seite 111: Das Display
Das Display Übersicht Standardanzeigen im Display Grunddisplay – Uhrzeit Im Grunddisplay erscheint: • in der ersten Zeile der aktive Modus (Gerätetyp) • in der zweiten Zeile Wochentag und Uhrzeit. Datum Nach kurzem Drücken der SETUP-Taste erscheint: • in der ersten Zeile für die aktivierte SHIFT- Funktion (S);... -
Seite 112: In Den Menüs Navigieren
In den Menüs navigieren Um das Setup-Menü zu öffnen, halten Sie die SETUP-Taste gedrückt, bis im CODE SETUP Display der Eintrag mit dem Zusatz „ “ erscheint. CODE SETUP Wenn das Display zeigt, drücken Sie die SETUP-Taste wiederholt, um die weiteren Menüs aufzurufen: CODE SETUP SYSTEM SETUP TIMER SETUP... -
Seite 113: Uhrzeit Und Datum Einstellen
Uhrzeit und Datum einstellen Das Grunddisplay zeigt in der unteren Zeile Wochentag und Uhrzeit. Durch kurzes Drücken der SETUP-Taste erscheint in der unteren Zeile für ca. 30 Sekunden das Datum. Uhrzeit einstellen 1. Halten Sie die SETUP-Taste für ca. 3 Sekunden CODE SETUP gedrückt, bis die Anzeige erscheint. -
Seite 114: Hintergrundbeleuchtung
DATE 6. Der Tag („ “) blinkt. Wählen Sie mit den Pfeilrichtungen den Tag und bestätigen Sie mit 7. Der Wochentag („ “) blinkt. Wählen Sie mit den Pfeilrichtungen den Wochentag und bestätigen Sie mit OK. SUCCESS CODE 8. Die Quittierungsmeldung erscheint;... -
Seite 115: Reset - Werkseinstellungen
RESET – Werkseinstellungen Mit einem Reset setzen Sie alle Einstellungen des Geräts auf die Werksein- stellungen zurück. Einprogrammierte Codes, Lernfunktionen, Makros werden also gelöscht. 1. Halten Sie die SETUP-Taste für ca. 3 Sekunden CODE SETUP gedrückt, bis die Anzeige erscheint. 2. -
Seite 116: Gerätecodes Programmieren
Sie jede Taste mit jedem Gerät belegen („Flex-Mode“). Die Quellentaste TV kann nur mit TV-Gerätecodes belegt werden. Ihre Universal-Fernbedienung ist mit einigen Codes von Geräten der Marke Medion vorprogrammiert und kann in den wichtigsten Funktionen ohne Programmierung auf einige Medion-Geräte angewendet werden. Gerätetypen und Codegruppen Beim Einprogrammieren der Codes können Sie zwischen folgenden... -
Seite 117: Zuordnung Zu Codegruppen
Zuordnung zu Codegruppen Jeder Gerätetyp ist einer Gruppe von Gerätecodes zugeordnet. Wenn Sie einen Gerätetyp auswählen, wird ein Gerätecode in der passenden Codegruppe gesucht. Die Gerätetypen sind folgendermaßen zugeordnet: Gerätetyp Codegruppe VCR, LD, DVD, DVR, HDD, HTIB VCR/DVD SAT, CABLE, DVB-T, STB, CBL/SAT AUDIO, AMP, RECR, MP3, CD, TAPE, TUNER, CD/AUDIO... -
Seite 118: Gerätecode Über Das Display Auswählen
Gerätecode über das Display auswählen 1. Schalten Sie das zu steuernde Gerät ein. 2. Halten Sie die SETUP-Taste für ca. 3 Sek. gedrückt, CODE SETUP bis die Anzeige erscheint. LIST CODES 3. Drücken Sie OK. Es erscheint das Menü (Codeliste aufrufen). MODE KEY 4. -
Seite 119: Gerätecode Nach Code-Liste Eingeben
Gerätecode nach Code-Liste eingeben Die Codes der entsprechenden Geräte sind der Code-Liste, die dieser Bedienungsanleitung beiliegt, zu entnehmen. 1. Schalten Sie das zu steuernde Gerät ein. 2. Halten Sie die SETUP-Taste für ca. 3 Sekunden CODE SETUP gedrückt, bis die Anzeige erscheint. -
Seite 120: Codesuche Nach Handelsname
7. Wählen Sie mit den Pfeilrichtungen den Gerätetyp aus, der auf diese Quellentaste programmiert werden soll. (Bei der Auswahl „TV“ ist keine Auswahl eines Gerätetyps möglich, weil auf die Quellentaste TV nur TV- Codes programmiert werden können.) Beachten Sie hierzu die Liste und die Tabelle auf Seite 13. SEARCH KEY 8. -
Seite 121: Code-Identifizierung
(Hersteller – Taste?). 9. Drücken Sie eine Zifferntaste für einen gewünschten Hersteller gemäß folgender Übersicht: Taste 1 = Medion, Tevion, Lifetec, Micromaxx, Microstar, Viden, TCM, General Technic, Innovation, Magnum Taste 2 = Philips, Erres, Pye, Philco, Radiola Taste 3 = Sony, Akai, Panasonic, Sharp, Toshiba, JVC, Daewoo... -
Seite 122: Normaler Betrieb
Normaler Betrieb Einzelgeräte bedienen Nachdem Sie die Programmierung Ihrer Fernbedienung für Ihre Audio/Video- Geräte vorgenommen haben, arbeitet die Fernbedienung in den gebräuchlichsten Hauptfunktionen wie die Original-Fernbedienung des jeweiligen Gerätes. Richten Sie Ihre Fernbedienung auf das gewünschte Gerät und drücken Sie die entsprechende Quellentaste. Die Bezeichnung der Quellentaste und der einprogrammierte Code erscheinen im Display. -
Seite 123: Epg - Electronisches Programm
EPG – Electronisches Programm Die Taste EPG („EPG“ = „Electronic Program Guide“) hat verschiedene Funktionen, je nachdem, auf welchen Code sie angewendet wird: • Bei TV- und Satellitencodes (z. B. SAT-TV oder DVB-T) öffnet die Taste das elektronische Fernsehprogramm. • Bei DVD-Codes öffnet die Taste das Titel-Menü. -
Seite 124: Alles-Aus-Funktion
Alles-Aus-Funktion Sie können alle vorprogrammierten Geräte gleichzeitig ausschalten. Gehen Sie wie folgt vor: 1. Drücken zweimal kurz hintereinander die ALL OFF Taste und halten Sie die Taste beim zweiten Tastendruck für ca. 3 Sekunden gedrückt. ALL OFF 2. Wenn Sie die Taste loslassen, erscheint die Geräte schalten sich aus. -
Seite 125: Timer Einstellen
Timer einstellen Die Universal-Fernbedienung verfügt über zwei Timer-Funktionen: • einen Sleeptimer für das TV-Gerät (automatische Ausschaltung nach 1 bis 90 Minuten); im Display erscheint „Zzz“;: • vier weitere Timer für selbstdefinierte Befehle (z. B. die Umschaltung auf ein anderes Programm); im Display erscheint das Glockensymbol. -
Seite 126: Befehlstimer
Befehlstimer Für diesen Timer muss die Uhrzeit eingestellt sein. Mit dem Befehlstimer können Sie eine Funktion programmieren, die zu einem bestimmten Zeitpunkt innerhalb der nächsten 24 Stunden automatisch ausgeführt wird. Die Befehlskette kann aus bis zu vier Befehlen bestehen, wobei der erste Befehl immer die Wahl einer Quellentaste sein muss. -
Seite 127: Befehlstimer Löschen
TIMER 1 KEY2 11. Es erscheint die Anzeige . Geben Sie den zweiten Befehl ein. In unserem Beispiel: Drücken Sie die Aufnahme-Taste. TIMER 1 KEY3 Nach dem zweiten Befehl erscheint In unserem Beispiel drücken Sie die Aufnahme-Taste ein zweites Mal. 12. -
Seite 128: Lernfunktion
Lernfunktion Sie können Funktionen einer Original-Fernbedienung manuell in Ihre Universal- Fernbedienung einspeichern. Die Befehle werden jeweils unter der Quellentaste gespeichert, auf die das Gerät der Original-Fernbedienung programmiert wurde. Die Universal-Fernbedienung kann bis zu 150 Befehle „lernen“. Hinweise zur Lernfunktion • Benutzen Sie für beide Fernbedienungen neue Batterien. -
Seite 129: Befehle Programmieren
Befehle programmieren Zur Programmierung gehen Sie wie folgt vor: 1. Legen Sie die beiden Fernbedienungen mit den Infra-Rot-Dioden zueinander in einem Abstand zwischen 15 und 50 mm auf den Tisch. Die Infratotdioden müssen genau aufeinander gerichtet sein. 2. Halten Sie die SETUP-Taste für ca. 3 Sekunden CODE SETUP gedrückt, bis die Anzeige erscheint. -
Seite 130: Befehle Löschen
Befehle löschen Befehle für nur eine Quellentaste löschen Rufen Sie den Lernen-Modus auf, wie im vorigen Abschnitt, Schritt 2. bis 4. beschrieben. Fahren Sie folgendermaßen fort: 1. Wählen Sie mit der Pfeilrichtung den Löschen- MODE CLEAR Modus ( ) und drücken Sie OK. 2. -
Seite 131: Makros
Makros Mit einem Makro können Sie eine Befehlskette speichern, also mehrere Funktionen hintereinander ausführen lassen. Sie können drei Makros programmieren und auf den Zifferntasten 1, 2 und 3 ablegen. Diese drei Zifferntasten haben die zusätzlichen Bezeichnungen TV, VCR, DVD, so dass Sie Makros entsprechend zuordnen können. -
Seite 132: Verzögerung Einbauen
Verzögerung einbauen Es kann sinnvoll sein, eine Zeitverzögerung vor einen Befehlsschritt einzubauen, um z. B. eine Aufwärmphase für das TV-Gerät zu berücksichtigen. Die standardmäßige Verzögerung zwischen den Infrarot-Signalen beträgt eine halbe Sekunde. 1. Drücken Sie beim Eingeben der Schritte (siehe Punkt 7. oben) an der Stelle, wo die Zeitverzögerung eingebaut werden soll, die PAUSE-Taste. -
Seite 133: Universalfunktionen („Punch Through")
Universalfunktionen („Punch Through”) Die Universal-Funktionen (auch „Punch Through“-Funktionen genannt) ermöglichen Ihnen, bestimmte Funktionen an einem anderen Gerätetyp als dem eingestellten auszuführen. Dies sind die Funktionen Lautstärke, Stummschal- tung sowie die Wiedergabefunktionen. Wiedergabefunktionen Wenn die Fernbedienung im TV-, SAT- oder Kabel-Betrieb ist (Geräte ohne eigene Abspielfunktion), steuern die Tasten PLAY, STOP, PAUSE, SCHNELL VOR/ZURÜCK und ggf. -
Seite 134: Universalfunktionen Vol/Mute Auf Einen Anderen Gerätetyp Programmieren
Universalfunktionen VOL/MUTE auf einen anderen Gerätetyp programmieren Gerätetyp programmieren Sie können die Fernbedienung so einstellen, dass die VOL/MUTE Universalfunktionen nicht das TV-Gerät, sondern einen anderen Gerätetyp ansteuert. Dieses Gerät muss natürlich über eine Lautstärkeregelung verfügen. 1. Halten Sie die SETUP-Taste für ca. 3 Sekunden CODE SETUP gedrückt, bis die Anzeige erscheint. -
Seite 135: Universalfunktion Vol/Mute Für Ein Bestimmtes Gerät Ausschalten
Universalfunktion VOL/MUTE für ein bestimmtes Gerät ausschalten Sie können die Universal-Fernbedienung so einstellen, dass sie auf ein bestimmtes Gerät nur dessen eigene VOL/MUTE-Funktionen anwendet. Die „Punch-Through“-Funktion ist damit für dieses Geräte ausgeschaltet. Für den TV-Modus können Sie die Universalfunktion nicht ausschalten. Falls Sie wie im vorherigen Kapitel beschrieben einen anderen Modus für die Universalfunktion VOL/MUTE ausgewählt haben, können Sie auch für diesen Modus die Universalfunktion nicht... -
Seite 136: Universalfunktion Vol/Mute Auf Die Werkseinstellung Zurückstellen
Universalfunktion VOL/MUTE auf die Werkseinstellung zurückstellen VOL/MUTE Falls Sie die Universalfunktionen wie in den vorangehenden zwei Abschnitte beschrieben verändert haben, können Sie diese durch die folgende Programmierung wieder auf die Werkseinstellung zurückstellen. 1. Halten Sie die SETUP-Taste für ca. 3 Sekunden CODE SETUP gedrückt, bis die Anzeige erscheint. -
Seite 137: Fehlerbehebung
Fehlerbehebung Das Display bleibt dunkel: • Überprüfen Sie, ob die Batterien der Fernbedienung korrekt eingelegt sind und die Polung + /– übereinstimmt. • Falls die Batterien zu schwach sind, tauschen Sie diese durch neue aus. Die Fernbedienung funktioniert nicht: • Überprüfen Sie, ob Ihre Geräte korrekt angeschlossen und eingeschaltet sind. -
Seite 138: Entsorgung
Entsorgung Verpackung Ihre Universal-Fernbedienung befindet sich zum Schutz vor Transportschäden in einer Verpackung. Verpackungen sind Rohstoffe und somit wiederverwendungsfähig oder können dem Rohstoffkreislauf zurückgeführt werden. Gerät Werfen Sie die Universal-Fernbedienung am Ende ihrer Lebenszeit keinesfalls in den normalen Hausmüll. Erkundigen Sie sich in Ihrer Stadt- oder Gemeindeverwaltung nach Möglichkeiten einer umwelt- und sachgerechten Entsorgung.