Sun STC 5325 Betriebsanleitung
Elektropneumatische reifenmontiermaschine

Verwandte Anleitungen für Sun STC 5325

Inhaltszusammenfassung für Sun STC 5325
- Seite 1 PNEUMATIC ELECTRIC TIRE CHANGER •OPERATOR’S MANUAL DÉMONTE-PNEUS ÉLECTRO-PNEUMATIQUE •NOTICE D’ UTILISATION ELEKTROPNEUMATISCHE REIFENMONTIERMASCHINE •BETRIEBSANLEITUNG STC 5325...
- Seite 2 DEU-Betriebsleiter ALB-Drejtori Operativ BUL-£(•&!•#••" )#&•%••& CES-Výkonný «editel HRV-Operativni direktor DAN-Driftsleder EST-Tegevdirektor FIN-Operatiivinen johtaja ELL-´M7Z37Q_876[?J ¿73\]\5KÀJ ISL-Starfandi framkvæmdarstjóri LAV-Operatxvais direktors STC 5325 LIT-Operacij| vadovas }~D-£(•&!•#••" )#&•%••& }ON-Operativni direktor NLD-Operationeel directeur POL-Dyrektor Operatywny RU}-Director Operator SLO-Výkonný riaditeº SLV-Operativni vodja SˆE-Driftledare TUR-‰letme }üdürü HUN-Operatív Igazgató...
- Seite 3 NOTE SULLA DOCUMENTAZIONE NOTES REGARDING DOCUMENTATION - ITA - ENG NOTAS SOBRE A DOCUMENTAÇÃO NOTES SUR LA DOCUMENTATION - POR - FRA NOTAS SOBRE LA DOCUMENTACIÓN ANMERKUNGEN ZUR DOKUMENTATION - SPA - DEU Original language edition in: ITALIAN :Product aid publication Langue d’origine de la publication: ITALIEN TIRE CHANGER Originalausgabe in: ITALIENISCH...
-
Seite 4: Accessories
Contents Page UPDATING REPORTS 1. General .............iv Revision A of May 2016 2. Installation and connection ......12 3. Bead breaking ..........18 First document issue PCN: 16G0151 4. Clamping wheels ..........20 5. Adjusting the mounting/demounting tool ..22 6. -
Seite 5: Inhaltsverzeichnis
Table des matières Page Inhalt Seite 1. Généralités ............5 1. Allgemeines ............5 2. Installation et raccordement ......13 2. Aufstellen und Anschließen .......13 3. Décollage d’un pneu .........19 3. Abdrücken eines Reifens ........19 4. Serrage des roues ..........19 4. Aufspannen der Räder ........19 5. -
Seite 6: General Safety Rules
1.3 General safety rules Only properly trained and authorized personnel shall be allowed to operate the tyre changer. Unauthorized changes and modifi cations to the machine relieve the manufacturer from any liability for damages and injuries that might result therefrom and cancel the EC Declaration given. -
Seite 7: Consignes De Sécurité Générales
Consignes de sécurité générales 1.3 1.3 Allgemeine Sicherheitshinweise Reifenmontiermaschinen dürfen nur von befugtem und L’emploi de l’appareil est consenti exclusivement au angemessen ausgebildetem Fachpersonal betrieben .personnel expressément formé et autorisé werden. Toute modification ou variation de l’appareil sans Jede Art von Umbauten und/oder Veränderungen l’autorisation préalable du constructeur soulève ce dernier an der Maschine, die nicht vorher vom Hersteller de toute responsabilité... -
Seite 8: Description Of Operation
Description of operation Clamping of the rim, tilting of the machine post and locking of the mounting head in its working position are effected pneumatically. The four-jaw chuck is driven by means of an electric motor via V-belt and worm gear. PRO speed operation: Maximum speed for a given stall torque. -
Seite 9: Description Du Fonctionnement
Description du fonctionnement Funktionsbeschreibung Le serrage de la jante, le basculement du montant de Die Felgenspannung, die Kippbewegung der la machine et le blocage de la tête de montage dans sa Montiersäule sowie die Arretierung des Montierkopfes position de travail se font par actionnement pneumatique. in seiner Arbeitsposition erfolgen pneumatisch. -
Seite 10: Machine Elements
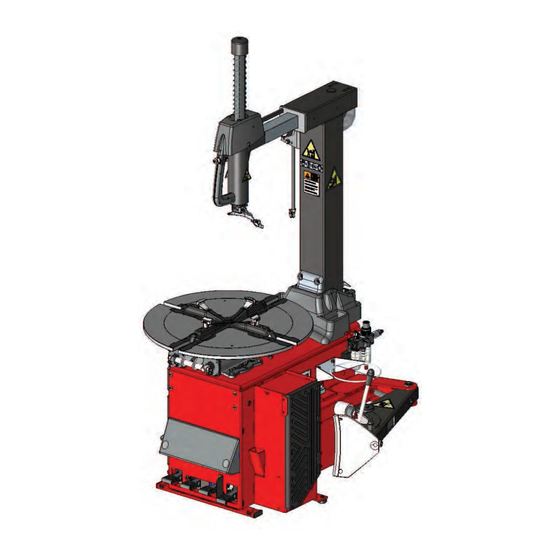
Machine Elements Fig. 1 Global view of the machine 1 Mounting head, vertically adjustable. 2 Lever with push-button (magnifi ed view) to lock mounting head in its position relative to the rim. 3 Mounting arm, horizontally displaceable. 4 Gauge. 5 Machine post, tiltable pneumatically. 6 Tyre lubricant support. -
Seite 11: Eléments De La Machine
Eléments de la machine Maschinenelemente Fig. 1 Vue de la machine et des éléments Abb. 1 Maschinenübersicht mit Funktionselementen fonctionnels Tête de montage, réglable en hauteur. 1 Montierkopf, höhenverstellbar. 2 Levier avec bouton-poussoir (vue agrandie) pour 2 Führungsgriff mit Drucktaster (vergrößerte bloquerla tête de montage dans sa position de travail. -
Seite 12: Installation Of The Machine
2. Installation of the machine 2.1 Installation The tire changer can be installed on any concreted fl oor or on any fl oor covered with a similarly hard fl oor covering. It is recommended to secure the machine to the ground at the four points provided with anchor bolts M10, or with appropriate dowels. -
Seite 13: Installation Et Raccordement
2. Installer la machine 2. Aufstellen und Anschließen 2.1 Installation 2.1 Aufstellen Die Reifenmontiermaschine kann auf jedem betonier- La machine peut être installée sur n’importe quel type de ten oder mit ähnlich festem Bodenbelag ausgestatteten plancher en béton ou autres présentant la même solidité. Boden aufgestellt werden. - Seite 14 For models with the infl ating device built into the column also: Connect the diameter 8 hose (12, Fig.2a), from the column to the infl ating pedal tap as illustrated. Note: For hose connections, see the pneumatic diagrams supplied in the Spare Parts Manual.
-
Seite 15: Transport Der Maschine An Den Aufstellungsort
Les modèles avec dispositif de gonfl age intégré ab und schließen Sie den Luftschlauch “3” dans la potence, nécessitent aussi de: (Werkzeugbewegung) an den Anschluss “11” der F. Raccorder le tuyau diamètre 8 (12, Fig.2a) qui Pedalsteuerung an. arrive de la potence au robinet de la pédale de Bei Modellen, bei denen die Reifenfüllvorrichtung in gonfl... -
Seite 16: Electrical Connection
2.5 Electrical connection ATTENTION.: Any intervention on the electrical system and the connection of a plug (when necessary), Standard models must be performed only by a qualifi ed electrician, PRO speed in compliance with the applicable standards and national laws and/or local regulations. 230 V, 1Ph, 50/60Hz, 16A The standard models of the tyre changers have 240 V, 1Ph, 50/60Hz, 16A... -
Seite 17: Branchement Électrique
2.5 Branchement électrique 2.5 Elektroanschluss ACHTUNG: Sämtliche Eingriffe an der elektrischen Anlage ATTENTION! Toute intervention sur le système und den Anschluss eines Steckers (wenn erforderlich), électrique et la connexion d’une fi che lorsque cela est dürfen ausschließlich von einem qualifi zierten Elektriker nécessaire, doit être effectuée exclusivement par un ausgeführt werden, unter Beachtung der von der électricien qualifi... -
Seite 18: Bead Breaking
3. Bead breaking With the tyre changers a pneumatic tyre bead breaker is part of the standard equipment. Please mind the special handling of Run-fl at tires, wheels with TD rims or rims having an asymmetric hump. Bead breaking Remove the valve insert of the wheel valve. We would recommend to demount the tyre from the wide rim shoulder in the fi... -
Seite 19: Décollage D'un Pneu
3. Détalonner un pneu 3. Abdrücken eines Reifens Les démonte-pneus standard sont équipés d’un Die Reifenmontiermaschinen sind standardmäßig mit einer détalonneur de pneus. pneumatisch betriebenen Reifenabdrückeinrichtung ausgerüstet. Se rappeler que les jantes pour roues Tubeless ou les Zu beachten ist auch die besondere Vorgehensweise jantes asymétriques doivent être traitées de manière beim Abdrücken von Rädern mit Notlaufeigenschaften spéciale. - Seite 20 4.1 Outer clamping of rims • Position the wheel (rim) • Fully depress the pedal (3, Fig. 10a) then take your foot off the pedal. The wheel is clamped (Fig. 11). • Depress the pedal past the lower end of stroke position then release it.
- Seite 21 4.1 Serrage extérieur des jantes 4.1 Außenspannung Felgendurchmesser • Mettre la roue en place • Das Rad aufl egen. • Actionner la pédale (3, Fig. 10a) à fond et relâcher. • Das Schaltpedal (Abb. 10a, Pos.3) ganz niedertreten La roue est serrée (Fig. 11). und den Fuß...
- Seite 22 Setting the mounting head Before demounting or mounting a tyre make sure the mounting arm is pushed fully to the rear and the mounting head is in top position. When handling several wheels of the same dimensions the mounting head can stay in the working position set for the fi...
-
Seite 23: Réglage De La Tête De Montage
Réglage de la tête de montage Einstellen des Montierkopfes Avant le démontage ou le montage d’un pneu, faire Vor Beginn einer Reifendemontage bzw. einer attention à ce que le bras de montage soit poussé Reifenmontage darauf achten, dass der Montierarm complètement en arrière et que la tête de montage bis zum Anschlag nach hinten eingeschoben ist und soit en position supérieure. - Seite 24 Fundamentals of demounting and mounting a tire Use the special plastic parts for clamping, the plastic mounting head and special tire levers (coated or the like) so as not to damage the rims, in particular alloy rims, when mounting or demounting the tires. Prior to demounting or mounting a commercial tire lubricant should be applied onto the bead outer and inner sides, the rim fl...
-
Seite 25: Règles Fondamentales De Démontage / Montage
Règles fondamentales de montage Grundsätzliche Hinweise zur Montage et de démontage des pneus und Demontage eines Reifens Utiliser les pièces spéciales en matière Um bei den Arbeitsgängen die Felgen, plastique, la tête de montage en plastique besonders die Leichtmetallfelgen, nicht zu et les leviers de montage spéciaux (à... - Seite 26 7. Demounting a tyre Always observe WdK or applicable national guidelines when demounting tyres. Demounting a tyre is much easier if, before demounting, a commercial lubricant is applied to the bead and the rim fl ange over which the bead will be demounted.
-
Seite 27: Démontage D'un Pneu
7. Démontage des pneus 7. Demontieren eines Reifens Observer strictement les règlements nationaux en Bei der Demontage von Reifen sind grundsätzlich vigueur pour le démontage des pneus. die WdKLeitlinien (Wirtschaftsverband der Le démontage d’un pneu est nettement facilité s’il deutschen Kautschukindustrie) zu beachten. est précédé... - Seite 28 8. Mounting a tire Always observe the applicable national guidelines when mounting tyres. Mounting of the tyre is feasible much more easily when prior to mounting a common tyre lubricant is applied onto the bead and the rim over which the bead will be mounted.
-
Seite 29: Montage D'un Pneu
8. Montage des pneus 8. Montieren eines Reifens Observer strictement les règlements nationaux en Bei der Montage von Reifen sind grundsätzlich die vigueur pour le montage des pneus. WdK-Leitlinien (Wirtschaftsverband der deutschen Kautschukindustrie) zu beachten. Le montage d’un pneu est rendu beaucoup plus Die Montage eines Reifens wird wesentlich erleichtert, facile si, avant le montage, un lubrifi... - Seite 30 If the turntable slows down during mounting due to excessive bead tension, stop the procedure, turn the turntable back slightly, press the part of the bead already mounted down into the rim, if necessary using a bead pusher (optional), then continue mounting. With easily mountable tyres and/or a skilled operator, mounting is possible without interruptions.
-
Seite 31: Gonfl Age Des Pneus
Si le mandrin ralentit pendant le montage à cause Sollte der Spannteller infolge zu hoher Wulstspannung du talon trop serré, arrêter la procédure, tourner stehenbleiben, den Vorgang verlangsamt, durch Anheben légèrement en arrière le mandrin, presser le talon des Schaltpedals den Spannteller etwas zurückdrehen, qui est déjà... - Seite 32 Beading the tires Beading means the initial grip of the tire bead on the rim, in order to allow the infl ation operations and subsequent settling in the seat on the rim. Safety Precautions: WARNING: DO NOT USE THE TIRE CHANGER TO INFLATE TIRES.
-
Seite 33: Eindrücken Der Reifenwülste
Eindrücken der Reifenwülste Enjantage du talon des pneus Unter Wulsteindrücken wird verstanden, dass man Par enjantage du talon, on entend l’adhérence intiale die Reifenwülste anfänglich so an der Felge anlegt, du talon du pneu à la jante, de manière à permettre la dass das Rad danach gefüllt werden kann und sich suite des opérations à... - Seite 34 Beading Tubeless tires: Perform the beading with the wheel blocked on the tire changer. • Ensure that both the beads and the inside of the rim are thoroughly lubricated. • Screw the valve insert. • Connect the compressed air hose to the valve (1,Fig.
-
Seite 35: Wulsteindrücken Bei Schlauchlosen Reifen
Enjantage talon de pneus Tubeless: Wulsteindrücken bei schlauchlosen Reifen: Effectuer l’enjantage talon avec la roue bloquée sur Beim Wulsteindrücken muss das Rad am le démonte-pneus. Reifenmontiergerät aufgespannt sein. • S’assurer que les deux talons et l’intérieur de la • Sicherstellen, dass beide Wülste und die Innenseite jante sont bien lubrifi... - Seite 36 If the machine is fi tted with the beading system for Tubeless tyres integrated in the slidings of the turn- table, follow the procedure set out below. Beading with Tubeless device on turntable: Proced as follows: A. If possible lock the wheel from inside. Outside locking reduces effi...
- Seite 37 Si la machine présente un système d’enjantage pour Wenn das System zum Wulsteindrücken für schlau- pneus Tubeless intégré dans les guides du plateau chlose Reifen bei Ihrer Maschine in die Reiter des autocentrant, suivre la procédure indiquée ci-dessous. Spanntellers integriert ist, befolgen Sie bitte die hier unten angegebene Vorgehensweise.
- Seite 38 10. Maintenance Before maintenance work is carried out, disconnect the machine from the supply lines and make sure that it cannot be switched on again accidentally. The Health and Safety at Work (UVV) regulations applicable must be observed for maintenance work. Basically, the tire changer requires no particular maintenance.
-
Seite 39: Entretien
10. Entretien 10. Wartung Avant l’entretien, débrancher la machine de toutes les Bei Wartungsarbeiten ist die Maschine von den lignes d’alimentation en énergie et la verrouiller pour éviter Versorgungsnetzen zu trennen und gegen unbeabsichtigtes une mise en marche accidentelle. Einschalten zu sichern. En général, pour les travaux d’entretien, respecter la Generell sind bei Wartungsarbeiten die diesbezüglichen réglementation en matière de prévention des accidents... -
Seite 40: Technical Specifications
STC5325 11. Technical specifi cations (Basic version) External clamping range 10” - 22” Internal clamping range 12” - 24” with motorcycle jaws 15” - 23” Bead breaking range: 1”-15”/40-392 mm Rim width 3 - 12” - Std Electrical connections - (Standard) 230 VAC, 1Ph, 50/60Hz, 16A (Japan) -
Seite 41: Données Techniques
STC5325 STC5325 11. Données techniques 11. Technische Daten (Version base) (Basisversion) Gamme de serrage de l’extérieur 10” - 22” Außenspannungsbereich 10” - 22” Gamme de serrage de l’intérieur 12” - 24” Innenspannungsbereich 12” - 24” avec mors pour roues de moto 15”... -
Seite 42: Disposing Of The Unit
12. Disposing of the unit When you decide to get rid of your unit, contact your reseller for a quote or for the regulations on disposal which apply to the unit. 12.1 Instructions for disposal For waste electrical and electronic equipment At the time of disposal, at the end of the lifetime of this equipment, you must: NOT dispose of the equipment as municipal... -
Seite 43: Vente
12. Vente 12. Entsorgung Lorsque vous décidez de vendre la machine, contactez Wenn das Gerät entsorgt werden soll, setzen Sie votre revendeur pour obtenir le prix offert ou les règle- sich bitte mit Ihrem Händler in Verbindung und fra- ments appropriés pour la revente de la machine. gen Sie ihn nach einem Preisangebot bzw. - Seite 44 The information contained in this document is subject to change without notice. SUN makes no war- ranty with regard to present documentation. SUN shall not be liable for errors contained herein or for in- cidental consequential damages in connection with furnishings, performance, or use of this material.