Herunterladen Inhalt Inhalt Diese Seite drucken
Inhaltsverzeichnis

Werbung

Verfügbare Sprachen
  • DE

Verfügbare Sprachen

  • DEUTSCH, seite 199
User manual
Model : PHT-65LHS
Version : 1.45
English
Français
Deutsch
Italiano
Español

Werbung

Inhaltsverzeichnis
loading

Inhaltszusammenfassung für VATECH Green16

  • Seite 1 User manual Model : PHT-65LHS Version : 1.45 English Français Deutsch Italiano Español...
  • Seite 3: Inhaltsverzeichnis

    ENGLISH Notice ......................... iii Conventions in this Manual ................iv 1. Imaging System Overview ................1 1.1 Equipment Overview ................3 1.2 Control Panel ..................5 1.3 Touch Screen ..................6 1.4 Emergency Stop Switch ..............15 1.5 Exposure Switch ................. 16 2.
  • Seite 5: Notice

    PANO, CEPH (Optional), CBCT, and 3D MODEL Scan imaging capabilities into a single system. This manual describes how to operate the Green16 (PHT-65LHS). This manual describes how to operate the Green16 (PHT-65LHS) system. It is recommended that you thoroughly familiarize yourself with this manual in order to make the most effective use of this equipment.
  • Seite 6: Conventions In This Manual

    Indicates a possible danger from exposure to RADIATION radiation. Indicates a component that must be replaced for SINGLE-USE each new patient. Indicates that an item is susceptible to damage from electrostatic discharges. susceptibility Green16 (PHT-65LHS) User Manual...
  • Seite 7: Imaging System Overview

    The system also utilizes carpal images for orthodontic treatment. Green16 (PHT-65LHS) may only be used by dentists, X-ray technicians, and other professionals who are licensed to perform X- rays by the law of the region in which it is being used.
  • Seite 8 1. Imaging System Overview Classifications (IEC 60601-1 6.1) Degree of protection against water ingress: Ordinary Equipment: IPX0  Degree of protection against electric shock: Class 1 equipment, Type B Applied  Parts: Temple Supports, Chinrests, and Bites. Green16 (PHT-65LHS) User Manual...
  • Seite 9: Equipment Overview

    Holds the Rotating Unit. Vertical Frame Can be controlled with the Column UP/DOWN switch. Rotates around the patient's head while the image is being acquired. Rotating Unit (Its movement is different according to the scan mode.) Green16 (PHT-65LHS) User Manual...
  • Seite 10 Supports, adjusts the height of the Vertical Frame, and prepares for operation when the READY button is pressed. (For the details, refer to 1.2 Control Panel.) Control Panel D-Sub Connector The input signal port for Column UP/DOWN Switch Green16 (PHT-65LHS) User Manual...
  • Seite 11: Control Panel

    Initializes the positioning of the Rotating Unit. Horizontal Beam Aligns the Horizontal Beam in PANO mode. UP/DOWN button Moves the Vertical Frame up or down. Column UP/DOWN button (For adjusting the height of the Chinrest) Green16 (PHT-65LHS) User Manual...
  • Seite 12: Touch Screen

    Always operate the Touch Screen by pressing it gently with your  fingertip. Do not use pointed objects such as ballpoint pens or pencils. Doing  so may cause damage to the screen. Green16 (PHT-65LHS) User Manual...
  • Seite 13 Adjusts Tube voltage, Tube current, Gender / Age Settings button group, X-ray Intensity, Examination type, Imaging type, Arch selection, and Image option. Displays current setting information. (Modality, Tube Imaging parameter voltage, Tube current, Arch type, Image option, and settings information Pano option.) Green16 (PHT-65LHS) User Manual...
  • Seite 14 Depending on the circumference of the patient’s X-ray intensity head, X-ray intensity may be classified as Hard, Normal, or Soft: Soft ≤ Normal ≤ Hard Closes the Settings Screen and moves back to PANO Main EXIT button Screen. Green16 (PHT-65LHS) User Manual...
  • Seite 15 / CBCT / MODEL) selection screen. Adjusts Tube voltage, Tube current, Gender / Age Settings button Group, X-ray Intensity, and Image Option. Imaging parameter Displays current setting information. (Modality, Tube settings information voltage, Tube current, and Image option) Green16 (PHT-65LHS) User Manual...
  • Seite 16 X-ray intensity may be classified as Hard, Normal, or Soft: Soft ≤ Normal ≤ Hard Selects between “High Resolution” and “Green”. Image Option (Image quality: High Resolution > Green) Closes the Settings Screen and moves back to CEPH Main EXIT button Screen. Green16 (PHT-65LHS) User Manual...
  • Seite 17 Adjusts Tube voltage, Tube current, Gender / Age group, Settings button X-ray intensity, Image Option, and Voxel Size. Imaging parameter Displays current setting information. (Modality, Tube settings information voltage, Tube current, Image option, and Voxel size) Green16 (PHT-65LHS) User Manual...
  • Seite 18 Depending on the circumference of the X-ray intensity patient’s head, X-ray intensity may be classified as Hard, Normal, or Soft: Soft ≤ Normal ≤ Hard Closes the Settings Screen and moves back to CBCT Main EXIT button Screen. Green16 (PHT-65LHS) User Manual...
  • Seite 19 Moves back to the modality (PANO / CEPH (Optional) / BACK button CBCT / MODEL) selection screen. Adjusts Tube voltage, Tube current, Gender / Age Settings button group, and X-ray intensity. Imaging parameter Displays current setting information. (Modality, Tube settings information voltage, and Tube current) Green16 (PHT-65LHS) User Manual...
  • Seite 20 Adjusts Tube voltage (kVp) and Tube current (mA). control button Patient’s gender / age Selects patient's gender / age group. group X-ray intensity Selects X-ray intensity. Closes the Settings Screen and moves back to 3D MODEL EXIT button Scan Main Screen. Green16 (PHT-65LHS) User Manual...
  • Seite 21: Emergency Stop Switch

    To restart the equipment, turn the Emergency Stop Switch clockwise until it pops up. The Emergency Stop Switch is located under the bottom of the Vertical Frame. Green16 (PHT-65LHS) User Manual...
  • Seite 22: Exposure Switch

    The Exposure Switch is detachable. Ensure the Exposure  Switch cable is not detached from the unit accidentally during the operation. Keep vocal/visual contact with the patient during exposure. If any  problem occurs during exposure, release the Exposure Switch immediately. Green16 (PHT-65LHS) User Manual...
  • Seite 23: Getting Started

    Press the Main Power Switch that is located under the bottom of the Vertical Frame to turn on the equipment. Main Power Switch isolates its circuits electrically from the supply mains on all poles simultaneously. Make sure that the green LED light at the top of the equipment is on. Green16 (PHT-65LHS) User Manual...
  • Seite 24: Running The Image Viewer (Ezdent-I / Easydent)

    For cyber security issues related to the software and medical devices, please contact the manufacturer. For Green16 (PHT-65LHS) dental computed tomography X-ray system, the both 3D viewer (Ez3D-i / Ez3D Plus) and Console Software are being accessed through 2D viewer (EzDent-i / EasyDent) SW.
  • Seite 25 Enter the required patient information. Chart Number, E-Mail address, First Name, and Last Name are required fields that must be filled in. (The Chart Number is filled in automatically.) Click Add button to save the patient record. Green16 (PHT-65LHS) User Manual...
  • Seite 26 Enter the required patient information. Chart Number, First Name, and Last Name are required fields that must be filled in. All other fields are optional, but it is recommended that they be filled in. Click Add button to save the patient record. Green16 (PHT-65LHS) User Manual...
  • Seite 27 Search button. The information on the patient that fits the search condition appears. Double-click the Keyboard icon to display the virtual keyboard. You may search patient information using the virtual keyboard. Double-click the patient information to see more details about the patient as shown below. Green16 (PHT-65LHS) User Manual...
  • Seite 28 Enter the Chart No., First name, or Last name of the patient by clicking the mouse on the virtual keyboard, then click Enter key. (The physical keyboard can be used to do the same job) Patient information can be displayed on the Patient Information panel and Patient List. Green16 (PHT-65LHS) User Manual...
  • Seite 29: Initiating The Console Software

    The Main Screen for the selected mode appears. From the Main Screen, you can configure the imaging parameter settings prior to acquiring an image. Refer to the following chapters (3 ~ 6) for more information on image acquisition. Green16 (PHT-65LHS) User Manual...
  • Seite 30 The Main Screen for the selected mode appears. From the Main Screen, you can configure the imaging parameter settings prior to acquiring an image. Refer to the following chapters (3 ~ 6) for more information on image acquisition. Green16 (PHT-65LHS) User Manual...
  • Seite 31: Acquiring Pano Images

    2. Getting Started and finish the step first. You can set the imaging parameters on either the Touch Screen or the Console Software running on the PC. They are synchronized and display the same environmental settings. Green16 (PHT-65LHS) User Manual...
  • Seite 32 (Optional) according to the patient’s positioning and arch shape.  Provides multiple panoramic images having different focal planes along with a typical panoramic image Insight PAN together. (Optional)  Enables detailed verification of images' in-depth direction. Green16 (PHT-65LHS) User Manual...
  • Seite 33 Panoramic image of normal adult palatal arches Panoramic image of square-shaped palatal arches (some Wide number of adult males) Panoramic image of child palatal arches, approximately more Child than 40% less x-ray dose than in Normal mode. Green16 (PHT-65LHS) User Manual...
  • Seite 34 Examination” panel is disabled. If you want to select a PANO Examination option, please conduct Arch selection again. The Gender / Age group of the patient is selected automatically based on the patient information. If necessary, you can select the option manually. <Console Software> <Touch Screen> Green16 (PHT-65LHS) User Manual...
  • Seite 35 The values of tube voltage and current are configured automatically according to the patient's gender/age group and X-ray intensity. Click the UP/DOWN arrow to adjust kVp and mA. The dose is adjustable by ±1 kVp and ±0.1 mA respectively. <Console Software> <Touch Screen> Green16 (PHT-65LHS) User Manual...
  • Seite 36  The Vertical Beam will be activated to make patient positioning easier.  The DAP (Dose Area Product), Scan Time, and Exposure Time will be displayed below the Patient Information window. 10. Guide the patient to the equipment. Green16 (PHT-65LHS) User Manual...
  • Seite 37: Patient Positioning

    Have the patient wear a lead apron to protect themselves from residual radiation. Use the Column UP/DOWN button or switch option to adjust the equipment to match the height of the patient. <Control Panel – LCD type> Green16 (PHT-65LHS) User Manual...
  • Seite 38 Hold the handles tightly.  Press the chest against the equipment.  Keep both feet close to the inside of the base.  Keep both shoulders parallel.  Straighten the Cervical Spine and standstill.  Green16 (PHT-65LHS) User Manual...
  • Seite 39 Let the patient bite the Bite along its grooves with his/her front teeth. Let the patient maintain the posture as follows: Close the mouth.  Place the tongue on the roof of the mouth.  Close the eyes.  Green16 (PHT-65LHS) User Manual...
  • Seite 40 Hold the handles tightly.  Press the chest against the equipment.  Keep both feet close to the inside of the base.  Keep both shoulders parallel.  Straighten the Cervical Spine and standstill.  Green16 (PHT-65LHS) User Manual...
  • Seite 41 3. Acquiring PANO Images Let the patient maintain the posture as follows: Close the mouth.  Place the tongue on the roof of the mouth.  Close the eyes.  Green16 (PHT-65LHS) User Manual...
  • Seite 42 Horizontal Beam is aligned to the patient's face horizontally. Direct the patient to smile and align the Canine Teeth Beam to the center of the canines. Use the Canine Teeth Beam Lever to adjust the position of the beam. Green16 (PHT-65LHS) User Manual...
  • Seite 43 Make sure that the Temple Supports are in the CLOSE position before clicking the READY button. Click the READY button. The X-ray exposure has not started yet. Now go to 3.3 X-ray Exposure to start the exposure. Green16 (PHT-65LHS) User Manual...
  • Seite 44 Use the Temple Supports OPEN/CLOSE button on the control panel to widen the Temple Supports. Guide the patient to the equipment. Use the Column UP/DOWN button or switch option to adjust the height of the equipment so that the patient's chin reaches the Chinrest. Green16 (PHT-65LHS) User Manual...
  • Seite 45 Close the eyes.   As shown in the picture, the support unit of the integrated Chinrest should touch the patient's acanthion point.  Ask the patient to maintain his/her position until the operation is completed. Green16 (PHT-65LHS) User Manual...
  • Seite 46 Align the Horizontal Beam in a straight line to the Frankfurt Line on the patient's face. Use the Horizontal Beam button on the control panel to position it. Make sure that the Horizontal Beam is aligned to the patient's face horizontally. Green16 (PHT-65LHS) User Manual...
  • Seite 47 Make sure that the Temple Supports are in the CLOSE position before clicking the READY button. Click the READY button. The X-ray exposure has not started yet. Now go to 3.3 X-ray Exposure to start the exposure. Green16 (PHT-65LHS) User Manual...
  • Seite 48 Guide the patient to place the base of his/her nose (acanthion point) against the Chinrest and bend the head forward about 5˚. Let the patient maintain the posture as follows: Close the mouth.  Place the tongue on the roof of the mouth.  Close the eyes.  Green16 (PHT-65LHS) User Manual...
  • Seite 49  Let the patient maintain his/her position until the operation is completed. Laser Beam Aligning This is the same as the one for TMJ Open mode. Finishing Patient Positioning This is the same as the one for TMJ Open mode. Green16 (PHT-65LHS) User Manual...
  • Seite 50 Hold the handles tightly.  Press the chest against the equipment.  Keep both feet close to the inside of the base.  Keep both shoulders parallel.  Straighten the Cervical Spine and standstill.  Green16 (PHT-65LHS) User Manual...
  • Seite 51 Close the eyes.   As shown in the picture, the support unit of the integrated Chinrest should touch the patient's acanthion point.  Ask the patient to maintain his/her position until the operation is completed. Green16 (PHT-65LHS) User Manual...
  • Seite 52 Make sure that the Temple Supports are in the CLOSE position before clicking the READY button. Click the READY button. The X-ray exposure has not started yet. Now go to 3.3 X-ray Exposure to start the exposure. Green16 (PHT-65LHS) User Manual...
  • Seite 53: X-Ray Exposure

    Get out of the X-ray room and close the door. The operator must keep vocal/visual contact with the patient at all times during image acquisition. Press and hold down the Exposure Switch until image acquisition is completed. The image appears on the screen. Green16 (PHT-65LHS) User Manual...
  • Seite 54: Finishing The Scan

    The images are automatically saved if the automatic save option is configured as default. If it is not configured as default, click the Save button to save the images. To check the image, double-click the one on the Patient List. Green16 (PHT-65LHS) User Manual...
  • Seite 55: Acquiring Ceph Images (Optional)

    To acquire CEPH images, 2. Getting Started must be completed first. You can set the imaging parameters on either the Touch Screen or the Console Software running on the PC. They are synchronized and display the same environmental settings. Green16 (PHT-65LHS) User Manual...
  • Seite 56 CEPH button exists only when the CEPH imaging program is included in the equipment. Select an Image Option. (On Touch Screen, click Settings button before selecting options.) <Console Software> <Touch Screen> Select an examination program in the CEPH Examination panel. <Console Software> <Touch Screen> Green16 (PHT-65LHS) User Manual...
  • Seite 57 If necessary, you can select the option manually. <Console Software> <Touch Screen> Select X-ray intensity. <Console Software> <Touch Screen> Depending on the circumference of the patient’s head, X-ray intensity may be classified as Hard, Normal, or Soft: Soft ≤ Normal ≤ Hard Green16 (PHT-65LHS) User Manual...
  • Seite 58 Click CONFIRM button when the exposure parameter setting is completed. <Console Software> <Touch Screen> When you click CONFIRM button,  The DAP (Dose Area Product), Scan Time, and Exposure Time will be displayed below the Patient Information window. Guide the patient to the equipment. Green16 (PHT-65LHS) User Manual...
  • Seite 59: Patient Positioning

    Have the patient wear a lead apron to protect themselves from residual radiation. Use the Column UP/DOWN button or switch option to adjust the equipment to match the height of the patient. <Control Panel – LCD type> Green16 (PHT-65LHS) User Manual...
  • Seite 60 Use the Porion Position Reference Indicator that appears in the acquired image to easily confirm the location of Porion. Guide the patient to the CEPH unit. Direct the patient to relax his/her neck and shoulders and stand upright. Green16 (PHT-65LHS) User Manual...
  • Seite 61 Direct the patient to swallow first before closing the mouth and to remain in his/her current position until image acquisition is completed. Click the READY button. The x-ray exposure has not started yet. 10. Now go to 4.3 X-ray Exposure to start the exposure. Green16 (PHT-65LHS) User Manual...
  • Seite 62 Fold the Nasal Positioner up. The Nasal Positioner is not used in PA mode. Guide the patient to the CEPH unit. Ask the patient to stand upright facing the sensor. Make sure that the patient’s shoulders are level and that his/her neck is relaxed. Green16 (PHT-65LHS) User Manual...
  • Seite 63 Direct the patient to swallow first before closing his/her mouth and to remain in his/her current position until image acquisition is completed. Click the READY button. The x-ray exposure has not started yet. 10. Now go to 4.3 X-ray Exposure to start the exposure. Green16 (PHT-65LHS) User Manual...
  • Seite 64 Turn the Nasal Positioner to the SMV mode Positioning Marker as shown below. Fold the Nasal Positioner up. The Nasal Positioner is not used in SMV mode. Guide the patient to the CEPH unit. Guide the patient to face the X-ray tube and stand upright. Green16 (PHT-65LHS) User Manual...
  • Seite 65 Direct the patient to swallow first before closing his/her mouth and to remain in his/her current position until image acquisition is completed. Click the READY button. The x-ray exposure has not started yet. 10. Now go to 4.3 X-ray Exposure to start the exposure. Green16 (PHT-65LHS) User Manual...
  • Seite 66 30˚ - 40˚. Direct the patient to remain in the current position until image acquisition is completed. Click the READY button. The x-ray exposure has not started yet. Now go to 4.3 X-ray Exposure to start the exposure. Green16 (PHT-65LHS) User Manual...
  • Seite 67 Fold the Nasal Positioner up. The Nasal Positioner is not used in Carpus mode. Fit the two ends of the Carpus Plate into the two holes of the CEPH unit as below. Confirm that the Carpus Plate is safely mounted. Green16 (PHT-65LHS) User Manual...
  • Seite 68 Ask the patient to close his/her eyes and stand still until the image acquisition is completed. Click the READY button. The x-ray exposure has not started yet. Now go to 4.3 X-ray Exposure to start the exposure. Green16 (PHT-65LHS) User Manual...
  • Seite 69: X-Ray Exposure

    An alert sound comes out to indicate that X-ray emission is  currently underway. On Console Software, the radiation mark turns yellow, and “X-RAY”  changes to “X-RAY ON”. Release the Exposure Switch when the “Image capturing is completed” message appears on the screen. Green16 (PHT-65LHS) User Manual...
  • Seite 70: Finishing The Scan

    The images are automatically saved if the automatic save option is configured as default. If it is not configured as default, click the Save button to save the images. To check the image, double-click the one on the Patient List. Green16 (PHT-65LHS) User Manual...
  • Seite 71: Acquiring Cbct Images

    You can set the imaging parameters on Console Software running on the PC. (Touch Screen is Optional. In case the Touch Screen is included in the equipment, Touch Screen and Console Software are synchronized and display the same environmental settings.) Green16 (PHT-65LHS) User Manual...
  • Seite 72 Click the CBCT button on the Main Screen. <Console Software> <Touch Screen> CEPH button exists only when the CEPH imaging program is included in the equipment. Select FOV Size (with Vertical Option, Horizon Option, Tooth Option.). <Console Software> <Touch Screen> Green16 (PHT-65LHS) User Manual...
  • Seite 73 Select an Image Option. (On Touch Screen, click Settings button before selecting options.) <Console Software> <Touch Screen> Select a Voxel Size. MAR (Metal Artifact Reduction) function is applied automatically if there are metal objects in the image. MAR may increase image reconstruction time. Green16 (PHT-65LHS) User Manual...
  • Seite 74 If necessary, you can select the option manually. <Console Software> <Touch Screen> Select X-ray intensity. <Console Software> <Touch Screen> Depending on the circumference of the patient’s head, X-ray intensity may be classified as Hard, Normal, or Soft: Soft ≤ Normal ≤ Hard Green16 (PHT-65LHS) User Manual...
  • Seite 75  The Vertical Beam will be activated to make patient positioning easier.  The DAP (Dose Area Product), Scan Time, and Exposure Time will be displayed below the Patient Information window. 10. Guide the patient to the equipment. Green16 (PHT-65LHS) User Manual...
  • Seite 76: Obtaining Double Scan Image (Optional)

    The PC's Console Software has the same function as the touch screen of the device. The Console Software and the touch screen are linked to each other in real-time, and the environment settings are the same. Click the Double Scan button on the CBCT main screen. Green16 (PHT-65LHS) User Manual...
  • Seite 77 Select the Image Option. (On the touchscreen, first, click the Settings button.) <Console Software> <Touch Screen> The patient's gender/age group is automatically selected based on patient information. You can choose manually if necessary. <Console Software> <Touch Screen> Green16 (PHT-65LHS) User Manual...
  • Seite 78 The tube voltage and tube current values are automatically set according to the patient's performance and X-ray intensity. If you click the arrow button, you can make fine adjustments in ±1 kVp, ±0.1 mA increments. <Console Software> <Touch Screen> Green16 (PHT-65LHS) User Manual...
  • Seite 79 5.3 Patient Positioning. Press the READY button. At this time, X-rays are not irradiated. Go to 5.4 X-ray Exposure and proceed with X-ray exposure. 10. Guide the patient out of the shielded room with equipment. Green16 (PHT-65LHS) User Manual...
  • Seite 80 The tube voltage and tube current values are automatically set according to the patient's performance and X-ray intensity. If you click the arrow button, you can make fine adjustments in ±1 kVp, ±0.1 mA increments <Console Software> <Touch Screen> Green16 (PHT-65LHS) User Manual...
  • Seite 81 Press the READY button. At this time, X-rays are not irradiated. Go to 5.4 X-ray Exposure and proceed with X-ray exposure. Guide the patient out of the shielded room with equipment. Move to the 5.5 Finishing the Scan to finish shooting and check the image. Green16 (PHT-65LHS) User Manual...
  • Seite 82: Patient Positioning

    Have the patient wear a lead apron to protect themselves from residual radiation. Use the Column UP/DOWN button or switch option to adjust the equipment to match the height of the patient. <Control Panel – LCD type> Green16 (PHT-65LHS) User Manual...
  • Seite 83 Hold the handles tightly.  Press the chest against the equipment.  Keep both feet close to the inside of the base.  Keep both shoulders parallel.  Straighten the Cervical Spine and standstill.  Green16 (PHT-65LHS) User Manual...
  • Seite 84 Let the patient bite the Bite along its grooves with his/her front teeth. Let the patient maintain the posture as follows: Close the mouth.  Place the tongue on the roof of the mouth.  Close the eyes.  Green16 (PHT-65LHS) User Manual...
  • Seite 85 Keep both shoulders parallel.  Straighten the Cervical Spine and standstill.  Let the patient maintain the posture as follows: Close the eyes.  Ask the patient to maintain his/her position until the operation is completed. Green16 (PHT-65LHS) User Manual...
  • Seite 86 Hold the handles tightly.  Press the chest against the equipment.  Keep both feet close to the inside of the base.  Keep both shoulders parallel.  Straighten the Cervical Spine and standstill.  Green16 (PHT-65LHS) User Manual...
  • Seite 87 Keep both shoulders parallel.  Straighten the Cervical Spine and standstill.  Let the patient maintain the posture as follows: Close the eyes.  Ask the patient to maintain his/her position until the operation is completed. Green16 (PHT-65LHS) User Manual...
  • Seite 88 Unlike PANO mode, the horizontal beam does not move only in  the CT mode. this is not a malfunction/error. Align the Vertical Beam with the center of the face (Mid-sagittal Line). (It’s to prevent the horizontal expansion of the image) Green16 (PHT-65LHS) User Manual...
  • Seite 89 Make sure that the Temple Supports are in the CLOSE position before clicking the READY button. Click the READY button. The X-ray exposure has not started yet. Now go to 5.4 X-ray Exposure to start the exposure. Green16 (PHT-65LHS) User Manual...
  • Seite 90: X-Ray Exposure

    Get out of the X-ray room and close the door. The operator must keep vocal/visual contact with the patient at all times during image acquisition. Press and hold down the Exposure Switch until image acquisition is completed. The image appears on the screen. Green16 (PHT-65LHS) User Manual...
  • Seite 91 An alert sound comes out to indicate that X-ray emission is  currently underway. On Console Software, the radiation mark turns yellow, and “X-RAY”  changes to “X-RAY ON”. Release the Exposure Switch when the “Image capturing is completed” message appears on the screen. Green16 (PHT-65LHS) User Manual...
  • Seite 92: Finishing The Scan

    If it is not configured as default, click the Save button to save the images. To check the image, double-click the one on the Patient List. Then, Ez3D-i / Ez3D Plus will run automatically for 3D viewing. Green16 (PHT-65LHS) User Manual...
  • Seite 93: Acquiring 3D Model Scan Images

    You can set the imaging parameters on either the Touch Screen or  the Console Software running on the PC. They are synchronized and display the same environmental settings. The 3D MODEL Scan modality is not available for EasyDent /  Ez3D Plus users. Green16 (PHT-65LHS) User Manual...
  • Seite 94 Select Model Examination type. <Console Software> <Touch Screen> The Gender / Age group of the patient is selected automatically based on the patient information. If necessary, you can select the option manually. <Console Software> <Touch Screen> Green16 (PHT-65LHS) User Manual...
  • Seite 95  The Vertical Beam will be activated to make patient positioning easier.  The DAP (Dose Area Product), Scan Time, and Exposure Time will be displayed below the Patient Information window. Bring the Plaster Cast to the equipment. Green16 (PHT-65LHS) User Manual...
  • Seite 96: Model Positioning

    Align the Mid-sagittal plane Laser Beam to the center of the Plaster Cast. (To prevent the horizontal expansion of the image) Click the READY button. The X-ray exposure has not started yet. Now go to 6.3 X-ray Exposure to start the exposure. Green16 (PHT-65LHS) User Manual...
  • Seite 97: X-Ray Exposure

    On Console Software, the radiation mark turns yellow, and “X-RAY”  changes to “X-RAY ON”. Release the Exposure Switch when the “Image capturing is completed” message appears on the screen. Remove the Plaster Cast out of the equipment. Green16 (PHT-65LHS) User Manual...
  • Seite 98: Checking The Captured Images

    If it is not configured as default, click the Save button to save the images. To check the image, double-click the one on the Patient List. You can check the captured image with a 3 party STL viewer. Refer to the EzDent-i User Manual for more information. Green16 (PHT-65LHS) User Manual...
  • Seite 99 6. Acquiring 3D MODEL Scan Images This Page Intentionally Left Blank Green16 (PHT-65LHS) User Manual...
  • Seite 101 No part of this manual may be reproduced, transmitted, or transcribed without the expressed written permission of the manufacturer. We reserve the right to make any alterations that may be required due to technical improvement. For the most current information, contact your VATECH representative. Tel: (+82) 1588-9510 Email: gcs@vatech.co.kr Website: www.vatech.com...
  • Seite 103 FRANÇAIS Introduction ......................iii Icônes utilisées dans ce manuel ..............iv 1. Présentation du système d’imagerie ............1 1.1 Présentation de l’équipement ............... 3 1.2 Panneau de commande ............... 5 1.3 Écran tactile..................6 1.4 Bouton d’arrêt d’urgence ..............15 1.5 Interrupteur d’exposition ..............
  • Seite 105: Introduction

    à la guérison. Green CT n’est cependant pas un nom de produit ou un nom de marque. Green16 (PHT-65LHS) est un système de diagnostic digital avancé qui intègre des capacités d’imagerie PANO, CEPH (facultatif), CBCT et 3D MODEL au cœur d’un seul appareil.
  • Seite 106: Icônes Utilisées Dans Ce Manuel

    Signale un potentiel danger d exposition à RADIATION des radiations. Signale un composant qui doit être remplacé USAGE UNIQUE pour chaque nouveau patient. ’ Signale qu un objet peut potentiellement être endommagé par des décharges potentielle électrostatiques. ’ Manuel d utilisation Green16 (PHT-65LHS)
  • Seite 107: Présentation Du Système D'imagerie

    PANO, CEPH (optionnel), CBCT et 3D MODEL Scan au ’ cœur d un seul appareil. Le Green16 (PHT-65LHS) est un système informatisé de tomographie par rayon X conçu pour produire des images panoramiques, céphalométriques et transversales de ’ ’...
  • Seite 108 Degré de protection contre la pénétration d eau : Équipement ordinaire : IPX0  Degré de protection contre les chocs électriques : Équipement de classe 1,  pièces appliquées de type B : appui-tempes, mentonniers et blocs de morsure. ’ Manuel d utilisation Green16 (PHT-65LHS)
  • Seite 109: Présentation De L'équipement

    Rangement fermé pour Place où les blocs de morsure, supports mentonniers composants et autres composants peuvent être conservés. ’ Porte l unité pivotante. ’ Potence Peut être contrôlée à l aide du bouton Column UP/DOWN. ’ Manuel d utilisation Green16 (PHT-65LHS)
  • Seite 110 READY est pressé. (Pour plus de détails, voir 1.2 Panneau de commande.) Panneau de commande Le port de signal entrant pour le bouton Column Connecteur D-Sub UP/DOWN ’ Manuel d utilisation Green16 (PHT-65LHS)
  • Seite 111: Panneau De Commande

    Initialise le positionnement de l unité pivotante. Bouton Horizontal Pour aligner le faisceau horizontal, en mode PANO. Beam UP/DOWN Pour élever ou abaisser la potence. Bouton Column UP/DOWN (Pour ajuster la hauteur du mentonnier) ’ Manuel d utilisation Green16 (PHT-65LHS)
  • Seite 112: Écran Tactile

    écran tactile, pressez toujours délicatement dessus  du bout du doigt. ’ ’ utilisez jamais d objets pointus tels que des stylos à bille ou des  ’ crayons. Vous pourriez endommager l écran. ’ Manuel d utilisation Green16 (PHT-65LHS)
  • Seite 113 Image option. Informations des Affiche des informations sur le réglage en cours. paramètres de (Modalité, tension et intensité du tube, type d’arcade, réglage de la option d’image et option Pano.) radiographie ’ Manuel d utilisation Green16 (PHT-65LHS)
  • Seite 114 Selon le périmètre crânien du patient, l’intensité Intensité des des rayons X peut être classée comme Hard, rayons X Normal, ou Soft : Soft ≤ Normal ≤ Hard Ferme l’écran de réglage pour revenir à l’écran principal Bouton EXIT PANO. ’ Manuel d utilisation Green16 (PHT-65LHS)
  • Seite 115 / âge, l intensité des rayons X et les paramètres Image Option. Informations des paramètres de Affiche des informations sur le réglage en cours. réglage de la (Modalité, tension et intensité du tube, Image option) radiographie ’ Manuel d utilisation Green16 (PHT-65LHS)
  • Seite 116 Soft ≤ Normal ≤ Hard Pour choisir entre « High Resolution » et « Green ». Image Option (Qualité d’image : High Resolution > Green) Ferme l’écran de réglage pour revenir à l’écran principal Bouton EXIT CEPH. ’ Manuel d utilisation Green16 (PHT-65LHS)
  • Seite 117: Fonction Description

    Image Option et Voxel Size. Informations des Affiche des informations sur le réglage en cours. paramètres de (Modalité, tension du tube, intensité du tube, Image réglage de la option et Voxel size) radiographie ’ Manuel d utilisation Green16 (PHT-65LHS)
  • Seite 118 Intensité des l’intensité des rayons X peut être classée rayons X comme Hard, Normal, ou Soft : Soft ≤ Normal ≤ Hard Ferme l’écran de réglage pour revenir à l’écran principal Bouton EXIT CBCT. ’ Manuel d utilisation Green16 (PHT-65LHS)
  • Seite 119 Pour ajuster la tension et l’intensité du tube, le groupe Bouton Settings genre / âge et ’intensité des rayons X. Informations des paramètres de Affiche des informations sur le réglage en cours. réglage de la (Modalité, tension et intensité du tube.) radiographie ’ Manuel d utilisation Green16 (PHT-65LHS)
  • Seite 120 Pour sélectionner le groupe genre / âge du patient. patient Intensité des Pour sélectionner l’intensité des rayons X. rayons X Ferme l’écran de réglage pour revenir à l’écran principal 3D Bouton EXIT MODEL Scan. ’ Manuel d utilisation Green16 (PHT-65LHS)
  • Seite 121: Bouton D'arrêt D'urgence

    équipement, tourner ’ ’ ’ ’ le bouton d arrêt d urgence dans le sens horaire jusqu à ce qu il remonte. ’ ’ Le bouton d arrêt d urgence est situé sous la potence. ’ Manuel d utilisation Green16 (PHT-65LHS)
  • Seite 122: Interrupteur D'exposition

    ’ Durant l exposition, gardez toujours un contact visuel ou vocal  avec le patient. Si un problème, même mineur, survient pendant ’ ’ exposition, relâchez immédiatement l interrupteur ’ exposition. ’ Manuel d utilisation Green16 (PHT-65LHS)
  • Seite 123: Mise En Route

    ’ interrupteur principal déconnecte tous les conducteurs des circuits ’ électriques de l appareil du réseau électrique. ’ Vérifiez que le témoin lumineux LED vert situé sur le haut de l équipement est allumé. ’ Manuel d utilisation Green16 (PHT-65LHS)
  • Seite 124: Fonctionnement De La Visionneuse D'image (Ezdent-I / Easydent)

    Pour le Green16 (PHT-65LHS), système de tomographie numérique par rayons X, la visionneuse 3D (Ez3D-i / Ez3D Plus) et le Console Software sont tous deux accessibles grâce au logiciel de la visionneuse 2D (EzDent-i / EasyDent).
  • Seite 125 First Name, et Last Name sont des champs qui doivent obligatoirement être renseignés. (Le numéro de dossier « Chart Number » se remplit automatiquement.) Cliquez sur Add pour sauvegarder le dossier du patient. ’ Manuel d utilisation Green16 (PHT-65LHS)
  • Seite 126 Saisissez les informations nécessaires au sujet du patient. Chart Number, First Name, et Last Name sont des champs qui doivent obligatoirement être renseignés. Tous les autres champs sont facultatifs. Il est toutefois recommandé de les remplir. Cliquez sur Add pour sauvegarder le dossier du patient. ’ Manuel d utilisation Green16 (PHT-65LHS)
  • Seite 127 Vous pouvez chercher les informations du patient en utilisant le clavier virtuel. Double-cliquez sur les informations du patient, comme montré ci-dessous, pour obtenir de plus amples détails sur ce dernier. ’ Manuel d utilisation Green16 (PHT-65LHS)
  • Seite 128 Enter. (Vous pouvez utiliser le clavier réel pour effectuer cette tâche.) Les informations relatives au patient peuvent être affichées sur le panneau Patient Information et sur la fenêtre Patient List. ’ Manuel d utilisation Green16 (PHT-65LHS)
  • Seite 129: Démarrage Du Console Software

    ’ Veuillez consulter les chapitres 3 ~ 6 pour obtenir plus d informations ’ ’ au sujet de l acquisition d images. ’ Manuel d utilisation Green16 (PHT-65LHS)
  • Seite 130 ’ Veuillez consulter les chapitres 3 ~ 6 pour obtenir plus d informations ’ ’ au sujet de l acquisition d images. ’ Manuel d utilisation Green16 (PHT-65LHS)
  • Seite 131: Acquisition D'images Pano

    Vous pouvez définir les paramètres d imagerie en utilisant au choix ’ ’ écran tactile ou le logiciel de la console fonctionnant sur l ordinateur. Ils sont synchronisés et affichent les mêmes paramètres ’ environnement. ’ Manuel d utilisation Green16 (PHT-65LHS)
  • Seite 132  Fournit plusieurs images panoramiques ayant différents plans focaux avec une image panoramique Insight PAN normale. (optionnel)  Permet une vérification détaillée des images dans le sens de la profondeur. ’ Manuel d utilisation Green16 (PHT-65LHS)
  • Seite 133 ’ Image panoramique d arcades palatines normales chez les Normal patients adultes ’ Image panoramique d arcades palatines de forme carrée Wide (observable chez quelques patients masculins adultes) ’ Manuel d utilisation Green16 (PHT-65LHS)
  • Seite 134 PANO Examination, veuillez refaire la sélection d’arcade. Le groupe genre / âge du patient est automatiquement sélectionné en fonction des informations renseignées à son sujet. Si nécessaire, vous avez également la possibilité de choisir cette option manuellement. ’ Manuel d utilisation Green16 (PHT-65LHS)
  • Seite 135 X. Cliquez sur la flèche ’ UP/DOWN pour ajuster la tension kVp ou l intensité mA. La dose peut être ajustée par paliers de ±1 kVp et ±0,1 mA, respectivement. <Console Software> <Écran tactile> ’ Manuel d utilisation Green16 (PHT-65LHS)
  • Seite 136  Le faisceau vertical est activé pour faciliter le positionnement du patient.  Les DAP (Dose Area Product / Produit-Dose-Surface), Scan Time et ’ afficheront sous la fenêtre Patient Information. Exposure Time s ’ ’ 10. Accompagnez le patient jusqu à l appareil. ’ Manuel d utilisation Green16 (PHT-65LHS)
  • Seite 137: Positionnement Du Patient

    Faites porter un tablier au plomb à votre patient pour le protéger des radiations résiduelles. Servez-vous du bouton Column UP/DOWN ou de la télécommande pour ajuster ’ équipement à la hauteur du patient. – < Panneau de commande Type écran LCD > ’ Manuel d utilisation Green16 (PHT-65LHS)
  • Seite 138 Appuyer la poitrine contre l appareil.  ’ Garder les deux pieds proches de l intérieur de la base.  Garder les deux épaules bien parallèles.  Redresser la colonne cervicale et maintenir la position.  ’ Manuel d utilisation Green16 (PHT-65LHS)
  • Seite 139 Demandez au patient de mordre le bloc de morsure le long de rainures avec ses dents avant. Demandez au patient de maintenir la position suivante : Fermer la bouche.  Placer la langue contre le voile du palais.  Fermer les yeux.  ’ Manuel d utilisation Green16 (PHT-65LHS)
  • Seite 140 Appuyer la poitrine contre l appareil.  ’ Garder les deux pieds proches de l intérieur de la base.  Garder les deux épaules bien parallèles.  Redresser la colonne cervicale et maintenir la position.  ’ Manuel d utilisation Green16 (PHT-65LHS)
  • Seite 141 3. Acquisition d’images PANO Demandez au patient de maintenir la position suivante : Fermer la bouche.  Placer la langue contre le voile du palais.  Fermer les yeux.  ’ Manuel d utilisation Green16 (PHT-65LHS)
  • Seite 142 Demandez au patient de sourire et d aligner le faisceau canine sur le centre de ses canines. Servez-vous du levier du faisceau canine pour ajuster la position du faisceau. Faisceau canine Levier faisceau canine ’ Manuel d utilisation Green16 (PHT-65LHS)
  • Seite 143 READY. ’ ’ Cliquez sur le bouton READY. L exposition aux rayons X n a pas encore commencé. Rendez-vous maintenant au chapitre 3.3 Exposition aux rayons X pour commencer ’ exposition. ’ Manuel d utilisation Green16 (PHT-65LHS)
  • Seite 144 OPEN/CLOSE présent sur le panneau de commande. ’ ’ Accompagnez le patient jusqu à l appareil. Servez-vous du bouton Column UP/DOWN ou de la télécommande pour ajuster le ’ mentonnier de l équipement à la hauteur du menton du patient. ’ Manuel d utilisation Green16 (PHT-65LHS)
  • Seite 145 ’ doit être en contact avec l acanthion du patient. ’  Demandez au patient de conserver sa position jusqu à la fin de ’ opération. ’ Manuel d utilisation Green16 (PHT-65LHS)
  • Seite 146 Assurez-vous que le faisceau horizontal est aligné horizontalement au visage du patient. Faisceau vertical / Plan médio-sagittal Horizontal Faisceau Faisceau horizontal UP Bouton / Plan de Francfort Horizontal Faisceau DOWN Bouton ’ Manuel d utilisation Green16 (PHT-65LHS)
  • Seite 147: Exposition Aux Rayons X

    READY. ’ ’ Cliquez sur le bouton READY. L exposition aux rayons X n a pas encore commencé. Rendez-vous maintenant au chapitre 3.3 Exposition au rayons X pour commencer ’ exposition. ’ Manuel d utilisation Green16 (PHT-65LHS)
  • Seite 148 5˚ vers l arrière. Demandez au patient de maintenir la position suivante : Fermer la bouche.  Placer la langue contre le voile du palais.  Fermer les yeux.  ’ Manuel d utilisation Green16 (PHT-65LHS)
  • Seite 149 à la fin de ’ opération. Alignement du faisceau laser Les consignes sont identiques à celles du mode TMJ Open. Fin du positionnement du patient Les consignes sont identiques à celles du mode TMJ Open. ’ Manuel d utilisation Green16 (PHT-65LHS)
  • Seite 150 Appuyer la poitrine contre l appareil.  ’ Garder les deux pieds proches de l intérieur de la base.  Garder les deux épaules bien parallèles.  Redresser la colonne cervicale et maintenir la position.  ’ Manuel d utilisation Green16 (PHT-65LHS)
  • Seite 151 ’ doit être en contact avec l acanthion du patient. ’  Demandez au patient de conserver sa position jusqu à la fin de ’ opération. ’ Manuel d utilisation Green16 (PHT-65LHS)
  • Seite 152 READY. ’ ’ Cliquez sur le bouton READY. L exposition aux rayons X n a pas encore commencé. Rendez-vous maintenant au chapitre 3.3 Exposition aux rayons X pour commencer ’ exposition. ’ Manuel d utilisation Green16 (PHT-65LHS)
  • Seite 153 ’ ’ Appuyez sur l interrupteur d exposition et maintenez le bouton enfoncé jusqu à ce ’ que l acquisition soit terminée. Jaune : Rayons X ON ’ ’ image apparaît sur l écran. ’ Manuel d utilisation Green16 (PHT-65LHS)
  • Seite 154: Fin Du Scan

    Si cette option n est pas activée par défaut, cliquez sur le bouton Save pour sauvegarder les images. Pour consulter les images, double-cliquez sur celle présente dans la Patient List. ’ Manuel d utilisation Green16 (PHT-65LHS)
  • Seite 155: Acquisition D'images Ceph (Optionnel)

    Vous pouvez définir les paramètres d imagerie en utilisant au choix ’ ’ écran tactile ou le logiciel de la console fonctionnant sur l ordinateur. Ils sont synchronisés et affichent les mêmes paramètres ’ environnement. ’ Manuel d utilisation Green16 (PHT-65LHS)
  • Seite 156 Sélectionnez une Image Option. (Sur l écran tactile, cliquez sur le bouton Settings avant de sélectionner les options.) <Console Software> <Écran tactile> ’ Sélectionnez un programme d examen dans le panneau CEPH Examination. <Console Software> <Écran tactile> ’ Manuel d utilisation Green16 (PHT-65LHS)
  • Seite 157 Soft ≤ Normal ≤ Hard Groupe Tour de tête moyenne Gamme L'intensité des d'âge (cm) (cm) rayons X >53±3 Hard Child 53±3 53±3 Normal <53±3 Soft >56±3 Hard Adult 56±3 56±3 Normal <56±3 Soft ’ Manuel d utilisation Green16 (PHT-65LHS)
  • Seite 158 Lorsque vous cliquez sur le bouton CONFIRM :  Les DAP (Dose Area Product / Produit-Dose-Surface), Scan Time et ’ Exposure Time s afficheront sous la fenêtre Patient Information. ’ ’ Accompagnez le patient jusqu à l appareil. ’ Manuel d utilisation Green16 (PHT-65LHS)
  • Seite 159: Positionnement Du Patient

    Faites porter un tablier au plomb à votre patient pour le protéger des radiations résiduelles. Servez-vous du bouton Column UP/DOWN ou de la télécommande pour ajuster ’ équipement à la hauteur du patient. – < Panneau de commande Type écran LCD > ’ Manuel d utilisation Green16 (PHT-65LHS)
  • Seite 160 ’ ’ Accompagnez le patient jusqu à l unité CEPH. Demandez au patient de relâcher sa nuque et ses épaules et de rester droit debout. ’ Manuel d utilisation Green16 (PHT-65LHS)
  • Seite 161: Exposition Aux Rayons X

    ’ ’ Cliquez sur le bouton READY. L exposition aux rayons X n a pas encore commencé. 10. Rendez-vous maintenant au chapitre 4.3 Exposition aux rayons X pour commencer ’ exposition. ’ Manuel d utilisation Green16 (PHT-65LHS)
  • Seite 162 Accompagnez le patient jusqu à l unité CEPH. Demandez au patient de se tenir droit debout, face au capteur. Assurez-vous que les épaules du patient sont parallèles au sol et que sa nuque est relâchée. ’ Manuel d utilisation Green16 (PHT-65LHS)
  • Seite 163 ’ ’ Cliquez sur le bouton READY. L exposition aux rayons X n a pas encore commencé. 10. Rendez-vous maintenant au chapitre 4.3 Exposition aux rayons X pour commencer ’ exposition. ’ Manuel d utilisation Green16 (PHT-65LHS)
  • Seite 164 Relevez le positionneur nasal. Le positionneur nasal n est pas utilisé en mode SMV. ’ ’ Accompagnez le patient jusqu à l unité CEPH. Placez le patient face au tube à rayons X et demandez-lui de rester droit debout. ’ Manuel d utilisation Green16 (PHT-65LHS)
  • Seite 165 ’ ’ Cliquez sur le bouton READY. L exposition aux rayons X n a pas encore commencé. 10. Rendez-vous maintenant au chapitre 4.3 Exposition aux rayons X pour commencer ’ exposition. ’ Manuel d utilisation Green16 (PHT-65LHS)
  • Seite 166 Demandez au patient de déglutir puis de fermer la bouche et aidez-le à incliner la tête ’ de 30˚ à 40˚ vers l arrière. Demandez au patient de conserver sa posture actuelle ’ ’ ’ jusqu à la fin de l acquisition d images. ’ Manuel d utilisation Green16 (PHT-65LHS)
  • Seite 167 Carpus. Ajustez les deux extrémités du plateau carpus dans les deux orifices du CEPH, comme indiqué ci-dessous. ’ Vérifiez que l installation du plateau carpus ne représente aucun danger. ’ Manuel d utilisation Green16 (PHT-65LHS)
  • Seite 168 ’ acquisition d images. ’ ’ Cliquez sur le bouton READY. L exposition aux rayons X n a pas encore commencé. Rendez-vous maintenant au chapitre 4.3 Exposition aux rayons X pour commencer ’ exposition. ’ Manuel d utilisation Green16 (PHT-65LHS)
  • Seite 169 ’ ’ image apparaît sur l écran. ’ ’ Durant l exposition de rayons X, l équipement présente les caractéristiques suivantes. ’ ’ Le témoin lumineux LED jaune de l interrupteur d exposition  ’ Manuel d utilisation Green16 (PHT-65LHS)
  • Seite 170: Fin Du Scan

    Si cette option n est pas activée par défaut, cliquez sur le bouton Save pour sauvegarder les images. Pour consulter les images, double-cliquez sur celle présente dans la Patient List. ’ Manuel d utilisation Green16 (PHT-65LHS)
  • Seite 171: Acquisition D'images Cbct

    Vous pouvez définir les paramètres d imagerie en utilisant au choix ’ ’ écran tactile ou le logiciel de la console fonctionnant sur l ordinateur. Ils sont synchronisés et affichent les mêmes paramètres ’ environnement. ’ Manuel d utilisation Green16 (PHT-65LHS)
  • Seite 172 ’ ’ imagerie CEPH est compris dans l équipement. Sélectionnez la taille du champ de vision (avecVertical Option (l’option verticale), Horizon Option (l’option d’horizon), Tooth Option (l’option de dent)). <Console Software> <Écran tactile> ’ Manuel d utilisation Green16 (PHT-65LHS)
  • Seite 173 Sélectionnez une Voxel Size. MAR La fonction MAR (Metal Artifact Reduction) est automatiquement ’ appliquée lorsque des objets métalliques sont présents dans l image. ’ MAR peut augmenter la durée de reconstruction de l image. ’ Manuel d utilisation Green16 (PHT-65LHS)
  • Seite 174 Soft ≤ Normal ≤ Hard Groupe Tour de tête moyenne Gamme L'intensité des d'âge (cm) (cm) rayons X >53±3 Hard Child 53±3 53±3 Normal <53±3 Soft >56±3 Hard Adult 56±3 56±3 Normal <56±3 Soft ’ Manuel d utilisation Green16 (PHT-65LHS)
  • Seite 175  Le faisceau vertical est activé pour faciliter le positionnement du patient.  Les DAP (Dose Area Product / Produit-Dose-Surface), Scan Time et ’ Exposure Time s afficheront sous la fenêtre Patient Information. ’ ’ 10. Accompagnez le patient jusqu à l appareil. ’ Manuel d utilisation Green16 (PHT-65LHS)
  • Seite 176: Obtention D'une Image À Scan Double (Optionnel)

    Pour obtenir une image de scan double, commencez 2. Mise en route devrait être terminée. Le Console Software du PC a la même fonction que l’écran tactile de l’appareil. Le Console Software et l’écran tactile sont reliés en temps réel et les paramètres d’environnement sont les mêmes. ’ Manuel d utilisation Green16 (PHT-65LHS)
  • Seite 177 Sélectionnez Image Option. (Cliquez d’abord sur le bouton Settings sur l’écran tactile.) <Console Software> <Écran tactile> Le sexe/groupe d’âge du patient est sélectionné automatiquement en fonction des informations du patient. Vous pouvez effectuer une sélection manuelle si nécessaire. <Console Software> <Écran tactile> ’ Manuel d utilisation Green16 (PHT-65LHS)
  • Seite 178 X. Si vous cliquez sur le bouton flèche, vous pouvez effectuer des réglages précis par incréments de ± 1 kVp, ± 0,1 mA. <Console Software> <Écran tactile> ’ Manuel d utilisation Green16 (PHT-65LHS)
  • Seite 179 Appuyez sur le bouton READY. Pour le moment, les rayons X ne sont pas irradiés. Rendez-vous au chapitre 5.4 Exposition aux rayons X et commencez l’exposition. 10. Accompagnez le patient hors de la pièce blindée avec l’appareil. ’ Manuel d utilisation Green16 (PHT-65LHS)
  • Seite 180 X. Si vous cliquez sur le bouton flèche, vous pouvez effectuer des réglages précis par incréments de ± 1 kVp, ± 0,1 mA. <Console Software> <Écran tactile> ’ Manuel d utilisation Green16 (PHT-65LHS)
  • Seite 181 Rendez-vous au chapitre 5.4 Exposition aux rayons X et commencez l’exposition. Accompagnez le patient hors de la pièce blindée avec l’appareil. Passez à l’étape 5.5 Fin du scan pour terminer la prise de cliché et vérifier l’image. ’ Manuel d utilisation Green16 (PHT-65LHS)
  • Seite 182: Positionnement Du Patient

    Faites porter un tablier au plomb à votre patient pour le protéger des radiations résiduelles. Servez-vous du bouton Column UP/DOWN ou de la télécommande pour ajuster ’ équipement à la hauteur du patient. – < Panneau de commande Type écran LCD > ’ Manuel d utilisation Green16 (PHT-65LHS)
  • Seite 183 Appuyer la poitrine contre l appareil.  ’ Garder les deux pieds proches de l intérieur de la base.  Garder les deux épaules bien parallèles.  Redresser la colonne cervicale et maintenir la position.  ’ Manuel d utilisation Green16 (PHT-65LHS)
  • Seite 184 Demandez au patient de mordre le bloc de morsure le long de rainures avec ses dents avant. Demandez au patient de maintenir la position suivante : Fermer la bouche.  Placer la langue contre le voile du palais.  Fermer les yeux.  ’ Manuel d utilisation Green16 (PHT-65LHS)
  • Seite 185 Gardez les deux pieds proches de l’intérieur de la base.  Gardez les deux épaules bien parallèles.  Redressez la colonne cervicale et maintenez la position.  Demandez au patient de maintenir la position suivante : Fermez les yeux.  ’ Manuel d utilisation Green16 (PHT-65LHS)
  • Seite 186 OPEN/CLOSE présent sur le panneau de commande. Accompagnez le patient jusqu’à l’appareil. Servez-vous du bouton Vertical Frame Up/Down ou de la télécommande pour ajuster le mentonnier de l’appareil à la hauteur du menton du patient. ’ Manuel d utilisation Green16 (PHT-65LHS)
  • Seite 187 Guidez le patient afin qu il se tienne bien au centre de l appareil et demandez-lui de rester dans la position décrite ci-dessous. Tenir fermement les poignées.  ’ Appuyer la poitrine contre l appareil.  ’ Manuel d utilisation Green16 (PHT-65LHS)
  • Seite 188 Contrairement au mode PANO, le faisceau horizontal ne se déplace pas uniquement en mode CT. Il ne s’agit pas un dysfonctionnement/d’une erreur. Alignez le faisceau vertical avec le centre du visage (plan médio-sagittal). (Pour éviter ’ tout agrandissement horizontal de l image.) ’ Manuel d utilisation Green16 (PHT-65LHS)
  • Seite 189 READY. ’ ’ Cliquez sur le bouton READY. L exposition aux rayons X n a pas encore commencé. Rendez-vous maintenant au chapitre 5.4 Exposition aux rayons X pour commencer ’ exposition. ’ Manuel d utilisation Green16 (PHT-65LHS)
  • Seite 190: Exposition Aux Rayons X

    ’ ’ interrupteur d exposition et maintenez le bouton enfoncé jusqu Appuyez sur l à ce ’ que l acquisition soit terminée. Jaune : Rayons X ON ’ ’ image apparaît sur l écran. ’ Manuel d utilisation Green16 (PHT-65LHS)
  • Seite 191 Sur le Console Software, le symbole « radiation » devient jaune et  le message « X-RAY » devient « X-RAY ON ». ’ ’ interrupteur d exposition lorsque le message « Image capturing is Relâchez l ’ completed » apparaît sur l écran. ’ Manuel d utilisation Green16 (PHT-65LHS)
  • Seite 192: Fin Du Scan

    Save pour sauvegarder les images. Pour consulter les images, double-cliquez sur celle présente dans la Patient List. Ez3D-i / Ez3D Plus se lancera alors automatiquement pour la vision en 3D. ’ Manuel d utilisation Green16 (PHT-65LHS)
  • Seite 193: Acquisition D'images 3D Model Scan

    écran tactile ou le logiciel de la console fonctionnant sur ’ ordinateur. Ils sont synchronisés et affichent les mêmes ’ paramètres d environnement. La modalité 3D MODEL Scan n’est pas disponible pour les  utilisateur des systèmes EasyDent / Ez3D Plus. ’ Manuel d utilisation Green16 (PHT-65LHS)
  • Seite 194 à son sujet. Si nécessaire, vous avez également la possibilité de choisir cette option manuellement. <Console Software> <Écran tactile> Groupe d'âge Norme de VATECH Child 2 ~ 12 ans Adult > 12 ans Woman ’ Manuel d utilisation Green16 (PHT-65LHS)
  • Seite 195  Le faisceau vertical est activé pour faciliter le positionnement du patient.  Les DAP (Dose Area Product / Produit-Dose-Surface), Scan Time et ’ afficheront sous la fenêtre Patient Information. Exposure Time s ’ Apporter le moulage en plâtre vers l équipement. ’ Manuel d utilisation Green16 (PHT-65LHS)
  • Seite 196: Model Positionnement

    (Pour éviter tout agrandissement horizontal de l image.) ’ ’ Cliquez sur le bouton READY. L exposition aux rayons X n a pas encore commencé. Rendez-vous maintenant au chapitre 6.3 Exposition aux rayons X pour commencer ’ exposition. ’ Manuel d utilisation Green16 (PHT-65LHS)
  • Seite 197 « X-RAY » devient « X-RAY ON ». ’ ’ Relâchez l interrupteur d exposition lorsque le message « Image capturing is ’ completed » apparaît sur l écran. ’ Retirez le moulage en plâtre de l équipement. ’ Manuel d utilisation Green16 (PHT-65LHS)
  • Seite 198: Consultation Des Images Acquises

    Pour consulter les images, double-cliquez sur celle présente dans la Patient List. ’ ’ Vous pouvez consulter les images acquises à l aide d une visionneuse STL tierce. ’ ’ informations, veuillez consulter le manuel d utilisation Pour plus d EzDent-i. ’ Manuel d utilisation Green16 (PHT-65LHS)
  • Seite 199 DEUTSCH Hinweis ....................... iii Konventionen in diesem Handbuch ..............iv 1. Überblick der Abbildungssysteme ............... 1 1.1 Geräteübersicht ..................3 1.2 Bedienfeld .................... 5 1.3 Touchscreen ..................6 1.4 Notfall-Stopp-Taste ................15 1.5 Belichtungsschalter ................16 2. Erste Schritte ....................18 2.1 Einschalten des Gerätes ..............
  • Seite 201: Hinweis

    Komplettsystem vereint. Dieses Handbuch beschreibt, wie Green16 (PHT-65LHS) zu bedienen ist Dieses Handbuch beschreibt, wie das System Green16 (PHT-65LHS) zu bedienen ist. Es wird empfohlen, dass Sie sich gründlich mit diesem Handbuch vertraut machen, um dieses Gerät so effektiv wie möglich anwenden zu können. Beachten Sie alle Vorsichts-, Sicherheitshinweise und Warnungen, die in diesem Handbuch vorkommen.
  • Seite 202: Konventionen In Diesem Handbuch

    Weist auf eine mögliche Gefahr der STRAHLUNG Aussetzung gegenüber Strahlung hin. Weist auf eine Komponente hin, die für EINZELANWENDUNG jeden neuen Patienten ausgetauscht werden muss. Zeigt an, dass ein Element empfindlich ist ESD- für Schäden durch elektrostatische Empfindlichkeit Entladungen (ESD). Green16 (PHT-65LHS) Handbuch...
  • Seite 203: Überblick Der Abbildungssysteme

    1. Überblick der Abbildungssysteme Überblick der Abbildungssysteme Green16 (PHT-65LHS) handelt es sich um ein fortschrittliches 4-in-1 digitales Röntgenbildsystem, das die Abbildungskomponenten PANO, CEPH (Optional), CBCT und 3D MODEL Scan in einem Komplettsystem vereint. Green16 (PHT-65LHS) ist ein Computertomografie-Röntgensystem für die Panorama-, Fernröntgen oder Schnittbild-Bildgebung der oralen Anatomie anhand einer...
  • Seite 204 1. Überblick der Abbildungssysteme Klassifizierungen (IEC 60601-1 6.1) Schutzgrad gegen das Eindringen von Wasser: Gewöhnliche Ausstattung: IPX0  Schutzgrad gegen Elektroschocks: Schutzklasse 1, Anwendungsteil des Typs B:  Schläfenstütze, Kinnstütze und Aufbisse. Green16 (PHT-65LHS) Handbuch...
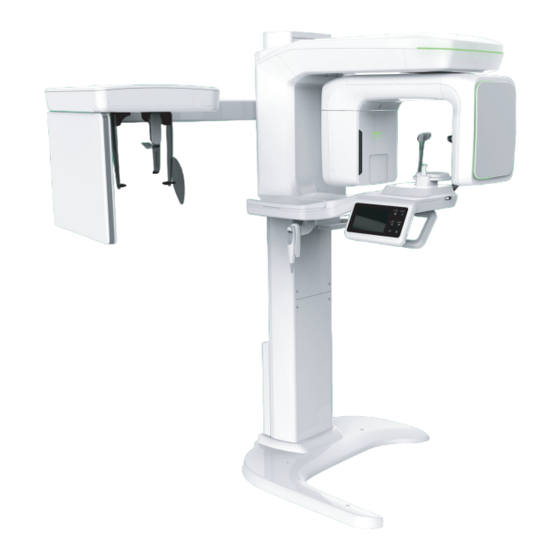
  • Seite 205: Geräteübersicht

    Sichern den Kopf des Patienten während der CEPH- Ohrstopfen Aufnahme. Aufbewahrungs- Der Platz an dem Aufbisse, Kinnstützen und die behälter anderen Komponenten aufbewahrt werden können. für Zubehör Die Dreheinheit ist hieran befestigt. Vertikaler Halter Kann mit den Column UP/DOWN-Tasten gesteuert werden. Green16 (PHT-65LHS) Handbuch...
  • Seite 206 Der Platz für die Ablage des Kinns. Mit der READY-Taste lässt sich der horizontale Laserstrahl bedienen, die Schläfenstütze öffnen/schließen, die Höhe des vertikalen Halters einstellen und der Betrieb vorbereiten. (Für Details siehe 1.2 Bedienfeld.) Bedienfeld Column Eingangssignalanschluss für D-Sub-Anschluss UP/DOWN-Schalter Green16 (PHT-65LHS) Handbuch...
  • Seite 207: Bedienfeld

    READY / RETURN ist. -Taste Setzt die Position der Dreheinheit zurück. Horizontal Beam Richtet den horizontalen Laserstrahl im PANO -Modus UP/DOWN-Taste aus. Bewegt den vertikalen Halter nach oben oder unten. Column UP/DOWN- Taste (Zur Einstellung der Höhe der Kinnstütze) Green16 (PHT-65LHS) Handbuch...
  • Seite 208: Touchscreen

    Andernfalls kann es zu körperlichen Verletzungen des Patienten oder zur Beschädigung des Gerätes kommen. Bedienen Sie den Touchscreen immer durch sanftes Drücken mit  der Fingerspitze. Verwenden Sie keine spitzen Gegenstände wie Kugelschreiber  oder Bleistifte. Dies kann zu Schäden am Bildschirm führen. Green16 (PHT-65LHS) Handbuch...
  • Seite 209 Dient zum Einstellen der Röhrenspannung, des Röhrenstroms, des Geschlechts/der Altersgruppe, Einstellungen-Taste der Röntgenintensität, des Untersuchungstyps, des Aufnahmetyps, der Zahnbogenauswahl und Image option. Informationen der Zeigt die aktuellen Einstellungsinformationen an. Bildaufnahmeparamet (Modus, Röhrenspannung, Röhrenstrom, ereinstellungen Zahnbogenart, Aufnahmeoption und Pano-Option.) Green16 (PHT-65LHS) Handbuch...
  • Seite 210: Pano Einstellungsbildschirm

    Dient zur Auswahl des Geschlechts / der Altersgruppe des /Altersgruppe des Patienten. Patienten Dient zur Auswahl der Röntgenintensität. Je nach Kopfumfang des Patienten, kann die Röntgenintensität Röntgenintensität als Hard, Normal oder Soft klassifiziert werden: Soft ≤ Normal ≤ Hard Green16 (PHT-65LHS) Handbuch...
  • Seite 211 (Optional) / CBCT / MODEL) zurück. Dient zum Einstellen der Röhrenspannung, des Einstellungen- Röhrenstroms, des Geschlechts/der Altersgruppe, der Taste Röntgenintensität und der Image Option. Informationen der Zeigt die aktuellen Einstellungsinformationen an. Bildaufnahmeparam (Modus, Röhrenspannung, Röhrenstrom und etereinstellungen Aufnahmeoption) Green16 (PHT-65LHS) Handbuch...
  • Seite 212: Ceph Einstellungsbildschirm

    Röntgenintensität als Hard, Normal oder Soft klassifiziert werden: Soft ≤ Normal ≤ Hard Dient zur Auswahl zwischen „High Resolution" und Image Option „Green". (Bildqualität: High Resolution > Green) Schließt den Einstellungsbildschirm und kehrt zum CEPH- BEENDEN-Taste Hauptbildschirm zurück. Green16 (PHT-65LHS) Handbuch...
  • Seite 213 Dient zum Einstellen der Röhrenspannung, des Einstellungen- Röhrenstroms, des Geschlechts/der Altersgruppe, der Taste Röntgenintensität, der Image Option und Voxel Size. Informationen der Zeigt die aktuellen Einstellungsinformationen an. Bildaufnahmeparam (Modus, Röhrenspannung, Röhrenstrom, Image option etereinstellungen und Voxel size) Green16 (PHT-65LHS) Handbuch...
  • Seite 214: Cbct Einstellungsbildschirm

    Dient zur Auswahl der Röntgenintensität. Je nach Kopfumfang des Patienten, kann die Röntgenintens Röntgenintensität als Hard, Normal oder Soft ität klassifiziert werden: Soft ≤ Normal ≤ Hard BEENDEN- Schließt den Einstellungsbildschirm und kehrt zum CBCT- Taste Hauptbildschirm zurück. Green16 (PHT-65LHS) Handbuch...
  • Seite 215 Kehrt zum Modusauswahlbildschirm (PANO / CEPH ZURÜCK-Taste (Optional) / CBCT / MODEL) zurück. Dient zum Einstellen der Röhrenspannung, des Einstellungen- Röhrenstroms, des Geschlechts/der Altersgruppe und Taste der Röntgenintensität. Informationen der Zeigt die aktuellen Einstellungsinformationen an. Bildaufnahmeparam (Modus, Röhrenspannung und Röhrenstrom) etereinstellungen Green16 (PHT-65LHS) Handbuch...
  • Seite 216: Model Scan-Einstellungsbildschirm

    Passt die Röhrenspannung (kVp) und den Röhrenstrom (mA) Steuertaste Geschlecht/Alt Dient zur Auswahl des Geschlechts / der Altersgruppe des ersgruppe des Patienten. Patienten Röntgenintens Dient zur Auswahl der Röntgenintensität. ität BEENDEN- Schließt den Einstellungsbildschirm und kehrt zum 3D MODEL Taste Scan-Hauptbildschirm zurück. Green16 (PHT-65LHS) Handbuch...
  • Seite 217: Notfall-Stopp-Taste

    Stopp-Taste um sofort die beweglichen Teile zu stoppen und jede Stromzufuhr an die Ausrüstung der elektrischen Komponenten abzuschneiden. Um das Gerät neu zu starten, drehen Sie die Notfall-Stopp-Taste im Uhrzeigersinn bis sie herausspringt. Die Notfall-Stopp-Taste befindet sich an der Unterseite des vertikalen Halters. Green16 (PHT-65LHS) Handbuch...
  • Seite 218: Belichtungsschalter

    Der Belichtungsschalter ist abnehmbar. Stellen Sie sicher,  dass das Kabel des Belichtungsschalters während des Betriebs nicht versehentlich abgetrennt wird. Halten Sie sprachlich/visuellen Kontakt mit dem Patienten  während der Aufnahme. Sollten während der Aufnahme Probleme auftreten, lassen Sie sofort den Belichtungsschalter los. Green16 (PHT-65LHS) Handbuch...
  • Seite 219: Absichtlich Freigelassen

    1. Überblick der Abbildungssysteme Absichtlich freigelassen Green16 (PHT-65LHS) Handbuch...
  • Seite 220: Erste Schritte

    Drücken Sie den Hauptstromschalter, welcher sich an der Unterseite des vertikalen Halters befindet, um das Gerät einzuschalten. Der Hauptstromschalter isoliert den elektrischen Schaltkreis vom Versorgungsnetz von allen Polen gleichzeitig. Stellen Sie sicher, dass das grüne LED-Licht an der Oberseite des Gerätes eingeschaltet ist. Green16 (PHT-65LHS) Handbuch...
  • Seite 221: Ausführen Des Image Viewer (Ezdent-I / Easydent)

    Hersteller, ist streng verboten. Für Fragen zur Cyber-Sicherheit der Software und zusammenhängende medizinische Geräte wenden Sie sich bitte an den Hersteller. Für das dentale Computertomografie-Röntgensystem Green16 (PHT-65LHS) Sowohl 3D viewer (Ez3D-i / Ez3D Plus) als auch die Konsolensoftware werden über die Software 2D viewer (EzDent-i / EasyDent) aufgerufen.
  • Seite 222: Neuen Patientendatensatz Erstellen

    Tragen Sie die notwendigen Patienteninformationen ein. Chart Number, E-Mail address, First Name und Last Name sind erforderliche Felder, die angegeben werden müssen. (Die Patientennummer wird automatisch ausgefüllt.) Klicken Sie auf die Add-Taste, um die Patientenakte zu speichern. Green16 (PHT-65LHS) Handbuch...
  • Seite 223 Tragen Sie die notwendigen Patienteninformationen ein. Chart Number, First Name und Last Name sind erforderliche Felder, die angegeben werden müssen. Alle anderen Felder sind optional, es wird jedoch empfohlen, sie ebenfalls auszufüllen. Klicken Sie auf die Add-Taste, um die Patientenakte zu speichern. Green16 (PHT-65LHS) Handbuch...
  • Seite 224: Aufrufen Von Patientenakten

    Klicken Sie doppelt auf das Tastatursymbol, um sich die virtuelle Tastatur anzeigen zu lassen. Sie können mit der virtuellen Tastatur nach Patienteninformationen suchen. Klicken Sie doppelt auf die Patienteninformation, um sich mehr Details über den Patienten, wie unten angegeben, anzeigen zu lassen. Green16 (PHT-65LHS) Handbuch...
  • Seite 225 Geben Sie die Chart No., First name oder den Last name des Patienten ein, indem Sie auf die Maus der virtuellen Tastatur und dann auf die Enter-Taste klicken. (Der Vorgang kann ebenfalls über die reguläre Tastatur ausgeführt werden.) Patienteninformationen können im Patient Information-Feld und unter Patient List angezeigt werden. Green16 (PHT-65LHS) Handbuch...
  • Seite 226: Initiieren Der Konsolensoftware

    (CT, Panorama oder Cephalo) aus. Der Hauptbildschirm des ausgewählten Modus erscheint. Von dem Hauptbildschirm aus können Sie die Bildaufnahmeparameter Einstellungen vor dem Erfassen eines Bildes konfigurieren. Gehen Sie zu folgenden Kapiteln (3 ~ 6) für weitere Information zur Bildaufnahme. Green16 (PHT-65LHS) Handbuch...
  • Seite 227 Bildaufnahmemodus-Taste oben links. Der Hauptbildschirm des ausgewählten Modus erscheint. Von dem Hauptbildschirm aus können Sie die Bildaufnahmeparameter Einstellungen vor dem Erfassen eines Bildes konfigurieren. Gehen Sie zu folgenden Kapiteln (3 ~ 6) für weitere Information zur Bildaufnahme. Green16 (PHT-65LHS) Handbuch...
  • Seite 228: Erstellen Von Pano Bildern

    Andernfalls muss zu 2. Erste Schritte zurückkehren und den ersten Schritt abschließen. Sie können die Bildparameter entweder auf dem Touchscreen oder der Konsolensoftware, die auf dem PC läuft, einstellen. Sie werden synchronisiert und zeigen die gleichen Umgebungseinstellungen an. Green16 (PHT-65LHS) Handbuch...
  • Seite 229: Beschreibung

    Minimiert die Unterschiede in der Bildqualität entsprechend der Positionierung des Patienten und der Zahnbogenform.  Liefert Mehrfach-Panoramabilder mit unterschiedlichen Fokusebenen zusammen mit einem typischen Insight PAN Panoramabild. (Optional)  Ermöglicht die detaillierte Überprüfung von Bildern in Tiefenrichtung. Green16 (PHT-65LHS) Handbuch...
  • Seite 230 Image Option-Feld ausgeblendet. Wählen Sie einen Arch. <Konsolensoftware> <Touchscreen> Zahnbogenauswahl Beschreibung Panoramabild eines V-förmigen Gaumenbogens (geringe Narrow Anzahl an weiblichen Erwachsenen) Panoramabild eines normalen Gaumenbogens eines Normal Erwachsenen Panoramabild eines viereckigen Gaumenbogens (geringe Wide Anzahl an männlichen Erwachsenen) Green16 (PHT-65LHS) Handbuch...
  • Seite 231 „PANO Examination“-Feld deaktiviert. Falls Sie eine PANO Examination-Option auswählen wollen, führen Sie bitte die Zahnbogenauswahl erneut aus. Das Geschlecht / die Altersgruppe des Patienten wird automatisch anhand der Patientendaten ausgewählt. Wenn nötig können Sie die Option manuell auswählen. Green16 (PHT-65LHS) Handbuch...
  • Seite 232 Geschlechts / der Altersgruppe des Patienten und der Röntgenintensität konfiguriert. Klicken Sie auf den NACH OBEN/UNTEN-Pfeil, um kVp und mA anzupassen. Die Dosis kann jeweils in Schritten von ±1 kVp und ±0,1 mA angepasst werden. <Konsolensoftware> <Touchscreen> Green16 (PHT-65LHS) Handbuch...
  • Seite 233  Der vertikale Laserstrahl wird aktiviert, um die Positionierung des Patienten zu vereinfachen.  DAP (Dose Area Product - Dosisflächenprodukt), Scan Time und Exposure Time werden im Patient Information-Fenster unten angezeigt. 10. Führen Sie den Patienten zum Gerät. Green16 (PHT-65LHS) Handbuch...
  • Seite 234: Patienten-Positionierung

    Geisterbilder hervorrufen und somit die Bildqualität verringern. Legen Sie dem Patienten eine Bleischürze an, um ihn vor der Reststrahlung zu schützen. Passen Sie die Höhe des Geräts mit der Column UP/DOWN-Taste oder der Schalteroption an die Größe des Patienten an. – <Bedienfeld LCD-Typ> Green16 (PHT-65LHS) Handbuch...
  • Seite 235 Position zu verharren. Die Griffe gut festhalten.  Den Brustkorb gegen das Gerät drücken.  Beide Füße nah an die Innenseite des Sockels stellen.  Beide Schultern parallel halten.  Die Wirbelsäule gerade halten und still stehen.  Green16 (PHT-65LHS) Handbuch...
  • Seite 236 Lassen Sie den Patienten auf den Aufbiss entlang der Rillen mit seinen Vorderzähnen beißen. Lassen Sie den Patienten die Körperhaltung wie folgt einnehmen: Den Mund geschlossen halten.  Die Zunge an den oberen Gaumen schieben.  Augen schließen.  Green16 (PHT-65LHS) Handbuch...
  • Seite 237: Zahnlose Patienten-Positionierung

    Position zu verharren. Die Griffe gut festhalten.  Den Brustkorb gegen das Gerät drücken.  Beide Füße nah an die Innenseite des Sockels stellen.  Beide Schultern parallel halten.  Die Wirbelsäule gerade halten und still stehen.  Green16 (PHT-65LHS) Handbuch...
  • Seite 238 3. Erstellen von PANO Bildern Lassen Sie den Patienten die Körperhaltung wie folgt einnehmen: Den Mund geschlossen halten.  Die Zunge an den oberen Gaumen schieben.  Augen schließen.  Green16 (PHT-65LHS) Handbuch...
  • Seite 239: Laserstrahl-Ausrichtung

    Taste / Frankfurt-Linie Eckzahn-Laserstrahl Horizontal Laserstrahl DOWN- Taste Weisen Sie den Patienten an zu lächeln und richten Sie den Eckzahn-Laserstrahl an der Mitte der Eckzähne aus. Nutzen Sie den Eckzahn-Laserstrahl-Hebel zur Ausrichtung des Strahls. Eckzahn-Laserstrahl Eckzahn-Laserstrahl- Hebel Green16 (PHT-65LHS) Handbuch...
  • Seite 240: Abschließende Patienten-Positionierung

    Vergewissern Sie sich, dass die Schläfenstützen sich in der GESCHLOSSEN-Position befinden, bevor Sie auf die READY-Taste klicken. Klicken Sie auf die READY-Taste. Die Röntgenstrahlung wird noch nicht abgegeben. Gehen Sie nun zu 3.3 Röntgenaufnahme, um die Aufnahme zu starten. Green16 (PHT-65LHS) Handbuch...
  • Seite 241 Verbreitern Sie die Schläfenstütze mit der Temple Supports OPEN/CLOSE-Taste auf dem Bedienfeld. Führen Sie den Patienten zum Gerät. Passen Sie die Höhe des Geräts mit der Column UP/DOWN-Taste oder der Schalteroption so an, dass das Kinn des Patienten die Kinnstütze erreicht. Green16 (PHT-65LHS) Handbuch...
  • Seite 242  Augen schließen.   Wie im Bild dargestellt, sollte die Positionierhilfe der integrierten Kinnstütze den Acanthion Punkt des Patienten berühren.  Weisen Sie den Patienten an, diese Position so lange beizubehalten, bis der Vorgang abgeschlossen ist. Green16 (PHT-65LHS) Handbuch...
  • Seite 243 Gesicht des Patienten aus. Positionieren Sie den Laserstrahl mithilfe der Horizontal Beam-Taste auf dem Bedienfeld. Vergewissern Sie sich, dass der horizontale Laserstrahl horizontal am Gesicht des Patienten ausgerichtet ist. Vertikaler Laserstrahl / Median-sagittale Linie Horizontal Laserstrahl UP-Taste Horizontaler Laserstrahl / Frankfurt-Linie Horizontal Laserstrahl DOWN-Taste Green16 (PHT-65LHS) Handbuch...
  • Seite 244 Vergewissern Sie sich, dass die Schläfenstützen sich in der GESCHLOSSEN-Position befinden, bevor Sie auf die READY-Taste klicken. Klicken Sie auf die READY-Taste. Die Röntgenstrahlung wird noch nicht abgegeben. 3. Gehen Sie nun zu 3.3 Röntgenaufnahme, um die Aufnahme zu starten. Green16 (PHT-65LHS) Handbuch...
  • Seite 245 Kinnstütze zu platzieren und den Kopf um 5˚ nach vorne zu beugen. Lassen Sie den Patienten die Körperhaltung wie folgt einnehmen: Den Mund geschlossen halten.  Die Zunge an den oberen Gaumen schieben.  Augen schließen.  Green16 (PHT-65LHS) Handbuch...
  • Seite 246  Weisen Sie den Patienten an, diese Position so lange beizubehalten, bis der Vorgang abgeschlossen ist. Laserstrahl-Ausrichtung Dieser Vorgang ist mit dem Vorgang für den TMJ Open-Modus identisch. Abschließende Patienten-Positionierung Dieser Vorgang ist mit dem Vorgang für den TMJ Open-Modus identisch. Green16 (PHT-65LHS) Handbuch...
  • Seite 247 Position zu verharren. Die Griffe gut festhalten.  Den Brustkorb gegen das Gerät drücken.  Beide Füße nah an die Innenseite des Sockels stellen.  Beide Schultern parallel halten.  Die Wirbelsäule gerade halten und still stehen.  Green16 (PHT-65LHS) Handbuch...
  • Seite 248  Augen schließen.   Wie im Bild dargestellt, sollte die Positionierhilfe der integrierten Kinnstütze den Acanthion Punkt des Patienten berühren.  Weisen Sie den Patienten an, diese Position so lange beizubehalten, bis der Vorgang abgeschlossen ist. Green16 (PHT-65LHS) Handbuch...
  • Seite 249 Vergewissern Sie sich, dass die Schläfenstützen sich in der GESCHLOSSEN-Position befinden, bevor Sie auf die READY-Taste klicken. Klicken Sie auf die READY-Taste. Die Röntgenstrahlung wird noch nicht abgegeben. Gehen Sie nun zu 3.3 Röntgenaufnahme, um die Aufnahme zu starten. Green16 (PHT-65LHS) Handbuch...
  • Seite 250: Röntgenaufnahme

    Verlassen Sie den Röntgenraum und schließen Sie die Tür. Der Bediener muss während des Bildaufnahme sprachlichen/visuellen Kontakt mit dem Patienten halten. Drücken und halten Sie den Belichtungsschalter gedrückt, bis die Bildaufnahme abgeschlossen ist. Gelb: Röntgen ein Das Bild erscheint auf dem Bildschirm. Green16 (PHT-65LHS) Handbuch...
  • Seite 251: Abschluss Des Scanvorgangs

    Die Bilder werden automatisch gesichert, wenn die automatische Sicherung als Standardoption konfiguriert wurde. Wenn sie nicht als Standard konfiguriert wurde, dann klicken Sie auf die Save-Taste, um die Bilder zu sichern. Um das Bild zu überprüfen, klicken Sie jenes von der Patient List doppelt an. Green16 (PHT-65LHS) Handbuch...
  • Seite 252: Erstellen Von Ceph Bildern (Optional)

    Um CEPH-Bilder zu erstellen, muss 2. Erste Schritte zuerst ausgeführt werden. Sie können die Bildparameter entweder auf dem Touchscreen oder der Konsolensoftware, die auf dem PC läuft, einstellen. Sie werden synchronisiert und zeigen die gleichen Umgebungseinstellungen an. Green16 (PHT-65LHS) Handbuch...
  • Seite 253 Die CEPH-Taste ist nur verfügbar, wenn die Anlage mit dem CEPH- Bildaufnahmeprogramm ausgestattet ist. Wählen Sie eine Image Option. (Klicken Sie vor der Auswahl von Optionen auf dem Touchscreen den Einstellungen-Knopf.) <Konsolensoftware> <Touchscreen> Wählen Sie im CEPH Examination-Feld ein Untersuchungsprogramm aus. <Konsolensoftware> <Touchscreen> Green16 (PHT-65LHS) Handbuch...
  • Seite 254 Je nach Kopfumfang des Patienten, kann die Röntgenintensität als Hard, Normal oder Soft klassifiziert werden: ≤ ≤ Soft Normal Hard Durchschnittlich Angebot Altersgruppe Röntgenintensität Kopfumfang (cm) (cm) >53±3 Hard Child 53±3 Normal 53±3 <53±3 Soft >56±3 Hard Adult 56±3 56±3 Normal <56±3 Soft Green16 (PHT-65LHS) Handbuch...
  • Seite 255 <Konsolensoftware> <Touchscreen> Nach dem Klicken auf die CONFIRM-Taste werden folgende Vorgänge ausgeführt:  DAP (Dose Area Product - Dosisflächenprodukt), Scan Time und Exposure Time werden im Patient Information-Fenster unten angezeigt. Führen Sie den Patienten zum Gerät. Green16 (PHT-65LHS) Handbuch...
  • Seite 256: Patienten-Positionierung

    Geisterbilder hervorrufen und somit die Bildqualität verringern. Legen Sie dem Patienten eine Bleischürze an, um ihn vor der Reststrahlung zu schützen. Passen Sie die Höhe des Geräts mit der Column UP/DOWN-Taste oder der Schalteroption an die Größe des Patienten an. – <Bedienfeld LCD-Typ> Green16 (PHT-65LHS) Handbuch...
  • Seite 257 Nutzen Sie die Porion-Positionsreferenzanzeige, die im erfassten Bild angezeigt wird, um die Porion-Position mühelos zu bestimmen. Führen Sie den Patienten zum CEPH-Gerät. Weisen Sie den Patienten an, seinen Nacken und seine Schulter zu entspannen und gerade zu stehen. Green16 (PHT-65LHS) Handbuch...
  • Seite 258 Weisen Sie den Patienten an, zuerst zu schlucken, bevor er den Mund schließen und in dieser Position verharren soll, bis die Bildaufnahme abgeschlossen ist. Klicken Sie auf die READY-Taste. Die Röntgenstrahlung wird noch nicht abgegeben. 10. Gehen Sie nun zu 4.3 Röntgenaufnahme, um die Aufnahme zu starten. Green16 (PHT-65LHS) Handbuch...
  • Seite 259 Modus nicht verwendet. Führen Sie den Patienten zum CEPH-Gerät. Weisen Sie den Patienten an, aufrecht mit dem Gesicht zum Sensor zu stehen. Vergewissern Sie sich, dass die Schultern des Patienten gerade sind und sein Nacken entspannt ist. Green16 (PHT-65LHS) Handbuch...
  • Seite 260 Weisen Sie den Patienten an, zuerst zu schlucken, bevor er den Mund schließen und in dieser Position verharren soll, bis die Bildaufnahme abgeschlossen ist. Klicken Sie auf die READY-Taste. Die Röntgenstrahlung wird noch nicht abgegeben. 10. Gehen Sie nun zu 4.3 Röntgenaufnahme, um die Aufnahme zu starten. Green16 (PHT-65LHS) Handbuch...
  • Seite 261 Drehen Sie den Nasenpositionierer zur Positionsmarkierung des SMV-Modus wie unten dargestellt. Klappen Sie den Nasenpositionierer nach oben. Der Nasenpositionierer wird im SMV- Modus nicht verwendet. Führen Sie den Patienten zum CEPH-Gerät. Weisen Sie den Patienten an, aufrecht mit dem Gesicht zur Röntgenröhre zu stehen. Green16 (PHT-65LHS) Handbuch...
  • Seite 262 Weisen Sie den Patienten an, zuerst zu schlucken, bevor er den Mund schließen und in dieser Position verharren soll, bis die Bildaufnahme abgeschlossen ist. Klicken Sie auf die READY-Taste. Die Röntgenstrahlung wird noch nicht abgegeben. 10. Gehen Sie nun zu 4.3 Röntgenaufnahme, um die Aufnahme zu starten. Green16 (PHT-65LHS) Handbuch...
  • Seite 263 Kopf um 30° - 40° nach hinten neigen soll. Weisen Sie den Patienten an, in dieser Position zu verharren, bis die Bildaufnahme abgeschlossen ist. Klicken Sie auf die READY-Taste. Die Röntgenstrahlung wird noch nicht abgegeben. Gehen Sie nun zu 4.3 Röntgenaufnahme, um die Aufnahme zu starten. Green16 (PHT-65LHS) Handbuch...
  • Seite 264: Befestigen Der Carpus-Platte

    Klappen Sie den Nasenpositionierer nach oben. Der Nasenpositionierer wird im Carpus-Modus nicht verwendet. Setzen Sie die zwei Enden der Carpus-Platte in die zwei Löcher des CEPH-Geräts, wie unten dargestellt, ein. Vergewissern Sie sich, dass die Carpus-Platte sicher befestigt ist. Green16 (PHT-65LHS) Handbuch...
  • Seite 265 Weisen Sie den Patienten an, seine Augen zu schließen und still zu stehen, bis die Bildaufnahme abgeschlossen ist. Klicken Sie auf die READY-Taste. Die Röntgenstrahlung wird noch nicht abgegeben. Gehen Sie nun zu 4.3 Röntgenaufnahme, um die Aufnahme zu starten. Green16 (PHT-65LHS) Handbuch...
  • Seite 266: Röntgenaufnahme

    Atem anzuhalten und nicht zu schlucken. Der Patient darf sich erst bewegen, wenn die Tempelstützen geöffnet sind. Verlassen Sie den Röntgenraum und schließen Sie die Tür. Drücken und halten Sie den Belichtungsschalter gedrückt, bis die Bildaufnahme abgeschlossen ist. Gelb: Röntgen ein Das Bild erscheint auf dem Bildschirm. Green16 (PHT-65LHS) Handbuch...
  • Seite 267: Abschluss Des Scanvorgangs

    Die Bilder werden automatisch gesichert, wenn die automatische Sicherung als Standardoption konfiguriert wurde. Wenn sie nicht als Standard konfiguriert wurde, dann klicken Sie auf die Save-Taste, um die Bilder zu sichern. Um das Bild zu überprüfen, klicken Sie jenes von der Patient List doppelt an. Green16 (PHT-65LHS) Handbuch...
  • Seite 268: Erstellen Von Cbct Bildern

    Um CBCT-Bilder zu erstellen, muss 2. Erste Schritte zuerst ausgeführt werden. Sie können die Bildparameter entweder auf dem Touchscreen oder der Konsolensoftware, die auf dem PC läuft, einstellen. Sie werden synchronisiert und zeigen die gleichen Umgebungseinstellungen an. Green16 (PHT-65LHS) Handbuch...
  • Seite 269 Klicken Sie auf die CBCT-Taste auf dem Hauptbildschirm. <Konsolensoftware> <Touchscreen> Die CEPH-Taste ist nur verfügbar, wenn die Anlage mit dem CEPH- Bildaufnahmeprogramm ausgestattet ist. FOV-Größe auswählen (mit „Vertical Option“ (Option Vertikal), „Horizontal Option“ (Option Horizont), „Tooth Option“ (Option Zahn).) < Konsolensoftware > <Touch Screen> Green16 (PHT-65LHS) Handbuch...
  • Seite 270 Wählen Sie eine Image Option. (Klicken Sie vor der Auswahl von Optionen auf dem Touchscreen den Einstellungen-Knopf.) <Konsolensoftware> <Touchscreen> Wählen Sie eine Voxel Size aus. MAR (Metal Artifact Reduction) wird automatisch angewendet, wenn sich Metallgegenstände im Bild befinden. MAR kann möglicherweise die Bildrekonstruktionszeit verlängern. Green16 (PHT-65LHS) Handbuch...
  • Seite 271 Je nach Kopfumfang des Patienten, kann die Röntgenintensität als Hard, Normal oder Soft klassifiziert werden: ≤ ≤ Soft Normal Hard Durchschnittlich Angebot Altersgruppe Röntgenintensität Kopfumfang (cm) (cm) >53±3 Hard Child 53±3 Normal 53±3 <53±3 Soft >56±3 Hard Adult 56±3 56±3 Normal <56±3 Soft Green16 (PHT-65LHS) Handbuch...
  • Seite 272  Der vertikale Laserstrahl wird aktiviert, um die Positionierung des Patienten zu vereinfachen.  DAP (Dose Area Product - Dosisflächenprodukt), Scan Time und Exposure Time werden im Patient Information-Fenster unten angezeigt. 10. Führen Sie den Patienten zum Gerät. Green16 (PHT-65LHS) Handbuch...
  • Seite 273: Doppelscan-Bild Erstellen (Optional)

    Die Konsolensoftware des PCs hat die gleiche Funktion wie der Touchscreen des Gerätes. Die Konsolensoftware und der Touchscreen sind in Echtzeit miteinander verbunden, und die Umgebungseinstellungen sind identisch. Klicken Sie auf die Schaltfläche „Double Scan“ auf dem CBCT-Hauptbildschirm. Green16 (PHT-65LHS) Handbuch...
  • Seite 274 Schaltfläche „Settings“.) <Konsolensoftware> <Touchscreen> Das Geschlecht / die Altersgruppe des Patienten wird automatisch anhand der Patienteninformationen ausgewählt. Sie können bei Bedarf manuell auswählen. <Konsolensoftware> <Touchscreen> Altersgruppe VATECH Standard Child 2 ~ 12 Alter Adult > 12 Alter Green16 (PHT-65LHS) Handbuch...
  • Seite 275 <Konsolensoftware> <Touchscreen> Nachdem Sie die Bedingungen „Aufnahme“ eingestellt haben, klicken Sie auf die Schaltfläche CONFIRM. <Konsolensoftware> <Touchscreen> Wenn Sie auf die Schaltfläche CONFIRM klicken  Die Rotationseinheit fährt in die Ausgangsposition.  Der vertikale Strahl wird aktiviert. Green16 (PHT-65LHS) Handbuch...
  • Seite 276 Weitere Informationen zur Ausrichtung der Körperhaltung des Patienten finden Sie in Abschnitt 5.3 Patienten-Positionierung. Drücken Sie den READY-Knopf. Zu diesem Zeitpunkt werden Röntgenstrahlen nicht bestrahlt. Gehen Sie zu 5.4 Röntgenaufnahme und fahren Sie mit der Röntgenaufnahme fort. 10. Führen Sie den Patienten aus dem Röntgenraum heraus. Green16 (PHT-65LHS) Handbuch...
  • Seite 277: Schritte Des Zweiten Scans Bei Doppelscan

    Wählen Sie den Maxilla als Vertical Option. Es wird automatisch ausgewählt. Die Röhrenspannungs- und Röhrenstromwerte werden automatisch entsprechend der Patientensituation und der Röntgenintensität eingestellt. Wenn Sie auf die Pfeiltaste klicken, können Sie Feineinstellungen in Schritten von ±1 kVp, ±0,1 mA vornehmen. <Konsolensoftware> <Touchscreen> Green16 (PHT-65LHS) Handbuch...
  • Seite 278 Gehen Sie zu 5.4 Röntgenaufnahme und fahren Sie mit der Röntgenaufnahme fort. Führen Sie den Patienten aus dem Röntgenraum heraus. Gehen Sie zu 5.5 Abschluss des Scanvorgangs um die Aufnahme zu beenden und das Bild zu überprüfen. Green16 (PHT-65LHS) Handbuch...
  • Seite 279: Patienten-Positionierung

    Geisterbilder hervorrufen und somit die Bildqualität verringern. Legen Sie dem Patienten eine Bleischürze an, um ihn vor der Reststrahlung zu schützen. Passen Sie die Höhe des Geräts mit der Column UP/DOWN-Taste oder der Schalteroption an die Größe des Patienten an. – <Bedienfeld LCD-Typ> Green16 (PHT-65LHS) Handbuch...
  • Seite 280: Normale Patienten-Positionierung

    Position zu verharren. Die Griffe gut festhalten.  Den Brustkorb gegen das Gerät drücken.  Beide Füße nah an die Innenseite des Sockels stellen.  Beide Schultern parallel halten.  Die Wirbelsäule gerade halten und still stehen.  Green16 (PHT-65LHS) Handbuch...
  • Seite 281 Lassen Sie den Patienten auf den Aufbiss entlang der Rillen mit seinen Vorderzähnen beißen. Lassen Sie den Patienten die Körperhaltung wie folgt einnehmen: Den Mund geschlossen halten.  Die Zunge an den oberen Gaumen schieben.  Augen schließen.  Green16 (PHT-65LHS) Handbuch...
  • Seite 282: Doppelscan (Unterkiefer) - Patientenpositionierung

    Den Brustkorb gegen das Gerät drücken.  Beide Füße nah an die Innenseite des Sockels stellen.  Beide Schultern parallel halten.  Die Wirbelsäule gerade halten und still stehen.  Lassen Sie den Patienten die Körperhaltung wie folgt einnehmen: Augen schließen.  Green16 (PHT-65LHS) Handbuch...
  • Seite 283: Doppelscan (Oberkiefer) - Patientenpositionierung

    Bedienfeld, um die Schläfenstützen zu erweitern. Führen Sie den Patienten zum Gerät. Passen Sie die Höhe des Geräts mit der Schaltfläche Vertical Frame Up/Down oder der Schalteroption so an, dass das Kinn des Patienten die Kinnstütze erreicht. Green16 (PHT-65LHS) Handbuch...
  • Seite 284: Tmj Patienten-Positionierung

    Schalteroption so an, dass das Kinn des Patienten die Kinnstütze erreicht. Weisen Sie den Patienten an, in der Mitte des Geräte zu stehen und in der unten genannten Position zu verharren. Die Griffe gut festhalten.  Den Brustkorb gegen das Gerät drücken.  Green16 (PHT-65LHS) Handbuch...
  • Seite 285: Laserstrahl-Ausrichtung

    Im Gegensatz zum PANO-Modus bewegt sich der horizontale Laserstrahl nicht nur im CT-Modus. Dies ist keine Fehlfunktion. Richten Sie den vertikalen Strahl an der Mitte des Gesichtes (median-sagittale Linie) aus. (Damit soll eine horizontale Verbreiterung des Bild verhindert werden.) Green16 (PHT-65LHS) Handbuch...
  • Seite 286: Abschließende Patienten-Positionierung

    Vergewissern Sie sich, dass die Schläfenstützen sich in der GESCHLOSSEN-Position befinden, bevor Sie auf die READY-Taste klicken. Klicken Sie auf die READY-Taste. Die Röntgenstrahlung wird noch nicht abgegeben. Gehen Sie nun zu 5.4 Röntgenaufnahme, um die Aufnahme zu starten. Green16 (PHT-65LHS) Handbuch...
  • Seite 287: Röntgenaufnahme

    Verlassen Sie den Röntgenraum und schließen Sie die Tür. Der Bediener muss während des Bildaufnahme sprachlichen/visuellen Kontakt mit dem Patienten halten. Drücken und halten Sie den Belichtungsschalter gedrückt, bis die Bildaufnahme abgeschlossen ist. Gelb: Röntgen ein Das Bild erscheint auf dem Bildschirm. Green16 (PHT-65LHS) Handbuch...
  • Seite 288  An der Konsolensoftware leuchtet das Strahlensymbol gelb auf und „ “ „ “ die Anzeige X-RAY wechselt zu X-RAY ON „ Lassen Sie den Belichtungsschalter los, wenn die Meldung Bildaufnahme ist “ abgeschlossen. auf dem Bildschirm erscheint. Green16 (PHT-65LHS) Handbuch...
  • Seite 289: Abschluss Des Scanvorgangs

    Standardoption konfiguriert wurde. Wenn sie nicht als Standard konfiguriert wurde, dann klicken Sie auf die Save-Taste, um die Bilder zu sichern. Um das Bild zu überprüfen, klicken Sie jenes von der Patient List doppelt an. Dann wird Ez3D-i / Ez3D Plus automatisch für die 3D-Ansicht ausgeführt. Green16 (PHT-65LHS) Handbuch...
  • Seite 290: Erstellen Von 3D Model Scan-Bildern

     Sie können die Bildparameter entweder auf dem Touchscreen oder der Konsolensoftware, die auf dem PC läuft, einstellen. Sie werden synchronisiert und zeigen die gleichen Umgebungseinstellungen an.  Der 3D MODEL Scan-Modus ist nicht für Benutzer von EasyDent / Ez3D Plus verfügbar. Green16 (PHT-65LHS) Handbuch...
  • Seite 291 <Touchscreen> Das Geschlecht / die Altersgruppe des Patienten wird automatisch anhand der Patientendaten ausgewählt. Wenn nötig können Sie die Option manuell auswählen. <Konsolensoftware> <Touchscreen> Altersgruppe VATECH Standard Child 2 ~ 12 Alter Adult > 12 Alter Woman Green16 (PHT-65LHS) Handbuch...
  • Seite 292  Der vertikale Laserstrahl wird aktiviert, um die Positionierung des Patienten zu vereinfachen.  DAP (Dose Area Product - Dosisflächenprodukt), Scan Time und Exposure Time werden im Patient Information-Fenster unten angezeigt. Bringen Sie den Gipsabdruck zum Gerät. Green16 (PHT-65LHS) Handbuch...
  • Seite 293: Model-Positionierung

    Die median-sagittale Ebene des Laserstrahls an der Mitte des Gipsabdrucks ausrichten. (Um eine horizontale Verbreiterung des Bildes zu verhindern.) Klicken Sie auf die READY-Taste. Die Röntgenstrahlung wird noch nicht abgegeben. Gehen Sie nun zu 6.3 Röntgenaufnahme, um die Aufnahme zu starten. Green16 (PHT-65LHS) Handbuch...
  • Seite 294: Röntgenaufnahme

     An der Konsolensoftware leuchtet das Strahlensymbol gelb auf und „ “ „ “ die Anzeige X-RAY wechselt zu X-RAY ON „ Lassen Sie den Belichtungsschalter los, wenn die Meldung Bildaufnahme ist “ abgeschlossen. auf dem Bildschirm erscheint. Nehmen Sie den Gipsabdruck vom Gerät. Green16 (PHT-65LHS) Handbuch...
  • Seite 295: Überprüfen Der Bildaufnahme

    Sie auf die Save-Taste, um die Bilder zu sichern. Um das Bild zu überprüfen, klicken Sie jenes von der Patient List doppelt an. Das erstellte Bild kann mit einem STL-Viewer eines Drittanbieters überprüft werden. Weitere Informationen finden Sie im EzDent-i Handbuch. Green16 (PHT-65LHS) Handbuch...
  • Seite 297 ITALIANO Avviso ......................... iii Convenzioni di questo manuale ............... iv 1. Panoramica sistema di acquisizione immagini ........... 1 1.1 Panoramica attrezzatura ..............3 1.2 Pannello di controllo ................5 1.3 Touch screen ..................6 1.4 Interruttore arresto di emergenza ............15 1.5 Interruttore esposizione ..............
  • Seite 299: Avviso

    Tuttavia, Green CT non è il nome di un prodotto o di un brand. Green16 (PHT-65LHS) è un avanzato sistema di diagnosi digitale che incorpora le funzioni di scansione e acquisizione delle immagini PANO, CEPH (opzionale), CBCT e 3D MODEL in un unico sistema.
  • Seite 300: Convenzioni Di Questo Manuale

    Indica un potenziale pericolo legato RADIAZIONI all'esposizione a radiazioni. Indica un componente che deve essere USO SINGOLO sostituito per ciascun paziente. Sensibilità Indica la sensibilità di un oggetto ai danni dovuti a scariche elettrostatiche. Manuale d'istruzioni Green16 (PHT-65LHS)
  • Seite 301: Panoramica Sistema Di Acquisizione Immagini

    X 4 in 1, che include PANO, CEPH (opzionale), CBCT e le capacità di acquisizione immagine 3D MODEL Scan in un solo sistema. Green16 (PHT-65LHS) è un sistema a raggi X per tomografie computerizzate ideato per produrre immagini panoramiche, cefalometriche e in sezione dell'anatomia orale mediante una ricostruzione computerizzata dei dati dell'immagine a raggi X provenienti dal medesimo piano assiale a diverse angolazioni.
  • Seite 302 Classificazioni (IEC 60601-1 6.1) Grado di protezione contro l'ingresso di acqua: Attrezzatura ordinaria: IPX0  Grado di protezione contro le scosse elettriche: Attrezzatura di classe 1, parti  applicate tipo B: Supporti tempie, poggiamenti e morsi. Manuale d'istruzioni Green16 (PHT-65LHS)
  • Seite 303: Panoramica Attrezzatura

    Il righello utilizzato come riferimento in un'immagine acquisita che è diverso dalla dimensione effettiva Assicurano la testa del paziente durante l'acquisizione Sostegni orecchie dell'immagine CEPH. Custodia Il luogo dove morsi, complessivo poggiamento e gli componente altri componenti vengono conservati. incluso Manuale d'istruzioni Green16 (PHT-65LHS)
  • Seite 304 READY. (Per maggiori dettagli, fare riferimento a 1.2 Pannello di controllo.) Pannello di controllo Il segnale di ingresso per interruttore Column Connettore D-Sub UP/DOWN Manuale d'istruzioni Green16 (PHT-65LHS)
  • Seite 305: Pannello Di Controllo

    READY / RETURN Inizializza il posizionamento dell'unità rotante. Pulsante Horizontal Allinea il fascio orizzontale nella modalità PANO.. Beam UP/DOWN Sposta il telaio verticale verso l'alto e verso il basso Pulsante Column UP/DOWN (Per la regolazione dell'altezza del poggiamento) Manuale d'istruzioni Green16 (PHT-65LHS)
  • Seite 306: Touch Screen

    Azionare sempre il touch screen premendolo gentilmente con le  proprie dita. Non usare oggetti appuntiti quali penne a sfera o matite. Fare ciò  potrebbe causare danni allo schermo. Manuale d'istruzioni Green16 (PHT-65LHS)
  • Seite 307 Gruppo sesso/età, Intensità raggi X, Tipo esame, Tipo Impostazioni di acquisizione dell'immagine, Arcata e Image option.. Informazioni impostazioni Mostra le attuali informazioni sulle impostazioni. parametri (Modalità, Tensione tubo, Corrente tubo, Tipo arcata, acquisizione Opzioni immagine e Opzioni Pano.) dell'immagine Manuale d'istruzioni Green16 (PHT-65LHS)
  • Seite 308 Seleziona il gruppo sesso/età del paziente. paziente Seleziona l'intensità dei raggi X. A seconda della circonferenza della testa del Intensità raggi X paziente, l'intensità dei raggi X può essere classificata come Hard, Normal, o Soft: Soft ≤ Normal ≤ Hard Manuale d'istruzioni Green16 (PHT-65LHS)
  • Seite 309 (PANO / CEPH (opzionale) / CBCT / MODEL). Pulsante Regola la selezione di Tensione tubo, Gruppo Impostazioni sesso/età, Intensità raggi X e Image Option. Informazioni impostazioni Mostra le attuali informazioni sulle impostazioni. parametri (Modalità, Tensione tubo, Corrente tubo, e Opzioni acquisizione immagine) dell'immagine Manuale d'istruzioni Green16 (PHT-65LHS)
  • Seite 310 Hard, Normal, o Soft: Soft ≤ Normal ≤ Hard Seleziona tra “High Resolution” e “Green”. Image Option (Qualità immagine: High Resolution > Green) Chiude la Schermata impostazioni e torna alla CEPH Pulsante ESCI Schermata principale. Manuale d'istruzioni Green16 (PHT-65LHS)
  • Seite 311 Regola la selezione di Tensione tubo, Gruppo sesso/età, Impostazioni Intensità raggi X Image Option e Voxel Size. Informazioni impostazioni Mostra le attuali informazioni sulle impostazioni. parametri (Modalità, Tensione tubo, Corrente tubo, Image option e acquisizione Voxel size) dell'immagine Manuale d'istruzioni Green16 (PHT-65LHS)
  • Seite 312 A seconda della circonferenza della testa del Intensità raggi X paziente, l'intensità dei raggi X può essere classificata come Hard, Normal, o Soft: Soft ≤ Normal ≤ Hard Chiude la Schermata impostazioni e torna alla CBCT Pulsante ESCI Schermata principale. Manuale d'istruzioni Green16 (PHT-65LHS)
  • Seite 313 (PANO / CEPH (opzionale) / CBCT / MODEL). Pulsante Regola la selezione di Tensione tubo, Gruppo sesso/età Impostazioni e Intensità raggi X. Informazioni impostazioni Mostra le attuali informazioni sulle impostazioni. parametri (Modalità, Tensione tubo e Corrente tubo) acquisizione dell'immagine Manuale d'istruzioni Green16 (PHT-65LHS)
  • Seite 314 Regola Tensione tubo (kVp) e Corrente tubo (mA). (Pulsante di controllo) Gruppo sesso/età Seleziona il gruppo sesso/età del paziente. paziente Intensità raggi X Seleziona l'intensità dei raggi X. Chiude la Schermata impostazioni e torna alla 3D MODEL Pulsante ESCI Scan Schermata principale. Manuale d'istruzioni Green16 (PHT-65LHS)
  • Seite 315: Interruttore Arresto Di Emergenza

    Per riavviare l'attrezzatura, ruotare l'Interruttore arresto di emergenza in senso orario fino a quando non scatta. L'Interruttore arresto di emergenza si trova al di sotto della parte inferiore del telaio verticale. Manuale d'istruzioni Green16 (PHT-65LHS)
  • Seite 316: Interruttore Esposizione

    L'Interruttore esposizione può essere rimosso. Assicurarsi che il  cavo dell'Interruttore esposizione non sia staccato dall'unità in maniera accidentale durante l'utilizzo. Mantenere un contatto vocale/visivo con il paziente durante  l'esposizione. Se, durante l'esposizione, si verifica qualche problema, rilasciare l'Interruttore esposizione immediatamente. Manuale d'istruzioni Green16 (PHT-65LHS)
  • Seite 317: Lasciato In Bianco Intenzionalmente

    1. Panoramica sistema di acquisizione immagini Lasciato in bianco intenzionalmente Manuale d'istruzioni Green16 (PHT-65LHS)
  • Seite 318: Per Cominciare

    L'Interruttore di alimentazione principale isola elettricamente i suoi circuiti dalla rete principale di alimentazione simultaneamente su tutti i poli. Assicurarsi che la luce a LED verde sulla parte superiore dell'attrezzatura sia accesa. Manuale d'istruzioni Green16 (PHT-65LHS)
  • Seite 319: Eseguire Il Visualizzatore Immagine (Ezdent-I / Easydent)

    Per il sistema tomografico dentale computerizzato a raggi X Green16 (PHT-65LHS), viene eseguito l'accesso sia al visualizzatore 3D (Ez3D-i / Ez3D Plus) che al software per la console dal software del visualizzatore 2D (EzDent-i / EasyDent).
  • Seite 320 Inserire le informazioni del paziente richieste. Chart Number, E-Mail address, First Name e Last Name sono campi necessari che dovranno essere popolati (il numero cartella viene completato automaticamente). Cliccare sul pulsante Addper salvare la cartella del paziente. Manuale d'istruzioni Green16 (PHT-65LHS)
  • Seite 321 Inserire le informazioni del paziente richieste. Chart Number, First Name, e Last Name sono campi necessari e dovranno essere popolari. Tutti gli altri campi sono opzionali, ma è sempre consigliato che siano anch'essi popolati. Cliccare sul pulsante Add per salvare la cartella del paziente. Manuale d'istruzioni Green16 (PHT-65LHS)
  • Seite 322 Fare doppio clic sull'icona della tastiera per mostrare la tastiera virtuale. È possibile ricercare le informazioni del paziente mediante la tastiera virtuale. Fare doppio clic sulle informazioni del paziente per vedere ulteriori dettagli sul paziente, come mostrato di seguito. Manuale d'istruzioni Green16 (PHT-65LHS)
  • Seite 323 Inserire Chart No., First name, o Last name del paziente cliccando con il mouse sulla tastiera virtuale e cliccare sul tasto Enter. (La tastiera fisica può essere usata per assolvere al medesimo compito) Le informazioni del paziente possono essere indicate sul pannello Patient Information e Patient List. Manuale d'istruzioni Green16 (PHT-65LHS)
  • Seite 324: Inizializzazione Del Software Per La Console

    Apparirà la schermata principale per la modalità selezionata. Dalla schermata principale, puoi configurare le impostazioni dei parametri di acquisizione dell'immagine prima dell'acquisizione stessa. Fare riferimento ai seguenti capitoli 3 ~ 6 per maggiori informazioni sull'acquisizione dell'immagine. Manuale d'istruzioni Green16 (PHT-65LHS)
  • Seite 325 Apparirà la schermata principale per la modalità selezionata. Dalla schermata principale, puoi configurare le impostazioni dei parametri di acquisizione dell'immagine prima dell'acquisizione stessa. Fare riferimento ai seguenti capitoli 3 ~ 6 per maggiori informazioni sull'acquisizione dell'immagine. Manuale d'istruzioni Green16 (PHT-65LHS)
  • Seite 326: Acquisizione Delle Immagini Pano

    Altrimenti, è necessario tornare al 2. Per cominciare, e terminare per prima cosa il passo. È possibile impostare i parametri di acquisizione dell'immagine sia sul touch screen che su software per la console avviato su PC. Sono sincronizzati e mostrano le medesime impostazioni ambientali. Manuale d'istruzioni Green16 (PHT-65LHS)
  • Seite 327  Fornisce immagini panoramiche multiple con diversi piani focali assieme a normali immagini panoramiche. Insight PAN (opzionale)  Permette una verifica dettagliata delle immagini sul piano della profondità. Manuale d'istruzioni Green16 (PHT-65LHS)
  • Seite 328 Immagine panoramica di arcate palatali a forma quadrata (un Wide certo numero di uomini adulti) Immagine panoramica delle arcate palatali di bambino, Child all'incirca poco più del 40% in meno della dose di raggi X che in modalità normale. Manuale d'istruzioni Green16 (PHT-65LHS)
  • Seite 329 “PANO Examination” viene disabilitato. Per selezionare un'opzione PANO Examination, ripetere la selezione dell'arcata. Il sesso/gruppo di età del paziente è selezionato automaticamente sulla base delle informazioni del paziente. Se necessario, è possibile selezionare l'opzione manualmente. <Software per la console> <Touch screen> Manuale d'istruzioni Green16 (PHT-65LHS)
  • Seite 330 I valori di tensione e corrente tubo sono configurati automaticamente secondo il sesso/gruppo età del paziente e l'intensità dei raggi X. Cliccare sulla freccia SU/GIÙ per regolare kVp e mA. La dose è regolabile di ±1 kVp e ±0,1 mA rispettivamente. <Software per la console> <Touch screen> Manuale d'istruzioni Green16 (PHT-65LHS)
  • Seite 331  Il fascio verticale sarà attivato per rendere il posizionamento del paziente più semplice.  Il DAP (Dose Area Product), Scan Time e Exposure Time saranno mostrati al di sotto della finestra Patient Information. 10. Condurre il paziente all'attrezzatura. Manuale d'istruzioni Green16 (PHT-65LHS)
  • Seite 332: Posizionamento Paziente

    Far indossare al paziente un grembiule piombato per proteggersi dalle radiazioni residue. Usare il pulsante o interruttore Column UP/DOWN per regolare l'attrezzatura per corrispondere approssimativamente all'altezza del paziente. – <Pannello di controllo Tipo LCD> Manuale d'istruzioni Green16 (PHT-65LHS)
  • Seite 333 Afferrare saldamente le maniglie.  Premere il petto contro l'attrezzatura.  Mantenere entrambi i piedi vicini all'interno della base.  Mantenere entrambe le spalle parallele.  Raddrizzare la colonna cervicale e restare fermi.  Manuale d'istruzioni Green16 (PHT-65LHS)
  • Seite 334 Lasciare che il paziente morda il morso lungo le sue scanalature con i suoi denti anteriori. Consentire al paziente di mantenere una posizione come indicato di seguito: Chiudere la bocca.  Posizionare la lingua contro il palato.  Chiudere gli occhi.  Manuale d'istruzioni Green16 (PHT-65LHS)
  • Seite 335 Afferrare saldamente le maniglie.  Premere il petto contro l'attrezzatura.  Mantenere entrambi i piedi vicini all'interno della base.  Mantenere entrambe le spalle parallele.  Raddrizzare la colonna cervicale e restare fermi.  Manuale d'istruzioni Green16 (PHT-65LHS)
  • Seite 336 3. Acquisizione delle immagini PANO Consentire al paziente di mantenere una posizione come indicato di seguito: Chiudere la bocca.  Posizionare la lingua contro il palato.  Chiudere gli occhi.  Manuale d'istruzioni Green16 (PHT-65LHS)
  • Seite 337 Pulsante orizzontale fascio DOWN Dirigere il paziente in modo che sorrida e allineare il fascio canini al centro dei canini. Usare la leva fascio canini per regolare la posizione del fascio. Fascio canini Leva fascio canini Manuale d'istruzioni Green16 (PHT-65LHS)
  • Seite 338 Assicurarsi che i supporti tempie sono in posizione di CHIUSURA prima di cliccare sul pulsante READY. Cliccare sul pulsante READY. L'esposizione ai raggi X non ha ancora avuto inizio. Ora, passare a 3.3 Esposizione raggi X per avviare l'esposizione. Manuale d'istruzioni Green16 (PHT-65LHS)
  • Seite 339 Usare il pulsante Temple Supports OPEN/CLOSE sul pannello di controllo per allargare i supporti tempie. Condurre il paziente all'attrezzatura. Usare il pulsante o interruttore Column UP/DOWN o per regolare l'altezza dell'attrezzatura in modo che il mento del paziente raggiunga il poggiamento. Manuale d'istruzioni Green16 (PHT-65LHS)
  • Seite 340 Chiudere gli occhi.   Come mostrato in figura, l'unità di supporto del poggiamento integrato deve essere in contatto con l'acanthion del paziente.  Chiedere al paziente di mantenere la sua posizione fino al completamente dell'operazione. Manuale d'istruzioni Green16 (PHT-65LHS)
  • Seite 341 Usare il pulsante Horizontal Beam sul pannello di controllo per posizionarlo. Assicurarsi che il fascio orizzontale sia allineato orizzontalmente al viso del paziente. Fascio verticale / linea mediano sagittale Pulsante orizzontale Fascio orizzontale fascio UP / piano di Francoforte Pulsante orizzontale fascio DOWN Manuale d'istruzioni Green16 (PHT-65LHS)
  • Seite 342 Assicurarsi che i supporti tempie sono in posizione di CHIUSURA prima di cliccare sul pulsante READY. Cliccare sul pulsante READY. L'esposizione ai raggi X non ha ancora avuto inizio. Ora, passare a 3.3 Esposizione raggi X per avviare l'esposizione. Manuale d'istruzioni Green16 (PHT-65LHS)
  • Seite 343 Guidare il paziente a posizionare la base del naso (acanthion) contro il poggiamento e piegare in avanti la testa di circa 5°. Consentire al paziente di mantenere una posizione come indicato di seguito: Chiudere la bocca.  Posizionare la lingua contro il palato.  Chiudere gli occhi.  Manuale d'istruzioni Green16 (PHT-65LHS)
  • Seite 344  Far mantenere al paziente la sua posizione fino al completamente dell'operazione. Allineamento raggio laser Questo è lo stesso per la modalità TMJ Open. Concludere il posizionamento del paziente Questo è lo stesso per la modalità TMJ Open. Manuale d'istruzioni Green16 (PHT-65LHS)
  • Seite 345 Afferrare saldamente le maniglie.  Premere il petto contro l'attrezzatura.  Mantenere entrambi i piedi vicini all'interno della base.  Mantenere entrambe le spalle parallele.  Raddrizzare la colonna cervicale e restare fermi.  Manuale d'istruzioni Green16 (PHT-65LHS)
  • Seite 346 Chiudere gli occhi.   Come mostrato in figura, l'unità di supporto del poggiamento integrato deve essere in contatto con l'acanthion del paziente.  Chiedere al paziente di mantenere la sua posizione fino al completamente dell'operazione. Manuale d'istruzioni Green16 (PHT-65LHS)
  • Seite 347 Assicurarsi che i supporti tempie sono in posizione di CHIUSURA prima di cliccare sul pulsante READY. Cliccare sul pulsante READY. L'esposizione ai raggi X non ha ancora avuto inizio. Ora, passare a 3.3 Esposizione raggi X per avviare l'esposizione. Manuale d'istruzioni Green16 (PHT-65LHS)
  • Seite 348: Esposizione Raggi X

    Uscire dalla stanza radiografica e chiudere la porta. L'operatore deve mantenere un contatto vocale/visivo con il paziente in maniera costante durante l'acquisizione dell'immagine. Tenere premuto l'Interruttore esposizione fino al completamento dell'acquisizione dell'immagine. Giallo: Raggi X On L'immagine compare sullo schermo. Manuale d'istruzioni Green16 (PHT-65LHS)
  • Seite 349: Terminare La Scansione

    Le immagini sono automaticamente salvate se l'opzione di salvataggio automatico è configurata come predefinita. Se non è configurato come predefinito, cliccare sul pulsante Save per salvare le immagini. Per verificare l'immagine, fare doppio clic su quella sulla Patient List. Manuale d'istruzioni Green16 (PHT-65LHS)
  • Seite 350: Acquisizione Delle Immagini Ceph (Opzionale)

    Per acquisire le immagini CEPH, 2. Per cominciare deve essere completato per primo. È possibile impostare i parametri di acquisizione dell'immagine sia sul touch screen che su software per la console avviato su PC. Sono sincronizzati e mostrano le medesime impostazioni ambientali. Manuale d'istruzioni Green16 (PHT-65LHS)
  • Seite 351 Selezionare una Image Option. (Sul touch screen, cliccare sul pulsante Impostazioni prima di selezionare le opzioni.) <Software per la console> <Touch screen> Selezionare un programma esame del pannello CEPH Examination. <Software per la console> <Touch screen> Manuale d'istruzioni Green16 (PHT-65LHS)
  • Seite 352 X può essere classificata come Hard, Normal o Soft: Soft ≤ Normal ≤ Hard Media circonferenza Gamma Fascia di età Intensità di raggi X della testa (cm) (cm) >53±3 Hard Child 53±3 53±3 Normal <53±3 Soft >56±3 Hard Adult 56±3 56±3 Normal <56±3 Soft Manuale d'istruzioni Green16 (PHT-65LHS)
  • Seite 353 <Software per la console > <Touch screen> Quando si fa clic sul pulsante CONFIRM,  Il DAP (Dose Area Product), Scan Time e Exposure Time saranno mostrati al di sotto della finestra Patient Information. Condurre il paziente all'attrezzatura. Manuale d'istruzioni Green16 (PHT-65LHS)
  • Seite 354: Posizionamento Paziente

    Far indossare al paziente un grembiule piombato per proteggersi dalle radiazioni residue. Usare il pulsante o interruttore Column UP/DOWN per regolare l'attrezzatura per corrispondere approssimativamente all'altezza del paziente. – <Pannello di controllo Tipo LCD> Manuale d'istruzioni Green16 (PHT-65LHS)
  • Seite 355 Usare l'indicatore di riferimento posizione Porion che appare nell'immagine acquisita per confermare facilmente la posizione del Porion. Condurre il paziente all'unità CEPH. Dirigere il paziente in modo che rilassi il proprio collo e le spalle e resti in posizione eretta. Manuale d'istruzioni Green16 (PHT-65LHS)
  • Seite 356 Spiegare al paziente di deglutire prima di chiudere la propria bocca e rimanere nella posizione attuale fino al completamento dell'acquisizione dell'immagine. Cliccare sul pulsante READY. L'esposizione ai raggi X non ha ancora avuto inizio. 10. Ora, passare a 4.3 Esposizione raggi X per avviare l'esposizione. Manuale d'istruzioni Green16 (PHT-65LHS)
  • Seite 357 Ripiegare verso l'alto il posizionatore nasale. Il posizionatore nasale non è usato in modalità PA. Condurre il paziente all'unità CEPH. Chiedere al paziente di restare dritto e orientato verso il sensore. Assicurarsi che le spalle del paziente siano a livello e che il suo collo sia rilassato. Manuale d'istruzioni Green16 (PHT-65LHS)
  • Seite 358 Spiegare al paziente di deglutire prima di chiudere la propria bocca e rimanere nella posizione attuale fino al completamento dell'acquisizione dell'immagine. Cliccare sul pulsante READY. L'esposizione ai raggi X non ha ancora avuto inizio. 10. Ora, passare a 4.3 Esposizione raggi X per avviare l'esposizione. Manuale d'istruzioni Green16 (PHT-65LHS)
  • Seite 359 Ripiegare verso l'alto il posizionatore nasale. Il posizionatore nasale non è usato in modalità SMV. Condurre il paziente all'unità CEPH. Guidare il paziente a orientarsi verso il tubo radiogeno, facendolo mantenere in posizione eretta. Manuale d'istruzioni Green16 (PHT-65LHS)
  • Seite 360 Spiegare al paziente di deglutire prima di chiudere la propria bocca e rimanere nella posizione attuale fino al completamento dell'acquisizione dell'immagine. Cliccare sul pulsanteREADY. L'esposizione ai raggi X non ha ancora avuto inizio. 10. Ora, passare a 4.3 Esposizione raggi X per avviare l'esposizione. Manuale d'istruzioni Green16 (PHT-65LHS)
  • Seite 361 30-40°. Spiegare al paziente di restare nella posizione attuale fino al completamento dell'acquisizione dell'immagine. Cliccare sul pulsante READY. L'esposizione ai raggi X non ha ancora avuto inizio. Manuale d'istruzioni Green16 (PHT-65LHS)
  • Seite 362 4. Acquisizione delle immagini CEPH (opzionale) Ora, passare a 4.3 Esposizione raggi X per avviare l'esposizione. Manuale d'istruzioni Green16 (PHT-65LHS)
  • Seite 363 Ripiegare verso l'alto il posizionatore nasale. Il posizionatore nasale non è usato in modalità Carpus. Inserire le due estremità della piastra carpale nei due fori dell'unità CEPH come indicato sotto. Confermare che la piastra carpale sia montata in sicurezza. Manuale d'istruzioni Green16 (PHT-65LHS)
  • Seite 364 Chiedere al paziente di chiudere gli occhi e restare fermo fino al completamento dell'acquisizione dell'immagine. Cliccare sul pulsante READY. L'esposizione ai raggi X non ha ancora avuto inizio. Ora, passare a 4.3 Esposizione raggi X per avviare l'esposizione. Manuale d'istruzioni Green16 (PHT-65LHS)
  • Seite 365: Esposizione Raggi X

    Uscire dalla stanza radiografica e chiudere la porta. Tenere premuto l'Interruttore esposizione fino al completamento dell'acquisizione dell'immagine. Giallo: Raggi X On L'immagine compare sullo schermo. Manuale d'istruzioni Green16 (PHT-65LHS)
  • Seite 366: Terminare La Scansione

    Le immagini sono automaticamente salvate se l'opzione di salvataggio automatico è configurata come predefinita. Se non è configurato come predefinito, cliccare sul pulsante Save per salvare le immagini. Per verificare l'immagine, fare doppio clic su quella sulla Patient List. Manuale d'istruzioni Green16 (PHT-65LHS)
  • Seite 367: Acquisizione Delle Immagini Cbct

    Per acquisire le immagini CBCT, 2. Per cominciare deve essere completato per primo. È possibile impostare i parametri di acquisizione dell'immagine sia sul touch screen che su software per la console avviato su PC. Sono sincronizzati e mostrano le medesime impostazioni ambientali. Manuale d'istruzioni Green16 (PHT-65LHS)
  • Seite 368 <Software per la console> <Touch screen> Il pulsante CEPH esiste solo quando il programma di acquisizione dell'immagine CEPH è incluso nell'attrezzatura. Selezionare Dimensioni FOV (con Vertical Option Horizon Option, Tooth Option.) <Software per la console> <Touch screen> Manuale d'istruzioni Green16 (PHT-65LHS)
  • Seite 369 Mandible (Double Scan; ; (prima scansione) Center N.D. cuciture 16x9) Maxilla (opzionale) (seconda scansione) Selezionare una Image Option. (Sul touch screen, cliccare sul pulsante Impostazioni prima di selezionare le opzioni.) <Software per la console> <Touch screen> Manuale d'istruzioni Green16 (PHT-65LHS)
  • Seite 370 <Software per la console> <Touch Screen> Fascia di età Standard VATECH Child 2 ~ 12 anni di età Adult > 12 anni di età Woman Selezionare l'intensità dei raggi X. <Software per la console> <Touch screen> Manuale d'istruzioni Green16 (PHT-65LHS)
  • Seite 371 CT viene ricostruita rapidamente. (Con MAR, visualizza meglio il metallo.) <Software per la console> <Touch screen> Cliccare sul pulsante CONFIRM quando l'impostazione del parametro esposizione è stata completata. <Software per la console > <Touch screen> Manuale d'istruzioni Green16 (PHT-65LHS)
  • Seite 372  Il fascio verticale sarà attivato per rendere il posizionamento del paziente più semplice.  Il DAP (Dose Area Product), Scan Time e Exposure Time saranno mostrati al di sotto della finestra Patient Information. 10. Condurre il paziente all'attrezzatura. Manuale d'istruzioni Green16 (PHT-65LHS)
  • Seite 373: Ottenimento Di Un'immagine Con Doppia Scansione (Opzionale)

    Il software per la console del PC ha la stessa funzione del touch screen del dispositivo. Il software per la console e il touch screen sono collegati l'uno all'altro in tempo reale e le impostazioni ambientali sono le stesse. Manuale d'istruzioni Green16 (PHT-65LHS)
  • Seite 374 <Software per la console> <Touch screen> Il sesso / gruppo età del paziente è selezionato automaticamente sulla base delle informazioni del paziente. Se necessario, è possibile selezionare queste opzioni manualmente. <Software per la console> <Touch screen> Manuale d'istruzioni Green16 (PHT-65LHS)
  • Seite 375 X. Facendo clic sul pulsante a forma di freccia, è possibile eseguire regolazioni di precisione con incrementi di ± 1 kVp e ± 0,1 <Software per la console> <Touch screen> Manuale d'istruzioni Green16 (PHT-65LHS)
  • Seite 376 Premere il pulsante READY. In questa fase, i raggi X non vengono emessi. Passare alla sezione 5.4 Esposizione raggi X e procedere con l'esposizione ai raggi 10. Condurre il paziente all'uscita della stanza schermata in cui è presente l'attrezzatura. Manuale d'istruzioni Green16 (PHT-65LHS)
  • Seite 377 X. Facendo clic sul pulsante a forma di freccia, è possibile eseguire regolazioni di precisione con incrementi di ± 1 kVp e ± 0,1 <Software per la console> <Touch screen> Manuale d'istruzioni Green16 (PHT-65LHS)
  • Seite 378 Passare alla sezione 5.4 Esposizione raggi X e procedere con l'esposizione ai raggi Condurre il paziente all'uscita della stanza schermata in cui è presente l'attrezzatura. Passare alla sezione 5.5 Terminare la scansione per completare la procedura e controllare l'immagine. Manuale d'istruzioni Green16 (PHT-65LHS)
  • Seite 379: Posizionamento Paziente

    Far indossare al paziente un grembiule piombato per proteggersi dalle radiazioni residue. Usare il pulsante o interruttore Column UP/DOWN per regolare l'attrezzatura per corrispondere approssimativamente all'altezza del paziente. – <Pannello di controllo Tipo LCD> Manuale d'istruzioni Green16 (PHT-65LHS)
  • Seite 380 Afferrare saldamente le maniglie.  Premere il petto contro l'attrezzatura.  Mantenere entrambi i piedi vicini all'interno della base.  Mantenere entrambe le spalle parallele.  Raddrizzare la colonna cervicale e restare fermi.  Manuale d'istruzioni Green16 (PHT-65LHS)
  • Seite 381 Lasciare che il paziente morda il morso lungo le sue scanalature con i suoi denti anteriori. Consentire al paziente di mantenere una posizione come indicato di seguito: Chiudere la bocca.  Posizionare la lingua contro il palato.  Chiudere gli occhi.  Manuale d'istruzioni Green16 (PHT-65LHS)
  • Seite 382 Mantenere entrambi i piedi vicini all'interno della base.  Mantenere entrambe le spalle parallele.  Raddrizzare la colonna cervicale e restare fermi.  Far mantenere al paziente la posizione come indicato di seguito: Chiedergli di chiudere gli occhi.  Manuale d'istruzioni Green16 (PHT-65LHS)
  • Seite 383 Usare il pulsante o interruttore Vertical Frame Up/Down per regolare l'altezza dell'attrezzatura in modo che il mento del paziente raggiunga il poggiamento. Guidare il paziente e farlo stare in piedi al centro dell'attrezzatura, quindi indicargli di restare nella posizione indicata di seguito. Manuale d'istruzioni Green16 (PHT-65LHS)
  • Seite 384 Rimuovere il Poggiamento normale e inserire il Poggiamento speciale nell'attrezzatura. Inserire il Morso speciale A nel Poggiamento speciale. Morso speciale A Poggiamento speciale Usare il pulsante Temple Supports OPEN/CLOSE sul pannello di controllo per allargare i supporti tempie. Manuale d'istruzioni Green16 (PHT-65LHS)
  • Seite 385 Afferrare saldamente le maniglie.  Premere il petto contro l'attrezzatura.  Mantenere entrambi i piedi vicini all'interno della base.  Mantenere entrambe le spalle parallele.  Raddrizzare la colonna cervicale e restare fermi.  Manuale d'istruzioni Green16 (PHT-65LHS)
  • Seite 386 Diversamente dalla modalità PANO, il fascio orizzontale non si sposta unicamente nella modalità CT. Non si tratta di errore o malfunzionamento. Allineare il fascio verticale con il centro del viso (linea mediano sagittale). (Ciò è per prevenire l'espansione orizzontale dell'immagine) Manuale d'istruzioni Green16 (PHT-65LHS)
  • Seite 387 Assicurarsi che i supporti tempie sono in posizione di CHIUSURA prima di cliccare sul pulsante READY. Cliccare sul pulsante READY. L'esposizione ai raggi X non ha ancora avuto inizio. Ora, passare a 5.4 Esposizione raggi X per avviare l'esposizione. Manuale d'istruzioni Green16 (PHT-65LHS)
  • Seite 388: Esposizione Raggi X

    Uscire dalla stanza radiografica e chiudere la porta. L'operatore deve mantenere un contatto vocale/visivo con il paziente in maniera costante durante l'acquisizione dell'immagine. Tenere premuto l'Interruttore esposizione fino al completamento dell'acquisizione dell'immagine. Giallo: Raggi X On L'immagine compare sullo schermo. Manuale d'istruzioni Green16 (PHT-65LHS)
  • Seite 389: Terminare La Scansione

    Se non è configurato come predefinito, cliccare sul pulsante Save per salvare le immagini. Per verificare l'immagine, fare doppio clic su quella sulla Patient List. Quindi, Ez3D-i / Ez3D Plus verrà avviato automaticamente per la visione in 3D. Manuale d'istruzioni Green16 (PHT-65LHS)
  • Seite 390: Acquisizione 3D Model Scan Delle Immagini

    PC. Sono sincronizzati e mostrano le medesime impostazioni ambientali. La modalità 3D MODEL Scan non è disponibile per gli utenti  EasyDent / Ez3D Plus. Manuale d'istruzioni Green16 (PHT-65LHS)
  • Seite 391 Il sesso/gruppo di età del paziente è selezionato automaticamente sulla base delle informazioni del paziente. Se necessario, è possibile selezionare l'opzione manualmente. <Software per la console> <Touch screen> Fascia di età Standard VATECH Child 2 ~ 12 anni di età Adult > 12 anni di età Woman Manuale d'istruzioni Green16 (PHT-65LHS)
  • Seite 392  Il fascio verticale sarà attivato per rendere il posizionamento del paziente più semplice.  Il DAP (Dose Area Product), Scan Time e Exposure Time saranno mostrati al di sotto della finestra Patient Information. Portare il calco in gesso fino all'attrezzatura. Manuale d'istruzioni Green16 (PHT-65LHS)
  • Seite 393: Posizionamento Model

    Allineare il raggio laser del piano mediano sagittale al centro del calco in gesso. (Ciò è per prevenire l'espansione orizzontale dell'immagine) Cliccare sul pulsante READY. L'esposizione ai raggi X non ha ancora avuto inizio. Ora, passare a 6.3 Esposizione raggi X per avviare l'esposizione. Manuale d'istruzioni Green16 (PHT-65LHS)
  • Seite 394: Esposizione Raggi X

     Nel software per la console, l'indicatore di radiazioni diventa giallo e “ ” “ ” X-RAY diventa X-RAY ON Rilasciare l'Interruttore esposizione quando il messaggio "Acquisizione immagine completata" appare sullo schermo. Rimuovere il calco in gesso dall'attrezzatura. Manuale d'istruzioni Green16 (PHT-65LHS)
  • Seite 395: Verifica Delle Immagini Acquisite

    Save per salvare le immagini. Per verificare l'immagine, fare doppio clic su quella presente in Patient List. È possibile verificare l'immagine acquisita con un visualizzatore STL di terze parti. Fare riferimento al manuale d'istruzioni EzDent-i per maggiori informazioni. Manuale d'istruzioni Green16 (PHT-65LHS)
  • Seite 397 ESPAÑOL Aviso ........................iii Convenciones utilizadas en este manual ............iv 1. Descripción general del sistema de generación de imágenes ....1 1.1 Descripción general del equipo ............3 1.2 Panel de control ................... 5 1.3 Pantalla táctil ..................6 1.4 Interruptor de parada de emergencia ..........
  • Seite 399: Aviso

    MODEL Scan en un único equipo. En este manual se describe cómo utilizar el sistema Green16 (PHT-65LHS). En este manual se describe cómo manejar el sistema Green16 (PHT-65LHS). Le recomendamos que se familiarice a fondo con este manual para así utilizar este equipo con la mayor eficacia posible.
  • Seite 400: Convenciones Utilizadas En Este Manual

    RADIACIÓN radiación. Indica un componente que se debe sustituir UN SOLO USO para cada paciente nuevo. Sensibilidad a Indica que un componente es susceptible de las descargas sufrir daños por una descarga electrostática. electrostáticas Manual de usuario de Green16 (PHT-65LHS)
  • Seite 401: Descripción General Del Sistema De Generación De Imágenes

    —PANO (panorámica), CEPH (cefalometría) (opcional), CBCT y 3D MODEL Scan (escaneo de modelos 3D)— en un único equipo. Green16 (PHT-65LHS) es un sistema de radiología dental para la generación de tomografías computarizadas diseñado para generar imágenes panorámicas, cefalométricas y transversales de la anatomía oral mediante la reconstrucción por...
  • Seite 402 Grado de protección frente a la entrada de agua: Equipo común: IPX0  Grado de protección frente a las descargas eléctricas: equipo de clase 1 con  piezas de contacto de tipo B (soportes para las sienes, reposabarbillas y bloques de mordida) Manual de usuario de Green16 (PHT-65LHS)
  • Seite 403: Descripción General Del Equipo

    Sujetan la cabeza del paciente durante la generación Varillas para oídos de imágenes en modo CEPH (cefalometría). Espacio Espacio donde se pueden guardar los bloques de de almacenaje mordida, el soporte reposabarbilla y otros de componentes componentes. Manual de usuario de Green16 (PHT-65LHS)
  • Seite 404 READY. (Si desea obtener detalles al respecto, consulte 1.2 Panel de control.) Panel de control Puerto de señal de entrada del interruptor Column Conector D-sub UP/DOWN Manual de usuario de Green16 (PHT-65LHS)
  • Seite 405: Panel De Control

    Inicia el posicionamiento de la unidad giratoria. Botón Horizontal Alinea el haz horizontal en modo PANO. Beam UP/DOWN Mueve el bastidor vertical hacia arriba o abajo. Botón Column UP/DOWN (Para regular la altura del reposabarbilla.) Manual de usuario de Green16 (PHT-65LHS)
  • Seite 406: Pantalla Táctil

    Manipule siempre la pantalla táctil pulsándola suavemente con la  punta del dedo. No use objetos puntiagudos, como bolígrafos o lápices. De lo  contrario, podrían producirse daños en la pantalla. Manual de usuario de Green16 (PHT-65LHS)
  • Seite 407 (Image option). Información sobre Muestra la configuración del momento (modalidad, la configuración de tensión del tubo, corriente del tubo, tipo de arcada, los parámetros de opción de imagen y opción de panorámica). imagen Manual de usuario de Green16 (PHT-65LHS)
  • Seite 408 Selecciona la intensidad de los rayos X. Según el perímetro cefálico del paciente, la Intensidad de intensidad de la radiación puede clasificarse los rayos X como Hard, Normal o Soft: Soft ≤ Normal ≤ Hard. Manual de usuario de Green16 (PHT-65LHS)
  • Seite 409 (Image Option). Información sobre Muestra la configuración del momento (modalidad, la configuración de tensión del tubo, corriente del tubo y opción de los parámetros de imagen). imagen Manual de usuario de Green16 (PHT-65LHS)
  • Seite 410 Soft ≤ Normal ≤ Hard. Selecciona entre «High Resolution» y «Green». Image Option (calidad de imagen: High Resolution > Green) Cierra la pantalla de configuración y vuelve a la pantalla Botón salir principal del modo CEPH. Manual de usuario de Green16 (PHT-65LHS)
  • Seite 411 (Image Option) y el tamaño de vóxel (Voxel Size). Información sobre Muestra la configuración del momento (Modalidad, la configuración de tensión del tubo, corriente del tubo, opción de imagen los parámetros de Image option y Voxel size) imagen Manual de usuario de Green16 (PHT-65LHS)
  • Seite 412 X como Hard, Normal o Soft: Soft ≤ Normal ≤ Hard. Cierra la pantalla de configuración y vuelve a la pantalla Botón salir principal del modo CBCT. Manual de usuario de Green16 (PHT-65LHS)
  • Seite 413 Botón ajustes y grupo de edad y la intensidad de la radiación Información sobre la configuración de Muestra la configuración del momento (modalidad, los parámetros de tensión del tubo y corriente del tubo). imagen Manual de usuario de Green16 (PHT-65LHS)
  • Seite 414 Selecciona el sexo y el grupo de edad del paciente. paciente Intensidad de Selecciona la intensidad de los rayos X. los rayos X Cierra la pantalla de configuración y vuelve a la pantalla Botón salir principal del modo 3D MODEL Scan. Manual de usuario de Green16 (PHT-65LHS)
  • Seite 415: Interruptor De Parada De Emergencia

    Para reiniciar el equipo, gire el interruptor de parada de emergencia en el sentido horario hasta que salte hacia fuera. El interruptor de parada de emergencia está situado en la parte inferior del bastidor vertical. Manual de usuario de Green16 (PHT-65LHS)
  • Seite 416: Interruptor De Exposición

    Mantenga contacto vocal o visual con el paciente durante la  exposición. Si se produce algún problema durante la exposición, suelte inmediatamente el interruptor de exposición. Manual de usuario de Green16 (PHT-65LHS)
  • Seite 417: Procedimientos Iniciales

    El interruptor principal aísla sus circuitos eléctricamente del suministro principal en todos los polos de forma simultánea. Asegúrese de que la luz LED verde situada en la parte superior del equipo esté encendida. Manual de usuario de Green16 (PHT-65LHS)
  • Seite 418: Ejecución Del Visor De Imágenes (Ezdent-I / Easydent)

    En el sistema de radiología para la generación de tomografías computarizadas de uso odontológico Green16 (PHT-65LHS), se accede tanto al visor 3D (Ez3D-i / Ez3D Plus) como al software de consola a través del software del visor 2D (EzDent-i / EasyDent). El visor 3D y el software de consola no tienen capacidad de almacenamiento de imágenes por sí...
  • Seite 419 Introduzca la información del paciente necesaria. Deben rellenarse obligatoriamente los campos Chart Number, E-Mail address, First Name y Last Name. (El campo del número de ficha se rellena automáticamente.) Haga clic en el botón Add para guardar el registro de paciente. Manual de usuario de Green16 (PHT-65LHS)
  • Seite 420 Introduzca la información del paciente necesaria. Deben rellenarse obligatoriamente los campos Chart Number, First Name y Last Name. Los demás campos son opcionales, pero se recomienda rellenarlos. Haga clic en el botón Add para guardar el registro de paciente. Manual de usuario de Green16 (PHT-65LHS)
  • Seite 421 Haga doble clic en el icono del teclado para mostrar el teclado virtual. Puede buscar información de pacientes usando el teclado virtual. Haga doble clic en la información del paciente para ver más detalles, tal y como se muestra a continuación. Manual de usuario de Green16 (PHT-65LHS)
  • Seite 422 Enter. (También se puede usar el teclado físico.) La información del paciente puede visualizarse en el panel Patient Information y en Patient List. Manual de usuario de Green16 (PHT-65LHS)
  • Seite 423: Inicio Del Software De Consola

    Aparecerá la pantalla principal del modo seleccionado. En la pantalla principal, puede configurar los ajustes de parámetros para la generación de imágenes antes de adquirir una imagen. Consulte los siguientes capítulos, del 3 al 6, para obtener más información sobre la adquisición de imágenes. Manual de usuario de Green16 (PHT-65LHS)
  • Seite 424 Aparecerá la pantalla principal del modo seleccionado. En la pantalla principal, puede configurar los ajustes de parámetros para la generación de imágenes antes de adquirir una imagen. Consulte los siguientes capítulos, del 3 al 6, para obtener más información sobre la adquisición de imágenes. Manual de usuario de Green16 (PHT-65LHS)
  • Seite 425: Adquisición De Imágenes Pano

    Procedimientos iniciales y completar esos pasos. Puede configurar los parámetros de imagen desde la pantalla táctil o a través del software de consola que se ejecuta en el PC. Al estar sincronizados, muestran la misma configuración del entorno. Manual de usuario de Green16 (PHT-65LHS)
  • Seite 426  Proporciona varias imágenes panorámicas con planos focales diferentes junto con imágenes panorámicas Insight PAN convencionales. (opcional)  Permite la verificación detallada de imágenes en una dirección en profundidad. Manual de usuario de Green16 (PHT-65LHS)
  • Seite 427 Imagen panorámica de arcadas palatinas normales de Normal adultos Imagen panorámica de arcadas palatinas cuadradas Wide (algunos hombres adultos) Imagen panorámica de arcadas palatinas de niños (radiación Child en torno a un 40 % inferior a la del modo normal) Manual de usuario de Green16 (PHT-65LHS)
  • Seite 428 PANO Examination, vuelva a seleccionar la arcada. El sexo y el grupo de edad del paciente se seleccionan automáticamente en función de la información del paciente introducida. Si fuera necesario, puede seleccionar esta opción manualmente. <Software de consola> <Pantalla táctil> Manual de usuario de Green16 (PHT-65LHS)
  • Seite 429 X. Haga clic en la flecha hacia arriba o hacia abajo para ajustar los valores de kVp y mA. La dosis se puede ajustar en ± 1 kVp y ± 0,1 mA, respectivamente. <Software de consola> <Pantalla táctil> Manual de usuario de Green16 (PHT-65LHS)
  • Seite 430  El haz vertical se activa para facilitar la colocación del paciente.  Los valores de DAP, Scan Time y Exposure Time se muestran en la ventana Patient Information. 10. Sitúe al paciente en el equipo. Manual de usuario de Green16 (PHT-65LHS)
  • Seite 431: Colocación Del Paciente

    Pida al paciente que se coloque un delantal plomado para protegerlo de la radiación residual. Utilice el botón o el conmutador Column UP/DOWN para colocar el equipo a la altura del paciente. <Panel de control de tipo LCD> Manual de usuario de Green16 (PHT-65LHS)
  • Seite 432 Debe presionar el pecho contra el equipo.  Debe mantener los pies cerca de la parte interior de la base.  Debe mantener ambos hombros en paralelo.  Debe mantenerse erguido e inmóvil.  Manual de usuario de Green16 (PHT-65LHS)
  • Seite 433 Pida al paciente que muerda las muescas del bloque de mordida con los incisivos. Pida al paciente que haga lo siguiente para mantener la postura: Cerrar la boca.  Pegar la lengua al paladar.  Cerrar los ojos.  Manual de usuario de Green16 (PHT-65LHS)
  • Seite 434 Debe presionar el pecho contra el equipo.  Debe mantener los pies cerca de la parte interior de la base.  Debe mantener ambos hombros en paralelo.  Debe mantenerse erguido e inmóvil.  Manual de usuario de Green16 (PHT-65LHS)
  • Seite 435 3. Adquisición de imágenes PANO Pida al paciente que haga lo siguiente para mantener la postura: Cerrar la boca.  Pegar la lengua al paladar.  Cerrar los ojos.  Manual de usuario de Green16 (PHT-65LHS)
  • Seite 436 Indique al paciente que sonría y alinee el haz para caninos con el centro de estos dientes. Use la palanca del haz para caninos para ajustar la posición del haz. Haz para caninos Palanca del haz para caninos Manual de usuario de Green16 (PHT-65LHS)
  • Seite 437 READY. Haga clic en el botón READY. Todavía no ha empezado la exposición a la radiación. Vaya al apartado 3.3 Exposición a rayos X para iniciar la exposición. Manual de usuario de Green16 (PHT-65LHS)
  • Seite 438 Sitúe al paciente en el equipo. Utilice el botón o el conmutador Column UP/DOWN para ajustar la altura del equipo de modo que la barbilla del paciente se encuentre sobre el reposabarbilla. Manual de usuario de Green16 (PHT-65LHS)
  • Seite 439  La unidad de soporte del reposabarbilla integrado debe tocar el punto acantión del paciente, tal como se observa en la imagen.  Pida al paciente que no se mueva hasta que haya finalizado la operación. Manual de usuario de Green16 (PHT-65LHS)
  • Seite 440 Use el botón Horizontal Beam del panel de control para posicionarlo. Asegúrese de que el haz horizontal esté alineado horizontalmente con la cara del paciente. Haz vertical /línea sagital Botón UP horizontal Haz horizontal del haz /línea de Frankfurt Botón DOWN horizontal del haz Manual de usuario de Green16 (PHT-65LHS)
  • Seite 441 READY. Haga clic en el botón READY. Todavía no ha empezado la exposición a la radiación. Vaya al apartado 3.3 Exposición a rayos X para iniciar la exposición. Manual de usuario de Green16 (PHT-65LHS)
  • Seite 442 5˚. Pida al paciente que haga lo siguiente para mantener la postura: Cerrar la boca.  Pegar la lengua al paladar.  Cerrar los ojos.  Manual de usuario de Green16 (PHT-65LHS)
  • Seite 443  Pida al paciente que no se mueva hasta que haya finalizado la operación. Alineación del haz láser Son idénticos a los del modo TMJ Open. Últimos ajustes para la colocación del paciente Son idénticos a los del modo TMJ Open. Manual de usuario de Green16 (PHT-65LHS)
  • Seite 444 Debe presionar el pecho contra el equipo.  Debe mantener los pies cerca de la parte interior de la base.  Debe mantener ambos hombros en paralelo.  Debe mantenerse erguido e inmóvil.  Manual de usuario de Green16 (PHT-65LHS)
  • Seite 445  La unidad de soporte del reposabarbilla integrado debe tocar el punto acantión del paciente, tal como se observa en la imagen.  Pida al paciente que no se mueva hasta que haya finalizado la operación. Manual de usuario de Green16 (PHT-65LHS)
  • Seite 446 READY. Haga clic en el botón READY. Todavía no ha empezado la exposición a la radiación. Vaya al apartado 3.3 Exposición a rayos X para iniciar la exposición. Manual de usuario de Green16 (PHT-65LHS)
  • Seite 447: Exposición A Rayos X

    El operador debe mantener contacto vocal o visual con el paciente en todo momento durante la adquisición de imágenes. Mantenga pulsado el interruptor de exposición hasta que se complete la adquisición de imágenes. Amarillo: rayos X activos La imagen aparecerá en la pantalla. Manual de usuario de Green16 (PHT-65LHS)
  • Seite 448: Finalización Del Escaneo

    Las imágenes se guardan automáticamente si la opción de almacenamiento automático está configurada como predeterminada. Si no está configurada como predeterminada, haga clic en el botón Save para guardar las imágenes. Para comprobar la imagen, haga doble clic en ella en Patient List. Manual de usuario de Green16 (PHT-65LHS)
  • Seite 449: Adquisición De Imágenes Ceph (Opcional)

    2. Procedimientos iniciales. Puede configurar los parámetros de imagen desde la pantalla táctil o a través del software de consola que se ejecuta en el PC. Al estar sincronizados, muestran la misma configuración del entorno. Manual de usuario de Green16 (PHT-65LHS)
  • Seite 450 Seleccione una de las opciones de Image Option. (En la pantalla táctil, haga clic sobre el botón Settings antes de seleccionar las opciones.) <Software de consola> <Pantalla táctil> Seleccione un programa de examen en el panel CEPH Examination. <Software de consola> <Pantalla táctil> Manual de usuario de Green16 (PHT-65LHS)
  • Seite 451 Soft ≤ Normal ≤ Hard Grupo de Circunferencia de la Distancia La intensidad de edad cabeza media (cm) (cm) rayos X >53±3 Hard Child 53±3 53±3 Normal <53±3 Soft >56±3 Hard Adult 56±3 56±3 Normal <56±3 Soft Manual de usuario de Green16 (PHT-65LHS)
  • Seite 452 <Pantalla táctil> Al hacer clic en el botón CONFIRM:  Los valores de DAP (producto dosis-área), Scan Time y Exposure Time se muestran en la ventana Patient Information. Sitúe al paciente en el equipo. Manual de usuario de Green16 (PHT-65LHS)
  • Seite 453: Colocación Del Paciente

    Pida al paciente que se coloque un delantal plomado para protegerlo de la radiación residual. Utilice el botón o el conmutador Column UP/DOWN para colocar el equipo a la altura del paciente. <Panel de control de tipo LCD> Manual de usuario de Green16 (PHT-65LHS)
  • Seite 454 Sitúe al paciente en la unidad de cefalometría (CEPH). Indique al paciente que relaje el cuello y los hombros y se coloque en posición erguida. Manual de usuario de Green16 (PHT-65LHS)
  • Seite 455 Haga clic en el botón READY. Todavía no ha empezado la exposición a la radiación. 10. Vaya al apartado 4.3 Exposición a rayos X para iniciar la exposición. Manual de usuario de Green16 (PHT-65LHS)
  • Seite 456 Sitúe al paciente en la unidad de cefalometría (CEPH). Indique al paciente que se coloque en posición erguida mirando al sensor. Asegúrese de que los hombros del paciente estén a la misma altura y este tenga el cuello relajado. Manual de usuario de Green16 (PHT-65LHS)
  • Seite 457 Haga clic en el botón READY. Todavía no ha empezado la exposición a la radiación. 10. Vaya al apartado 4.3 Exposición a rayos X para iniciar la exposición. Manual de usuario de Green16 (PHT-65LHS)
  • Seite 458 Repliegue el posicionador nasal. El posicionador nasal no se usa en modo SMV. Sitúe al paciente en la unidad de cefalometría (CEPH). Indique al paciente que se coloque en posición erguida mirando hacia el tubo de rayos X. Manual de usuario de Green16 (PHT-65LHS)
  • Seite 459 Haga clic en el botón READY. Todavía no ha empezado la exposición a la radiación. 10. Vaya al apartado 4.3 Exposición a rayos X para iniciar la exposición. Manual de usuario de Green16 (PHT-65LHS)
  • Seite 460 30˚ y 40˚. Pida al paciente que no se mueva hasta que haya finalizado la adquisición de la imagen. Haga clic en el botón READY. Todavía no ha empezado la exposición a la radiación. Vaya al apartado 4.3 Exposición a rayos X para iniciar la exposición. Manual de usuario de Green16 (PHT-65LHS)
  • Seite 461 Encaje los dos extremos de la placa para radiografías carpales en los dos orificios de la unidad de cefalometría (CEPH), tal como se muestra más abajo. Compruebe que la placa se encuentre bien montada. Manual de usuario de Green16 (PHT-65LHS)
  • Seite 462 Pida al paciente que cierre los ojos y no se mueva hasta que haya finalizado la adquisición de la imagen. Haga clic en el botón READY. Todavía no ha empezado la exposición a la radiación. Vaya al apartado 4.3 Exposición a rayos X para iniciar la exposición. Manual de usuario de Green16 (PHT-65LHS)
  • Seite 463: Exposición A Rayos X

    Salga de la sala de rayos X y cierre la puerta. Mantenga pulsado el interruptor de exposición hasta que se complete la adquisición de imágenes. Amarillo: rayos X activos La imagen aparecerá en la pantalla. Manual de usuario de Green16 (PHT-65LHS)
  • Seite 464: Finalización Del Escaneo

    Las imágenes se guardan automáticamente si la opción de almacenamiento automático está configurada como predeterminada. Si no está configurada como predeterminada, haga clic en el botón Save para guardar las imágenes. Para comprobar la imagen, haga doble clic en ella en Patient List. Manual de usuario de Green16 (PHT-65LHS)
  • Seite 465: Adquisición De Imágenes En El Modo Cbct

    2. Procedimientos iniciales. Puede configurar los parámetros de imagen desde la pantalla táctil o a través del software de consola que se ejecuta en el PC. Al estar sincronizados, muestran la misma configuración del entorno. Manual de usuario de Green16 (PHT-65LHS)
  • Seite 466 El botón CEPH solo está disponible cuando el programa incluye el modo CEPH. Seleccione FOV Size (Tamaño del campo de visión) (con las opciones Vertical Option, Horizon Option, Tooth Option). <Software de consola> <Pantalla táctil> Manual de usuario de Green16 (PHT-65LHS)
  • Seite 467 Cuando aparecen objetos metálicos en la imagen, se aplica automáticamente la función MAR (reducción de artefactos metálicos, por sus siglas en inglés). La función MAR puede alargar el tiempo de reconstrucción de la imagen. Manual de usuario de Green16 (PHT-65LHS)
  • Seite 468 Soft ≤ Normal ≤ Hard Grupo de Circunferencia de la Distancia La intensidad de edad cabeza media (cm) (cm) rayos X >53±3 Hard Child 53±3 53±3 Normal <53±3 Soft >56±3 Hard Adult 56±3 56±3 Normal <56±3 Soft Manual de usuario de Green16 (PHT-65LHS)
  • Seite 469  El haz vertical se activa para facilitar la colocación del paciente.  Los valores de DAP (producto dosis-área), Scan Time y Exposure Time se muestran en la ventana Patient Information. 10. Sitúe al paciente en el equipo. Manual de usuario de Green16 (PHT-65LHS)
  • Seite 470: Obtención De Una Imagen Double Scan (Opcional)

    El software de consola y la pantalla táctil están vinculados entre ellos en tiempo real y los ajustes del entorno son iguales. Haga clic en el botón Double Scan en la pantalla principal del modo CBCT. Manual de usuario de Green16 (PHT-65LHS)
  • Seite 471 < Pantalla táctil > El sexo y grupo de edad del paciente se seleccionan de forma automática en función de la información de dicho paciente. < Software de consola > < Pantalla táctil > Manual de usuario de Green16 (PHT-65LHS)
  • Seite 472 X. Si hace clic en el botón de flecha, puede realizar ajustes finos en incrementos de ± 1 kVp y ± 0,1 mA. < Software de consola > < Pantalla táctil > Manual de usuario de Green16 (PHT-65LHS)
  • Seite 473 Pulse el botón READY. En este momento, no se irradian los rayos X. Vaya al apartado 5.4 Exposición a rayos X para iniciar la exposición. 10. Ayude al paciente a salir del equipo de la sala blindada. Manual de usuario de Green16 (PHT-65LHS)
  • Seite 474 X. Si hace clic en el botón de flecha, puede realizar ajustes finos en incrementos de ± 1 kVp y ± 0,1 mA. < Software de consola > < Pantalla táctil > Manual de usuario de Green16 (PHT-65LHS)
  • Seite 475 Vaya al apartado 5.4 Exposición a rayos X para iniciar la exposición. Ayude al paciente a salir del equipo de la sala blindada. Vaya al apartado 5.5 Finalización del escaneo para finalizar la adquisición y comprobar la imagen. Manual de usuario de Green16 (PHT-65LHS)
  • Seite 476: Colocación Del Paciente

    Pida al paciente que se coloque un delantal plomado para protegerlo de la radiación residual. Utilice el botón o el conmutador Column UP/DOWN para colocar el equipo a la altura del paciente. <Panel de control de tipo LCD> Manual de usuario de Green16 (PHT-65LHS)
  • Seite 477 Debe presionar el pecho contra el equipo.  Debe mantener los pies cerca de la parte interior de la base.  Debe mantener ambos hombros en paralelo.  Debe mantenerse erguido e inmóvil.  Manual de usuario de Green16 (PHT-65LHS)
  • Seite 478 Pida al paciente que muerda las muescas del bloque de mordida con los incisivos. Pida al paciente que haga lo siguiente para mantener la postura: Cerrar la boca.  Pegar la lengua al paladar.  Cerrar los ojos.  Manual de usuario de Green16 (PHT-65LHS)
  • Seite 479 Debe mantener los pies cerca de la parte interior de la base.  Debe mantener ambos hombros en paralelo.  Debe mantenerse erguido e inmóvil.  Pida al paciente que haga lo siguiente para mantener la postura: Cerrar los ojos.  Manual de usuario de Green16 (PHT-65LHS)
  • Seite 480 Sitúe al paciente en el equipo. Utilice el botón o el conmutador Vertical Frame Up/Down (Subir/bajar bastidor vertical) para ajustar la altura del equipo de modo que la barbilla del paciente se encuentre sobre el reposabarbilla. Manual de usuario de Green16 (PHT-65LHS)
  • Seite 481 Debe sujetar firmemente las agarraderas.  Debe presionar el pecho contra el equipo.  Debe mantener los pies cerca de la parte interior de la base.  Manual de usuario de Green16 (PHT-65LHS)
  • Seite 482 CT. No se trata de un fallo/error. Alinee el haz vertical con el centro de la cara del paciente (línea sagital). (De esta forma, se evita la expansión horizontal de la imagen.) Manual de usuario de Green16 (PHT-65LHS)
  • Seite 483 READY. Haga clic en el botón READY. Todavía no ha empezado la exposición a la radiación. Vaya al apartado 5.4 Exposición a rayos X para iniciar la exposición. Manual de usuario de Green16 (PHT-65LHS)
  • Seite 484: Exposición A Rayos X

    El operador debe mantener contacto vocal o visual con el paciente en todo momento durante la adquisición de imágenes. Mantenga pulsado el interruptor de exposición hasta que se complete la adquisición de imágenes. Amarillo: rayos X activos La imagen aparecerá en la pantalla. Manual de usuario de Green16 (PHT-65LHS)
  • Seite 485 En el software de consola, la marca de radiación cambia a color  amarillo y la indicación «X-RAY» pasa a «X-RAY ON». Suelte el interruptor de exposición cuando el mensaje «Image capturing is completed» (La captura de imagen se ha completado) aparezca en la pantalla. Manual de usuario de Green16 (PHT-65LHS)
  • Seite 486: Finalización Del Escaneo

    Save para guardar las imágenes. Para comprobar la imagen, haga doble clic en ella en Patient List. A continuación, Ez3D-i / Ez3D Plus se ejecutará automáticamente para la visualización 3D. Manual de usuario de Green16 (PHT-65LHS)
  • Seite 487: Adquisición De Imágenes En Modo 3D Model Scan

    PC. Al estar sincronizados, muestran la misma configuración del entorno. La modalidad 3D MODEL Scan no está disponible para los  usuarios de EasyDent / Ez3D Plus. Manual de usuario de Green16 (PHT-65LHS)
  • Seite 488 Si fuera necesario, puede seleccionar esta opción manualmente. <Software de consola> <Pantalla táctil> Grupo de edad Estándar de VATECH Child 2 ~ 12 años de edad Adult > 12 años de edad Woman Manual de usuario de Green16 (PHT-65LHS)
  • Seite 489  El haz vertical se activa para facilitar la colocación del paciente.  Los valores de DAP (producto dosis-área), Scan Time y Exposure Time se muestran en la ventana Patient Information. Coloque el modelo de escayola en el equipo. Manual de usuario de Green16 (PHT-65LHS)
  • Seite 490: Colocación En El Modo Model

    Alinee el haz láser del plano sagital con el centro del modelo. (De esta forma, se evita la expansión horizontal de la imagen.) Haga clic en el botón READY. Todavía no ha empezado la exposición a la radiación. Vaya al apartado 6.3 Exposición a rayos X para iniciar la exposición. Manual de usuario de Green16 (PHT-65LHS)
  • Seite 491: Exposición A Rayos X

    «X-RAY» pasa a «X-RAY ON». Suelte el interruptor de exposición cuando el mensaje «Image capturing is completed» (La captura de imagen se ha completado) aparezca en la pantalla. Quite el modelo de escayola del equipo. Manual de usuario de Green16 (PHT-65LHS)
  • Seite 492: Comprobación De Las Imágenes Capturadas

    Para comprobar la imagen, haga doble clic en ella en Patient List. Puede visualizar la imagen adquirida mediante software de visualización de terceros que sea compatible con el formato STL. Consulte el Manual de usuario de EzDent-i para obtener más información. Manual de usuario de Green16 (PHT-65LHS)
  • Seite 495 РУССКИЙ Примечание ......................iii Условные обозначения, используемые в Руководстве ......... iv 1. Обзор системы визуализации ................. 1 1.1 Обзор оборудования ................... 3 1.2 Панель управления ..................6 1.3 Сенсорный экран ..................7 1.4 Аварийный выключатель ................16 1.5 Реле экспозиции ..................17 2.
  • Seite 497: Примечание

    которая сочетает в одном устройстве такие возможности визуализации, как PANO, CEPH (дополнительно), CBCT и 3D MODEL Scan. Данный документ представляет собой руководство по эксплуатации системы Green16 (PHT-65LHS). Данное руководство описывает способ управления системой Green16 (PHT- 65LHS). Рекомендуется внимательно ознакомиться с данным руководством для...
  • Seite 498: Условные Обозначения, Используемые В Руководстве

    ПРИМЕЧАНИЕ предоставляет полезные советы и подсказки. Обозначает потенциальную опасность РАДИАЦИЯ воздействия радиации. Обозначает компонент, который ОДНОРАЗОВОГО необходимо менять с каждым новым ИСПОЛЬЗОВАНИЯ пациентом. Означает, что элемент оборудования Восприимчивость подвержен вредному воздействию к ЭСР электростатических разрядов. Руководство пользователя для Green16 (PHT-65LHS)
  • Seite 499: Обзор Системы Визуализации

    стоматологами, рентгенологами и другими специалистами, имеющими лицензию для осуществления рентгеновских исследований, согласно закону того региона, в котором данное устройство будет использовано. Стандарты и нормы Система Green16 (PHT-65LHS) сконструирована и разработана в соответствии с требованиями следующих международных стандартов и норм: MEDICAL - APPLIED ELECTROMAGNETIC RADIATION EQUIPMENT ...
  • Seite 500 IEC 60601-1 6.1) Классификации ( Степень защиты от проникновения воды: Стандартное оборудование: IPX0  Степень защиты от удара электрическим током: Оборудование 1-класса,  рабочая часть аппарата типа В: Височное опоры, опоры для подбородка и прикусные блоки. Руководство пользователя для Green16 (PHT-65LHS)
  • Seite 501: Обзор Оборудования

    полученном изображении, которое отличается от фактического размера Фиксирует голову пациента во время получения Ушные штифты изображений CEPH . Закрытый ящик Место, где можно хранить прикусные блоки, для хранения комплекты опор для подбородка и другие компонентов компоненты. Руководство пользователя для Green16 (PHT-65LHS)
  • Seite 502 Опора для Место для подбородка. подбородка Управляет горизонтальным лучом, открывает/закрывает височные опоры, регулирует высоту вертикальной рамы и подготавливает к Панель управления операции при нажатии на кнопку READY. (Для подробной информации, смотрите раздел 1.2 Панель управления.) Руководство пользователя для Green16 (PHT-65LHS)
  • Seite 503 1. Обзор системы визуализации № Деталь Описание Порт входного сигнала для переключателя Column Разъём D-sub UP/DOWN Руководство пользователя для Green16 (PHT-65LHS)
  • Seite 504: Панель Управления

    Кнопка READY / позиционирования пациента. RETURN Устанавливает место вращающегося блока. Кнопка Horizontal Выравнивает горизонтальный луч в режиме PANO. Beam UP/DOWN Перемещает вертикальную раму вверх или вниз. Кнопка Column (Для того чтобы отрегулировать высоту опоры для UP/DOWN подбородка) Руководство пользователя для Green16 (PHT-65LHS)
  • Seite 505: Сенсорный Экран

    может привести к травме пациента или повреждению оборудования. Всегда используйте сенсорный экран, осторожно нажав на него  кончиком пальца. Не используйте острые предметы, такие как шариковые ручки  или карандаши. Это может привести к повреждению экрана. Руководство пользователя для Green16 (PHT-65LHS)
  • Seite 506 возрастную группу, интенсивность рентгеновского Кнопка Настроек излучения, тип обследования и визуализации, выбор дуги и Image option. Информация о Отображает текущую информацию о настройках. настройках (Модальность, напряжение и ток трубки, арочный параметров тип, опция изображения и режима Pano.) визуализации Руководство пользователя для Green16 (PHT-65LHS)
  • Seite 507 Выбор пола пациента / возрастной группы. группа Выбор интенсивности рентгеновского излучения. В зависимости от длины окружности головы Интенсивность пациента, интенсивность рентгеновского рентгеновского излучения могут быть классифицированы, как излучения Hard, Normal или Soft : Soft ≤ Normal ≤ Hard Руководство пользователя для Green16 (PHT-65LHS)
  • Seite 508 регулировка напряжения и тока трубки, пола / Кнопка Настроек возрастной группы, интенсивности рентгеновского излучения и Image Option. Информация о Отображает текущую информацию о настройках. настройках (Модальность, напряжение и ток трубки, а также параметров опция изображения) визуализации Руководство пользователя для Green16 (PHT-65LHS)
  • Seite 509 Hard, Normal или Soft : Soft ≤ Normal ≤ Hard Выбор между “High Resolution” и “Green”. Image Option (Качество изображения: High Resolution > Green) Кнопка Закрывает экран настроек и возвращается на главный ВЫХОД экран CEPH. Руководство пользователя для Green16 (PHT-65LHS)
  • Seite 510 регулировка напряжения и тока трубки, пола / Кнопка Настроек возрастной группы, интенсивности рентгеновского излучения, Image Option и Voxel Size. Информация о Отображает текущую информацию о настройках. настройках (Модальность, напряжение и ток трубки, Image option параметров и Voxel size) визуализации Руководство пользователя для Green16 (PHT-65LHS)
  • Seite 511 В зависимости от длины окружности головы ть пациента, интенсивность рентгеновского рентгеновско излучения могут быть классифицированы, го излучения как Hard, Normal или Soft : Soft ≤ Normal ≤ Hard Кнопка Закрывает экран настроек и возвращается на главный ВЫХОД экран CBCT. Руководство пользователя для Green16 (PHT-65LHS)
  • Seite 512 (PANO / CEPH (дополнительно) / CBCT / MODEL). Регулировка напряжения и тока трубки, пола / Кнопка Настроек возрастной группы и интенсивности рентгеновского излучения. Информация о настройках Отображает текущую информацию о настройках. параметров (Модальность, напряжение и ток трубки) визуализации Руководство пользователя для Green16 (PHT-65LHS)
  • Seite 513 кВп / мА Пол пациента / возрастная Выбор пола пациента / возрастной группы. группа Интенсивнос ть Выбор интенсивности рентгеновского излучения. рентгеновско го излучения Кнопка Закрывает экран настроек и возвращается на главный ВЫХОД экран 3D MODEL Scan. Руководство пользователя для Green16 (PHT-65LHS)
  • Seite 514: Аварийный Выключатель

    Аварийный выключатель, чтобы немедленно остановить движущиеся части и отключить от электричества электрические детали оборудования. Для перезапуска оборудования, поверните Аварийный выключатель по часовой стрелке, пока он не выскочит. Аварийный выключатель находится под нижней части вертикальной рамы. Руководство пользователя для Green16 (PHT-65LHS)
  • Seite 515: Реле Экспозиции

    том, что во время работы кабель Реле экспозиции по случайности не отделиться от блока. Сохраняйте словесный/визуальный контакт с пациентом во  время экспозиции. Если во время экспозиции возникнет какая-либо проблема, то следует немедленно отпустить Реле экспозиции. Руководство пользователя для Green16 (PHT-65LHS)
  • Seite 516 1. Обзор системы визуализации Разделительная страница Руководство пользователя для Green16 (PHT-65LHS)
  • Seite 517: Начало Работы

    Для того чтобы включить оборудование, нажмите на Главный переключатель питания, который находится под нижней части вертикальной рамы. Главный переключатель питания обесточивает цепи на всех полюсах одновременно. Убедитесь в том, что зеленый светодиодный индикатор в верхней части оборудования включен. Руководство пользователя для Green16 (PHT-65LHS)
  • Seite 518: Запуск Программы Просмотра Снимков (Ezdent-I / Easydent)

    с программным обеспечением и медицинскими устройствами, обратитесь к производителю. Для системы стоматологической рентгеновской компьютерной томографии Green16 (PHT-65LHS), обе программы просмотра 3D-снимков (Ez3D-i / Ez3D Plus) и программное обеспечение консоли доступны через программу просмотра 2D-снимков (ПО EzDent-i / EasyDent). В программе просмотров 3D снимков и...
  • Seite 519 а главном окне GUI щелкните вкладку PATIENT и значок Add Patient. Введите необходимую информацию о пациенте. Chart No., E-Mail адрес, First Name и Last Name обязательные для заполнения поля, которые должны быть заполнены. (Номер медицинской карты заполняется автоматически.) Чтобы сохранить карту пациента, нажмите кнопку Add. Руководство пользователя для Green16 (PHT-65LHS)
  • Seite 520 Введите необходимую информацию о пациенте. Chart Number, First Name и Last – Name обязательные для заполнения поля. Все остальные поля не являются обязательными, но рекомендуется, чтобы они были заполнены. Чтобы сохранить карту пациента, нажмите кнопку Add. Руководство пользователя для Green16 (PHT-65LHS)
  • Seite 521 Для отображения виртуальной клавиатуры дважды щелкните по значку клавиатуры. Вы можете искать информацию о пациентах с помощью виртуальной клавиатуры. Дважды щелкните по информации о пациенте, чтобы посмотреть более подробные сведения о пациенте, как показано ниже. Руководство пользователя для Green16 (PHT-65LHS)
  • Seite 522 Введите Chart No., First name или Last name пациента, щелкнув мышью на виртуальной клавиатуре и нажав клавишу Enter. (Можно использовать физическую клавиатуру, чтобы сделать то же самое) Информация о пациенте может быть отображена на панели Patient Information и Patient List. Руководство пользователя для Green16 (PHT-65LHS)
  • Seite 523: Запуск Программного Обеспечения Консоли

    Щелкните вкладку ACQUISITION и выберите режим визуализации (CT, Panorama или Cephalo). Появится главный экран, выбранного режима. На главном экране можно настроить настройки параметров визуализации перед получением изображения. Смотрите следующие главы 3 ~ 6 для более подробной информации о получении изображения. Руководство пользователя для Green16 (PHT-65LHS)
  • Seite 524 выбора нажмите кнопку устройства получения изображения в верхнем левом углу. Появится главный экран, выбранного режима. На главном экране можно настроить настройки параметров визуализации перед получением изображения. Смотрите следующие главы 3 ~ 6 для более подробной информации о получении изображения. Руководство пользователя для Green16 (PHT-65LHS)
  • Seite 525: Получение Изображений Pano

    работы. В противном случае, сначала нужно вернуться к шагу 2. Начало работы и завершить его. Вы можете настроить параметры визуализации на любом сенсорном экране или программном обеспечении консоли, работающем на компьютере. Они синхронизированы и отображают одни и те же параметры среды. Руководство пользователя для Green16 (PHT-65LHS)
  • Seite 526 которое варьируется в зависимости от местоположения и дугообразной формы пациента.  Предоставляет несколько панорамных изображений, имеющих разные фокусные плоскости, в сочетании с типовым панорамным Insight PAN изображением. (дополнительно)  Позволяет детально проверять изображения в направлении глубины. Руководство пользователя для Green16 (PHT-65LHS)
  • Seite 527 Выбор дуги Описание Панорамное изображение V-образных небных дуг (у Narrow небольшого количества взрослых женщин) Панорамное изображение небных дуг у нормального Normal взрослого человека Панорамное изображение небных дуг квадратной формы Wide (у некоторого количества взрослых мужчин) Руководство пользователя для Green16 (PHT-65LHS)
  • Seite 528  Для активации опций исследования Bitewing – Bitewing, Bitewing Incisor (дополнительно), Bitewing Right, Bitewing Left, выберите дугу Orthogonal на панели выбора дуги.  При выборе опции Special Examination панель “PANO Examination” выключена. Если необходимо выбрать опцию PANO Examination, выберите дугу повторно. Руководство пользователя для Green16 (PHT-65LHS)
  • Seite 529 Normal или Soft : Soft ≤ Normal ≤ Hard Средняя Возрастная Ассортимент Рентгеновский Окружность головы группа (cm) Интенсивность (cm) >53±3 Hard Child 53±3 53±3 Normal <53±3 Soft >56±3 Hard Adult 56±3 56±3 Normal <56±3 Soft Руководство пользователя для Green16 (PHT-65LHS)
  • Seite 530  Вертикальный луч будет активирован, чтобы сделать позиционирование пациента более легким.  Значения DAP (Произведение дозы облучения на площадь), Scan Time и Exposure Time будут отображаться ниже окна Patient Information. 10. Подведите пациента к оборудованию. Руководство пользователя для Green16 (PHT-65LHS)
  • Seite 531: Позиционирование Пациента

    ложные изображения и снизить качество изображения. Для защиты от рассеянной радиации рекомендуется надеть на пациента рентгенозащитный фартук. Для того чтобы отрегулировать высоту оборудования в зависимости от роста пациента, нажмите кнопку Column UP/DOWN или переключатель опции. – <Панель управления ЖК-экран> Руководство пользователя для Green16 (PHT-65LHS)
  • Seite 532 оставаться в положении, описанных ниже. Взяться крепко за поручни.  Прижаться грудью к оборудованию.  Держать обе ноги ближе к внутренней стороне основания.  Держать плечи параллельно друг другу.  Выпрямить шейный отдел позвоночника и стать прямо.  Руководство пользователя для Green16 (PHT-65LHS)
  • Seite 533 3. Получение изображений PANO Попросите пациента прикусить прикусной блок по желобку передними зубами. Попросите пациента сохранять позицию следующим образом: Закрыть рот.  Прижать язык к небу.  Закрыть глаза.  Руководство пользователя для Green16 (PHT-65LHS)
  • Seite 534 оставаться в положении, описанных ниже. Взяться крепко за поручни.  Прижаться грудью к оборудованию.  Держать обе ноги ближе к внутренней стороне основания.  Держать плечи параллельно друг другу.  Выпрямить шейный отдел позвоночника и стать прямо.  Руководство пользователя для Green16 (PHT-65LHS)
  • Seite 535 3. Получение изображений PANO Попросите пациента сохранять позицию следующим образом: Закрыть рот.  Прижать язык к небу.  Закрыть глаза.  Руководство пользователя для Green16 (PHT-65LHS)
  • Seite 536 / Франкфуртская линия Лазерный маркер клыков Кнопка горизонтальный луч DOWN Попросите пациента улыбнуться и выровняйте лазерный маркер клыков по центру клыков. Для регулировки положения луча, используйте рычаг лазерного маркера клыков. Лазерный маркер Рычаг лазерного клыков маркера клыков Руководство пользователя для Green16 (PHT-65LHS)
  • Seite 537 Перед нажатием кнопки READY убедитесь в том, что височные опоры находятся в положении CLOSE (ЗАКРЫТЬ). Нажмите кнопку READY. На данном этапе рентгеновское облучение не начнется. Для того чтобы начать облучение, перейдите к разделу 3.3 Рентгеновское облучение. Руководство пользователя для Green16 (PHT-65LHS)
  • Seite 538 Перед обследованием следующего пациента очистите опору для подбородка и прикусной блок с помощью этилового спирта и протрите сухим полотенцем. Для того чтобы расширить височные опоры, используйте кнопку Temple Supports OPEN/CLOSE на панели управления. Подведите пациента к оборудованию. Руководство пользователя для Green16 (PHT-65LHS)
  • Seite 539 Прижать язык к небу.  Закрыть глаза.   Как показано на рисунке, блок поддержки интегрированной опоры для подбородка не должен касаться точки передней носовой ости пациента.  Попросите пациента оставаться в том же положении до завершения сканирования. Руководство пользователя для Green16 (PHT-65LHS)
  • Seite 540 лице пациента. Для расположения нажмите кнопку Horizontal Beam на панели управления. Убедитесь в том, чтобы горизонтальный луч выравнивался по поверхности пациента в горизонтальном положении. Вертикальный луч /Серединная сагиттальная линия Кнопка горизонтальный луч UP Горизонтальный луч / Франкфуртская линия Кнопка горизонтальный луч DOWN Руководство пользователя для Green16 (PHT-65LHS)
  • Seite 541 Перед нажатием кнопки READY убедитесь в том, что височные опоры находятся в положении CLOSE (ЗАКРЫТЬ). Нажмите кнопку READY. На данном этапе рентгеновское облучение не начнется. Для того чтобы начать облучение, перейдите к разделу 3.3 Рентгеновское облучение. Руководство пользователя для Green16 (PHT-65LHS)
  • Seite 542 Попросите пациента расположить основание носа (точка передней носовой ости) напротив опоры для подбородка и согните голову вперед на 5˚. Попросите пациента сохранять позицию следующим образом: Закрыть рот.  Прижать язык к небу.  Закрыть глаза.  Руководство пользователя для Green16 (PHT-65LHS)
  • Seite 543  Попросите пациента оставаться в том же положении до завершения сканирования. Выравнивание лазерного луча Инструкции те же, что и для режима TMJ Open. Завершение позиционирования пациента Инструкции те же, что и для режима TMJ Open. Руководство пользователя для Green16 (PHT-65LHS)
  • Seite 544 оставаться в положении, описанных ниже. Взяться крепко за поручни.  Прижаться грудью к оборудованию.  Держать обе ноги ближе к внутренней стороне основания.  Держать плечи параллельно друг другу.  Выпрямить шейный отдел позвоночника и стать прямо.  Руководство пользователя для Green16 (PHT-65LHS)
  • Seite 545 Прижать язык к небу.  Закрыть глаза.   Как показано на рисунке, блок поддержки интегрированной опоры для подбородка не должен касаться точки передней носовой ости пациента.  Попросите пациента оставаться в том же положении до завершения сканирования. Руководство пользователя для Green16 (PHT-65LHS)
  • Seite 546 Перед нажатием кнопки READY убедитесь в том, что височные опоры находятся в положении CLOSE (ЗАКРЫТЬ). Нажмите кнопку READY. На данном этапе рентгеновское облучение не начнется. Для того чтобы начать облучение, перейдите к разделу 3.3 Рентгеновское облучение. Руководство пользователя для Green16 (PHT-65LHS)
  • Seite 547: Рентгеновское Облучение

    Выйдите из ренгтенкабинета и закройте дверь. Оператор должен постоянно поддерживать словесный/визуальный контакт с пациентом во время получения изображения. Нажмите и удерживайте Реле экспозиции до завершения процесса получения изображения. Желтый: Включено рентгеновское излучение Изображение появится на экране. Руководство пользователя для Green16 (PHT-65LHS)
  • Seite 548: Завершение Сканирования

    Изображения автоматически передаются в программу EzDent-i / EasyDent. Изображения сохраняются автоматически, если опция автоматического сохранения настроена по умолчанию. Если опция не настроена по умолчанию, нажмите кнопку Save, чтобы сохранить изображения. Для проверки изображения, два раза нажмите на одну из вкладок Patient List. Руководство пользователя для Green16 (PHT-65LHS)
  • Seite 549: Получение Снимков Ceph (Дополнительный)

    Для получения изображений сперва нужно завершить шаг CEPH, 2. Начало работы. Вы можете настроить параметры визуализации на любом сенсорном экране или программном обеспечении консоли, работающем на компьютере. Они синхронизированы и отображают одни и те же параметры среды. Руководство пользователя для Green16 (PHT-65LHS)
  • Seite 550 визуализации CEPH включена в систему оборудования. Выберите опцию Image Option. (На сенсорном экране, нажмите кнопку Settings перед выбором опций.) <Программное обеспечение консоли> <Сенсорный экран> На панели CEPH Examination выберите программу исследования. <Программное обеспечение консоли> <Сенсорный экран> Руководство пользователя для Green16 (PHT-65LHS)
  • Seite 551 Normal или Soft : Soft ≤ Normal ≤ Hard Средняя Возрастная Ассортимент Рентгеновский Окружность головы группа (cm) Интенсивность (cm) >53±3 Hard Child 53±3 53±3 Normal <53±3 Soft >56±3 Hard Adult 56±3 56±3 Normal <56±3 Soft Руководство пользователя для Green16 (PHT-65LHS)
  • Seite 552 После настройки параметров экспозиции, нажмите на кнопку CONFIRM. <Программное обеспечение консоли> <Сенсорный экран> При нажатии на кнопку CONFIRM,  Значения DAP (Произведение дозы облучения на площадь), Scan Time и Exposure Time будут отображаться ниже окна Patient Information. Подведите пациента к оборудованию. Руководство пользователя для Green16 (PHT-65LHS)
  • Seite 553: Позиционирование Пациента

    ложные изображения и снизить качество изображения. Для защиты от рассеянной радиации рекомендуется надеть на пациента рентгенозащитный фартук. Для того чтобы отрегулировать высоту оборудования в зависимости от роста пациента, нажмите кнопку Column UP/DOWN или переключатель опции. – <Панель управления ЖК-экран> Руководство пользователя для Green16 (PHT-65LHS)
  • Seite 554 Для того чтобы легко проверить расположение пориона, используйте Porion Position Reference Indicator (Индикатор для определения место положения пориона), который появляется на получившемся изображении. Подведите пациента к оборудованию CEPH. Попросите пациента расслабить шею и плечи, а затем стать ровно. Руководство пользователя для Green16 (PHT-65LHS)
  • Seite 555 Попросите пациента перед тем, как закрыть рот, сглотнуть слюну и оставаться в текущем положении до завершения процесса получения изображения. Нажмите кнопку READY. На данном этапе рентгеновское облучение не начнется. 10. Для того чтобы начать облучение, перейдите к разделу 4.3 Рентгеновское облучение. Руководство пользователя для Green16 (PHT-65LHS)
  • Seite 556 Согните назальный локализатор вверх. Назальный локализатор не используется в режиме PA. Подведите пациента к оборудованию CEPH. Попросите пациента стать ровно лицом к датчику. Убедитесь в том, чтобы плечи пациента находились на одном уровне, и чтобы шея была расслаблена. Руководство пользователя для Green16 (PHT-65LHS)
  • Seite 557 Попросите пациента перед тем, как закрыть рот, сглотнуть слюну и оставаться в текущем положении до завершения процесса получения изображения. Нажмите кнопку READY. На данном этапе рентгеновское облучение не начнется. 10. Для того чтобы начать облучение, перейдите к разделу 4.3 Рентгеновское облучение. Руководство пользователя для Green16 (PHT-65LHS)
  • Seite 558 Поверните назальный локализатор в положение маркера позиционирование в режиме SMV, как показано на рисунке. Согните назальный локализатор вверх. Назальный локализатор не используется в режиме SMV. Подведите пациента к оборудованию CEPH. Попросите пациента стать лицом к рентгеновской трубке и стоять прямо. Руководство пользователя для Green16 (PHT-65LHS)
  • Seite 559 Попросите пациента перед тем, как закрыть рот, сглотнуть слюну и оставаться в текущем положении до завершения процесса получения изображения. Нажмите кнопку READY. На данном этапе рентгеновское облучение не начнется. 10. Для того чтобы начать облучение, перейдите к разделу 4.3 Рентгеновское облучение. Руководство пользователя для Green16 (PHT-65LHS)
  • Seite 560 голову назад на 30˚ - 40˚. Попросите пациента оставаться в текущем положении до завершения процесса получения изображения. Нажмите кнопку READY. На данном этапе рентгеновское облучение не начнется. Для того чтобы начать облучение, перейдите к разделу 4.3 Рентгеновское облучение. Руководство пользователя для Green16 (PHT-65LHS)
  • Seite 561 режиме PA / Waters’ view / Carpus, как показано на рисунке. Согните назальный локализатор вверх. Назальный локализатор не используется в режиме Carpus. Установите два конца пластины для запястья в два отверстия оборудования CEPH, как показано ниже. Убедитесь в том, что пластина для запястья установлена надежно. Руководство пользователя для Green16 (PHT-65LHS)
  • Seite 562 показано ниже), растопырив пальцы. Убедитесь в том, чтобы пациент не сгибал пальцы. Попросите пациента закрыть глаза и не двигаться до завершения процесса получения изображения. Нажмите кнопку READY. На данном этапе рентгеновское облучение не начнется. Для того чтобы начать облучение, перейдите к разделу 4.3 Рентгеновское облучение. Руководство пользователя для Green16 (PHT-65LHS)
  • Seite 563: Рентгеновское Облучение

    задержать дыхание и не глотать слюну. Также, попросите не шевелиться пока не откроются височные опоры. Выйдите из ренгтенкабинета и закройте дверь. Нажмите и удерживайте Реле экспозиции до завершения процесса получения изображения. Желтый: Включено рентгеновское из лучение Изображение появится на экране. Руководство пользователя для Green16 (PHT-65LHS)
  • Seite 564: Завершение Сканирования

    Изображения автоматически передаются в программу EzDent-i / EasyDent. Изображения сохраняются автоматически, если опция автоматического сохранения настроена по умолчанию. Если опция не настроена по умолчанию, нажмите кнопку Save, чтобы сохранить изображения. Для проверки изображения, два раза нажмите на одну из вкладок Patient List. Руководство пользователя для Green16 (PHT-65LHS)
  • Seite 565: Получение Изображений Cbct

    Для получения изображений сперва нужно завершить шаг CBCT, 2. Начало работы. Вы можете настроить параметры визуализации на любом сенсорном экране или программном обеспечении консоли, работающем на компьютере. Они синхронизированы и отображают одни и те же параметры среды. Руководство пользователя для Green16 (PHT-65LHS)
  • Seite 566 На главном экране нажмите кнопку CBCT. <Программное обеспечение консоли> <Сенсорный экран> Кнопка CEPH отображается лишь тогда, когда программа визуализации CEPH включена в систему оборудования. Выберите размер поля обзора (с Vertical Option, Horizon Option, Tooth Option). <Программное обеспечение консоли> <Сенсорный экран> Руководство пользователя для Green16 (PHT-65LHS)
  • Seite 567 Left Molar Mandible 16x15 (первое (Double Scan; сканирование) Не предусмотрено Не предусмотрено 16x9 шить) Maxilla (дополнительно) (второе сканирование) Выберите опцию Image Option. (На сенсорном экране, нажмите кнопку Settings перед выбором опций.) <Программное обеспечение консоли> <Сенсорный экран> Руководство пользователя для Green16 (PHT-65LHS)
  • Seite 568 автоматически. При необходимости, вы можете выбрать опцию вручную. <Программное обеспечение консоли> <Сенсорный экран> Возрастная группа Стандарт VATECH Child 2 ~ 12 лет Adult > 12 лет Woman Выберите интенсивность рентгеновского излучения. <Программное обеспечение консоли> <Сенсорный экран> Руководство пользователя для Green16 (PHT-65LHS)
  • Seite 569 изображения по умолчанию для оборудования. Пост более шумный, чем HD, но изображение CT быстро восстанавливается. (С MAR лучше отображать металл.) <Программное обеспечение консоли> <Сенсорный экран> После настройки параметров экспозиции, нажмите на кнопку CONFIRM. <Программное обеспечение консоли> <Сенсорный экран> Руководство пользователя для Green16 (PHT-65LHS)
  • Seite 570  Вертикальный луч будет активирован, чтобы сделать позиционирование пациента более легким.  Значения DAP (Произведение дозы облучения на площадь), Scan Time и Exposure Time будут отображаться ниже окна Patient Information. 10. Подведите пациента к оборудованию. Руководство пользователя для Green16 (PHT-65LHS)
  • Seite 571: Получение Изображения Двойного Сканирования (Дополнительно)

    выполнить указания, приведенные в разделе 2. Начало работы. Программное обеспечение консоли ПК оснащено теми же функциями, что и сенсорный экран устройства. Программное обеспечение консоли и сенсорный экран связаны друг с другом в режиме реального времени, и параметры среды аналогичны. Руководство пользователя для Green16 (PHT-65LHS)
  • Seite 572 Выберите опцию Image Option (На сенсорном экране сначала нажмите кнопку Settings.) <Программное обеспечение консоли> <Сенсорный экран> Пол пациента/возрастная группа выбирается автоматически на основе информации о пациенте. В случае необходимости можно осуществить выбор вручную. <Программное обеспечение консоли> <Сенсорный экран> Руководство пользователя для Green16 (PHT-65LHS)
  • Seite 573 Значения напряжения и тока трубки автоматически устанавливаются в зависимости от характеристик пациента и выбранной интенсивности рентгеновского излучения. При нажатии кнопки со стрелкой можно выполнить точную настройку ± 1 кВп с шагом ± 0,1 мА. <Программное обеспечение консоли> <Сенсорный экран> Руководство пользователя для Green16 (PHT-65LHS)
  • Seite 574 Дополнительную информацию о выравнивании положения пациента см. в разделе 5.3 Позиционирование пациента. Нажмите кнопку READY. В это время излучение рентгеновских лучей не происходит. Перейдите к разделу 5.4 Рентгеновское облучение и приступайте к рентгеновскому облучению. 10. Выведите пациента из экранированного кабинета с оборудованием. Руководство пользователя для Green16 (PHT-65LHS)
  • Seite 575 Значения напряжения и тока трубки автоматически устанавливаются в зависимости от характеристик пациента и выбранной интенсивности рентгеновского излучения. При нажатии кнопки со стрелкой можно выполнить точную настройку ± 1 кВп с шагом ± 0,1 мА. <Программное обеспечение консоли> <Сенсорный экран> Руководство пользователя для Green16 (PHT-65LHS)
  • Seite 576 Нажмите кнопку READY. В это время излучение рентгеновских лучей не происходит. Перейдите к разделу 5.4 Рентгеновское облучение и приступайте к рентгеновскому облучению. Выведите пациента из экранированного кабинета с оборудованием. Перейдите к разделу 5.5 Завершение сканирования чтобы завершить съемку и проверить изображение. Руководство пользователя для Green16 (PHT-65LHS)
  • Seite 577: Позиционирование Пациента

    ложные изображения и снизить качество изображения. Для защиты от рассеянной радиации рекомендуется надеть на пациента рентгенозащитный фартук. Для того чтобы отрегулировать высоту оборудования в зависимости от роста пациента, нажмите кнопку Column UP/DOWN или переключатель опции. – <Панель управления ЖК-экран> Руководство пользователя для Green16 (PHT-65LHS)
  • Seite 578 оставаться в положении, описанных ниже. Взяться крепко за поручни.  Прижаться грудью к оборудованию.  Держать обе ноги ближе к внутренней стороне основания.  Держать плечи параллельно друг другу.  Выпрямить шейный отдел позвоночника и стать прямо.  Руководство пользователя для Green16 (PHT-65LHS)
  • Seite 579 5. Получение изображений CBCT Попросите пациента прикусить прикусной блок по желобку передними зубами. Попросите пациента сохранять позицию следующим образом: Закрыть рот.  Прижать язык к небу.  Закрыть глаза.  Руководство пользователя для Green16 (PHT-65LHS)
  • Seite 580 Грудью прижаться к оборудованию.  Поставить обе ноги ближе к внутренней стороне основания.  Расправить плечи.  Выпрямить шейный отдел позвоночника и стоять неподвижно.  Попросите пациента сохранять положение тела следующим образом. Закрыть глаза.  Руководство пользователя для Green16 (PHT-65LHS)
  • Seite 581 Для того чтобы расширить височные опоры, используйте кнопку Temple Supports OPEN/CLOSE на панели управления. Подведите пациента к оборудованию. Используйте кнопку Vertical Frame Up/Down или переключатель для регулировки высоты оборудования таким образом, чтобы подбородок пациента достигал опоры для подбородка. Руководство пользователя для Green16 (PHT-65LHS)
  • Seite 582 Поставить обе ноги ближе к внутренней стороне основания.  Расправить плечи.  Выпрямить шейный отдел позвоночника и стоять неподвижно.  Попросите пациента сохранять положение тела следующим образом. Закрыть глаза.  Попросите пациента оставаться в том же положении до завершения сканирования. Руководство пользователя для Green16 (PHT-65LHS)
  • Seite 583 Держать обе ноги ближе к внутренней стороне основания.  Держать плечи параллельно друг другу.  Выпрямить шейный отдел позвоночника и стать прямо.  Попросите пациента сохранять позицию следующим образом: Закрыть глаза.  Попросите пациента оставаться в том же положении до завершения сканирования. Руководство пользователя для Green16 (PHT-65LHS)
  • Seite 584 изображения по высоте в пределах поля обзора.  В отличие от режима PANO, в режиме КТ горизонтальный луч переместить невозможно. Это не является неисправностью или ошибкой. Выровняйте вертикальный луч с центром лица (Срединная сагиттальная линия). (Чтобы предотвратить горизонтальное расширение изображения) Руководство пользователя для Green16 (PHT-65LHS)
  • Seite 585 Перед нажатием кнопки READY убедитесь в том, что височные опоры находятся в положении CLOSE (ЗАКРЫТЬ). Нажмите кнопку READY. На данном этапе рентгеновское облучение не начнется. Для того чтобы начать облучение, перейдите к разделу 5.4 Рентгеновское облучение. Руководство пользователя для Green16 (PHT-65LHS)
  • Seite 586: Рентгеновское Облучение

    Выйдите из ренгтенкабинета и закройте дверь. Оператор должен постоянно поддерживать словесный/визуальный контакт с пациентом во время получения изображения. Нажмите и удерживайте Реле экспозиции до завершения процесса получения изображения. Желтый: Включено рентгеновское излучение Изображение появится на экране. Руководство пользователя для Green16 (PHT-65LHS)
  • Seite 587 На программном обеспечении консоли символ радиации будет  окрашен в желтый цвет и положение "X-RAY" изменится на "X- RAY ON". Отпустите кнопку Реле экспозиции, когда на экране появится сообщение "Image capturing is completed" (Процесс получения изображения завершен). Руководство пользователя для Green16 (PHT-65LHS)
  • Seite 588: Завершение Сканирования

    сохранения настроена по умолчанию. Если опция не настроена по умолчанию, нажмите кнопку Save, чтобы сохранить изображения. Для проверки изображения, два раза нажмите на одну из вкладок Patient List. Затем, программа Ez3D-i / Ez3D Plus будет работать автоматически для трехмерного видения. Руководство пользователя для Green16 (PHT-65LHS)
  • Seite 589: Получение 3D Model Scan Снимков

    Вы можете настроить параметры визуализации на любом  сенсорном экране или программном обеспечении консоли, работающем на компьютере. Они синхронизированы и отображают одни и те же параметры среды. Модальность 3D MODEL Scan не доступна для пользователей  EasyDent / Ez3D Plus. Руководство пользователя для Green16 (PHT-65LHS)
  • Seite 590 На основе информации о пациенте пол / возрастная группа пациента выбирается автоматически. При необходимости, вы можете выбрать опцию вручную. <Программное обеспечение консоли> <Сенсорный экран> Возрастная группа Стандарт VATECH Child 2 ~ 12 лет Adult > 12 лет Woman Руководство пользователя для Green16 (PHT-65LHS)
  • Seite 591  Вертикальный луч будет активирован, чтобы сделать позиционирование пациента более легким.  Значения DAP (Произведение дозы облучения на площадь), Scan Time и Exposure Time будут отображаться ниже окна Patient Information. Поднесите гипсовый слепок к оборудованию. Руководство пользователя для Green16 (PHT-65LHS)
  • Seite 592: Model Позиционирование

    Выровняйте лазерный луч срединной сагиттальной плоскости к центру гипсового слепка. (Чтобы предотвратить горизонтальное расширение изображения) Нажмите кнопку READY. На данном этапе рентгеновское облучение не начнется. Для того чтобы начать облучение, перейдите к разделу 6.3 Рентгеновское облучение. Руководство пользователя для Green16 (PHT-65LHS)
  • Seite 593: Рентгеновское Облучение

     окрашен в желтый цвет и положение "X-RAY" изменится на "X- RAY ON". Отпустите кнопку Реле экспозиции, когда на экране появится сообщение "Image capturing is completed" (Процесс получения изображения завершен). Извлеките гипсовый слепок из оборудования. Руководство пользователя для Green16 (PHT-65LHS)
  • Seite 594: Проверка Полученных Снимков

    нажмите кнопку Save, чтобы сохранить изображения. Для проверки изображения, два раза нажмите на одну из вкладок Patient List. Вы можете проверить полученный снимок устройством просмотра STL стороннего производителя. Для более подробной информации смотрите Руководство пользователя EzDent-i. Руководство пользователя для Green16 (PHT-65LHS)
  • Seite 596 Français 국가는 노인과 청소년의 복지향상을 위한 정책을 실시할 의무를 진다. www.vatech.com...

Diese Anleitung auch für:

Pht-65lhs

Inhaltsverzeichnis