Hitachi PC-ARFP1E Installations- Und Betriebshandbuch
Vorschau ausblenden
Andere Handbücher für PC-ARFP1E:
- Bedienungsanleitung (19 Seiten) ,
- Installations- und betriebshandbuch (430 Seiten)
Inhaltsverzeichnis
Verfügbare Sprachen
Verfügbare Sprachen
Quicklinks
–
INSTALLATION &
OPERATION
MANUAL
–
REMOTE CONTROLLER
MODELS
PC-ARFP1E
EN
INSTALLATION AND OPERATION MANUAL
ES
MANUAL DE INSTALACIÓN Y FUNCIONAMIENTO
DE
INSTALLATIONS- UND BETRIEBSHANDBUCH
FR
MANUEL D'INSTALLATION ET DE FONCTIONNEMENT
IT
MANUALE D'INSTALLAZIONE E D'USOI
PT
MANUAL DE INSTALAÇÃO E DE FUNCIONAMENTO
DA
INSTALLATIONS- OG BETJENINGSVEJLEDNING
NL
INSTALLATIE- EN BEDIENINGSHANDLEIDING
SV
INSTALLATION- OCH DRIFTHANDBOK
EL
ΕΓΧΕΙΡΙΔΙΟ ΕΓΚΑΤΑΣΤΑΣΗΣ ΚΑΙ ΛΕΙΤΟΥΡΓΙΑΣ
PMML0496 rev.1 - 12/2020
Inhaltsverzeichnis

Verwandte Anleitungen für Hitachi PC-ARFP1E


Inhaltszusammenfassung für Hitachi PC-ARFP1E
- Seite 3 Specifikationerna i den här handboken kan ändras utan föregående meddelande för att Hitachi ska kunna leverera de senaste innovationerna till kunderna. Vi på Hitachi gör allt vi kan för att se till att alla specifikationer stämmer, men vi har ingen kontroll över tryckfel och kan därför inte hållas ansvariga för den typen av fel.
- Seite 4 C A U T I O N This product shall not be mixed with general house waste at the end of its life and it shall be retired according to the appropriated local or national regulations in a environmentally correct way. Due to the refrigerant, oil and other components contained in Air Conditioner, its dismantling must be done by a professio- nal installer according to the applicable regulations.
- Seite 5 DANGER – Hazards or unsafe practices which COULD result in severe personal injuries or death. PELIGRO – Riesgos o prácticas poco seguras que PODRÍAN producir lesiones personales e incluso la muerte. GEFAHR – Gefährliche oder unsichere Anwendung, die zu schweren Körperverletzungen oder zum Tod führen kann. DANGER –...
- Seite 6 The English version is the original one; other languages are translated from English. Should any discrepancy occur between the English and the translated versions, the English version shall prevail. La versión en inglés es la original, y las versiones en otros idiomas son traducciones de la inglesa. En caso de discrepancias entre la versión inglesa y las versiones traducidas, prevalecerá...
-
Seite 7: Inhaltsverzeichnis
INDEX INDICE 1 SAFETY SUMMARY 1 PRECAUZIONI PER LA SICUREZZA 2 SWITCH NAMES AND FUNCTIONS 2 NOMI E FUNZIONI DEI TASTI 3 START UP PROCESS 3 AVVIARE IL PROCESSO 4 OPERATION METHOD 4 METODO DI FUNZIONAMENTO 5 POWER SAVING GUIDE 5 GUIDA DI RISPARMIO ENERGETICO 6 TEST RUN MENU 6 MENÙ... -
Seite 161: Sicherheitsübersicht
SICHERHEITSÜBERSICHT 1 SICHERHEITSÜBERSICHT Hitachi kann nicht alle möglichen Umstände voraussehen, die H I N W E I S potentielle Gefahrenquellen bergen können. • Der Installateur und Systemexperte sollte die örtlichen Vorschriften oder Sicherheitsnormen erfüllen. Die folgenden Normen können G E FA H R ggf. angewandt werden, wenn örtliche Vorschriften nicht verfügbar... -
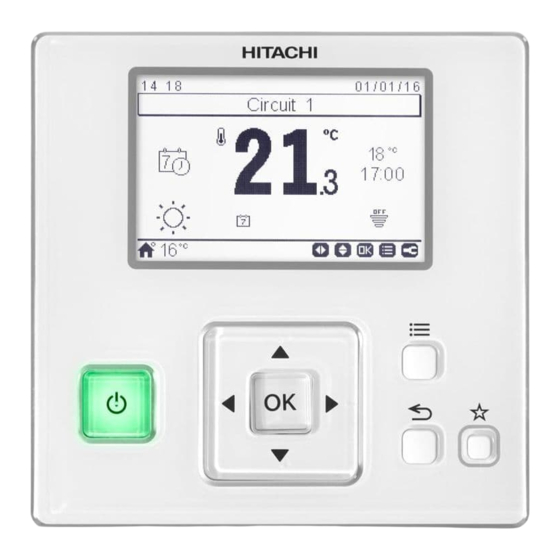
Seite 162: Schalternamen Und -Funktionen
SCHALTERNAMEN UND -FUNKTIONEN 2 SCHALTERNAMEN UND -FUNKTIONEN Die Abbildung unten enthält eine Übersicht aller Anzeigen. Die tatsächliche Anzeige verändert sich während des Betriebs. Raumbezeichnungs- Betriebszeitplananzeige Lüfterdrehzahlanzeige Schwingluftklappenanzeige Anzeige Es wird angezeigt, wenn die Betriebszeitplanfunktion eingestellt ist. Blockieranzeige Betriebsartanzeige Es wird angezeigt, wenn die Blockierfunktion Die Anzeigen „HEIZEN“... -
Seite 163: Startvorgang
STARTVORGANG 3 STARTVORGANG 1 Schalten Sie die Stromversorgung der Innengeräte ein. 2 Bei Modellen mit der Auto-Adressenfunktion warten Sie etwa 3 Minuten. Das Adressieren wird automatisch durchgeführt. (Es kann vorkommen, dass entsprechend der Einstellungsbedingungen 5 Minuten erforderlich sind.) Drücken Sie danach „ “ (Menü) und wählen Sie die zu verwendende Sprache von „8.19.2 Spracheinstellung“... -
Seite 164: Lüfterdrehzahl
BETRIEBSVERFAHREN 4.4 BETRIEBSART (KÜHLEN, HEIZEN, TROCKNEN, KÜHL-/HEIZ-AUTOMATIK UND LUFTSTROM-BETRIEB) Funktion 2 Drücken Sie „ “ oder „ “ und wählen Sie „MODUS“. • Kühlbetrieb (KÜHLEN): Meeting Room MODUS STUFE TEMP WAHL Zur Verminderung der Raumtemperatur. KÜHLEN • Heizbetrieb (HEIZEN): Zur Erhöhung der Raumtemperatur. -
Seite 165: Schwingluftklappen-Richtung
BETRIEBSVERFAHREN 4.6 SCHWINGLUFTKLAPPEN-RICHTUNG 1 Drücken Sie „ “ (Start/Stopp). Stellen Sie sicher, dass der : Auto-Schwingbetrieb wird gestartet. Zu diesem Zeitpunkt Betrieb gestartet ist. Drücken Sie „ “ oder „ “ und wählen schwingt die Luftlamelle wiederholt auf der LCD. Sie „LOUV“. -
Seite 166: Dualer Sollwert Des Automatischen Kühl-/Heizbetriebs
BETRIEBSVERFAHREN 4.8 AUTOMATISCHER KÜHL-/HEIZBETRIEB Der Betrieb ändert sich automatisch und gemäß der Meeting Room MODUS STUFE LOUV TEMP WAHL Innentemperatur wie folgt: AUTO Wenn der Betrieb auf Kühlen steht, ändert er sich auf Heizen, wenn die Innentemperatur der „Heiz-Sollwert“ -1 ºC ist. Wenn der Betrieb auf Heizen steht, ändert er sich auf Kühlen, STUFE Änd. -
Seite 167: Energiesparführer
ENERGIESPARFÜHRER 5 ENERGIESPARFÜHRER Diese Funktion legt einfach das Energiesparmerkmal fest. H I N W E I S Abhängig vom Typ und der Einstellung des Innen- und Außen- • *1: Wenn der Energiesparmodus „Rotationssteuerung“ ist, werden geräts kann es eventuell nicht möglich sein, diese Funktion die „Energiesparstufe“ und der „Zeitplan“ nicht angezeigt. Wenn der einzustellen. -
Seite 168: Testlauf-Menü
TESTLAUF-MENÜ 6 TESTLAUF-MENÜ 6.1 TESTLAUF 1 Nach drücken Sie „ “ (Menü) und „ “ 3 Drücken Sie „ “ (Start/Stopp). Nun beginnt der Testlaufbetrieb. „3 Startvorgang“ (Zurück/Hilfe) gleichzeitig mindestens 3 Sekunden lang. Die Betriebsart, die Luftstrommenge, die Luftstromrichtung und die Testlaufzeit können am Testlaufbildschirm eingestellt wer- a. - Seite 169 TESTLAUF-MENÜ kann dies ein Fehler in der Übertragung zwischen dem Kühlkreislaufnummer des Innengerätenummer, an Innengeräts, an dem die dem die Anomalie auftritt Innengerät und der Fernbedienung anzeigen (Anschluss löst Anomalie auftritt sich, Ablösung der Verkabelung oder Kabelbruch usw.) In Alarmcodenummer diesem Fall sehen Sie unter Punkt für die „10.3 Alarmcodes“...
- Seite 170 TESTLAUF-MENÜ Optionale Einstellungselemente für die Funktionsauswahl Einzelne Einstellun- Element Optionale Funktion Einstel- Einstellungsbedingungen Beschreibung lung Heiztemperaturkompen- Normal (werkseitige Einstellung) sation (Temperatureinstellung + 4 ºC) Modelle: Diese Funktion wird verwendet, um die Differenz der Temperatur zwischen Keine Kompensation RCI-FSN4 der vom Einlasssensor gemessenen (Temperatureinstellung) Temperatur und der tatsächlichen RCIM-FSN4E...
- Seite 171 TESTLAUF-MENÜ Einzelne Einstellun- Element Optionale Funktion Einstel- Einstellungsbedingungen Beschreibung lung Keine aktivierte Funktion Diese Funktion wird verwendet, wenn (werkseitige Einstellung) Einstellung Betriebsart ausschließlich der Kühlbetrieb verwendet nur als Kühlbetrieb werden soll und verhindert die Aktivierung Funktion aktiviert des Heizbetriebs. Keine aktivierte Funktion Diese Funktion ermöglicht die Auswahl des automatischen Kühl-/Heizbetrieb.
- Seite 172 TESTLAUF-MENÜ Einzelne Einstellun- Element Optionale Funktion Einstel- Einstellungsbedingungen Beschreibung lung Keine aktivierte Funktion Diese Funktion wird verwendet, um Erhöhung der (werkseitige Einstellung) die Lüfterdrehzahl zu erhöhen, wenn Lüfterdrehzahl bei das Thermostat die Solltemperatur im Heizungs-Thermo-OFF Funktion aktiviert Heizbetrieb mit der Funktion C5 erreicht. Keine aktivierte Funktion Abbruch des (werkseitige Einstellung)
- Seite 173 OFF- Einstellung) gestoppt, bei der Verwendung des Bedingungen zusätzlichen Ferntemperaturfühler THM- R2AE (angeschlossen an THM4) oder H I N W E I S des Temperatursensors der PC-ARFP1E Der Innengerätelüfter ist bei Fernbedienung. Kühlungs-Thermo-OFF gestoppt Diese Funktion ist NICHT verfügbar für...
- Seite 174 TESTLAUF-MENÜ Einzelne Einstellun- Element Optionale Funktion Einstel- Einstellungsbedingungen Beschreibung lung Wenn die Stromversorgung wieder aufgenommen ist, werden die mit Keine aktivierte Funktion der Kabelfernbedienung gesteuerten (werkseitige Einstellung) Innengeräte NUR automatisch eingeschaltet, wenn sie zum Zeitpunkt Verwaltung des Betriebs der letzten Unterbrechung der der Inneneinheit nach Stromversorgung bereits eingeschaltet Unterbrechung der...
- Seite 175 TESTLAUF-MENÜ Einzelne Einstellun- Element Optionale Funktion Einstel- Einstellungsbedingungen Beschreibung lung Automatische Lüftung Über diese Funktion kann der Dämpfer (werkseitige Einstellung) des Außenlufteinlasses im All-Fresh- Lüftung mit Betriebsmodus geöffnet werden. Dieser KPI: Belüftungsmodus Gesamtwärmeaustausch Modus ermöglicht, den Außenluftdämpfer vollständig zu öffnen (gemäß dem Lüftung mit Bypass Steuerungssystem) (Gesamtwärmeaustausch wird nicht...
- Seite 176 TESTLAUF-MENÜ Einzelne Einstellun- Element Optionale Funktion Einstel- Einstellungsbedingungen Beschreibung lung Wenn der Betrieb des Innengeräts durch Intermittierender Keine aktivierte Funktion die Fernbedienung auf AUS gestellt Lüfterbetrieb bei (werkseitige Einstellung) ist, wird der Lüfter unter bestimmten Heizstopp Bedingungen in Zyklen betrieben, die Nicht verfügbar bei aus 3 Minuten Betrieb bei langsamer Modellen:...
- Seite 177 TESTLAUF-MENÜ Einzelne Einstellun- Element Optionale Funktion Einstel- Einstellungsbedingungen Beschreibung lung Keine aktivierte Funktion (werkseitige Einstellung) 1 Stunde Diese Funktion stellt einen automatischen Automatische AUS- 2 Stunden AUS-Timer ein, um die durch die Timereinstellung 3 Stunden Fernbedienung gesteuerten Innengeräte Modelle: auszuschalten (wenn die Geräte von der RCI-FSN4 (04-24) Stunden 04-24...
- Seite 178 TESTLAUF-MENÜ Einzelne Einstellun- Element Optionale Funktion Einstel- Einstellungsbedingungen Beschreibung lung 17 ºC 18 ºC · · · · · · Diese Funktion legt den voreingestellten 20 ºC Automatische Reset- Temperatursollwert für die automatische 21 ºC (werkseitige Einstellung) Temperatur für Heizen 25 ºC Zurücksetzung-Funktion F3 bei HEIZ- ·...
- Seite 179 TESTLAUF-MENÜ Einzelne Einstellun- Element Optionale Funktion Einstel- Einstellungsbedingungen Beschreibung lung Keine aktivierte Funktion 30 ºC ist der standardmäßige Maximalsollwert. (werkseitige Einstellung) -1 ºC (Obergrenze 29 ºC) Diese Funktion legt den höchsten -2 ºC (Obergrenze 28 ºC) Oberer Grenzwert der Temperatureinstellwert bei HEIZ-Betrieb Einstelltemperatur für fest.
- Seite 180 TESTLAUF-MENÜ Einzelne Einstellun- Element Optionale Funktion Einstel- Einstellungsbedingungen Beschreibung lung Start / Stopp zulässig (werkseitige Einstellung) Wenn ein Fernbedienungsverbot von einem zentralen Steuerungsgerät aus Start / Stopp nicht zulässig vorhanden ist, übersteuert diese Funktion dieses Verbot, so dass die Start/Stopp- Übersteuerung des Start WA R N U N G : Taste der Fernbedienung betätigt werden...
- Seite 181 TESTLAUF-MENÜ Einzelne Einstellun- Element Optionale Funktion Einstel- Einstellungsbedingungen Beschreibung lung Modelle: RPF(I)-FSN2E Standard (wekseitige Einstellung) Nicht verfügbar, verwenden bei 00-Bedingungen. Dieser Parameter definiert die Empfindlichkeit des Bewegungssensors. Erkennungsstufe des Hoch Die Aktivitätsmenge im Raum wird Bewegungssensors basierend auf dieser Einstellung nach einer anderen Skala bewertet. Detaillierte Informationen zum Betrieb des Bewegungssensors finden Sie in Niedrig...
- Seite 182 TESTLAUF-MENÜ Einzelne Einstellun- Element Optionale Funktion Einstel- Einstellungsbedingungen Beschreibung lung Energieeinsparung muss eingeschaltet Direkte Luftausblasung Niedrig sein um diese Funktion zu verwenden (werkseitige Einstellung) (L5 muss nach 01 eingestellt sein). Diese Funktion wird verwendet, um das Schwingen der Luftklappen vom Direkte Luftausblasung Mittel kontinuierlichen Schwingen bis zum statischen Betrieb einzurichten.
- Seite 183 TESTLAUF-MENÜ Einzelne Einstellun- Element Optionale Funktion Einstel- Einstellungsbedingungen Beschreibung lung ECO-Taste aktiviert (werkseitige Das Betätigung der ECO-Taste wird Einstellung) Betätigung der ECO- deaktiviert, wenn P6 nach 01 eingestellt Taste ECO-Taste deaktiviert Diese Funktion wird verwendet, um Keine aktivierte Funktion den Zugriff auf Menübildschirmen zu (werkseitige Einstellung) verboten.
- Seite 184 TESTLAUF-MENÜ Einzelne Einstellun- Element Optionale Funktion Einstel- Einstellungsbedingungen Beschreibung lung 10 Minuten 20 Minuten Um das häufige Aktivieren des 30 Minuten Setbackbetriebs zu vermeiden, muss 40 Minuten eine Mindestauszeit vom Ende des Setbackbetriebs bis zum Beginn des 50 Minuten folgenden Setbackbetriebs vergehen. Mindeststoppzeit bei 60 Minuten Setbackbetrieb Auch wenn die Raumtemperatur den...
- Seite 185 TESTLAUF-MENÜ Einzelne Einstellun- Element Optionale Funktion Einstel- Einstellungsbedingungen Beschreibung lung Start / Stopp zulässig (werkseitige Einstellung) Start / Stopp nicht zulässig Manueller Start/Stopp kann von der Fernbedienung aus während des WA R N U N G : Verbot der Setbackbetriebs deaktiviert werden. Fernbedienung während Die Blockierung von Start / Stopp Manueller Start/Stopp kann von der...
- Seite 186 TESTLAUF-MENÜ Einzelne Einstellun- Element Optionale Funktion Einstel- Einstellungsbedingungen Beschreibung lung Deaktiviert 10,0 ºC 11,0 ºC 12,0 ºC Minimale Wenn die Außenumgebungstemperatur · · Außentemperatur, um niedriger als rd ist, erfolgt im · · Betriebsartschaltung automatische Kühl-/Heizbetrieb kein · · auf Heizung bei Umschalten der Betriebsart auf Kühlung, 40,0 ºC automatischer Kühl-/...
- Seite 187 TESTLAUF-MENÜ Einzelne Einstellun- Element Optionale Funktion Einstel- Einstellungsbedingungen Beschreibung lung Nicht verwendet Verwenden bei 00 Bedingungen H I N W E I S • Die Änderungen der Einstellung des optionalen Funktionen müssen durchgeführt werden, nachdem 3 Minuten nach dem Hochfahren vergangen sind. • Wenn die Raumtemperatur über dieser Einstellung liegt, wird der Betrieb des Innengeräts im Kühlmodus durch die Rückstellfunktion fortgesetzt. • Die verfügbaren optionalen Einstellungen unterscheiden sich abhängig von Innen- und Außengerätemodellen. Bitte bestätigen Sie in der technischen Dokumentation von Innen- und Außengeräten, dass jede optionale Einstellung für diese Geräte verfügbar ist.
-
Seite 188: Thermistor-Auswahl
TESTLAUF-MENÜ 6.3 THERMISTOR-AUSWAHL Diese Funktion ändert den Temperaturthermistor von Temp.fühler-Auswahl Innengerätethermistor auf Fernbedienungsthermistor oder auf IG Typ Fühler: einen Durchschnittswert zwischen beiden Temperaturen. 1 Drücken Sie „ “ (Menü) und „ “ (Zurück/Hilfe) gleichzeitig LOUV. für mindestens 3 Sekunden während des Normalmodus T-RUN TIME 120MIN (wenn das Gerät nicht in Betrieb ist). - Seite 189 TESTLAUF-MENÜ Eingangs- und Ausgangsnummern-Anzeige und Anschlüsse Eingangsnummern-Anzeige Werkseitige Einstellung Port Anzeige Eingang/Ausgang Einstellung Anzeige Einstellung Eingang 1 CN3 1-2 Fernbedienung EIN/AUS 1 (Ebene) Eingang 2 CN3 2-3 Fernbedienung nach manuellem Stopp verbieten Ausgang 1 CN7 1-2 Betrieb Ausgang 2 CN7 1-3 Alarm Ausgang 3...
-
Seite 190: Änderung Der Innnegeräteadresse
TESTLAUF-MENÜ 6.6 ÄNDERUNG DER INNNEGERÄTEADRESSE Mit dieser Funktion kann die Adresse (Kühlkreislaufnummer und 5 Der Bestätigungs-Bildschirm wird angezeigt. Wählen Sie „Ja“ Innengeräte-Einheit) von Innengeräten geändert werden. Wenn und drücken Sie „OK“, um den Adress-Änderungsprozess diese Einstellung vorgenommen wurde, hat sie Priorität vor der zu starten. -
Seite 191: Initialisierung Der Adresse
TESTLAUF-MENÜ 6.7 ADRESSENKONFIGURATION Diese Funktion wird verwendet, um das Verhältnis zwischen 4 Zum Starten des Vorgangs des in (3) ausgewählten dem Innengerät und der IG Adresse zu prüfen. Dieser Vorgang Innengeräts drücken Sie „ “ (START/STOPP). sollt verwendet werden, wenn mehrere Innengeräte an die Um zum (3) Bildschirm zurückzukehren, drücken Sie „... -
Seite 192: Suche Ein/Ausgang
TESTLAUF-MENÜ 6.9 SUCHE EIN/AUSGANG Diese Funktion stellt die Funktionswerte Auswahl und Eingang/ 5 Wählen Sie „Fertig“ und drücken Sie „OK“. Das Testlauf- Ausgang auf die werkseitige Einstellung zurück. Menü wird angezeigt. 1 Drücken Sie „ “ (Menü) und „ “ (Zurück/Hilfe) gleichzeitig Drücken Sie im Testlauf-Menü... -
Seite 193: Hauptgerät Einstellung
TESTLAUF-MENÜ 6.10 HAUPTGERÄT EINSTELLUNG Die Fernbedienung ist werkseitig vorher als HAUPT konfiguriert worden. Diese Funktion wechselt zwischen „NEBEN“- und „HAUPT“-STEUERUNG. Das folgende Beispiel zeigt eine Installation, die eine Gruppe von mehreren Steuerungen enthält: Die Innen- und Außengeräte müssen mit den in der Tabelle angegebenen Funktionen kompatibel sein. Einige Außengeräte können die Einstellungen „Power Up Einstellung“* und „Schnellfunktion“* nicht verwenden.. H-LINK Steuerkabel Hauptsteuerung …... -
Seite 194: Prioritätseinstellung
TESTLAUF-MENÜ 6.11 PRIORITÄTSEINSTELLUNG Diese Funktion legt die Betriebsart und die Einstelltemperatur mehrerer Innengeräte im gleichen Kühlsystem von einer spezifischen Fernbedienung (die Hauptfernbedienung), ohne die Zentralsteuerung benutzen zu müssen. Die Nebenfernbedienungen folgen die Einstellungen aus der Hauptfernbedienung. Beispiel: On/Off On/Off On/Off Steuerung A Steuerung B Steuerung C (Haupt) (Neben) (Neben) Fernbedienungsauswahl Prioritätseinstellung Steuerung A (Haupt) Steuerung B und C (Neben) Temperatursollwert der Betriebsart Betriebsart Temperatursollwert... -
Seite 195: Power Up Einstellung
TESTLAUF-MENÜ 6.12 POWER UP EINSTELLUNG Diese Funktion wird verwendet, um die maximale Kompressor- Power Up Einstellung frequenz und die Kompressor-Zielfrequenz höher als gewöhnlich Nur KÜHL Power Up einzustellen. Power up-Betrieb wird durchgeführt, nachdem der Betrieb in der ausgewählten Betriebsart (nur KÜHLEN - NUR LOUV. -
Seite 196: Abbruch Der Kompressorvorwärmung
TESTLAUF-MENÜ 6.14 ABBRUCH DER KOMPRESSORVORWÄRMUNG Diese Funktion deaktiviert das Vorwärmen des Kompressors. 3 Der Bestätigungs-Bildschirm wird angezeigt. 1 Drücken Sie „ “ (Menü) und „ “ (Zurück/Hilfe) gleichzeitig Storno Kompressor Vorheizkontrolle für mindestens 3 Sekunden während des Normalmodus (wenn das Gerät nicht in Betrieb ist). Das Testlauf-Menü wird Kompressorvorwärmung angezeigt. -
Seite 197: Prüfmenü
PRÜFMENÜ 7 PRÜFMENÜ Meeting Room FLTR MODE SPEED LOUV. TEMP COOL Jedes „Prüfmenü“-Element und seine Funktionen werden in der Prüfmenü- HIGH Funktion folgenden Tabelle erklärt: Element Motion Sensor is activated Die Sensor-Bedingung der Klimaanlage wird Anzeige des Prüfmenüs LOUV. Überprüfen 1 überwacht und angezeigt. - Seite 198 PRÜFMENÜ 7.1.1 Elemente der Menü 1 7.1.2 Elemente der Menü 2 Element Elementname Element Elementname Einstelltemperatur Einlasslufttemperatur Einlasslufttemperatur Ablufttemperatur Ablufttemperatur Flüssigkeitsleitungstemperatur Flüssigkeitsleitungstemperatur Außenlufttemperatur Fernthermistortemperatur Gasleitungstemperatur Außenlufttemperatur Verdampfungstemperatur im Heizbetrieb Gasleitungstemperatur Steuerinformationen Verdampfungstemperatur im Heizbetrieb Kompressoroberseitentemperatur Kondensationstemperatur im Kühlbetrieb Ausströmdruck Kompressoroberseitentemperatur Ansaugdruck Temperatur des verkabelten Steuerinformationen...
-
Seite 199: Anzeige Der Fehlerhistorie
PRÜFMENÜ 7.2 ANZEIGE DER FEHLERHISTORIE Die Anzeige der Fehlerhistorie kann über das Prüfmenü 4 Um die Fehlerhistorie zu löschen, drücken Sie auf „OK.” Der eingestellt werden. Bestätigungsbildschirm wird angezeigt. Wählen Sie „Ja“ und drücken Sie „OK“. Die Fehlerhistorie 1 Drücken Sie „Menü“ und „ECO“ gleichzeitig 3 Sekunden wird gelöscht und der Bildschirm kehrt zu (3) zurück. -
Seite 200: Ergebnis Der Pcb-Prüfung
PRÜFMENÜ 7.3.1 Ergebnis der PCB-Prüfung Innengeräte-PCB Außengeräte-PCB Normal Normal Anomalie des Einlasslufttemperatur- Übertragungsfehler des Außengeräts Thermistors Störung ITO- Eingang Anomalie des Auslasslufttemperatur- Störung HPS-Eingang Thermistors Anomalie des Anomalie des Thermistors für die Temperatur Schutzsignalfeststellungskreislaufs der Flüssigkeitsleitung Anomalie der Phasenerkennung Anomalie des Fernthermistors Anomalie der Inverter-Übertragung Anomalie des Thermistors für die Temperatur Störung des Hochdrucksensors... - Seite 201 PRÜFMENÜ 8 (06) Tasteneingabetest 13 (11) EEPROM-Test Drücken Sie die neuen Tasten eine nach den anderen. Die EEPROM-Reinigung abbrechen mit „ “ angezeigte Nummer wird beim Drücken der Tasten / “ (Zurück/Hilfe). Drücken Sie auf „ zugezählt. EEPROM löschen * Die Reihenfolge der gedrückten Tasten ist willkürlich. Drücken Sie „OK“...
-
Seite 202: Betriebsmenü
BETRIEBSMENÜ 8 BETRIEBSMENÜ 8.1 MENÜ / “ (Zurück/Hilfe), um in den normalen Jede Einstellfunktion wird im Menü angezeigt. Siehe die 3 Drücken Sie „ folgenden Abschnitte zu jeder Funktion. Modus (Betriebsartenanzeige) zurückzukehren. Meeting Room H I N W E I S MODUS STUFE TEMP WAHL •... -
Seite 203: Filterzeitsignal Zurückst
BETRIEBSMENÜ 4 Drücken Sie „OK“, um die einfache Timereinstellung zu 3 Drücken Sie „ “ oder „ “ und wählen Sie den Einstellinhalt für beenden. Der Bestätigungs-Bildschirm wird angezeigt. die einzustellenden Elemente. Wenn „Timerbetrieb“ gewählt wird, werden die Einstellinhalte in der Reihenfolge „nicht 5 Wählen Sie „Ja“... -
Seite 204: Timer Programmieren (Einstellung Tag/Zeit)
BETRIEBSMENÜ 8.4 BETRIEBSZEITPLAN 8.4.1 Timer programmieren (Einstellung Tag/Zeit) Diese Funktion dient dem Starten und Stoppen des Gerätebetriebs 4 Wählen Sie die Zeitplan-Nummer (von 1 bis 5) durch Drücken zur eingestellten Zeit. von „ “ oder „ “. Wenn „Timer EIN“, „Timer AUS“ oder „Einstelltemperatur“ Die Temperatur kann auch mit dem „Betriebszeitplan“... -
Seite 205: Feiertagseinstellung
BETRIEBSMENÜ 8 Zum Kopieren der Einstellinhalte in den vorherigen Tag 2 Wählen Sie „Feiertagseinstellung“ durch Drücken von „ “ drücken Sie „ “ und „OK“ gleichzeitig. oder „ “ und drücken Sie „OK“. Beispiel: Betriebszeitplan 15:10 Die Einstellinhalte von Montag werden in Dienstag kopiert. Datum/Zeit einstellen Wählen Sie „Di.“. -
Seite 206: Energieeinsparung
BETRIEBSMENÜ 8.4.3 Einstellung von Zeitplan EIN/AUS Diese Funktion wird zur temporären Deaktivierung des Zeitplan- 3 Wählen Sie „Ja“ durch Drücken von „ “ oder „ “ und drücken Betriebs verwendet. Sie „OK“. Die Einstellung Zeitplan AKT/DEAKT wird bestätigt und der Bildschirm kehrt in den normalen Modus zurück. Der Zeitplan-Betrieb wird nicht ausgeführt, wenn „AUS“... -
Seite 207: Energieeinsparung-Einst
BETRIEBSMENÜ 8.5.1 Detaillierte Einstellung der 1 Wählen Sie „Energieeinsparung-Einst.“ vom „Menü“ und Energieeinsparung (Leistungssteuerung drücken Sie „OK“. des Außengeräts) Der Bildschirm „Energieeinsparung-Einst.“ wird angezeigt. Diese Funktion wird verwendet, um die Details der Leistungs- steuerung des Außengeräts einzustellen. MENÜ 15:10 Einfacher Timer • Steuerungsmethode: Filterzeichen zurückst. -
Seite 208: Energieeinsparung (Rotationssteuerung Des Innengeräts)
BETRIEBSMENÜ 6 Durch Drücken von „ “ oder „ “ wird sich die Einstellungs- 3 Wählen Sie „Leistungssteuerung“ mithilfe von „ “oder „ “ funktion wie folgt ändern „NIEDRIG↔MITTEL↔HOCH“ ↔ und drücken Sie „OK“. „Nur NIEDRIG“ ↔ „Nur MITTEL“ ↔ „Nur HOCH“. Der Bildschirm „Leistungssteuerung des Außengeräts“ wird Drücken Sie „OK“, nachdem Sie die Einstellung durchgeführt angezeigt. - Seite 209 BETRIEBSMENÜ • Lüfterbetriebszeit 4 Drücken Sie „ “ oder „ “ und wählen Sie die Einstellung. Es ist möglich, die Zeit des Lüfterbetriebs des Innengeräts Die Einstellung wird sich wie folgt ändern: „Steuerung“ ↔ zu ändern. „Lüfterbetriebszeit“ Rotationssteuerung IG H I N W E I S Steuer. Adress Reihe 10 min LÜFTEN Zeit : •...
-
Seite 210: Betriebsgeräuschverminderung
BETRIEBSMENÜ 3 Wählen Sie „Abwechselndesteuerung“ mit „ “oder „ “ und Kühl-/Trockenbetrieb Heizbetrieb drücken Sie „OK“. Normalmodus 20 Normalmodus 25 Der Bildschirm Detaillierte Einstell. der abwechselnden Minuten Minuten ÖKO:NIEDRIG Steuerung wird angezeigt. ↕ ↕ Lüftermodus 10 Minuten Lüftermodus 5 Minuten Normalmodus 17 Normalmodus 20 Detaillierte Einstell. - Seite 211 BETRIEBSMENÜ STOPP ↔ NIEDRIG ↔ MITTEL ↔ HOCH Einstellung Wirkung Wählen Sie die Stufe und drücken Sie „OK“. Nicht verfügbar Keine Einstellung Reduzierung auf ca. 80% der NIEDRIG Nennleistung Geräuschverminderung Reduzierung auf ca. 60% der MITTEL Geräuschverm. stop Nennleistung Reduzierung auf ca. 40% der HOCH Nennleistung •...
-
Seite 212: Komfort-Einstellungen
BETRIEBSMENÜ Das Symbol „SCHNELL“ wird im Schnellmodus angezeigt. Einst. Schnellfunktion H I N W E I S Bestätigung der Schnellfunktion Einstellungen. Fortsetzen? Die Einst. Schnellfunktion ist nur verfügbar, wenn Außengeräte der Serie RAS-(3-12)H(V)NC1(E) und RAS-(4-6)FS(V)NME verwendet werden. Nein Wahl Best < Meeting Room MODUS STUFE TEMP WAHL KÜHLEN SCHNEll STUFE Änd. 8.8 KOMFORT-EINSTELLUNGEN Diese Funktion wird verwendet, um die Kühlung der Ablufttem- MITTEL ↔ HOCH peratur im Kühlbetrieb zu steuern. - Seite 213 BETRIEBSMENÜ 8.9.1 Beispiel für den Energiesparbetrieb und Drücken Sie „OK“. für die Timerprogrammierung HOCH 15:10 ÖKO/Geräuschv. Zeitplan MITTEL Leistungssteuerung AG Abwechselsteuerung Geräuschverminderung 08:00 10:00 12:00 14:00 16:00 18:00 Gesetzt wann Zeitplan verwendet ist. * ÖKO-Modus Einstell. auch aktiviert Beispiel für den Timerbetrieb zur Energieeinsparung Wahl Best <...
- Seite 214 BETRIEBSMENÜ 8.9.2 Wochentimer EIN/AUS Um einen anderen Tag einzustellen, drücken Sie „Menü“, um die Zeiteinstellung des nächsten Tages anzuzeigen. • Diese Funktion wird zur temporären Deaktivierung des Drücken Sie „OK“. Wochentimerbetriebs verwendet. • Timersteuerung kann nicht durchgeführt werden, wenn die Timereinstellung nicht zugänglich ist.
-
Seite 215: Individuelle Lüfterklappeneinstellung
BETRIEBSMENÜ 4 Der Einstellungsbestätigungs-Bildschirm „Wochentimer EIN/ 15:10 ( AUS“ wird angezeigt. Leistungssteuerung AG Wenn der Wochentimer EIN ist, wählen Sie „Zeitplan Zeitplan deaktivieren? deaktivieren“ aus. Wenn der Wochentimer AUS ist, wählen Sie „Zeitplan aktivieren“ aus. Nein Wählen Sie „Ja“ mit „ “ oder „ “ und drücken Sie „OK“, um Wahl Best <... -
Seite 216: Abbruch Der Luftlammeneinstellung
BETRIEBSMENÜ Die Luftlamellenwinkel wird wie folgt geändert. 2 Wählen Sie „Storno Einst.“ von individuelle Luftlamelleneinstellung und drücken Sie „OK“. INDV INDV INDV INDV INDV INDV INDV INDV Luftlammeneinstellung H I N W E I S Luftlammeneinstellung Storno Einst. Die Lamellenausrichtung ohne „änd“ erfolgt über die Einstellung des Normalmodus. -
Seite 217: Belüftung
BETRIEBSMENÜ 1 Wählen Sie „Lamelle bewegen“ vom Menü und drücken Sie 2 Wählen Sie „Ja“ durch Drücken von „ “ oder „ “ und drücken „OK“. Sie „OK“. Die Luftlamelle wird geöffnet (geschlossen) und der Bildschirm kehrt in den normalen Modus zurück. 15:10( MENÜ... -
Seite 218: Einstellung Des Bewegungssensors
BETRIEBSMENÜ 2 Bei mehrmaligem Drücken von „ “ oder „ “,wechselt 3 Wählen Sie „Ja“ durch Drücken von „ “ oder „ “ und die Anzeige in der Reihenfolge „AUTO LÜFTEN“, drücken Sie „OK“. Die Einstellung wird bestätigt und der „LÜFTEN+KPI“, „Norm LÜFTEN“. - Seite 219 BETRIEBSMENÜ (Die standardmäßige Einstellung ist „EIN“.) 3 Drücken Sie „ “ oder „ “ und wählen Sie „Sensor“. • EIN: Einstell. Bewegungssendor Der Betrieb wird mit der Leistungssicherung nach Sensor ALLE MODI Feststellung der Abwesenheit fortgesetzt. Wenn abwesend Wenn über einen Zeitraum menschliche Aktivität festgestellt Prüfungsinterval : Wahl wird, wird erneut der normale Betrieb ausgeführt.
- Seite 220 BETRIEBSMENÜ bestätigt und der Bildschirm kehrt in den normalen Modus 8 Die Anzeige wird durch Drücken von „ “ oder „ “ auf (Betriebsartanzeige) zurück. „30 Min.“, „60 Min.“, „90 Min.“, „120 Min.“ und „180 Min.“ umgeschaltet und die Einstellung geändert. Einstell.
- Seite 221 BETRIEBSMENÜ 8.16 SOMMERZEIT Diese Funktion stellt die Uhrzeit eine Stunde (standardmäßig) oder zwei Stunden (Einstellung der optionalen Funktion pa=01) 3 Der Bestätigungs-Bildschirm Sommerzeit wird angezeigt. vor oder zurück, wenn die Sommerzeit beginnt oder endet. Wählen Sie „Ja“ mithilfe von „ “ oder „ “ und drücken Sie „OK“, um die Einstellung zu bestätigen.
-
Seite 222: Absenkungs Einstellung
BETRIEBSMENÜ 8.18 ABSENKUNGS EINSTELLUNG 8.18.1 Einstellung des Setback-Zeitplans H I N W E I S Diese Funktion dient zum Starten und Stoppen des Stellen Sie nicht die gleiche Uhrzeit für die Einschaltzeit und Ausschaltzeit Setbackbetriebs zur gewünschten Zeit. ein. Nicht verfügbar, wenn die Einschaltzeit/Ausschaltzeit nicht eingestellt ist. Diese Funktion ist nur verfügbar, wenn der Setbackmodus als 4 Drücken Sie „OK“, um die „Absenkungs-Einst.“ zu beenden. Zeitplanmodus (qE=02) eingestellt ist. -
Seite 223: Immer Setback/Eingangseinstellung
BETRIEBSMENÜ 2 Wählen Sie „Ja“ durch Drücken von „ “ oder „ “ und drücken Sie „OK“. 15:10( MENÜ Die Einstellung wird bestätigt und der Bildschirm kehrt in den Datum & Uhrzeit einstellen Normalmodus zurück. Sommerzeit Absenkungs-Einst. Bildschirmeinstellung Absenkungs-Einst. Funktion 20 Absenkung aktivieren? Wahl Best... -
Seite 224: Spracheinstellung
BETRIEBSMENÜ • Lampe Ein/Aus: 3 Drücken Sie „ “ oder „ “ und wählen Sie die Sprache und drücken Sie „OK“. Der Bestätigungs-Bildschirm wird angezeigt. Drücken Sie „ “ oder „ “ und die Helligkeit der Betriebsan- zeige wird geändert. Drücken Sie „OK“... -
Seite 225: Energieeinsparung-Einstellung
BETRIEBSMENÜ geändert: „Grad C“ ↔ „Grad F“. Bildschirmeinstellung Wenn „Temperaturintervall“ ausgewählt wird, wird es wie Bildeinstellung folgt geändert: Spracheinstellung Temperatureinheit „0,5ºC“ ↔ „1ºC“. Drücken Sie „OK“, wenn alle Einstellungen Haupt/Neben Anzeige durchgeführt wurden. Temperatureinheit Wahl Best < Temp. Grad C Temp. Stufen 0.5ºC 3 Der Bildschirm „Haupt/Neben Anzeige“ wird angezeigt. Durch Drücken auf „ “ oder auf „ “ wird die Einstellung wie folgt geändert: „Anzeige“ ↔ „Verbergen“... -
Seite 226: Raumbezeichnung
BETRIEBSMENÜ 8.20 RAUMBEZEICHNUNG Die Funktion wird dazu verwendet, um die Bezeichnung des 3 Drücken Sie „ “, „ “, „ “ oder „ “ und wählen Sie den Raums zu registrieren (Installationsort der Fernbedienung). Buchstaben oder Symbol. Drücken Sie „OK“ zur Bestätigung des gewählten Buchstabens oder Symbols (maximal 12 1 Wählen Sie „Raumbezeichnung“... -
Seite 227: Anzeige Einfache Wartung
BETRIEBSMENÜ Der Einstellungsbildschirm Anz. Verwendungsbetrag wird „1 Woche vorher/Diese Woche“ angezeigt. Wenn die aktuelle Zeit nicht eingestellt ist, wird „2 Jahre vorher/1 Jahr vorher“ der Bildschirm zur Zeiteinstellung automatisch angezeigt ↕ 2 Der Bestätigungs-Bildschirm wird angezeigt. Drücken Sie „1 Jahr vorher/Dieses Jahr“ „OK“, um den Bildschirm auf die Anzeige „Stromverbrauch“... -
Seite 228: Hilfe-Menü
HILFE-MENÜ 4 Der Einstellungsbildschirm Einfache Wartungsanzeige wird 3 Wählen Sie das Innengerät durch Betätigen von „ “ angezeigt. und drücken Sie dann auf „OK“. 00-03 Einfache Wartung Teil Wert Suche Ein/Ausgang Alle Kompressorszeit (Std) ----- 01-01 02-01 03-01 04-01 00000 Lüfterszeit (Std) 01-02 02-02... -
Seite 229: Anzeigen Auf Der Lcd
HILFE-MENÜ 3 Drücken Sie auf „Zurück/Hilfe“ um zum „Hilfe-Menü“ Haupt-/Nebengeräte zurückzukehren. Externe Energieeinspar. Drücken Sie auf „Zurück/Hilfe“, um zum Normalmodus zurückzukehren. Einstellung 3 Prioritäten Geräuschverminderung Hilfe Gegenwärtige Einstellung Schnellmodus Zeichenerklärung Einfach Über den Betrieb Fehlerbehebung Betrieb Kontaktinformation Zeitplan Zeitplan Leistungssteuerung des Außengeräts Wahl Best <... -
Seite 230: Über Den Betrieb
HILFE-MENÜ 9.3 ÜBER DEN BETRIEB Diese Funktion wird verwendet, wenn die Erklärung der 3 Drücken Sie „ “ oder „ “, um den Text nach oben oder nach Betriebsarten und Betriebsmethoden erforderlich ist. unten zu scrollen. 1 Wählen Sie „Über den Betrieb“ vom Hilfe-Menü und drücken Über den Betrieb Sie „OK“. -
Seite 231: Kontaktinformation
HILFE-MENÜ 5 Drücken Sie auf „ “ (Zurück/Hilfe). Der Bildschirm kehrt 3 Drücken Sie „ “ oder „ “, um den Text nach oben oder nach zum Hilfe-Menü zurück. unten zu scrollen. Drücken Sie wieder „ “ (Zurück/Hilfe), um in den Fehlerbehebung Normalmodus zurückzukehren. -
Seite 232: Andere Anzeigen
ANDERE ANZEIGEN 10 ANDERE ANZEIGEN 10.1 IN NORMALZUSTAND 10.1.1 Haupt-/Nebensteuerung Klima Meeting Room MODUS STUFE LOUV TEMP WAHL Das Symbol „HAUPT“ wird angezeigt, wenn die Steuerung auf „HAUPT“ eingestellt ist. KÜHLEN Verwenden Sie die Hauptsteuerung, um Hauptstromeinsparung einzustellen. Wenn nur eine einzige Steuerung vorhanden ist, dann wird das Zentralsteuerungen Symbol „HAUPT“... -
Seite 233: Verarbeitung Externe Energiesparsteuerung
ANDERE ANZEIGEN 10.1.5 Verarbeitung Externe Energiesparsteuerung Meeting Room Klima MODUS STUFE LOUV TEMP WAHL Während der Einstellung Außenleistungssteuerung in Verarbeitung der Zentralsteuerung oder des Außengeräts, wird KÜHLEN das Symbol „Ext. ÖKO“ angezeigt. Wenn jedoch die Steuerung für die Innengeräterotation oder Vorwärmphase Abwechselsteuerung des Betriebs eingestellt ist, wird das STUFE... -
Seite 234: Bei Fehlerbedingungen
ANDERE ANZEIGEN „Setback abbrechen“ wird auf der LCD-Anzeige angegeben, H I N W E I S wenn Setback abgebrochen wird. Für die Funktion des Setbackbetriebs ist die optionale Konfiguration und die Änderung des Ausgleichs für das Absenken erforderlich. Klima Meeting Room MODUS STUFE LOUV TEMP WAHL KÜHLEN Setback abbrechen STUFE Änd. 10.2 BEI FEHLERBEDINGUNGEN 10.2.2 Stromausfall Alle Anzeigen sind ausgeschaltet. -
Seite 235: Alarmcodes
ANDERE ANZEIGEN 10.3 ALARMCODES Code-Nr. Kategorie Fehler Ursache Aktivierung des Schwimmerschalters (hoher Wasserpegel in der Innengerät Aktivierung der Sicherheitsvorrichtung. Abflusswanne oder Fehler in Abflussleitung, Schwimmerschalter oder Abflusswanne). PSH-Aktivierung (Rohrverstopfung, übermäßige Kältemittelmenge, träge Außengerät Aktivierung der Sicherheitsvorrichtung. Gasvermischung) Falsche Verkabelung, lockere Anschlüsse, abgelöstes Übertragungsfehler zwischen Außen- Kommunikationskabel, durchgebrannte Sicherung, Innengerät und Innengeräten ausgeschaltet Übertragung... - Seite 236 ANDERE ANZEIGEN Code-Nr. Kategorie Fehler Ursache Fehlerhafte Kühlrippentemperatur der Fehlerhafter Kühlrippenthermistor oder Lüftersteuerung, Verschmutzung Lüftersteuerung des Wärmetauschers, fehlerhafter Lüftermotor Aktivierung der Störung des Lüftermotors Überstromschutzvorrichtung Innenlüfter- Problem mit dem Stromsensor Fehlerhafter Stromsensor der Lüftersteuerung steuerung Aktivierung des Erkennung Fehlersignal IC-Driver, sofortiger Überstrom Lüftersteuerungsschutzes Fehlerhafte Spannung der Innenspannungsabfall, unzureichende Kapazität der...
- Seite 237 ANDERE ANZEIGEN Code-Nr. Kategorie Fehler Ursache Wenn die Leitungsthermistortemperatur des Außengeräts höher ist als Kühlüberlast (mögliche Aktivierung des 55ºC und die Temperatur der Kompressoroberseite über 95ºC liegt, ist Hochdruckgeräts) die Außengeräte-Schutzvorrichtung aktiviert. Wenn die Temperatur des Innengeräte-Frostschutzthermistors höher als Heizungsüberlast (mögliche Aktivierung 55ºC ist und die Temperatur der Kompressoroberseite über 95ºC liegt, ist des Hochdruckgeräts) die Außengeräte-Schutzvorrichtung aktiviert.
- Seite 238 ANDERE ANZEIGEN Code-Nr. Kategorie Fehler Ursache Falscher Anschluss des 2 oder mehr Umschaltkästen sind zwischen Außen- und Innengerät Umschaltkastens angeschlossen Falsche Zuordnung der CH-Gerät Es gibt 9 oder mehr Innengeräte am Umschaltkasten angeschlossen Anschlussnummer des Innengeräts Falsche Einstellung der Innengeräte von verschiedenen Kältemittelkreisläufen sind am Kältemittelnummer des Innengeräts Umschaltkasten angeschlossen Kompressorschutzalarm (kann nicht...