Herunterladen Inhalt Inhalt Diese Seite drucken
Inhaltsverzeichnis

Werbung

Verfügbare Sprachen
  • DE

Verfügbare Sprachen

  • DEUTSCH, seite 1
WRX1000
Water Rower
DE
EN
ES
FR
IT
NL

Werbung

Inhaltsverzeichnis
loading

Inhaltszusammenfassung für SPORTSTECH WRX1000

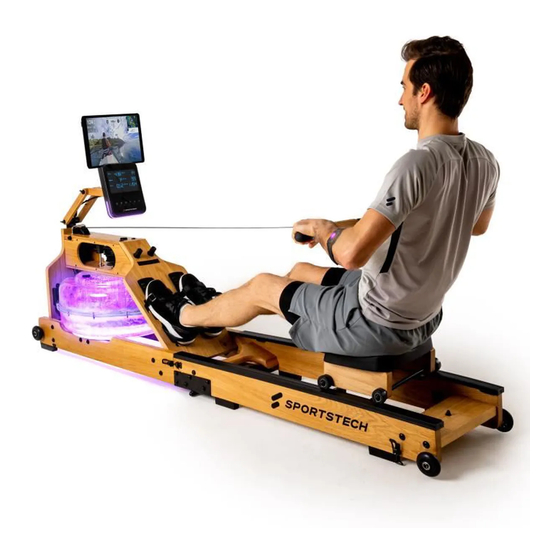
  • Seite 1 WRX1000 Water Rower...
  • Seite 3: Stellen Sie Sicher, Dass Alle Personen, Die Das Gerät Ver

    Liebe Kund*innen wir freuen uns, dass Sie sich für ein Gerät aus der SPORTSTECH Produktpalette entschieden haben. SPORTSTECH Sportgeräte bieten Ihnen höchste Qualität und neueste Technologie. Um die Leistungsfähigkeit des Gerätes voll nutzen zu können und viele Jahre Freude an Ihrem Gerät zu haben, lesen Sie bitte vor der Inbetriebnahme und dem Beginn des Trainings dieses Benutzerhandbuch sorgfältig durch und verwenden Sie das Gerät den Anweisungen entsprechend.
  • Seite 4: Video Tutorials

    Uns gibt es auch auf Social Media! Hol dir die neuesten Produktinfos, Trainingsinhalte uvm. auf unserer: Instagram-Seite Facebook-Seite https://www.instagram.com/sportstech.official/ https://www.facebook.com/sportstech.de Unsere Marken - Entdecken Sie viele weitere interessante Produkte: Bluewheel Sportstech Fitness Deskfit Electromobility https://www.bluewheel.de/ https://www.deskfit.de/ https://www.sportstech.de/ Relaxxnow erhältlich über Sportstech.de...
  • Seite 5: Inhaltsverzeichnis

    INHALT INHALT EXPLOSIONSZEICHNUNG/ERSATZTEILLISTE ..............4 LIEFERUMFANG/ TECHNISCHE DATEN ................5 WICHTIGE SICHERHEITSHINWEISE ................6 DIES KÖNNTE SIE AUCH INTERESSIEREN............... 8 MONTAGE ........................9 AUFKLAPPEN ......................17 ZUSAMMENKLAPPEN ....................19 BEFÜLLEN / ENTLEEREN DES WASSERTANKS ............... 20 PRODUKTWARTUNG ....................21 EINSTELLUNGEN ....................... 22 KONSOLEN-BEDIENUNGSANLEITUNG ................
  • Seite 6: Wichtige Sicherheitshinweise

    WICHTIGE SICHERHEITSHINWEISE Diese allgemeinen Sicherheitsinformationen müssen unbedingt für die Benutzung dieses Produktes beachtet werden. Lesen Sie alle Hinweise, bevor Sie das Produkt in Benutzung nehmen. • Bitte lesen Sie die ganze Anleitung vor dem Aufbau und der Benutzung des Gerätes sorgfältig durch.
  • Seite 7: Netzstecker

    • Das Gerät wurde getetest und gemäss Klasse H.C. zertifiziert. Maximales Gewicht des Benutzers: 120kg (265 lb). Die Bremsfähigkeit ist unabhängig von der Geschwindigkeit. • Das Gerät ist nicht für den therapeutischen Gebrauch geeignet. • Beim Anheben oder Bewegen des Gerätes ist darauf zu achten, dass der Rücken nicht verletzt wird.
  • Seite 8: Dies Könnte Sie Auch Interessieren

    Der ideale Schutz. Für Ihr Hometraining. Damit Ihr Fußboden zu Hause von Ihren Fitnessgeräten nicht beschädigt wird, gibt es von Sportstech eine Bodenschutzmat- te. Natürlich ist diese in verschiedenen Größen erhältlich und kann auch für Yoga oder andere Übungen genutzt werden. Sie schützt Ihren Boden vor Abdrücken, Schmutz oder Kratzern.
  • Seite 9: Montage

    MONTAGE Alle Einzelteile und vormontierten Teile fest anziehen! Kontrollieren Sie die Festheit vor jeder Trainingseinheit erneut! WRX1000 SCREWS AND TOOLS Kasten-Nr. 1 Kasten-Nr. 2 WRX1000 SCREWS AND TOOLS...
  • Seite 10 Schritt 1 Montieren Sie die vordere Stützplatte der Aluminiumschiene (118) auf der linken Seite der Aluminiumschienenbaugruppe (115) mit Flachkopfschrauben (38) und Unterlegscheiben (13). - 2PCS - 2PCS Schritt 2. Montieren Sie die hintere Stützplatte (117) der Aluminiumschiene mit Hilfe von Flachkopfschrauben (38) und Unterlegscheiben (13) an der oberen linken Seite der Aluminiumschienenbaugruppe.
  • Seite 11 Schritt 3 Montieren Sie den rechten Aluminiumschienensatz (116) mit Flachkopfschrauben (38) und Unterlegscheiben (13) auf den oberen linken Aluminiumschienensatz. Schritt 4 Montieren Sie den Rahmenverbinder (122) von beiden Seiten mit Hilfe von Flachkopfschrauben (38) (14), Unterlegscheiben (13) und Nylonmuttern (15) an der Aluminiumschieneneinheit. Verriegeln Sie dann den Rahmenverbinder von unten nach oben mit Flachkopfschrauben (121) und Unterlegscheiben (13).
  • Seite 12 Schritt 6 Montieren Sie die Rahmenträgerplatte rechts (62) mit Flachkopfschrauben (14), Unterlegscheiben (13) und Nylonmuttern (15) am Rahmen. Ziehen Sie die Rahmenträgerplatte von unten nach oben rechts mit Flachkopfschrauben (121) und Unterlegscheiben (13) fest. Schritt 7 Montieren Sie den Wassertank (78) von beiden Seiten mit L-förmigen Platten (23) unter Verwendung von Flachkopf-Umkehrschrauben (14), Unterlegscheiben (13) und Nylonmuttern (15) am Rahmen.
  • Seite 13 Schritt 9 Entfernen Sie die Platte (24) (25) mit Werkzeug (148) vom Rahmen. Befestigen Sie die L-Platten mit Flachkopfschrauben (12) und Nylonmuttern (15) am Pedalsatz. Befestigen Sie die Pedalsätze von beiden Seiten vertikal am Rahmen mit Flachkopfschrauben (14), Unterlegscheiben (13) und Nylonmuttern (15).
  • Seite 14 Schritt 11 Das Sitzkissen (127) wird mit einer zylindrischen Innensechskantschraube (134) durch die Rolle (133) und die Hülse (135) an der Sitzhalterung (128) befestigt. Schritt 12 Entfernen Sie die Aluminiumschienenabdeckung links (137), die Aluminiumschienenabdeckung rechts (138) und die beiden Gummidämpfer (120) mit Werkzeug (148) vom Rahmen. Montieren Sie das Sitzkissen (128) auf den Rahmen.
  • Seite 15 Schritt 14 Führen Sie das elastische Seil unter dem Rollenrahmen durch und befestigen Sie es an der hinteren Stützplatte der Aluminiumschiene. Schritt 15 Montieren Sie die Konsole (1) mit vier Kreuzschrauben (22), einer Flachkopfschraube (146) und fünf Unterlegscheiben (147) und auf dem Rahmen. - 5PCS Schritt 16 Verbinden Sie das Kabel am Rahmen mit dem Kabel an der Konsole.
  • Seite 16 Schritt 17 Befestigen Sie das Losrad (60) wie abgebildet am Rahmen. Schritt 18 Befestigen Sie den schnell verstellbaren Schnappverschluss (36-L),(36-R) mit der Senkkopfschraube (37) am Rahmen.
  • Seite 17: Aufklappen

    AUFKLAPPEN Lagern Sie Ihr Gerät in einem trockenen Bereich, ausserhalb der Reichweite von Kindern, und der wenig benutzt wird. Vergewissern Sie sich, dass das Gerät sicher steht und nicht auf kleine Tiere oder Kinder fallen kann. Schieben und halten Sie den Sitz nach oben, um zu verhindern, dass der Sitz beim Aufklappen nach vorne schlägt.
  • Seite 18 ACHTUNG! Vermeiden Sie es Ihre Finger oder andere Körper- teile zwischen die angrenzenden Bauteile zu halten. Es besteht Quetschgefahr! Schliessen Sie den Spannver- schluss, um die Laufschiene zu stabilisieren! Hinweis: Der Spannverschluss ist nur auf einer Seite vorhanden und ist als Sicherung hinreichend. Die Stabilität ist durch eine sachgemä- ße Aufstellung auf einem ebenen Untergrund gegeben.
  • Seite 19: Zusammenklappen

    ZUSAMMENKLAPPEN Öffnen Sie den Spannverschluss. Schieben Sie den Sitz nach hin- ten, um zu verhindern, dass der Sitz beim Zusammenklappen nach unten schlägt. Greifen Sie das Gerät am mittleren Steg und ziehen Sie dieses nach oben.
  • Seite 20: Befüllen / Entleeren Des Wassertanks

    BEFÜLLEN / ENTLEEREN DES WASSERTANKS WIDERSTANDS-EINSTELLUNG Der Widerstand des Rudergerätes lässt sich über die Füllmenge des Wassertanks einstellen. Hierzu folgen Sie den nachstehenden Anweisungen: MAX: Die maximale Füllmenge bietet den schwersten Widerstand. BEFÜLLEN 1. Öffnen Sie die Verschlusskappe, die sich auf dem Wassertank befindet. 2.
  • Seite 21: Produktwartung

    PRODUKTWARTUNG Die Häufigkeit des Wasseraustausches ist abhängig von der Häufigkeit der Benutzung und der Umgebung des Aufstellortes. Nach ungefähr einem halben Jahr oder bei Anzeichen von Verfärbungen des Wassers sowie Anzeichen von Algen oder Bakterien ist das Wasser zu wechseln! (HINWEIS: benutzen Sie destiliertes Wasser!) Sollten Sie das Gerät längere Zeit nicht benutzen, ist das Wasser abzulassen.
  • Seite 22: Einstellungen

    EINSTELLUNGEN SPANNKNOPF-EINSTELLUNG Sie können die Spannung für verschiedene Widerstandsstufen wie unten einstellen: Sie sollten zu Beginn Ihres Trainingsprogramms die Widerstandsebene und Ge- schwindigkeit wählen, die Ihren Bedürfnissen entsprechen. Denken Sie daran, langsam und einfach zu beginnen, und arbeiten Sie sich dann bis zu dem gewünschten Fitness- Level hoch.
  • Seite 23: Konsolen-Bedienungsanleitung

    KONSOLEN-BEDIENUNGSANLEITUNG TASTENFUNKTIONEN FARBE: Drücken Sie im Standby-Modus diese Taste, um die Auswahl der Lampenfarbe (C 0 – C 7) aufzurufen. Drücken Sie diese Taste zur Bestätigung und zur Rückkehr in den Standby-Modus; ERHOLUNG: Dies ist die Taste für die Puls-Erholungszeit. Nachdem der Benutzer eine bestimmte Zeit lang trainiert hat, drücken Sie diese Taste und zählen eine Minute lang rückwärts.
  • Seite 24: Funktionsbeschreibung

    FUNKTIONSDATEN-ANZEIGE Anzeige Anzeigebereich Einstellungs- Speicher Null- Beschreibung bereich setzen Wenn der Countdown 0 0:00~99:00 erreicht, ertönt ein Signalton ZEIT 0:00~99:59 ±1 und die Standby-Anzeige erscheint. - Signale vom Sensor werden nach 3 Sekunden angezeigt; 0~15~999 - Wenn keine Signale vorlie- gen, wird nach 4 Sekunden Null angezeigt.
  • Seite 25: Farbanzeige-Funktion

    3. Bluetooth APP-Funktion Im Standby-Modus können Sie die Bluetooth-APP verbinden. Schalten Sie Bluetooth auf dem Telefon ein und öffnen Sie die entsprechende APP (Kinomap), um eine Verbindung herzustellen. 4. Farbanzeige-Funktion Drücken Sie im Standby-Modus kurz “ ”, um den Farbmodus für die Anzeige zu wählen. Standardmässig ist C0 eingestellt: Hier wird eine von 7 Farben abhängig von der aktuellen Pulsfrequenz oder Trittleistung automatisch gewählt.
  • Seite 26: Anwendungssoftware (App)

    Kinomap Hinweise zur Nutzung der App: Die dargestellten Apps gehören nicht zu SPORTSTECH. Wir schliessen ausdrücklich jegliche Haftung für Software von Drittanbietern aus und sind nicht verantwortlich für deren Inhalte, Codes oder für jegliche Verluste oder Schäden aus deren Nutzung. Wenn Sie Drittanbieter-Ressourcen nutzen, unterliegen Sie deren Bedingungen und Lizenzen und werden nicht mehr durch unsere Datenschutzerklärung oder Sicherheitsmassnahmen geschützt.
  • Seite 27: Dehnungsübungen

    DEHNUNGSÜBUNGEN Vor jedem Training sollten Sie Ihre Muskeln mindestens 5-10 Minuten lang dehnen, um sie ausreichend aufzuwärmen. Wiederholen Sie die nachfolgenden Dehnungsübungen daher fünf Mal. Das Dehnen vor dem Training trägt zur Verbesserung der Flexibilität bei und verringert das Verletzungsrisiko. MIT DEM KOPF ROLLEN Drehen Sie den Kopf nach rechts für eine Sekunde, fühlen Sie die Streckung auf der linken Seite des Nackens, dann drehen Sie den Kopf zurück für eine Sekunde, recken Sie Ihr Kinn nach oben und lassen...
  • Seite 28: Übungsanleitungen

    ÜBUNGSANLEITUNGEN Rudern ist eine sehr effektive Trainingsform und bietet mehrere Vorteile: 1. Es verbessert die allgemeine Fitness durch Stärkung von Herz und Kreislauf. 2. Es stärkt und, wenn gewünscht, formt alle wichtigen Muskelgruppen: Rücken, Taille, Arme, Schultern, Hüfte und Beine. 3.
  • Seite 29: Rudern Nur Mit Den Armen

    RUDER-STILE Normaler Ruderstil 1. Nehmen Sie Platz und befestigen Sie Ihre Füsse mit den Riemen an den Pedalen. Nehmen Sie die Griffstange. 2. Nehmen Sie die Startposition ein und lehnen Sie sich mit gestreckten Armen und gebeugten Knien nach vorne (Abb. 1). 3.
  • Seite 30 ABKÜHLPHASE In diesem Stadium sollen Ihr Herz-Kreislauf-System und die Muskeln sich wieder entspannen. Dies ist eine Wiederholung der Aufwärmphase. Zuerst reduzieren Sie Ihr Tempo und machen mit diesem langsamen Tempo für ca. 5 Minuten weiter, bevor Sie vom Gerät steigen. Die Dehnungs-Übungen sollten nun wiederholt werden, aber bitte daran erinnern, Ihre Muskeln nicht mit Gewalt in die Dehnung zu zwingen.
  • Seite 31: Entsorgung

    Elektroaltgeräts fordern. Bitte wenden Sie sich hierfür an unsere Mitarbeiter. Sie erreichen uns per E-Mail unter takeaway@sportstech.de. Weitergehende Informationen zur Abholung eines Elektroaltgeräts finden Sie unter www.sportstech.de/entsorgung. Daneben können Sie Elektroaltgeräte an den Sammelstellen der öffentlich-rechtlichen Entsorgungsträger abgeben. Sie leisten einen wichtigen Beitrag zur Wiederverwendung, zum Recycling und zur sonstigen Verwertung von Altgeräten, indem Sie Ihre Altgeräte einer getrennten Erfassung in den richtigen Sammelgruppen zuführen.Für...
  • Seite 32: Konformität

    Sie die Verpackung gemäß den aktuellen Bestimmungen. Informationen erhalten Sie bei den Rückgabe- und Sammelsystemen Ihrer Gemeinde. KONFORMITÄT Hiermit erklärt Sportstech Brands Holding GmbH, dass der Funkanlagentyp WRX1000 der Richtlinie 2014/53/EU entspricht. Der vollständige Text der EU-Konformitätserklärung ist unter der folgenden Internetadresse verfügbar: https://service.innovamaxx.de/wrx1000_conformity...
  • Seite 33 Dear customer, We are pleased you chose a device from the SPORTSTECH product range. With sports equipment from SPORTSTECH you get the highest quality and latest technology. In order to fully use the potential of your device and be able to enjoy it for many years, please read this manual carefully before starting up and beginning of training, and use the device according to the instruc- tions.
  • Seite 34: Exploded Drawing/Spare Parts List

    We are also on social media! Get the latest product information, training content and much more on our: Instagram-page Facebook-page https://www.instagram.com/sportstech.official/ https://www.facebook.com/sportstech.de Our brands - Discover many other interesting products: Bluewheel Sportstech Fitness Deskfit Electromobility https://www.bluewheel.de/ https://www.deskfit.de/ https://www.sports-tech.uk.com/ Relaxxnow available via Sportstech.de...
  • Seite 35: Scope Of Delivery/ Technical Data

    INDEX INHALT EXPLODED DRAWING/SPARE PARTS LIST ..............34 SCOPE OF DELIVERY/ TECHNICAL DATA ................ 35 IMPORTANT SAFETY INSTRUCTIONS ................36 YOU MAY ALSO BE INTERESTED IN THESE ACCESSOIRES ..........38 ASSEMBLY ......................... 39 UNFOLDING ....................... 47 FOLDING ........................49 FILLING / EMPTYING THE WATER TANK ................. 50 PRODUCT MAINTENANCE ....................
  • Seite 36: Important Safety Instructions

    IMPORTANT SAFETY INSTRUCTIONS Basic precautions should always be followed, including the following safety instructions when using the crosstrainer: Read all instructions before using this equipment. • It is important to read this entire manual before assembling and using the equipment. Safe and effective use can only be achieved if the equipment is assembled, maintained and used properly.
  • Seite 37 • Care must be taken when lifting or moving the equipment so as not to injure your back. Always use proper lifting techniques and/or seek assistance if necessary. • The device is intended exclusively for home use and not for commercial purposes. •...
  • Seite 38: You May Also Be Interested In These Accessoires

    SPORTSTECH floor protection mat 120 The ideal protection. For your home workout. Sportstech has a floor protection mat to prevent your fitness equipment from damaging your floor at home. Of course it is available in different sizes and can also be used for yoga or other exercises.
  • Seite 39: Assembly

    ASSEMBLY Firmly tighten all component parts and pre-assembled parts! WRX1000 SCREWS AND TOOLS Box no. 1 Box no. 2 WRX1000 SCREWS AND TOOLS...
  • Seite 40 Step 1 Assemble the aluminum rail front support plate (118) onto the aluminum rail assembly left side (115) using flat head inverted side screws (38) and flat washers(13). - 2PCS - 2PCS Step 2 Assemble the aluminum rail rear support plate (117) onto the upper left of the aluminum rail assembly using flat head inverted side screws (38) and flat washers (13).
  • Seite 41 Step 3 Assemble the right aluminum rail set (116) onto the upper left aluminum rail set using flat head inverted edge screws (38) and flat washers (13). Step 4 Assemble the frame connecting seat (122) from both sides to the aluminum rail assembly using flat head inverted side screws (38) (14) and flat washers (13) and nylon nuts (15).
  • Seite 42 Step 6 Assemble the frame support plate right (62) onto the frame using flat head inverted edge screws (14), flat washers (13) and nylon nuts (15). Tighten the frame support plate from bottom to top right with flat head inverted edge screws (121) and flat washers (13). Step 7 Assemble the water tank (78) from both sides to the frame by means of L-shaped plates (23) using flat head inverted screws (14), flat washers(13) and nylon nuts (15).
  • Seite 43 Step 9 Remove the board (24) (25) from the frame with tools (148). Fix the L-plates to the pedal set using flat head inverted edge screws (12) and nylon nuts (15). Fix the pedal sets vertically to the frame from both sides using flat head inverted side screws (14) flat washers (13) and nylon nuts (15).
  • Seite 44 Step 11 The seat cushion (127) is fixed to the seat bracket (128) with cylindrical head hexagon socket screw (134) through the roller (133), sleeve (135). Step 12 Remove the aluminum rail cover left (137), aluminum rail cover right (138) and two rubber cushions (120) from the frame with tools (148).
  • Seite 45 Step 14 Pass the elastic rope under the roller frame and fix it on the back support plate of the aluminum rail. Step 15 Assemble the display (1) on the frame using four umbrella head cross screws (22), one flat head inverted edge screw (146) and five flat washers (147).
  • Seite 46 Step 17 Fix the idler wheel (60) on the frame as shown. Step 18 Fix quick adjustable snap lock (36-L),(36-R) to frame by countersunk cross tapping screw (37).
  • Seite 47: Unfolding

    UNFOLDING Store your device in a dry area, out of the reach of children. Make sure the device is secure and not accecssible to small animals or where it can be touched by or may fall on children. Push and hold the seat upwards to prevent the seat from shif- ting forward when unfolding the device.
  • Seite 48 EXTREME CAUTION! Be extre- mely careful and avoid putting your fingers or other body parts between adjacent pieces of the device that otherwise could result in body parts being trapped or crushed! Close the clamping lock to stabili- ze the track! Note: The turnbuckle is only avai- lable on one side and is sufficient as a fuse.
  • Seite 49: Folding

    FOLDING Open the clamping lock Push the seat to the end so that when the deivce is folded the seat is underneath. Grasp the device in the middle bridge and pull it back up.
  • Seite 50: Filling / Emptying The Water Tank

    FILLING /DRAINING THE WATER TANK SET RESISTANCE The resistance of the rowing machine can be adjusted via the quantity filled into the water tank. To do this, follow the instructions below: MAX: the maximum filling level offers the highest resistance. FILLING 1.
  • Seite 51: Product Maintenance

    PRODUCT MAINTENANCE The frequency of changing the water depends on the amount of use and also the environment in which the device is used. The water should be changed after about half a year or as soon as there is a sign of discoloration of the water and/or signs of algae or bacteria is the water. (NOTE: Use DISTILLED water!) If you are not going to use the unit for a long time then drain the water.
  • Seite 52: Settings

    SETTINGS TENSION KNOB ADJUSTMENT You could adjust the tension for varied resistance as below: You should begin your “Exercise Period” at the resistance level and speed to suit your needs. Remember to start out slow and easy, and work your way up to the fitness level you desire.
  • Seite 53: Console Manual

    CONSOLE MANUAL KEY INSTRUCTION COLOUR: In standby mode, press this key to enter the lamp colour selection mode (C 0~C 7) press this key to confirm and return to standby mode; RECOVERY: This is the heart recovery key. After the user exercises for a period of time, press this key and count down for one minute.
  • Seite 54: Function Description

    FUNCTION DATA DISPLAY DESCRIPTION Display Display Range Setting Range Memory Zeroing Description Item When the time countdown 0:00~99:00 is 0, there will be a prompt TIME 0:00~99:59 ±1 tone and return to the standby interface. - Signal sensor, values are displayed after 3 seconds;...
  • Seite 55 3. Bluetooth APP function In standby mode you can conmnect the Bluetooth APP. Activate Bluetooth on the phone and open the corresponding APP (Kinomap) to connect. 4. Display colour function In standby mode, short press “ ”, to select the display colour mode. By default, C0 is set: One of 7 display colours will be automatically selected according to WATT/Heartrate.
  • Seite 56: Application Software (App)

    Notes on using the App: The apps presented do not belong to SPORTSTECH. We expressly disclaim all liability of any kind whatsoever for third-party software and are not responsible for their content, code or for any loss or damage arising from the use of them.
  • Seite 57: Stretch Exercise

    STRETCH EXERCISE Before each workout you should stretch your muscles for at least 5-10 minutes to warm them up sufficiently. Repeat the following stretching exercises five times. Stretching before training helps improve flexibility and reduces the risk of injury. HEAD ROLLS Rotate your head to the right for one count, feeling the stretch up the left side of your neck, then rotate your head back for one count, stretching your chin to the ceiling and letting your mouth open.
  • Seite 58: Exercise Instructions

    EXERCISE INSTRUCTIONS Rowing is a very effective form of exercise and provides several benefits: 1. It improves the general fitness by strengthening the heart and circulation. 2. It strengthens and, if desired, also tones all major muscle groups: Back, waist, arms, shoulders, hips and legs. 3.
  • Seite 59 ROWING STYLES Basic Rowing style 1. Take seat and fasten your feet to the pedals, using the straps. Take the handle bar. 2. Take the start position, leaning forward with your arms straight and knees bent (Fig 1). 3. Push yourself backwards, straightening your back and legs at the same time (Fig 2). 4.
  • Seite 60: Cooling-Down Phase

    COOLING-DOWN PHASE This stage is to let your cardio-vascular system and muscles wind down. This is a repeat of the warm-up phase. First, reduce your tempo and continue at this slower pace for approximately 5 minutes before you get off your Rowing Machine. The stretching exercises should now be repeated, again remembering not to force or jerk your muscles into the stretch.
  • Seite 61: Disposal

    CONFORMITY Sportstech Brands Holding GmbH hereby declares that the radio system type WRX1000 is compliant with EU Directive 2014/53 / EU. The full text of the EU declaration of conformity is available at the following internet address:...
  • Seite 63 Querido cliente, Nos complace que haya elegido un dispositivo de la línea de productos SPORTSTECH. Con el equipo deportivo de SPORTSTECH usted obtiene la más alta calidad y la mejor tecnología. Con el fin de usar todo el potencial de su dispositivo y para que pueda disfrutarlo durante muchos años, por favor lea este manual cuidadosamente antes de comenzar a ejercitarse, y use el dispositivo de acuer- do a las instrucciones.
  • Seite 64: Dibujo De Explosión/Lista De Repuestos

    ¡También estamos en redes sociales! Obtenga la última información sobre nuestros productos, entrenamientos y mucho más aquí: Instagram Facebook https://www.instagram.com/sportstech.official/ https://www.facebook.com/sportstech.de Nuestras marcas - Descubra muchos otros productos interesantes: Bluewheel Sportstech Fitness Deskfit Electromobility https://www.bluewheel.de/ https://www.deskfit.de/ https://www.sports-tech.es Relaxxnow available via Sportstech.de DIBUJO DE EXPLOSIÓN/LISTA DE REPUESTOS...
  • Seite 65: Contenido/ Datos Técnicos

    CONTENIDOS INHALT DIBUJO DE EXPLOSIÓN/LISTA DE REPUESTOS .............. 64 CONTENIDO/ DATOS TÉCNICOS ................... 65 INFORMACIÓN DE SEGURIDAD IMPORTANTE ..............66 TAMBIÉN PODRÍA INTERESARLE ................... 68 MONTAJE ........................69 ABRIR EL REMO ......................77 PLEGAR EL REMO ...................... 79 MANTENIMIENTO DEL TANQUE DE AGUA ..............80 MANTENIMIENTO DEL PRODUCTO ................
  • Seite 66: Información De Seguridad Importante

    INFORMACIÓN DE SEGURIDAD IMPORTANTE Al usar la caminadora siempre se deben seguir las precauciones básicas, incluyendo las siguientes instrucciones de seguridad importantes. Lea todas las instrucciones antes de usar este producto. • Es importante leer todo este manual antes de ensamblar y usar el equipo. •...
  • Seite 67 • Debe tenerse cuidado al levantar o mover la máquina para no lastimar su espalda. Siempre use técnicas de levantamiento adecuadas y/o busque ayuda si es necesario. • El dispositivo está destinado exclusivamente para uso doméstico privado y no con fines comerci- ales.
  • Seite 68: También Podría Interesarle

    Puede comprar este producto en el tamaño deseado a través del siguiente código QR o enlace: https://www.sportstech.de/bodenschutzmatte SPORTSTECH WBT100 Botella de agua Muchas personas no consiguen beber suficiente agua a lo largo del día. Sin embargo, esto es esencial para nuestro cuerpo: en el trabajo, durante un entrenamiento o en nuestro tiempo libre.
  • Seite 69: Montaje

    MONTAJE Apriete todos los componentes y piezas premontadas! WRX1000 SCREWS AND TOOLS Caja no. 1 Caja no. 2 WRX1000 SCREWS AND TOOLS...
  • Seite 70 Paso 1 Una la plancha de soporte frontal del riel de aluminio (118) en el lado izquierdo del conjunto del riel de aluminio (115) con tornillos laterales de cabeza plana invertida (38) y arandelas planas (13). - 2PCS - 2PCS Paso 2 Ensamble la plancha de soporte trasera del riel de aluminio (117) en la parte izquierda del conjunto del riel de aluminio utilizando tornillos laterales de cabeza plana invertida (38) y arandelas planas (13).
  • Seite 71 Paso 3 Una ahora la parte derecha del riel de aluminio (116) a la parte ya montada en los pasos anteriores utilizando tornillos de cabeza plana de borde invertido (38) y arandelas planas (13). Paso 4 Ensamble el conector del bastidor (122) desde ambos lados al conjunto de rieles de aluminio utilizando tornillos laterales de cabeza invertida (38) (14), arandelas planas (13) y tuercas de nylon (15).
  • Seite 72 Paso 6 Fije el lado derecho de la placa de soporte del bastidor (62) en el bastidor utilizando tornillos de cabeza plana de borde invertido (14), arandelas planas (13) y tuercas de nylon (15). A continuación, fije el lado derecho de la placa de soporte del bastidor desde abajo con tornillos de cabeza plana de borde invertido (121) y arandelas planas (13).
  • Seite 73 Paso 9 Retire las planchas (24) (25) del bastidor con las herramientas (148). Fije las placas en L a los pedales utilizando tornillos laterales de cabeza plana invertida (12) y tuercas de nylon (15). Fije los pedales verticalmente al bastidor desde ambos lados utilizando tornillos laterales de cabeza plana invertida (14) arandelas planas (13) y tuercas de nylon (15).
  • Seite 74 Paso 11 Fije el acolchado del asiento (127) al soporte del asiento (128) con un tornillo hexagonal de cabeza cilíndrica (134) a través del rodillo (133) y el manguito (135). Paso 12 Retire del bastidor las cubiertas del riel de aluminio izquierda (137) y la derecha (138) y los dos protectores de goma (120) con las herramientas (148).
  • Seite 75 Paso 14 Pase la cuerda elástica por debajo del rodillo y fíjela en la placa de soporte posterior del riel de aluminio. Paso 15 Monte la pantalla (1) utilizando cuatro tornillos en cruz de cabeza semicónica (22), un tornillo de cabeza plana de borde invertido (146) y cinco arandelas planas (147).
  • Seite 76 Paso 17 Fije las ruedas (60) en el bastidor como se muestra en la imagen. Paso 18 Fije el cierre rápido ajustable (36-L),(36-R) al bastidor mediante un tornillo avellanado de rosca en cruz (37).
  • Seite 77: Abrir El Remo

    ABRIR EL REMO Guarde el dispositivo en un lugar seco, fuera del alcance de los niños y donde haya poco movimien- to. Asegúrese de que la unidad esté bien colocada y que no pueda caerse sobre animales pequeños o niños. Deslice y mantenga el asiento hacia arriba para evitar que se balancee hacia adelante cuando...
  • Seite 78 ATENCIÓN: Evite colocar los dedos u otras partes del cuerpo entre los componentes del remo. Puede causar lesiones. Active el bloqueo para fijar el riel. ATENCIÓN: El bloqueo sólo está presente en un lado y es necesa- rio para asegurarlo. La estabilidad se consigue si se instala sobre una superficie plana.
  • Seite 79: Plegar El Remo

    PLEGAR EL REMO Desactive el bloqueo del riel. Deslice el asiento hacia atrás para evitar que caiga cuando esté plegado. Sujete el dispositivo por su parte central y tire de él hacia arriba.
  • Seite 80: Mantenimiento Del Tanque De Agua

    MANTENIMIENTO DEL TANQUE DE AGUA AJUSTE LA RESISTENCIA La resistencia de la máquina de remo se puede ajustar a través de la cantidad de agua del depósito. Para ello, siga las siguientes instrucciones: MAX: La cantidad máxima de agua para ofrecer la mayor resistencia posible. LLENADO 1.
  • Seite 81: Mantenimiento Del Producto

    MANTENIMIENTO DEL PRODUCTO La frecuencia a la que se debe cambiar el agua depende de la frecuencia de uso y del entorno del lugar de instalación. Debe cambiar el agua más o menos cada medio año o si empieza a haber síntomas de que hay algas o bacterias.
  • Seite 82: Ajustes

    AJUSTES AJUSTE DE LA PERILLA DE TENSIÓN Puede ajustar los niveles de tensión para variar la resistencia como se muestra a continuación: Debe comenzar su "periodo de ejercicio" en el nivel de resistencia y velocidad que se ajuste a sus necesidades. Recuerde comenzar despacio y aumente progresivamente hasta alcanzar el nivel deseado.
  • Seite 83: Instrucciones De La Consola

    INSTRUCCIONES DE LA CONSOLA FUNCIONES DE LOS BOTONES COLOR: Pulse este botón en modo reposo para elegir el color de la lámpara (C 0 - C 7). Vuélvalo a pulsar para confirmarlo y volver al modo de reposo; RECUPERACIÓN: Activa la función de recuperación cardiaca. Pulse este botón después de un ejercicio prolongado y cuente un minuto.
  • Seite 84: Descripción De Las Funciones

    DESCRIPCIÓN DE LA INFORMACIÓN EN PANTALLA Pantalla Rango de Configurar Memo- Reesta- Descripción Nº muestra rango blecer Cuando la cuenta atrás 0:00~99:00 llegue a 0, se activará una TIEMPO 0:00~99:59 SÍ SÍ ±1 señal sonora y volverá al modo reposo. - Pulsímetro, los valores se muestran después de 3 s;...
  • Seite 85: Función Bluetooth

    1. Función Bluetooth En el modo reposo puede conectar la aplicación por Bluetooth. Active el Bluetooth en el teléfono y abra la APP correspondiente (Kinomap) para conectarse. 2. Función de color En el modo reposo, pulse brevemente “ ”, para seleccionar el modo de color de la pantalla. Por defecto, se ajusta el C0: Se seleccionará...
  • Seite 86: Software (Aplicación)

    Consejos para el uso de las aplicaciones: Las aplicaciones mostradas no son propiedad de SPORTSTECH. No nos hacemos responsables por el software de terceros ni de su contenido, códigos o de cualquier pérdida o daño derivado de su uso. Si utiliza recursos de terceros, estará...
  • Seite 87: Ejercicios De Estiramiento

    EJERCICIOS DE ESTIRAMIENTO Antes de cada entrenamiento debes estirar tus músculos durante al menos 5-10 minutos para calentarlos lo suficiente. Repita los siguientes ejercicios de estiramiento cinco veces. El estiramiento antes del entrenamiento ayuda a mejorar la flexibilidad y reduce el riesgo de lesiones. GIROS CON LA CABEZA Gire su cabeza hacia la derecha por un segundo, sienta como se estira el lado izquierdo de su cuello, luego gire su cabeza hacia tras por un segundo, estirando su barbilla hacia el techo y dejando su boca...
  • Seite 88: Instrucciones De Ejercicio

    INSTRUCCIONES DE EJERCICIO El remo es una forma de ejercicio muy eficaz y ofrece varias ventajas: 1. Mejora el estado físico general al fortalecer el corazón y la circulación. 2. Fortalece y, si lo desea, da forma a todos los grupos musculares importantes: espalda, cintura, brazos, hombros, caderas y piernas.
  • Seite 89 FORMA DE REMAR Remo normal 1. Tome asiento y fije los pies a los pedales con las correas. Agarre el asa. 2. Colóquese en posición inicial e inclínese hacia delante con los brazos extendidos y las rodillas dobladas (fig. 1). 3.
  • Seite 90: Fase De Enfriamiento

    FASE DE ENFRIAMIENTO Esta fase es para hacer que su sistema cardiovascular y sus músculos se relajen. Esta es una repetición de la fase de calentamiento. Primero, reduzca su ritmo y continúe con este ritmo más lento durante aproximadamente 5 minutos antes de bajarse de la máquina. Ahora debe repetir los ejercicios de estiramiento, de nuevo recuerde no forzar ni estirar demasiado sus músculos.
  • Seite 91: Desecho

    CONFORMIDAD Sportstech Brands Holding GmbH declara que el sistema de radio tipo WRX1000 cumple con la directiva 2014/53/EU. El texto completo de la Declaración UE de Conformidad está disponible en el siguiente enlace:...
  • Seite 93 FRANÇAIS Chère clientèle, Nous sommes ravis que vous ayez choisi un appareil de la gamme de produits SPORTSTECH. Avec les équipements sportifs de SPORTSTECH, vous obtenez la plus haute qualité et la meilleure technologie. Afin d'utiliser pleinement le potentiel de votre appareil et de pouvoir l'apprécier pendant de nombreuses années, lisez attentivement ce manuel avant l'utilisation et le début de votre entraînement et utilisez l'ap-...
  • Seite 94: Dessin Éclaté/Liste Des Pièces De Rechange

    Retrouve les dernières informations sur les produits, le contenu des entraînements et bien plus encore sur notre: La page Instagram La page Facebook https://www.instagram.com/sportstech.official/ https://www.facebook.com/sportstech.de Nos marques - Découvrez de nombreux autres produits intéressants: Bluewheel Sportstech Fitness Deskfit Electromobility https://www.bluewheel.de/ https://www.deskfit.de/ https://www.sports-tech.fr/ Relaxxnow available via Sportstech.de...
  • Seite 95: Contenu De La Livraison

    CONTENU INHALT DESSIN ÉCLATÉ/LISTE DES PIÈCES DE RECHANGE ............94 CONTENBU DE LA LIVRAISON/ DONNÉES TECHNIQUES ..........95 INFORMATIONS DE SÉCURITÉ IMPORTANTES ..............96 CELA POURRAIT AUSSI VOUS INTÉRESSER ..............98 ENSEMBLE ........................ 99 OUVRIR........................107 REPLIER ........................109 REMPLISSAGE / VIDANGE DU RÉSERVOIR D'EAU ............110 ENTRETIEN DU PRODUIT .....................
  • Seite 96: Informations De Sécurité Importantes

    INFORMATIONS DE SÉCURITÉ IMPORTANTES Les précautions de base, y compris les consignes de sécurité importantes suivantes doivent toujours être respectées lorsque vous utilisez ce tapis roulant. Lisez toutes les instructions avant d'utiliser cette appareil. • Il est important de lire ce manuel en entier avant d'assembler et d'utiliser l'équipement. Une utilisation sûre et efficace ne peut se produire que si l'équipement est assemblé, entretenu et utilisé...
  • Seite 97: Bloc D'alimentation

    • L'équipement a été testé sous la classe H.C. Poids maximum de l'utilisateur: 120kg. La capacité de freinage est indépendante de la vitesse. • L'équipement n'est pas adapté à un usage thérapeutique. • Il faut faire attention lors du soulevement ou déplacement de l'équipement afin de ne pas faire du mal à...
  • Seite 98: Cela Pourrait Aussi Vous Intéresser

    La protection idéale. Pour votre entraînement à domicile. Afin que votre sol ne soit pas endommagé par votre équipement de fitness, il existe un tapis de protection Sportstech. Il est dispo- nible en différentes tailles et peut également être utilisé pour le yoga ou d‘autres exercices.
  • Seite 99: Ensemble

    ENSEMBLE Serrez fermement tous les composants et les pièces préassemblées ! WRX1000 SCREWS AND TOOLS Case numéro 1 Case numéro 2 WRX1000 SCREWS AND TOOLS...
  • Seite 100 Étape 1 Installez la plaque support avant du rail en aluminium (118) sur le côté gauche du bloc rail aluminium (115) à l'aide de vis à tête plate (38) et de rondelles (13). - 2PCS - 2PCS Étape 2 Installez la plaque support arrière du rail en aluminium (117) sur le côté supérieur gauche du bloc rail aluminium à...
  • Seite 101 Étape 3 Assemblez le bloc rails aluminium droit (116) et le bloc rails aluminium supérieur gauche à l'aide de vis à tête plate (38) et de rondelles (13). Étape 4 Fixez le raccordement du châssis (122) de part et d’autre du bloc rails aluminium à l'aide de vis à tête plate (38) (14), de rondelles (13) et d'écrous nylon (15).
  • Seite 102 Étape 6 Fixez la plaque support du châssis à droite (62) au châssis à l'aide de vis à tête plate (14), de rondelles (13) et d'écrous nylon (15). Resserrez la plaque support du châssis du bas vers le haut à droite avec des vis à...
  • Seite 103 Étape 9 Retirez la plaque (24) (25) du châssis en utilisant l'outil (148). Fixez fermement les plaques en L au jeu de pédales à l'aide de vis à tête plate (12) et d'écrous nylon (15). Fixez les jeux de pédales verticalement des deux côtés du châssis à...
  • Seite 104 Étape 11 Le coussin de l’assise (127) est fixé au support de siège (128) à l'aide d'une vis cylindrique à six pans creux (134) à travers le rouleau (133) et le manchon (135). Étape 12 Retirez du châssis, la protection du rail aluminium de gauche (137), la protection du rail aluminium de droite (138) et les deux amortisseurs en caoutchouc (120) en utilisant l'outil (148).
  • Seite 105 Étape 14 Faites passer la corde élastique sous le châssis des rouleaux et fixez-la à la plaque support arrière du rail aluminium. Étape 15 Installez la console (1) sur le cadre à l'aide de quatre vis cruciformes (22), d' une vis à tête plate (146) et de cinq rondelles (147).
  • Seite 106 Étape 17 Fixez le pignon fou (60) sur le châssis comme illustré. Étape 18 Fixez le loquet de réglage rapide (36-L),(36-R) sur le châssis à l'aide de la vis à tête fraisée (37).
  • Seite 107: Ouvrir

    OUVRIR Rangez votre appareil dans un endroit sec et peu utilisé, hors de portée des enfants. Assurez-vous que l'appareil soit placé de façon sécurisée et qu'il ne puisse pas tomber sur de petits animaux ou des enfants. Glissez et maintenez le siège vers le haut pour empêcher qu'il ne bascule vers l'avant lorsque l'appareil sera déplié.
  • Seite 108 ATTENTION : Évitez de placer vos doigts ou toute autre partie de votre corps entre les composants adjacents. Il y a un risque de se coincer ! Fermez le système de verrouillage pour stabiliser le rail de roulement! Remarque : le dispositif de ver- rouillage n'est présent que d'un seul côté...
  • Seite 109: Replier

    REPLIER Ouvrir le système de verrouillage Glissez le siège vers l'arrière pour éviter qu'il ne tombe quand vous repliez l'appareil. Saisissez l'appareil par la barre centrale et tirez-la vers le haut.
  • Seite 110: Remplissage / Vidange Du Réservoir D'eau

    REMPLISSAGE / VIDANGE DU RÉSERVOIR D'EAU RÉGLAGE DE LA RÉSISTANCE La résistance du rameur peut être réglée par la quantité de remplissage du réservoir d'eau. Pour ce faire, suivez les instructions ci-dessous : MAX : la capacité maximale offre la résistance la plus élevée. REMPLISSAGE 1.
  • Seite 111: Entretien Du Produit

    ENTRETIEN DU PRODUIT La fréquence des changements d'eau dépend de la fréquence d'utilisation et de l'environnement du lieu d'installation. Après environ six mois ou si l'eau se colore, contient des algues ou des bactéries, elle devra être changée ! (REMARQUE : utiliser de l'eau distillée !) Si vous n'utilisez pas l'appareil pendant une longue période, vidangez l'eau.
  • Seite 112: Réglages

    RÉGLAGES RÉGLAGE DU BOUTON DE TENSION Vous devriez commencer votre "Période d'exercice" au niveau de résistance et à la vitesse qui correspondent à vos besoins. Rappelez-vous que le démarrage des exercices doit se faire facilement et lentement et de travailler doucement jusqu'à atteindre la forme physique que vous désirez.
  • Seite 113: Notice D'utilisation De La Console

    NOTICE D'UTILISATION DE LA CONSOLE FONCTIONS DES TOUCHES COULEUR : en mode veille, appuyez sur cette touche pour accéder à la sélection de la couleur de la lampe (C 0 - C 7). Appuyez sur cette touche pour confirmer votre choix et revenir au mode veille; REPOS : il s'agit de la touche pour le temps de récupération du pouls.
  • Seite 114 AFFICHAGE DES DONNÉES DE FONCTION Affichage Plage Plage de Mé- Remise Description d'affichage réglage moire à zéro Lorsque le compte à rebours 0:00~99:00 atteint 0, un signal sonore TEMPS 0:00~99:59 ±1 retentit et l’affichage de veille apparait. - Les signaux du capteur s'affichent au bout de 3 s;...
  • Seite 115 3. Application Bluetooth En mode veille, vous pouvez vous connecter à l'application Bluetooth. Pour établir une connexion, activez le Bluetooth sur le téléphone et ouvrez l'application qui convient (Kinomap). 4. Fonction d'affichage couleur En mode veille, appuyez brièvement sur “ ”, pour sélectionner le mode couleur pour l'affichage.
  • Seite 116: Logiciel D'application (App)

    Kinomap Informations sur l’utilisation de l’application : Les applications présentées ne sont pas la propriété de SPORTSTECH. Nous excluons expressément toute responsabilité pour les logiciels provenant de tiers. Nous ne sommes en aucun cas responsables de leur contenu, de leur code source, ou de toute perte ou dommage résultant de leur utilisation. Si vous utilisez des ressources provenant de tiers, vous serez soumis à...
  • Seite 117: Excercice D'étirement

    EXCERCICE D'ÉTIREMENT Avant chaque séance d'entraînement, vous devez étirer vos muscles pendant au moins 5 à 10 minutes pour les réchauffer suffisamment. Répétez les exercices d'étirement suivants cinq fois. Les étirements avant l'entraînement permettent d'améliorer la flexibilité et de réduire le risque de blessure. ROULER LA TÊTE Tournez la tête vers la droite une fois, en étirant le côté...
  • Seite 118: Instructions D'exercice

    INSTRUCTIONS D'EXERCICE L'aviron constitue un entraînement très efficace et présente plusieurs avantages: 1. Il améliore la condition physique générale en renforçant le cœur et la circulation sanguine. 2. Il renforce et, si on le souhaite, sculpte tous les groupes musculaires importants : dos, taille, bras, épaules, hanches et jambes.
  • Seite 119: Comment Ramer

    COMMENT RAMER Ramer de façon classique 1. Prenez place et attachez vos pieds aux pédales à l'aide des sangles. Prenez la barre de traction. 2. Prenez la position de départ et penchez-vous vers l'avant, les bras tendus et les genoux pliés (fig.
  • Seite 120: Phase De Refroidissement

    PHASE DE REFROIDISSEMENT Cette étape consiste à laisser votre système cardio-vasculaire et vos muscles se reposer. Il s'agit d'une répétition de la phase d'échauffement. Tout d'abord, réduisez votre tempo et continuez à ce rythme plus lent pendant environ 5 minutes avant de quitter votre vélo d'exercice. Les exercices d'étirement devraient maintenant être répétés, sans forcer vos muscles.
  • Seite 121: Mise Au Rebut

    CONFORMITÉ Sportstech Brands Holding GmbH déclare par la présente que l‘installation radio de type WRX1000 est conforme à la directive 2014/53/CE. Le texte intégral de la déclaration UE de conformité est disponible à l‘adresse Internet suivante:...
  • Seite 123 ITALIANO Cari client* Siamo lieti che abbiate scelto un dispositivo della gamma SPORTSTECH. Con le attrezzature sportive di SPORSTECH potrete usufruire della più alta qualità e della più recente tecnologia. Per sfruttare a pieno il potenziale del dispositivo e poterlo utilizzare per molti anni, raccomandiamo di leggere attentamente questo manuale prima di iniziare l’allenamento e di utilizzare il dispositivo seguen-...
  • Seite 124: Disegno Esploso/Lista Dei Pezzi Di Ricambio

    Scopri le ultime novità sui prodotti, contenuti per l'allenamento e molto altro ancora sul nostro: Pagina Instagram Pagina Facebook https://www.instagram.com/sportstech.official/ https://www.facebook.com/sportstech.de Le nostre marche - Scopri molti altri prodotti interessanti: Bluewheel Sportstech Fitness Deskfit Electromobility https://www.bluewheel.de/ https://www.deskfit.de/ https://www.sports-tech.it/ Relaxxnow available via Sportstech.de...
  • Seite 125: Display Del Computer

    INDICE INHALT DISEGNO ESPLOSO/LISTA DEI PEZZI DI RICAMBIO ............124 CONTENUTO DI SPEDIZIONE/ DATI TECNICI ..............125 INFORMAZIONI IMPORTANTI PER LA SICUREZZA ............126 VI POTREBBE ANCHE INTERESSARE ................128 MONTAGGIO ....................... 129 APRIRE ........................137 RIPIEGARE ......................... 139 RIEMPIMENTO / SVUOTAMENTO DEL SERBATOIO DELL'ACQUA ........140 MANUTENZIONE PRODOTTO ..................
  • Seite 126: Informazioni Importanti Per La Sicurezza

    INFORMAZIONI IMPORTANTI PER LA SICUREZZA Precauzioni minime, incluse importanti istruzioni di sicurezza incluse nel presente manual dovrebbero essere sempre seguite durante l’uso del tapisroulant. Leggere tutte le istruzioni prima di utilizzare il dispositivo. • È importante leggere completamente questo manuale prima di assemblare ed utilizzare l’attrezzatura.
  • Seite 127 • L’attrezzatura è stata testata nellla classe H.C. Peso massimo utente: 120kg. La capacità di frenatura è indipendente dalla velocità. • L’attrezzatura non è adatta all’uso terapeutico. • È necessario prestare attenzione durante il sollevamento o lo spostamento dell’attrezzatura per non danneggiare la tua schiena.
  • Seite 128: Vi Potrebbe Anche Interessare

    VI POTREBBE ANCHE INTERESSARE SPORTSTECH materassino protettivo 120 La protezione ideale. Per il vostro allenamento a casa Per fare in modo che il vostro pavimento non venga danneggiato dagli attrezzi fitness che utilizzate per allenarvi abbiamo creato per voi un materassino protettivo per il pavimento.Disponibile ovviamente in diverse dimensioni, può...
  • Seite 129: Montaggio

    MONTAGGIO Avvitare bene tutti gli elementi e i pezzi preassemblati! WRX1000 SCREWS AND TOOLS Casella no.1 Casella no. 2 WRX1000 SCREWS AND TOOLS...
  • Seite 130 Passo 1 Montare la piastra di supporto anteriore della guida in alluminio (118) sul lato sinistro del gruppo della guida in alluminio (115) utilizzando viti a testa bombata (38) e rondelle (13). - 2PCS - 2PCS Passo 2 Montare la piastra di supporto posteriore della guida in alluminio (117) sul lato superiore sinistro del gruppo della guida in alluminio usando viti a testa piatta (38) e rondelle (13).
  • Seite 131 Passo 3 Montare il gruppo della guida in alluminio di destra (116) sul gruppo della guida in alluminio superio- re di sinistra utilizzando le viti a testa piatta (38) e le rondelle (13). Passo 4 Montare il connettore del telaio (122) sul gruppo della guida in alluminio da entrambi i lati usando viti a testa bombata (38) (14), rondelle (13) e dadi in nylon (15).
  • Seite 132 Passo 6 Montare la piastra di supporto del telaio a destra (62) al telaio con viti a testa piatta (14), rondelle (13) e dadi in nylon (15). Serrare la piastra di supporto del telaio dal basso verso l'alto a destra con viti a testa piatta (121) e rondelle (13).
  • Seite 133 Passo 9 Rimuovere la piastra (24) (25) dal telaio con l'attrezzo (148). Fissare le piastre L alla pedaliera con viti a testa piatta (12) e dadi in nylon (15). Fissare le pedaliere verticalmente al telaio da entrambi i lati usando bulloni a testa piatta (14), rondelle piatte (13) e dadi in nylon (15). Fissare il manicotto di montaggio della barra (34) al telaio con viti a testa piatta (35) e dadi in nylon (15).
  • Seite 134 Passo 11 Fissare il cuscino del sedile (127) con una vite ad esagono cavo (134) attraverso il rullo (133) e il manicotto (135) al (128) attraverso il rullo (133) e il manicotto (135). Passo 12 Rimuovere il coperchio della guida in alluminio a sinistra (137), il coperchio della guida in alluminio a destra (138) e i due ammortizzatori in gomma (120) dal telaio utilizzando l'attrezzo (148).
  • Seite 135 Passo 14 Passare la corda elastica sotto il telaio del rullo e fissarla alla piastra di supporto posteriore della guida in alluminio. Passo 15 Montare la staffa (1) sul telaio con quattro viti a croce (22), una vite a testa piatta (146) e cinque rondelle (147). - 5PCS Passo 16 Collegare il cavo sul telaio al cavo sulla console.
  • Seite 136 Passo 17 Fissare la ruota folle (60) al telaio come mostrato. Passo 18 Fissare il blocco rapido a scatto regolabile (36-L),(36-R) al telaio con la vite a testa svasata (37).
  • Seite 137: Aprire

    APRIRE Tenete il vostro Vogatore in un luogo asciutto, fuori dalla portata di bambini, in un luogo che viene utilizzato poco. Assicuratevi che il Vogatore sia riposto in sicurezza e che non possa cadere su piccoli animali o bambini. Fate scivolare il sellino nella parte superiore e tenetelo, per evitare che possa scivolare in avanti mentre aprire il Vogatore.
  • Seite 138 ATTENZIONE! Evitate di mettere le dita o altri parti del corpo tra le componenti. C’è pericolo di schiacciarsi! Chiudete la chiusura di sblocco, per stabilizzare il binario! Nota bene: la chiusura si trova solo su un lato ed è sufficiente come sicurezza.
  • Seite 139: Ripiegare

    RIPIEGARE Aprite lo sblocco. Fate scivolare il sellino indietro, per evitare che il sellino possa scivolare in giù mentre si ripiega il Vogatore. Prendete il Vogatore nella parte centrale e tiratelo verso su.
  • Seite 140: Riempimento / Svuotamento Del Serbatoio Dell'acqua

    RIEMPIRE / SVUOTARE IL SERBATOIO D'ACQUA IMPOSTARE LA RESISTENZA La resistenza del vogatore viene impostata a seconda della quantità d'acqua presente nel serbatoio. Si prega di seguire le seguenti istruzioni: MAX: un serbatoio riempito al massimo garantisce la massima resistenza COME RIEMPIRLO 1.
  • Seite 141: Manutenzione Prodotto

    MANUTENZIONE PRODOTTO La frequenza con cui andrà cambiata l’acqua dipende dall’utlizzo che se ne fa e dal luogo in cui é posizionata. L’acqua é da cambiare dopo circa 6 mesi o quando comincia a cambiare colore e si cominciano ad intravedere alghe o batteri! (AVVISO: Usate acqua distillata!) Nel caso il Vogatore non dovesse essere utilizzato per un periodo più...
  • Seite 142: Impostazioni

    IMPOSTAZIONI REGOLAZIONE DELLA MANOPOLA DELLA TENSIONE Potresti regolare la tensione per resistenze variabili come segue: Dovresti iniziare il tuo “Periodo di Allenamento” al livello di resistenza e velocità adeguato alle tue necessità. Ricorda di iniziare in modo lento e semplice e lavora col tuo ritmo fino al livello desiderato.
  • Seite 143: Manuale D'istruzione Della Console

    MANUALE D’ISTRUZIONE DELLA CONSOLE FUNZIONI DEI PULSANTI COLOUR: In modalità standby, premere questo pulsante per acce- dere alla selezione del colore della lampada (C 0 - C 7). Premere questo tasto per confermare e tornare alla modalità standby; RECOVERY: Questo è il pulsante del tempo di recupero del polso. Dopo che l'utente si è...
  • Seite 144: Descrizione Della Funzione

    VISUALIZZAZIONE DEI DATI DI FUNZIONE No. Visualizza Gamma di Campo di Memoria Azzera- Descrizione visualizzazione regolazione mento Quando il conto alla rovescia 0:00~99:00 raggiunge lo 0, viene emesso TEMPO 0:00~99:59 Sì Sì ±1 un bip e appare il display di standby.
  • Seite 145 3. Funzione Bluetooth APP In modalità standby, è possibile collegare l'APP Bluetooth. Attivare il Bluetooth sul telefono e aprire l'APP corrispondente (Kinomap) per connettersi. 4. Funzione di visualizzazione a colori In modalità standby, premere brevemente “ ”, per selezionare la modalità colore per la visualizzazione. L'impostazione predefinita è...
  • Seite 146: Software Di Utilizzo (App)

    Kinomap Note sull'uso dell'app: Le applicazioni mostrate non appartengono a SPORTSTECH. Decliniamo espressamente ogni res- ponsabilità per i software di terzi e non siamo responsabili del loro contenuto, dei codici o di qualsiasi perdita o danno derivante dal loro uso. Se utilizzi risorse di terzi, sei soggetto ai loro termini e licenze e non sei più...
  • Seite 147: Esercizi Di Stretching

    ESERCIZI DI STRETCHING Prima di ogni allenamento si dovrebbe allungare i muscoli per almeno 5-10 minuti per riscaldarli a sufficienza. Ripetere i seguenti esercizi di stretching per cinque volte. Lo stretching prima dell'allenamento aiuta a migliorare la flessibilità e riduce il rischio di lesioni. RULLI PER LA TESTA Ruotare la testa a destra, fino a sentir allungare il lato sinistro del collo, poi ruotare la testa indietro, allungando il mento verso il soffitto e aprendo la bocca.
  • Seite 148: Istruzioni Di Allenamento

    ISTRUZIONI DI ALLENAMENTO Il canottaggio è una forma di esercizio molto efficace e offre diversi benefici: 1. Migliora la forma fisica generale rafforzando il cuore e la circolazione. 2. Rafforza e, se lo si desidera, modella tutti i principali gruppi muscolari: Schiena, vita, braccia, spalle, fianchi e gambe.
  • Seite 149 STILE DI CANOTTAGGIO Stile di voga normale 1. Prendete posto e fissate i vostri piedi ai pedali con le cinghie. Prendi il manubrio. 2. Assumere la posizione di partenza e piegarsi in avanti con le braccia distese e le ginocchia piegate (Fig.
  • Seite 150 FASE DI SCARICO Questa fase serve a rilassare il tuo sistema cardiovascolare ed i tuoi muscoli. Questa è una ripetizione della fase di riscaldamento. Innanzitutto, riduci il tuo ritmo e continua a questa andatura più lenta per circa 5 minuti prima di scendere dal Vogatore. Gli esercizi di stretching dovrebbero essere ripetuti adesso, di nuovo ricordando di non forzare o stirare i tuoi muscoli.
  • Seite 151: Smaltimento

    CONFORMITÀ Sportstech Brands Holding GmbH dichiara che il tipo WRX1000 di sistema radio è conforme alla direttiva 2014/53/UE. Il testo completo della dichiarazione di conformità UE è disponibile al seguente indirizzo internet:...
  • Seite 153 NEDERLANDS Beste klant, We zijn blij dat je een apparaat uit het SPORTSTECH-assortiment hebt gekozen. De sportuitrusting van SPORTSTECH biedt je de hoogste kwaliteit en de nieuwste technologie. Lees vóór gebruik deze gebruikershandleiding aandachtig door en gebruik het apparaat zoals aangege- ven.
  • Seite 154: Explosietekening/Onderdelenlijst

    We zijn ook actief op social media! Raadpleeg voor de meest recente productinformatie, trainingen en nog veel meer, onze website: Instagram-pagina Facebook-pagina https://www.instagram.com/sportstech.official/ https://www.facebook.com/sportstech.de Onze merken - Ontdek nog veel meer interessante producten: Bluewheel Sportstech Fitness Deskfit Electromobility https://www.bluewheel.de/ https://www.deskfit.de/ https://www.sportstech.de/ Relaxxnow available via Sportstech.de...
  • Seite 155: In De Verpakking/ Technische Gegevens

    INHOUD INHALT EXPLOSIETEKENING/ONDERDELENLIJST ............... 154 IN DE VERPAKKING/ TECHNISCHE GEGEVENS ..............155 BELANGRIJKE VEILIGHEIDSINSTRUCTIES ............... 156 DIT KAN OOK INTERESSANT VOOR JE ZIJN ..............158 MONTAGE ........................159 UITKLAPPEN ......................167 OPKLAPPEN ....................... 169 WATERTANK VULLEN / LEGEN ..................170 PRODUCTAANSPRAKELIJKHEID ..................
  • Seite 156: Belangrijke Veiligheidsinstructies

    BELANGRIJKE VEILIGHEIDSINSTRUCTIES Deze algemene veiligheidsinformatie moet strikt worden nageleefd bij het gebruik van dit product. Lees alle instructies voordat je het product gebruikt. • Lees de volledige instructies zorgvuldig door voordat je het toestel instelt en gebruikt. Veilig en effectief gebruik kan alleen worden gegarandeerd als het toestel correct is gemonteerd, onderhouden en gebruikt.
  • Seite 157 • Let er bij het tillen of verplaatsen van het toestel op dat de rug niet gekwetst raakt. Gebruik altijd de juiste heftechniek en/of vraag iemand om hulp. • Het apparaat is uitsluitend voor thuisgebruik en is niet voor commerciële doeleinden bestemd. •...
  • Seite 158: Dit Kan Ook Interessant Voor Je Zijn

    DIT KAN OOK INTERESSANT VOOR JE ZIJN SPORTSTECH vloerbeschermingsmat 120 De ideale bescherming voor je training thuis. Sportstech biedt een vloerbeschermingsmat om ervoor te zor- gen dat je vloer thuis niet wordt beschadigd door je fitnessappa- ratuur. De mat is natuurlijk in verschillende maten verkrijgbaar en kan ook worden gebruikt voor yoga of andere oefeningen.
  • Seite 159: Montage

    MONTAGE Alle componenten en voorgemonteerde onderdelen stevig vastdraaien! WRX1000 SCREWS AND TOOLS Doos nu. 1 Doos nu. 2 WRX1000 SCREWS AND TOOLS...
  • Seite 160 Stap 1 Monteer het aluminium railvoorstuk (118) op de linker aluminium rail (115) met platkopschroeven (38) en sluitringen (13). - 2PCS - 2PCS Stap 2 Monteer het aluminium raileindstuk (117) aan de linker bovenkant van de aluminium rail met platkopschroeven (38) en sluitringen (13).
  • Seite 161 Stap 3 Verbind de rechter aluminium rail (116) met de linker aluminium rail met platkopschroeven (38) en sluitringen (13). Stap 4 Monteer de frameverbinding (122) op beide zijden van de aluminium rails met platkopschroeven (38) (14), sluitringen (13) en nylon moeren (15). Zet vervolgens de frameverbinding van onder tot boven vast met platkopschroeven (121) en sluitringen (13).
  • Seite 162 Stap 6 Monteer de rechter frameplaat (62) op het frame met platkopschroeven (14), sluitringen (13) en nylon moeren (15). Zet de frameplaat rechts van onder tot boven vast met platkopschroeven (121) en sluitringen (13). Stap 7 Monteer de watertank (78) op beide kanten van het frame met L-vormige platen (23), platkopschroeven (14), sluitringen (13) en nylon moeren (15).
  • Seite 163 Stap 9 Verwijder de plaat (24) (25) van het frame met gereedschap (148). Bevestig de L-platen aan de pedalen met platkopschroeven (12) en nylon moeren (15). Bevestig de pedalen aan beide zijden verticaal op het frame met platkopschroeven (14), sluitringen (13) en nylon moeren (15). Bevestig de stangbevestigingshuls (34) aan het frame met platkopschroeven (35) en nylon moeren (15).
  • Seite 164 Stap 11 Het zitkussen (127) wordt aan de stoelbeugel (128) bevestigd met de cilindrische inbusbout (134) door de rol (133) en de huls (135). Stap 12 Verwijder de linker aluminium railbekleding (137), rechter aluminium raibekleding (138) en twee rubberen dempers (120) van het frame met gereedschap (148). Monteer het zitkussen (128) op het frame.
  • Seite 165 Stap 14 Haal het elastische koord onder het rolframe door en bevestig het aan het aluminium raileindstuk. Stap 15 Monteer het beeldscherm (1) op het frame met vier bolle kruiskopschroeven (22), een platkopschroeve (146) en vijf sluitringen (147). - 5PCS Stap 16 Verbind de kabel van het frame met de kabel van het beeldscherm.
  • Seite 166 Stap 17 Bevestig het loopwiel (60) op het frame zoals afgebeeld. Stap 18 Bevestig de snelvergrendeling (36-L), (36-R) op het frame met de verzonken kruiskopschroef (37).
  • Seite 167: Uitklappen

    UITKLAPPEN Bewaar het toestel op een droge plaats, buiten het bereik van kinderen en op een plaats die weinig wordt gebruikt. Zorg ervoor dat het toestel veilig is geplaatst en niet op huisdieren of kinderen kan vallen. Schuif en houd de zitting omhoog om te voorkomen dat de zitting bij het openen naar voren kantelt.
  • Seite 168 LET OP: Houd je vingers of ande- re delen van je lichaam niet tussen de aangrenzende onderdelen. Er bestaat gevaar voor verplettering! Sluit de spanvergrendeling om de looprail te stabiliseren! Let op: Er is slechts aan één kant een spanvergrendeling maar dat is voldoende om het apparaat te ze- keren.
  • Seite 169: Opklappen

    OPKLAPPEN Open de spanvergrendeling. Schuif de zitting naar achteren om te voorkomen dat deze de grond raakt bij het inklappen. Pak het toestel bij de middelste balk vast en trek het naar boven.
  • Seite 170: Watertank Vullen / Legen

    WATERRESERVOIR VULLEN/LEDIGEN DE WEERSTAND INSTELLEN De weerstand van de roeimachine kan worden aangepast via de capaciteit van het waterreservoir. Volg hiervoor de onderstaande instructies: MAX: De maximale capaciteit biedt de grootste weerstand. VULLEN 1. Open de afsluitdop die zich op het waterreservoir bevindt. 2.
  • Seite 171: Productaansprakelijkheid

    PRODUCTAANSPRAKELIJKHEID De frequentie van de wateruitwisseling is afhankelijk van de frequentie van het gebruik en de omgeving van de opstellingsplaats. Na ongeveer een half jaar of als er tekenen van verkleuring van het water zijn of algen of bacteriën voorkomen, moet het water worden ververst! (OPMERKING: gebruik gedistilleerd water!) Laat het water weglopen als je het toestel gedurende lange tijd niet gebruikt.
  • Seite 172: Instellingen

    INSTELLINGEN INSTELLINGEN VAN DE SPANNINGSKNOP Je kunt de spanning voor verschillende weerstandsniveaus instellen zoals hieronder: Aan het begin van je trainingsprogramma moet je het weerstandsniveau en de snelheid kiezen die bij je behoeften passen. Vergeet niet om langzaam en gemakkelijk te beginnen en vervolgens naar het gewenste fitnessniveau te werken.
  • Seite 173: Handleiding Console

    HANDLEIDING CONSOLE TOETSENFUNCTIES KLEUR: Druk in de stand-by modus op deze toets om de lampkleu- ren te selecteren (C 0~C 7) Druk op deze toets om te bevestigen en terug te keren naar de stand-by modus; HERSTEL: Dit is de hartslag hersteltoets. Nadat de gebruiker een bepaalde tijd heeft getraind, drukt u op deze toets en telt u één minuut af.
  • Seite 174: Functiebeschrijving

    WEERGAVE FUNCTIEGEGEVENS Item Weergave Weergavebereik Instelbereik Geheu- Nulin- Beschrijving stelling Wanneer de tijd is afgeteld tot 0, 0:00~99:00 klinkt er een geluidssignaal en TIJD 0:00~99:59 ±1 keert u terug naar het stand-by scherm. - Signaalsensor, waarden wor- den na 3 sec. weergegeven; 0~15~999 - Wanneer er geen signaal is, wordt na 4 sec.
  • Seite 175 3. Bluetooth APP-functie In stand-by modus kunt u de Bluetooth APP verbinden. Activeer Bluetooth op de telefoon en open de bijbehorende APP (Kinomap) om verbinding te maken. 4. Kleurweergave functie Druk in stand-by modus kort op “ ”, om de kleur van het beeldscherm te kiezen. Standaard is C0 ingesteld: Een van de 7 kleuren wordt automatisch geselecteerd op basis van WATT/Hartslag.
  • Seite 176: Applicatiesoftware (App)

    Opmerkingen over het gebruik van de app: De apps die worden getoond zijn geen eigendom van SPORTSTECH. We verwerpen uitdrukkelijk alle aansprakeli- jkheid voor software van derden en zijn niet verantwoordelijk voor hun inhoud, codes of voor verlies of schade die uit het gebruik ervan voortvloeit.
  • Seite 177: Stretchoefeningen

    STRETCHOEFENINGEN Voor elke training moet u uw spieren minstens 5-10 minuten strekken om ze voldoende op te warmen. Herhaal de volgende stretchoefeningen vijf keer. Rekken voor de training helpt de flexibiliteit te verbeteren en vermindert het risico op letsel. MET JE HOOFD ROLLEN Draai je hoofd een seconde naar rechts, voel de stretch aan de linkerkant van je nek, draai dan je hoofd een seconde terug, strek je kin omhoog en laat je mond open.
  • Seite 178: Oefeninstructies

    OEFENINSTRUCTIES Roeien is een zeer effectieve vorm van lichaamsbeweging en biedt verschillende voordelen: 1. Het verbetert de algemene conditie en versterkt het hart en de bloedsomloop. 2. Het versterkt en vormt desgewenst alle belangrijke spiergroepen: rug, taille, armen, schouders, heupen en benen. 3.
  • Seite 179 ROEISTIJLEN Normale roeistijl 1. Neem plaats en maak je voeten met de riemen aan de pedalen vast. Neem de greepstang. 2. Neem de startpositie aan en leun voorover met gestrekte armen en gebogen knieën (afb. 1). 3. Duw jezelf naar achteren en strek tegelijk je rug en benen (afb. 2). 4.
  • Seite 180 AFKOELEN In dit stadium moeten je cardiovasculaire systeem en spieren weer ontspannen. Dit is een herhaling van de opwarmfase. Verlaag eerst je tempo en ga ongeveer 5 minuten in dit lage tempo verder voordat je van het toestel stapt. De stretchoefeningen moeten nu worden herhaald, maar vergeet niet om je spieren niet te forceren.
  • Seite 181: Verwijdering

    Informatie kan worden verkregen uit de retournerings- en ophaalsystemen van je gemeente. CONFORMITEIT Hierbij verklaart Sportstech Brands Holding GmbH dat het type WRX1000 radioapparatuur voldoet aan de richtlijn 2014/53/EU. De volledige tekst van de EU-conformiteitsverklaring is beschikbaar op het volgende internetadres: https://service.innovamaxx.de/wrx1000_conformity...
  • Seite 182 Verkauf durch / Distributed by / Distribuido por / Distribué / Distribuito da / Verkoop via Sportstech Brands Holding GmbH Potsdamer Platz 11 10785 Berlin +49 30 23 59 600 www.sportstech.de...

Inhaltsverzeichnis