Herunterladen Inhalt Inhalt Diese Seite drucken

Werbung

Verfügbare Sprachen
  • DE

Verfügbare Sprachen

  • DEUTSCH, seite 1
KS700
DE
EN
ES
FR
IT
NL

Werbung

Inhaltsverzeichnis
loading

Inhaltszusammenfassung für SPORTSTECH KS700

  • Seite 1 KS700...
  • Seite 3 Sehr geehrter Kunde wir freuen uns, dass Sie sich für ein Gerät aus der SPORTSTECH Produktpalette entschieden haben. SPORTSTECH Sportgeräte bieten Ihnen höchste Qualität und neueste Technologie. Um die Leistungsfähigkeit des Gerätes voll nutzen zu können und viele Jahre Freude an Ihrem Gerät zu haben, lesen Sie bitte vor der Inbetriebnahme und dem Beginn des Trainings dieses Benutzerhandbuch sorgfältig durch und verwenden Sie das Gerät den Anweisungen entsprechend.
  • Seite 4: Video Tutorials

    Aufbau, Benutzung, Abbau. 1. QR-Code scannen 2. Videos anschauen 3. Schnell und sicher starten Link zu den Videos: https://service.innovamaxx.de/ks700_video Uns gibt es auch auf Social Media! Hol dir die neuesten Produktinfos, Trainingsinhalte uvm. auf unserer: Instagram-Seite Facebook-Seite https://www.instagram.com/sportstech.de https://www.facebook.com/sportstech.de...
  • Seite 5 INHALTSVERZEICHNIS 1. WICHTIGE SICHERHEITSHINWEISE ................6 2. EXPLOSIONSZEICHNUNG/ERSATZTEILLISTE ............. 7 3. MONTAGEANLEITUNG ..................8 4. ÜBUNGSVORSCHLÄGE ..................13...
  • Seite 6: Wichtige Sicherheitshinweise

    BITTE DIESE BEDIENUNGSANLEITUNG AN EINEM SICHEREN PLATZ AUFBEWAHREN. • Es ist wichtig, vor der Montage und Nutzung des KS700 das gesamte Handbuch zu lesen. Sichere und effiziente Nutzung kann nur erreicht werden, wenn das KS700 ordnungsgemäß montiert, gewartet und verwendet wird. Es liegt in Ihrer Verantwortung zu gewährleisten, dass alle Benutzer des KS700 über alle Vorsichtsmaßnahmen und Warnungen informiert sind.
  • Seite 7: Explosionszeichnung/Ersatzteilliste

    2. EXPLOSIONSZEICHNUNG/ERSATZTEILLISTE Unter folgendem Link Unter folgendem Link finden Sie die Explosionszeichnung finden Sie die Explosionszeichnung und die Ersatzteile-Liste: und die Ersatzteile-Liste: https://service.innovamaxx.de/ks700_spareparts...
  • Seite 8: Montageanleitung

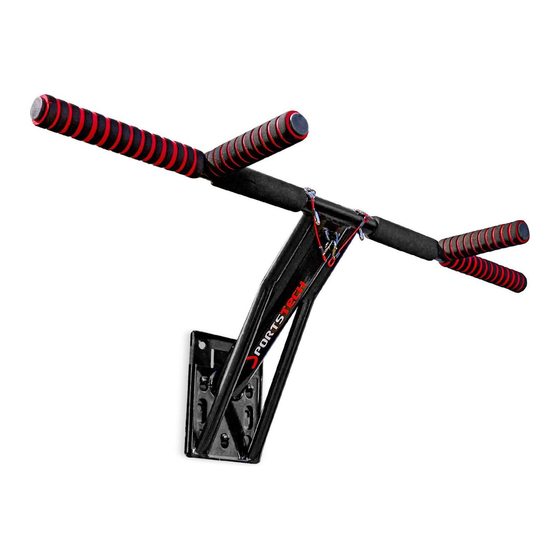
    3. MONTAGEANLEITUNG Montage des Gerätes: Schritt 1 Stecken Sie die Griffstangen seitlich an den Hauptrahmen, sodass die vorderen Griffe von der Halteplatte weg zeigen. Sichern Sie die Griffe mit den Sicherungsbolzen. Achten Sie darauf die Bolzen von oben einzusetzen, damit diese nicht unbeabsichtigt und leicht nach unten hinausgezogen werden können.
  • Seite 9 Schritt 3 Nachdem die Halteplatte fest angebracht wurde, setzen Sie die Klimmzugstange auf die Befestigungsschrauben und schieben die Klimmzugstange leicht nach unten. Zie- hen Sie die Befestigungsschrauben gut fest! Schritt 4 Sie können die Klimmzugstange auch wieder lösen und sie anders herum aufhängen. Stecken Sie die Sicherungsbolzen immer von oben hinein, um ein Herausfallen und ungesicherte Griffstangen zu vermeiden.
  • Seite 10: Montage An Der Wand

    Montage an der Wand: Befolgen Sie diese Anweisungen bitte sorgfältig und in circa 10 Minuten ist Ihre Klimmzugstange fertig und bereit zur Montage. Vor der Installation prüfen Sie bitte aus welchem Material Ihr gewünschter Montageort besteht und ob er tragfähig ist. Altbauwohnungen bestehen fast immer aus Ziegelmauerwerk somit ist die Montage einer Klimm- zugstange an der Wand durchaus möglich.
  • Seite 11 Montage an der Wand: Die Klimmzugstange wird an der Wand an den dafür vorgesehenen Halterungen angebracht. Achtung! Ein fehlerhaft eingeschlagener Schwerlastanker kann nur unter hohem Aufwand herausgezogen werden. Schritt 1 Für eine Bohrung der beiden Hauptrahmen werden nun zunächst zwei Markierun- gen an der Wand unter Zuhilfenahme der Wasserwaage angezeichnet.
  • Seite 12: Montage An Einem Baum

    Montage an einem Baum Legen Sie die Schutzmatte um den Baum, um diesen zu schützen. Schutzmatte Stecken Sie den Spanngurt, an der länglichen Öffnung, von hinten durch die Montageplatte und führen den Gurt an der gegenüberliegenden Öffnung wieder nach hinten hinaus. Ziehen Sie den Gurt soweit hindurch, dass Sie den Baum umschließen und ziehen Sie den Spanngurt fest.
  • Seite 13: Übungsvorschläge

    4. ÜBUNGSVORSCHLÄGE Neben dem typischen Klimmzug sind u.a. folgende Übungen mit der Klimmzugstange von Sportstech möglich. Dehnübungen Dehnen Sie Ihren Körper ausreichend vor und nach den Übungen, um Krämpfe oder Verletzun- gen vorzubeugen. 1. Knie- und Hüftdehnung Halten Sie die Klimmzugstange mit Ihren Händen in entgegengesetzten Richtungen, eine zu Ihnen, die andere zum Rücken zeigend, fest.
  • Seite 15 Dear customer, We are pleased you chose a device from the SPORTSTECH product range. With sports equipment from SPORTSTECH you get the highest quality and latest technology. In order to fully use the potential of your device and be able to enjoy it for many years, please read this manual carefully before starting up and beginning of training, and use the device according to the instructions.
  • Seite 16 1. Scan the QR code 2. Watch videos 3. Start fast and safely Link to the videos: https://service.innovamaxx.de/ks700_video We are also on social media! Get the latest product information, training content and much more on our: Instagram-page Facebook-page https://www.instagram.com/sportstech.de https://www.facebook.com/sportstech.de...
  • Seite 17 TABLE OF CONTENTS 1. IMPORTANT SAFETY INFORMATION ................. 18 2. EXPLODED DRAWING/SPARE PARTS LIST ..............19 3. ASSEMBLY INSTRUCTIONS ..................20 4. EXERCISE SUGGESTIONS ..................25...
  • Seite 18: Important Safety Information

    • Ensure that your equipment is firmly fixed and securely attached to the wall with the heavy-duty anchors provided before using it. • The safety level of the KS700 can only be maintained if it is regularly examined for damage and/ or wear and tear.
  • Seite 19: Exploded Drawing/Spare Parts List

    2. EXPLODED DRAWING/SPARE PARTS LIST At the following link At the following link you will find the exploded drawing you will find the exploded drawing and the spare parts list: and the spare parts list: https://service.innovamaxx.de/ks700_spareparts...
  • Seite 20: Assembly Instructions

    3. ASSEMBLY INSTRUCTIONS Installation of the device: Attach the handlebars to the side of the mainframe so that the front handles face Step 1 away from the mounting plate. Secure the handles with the safety bolts. Be sure to insert the bolts from above so that they can not be pulled out accidentally. Step 2 Use the built-in pull-up bar with mounting plate to mark the mounting holes for dril- ling through the actual holes in the mounting plate.
  • Seite 21 Step 3 After the mounting plate has been firmly attached, place the chin-up bar on the mounting screws and gently push the chin-up bar down. Tighten the fastening screws very firmly! Step 4 You can also undo the pull-up bar and hang it up the other way around. Always en- sure that you insert the safety pins from above so that they do not fall out and so you avoid an insufficiently secure handlebar...
  • Seite 22: Mounting On The Wall

    Mounting on the wall: Please follow these instructions carefully, and in about 10 minutes, your pull bar is assembled and ready for assembly. Prior to installation, please check of which material your desired installation location is made and whether it is resilient. Older buildings are almost always made of brickwork, so the installation of a pull-up bar on the wall is quite possible.
  • Seite 23 Mounting on the wall: The pull bar is attached to the wall at the brackets provided for this purpose. Attention! An incorrectly loaded heavy load anchor can only be ext- racted with great effort. Step 1 For a drilling of the two main frames, two markings on the wall are now marked with the help of the water scale.
  • Seite 24 Mounting on a tree Lay the protective mat around the tree to protect it. Protection mat Insert the strap, at the elongated opening, from behind through the mounting plate and guide the strap back out at the opposite opening. Pull the strap through so it fully encloses the tree and tighten the strap.
  • Seite 25: Exercise Suggestions

    4. EXERCISE SUGGESTIONS Apart from the typical pull-up, with this pull-up bar by Sportstech you can also do the following types of exercises. Stretching exercises Stretch your body sufficiently before and after the exercises to prevent cramps or injuries. 1. Knee and Hip Stretching Hold the pull-up bar with your hands in opposite directions, one hand towards your body, the other hand pointing to your back.
  • Seite 27 Estimado cliente, Nos complace que haya elegido un dispositivo de la línea de productos SPORTSTECH. Con el equipo deportivo de SPORTSTECH usted obtiene la más alta calidad y la mejor tecnología. Con el fin de usar todo el potencial de su dispositivo y para que pueda disfrutarlo durante muchos años, por favor lea este manual cuidadosamente antes de comenzar a ejercitarse, y use el dispositivo...
  • Seite 28 Montaje, Utilizar, Desmontaje. 1. Escanear el código QR 2. Ver vídeos 3. Comienza rápido y seguro Enlace a los videos: https://service.innovamaxx.de/ks700_video ¡También estamos en redes sociales! Obtenga la última información sobre nuestros productos, entrenamientos y mucho más aquí: Instagram Facebook https://www.instagram.com/sportstech.de https://www.facebook.com/sportstech.de...
  • Seite 29 CONTENIDO INHALT 1. INSTRUCCIONES DE SEGURIDAD IMPORTANTES ............29 2. DIBUJO DE EXPLSOIÓN/LISTA DE REPUESTOS ............30 3. INSTRUCCIONES DE ENSAMBLAJE ................31 4. SUGERENCIAS DE EJERCICIOS ................36...
  • Seite 30: Instrucciones De Seguridad Importantes

    GUARDE ESTE MANUAL EN UN LUGAR SEGURO PARA REFERENCIA. • Es importante leer la totalidad de este manual antes de ensamblar y usar la KS700. Solo se podrá conseguir un uso efectivo y seguro si la KS700 se ensambla, se mantiene y se usa adecuada- mente.
  • Seite 31: Dibujo De Explsoión/Lista De Repuestos

    2. DIBUJO DE EXPLSOIÓN/LISTA DE REPUESTOS En el siguiente enlace En el siguiente enlace encontrarás el dibujo de explosión encontrarás el dibujo de explosión y la lista de repuestos: y la lista de repuestos: https://service.innovamaxx.de/ks700_spareparts...
  • Seite 32: Instrucciones De Ensamblaje

    3. INSTRUCCIONES DE ENSAMBLAJE Instalación del dispositivo: Fije la empuñadura al lado de la estructura principal con las asas delanteras hacia Paso 1 el lado opuesto de la placa de soporte. Asegure la empuñadura con los pernos de bloqueo Tenga cuidado de insertar los pernos desde arriba para que no se puedan salir con facilidad sin querer.
  • Seite 33 Paso 3 Una vez fijada la placa de soporte, coloque la barra de dominadas sobre los tornillos de fijación y tire ligeramente de ella hacia abajo. ¡Apriete bien los tornillos de fijación! Paso 4 También puede volver a soltar la barra de dominadas y colgarla al revés. Inserte siempre los pernos de seguridad desde arriba para evitar que se caigan y que las empuñaduras se desajusten.
  • Seite 34: Montaje Sobre La Pared

    Montaje sobre la pared: Siga estas instrucciones cuidadosamente y en unos 10 minutos, la barra de do- minadas está montado y listo para su instalación. Antes de la instalación, por favor revise de qué material está hecho su lugar deseado de instalación y si es resistente. Los edificios más antiguos casi siempre están hechos de ladrillo, así...
  • Seite 35 Montaje sobre la pared: The pull bar is attached to the wall at the brackets provided for this purpose. ¡Precaución! anclajes de servicio incorrectamente plegado-pesados sólo puedan retirarse a un gran costo. Paso 1 Para un diámetro interior del bastidor principal ahora dos primeras marcas pueden marcar en la pared con la ayuda de un nivel de burbuja.
  • Seite 36 Montaje en un árbol Coloque la esterilla protectora alrededor del árbol para protegerlo. Esterilla protectora Inserte la correa de amarre a través de la placa de montaje desde atrás, en la abertura larga, y guíe la correa hacia atrás de nuevo por la abertura opuesta. Tire de la correa hasta que rodee firmemente el árbol y apriétela.
  • Seite 37: Sugerencias De Ejercicios

    4. SUGERENCIAS DE EJERCICIOS Además de los ejercicios típicos, con esta barra para dominadas de Sportstech también puede hacer los siguientes tipos de ejercicios. Ejercicios de estiramiento Estire su cuerpo suficientemente antes y después de ejercitarse para prevenir calambres o lesiones.
  • Seite 39 FRANÇAIS Cher client, Nous sommes ravis que vous ayez choisi un appareil de la gamme de produits SPORTSTECH. Avec les équipements sportifs de SPORTSTECH, vous obtenez la plus haute qualité et la meilleure technologie. Afin d'utiliser pleinement le potentiel de votre appareil et de pouvoir l'apprécier pendant de nombreuses années, lisez attentivement ce manuel avant l'utilisation et le début de votre entraînement et utilisez...
  • Seite 40 3. Démarrez rapidement et en toute sécurité Lien vers les vidéos: https://service.innovamaxx.de/ks700_video Vous pouvez aussi nous trouver sur les réseaux sociaux! Retrouve les dernières informations sur les produits, le contenu des entraînements et bien plus encore sur notre: la page Instagram la page Facebook https://www.instagram.com/sportstech.de https://www.facebook.com/sportstech.de...
  • Seite 41 TABLE DES MATIÈRES INHALT 1. INFORMACIÓN DE SEGURIDAD IMPORTANTE ............40 2. DESSIN ÉCLATÉ/LISTE DES PIÈCES DE RECHANGE ........... 41 3. INSTRUCTIONS D‘ASSEMBLAGE ................42 4. SUGGESTIONS D‘EXERCICE ..................47...
  • Seite 42: Instructions Importantes De Sécurité

    • Assurez-vous que votre équipement est fermement et solidement fixé au mur avec les ancrages lourds fournis avant de l‘utiliser. • El nivel de seguridad de la KS700 solo puede mantenerse si se examina de manera regular en busca de daños o de desgaste.
  • Seite 43: Dessin Éclaté/Liste Des Pièces De Rechange

    2. DESSIN ÉCLATÉ/LISTE DES PIÈCES DE RECHANGE A l‘adresse suivante A l‘adresse suivante vous trouverez le dessin éclaté vous trouverez le dessin éclaté et la liste des pièces de rechange : et la liste des pièces de rechange : https://service.innovamaxx.de/ks700_spareparts https://service.innovamaxx.de/ks700_spareparts...
  • Seite 44: Instructions D'assemblage

    3. INSTRUCTIONS D‘ASSEMBLAGE Installation de l‘appareil: Étape 1 Fixez les barres des poignées sur le côté du cadre principal de façon à ce que les poignées avant soient dirigées vers l‘extérieur de la plaque de fixation. Bloquez les poignées avec les goujons de sécurité. Veillez à ce que les goujons soient insérés par le haut de manière à...
  • Seite 45 Après avoir bien attaché la plaque de fixation, placez la barre de traction sur les vis Étape 3 de fixation et poussez légèrement la barre de traction vers le bas. Serrez bien les vis de fixation ! Étape 4 Vous pouvez aussi enlever à nouveau la barre de traction pour l‘accrocher ailleurs. Insérez toujours les goujons de sécurité...
  • Seite 46: Montage Sur Le Mur

    Montage sur le mur: Suivez attentivement ces instructions et en 10 minutes, la barre de chin-up est as- semblé et prêt à être installé. Avant l‘installation, veuillez vérifiez de quel matériel, l‘installation de votre lieu désirée a été faite et si elle est résiliente. Les anciens bâtiments sont presque toujours construits en briques, l‘installation d‘une barre de trac- tion sur le mur est donc tout à...
  • Seite 47 Montage sur le mur: La barre de tirage vers le haut est fixé à la paroi au niveau des supports appro- priés. Attention! Repliée de manière incorrecte lourdes ancres de service peuvent être retirés qu‘à grands frais. Étape 1 Pour un alésage du châssis principal maintenant deux premières marques marquées sur le mur à...
  • Seite 48 Installation dans un arbre Placez le tapis de protection autour de l‘arbre pour le protéger. Tapis de protection Insérez la sangle dans l‘ouverture longue, par derrière à travers la plaque de montage et guidez la sangle vers l‘ouverture opposée en la faisant à nouveau ressortir à l‘arrière. Tirez la sangle jusqu‘à ce que vous entouriez l‘arbre et resserrez la sangle fermement.
  • Seite 49 4. SUGGESTIONS D‘EXERCICE Mise à part la traction typique, avec cette barre de traction de Sport- stech, vous pouvez également effectuer les exercices suivants. Exercices d‘étirement Étirez votre corps suffisamment avant et après les exercices pour éviter les crampes ou les blessures.
  • Seite 51 ITALIANO Gentile cliente Siamo lieti che abbiate scelto un dispositivo della gamma SPORTSTECH. Con le attrezzature sportive di SPORSTECH potrete usufruire della più alta qualità e della più recente tecnologia. Per sfruttare a pieno il potenziale del dispositivo e poterlo utilizzare per molti anni, raccomandiamo di leggere attentamente questo manuale prima di iniziare l’allenamento e di utilizzare il dispositivo...
  • Seite 52 2. Guarda il video 3. Inizia ad allenarti veloce e sicuro Link per il Video: https://service.innovamaxx.de/ks700_video Ci siamo anche sui social! Scopri le ultime novità sui prodotti, contenuti per l'allenamento e molto altro ancora sul nostro: pagina Instagram pagina Facebook https://www.instagram.com/sportstech.de https://www.facebook.com/sportstech.de...
  • Seite 53 INDICE INHALT 1. INFORMAZIONI IMPORTANTI SULLA SICUREZZA ............52 2. DISEGNO ESPLOSO/LISTA DEI PEZZI DI RICAMBIO ............ 53 3. ISTRUZIONI DI ASSEMBLAGGIO ................54 4. SUGGERIMENTI DI ESERCIZI ................59...
  • Seite 54: Informazioni Importanti Sulla Sicurezza

    CONSERVARE QUESTO MANUALE IN UN POSTO SICURO PER ULTERIORE RIFERIMENTO. • È importante leggere l‘intero manuale prima di assemblare e utilizzare la KS700. Un uso sicuro ed efficiente può essere raggiunto solo se la KS700 è assemblata, mantenuta e utilizzata corret- tamente.
  • Seite 55: Disegno Esploso/Lista Dei Pezzi Di Ricambio

    2. DISEGNO ESPLOSO/LISTA DEI PEZZI DI RICAMBIO Al seguente link Al seguente link troverete il disegno esploso troverete il disegno esploso e la lista dei pezzi di ricambio: e la lista dei pezzi di ricambio: https://service.innovamaxx.de/ks700_spareparts...
  • Seite 56: Istruzioni Di Assemblaggio

    3. ISTRUZIONI DI ASSEMBLAGGIO Installazione del dispositivo: Fase 1 Fissare la sbarra sul lato del telaio principale in modo che le prese anteriori siano lontane dalla piastra di montaggio. Fissare le maniglie con i bulloni di sicurezza. Assicurati di inserire i bulloni dall‘alto in modo che non possano essere estratti acci- dentalmente e sfilati dal basso.
  • Seite 57 Fase 3 Dopo aver fissato la piastra di fissaggio, posizionare la barra sulle viti di montaggio e spingerla delicatamente verso il basso. Infine stringere bene le viti! Fase 4 Puoi anche appendere la barra in altre posizioni. Inserire i perni di sicurezza sempre dall‘alto verso il basso, per evitare la caduta della barra.
  • Seite 58: Montaggio Sulla Parete

    Montaggio sulla parete: Seguire attentamente e in circa 10 minuti queste istruzioni, il mento-up bar è assem- blato e pronto per l‘installazione. Prima dell‘installazione, verificare il materiale di costruzione e la resistenza del luogo di istallazione desiderato. Gli edifici più vecchi sono quasi sempre fatti di mattoni, quindi è possibile installare una barra per tra- zioni sulla parete.
  • Seite 59 Montaggio sulla parete: La barra di pull-up è attaccato al muro in appositi supporti. Attenzione! ancoranti non correttamente ripiegata pesanti possono essere ritirati solo a grandi spese. Fase 1 Per un foro del telaio principale ora primi due segni marcati sulla parete con l‘ausilio di una livella.
  • Seite 60 Montaggio ad un albero Appoggia il tappetino protettivo attorno all‘albero per proteggerlo. tappetino protettivo Inserire la cintura di serraggio, nell‘apposita apertura, da dietro, e farla passare attraverso la piastra di montaggio. Far passare poi la cinghia nell‘apertura opposta. Tirarla abbastanza da fissarla bene attorno all‘albero e stringere.
  • Seite 61: Suggerimenti Di Esercizi

    4. SUGGERIMENTI DI ESERCIZI Oltre alle classiche trazioni, con questa barra per trazioni realizzata da Sportstech è possibile fare anche i seguenti esercizi. Esercizi di stretching Allunga il tuo corpo prima e dopo gli esercizi per prevenire i crampi o le lesioni.
  • Seite 63 GEBRUIKSAANWIJZING NEDERLANDS Geachte klant, Bedankt voor het kiezen van de premium SUP Board van InnovaMaxx GmbH. Lees de instructies zorgvuldig door en neem de veiligheidsinstructies in acht. De bedrijfsveiligheid en de werking van het apparaat kunnen alleen worden gegarandeerd als zowel de algemene veiligheids- en ongevallenpreventievoorschriften van de wetgeving en de veiligheidsinstruc- ties in deze gebruiksaanwijzing in acht worden genomen.
  • Seite 64 1. Scan de QR-code 2. Bekijk video‘s 3. Begin snel en veilig Link naar de video's: https://service.innovamaxx.de/ks700_video We zijn ook actief op social media! Raadpleeg voor de meest recente productinformatie, trainingen en nog veel meer, onze: Instagram-pagina Facebook-pagina https://www.instagram.com/sportstech.de https://www.facebook.com/sportstech.de...
  • Seite 65 INHOUD INHALT 1. BELANGRIJKE VEILIGHEIDSINSTRUCTIES ..............64 2. EXPLOSIETEKENING/ONDERDELENLIJST ..............65 3. MONTAGE-INSTRUCTIES ..................66 4. TRAININGSVOORSTELLEN ................. 71...
  • Seite 66: Belangrijke Veiligheidsinstructies

    1. BELANGRIJKE VEILIGHEIDSINSTRUCTIES BEWAAR DEZE HANDLEIDING OP EEN VEILIGE PLAATS. • Het is belangrijk om de hele handleiding te lezen voordat je de KS700 installeert en gebruikt. Veilig en efficiënt gebruik kan alleen worden bereikt als de KS700 correct wordt geïnstalleerd, onder- houden en gebruikt.
  • Seite 67: Explosietekening/Onderdelenlijst

    2. EXPLOSIETEKENING/ONDERDELENLIJST Onder de volgende link Onder de volgende link vind je de explosietekening vind je de explosietekening en de reserveonderdelenlijst: en de reserveonderdelenlijst: https://service.innovamaxx.de/ks700_spareparts...
  • Seite 68: Montage-Instructies

    3. MONTAGE-INSTRUCTIES Het apparaat monteren: Stap 1 Bevestig de gripstangen aan de zijkant van het hoofdframe, zodanig dat de voorste grepen van de montageplaat zijn afgewend. Zet de handgrepen vast met de veilig- heidsbouten. Let erop om de bouten langs boven in te steken, zodat ze niet onbe- doeld en gemakkelijk kunnen worden weggenomen.
  • Seite 69 Stap 3 Nadat de montageplaat stevig is bevestigd, plaats je de optrekstang op de bevesti- gingsschroeven en trek je de optrekstang iets naar beneden. Draai de bevestigings- schroeven goed vast! Stap 4 Je kunt de optrekstang ook weer losmaken en andersom ophangen. Steek de veilig- heidsbouten altijd van boven naar beneden.
  • Seite 70: Bevestiging Aan De Muur

    Bevestiging aan de muur: Volg deze instructies zorgvuldig op en na ongeveer 10 minuten is je optrekstang klaar voor gebruik. Controleer voor installatie uit welk materiaal de gewenste instal- latielocatie bestaat en of deze stabiel is. Oudere woningen zijn bijna altijd gemaakt uit metselwerk, dus het is heel goed mogelijk om een optrekstang aan de muur te bevestigen.
  • Seite 71 Bevestiging aan de muur: De optrekstang wordt met de meegele- verde beugels aan de muur bevestigd. Let op! Een verkeerd ingestoken zwaar anker kan alleen met veel mo- eite terug uit de muur worden getrokken. Stap 1 Voor de boorgaten van de twee hoofdframes worden eerst twee markeringen op de muur gemarkeerd met behulp van een waterpas.
  • Seite 72 Bevestiging aan een boom Maak de beschermmat rond de boom om hem te beschermen. Beschermmat Steek de opspanriem van achter naar voren door de langwerpige opening van de montageplaat en leid de riem terug naar de tegenovergestelde opening. Trek de riem voldoende door om de boom te omsluiten en trek de riem aan.
  • Seite 73: Trainingsvoorstellen

    4. TRAININGSVOORSTELLEN Naast de typische optrekoefeningen zijn de volgende oefeningen ook mogelijk met de optrekstang van Sportstech. Rekoefeningen Strek je lichaam voldoende uit voor en na de oefeningen om krampen of letsel te voorkomen. 1. Uitrekken van knieën en heupen Houd de optrekstang met beide handen in tegengestelde rich- ting: een hand wijst naar je toe en de andere naar achter.
  • Seite 74 Verkauf durch / Distributed by / Distribuido por / Distribué / Distribuito da / Verkoop via InnovaMaxx GmbH Potsdamer Platz 11 10785 Berlin +49 30 220 663 520 service@innovamaxx.de www.sportstech.de...

Inhaltsverzeichnis