Herunterladen Inhalt Inhalt Diese Seite drucken
Inhaltsverzeichnis

Werbung

Verfügbare Sprachen
  • DE

Verfügbare Sprachen

  • DEUTSCH, seite 49
IDROPULITRICI ELETTRICHE
ELECTRIC HIGH-PRESSURE WATER CLEANERS
NETTOYEURS HAUTE PRESSION ELECTRIQUES
ELEKTRISCHE WASSER-HOCHDRUCKREINIGER
HIDROLAVADORA ELÉCTRICAS
HIDROLIMPADORAS ELÉCTRICAS
  
(I) MANUALE DI USO E MANUTENZIONE
(GB) USE AND MAINTENANCE MANUAL
(FRA) MANUEL D'UTILISATION ET D'ENTRETIEN
(D) BETRIEBS - UND WARTUNGSANLEITUNG
(E) MANUAL DE USO Y MANTENIMIENTO
(P) MANUAL DE USO E MANUTENÇÃO
(GR)    
ATTENZIONE. Non usare l'apparecchio senza avere letto il foglio di istruzioni.
CAUTION. Do not use the device without the previous reading of the instruction leafl et.
ATTENTION. Ne pas utiliser l'appareil sans avoir lu la notice d'utilisation.
ACHTUNG. Das Gerät nicht benutzen, ohne die vorliegende Gebrauchsanweisung gelesen zu haben.
CUIDADO. No utilicen el aparato sin haber previamente leído el folleto de instrucciones.
ATENÇÃO. Não usar o aparelho sem antes ter lido a folha de instruções.
.           
KSM

Werbung

Inhaltsverzeichnis
loading

Inhaltszusammenfassung für Comet KSM 1450

  • Seite 1 IDROPULITRICI ELETTRICHE ELECTRIC HIGH-PRESSURE WATER CLEANERS NETTOYEURS HAUTE PRESSION ELECTRIQUES ELEKTRISCHE WASSER-HOCHDRUCKREINIGER HIDROLAVADORA ELÉCTRICAS HIDROLIMPADORAS ELÉCTRICAS    (I) MANUALE DI USO E MANUTENZIONE (GB) USE AND MAINTENANCE MANUAL (FRA) MANUEL D’UTILISATION ET D’ENTRETIEN (D) BETRIEBS - UND WARTUNGSANLEITUNG (E) MANUAL DE USO Y MANTENIMIENTO (P) MANUAL DE USO E MANUTENÇÃO (GR) ...
  • Seite 5 ITALIANO ___________________________________________ 7 ENGLISH___________________________________________ 21 FRANÇAIS _________________________________________ 35 DEUTSCH __________________________________________ 49 ESPAÑOL __________________________________________ 63 PORTUGUÊS _______________________________________ 77  _______________________________________ 91...
  • Seite 7: Inhaltsverzeichnis

    ITALIANO Sommario 1 INFORMAZIONI GENERALI _____________________________________8 1.1 C ...................8 ONDIZIONI DI ARANZIA 1.2 I ................9 NDIRIZZO DEL OSTRUTTORE 1.3 U ....9 TILIZZO E ONSERVAZIONE DEL ANUALE DI SO E ANUTENZIONE 1.4 S .................9 IMBOLOGIA E EFINIZIONI 1.4.1 Simbologia ........................1.4.2 Definizioni........................2 CARATTERISTICHE E DATI TECNICI ___________________________10 2.1 I ..............11...
  • Seite 8: Informazioni Generali

    NFORMAZIONI ENERALI Complimentandoci per la scelta di un nostro prodotto, vorremmo ricordare che esso è stato concepito e costruito prestando la massima attenzione alla sicurezza dell’operatore, all’efficienza del suo lavoro ed alla protezione dell’ambiente. Al fine di preservare queste caratteristiche nel tempo, raccomandiamo la lettura attenta di questo manuale ed invitiamo ad attenersi scrupolosamente a quanto in esso contenuto.
  • Seite 9: Ndirizzo Del Ostruttore

    Il Costruttore si riserva la facoltà di apportare, in qualsiasi momento, tutte le modifiche ritenute necessarie per migliorare il prodotto, senza rendersi obbligato ad applicare tali modifiche sugli apparecchi prodotti in precedenza, consegnati od in corso di consegna. Quanto espresso nel presente paragrafo esclude ogni condizione preesistente, espressa od implicita.
  • Seite 10: Caratteristiche E Dati Tecnici

    • Easy Start: dispositivo che agevola l’avviamento dell’idropulitrice abbassando la pressione nei primi istanti di funzionamento. ARATTERISTICHE E ECNICI KSM 1450 KSM 1480 Classic Extra Classic Extra COLLEGAMENTO ELETTRICO Rete di alimentazione 230 V 230 V 1~50 Hz 1~50 Hz...
  • Seite 11: Dentificazione Dei Omponenti

    2.1 I DENTIFICAZIONE DEI OMPONENTI Si faccia anche riferimento alle figure 1 e 2, collocate all’inizio del manuale di uso e manutenzione 1 Raccordo rapido ingresso acqua 15 Targhetta “Potenza sonora garantita” 2 Interruttore generale 16 Idropistola 3 Leva avvolgitubo (solo EXTRA) 17 Tubo lancia 4 Avvolgitubo (solo EXTRA) Testina portaugello...
  • Seite 12: Arghetta Di Identificazione Earghette Di Avvertenza

    2.3 D ’U ESTINAZIONE D fi« ATTENZIONE • L’idropulitrice è esclusivamente destinata ai seguenti usi: - lavaggio di veicoli, macchinari, edifici, utensili, ecc. con acqua fredda, eventualmente addizionata di detergenti previsti dal Costruttore; - distribuzione di detergente previsti dal Costruttore; - disincrostazione e disotturazione di tubazioni, tramite appositi accessori previsti dal Costruttore;...
  • Seite 13: Dotazione Standard

    • Se durante l’uso la targhetta di identificazione o le targhette di avvertenza dovessero deteriorarsi, rivolgersi al rivenditore o ad un centro di assistenza autorizzato per il loro ripristino. 3.2 D OTAZIONE TANDARD Accertarsi che nella confezione del prodotto che è stato acquistato siano contenuti i seguenti elementi: •...
  • Seite 14: Erifiche Ed Allacciamento Alla Linea Elettrica

    c) Montare il tubo (5) tra avvolgitubo e idropulitrice, serrando a fondo i due raccordi ad attacco rapido. Operazione D di Fig. 3. Srotolare la quantità di tubo (7) necessaria ruotando l’avvolgitubo attraverso la leva (3) (solo EXTRA). d) Srotolare il tubo alta pressione (24), inserire il raccordo ad attacco rapido al raccordo di uscita acqua (6), avvitare e serrare (solo CLASSIC).
  • Seite 15: Funzionamento

    UNZIONAMENTO fi« ATTENZIONE • L’utilizzo dell’idropulitrice richiede attenzione e prudenza. Non affidare ad altri l’idropulitrice senza esserci accertati, sotto la propria diretta responsabilità, che l’utente occasionale abbia letto attentamente questo manuale e conosca l’uso dell’idropulitrice. Le idropulitrice non devono essere usate da bambini o da personale non addestrato. •...
  • Seite 16: Unzionamento Standard Ad Alta Pressione

    premere la leva (28) dell’idropistola per scaricare la eventuale pressione residua e portare in posizione di blocco il fermo di sicurezza (29) (Fig. 2 - Posizione S): - prima di lasciare senza sorveglianza, anche se per breve tempo, l’idropulitrice; - dopo l’uso, aspettare, inoltre, che idropulitrice si sia anche completamente raffreddata prima di ogni pulizia o manutenzione.
  • Seite 17: Nterruzione Del Unzionamento Total Stop

    • In caso di ingestione, non indurre il vomito e rivolgersi subito ad un medico portando con sé la confezione di detergente. I detergenti raccomandati, sono biodegradabili oltre il 90 %. Per le modalità di impiego del detergente, fare riferimento a quanto riportato in tabella e sull’etichetta della confezione di detergente.
  • Seite 18: Messa A Riposo

    6.2 M ESSA A IPOSO • Riavvolgere il tubo alta pressione (7) o (24) con cura, evitando piegature. • Riavvolgere con cura il cavo di alimentazione (14) sfruttando l’avvolgicavo (11). • Riporre con cure l’idropulitrice in un luogo asciutto e pulito, facendo attenzione a non danneggiare il cavo di alimentazione ed il tubo alta pressione.
  • Seite 19: Manutenzione Straordinaria

    7.2 M ANUTENZIONE TRAORDINARIA fi« ATTENZIONE • Gli interventi di manutenzione straordinaria debbono essere eseguiti solamente da un Tecnico Specializzato. Per la manutenzione straordinaria attenersi a quanto riportato nella tabella seguente. INTERVALLO DI MANUTENZIONE INTERVENTO Ogni 50ore Controllo circuito idraulico pompa. Controllo fissaggio pompa.
  • Seite 20: Inconvenienti, Cause E Rimedi

    NCONVENIENTI AUSE E IMEDI fi« ATTENZIONE • Prima di effettuare ogni intervento eseguire le operazioni descritte nel paragrafo “Arresto”. Qualora non si riesca a ripristinare il corretto funzionamento dell’idropulitrice con l’ausilio delle informazioni contenute nella tabella seguente, rivolgersi ad un Tecnico Specializzato. INCONVENIENTI CAUSE RIMEDI...
  • Seite 21 ENGLISH Summary 1 GENERAL INFORMATION______________________________________22 1.1 T ................22 ERMS OF THE UARANTEE 1.2 A ..............23 DDRESS OF THE ANUFACTURER 1.3 U ..23 SE AND ONSERVATION OF THESE PERATING AND AINTENANCE MANUAL 1.4 S ..................23 YMBOLS AND ERMS 1.4.1 Symbols ......................1.4.2 Terms ........................
  • Seite 22: General Information

    ENERAL NFORMATION Congratulations for choosing one of our products. We would like to remind you that we took the safety of the operator, the efficiency of its use and the protection of the environment into great consideration when designing and manufacturing this product. In order to preserve its features over time, please read and follow these instructions carefully.
  • Seite 23: Address Of The Manufacturer

    The Manufacturer reserves the right to make any modification at any time which it deems necessary to improve the product and is not liable to make these modifications to previously manufactured products, be they delivered or under delivery. The conditions in this section exclude any previous explicit or implicit condition. 1.2 A DDRESS OF THE ANUFACTURER...
  • Seite 24: Features And Technical Specifications

    EATURES AND ECHNICAL PECIFICATIONS KSM 1450 KSM 1480 Classic Extra Classic Extra ELECTRICAL CONNECTION Mains power supply 230 V 230 V 1~50 Hz 1~50 Hz Absorbed power 2,3 kW 2,3 kW Fuse 16 A 16 A HYDRAULIC CONNECTION Maximum inlet water temperature 50 °C...
  • Seite 25: Dentification Of Omponents

    2.1 I DENTIFICATION OF OMPONENTS Please also refer to figures 1 to 2, which are located at the start of these operating and maintenance instructions. Water gun 1 Water inlet fast connector 17 Lance hose 2 Main switch 18 Nozzle-holding head 3 Hose reel lever (only EXTRA) 19 Nozzle cleaning hole 4 Hose reel (only EXTRA)
  • Seite 26: Dentification Label And Warning Llabels

    2.3 I NTENDED fi« CAUTION • This water cleaner is to be used exclusively for: - cleaning vehicles, machinery, buildings, tools etc with cold water, possibly with the addition of detergents as per the Manufacturer’s instructions; - distributing detergents as per the Manufacturer’s instructions; - removing lime scale and unblocking pipe work using the appropriate tools as per the Manufacturer’s instructions;...
  • Seite 27: Standard Accessories

    fi« CAUTION • After removing the appliance from the packing materials, check that the identification label and the warning labels are present and are legible. If this is not the case, contact your dealer or an authorised service centre so they can be replaced. •...
  • Seite 28: Ains Water Supply

    c) Mount the hose (5) between the hose reel and the water cleaner, by tightening the two fast coupling connectors (operation D - Fig. 3); unroll the hose quantity (7) that is necessary by rotating the hose reel by means of the lever (3) (only EXTRA). d) Unroll the high-pressure hose (24), connect the fast coupling connector to the water outlet connector (6), screw and tighten (only CLASSIC) (operation C - Fig.
  • Seite 29: Operation

    PERATION fi« CAUTION • The high pressure cleaner must be used with care and attention. It is your responsibility to make sure that any infrequent users have read these instructions and are acquainted with the operation of the water cleaner; otherwise do not allow others to use the high pressure cleaner. Water cleaners must not be used by children or by unauthorised personnel.
  • Seite 30: Tandard Operation High Pressure

    - before leaving the high power cleaner unattended, even for only a short time; - after use; In addition, wait until the high pressure cleaner has completely cooled down before cleaning or maintenance. • During use, do not lock the lever (28) on the cleaner gun in the open position. •...
  • Seite 31: Witching Off

    The recommended detergents, are over 90% biodegradable. For information on how to use the detergents, refer to the instructions in the table below and on the label on the container of detergent. • Fill the bottle (23) with the desired detergent •...
  • Seite 32: Torage

    6.2 S TORAGE • Wind up the high-pressure pipe (7) or (24) carefully and avoid bending it. • Wind up the electric power supply cable (14) and hook it to its support (11). • Put the water cleaner in a clean and dry place making sure that the electric power supply cable and the high-pressure pipe are not damaged.
  • Seite 33: Pecial Aintenance

    7.2 S PECIAL AINTENANCE fi« CAUTION • Only Skilled Technicians are authorised to carry out special maintenance. Follow the instructions in the table below for special maintenance. INTERVAL FOR MAINTENANCE ACTION Every 50 hours Check the pump hydraulic circuit. Check the pump fixing. Every 100 hours Replace the pump oil.
  • Seite 34: Problems, Causes And Solutions

    ROBLEMS AUSES OLUTIONS fi« CAUTION • Before undertaking any action, follow the instructions in the “Switching off” section. If it is not possible to restore correct operation of the high pressure cleaner using the information in the table below, contact a Skilled Technician. FAILURES CAUSES SOLUTIONS...
  • Seite 35 FRANÇAIS Sommaire 1 INFORMATIONS GENERALES __________________________________36 1.1 C ................36 ONDITIONS DE ARANTIE 1.2 A ...................37 DRESSE DU ABRICANT 1.3 U ’U ’E ..37 TILISATION ET ONSERVATION DU ANUEL D TILISATION ET D NTRETIEN 1.4 S ................37 YMBOLES ET EFINITIONS 1.4.1 Symboles ........................1.4.2 Définitions.........................
  • Seite 36: Informations Generales

    NFORMATIONS ENERALES Vous félicitant pour avoir choisi l’un de nos produits, nous rappelons qu’il a été conçu et fabriqué en prêtant la plus grande attention à la sécurité de l’utilisateur, au rendement de son travail et à la protection de l’environnement. Afin de préserver longtemps ces caractéristiques, nous vous prions de lire attentivement ce manuel et d’en respecter scrupuleusement le contenu.
  • Seite 37: Utilisation Et Conservation Du Manuel Dutilisation Et Dntretien

    Toute modification du nettoyeur haute pression, en particulier des dispositifs de sécurité, fera cesser la garantie et la responsabilité du Fabricant ne pourra être engagée. Le Fabricant se réserve le droit d’apporter, à tout moment, toutes les modifications jugées nécessaires pour améliorer le produit, sans l’obligation d’appliquer ces modifications aux appareils produits antérieurement, livrés ou en cours de livraison.
  • Seite 38: Caracteristiques Et Donnees Techniques

    • Easy Start: dispositif qui facilite la mise en marche du nettoyeur haute pression en abaissant la pression dans les premiers instants de fonctionnement. ARACTERISTIQUES ET ONNEES ECHNIQUES KSM 1450 KSM 1480 Classic Extra Classic Extra BRANCHEMENT ELECTRIQUE Réseau d’alimentation...
  • Seite 39: Dentification Des Lements

    2.1 I DENTIFICATION DES LEMENTS Faire également référence aux figures 1 et 2, en début de manuel. Plaque “Puissance sonore garantie” 1 Raccord rapide entrée de l’eau Pistolet haute pression 2 Interrupteur général 17 Tube lance 3 Levier dévidoir (uniquement EXTRA) 18 Tête porte-buse 4 Dévidoir (uniquement EXTRA) 19 Pointe pour le nettoyage de la buse...
  • Seite 40: Destination D 'Usage

    2.3 D ’U ESTINATION D SAGE fi« ATTENTION • Le nettoyeur haute pression est destiné exclusivement aux usages suivants: - lavage de véhicules, machines, bâtiments, outils, etc. avec de l’eau froide, additionnée éventuellement de détergents indiqués par le Fabricant; - distribution de détergents indiqués par le Fabricant; - désincrustation et désobstruction de tuyauteries, au moyen des accessoires appropriés prévus par le Fabricant;...
  • Seite 41: Equipement Standard

    • Si, pendant l’utilisation, la plaque signalétique ou les plaques d’avertissement devaient se détériorer, s’adresser au revendeur ou à un centre d’assistance agréé pour leur remise en état. 3.2 E QUIPEMENT TANDARD Vérifier que les éléments suivants sont contenus dans l’emballage du produit acheté: •...
  • Seite 42: Ontroles Et Raccordement Hydraulique

    d) Dérouler le tuyau haute pression (24), insérer le raccord à fixation rapide dans le raccord de sortie de l’eau (6), visser et serrer (uniquement CLASSIC). Opération C de la Fig. 3. e) Visser l’extrémité du tuyau haute pression (7) ou (24) (côté sans raccord rapide pour CLASSIC) sur le filet du pistolet haute pression (16) et serrer à...
  • Seite 43: Fonctionnement

    ONCTIONNEMENT fi« ATTENTION • L’utilisation du nettoyeur haute pression requiert attention et prudence. Ne pas confier le nettoyeur haute pression à d’autres personnes sans s’être assuré, sous la propre responsabilité directe, que l’utilisateur occasionnel a lu attentivement ce manuel et qu’il connaît l’utilisation du nettoyeur haute pression.
  • Seite 44: Ctivites Reliminaires

    • Prêter une attention particulière au contenu du paragraphe “Fonctionnement avec détergent”. • Lorsqu’il n’est pas en fonctionnement, ne pas laisser le nettoyeur haute pression avec la fiche insérée dans la prise de courant et, en tout cas, la débrancher avant toute intervention. Plus spécifiquement, mettre toujours l’interrupteur général (2) en position “0”, débrancher la fiche de la prise de courant, appuyer sur la gâchette (28) du pistolet haute pression pour décharger toute pression résiduelle et mettre en position de blocage la sûreté...
  • Seite 45: Onctionnement Avec Etergent

    5.3 F ONCTIONNEMENT AVEC ETERGENT fi« ATTENTION • Le nettoyeur haute pression a été conçu pour être utilisé avec les détergents recommandés par le Fabricant. L’emploi d’autres détergents ou de produits chimiques peut influencer négativement la sécurité du nettoyeur haute pression. Ne jamais aspirer de liquides contenant solvants, essence, diluants, acétone et fioul, car le produit pulvérisé...
  • Seite 46: Mise Au Repos

    • Mettre l’interrupteur général (2) en position “0”. • Débrancher la fiche d’alimentation de la prise de courant. • Eliminer toute pression résiduelle présente dans le tuyau haute pression (7) ou (24) en maintenant appuyée pendant quelques secondes la gâchette (28) du pistolet haute pression. •...
  • Seite 47: Ntretien Rdinaire

    7.1 E NTRETIEN RDINAIRE Exécuter les opérations décrites au paragraphe “Arrêt” et suivre les indications contenues dans le tableau suivant. INTERVALLE D’ENTRETIEN INTERVENTION A chaque utilisation • Contrôle du câble d’alimentation, tuyau haute pression, raccords, pistolet haute pression, tube lance Si une ou plusieurs pièces sont endommagées, ne pas utiliser le nettoyeur haute pression et s’adresser à...
  • Seite 48: Problemes, Causes Et Solutions

    ROBLEMES AUSES ET OLUTIONS fi« ATTENTION • Avant d’effectuer toute intervention, exécuter les opérations décrites au paragraphe “Arrêt”. S’il est impossible de rétablir le fonctionnement correct du nettoyeur haute pression à l’aide des informations contenues dans le tableau suivant, s’adresser à un Technicien Spécialisé. PROBLEMES CAUSES SOLUTIONS...
  • Seite 49 DEUTSCH Inhaltsverzeichnis 1 ALLGEMEINE HINWEISE ______________________________________50 1.1 G ...................50 ARANTIEBEDINGUNGEN 1.2 H ..................51 ERSTELLERANSCHRIFT 1.3 V ERWENDUNG UND UFBEWAHRUNG DER EDIENUNGS ................51 ARTUNGSANWEISUNG 1.4 S ................51 YMBOLIK UND EFINITION 1.4.1 Symbolik ......................1.4.2 Definitionen....................... 2 TECHNISCHE EIGENSCHAFTEN UND TECHNISCHE DATEN______52 2.1 K ..............53 ENNZEICHNUNG DER...
  • Seite 50: Allgemeine Hinweise

    LLGEMEINE INWEISE Wir beglückwünschen sie zur Wahl eines unserer Produkte und möchten Sie daran erinnern, dass dieses unter größter Aufwendung, bezüglich Sicherheit für den Benutzer, Arbeitseffizienz und Umweltschutz konzipiert und hergestellt worden ist. Um alle diese Eigenschaften für lange Zeit zu bewahren, empfehlen wir das aufmerksame Durchlesen und ein gewissenhaftes Befolgen dieses Handbuchs.
  • Seite 51: Herstelleranschrift

    • Schäden die durch Verwendung von nicht Originalersatzteilen oder durch nicht ausdrücklich vom Hersteller genehmigte Teile, sowie Reparaturen, die nicht von einem spezialisierten Techniker ausgeführt worden sind, entstanden sind; • Schäden hervorgerufen durch eine falsche Stromzufuhr. Jegliche Verletzung am Hochdruckreiniger, insbesondere an den Sicherheitsvorrichtungen, führt zur Ungültigkeit der Garantie und enthebt den Hersteller von jeglicher Haftung.
  • Seite 52: Technische Eigenschaften Und Technische Daten

    • Total-Stop: Vorrichtung welche die Funktion des Hochdruckreiniger, bei jedem Loslassen des Hebels der Spritzpistole, zum Stillstand bringt. • Easy-Start: Vorrichtung welche das Anlassen des Hochdruckreinigers erleichtert und zwar durch Vermindern des Drucks in den ersten Betriebsmomenten. ECHNISCHE IGENSCHAFTEN ECHNISCHE ATEN KSM 1450 KSM 1480 Classic Extra Classic Extra STROMANSCHLUSS Versorgungsnetz...
  • Seite 53: Kennzeichnung Der Bestandteile

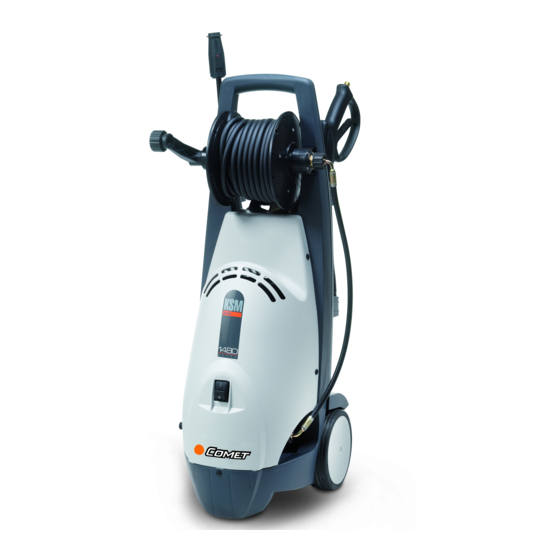
    2.1 K ENNZEICHNUNG ESTANDTEILE Bitte auch die Abbildungen 1 und 2, welche sich am Anfang der Betriebs - und Wartungsanleitung befinden, beachten. 1 Schnellanschluss Wassereingang 16 Spritzpistole 2 Hauptschalter 17 Strahlrohr 3 Hebel Schlauchaufwickler (nur EXTRA) 18 Düsenträgerkopf 4 Schlauchaufwickler (nur EXTRA) 19 Nadel zum Reinigen der Düse 5 Hochdruckschlauch Anschluss 20 Strahlrohr mit rotierender Düse (nur EXTRA)
  • Seite 54: Verwendungszweck

    2.3 V ERWENDUNGSZWECK fi« ACHTUNG! • Der Hochdruckreiniger ist ausschließlich zum Gebrauch von nachfolgend aufgeführten Eingriffen vorgesehen: - Reinigung mit kaltem Wasser von Fahrzeugen, Geräten, Gebäuden, Werkzeugen etc., eventuell mit vom Hersteller vorgesehenen Reinigungsmitteln versetzt; - Verteilung der vom Hersteller vorgesehenen Reinigungsmittel; - Entkalkung und Befreiung von verstopften Rohrleitungen, mittels der extra vom Hersteller vorgesehenen Zubehörteilen;...
  • Seite 55: Standardausstattung

    fi« ACHTUNG • Nach dem Auspacken des Hochdruckreinigers überprüfen, ob das Kennzeichnungsschild und die Hinweisschilder vorhanden und lesbar sind. Im gegenteiligen Fall wenden sie sich, für deren Wiederanbringung an den Vertragshändler oder an eine ermächtige Servicestelle. • Sollten während der Verwendung das Kennzeichnungsschild oder die Warnschilder beschädigt oder unleserlich werden, wenden sie sich bitte, zur Wiederanbringung an den Vertragshändler oder an eine ermächtige Servicestelle.
  • Seite 56: Installation

    NSTALLATION 4.1 M ONTAGE DER UBEHÖRTEILE a) Das Strahlrohr (17) mit der Spritzpistole zusammenstecken (16) und bis zum Anschlag festschrauben. Tätigkeit A auf Abb. 3. b) Die Halterung für die Zubehörteile (8) an der Lenkstange (30) montieren; den Drehgriff und den Hebel (3) auf dem Schlauchaufwickler montieren (4) (nur EXTRA).
  • Seite 57: Betrieb

    • Bei einem zu kurzen Versorgungskabel kann ein Verlängerungskabel verwendet werden. Dabei darauf achten, dass das Kabel nicht länger als 10 m/32,8 ft ist, der Querschnitt der Leiter zumindest 1,5 mm² beträgt und Stecker und Dose wasserdicht sind. Damit alle diese Vorschriften beachtet werden, muss ein qualifizierter Fachelektriker kontaktiert werden.
  • Seite 58: Vorbereitungen

    • Den Wasserstrahl nicht gegen Materialien, die Asbest oder andere für die Gesundheit schädliche Substanzen enthalten, richten. • Den Hochdruckreiniger nicht im Regen benutzen. • Auf die Anweisungen im Abschnitt “Überprüfungen und Anschluss an das Stromnetz” besonders achten. • Auf die Anweisungen im Abschnitt “Betrieb mit Reinigungsmittel” besonders achten. •...
  • Seite 59: Betrieb Mit Reinigungsmittel

    • Man kann den Strahlwinkel regulieren, indem man auf den Kopf (18) einwirkt (Abb. 2 - Positionen a und b). 5.3 B ETRIEB MIT EINIGUNGSMITTEL fi« ACHTUNG • Der Hochdruckreiniger ist entwickelt worden, um mit den vom Hersteller empfohlenen Reinigungsmitteln bedient zu werden. Die Verwendung anderer Reinigungsmittel oder Chemikalien kann die Sicherheit des Hochdruckreinigers beeinträchtigen.
  • Seite 60: Ausschalten

    6.1 A USSCHALTEN • Den Wasserhahn der Wasserversorgung völlig schließen. • Das Wasser aus dem Hochdruckreiniger ganz abfließen lassen. Dazu den Hebel (9) der Spritzpistole für einige Sekunden gedrückt halten. • Den Hauptschalter (2) in die Stellung “0” bringen. • Den Versorgungsstecker aus der Steckdose ziehen. •...
  • Seite 61: Regelmässige Wartung

    7.1 R EGELMÄSSIGE ARTUNG Die im Abschnitt “Ausschalten” beschriebenen Tätigkeiten durchführen und die Anweisungen folgender Tabelle beachten. WARTUNGSINTERVALL WARTUNGSARBEIT Bei jeder Verwendung • Versorgungsleitung, Hochdruckschlauch, Verbindungsstücke, Spritzpistole Strahlerrohr kontrollieren. Sollte(n) ein oder mehrere Teil(e) beschädigt sein, den Hochdruckreiniger keinesfalls benutzen und einen spezialisierten Techniker kontaktieren. Wöchentlich •...
  • Seite 62: Betriebsstörungen, Ursachen Und Abhilfe

    ETRIEBSSTÖRUNGEN RSACHEN UND BHILFE fi« ACHTUNG • Vor jedem Eingrifft die im Abschnitt “Ausschalten” beschriebenen Tätigkeiten ausführen. Sollte es auch anhand der Informationen in folgender Tabelle unmöglich sein, den Hochdruckreiniger wieder korrekt zu betreiben, einen spezialisierten Techniker kontaktieren. BETRIEBSSTÖRUNGEN URSACHEN ABHILFE Wenn man den Schalter (2) auf Eine Sicherheitsvorrichtung der...
  • Seite 63 ESPAÑOL Sumario 1 INFORMACIÓN GENERAL _____________________________________64 1.1 C ................64 ONDICIONES DE ARANTÍA 1.2 D ................65 IRECCIÓN DEL ONSTRUCTOR 1.3 U ....65 TILIZACIÓN Y ONSERVACIÓN DEL ANUAL DE SO Y ANTENIMIENTO 1.4 S ................65 IMBOLOGÍA Y EFINICIONES 1.4.1 Simbología ........................ 1.4.2 Definiciones ......................2 CARACTERÍSTICAS Y DATOS TÉCNICOS _______________________66 2.1 I ...............67...
  • Seite 64: Información General

    NFORMACIÓN ENERAL ¡Felicitaciones! Uds. han elegido una hidrolavadora que ha sido concebida y construida teniendo en máximo cuidado la seguridad del operador, la eficiencia de su trabajo y la protección del medioambiente. Para preservar estas características en el tiempo, Les recomendamos que lean con cuidado este manual y Les invitamos a la estricta observancia de su contenido.
  • Seite 65: Dirección Del Constructor

    Cualquier manumisión a la hidrolavadora, y particularmente a los dispositivos de seguridad, provocará el vencimiento de la garantía y no comportará ninguna responsabilidad del Constructor. El constructor tiene la facultad de efectuar, en cualquier momento, todas las modificaciones necesarias para el amejoramiento del producto, sin la obligación de efectuar estas mismas modificaciones en los aparatos producidos anteriormente, suministrados o en curso de suministro.
  • Seite 66: Características Y Datos Técnicos

    • Easy Start dispositivo che facilita el arranque de la hidrolavadora disminuyendo la presión durante los primeros instantes de funcionamiento. ARACTERÍSTICAS Y ATOS ÉCNICOS KSM 1450 KSM 1480 Classic Extra Classic Extra CONEXIÓN ELÉCTRICA Red de alimentación 230 V 230 V...
  • Seite 67: Dentificación De Los Omponentes

    2.1I DENTIFICACIÓN DE LOS OMPONENTES Refiéranse también a las figuras 1 y 2, al comienzo del manual de uso y mantenimiento. 1 Conexión rápida entrada agua 16 Hidropistola 2 Interruptor general 17 Tubo lanza 3 Palanca enrolla-tubo (sólo EXTRA) 18 Cabeza porta-boquilla 4 Enrolla-tubo (solo EXTRA) Aguja limpia-boquilla 5 Tubo alta presión conexión enrolla-tubo...
  • Seite 68: Destinación De Uso

    2.3 D ESTINACIÓN DE fi« CUIDADO • La hidrolavadora se destina exclusivamente a los usos indicados a continuación: - lavado de vehículos, maquinaria, edificios, herramienta, etc. con agua fría, eventualmente adicionada a detergentes, previstos por el constructor; - distribución de detergentes previstos por el constructor; - eliminación de incrustación y atascamiento de tubería, a través de los accesorios correspondientes, previstos por el Constructor;...
  • Seite 69: Dotación Estándar

    fi« CUIDADO • Tras haber desembalado la hidrolavadora, verifiquen que en ésta se encuentren y sean legibles la tarjeta de identificación y las tarjetas de aviso. En caso contrario contacten con su revendedor o con un centro de asistencia autorizado para su restablecimiento. •...
  • Seite 70: Instalación

    NSTALACIÓN 4.1 M ONTAJE DE LOS CCESORIOS a) Conecten el tubo lanza (17) a la hidropistola (16) y atornillen a fondo. Operación A de Fig. 3. b) Monten el soporte accesorios (8) sobre el manubrio (30); monten el pomo y la palanca (3) sobre el enrolla-tubo (4) (sólo EXTRA).
  • Seite 71: Funcionamiento

    UNCIONAMIENTO fi« CUIDADO • La utilización de la hidrolavadora requiere cuidado y prudencia. No encarguen a otros usuarios ocasionales el trabajo con la hidrolavadora, sin haberse enterado previamente y bajo su propia responsabilidad si éstos han leído con cuidado el presente manual y conocen bien el funcionamiento de la hidrolavadora.
  • Seite 72: Uncionamiento Estándar De Alta Presión

    siempre el interruptor general (2) a la posición “0”, desconecten el enchufe de la toma de corriente, aprieten la palanca (28) de la hidropistola para descargar la eventual presión residual y lleven a la posición de bloqueo el paro de seguridad (29) (Fig. 2 - Posición S): - antes de dejarla sin vigilancia, aún si por un plazo breve;...
  • Seite 73: Nterrupción Del Uncionamiento Total Stop

    • Guarden los detergentes en un lugar seguro e inaccesible para los niños. • En caso de contacto con los ojos laven inmediatamente con agua y diríjanse enseguida a un médico, llevando consigo el envase del detergente. • En caso de ingestión, no provoquen vómito y diríjanse a un médico trayendo consigo el envase del detergente.
  • Seite 74: Uesta Aeposo

    6.2 P UESTA A EPOSO • Vuelvan a enrollar el tubo de alta presión (7) ó (24) sin doblarlo • Vuelvan a enrollar con cuidado el cable de alimentación (14) con la ayuda del enrolla cable (11). • Coloquen la hidrolavadora en un lugar limpio y seco, poniendo cuidado con no dañar el cable de alimentación y el tubo de alta presión.
  • Seite 75: Antenimiento Xtraordinario

    7.2 M ANTENIMIENTO XTRAORDINARIO fi« CUIDADO • Las intervenciones de mantenimiento extraordinario tienen que ser efectuadas sólo por un Técnico Especializado. En caso de mantenimiento extraordinario consulten la tabla a continuación. INTERVENCIÓN DE MANTENIMIENTO INTERVENCIÓN Cada 50 horas Control circuito hidráulico bomba. Control fijación bomba.
  • Seite 76: Inconvenientes, Causas Y Remedios

    NCONVENIENTES AUSAS Y EMEDIOS fi« CUIDADO • Antes de efectuar cualquier intervención, efectúen las operaciones descritas en el párrafo “Parada”. Si no es posible restablecer el correcto funcionamiento de la hidrolavadora con la ayuda de las informaciones contenidas en la tabla siguiente, contacten con un Técnico Especializado. INCONVENIENTES CAUSAS REMEDIOS...
  • Seite 77 PORTUGUÊS Sumário 1 INFORMAÇÕES GERAIS _______________________________________78 1.1 C .................78 ONDIÇÕES DE ARANTIA 1.2 E ................79 NDEREÇO DO ABRICANTE 1.3 U ....79 TILIZAÇÃO E ONSERVAÇÃO DO ANUAL DE SO E ANUTENÇÃO 1.4 S ................79 IMBOLOGIA E EFINIÇÕES 1.4.1 Simbologia ........................ 1.4.2 Definições ......................... 2 CARACTERÍSTICAS E DADOS TÉCNICOS _______________________80 2.1 I ..............81...
  • Seite 78: Informações Gerais

    NFORMAÇÕES ERAIS Cumprimentando-os pela escolha de um nosso produto, desejamos lembrar-lhes que este produto foi projectado e construído prestando a máxima atenção à segurança do operador, à eficiência de seu trabalho e à protecção do ambiente. A fim de preservar estas características no tempo, recomendamos a cuidadosa leitura deste manual e convidamos a seguir escrupulosamente tudo quanto se encontra nele escrito.
  • Seite 79: Ndereço Do Abricante

    Qualquer violação na hidrolimpadora, em especial modo aos dispositivos de segurança, fará decair a garantia e isentará o Fabricante de qualquer responsabilidade. O Fabricante se reserva o direito de executar, em qualquer momento, todas as modificações consideradas necessárias para melhorar o produto, sem ter a obrigação de aplicar tais modificações às aparelhagens anteriormente produzidas, já...
  • Seite 80: Características E Dados Técnicos

    • Total Stop: dispositivo que pára o funcionamento da hidrolimpadora toda vez que a alavanca da hidropistola é solta. • Easy Start: dispositivo que facilita a partida da hidrolimpadora abaixando a pressão nos primeiros instantes de funcionamento. ARACTERÍSTICAS E ADOS ÉCNICOS KSM 1450 KSM 1480 Classic Extra Classic Extra CONEXÃO ELÉCTRICA Rede de alimentação...
  • Seite 81: Dentificação Dos Omponentes

    2.1I DENTIFICAÇÃO DOS OMPONENTES Fazer também referência às figuras 1 e 2, colocadas no início do manual de uso e manutenção. Placa “Potência sonora garantida” 1 Engate rápido entrada água Hidropistola 2 Interruptor geral 17 Tubo lança 3 Alavanca dispositivo enrolamento tubo (somente EXTRA) 18 Cabeça porta bico injector 4 Dispositivo enrolamento tubo...
  • Seite 82: Laca De Identificação Elacas De Advertência

    2.3 D ESTINAÇÃO DE fi« ATENÇÃO • A hidrolimpadora é exclusivamente destinada aos seguintes usos: - lavagem de veículos, maquinarias, edifícios, ferramentas, etc. com água fria, eventualmente adicionada de detergentes previstos pelo Fabricante; - distribuição de detergentes previstos pelo Fabricante; - desincrustação e desobstrução de tubulações, por meio de acessórios especiais previstos pelo Fabricante;...
  • Seite 83: Dotação Padrão

    fi« ATENÇÃO • Após ter desembalado a hidrolimpadora, verificar que a placa de identificação e as placas de advertência estejam presentes e legíveis. Caso contrário dirigir-se ao revendedor ou a um centro assistência autorizado para a sua troca. • Se durante o uso a placa de identificação ou as placas de advertência vierem a se deteriorar, dirigir-se ao revendedor ou a um centro de assistência autorizado para a sua troca.
  • Seite 84: Erificações E Onexão Com A

    c) Montar o tubo (5) entre o dispositivo de enrolamento do tubo e a hidrolimpadora apertando firmemente os dois engates rápidos. Operação D da Fig. 3. Desenrolar a quantidade de tubo (7) necessária girando o dispositivo de enrolamento do tubo por meio da alavanca (3) (somente EXTRA).
  • Seite 85: Funcionamento

    UNCIONAMENTO fi« ATENÇÃO • A utilização da hidrolimpadora requer atenção e prudência. Não confiar a hidrolimpadora a terceiros sem ter a certeza, sobre a própria e directa responsabilidade, que o usuário ocasional tenha lido cuidadosamente este manual e conheça o uso da hidrolimpadora. As hidrolimpadoras não devem ser usadas por crianças ou pessoas não treinadas.
  • Seite 86: Ctividades Reliminares

    • Quando a hidrolimpadora não estiver em função, não deixá-la com a tomada introduzida no ponto de corrente eléctrica e, todavia, desligá-la antes de qualquer intervenção. Mais especificamente sempre posicionar o interruptor geral (2) em posição “0”, tirar a tomada do ponto de corrente, pressionar a alavanca (28) da hidropistola para descarregar a eventual pressão residual e posicionar a trava de segurança (29) na posição de bloqueio (Fig.
  • Seite 87: Nterrupção Do Uncionamento Total Stop

    Em particular, nunca aspirar líquidos que contenham solventes, gasolina, diluentes, acetonas e óleo combustível, já que o produto nebulizado é altamente inflamável, explosivo e tóxico. • Ler cuidadosamente as prescrições e advertências indicadas na etiqueta do detergente utilizado. • Conservar os detergentes em um local seguro e inacessível às crianças. •...
  • Seite 88: Olocação Em Epouso

    fi« ATENÇÃO • Quando a hidrolimpadora estiver esfriando, prestar atenção: - em não deixar a hidrolimpadora sozinha se houver crianças, idosos ou doentes sem vigilância; - em dispor a hidrolimpadora em uma posição estável, sem perigo de quedas; - em não colocar a hidrolimpadora em contacto ou nas imediatas proximidades de materiais inflamáveis.
  • Seite 89: Manutenção Ordinária

    7.1 M ANUTENÇÃO RDINÁRIA Executar as operações descritas no parágrafo “Parada” e seguir quanto indicado na tabela a seguir: INTERVALO DE MANUTENÇÃO INTERVENÇÃO Sempre que for utilizada. • Controlar o cabo de alimentação, o tubo de alta pressão, as junções, a hidropistola, o tubo lança.
  • Seite 90: Inconvenientes, Causas E Soluções

    NCONVENIENTES AUSAS OLUÇÕES fi« ATENÇÃO Antes de efectuar qualquer intervenção executar as operações descritas no parágrafo • “Parada”. Caso não se consiga restabelecer o correcto funcionamento da hidrolimpadora com o auxílio das informações contidas na tabela a seguir, dirigir-se a um Técnico Especializado. INCONVENIENTES CAUSAS SOLUÇÕES...
  • Seite 91     ____________________________________________ 92 1.1   ......................92 1.2    ................93 1.3         ...93 1.4    ....................93 1.4.1  ...........................93 1.4.2  ..........................93     __________________________ 94 2.1 ...
  • Seite 92           ,                     ,          . ...
  • Seite 93 •       .     ,                   .         ,    ...
  • Seite 94 • Easy Start:                  .     KSM 1450 KSM 1480 Classic Extra Classic Extra   230 V 230 V  ...
  • Seite 95 2.1        1  2, ,           16  1     17   2   18      3 ...
  • Seite 96 2.3   fi«  •             : -  , , , , .   ,           , - ...
  • Seite 97 fi«  •                       .                 . •...
  • Seite 98 b)      (8)    (30),       (3)      (4) ( EXTRA). c)    (5)         ,           .  D .
  • Seite 99 5  fi«  •         .             .    ,               ...
  • Seite 100 , ,              . •     ,     (28)      . •           . •...
  • Seite 101       . •    (23)     . •          : -    (22)    (21); -    L   (22)         ...
  • Seite 102     ,          ,  ,     “ ”,               ,      , ...
  • Seite 103 7.2   fi«  •              .            .     50       . ...
  • Seite 104 9 ,    fi«  •             “ ”.                       ,   ...
  • Seite 108 COMET S.p.A. Via G. Dorso n°4 42100 Reggio Emilia ITALY • • • Tel.+39 0522 386111 Fax + 39 0522 386286 • E-Mail: marketing@comet.re.it E-Mail: vendite@comet.re.it • http://www.comet.re.it 1610 0926 09/2006 - Rev.02...

Diese Anleitung auch für:

Ksm 1480Xstar

Inhaltsverzeichnis