Elmo P10 Bedienungsanleitung
Inhaltsverzeichnis
Quicklinks
日本語 P1~66
Español P275~344
Deutsch P205~274 Français P135~204
English P67~134
取扱説明書
ご使用に先だち取扱説明書をよくお読みいただき、
大切に保存してください。
INSTRUCTION MANUAL
Please read this instruction manual carefully before using
this product and keep it for future reference.
MODE D'EMPLOI
Lire attentvement ce mode d'emploi avant de mettre le Présentateur
Visuel en service. Le conserver á titre de référence permanente.
BEDIENUNGSANLEITUNG
Bitte lesen Sie diese Bedienungsanleitung sorgfältig, bevor Sie das
Gerät benutzen. Bewahren Sie die Anleitung als Referenz auf.
MANUAL DE INSTRUCCIONES
Antes de utilizar este producto, lea atentamente este manual de
instrucciones y guárdelo para consultas futuras.
Inhaltsverzeichnis

Verwandte Anleitungen für Elmo P10


Inhaltszusammenfassung für Elmo P10
- Seite 1 日本語 P1~66 Español P275~344 Deutsch P205~274 Français P135~204 English P67~134 取扱説明書 ご使用に先だち取扱説明書をよくお読みいただき、 大切に保存してください。 INSTRUCTION MANUAL Please read this instruction manual carefully before using this product and keep it for future reference. MODE D'EMPLOI Lire attentvement ce mode d'emploi avant de mettre le Présentateur Visuel en service.
- Seite 3 English Document Camera INSTRUCTION MANUAL Please read this instruction manual carefully before using this product and keep it for future reference.
-
Seite 4: Important Safeguards
English IMPORTANT SAFEGUARDS „ Read Instructions All the safety and operating instructions should be read before the appliance is operated. „ Retain Instructions The safety and operating instructions should be retained for future reference. „ Heed Warnings All warnings on the product and in the operating instructions should be adhered „... - Seite 5 English „ Power Sources This product should be operated only from the type of power source indicated on the marking label. If you are not sure of the type of power supply to your home consult your appliance dealer or local power company. For products intended to operate from battery power, or other sources, refer to the operating instructions.
- Seite 6 English „ Servicing Do not attempt to service this product yourself as opening or removing covers may expose you to dangerous voltage or other hazards. Refer all servicing to qualified service personnel. „ Damage Requiring Service Unplug this product from the wall outlet and refer servicing to qualified service personnel under the following conditions: •...
- Seite 7 English CAUTION RISK OF ELECTRIC SHOCK DO NOT OPEN CAUTION: TO REDUCE THE RISK OF ELECTRIC SHOCK, DO NOT REMOVE COVER (OR BACK). NO USER-SERVICEABLE PARTS INSIDE. REFER SERVICING TO QUALIFIED SERVICE PERSONNEL. The lightning flash with arrowhead symbol, within an equilateral triangle, is intended to aler t the user to the presence of uninsulated "dangerous voltage"...
- Seite 8 English WARNING: TO REDUCE THE RISK OF FIRE OR ELECTRIC SHOCK, DO NOT EXPOSE THIS PRODUCT TO RAIN OR MOISTURE. The connection of a non-shielded equipment interface cable to this equipment will invalidate the FCC Certification or Declaration of this device and may cause interference levels which exceed the limits established by the FCC for this equipment.
-
Seite 9: Before You Use
English Before You Use „ Be sure to use the power cord applicable to your local power specifications. If the product was sold in Japan, use the power cord or AC adapter sold with the product with 100 VAC and 50 or 60 Hz. „... - Seite 10 English „ Battery precautions: If this product is not going to be used for a long time, take the batteries out of the remote control. Do not use rechargeable batteries (e.g. Hi-MH (nickel-metal hybrid batteries)). Do not use new and old batteries or batteries of different types together. Do not try to recharge or short-circuit the batteries.
-
Seite 11: Inhaltsverzeichnis
English CONTENTS IMPORTANT SAFEGUARDS ..............68 Before You Use .................... 73 CONTENTS .................... 75 1. PART NAMES AND FUNCTIONS ............77 Part Names ....................77 Appearance ..................... 77 List of Functions ................... 78 Front operating panel ................78 Rear panel ....................80 Side panel .................... - Seite 12 English Save/call Settings ..................121 How to save settings ................121 How to call settings ................122 Highlight Function ..................123 Mask Function ................... 125 Scroll Function ................... 126 PIP (Picture in Picture) Function ..............127 Using a Desktop Recorder (Optional) ............128 6.
-
Seite 13: Part Names And Functions
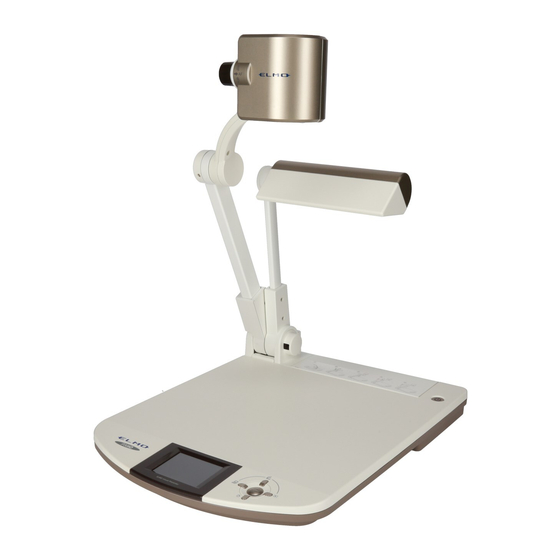
English PART NAMES AND FUNCTIONS Part Names „ Appearance Front Rear/Side (10) (12) (11) Front Rear/Side Number Name Number Name Camera head Side panel P.81 Lamp head Rear panel P.80 (10) Cord cover Lamp column (11) Camera column Remote control P.82 Infrared receiver (12) -
Seite 14: List Of Functions
English List of Functions „ Front operating panel (1)(3) (2)(4)(15) (3)(8) (3)(9) (3)(10) (11)(13) (∗) (12)(14) (16) * From here on, menu items displayed/selected on the monitor or the projection screen are referred to as “OSD (On-Screen Display).” Name Function Flashes blue when the power is turned on. - Seite 15 English Name Function To switch illumination ON/OFF. (Lamp) (7) ZOOM Turn the dial to operate Zoom. P.113 (8) Image select To switch the output image to the image input to RGB IN. The LED is lit when RGB IN image is selected as the out- (PC) put image.
-
Seite 16: Rear Panel
English „ Rear panel Images you can change to with Name Function the Image select button (1) DVI OUT To output digital video signal to a Camera image (DVI Output Terminal) projector, a PC monitor, or other DVI SD Mode input device. -
Seite 17: Side Panel
English „ Side panel Name Function (1) USB By connecting to a PC, you can transfer data stored on (2.0 Compliant) an SD card to your PC, or transfer images and control the main unit using the software contained in the supplied Im- age Mate CD-ROM. -
Seite 18: Remote Control
English „ Remote control (18) (17) (14)(15)(16) (13) (12) (11) (10) N o t e • When setting the batteries, remove the battery case cover by pushing the [ ] mark in the arrow direction on the back side of the remote control, and set 2 AAA batteries in the case. -
Seite 19: List Of Functions
English „ List of functions Name Function (POWER ON/OFF To turn the power ON/OFF. Only operates when the standby status) main power switch is ON. (2) SD mode/ To move forward/backward through the images saved highlight/ in SD mode. mask/scroll Moves the highlight section in highlight mode, moves operations the mask section in mask mode, and moves the dis-... - Seite 20 English Name Function (14) AF To perform One-shot Auto Focus. (Auto Focus) P.114 (15) SD mode Change between SD image single display and 4x4 operations display.*3 (16) Recorder mode To decide the OSD cursor for the recorder. operations (17) BRIGHTNESS To darken the camera image.
- Seite 21 English Remote Control Reception Point the transmission unit of the remote control at the sensor unit located on the front of the camera main unit, press the operation button for the intended operation, and operate the camera main unit accordingly. Receivable Range Distance: Within approx.
-
Seite 22: Osd (On-Screen Display)
English OSD (On-Screen Display) OSD is used to display characters such as text and icons on a monitor or projection screen. It displays this device’s menu screens for various operations and settings. In this manual, this is referred to as the OSD menu. OSD Basic Operations The following procedure shows button operations used when setting or operating via OSD. - Seite 23 English „ Adjusting the level bar Use the [ ↑↓ ] buttons on the front panel to adjust the setting value. Use the [Enter] button on the front panel to enter the setting value. Increase the level bar setting Reduce the level bar setting Set the level Focus...
-
Seite 24: Camera Mode Osd Menu
English „ Camera mode OSD menu After using Image select to change the output image to camera image, press the “MENU” button to display the OSD menu. P.119 „ Top menu Icon Name Selection Item Function To display the menu for adjusting and Image Setting –... - Seite 25 English „ Image setting menu Icon Name Conditions Selection Item Function To automatically adjust the bright- ness of the camera image to suit Auto the subject of the image. You can adjust the amount of auto adjust- Brightness ment. To set the camera image to a fixed Manual brightness.
- Seite 26 English Icon Name Conditions Selection Item Function To clearly reproduce black & white Text1 subjects such as characters and lines. Use this when shooting ma- Text2 terials such as documents or text based data. The effect grows stron- Text3 ger as the number is increased. Image Mode To clearly reproduce color subjects.
- Seite 27 English „ Function setting menu Icon Name Selection Item Function After connecting to a PC via a USB cable, Mass Storage (*) data on the SD card loaded in this device can be sent to the PC. USB Mode After connecting to a PC via a USB cable, it Application is possible to take control of this device and import images by PC.
- Seite 28 English Icon Name Selection Item Function To call the setting saved in the memory of the selected number. Current settings are returned to the Default Call Default status. (∗) Current settings are returned to the Power On Power On status. (∗) Exit Exits without calling settings.
-
Seite 29: Sd Mode Osd Menu
English „ SD mode OSD menu After using Image select to change the output image to SD mode, press the “MENU” button to display the OSD menu. P.119 „ OSD top menu Icon Name Selection Item Function SD settings menu To display the setting menu for SD images. Slide Show Slide Show To display the setting menu for Slide Show. -
Seite 30: Sd Menu
English „ SD menu On this menu, when any item except for [Back] is selected, a [Yes] or [No] confirmation message is displayed. Select [Yes] to perform the operation, or [No] to cancel. Icon Name Selection Item Function To delete the image currently displayed. Current (Locked images cannot be deleted.) Delete... - Seite 31 English „ Slide show menu Icon Name Selection Item Function Start Slide To start a slide show. Show 5sec 10sec The image changes at the interval set when a Interval slide show is performed. 15sec 30sec To use all images stored on the SD card for the slide show.
-
Seite 32: Setting Up
English SETTING UP Setting Up Raise the camera column. The lamp column is raised at the same time. Rotate the camera head. Adjust the lamp column and lamp head to a suitable position, as shown in the illustration on the right. - Seite 33 English Connect the analog RGB cable to the [RGB OUT] terminal and connect the AC adapter’s DC plug to the [DC IN 12V] terminal. (Connecting the AC Adapter and Video Cable. P.98 Turn on the projector. N o t e •...
-
Seite 34: Connecting The Ac Adapter And Video Cable
English Connecting the AC Adapter and Video Cable (8) DC OUT terminal · To optional accessories (1) USB terminal SD card · To PC (7) DC IN 12V terminal · To power plug (6) RECORDER terminal (4) RGB IN terminal ·... - Seite 35 English (3) Connecting to the unit with analog RGB input terminal equipped Connect the supplied analog RGB cable to the [RGB OUT] terminal on the rear panel. • The display position may be displaced from the center of the screen. In such a case, adjust the horizontal and vertical positions manually from the connected device.
- Seite 36 English (8) Connecting the optional Light Box Connect the optional Light Box to the main unit with a dedicated cable. Do not connect any other device. Malfunctions may result. N o t e • Only one image can be output at a time; either [RGB OUT] and [DVI OUT] or [VIDEO OUT].
-
Seite 37: Storing
English STORING Storing Rotate the lamp head and the lamp column and fold them down onto the stage as shown in the illustration on the right. N o t e • Before storing the main unit, be sure to turn the power off. -
Seite 38: Operation Procedure
English OPERATION PROCEDURE Presentation Using Printed Materials, etc. „ Setting the main unit Set the main unit as shown in the figure above. Then connect it to a projector or a PC P.98 monitor, and turn on the power for the main unit. „... - Seite 39 English „ Turning the illumination lamp ON/OFF Press the Illumination lamp button on the unit to switch between ON and OFF. N o t e • Before connecting the main unit to other devices, be sure to turn off the power for all of the devices.
-
Seite 40: Presentation Using An Sd Card (Commercially-Available)
WXGA output), and 1280x960 (for XGA output). This product can store up to 2048 images. • ELMO is not liable for any damage caused by the loss of the data in the SD card or passive damage. • When an SD card is inserted, “Card Reading” is displayed on the screen, and to allow this device to check the contents of the SD card, it may take some time between inserting the card and the JPEGs being displayed and captured. - Seite 41 • Saved images will not be Time/Date stamped. • Please confirm images are saved correctly to the SD card or PC. ELMO is not liable for lost images or failure to capture images. • The [ ] mark is only displayed on the screen when [Function Setting] → [Guide] is set to ON from the Camera OSD menu.
- Seite 42 English z Changing display mode (1) During Single display in SD Mode, make sure that the OSD is not displayed, and then press the [ ] button on the operating panel or the [AF ] button on the remote control to change the display from Single display to 4x4 display. (2) Press the [ ] and [ ] buttons on the operating panel or the [ ] and [ ] buttons on...
- Seite 43 English „ Formatting the SD card When you need to format the SD card, insert the SD card into this product, and execute formatting. (1) Make sure that the OSD is not displayed, and then press the [ ] button on the operating panel or on the remote control to switch the output image to SD mode.
-
Seite 44: Transferring Images From The Sd Card To A Usb-Connected Pc
English Transferring Images From the SD Card to a USB-connected PC SD card N o t e • Set [USB Mode] to [Mass Storage] on the OSD Camera settings menu. • Insert the SD card with the label facing up. Forcing it into the slot in the wrong orientation may cause a malfunction. - Seite 45 English (3) This product is recognized as a removable disk. You can view the image data on an SD card on the PC’s viewer software. • The image data is stored in JPEG format in the following folders: My Computer Removable disk DCIM 100_ELMO...
-
Seite 46: Presentation Using The Supplied Software With A Usb-Connected Pc
English Presentation Using the Supplied Software with a USB-connected PC SD card N o t e • Set USB Mode to Application on the OSD. “Image Mate” can be found on the supplied CD-ROM. The “Image Mate” and TWAIN driver “Image Mate TWAIN” software for controlling this device can be found on the CD-ROM and allows you to perform the following functions. -
Seite 47: Shooting Off The Stage
English Shooting Off the Stage Close-up lens holder <Shooting forward> <Shooting downward> When the camera head section is set horizontally, you can shoot walls, distant views, etc. If the subject is far away, open the close-up lens holder forward. N o t e •... -
Seite 48: Presentation Using Film
English Presentation Using Film Slide shooting adapter Slide Film Pass film through clips „ Setting the main unit After folding the lamp onto the main unit as shown in Figure A, and then connecting a projector or PC monitor, turn on the power. „... -
Seite 49: Various Functions And Operations
English VARIOUS FUNCTIONS AND OPERATIONS Zoom The display range of the document can be adjusted by rotating the zoom dial on the main unit [ ] or by pressing the zoom buttons on the remote control [ • WIDE (ZOOM-OUT ) : Object can be shown in small size. -
Seite 50: Focus
English Focus „ Auto Focus (AF) Normal AF mode or One-shot AF mode can be selected on the main unit. N o t e • The objects listed below may not be brought into focus by Auto Focus. In such cases, use the manual focus. • Low contrast objects • Objects with fine repeated patterns, such as lateral stripes and crisscross stripes • Objects glittering or reflecting strong light • Objects on the far side of glass which is wet or dirty • Objects with a bright background or excessive contrast • Objects that are entirely dark • Objects in motion • In normal AF mode, the focus is adjusted constantly. -
Seite 51: Normal Af Mode
English „ Normal AF mode The focus is adjusted constantly and the camera focuses on objects automatically. (factory setting) „ One-shot AF mode You can automatically adjust the focus by selecting [AF Mode] → [Shot] from the OSD menu or pressing the [AF] button on the operation panel or the remote control. Once the camera has been focused, AF is released and the focus is fixed in that position. - Seite 52 English „ Manual focus You can change the focus position by pressing the [ ] and [ ] buttons on the main unit after selecting [Focus] from the OSD menu. Use this function (manual focus) to focus on any part of a 3-D object. Move the cursor up Move the...
- Seite 53 English Illumination The illumination lamp turns on when you press [ ] on the operating panel. It turns on or off each time the [ ] button is pressed. When the illumination lamp does not provide enough light on the stage’s surface, or when shooting 3-D objects, it renders a high quality, vivid image.
-
Seite 54: Adjusting The Brightness
English Adjusting the Brightness Press the [BRIGHTNESS ] or [BRIGHTNESS ] button on the operating panel or on the remote control to adjust image brightness. The following two adjustment modes can be set by selecting [Brightness] from the OSD menu. „... -
Seite 55: Image Selection
English Image Selection You can switch to camera image when you press the [ ] button on the operating or the [ button on the remote control, switch to the image input to the analog RGB input terminal [RGB IN] by pressing the [ ] button on the operating panel or on the remote control, and switch to images saved on the SD card by pressing the [ ] button on the operating panel or on... -
Seite 56: White Balance
English White Balance „ How to use [Auto] Adjust the white balance automatically according to the color status of the document. Factory setting: [Auto] > Auto One-Push Manual „ How to use [One-Push] To be used when the color balance of the image is lost. Shoot a sheet of white paper and then set [White Balance] →... - Seite 57 English Save/call Settings The operation status of the unit can be saved to or called from the memory. The unit saves 4 conditions (1 to 3 and Power ON) under the following storage conditions. • Current zoom ratio (The range of the optical zoom) •...
- Seite 58 English „ How to call settings Select [Call] → [1] to [3] from the OSD menu to call the settings for the selected number. Select [Call] → [Power On] from the OSD menu to call the settings for when the power is turned on. Default Power On Select [Call] →...
- Seite 59 English Highlight Function It you want to draw attention to a particular section of the output image, you can use Highlight display. „ Highlight settings From the Camera Mode OSD Menu, select [Function Setting] → [Highlight]. When [Darkness] is selected, the level bar is displayed, and you can then set the darkness for the areas outside the highlighted section with the [ ] and [ ] buttons on the operating panel.
- Seite 60 English „ Highlight operations When you press the [ ] button on the remote control while the output image is Camera Image or SD Mode, the highlight display uses the darkness and size set previously. You can move the highlighted area using the [ ], [ ], [ ]. and [ ] buttons on the remote control.
- Seite 61 English Mask Function You can mask a section of the output image. „ Mask settings From the Camera Mode OSD Menu, select [Function Setting] → [Mask]. The level bar to set [Darkness] is displayed, and you can then set the darkness for the masked areas with the ] and [ ] buttons on the operating panel.
-
Seite 62: Scroll Function
English Scroll Function The image expands to the digital zoom set previously, and the screen can be scrolled. „ Digital zoom settings From the Camera Mode OSD Menu, select [Function Setting] → [Scroll], and set the digital zoom ratio to x2, x3, or x4. „... -
Seite 63: Pip (Picture In Picture) Function
English PIP (Picture in Picture) Function When you press this button, you can display a quarter-size still image on a live camera display. „ PIP operations If you press the [ ] button on the remote control while the output image is Camera Image, a quarter-size still image is displayed at the bottom left of the screen. - Seite 64 English Using a Desktop Recorder (Optional) By connecting the optional desktop recorder to the main unit with a dedicated cable, you can record camera images from the main unit with the desktop recorder, and output video playback for the desktop recorder from the analog RGB output terminal of the main unit. „...
-
Seite 65: Symptoms And Confirmation
English TROUBLE SHOOTING Symptoms and Confirmation Check the following items. If any abnormality is found, consult the dealer from whom you purchased this product or our nearest branch/office. Symptom Possible causes/countermeasures No image is displayed. • The cable is not correctly connected. •... - Seite 66 English Symptom Possible causes/countermeasures Button operations are • Is an operation that is overloading the product, such as continuously delayed or ineffective. pressing a button, or performing another operation while pressing a button, being performed? Turn the power off, and then turn it on again. Images on the SD •...
-
Seite 67: Main Camera
English SPECIFICATIONS „ General Item Specifications Power source 12VDC (AC adapter AC100 - 240V) Power consumption 20W (AC adapter included) 30W (AC adapter included when the DC OUT terminal is connected) Outside dimensions W377 x D482 x H196mm (W14 x D19 x H7 in) (When folded) W377 x D482 x H613mm (W14 x D19 x H24... -
Seite 68: Illumination Device
English Item Specifications Effective pixels SXGA : Horizontal 1280, Vertical 1024 HDTV : Horizontal 1280, Vertical 720 WXGA : Horizontal 1280, Vertical 800 : Horizontal 1280, Vertical 960 Synchronized signal Internal Resolution Analog RGB Horizontal 800TV lines or more, Vertical 800TV lines or more Video output Horizontal 500TV lines or more DVI (DVI-D) output... -
Seite 69: Supplied Accessories
• Use pin plug for RCA pin in accordance with EIAJ RC-6703. • The above specifications are subject to change without notice. Trademarks is a trademark of ELMO Co., Ltd. VESA is the registered trademark of Video Electronics Standards Association. : SD logo is a trademark. - Seite 70 Unauthorized recording of copyrighted slide films, OVERSEAS SUBSIDIARY COMPANIES materials, photographs, etc. may infringe on the rights of copyright owners and be contrar y to U.S.A. ELMO USA CORP. copyright laws. Headquarters 1478 Old Country Road AVERTISSEMENT Plainview, NY 11803-5034, U.S.A...