Herunterladen Inhalt Inhalt Diese Seite drucken
EOS Infratec Classic Montage- Und Gebrauchsanweisung
Vorschau ausblenden Andere Handbücher für Infratec Classic:
Inhaltsverzeichnis

Werbung

Verfügbare Sprachen

Verfügbare Sprachen

Infratec Classic
Montage- und Gebrauchsanweisung
D
Assembly and operating instruction
GB
Руководство по монтажу и эксплуатации
RU
Made in Germany
Druck Nr. 29343654 / 18.17
D
1

Werbung

Inhaltsverzeichnis
loading

Inhaltszusammenfassung für EOS Infratec Classic

  • Seite 1 Infratec Classic Montage- und Gebrauchsanweisung Assembly and operating instruction Руководство по монтажу и эксплуатации Made in Germany Druck Nr. 29343654 / 18.17...
  • Seite 2 Deutsch ..................3 English ..................16 Русский ...................29...
  • Seite 3: Inhaltsverzeichnis

    Deutsch Inhalt Technische Daten ....................3 Lieferumfang ......................3 Allgemeine Hinweise ....................4 Allgemeine Sicherheitsbestimmungen ..............4 Montage des Steuergerätes ...................5 Elektrische Installationen ..................6 Installation der IR-Strahler ................6 Installation der Kabinenbeleuchtung ..............7 Montage des Fühlers ....................7 Anschlußplan ......................8 Bedienung .......................9 Einstellen der Sprache in der Anzeige ..............9 Inbetriebnahme .....................10 Kabinenbeleuchtung .....................10 Einschalten der IR-Strahler ...................10...
  • Seite 4: Technische Daten

    Technische Daten Netzspannung: 230 V N AC 50 Hz Absicherung: 1 x 16 A Leistung : max. 3500 W Regelbereich: 30 - 70 °C Regelcharakteristik: digitale Zweipunktregelung Fühlersystem: KTY - Sensor Heizzeibegrenzung: 1 - 99 Minuten Umgebungstemperatur: -20 bis +40 °C Einbaumaße HxBxT: 139 x 194 x 49 mm Lieferumfang...
  • Seite 5: Allgemeine Hinweise

    mals Reparaturen und Installationen Sehr geehrter Kunde, mit diesem IR - Steuergerät haben Sie ein selbst durch. Die Gehäuseabdeckung darf hochwertiges elektronisches Gerät erworben, nur von einem Fachmann entfernt wer- welches nach den neuesten Normen- und Güterichtlinien entwickelt und gefertigt wurde. den.
  • Seite 6: Montage Des Steuergerätes

    Montage des Steuergerätes • Stellen Sie zunächst den Wandausschnitt an der Aussenseite der Kabine, zweckmäßi- ger Weise in Augenhöhe neben der Tür her. Das Steuergerät darf nicht innerhalb Der Ausschnitt muss 178 mm breit und 114 mm hoch sein. Die Einbautiefe beträgt 45 der IR-Kabine montiert werden.
  • Seite 7: Elektrische Installationen

    • In diesem Fall ist es sinnvoll, die Kabel hin- ter einem Knotenbrett zu verlegen. Soll in Knotenbrett diesem Knotenbrett auch ein IR-Strahler ein- Steuerung gebaut werden, muss dieser unterhalb der Steuerung platziert sein. IR-Strahler 190 mm • Danach fügen Sie nun das Unterteil des Ge- rätes in die vorbereitete Rechtecköffnung ein.
  • Seite 8: Installation Der Kabinenbeleuchtung

    Bei Infratec classic Geräten ohne Leitungs- 2. Bohren Sie dafür ein Loch für die Kabeldurch- satz (ArtNr. 94.4388) Leitungen mit min. 90° C führung, vorzugsweise in die Mitte eines Pro- Temperaturbeständigkeit nach Anschlussplan filbrettes. verdrahten. 3. Führen Sie die Fühlerkabel durch das ge- bohrte Loch und schließen Sie die Fühler-...
  • Seite 9: Anschlußplan

    Anschlußplan Licht Netz Strahler Infratec Classic I R -E m itte r I R -E m itte r I R -E m itte r I R -E m itte r I R -E m itte r S e nsor Verteilerblock...
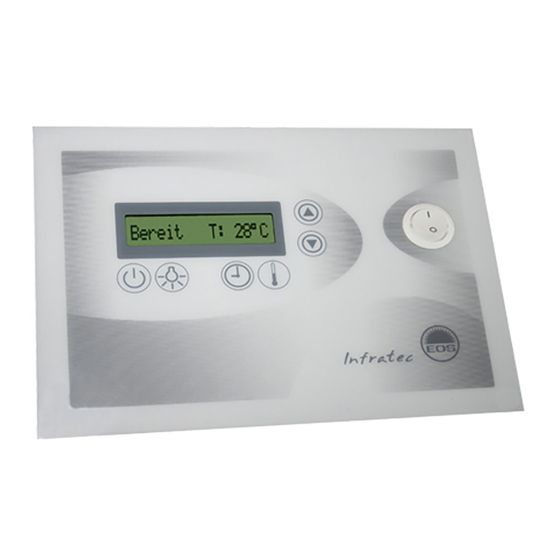
  • Seite 10: Bedienung

    Bedienung Infratec Standby - Schalter Betrieb Ein / Aus Einstell - Tasten Auf/Ab Licht Ein / Aus Modustaste Temperatur Modustaste Heizzeit Display Einstellen der Sprache in der Anzeige Werkseitig ist das Gerät so eingestellt, dass die Anzeige im Display in deutsch erscheint. Wollen Sie, dass die Anzeige in englisch dargestellt wird? Schalten Sie das Gerät zunächst mit dem Standby - Schalter aus.
  • Seite 11: Inbetriebnahme

    Inbetriebnahme Betätigen Sie den Standby - Schalter. Guten Tag Das Gerät begrüsst Sie kurz Bereit T: 28°C und geht in den Standby - Modus. In der Anzei- ge wird die aktuelle Temperatur in der Kabine angezeigt. Kabinenbeleuchtung Durch betätigen der -Taste wird die Kabi- nenbeleuchtung ein- oder ausgeschaltet.
  • Seite 12: Einstellung Der Heizzeit

    Einstellung der Heizzeit Mit dem Steuergerät können Sie die Heizzeit im Bereich1 bis 99 Minuten vorwählen. Set Zeit: 25 m Schalten Sie zunächst das Gerät in den Stand by Modus. Betätigen Sie dann die -Taste um in den Ein- stellmodus zu gelangen. Set Zeit: 60 m Mit den Tasten...
  • Seite 13: Fehleranzeigen

    Fehleranzeigen Ist der Sensor defekt oder ist die Fühlerleitung Fehler Temp Sens unterbrochen, zeigt das Display nebenstehen- de Anzeige. Ist der Sensor defekt oder ist auf der Fühlerlei- Schluss Sensor tung ein Kurzschluss, zeigt das Display neben- stehende Anzeige. Lassen Sie die Anlage durch einen Fachmann überprüfen.
  • Seite 14: Service Adresse

    Nicht mehr gebrauchte Geräte / Leuchtmittel sind gem. Richtlinie 2002/96 EG bzw. ElektroG zum Recy- celn bei einer Werkstoffsammelstelle abzugeben. Nicht mit dem Hausmüll entsorgen. Service Adresse EOS Saunatechnik GmbH Schneiderstriesch 1 35759 Driedorf Germany Tel: +49 (0)2775 82-514 Fax: +49 (0)2775 82-431 servicecenter@eos-sauna.de www.eos-sauna.de...
  • Seite 15: Gewährleistung

    Allgemeine Servicebedingungen (ASB) ausdrücklich darauf hin, dass unsere Verpackungen nicht für den Einzelversand per Paketdienst geeignet I. Geltungsbereich sind. Für Schäden, die aufgrund von unsachgemäßer Verpackung im Einzelversand entstehen, übernimmt Diese Servicebedingungen gelten für Serviceabwick- der Hersteller keine Haftung. lungen inklusive Überprüfung und Reparaturen von VI.
  • Seite 16 English Table of Contents Technical data .......................16 General Information ....................17 General Safety Precautions ..................17 Assembling the control unit ...................18 Electrical installations ...................19 Installation of the IR-Emitter .................19 Mount the infrared emitter according to the mounting instructions.......19 Installation of the booth lighting ................20 Connection diagram ....................21 Controls ........................22 Setting the display language .................22...
  • Seite 17: Technical Data

    Technical data Voltage: 230 V N AC 50 Hz Fusing: 1 x 16 A Power intake : max. 3500 W Control range: 30 - 60° C Control characteristics: Digital, two-point control Sensor system: KTY sensor Heating time limitation: 1 - 99 Minutes Ambient temperature: -20 bis +40°...
  • Seite 18: General Information

    Dear Customer, With this IR controller you have purchased a high quality electronic appliance developed and produced in conformance with the latest standards and quality guidelines. Read these instructions carefully to fami- liarize yourself quickly and simply with the unit. General Safety Precautions •...
  • Seite 19: Assembling The Control Unit

    Assembling the control unit • But make sure the maximum radiation out- put does not exceed 3.5 kW. The control unit must not be as- sembled inside the IR cabin. • The connector cable for cabin lighting is connected to the cabin lighting in the ca- bin (max.
  • Seite 20: Electrical Installations

    • Next, we suggest that the cable be laid be- hind a node board. If a IR radiator has also Node board been installed in this node board, it must IR control be located below the control unit. IR radiator •...
  • Seite 21: Installation Of The Booth Lighting

    2. Drill a hole to lead the cable through, pref- The Infratec Classic control units wit- erably through the middle of one of the hout pre-installed cables (item no. 94.4388) wooden boards. shall be connected only with the cable resis- tant to at least 90°C according to the given...
  • Seite 22: Connection Diagram

    Connection diagram Licht Netz Strahler Infratec Classic I R -E m itte r I R -E m itte r I R -E m itte r I R -E m itte r I R -E m itte r S e nsor...
  • Seite 23: Controls

    Controls Infratec Standby switch On / off Control buttons - up/down Light on / off Mode button - temperature Mode button - heating time Display Setting the display language The unit comes preset with German as the display language. To change the display language to English, first switch off the unit using the Standby switch.
  • Seite 24: Starting The Unit

    Starting the unit Activate the Standby switch. Hello The unit displays a brief greeting and ready T: 28°C enters Standby mode. The display displays the current temperature in the cabin. Cabin lighting To switch the cabin lighting on or off, press the light button.
  • Seite 25: Setting The Heating Time

    Setting the heating time You can preset the heating time between 1-99 minutes with the control unit. First, switch the unit to Standby mode. set time: 25 m Next, select the -button to switch to control mode. Now set the desired heating time using the buttons.
  • Seite 26: Error Indicators

    Error indicators Temperature sensor fault / circuit broken If the sensor is defective, the message shown sensor error opposite appears in the display. Have the unit examined by a trained technician. Reference value = approx. 2 k W at 20° C Temperature sensor short circuit sensor short error...
  • Seite 27: Service Address

    Service Address: EOS Saunatechnik GmbH Schneiderstriesch 1 35759 Driedorf, Germany Tel: +49 (0)2775 82-514 Fax: +49 (0)2775 82-431 servicecenter@eos-sauna.de www.eos-sauna.de Equipment commissioning date: Please keep this address in a safe place togeth- er with the installation guide. Stamp and signature of the authorized elec-...
  • Seite 28: General Terms And Conditions Of Service

    General Terms and Conditions of Service shipments via parcel post. The manufacturer shall accept no liability for damage incurred as a result of improper I. Scope packaging in an individual shipment. Unless otherwise agreed in writing in a specific case, VI.
  • Seite 29 Русский Содержание Технические данные ...................30 Объем поставки ....................30 Общие указания ....................31 Общие указания техники безопасности ............31 Монтаж устройства управления ................32 Электрический монтаж ..................33 Установка системы инфракрасный излучатель ..........33 Монтаж датчика ....................34 Пример подключения ..................35 Управление ......................36 Настройка языка на индикаторе ...............36 Ввод...
  • Seite 30: Технические Данные

    Технические данные Напряжение сети: 230 В N AC 50 Гц Защита: 1 x 16 A Мощность: макс. 3500 Ватт Диапазон регулировки: 30 - 60° C Характеристика регулировки: цифровая двухточечная регулировка Система зонда: KTY – сенсор Ограничение времени нагрева: 1 - 99 минут Температура...
  • Seite 31: Общие Указания

    Общие указания техники Уважаемый покупатель! безопасности В р а м к а х п о к у п к и и н ф р а к р а с н о го управляющего устройства Вы приоб- • Электрический монтаж может рели...
  • Seite 32: Монтаж Устройства Управления

    Монтаж устройства управления Ус т р о й с т в о у п р а в л е н и я н е • Тем не менее, следите за тем, чтобы должно устанавливаться внутри не была превышена максимальная инфракрасной кабины. мощность...
  • Seite 33: Электрический Монтаж

    • В этом случае целесообразно проложить у з л о в а я кабели за узловой доской. Если в этой доска узловой доске должен быть установлен с и с т е м а и н ф р а - также инфракрасный...
  • Seite 34: Монтаж Датчика

    2. Просверлите отверстие для кабельно- Для подключения панели управления го ввода, предпочтительнее по центру Infratec Classic, поставляемоей без с о ед и н и тел ь н ы х к а бел е й ( а рт и к ул профильной доски.
  • Seite 35: Пример Подключения

    Пример подключения Licht Netz Strahler Infratec Classic I R -E m itte r I R -E m itte r I R -E m itte r I R -E m itte r I R -E m itte r S e nsor...
  • Seite 36: Управление

    Управление Infratec в ы к л ю ч а т е л ь режима резерва вкл. / выкл клавиши настройки „вверх/вниз“ свет вкл. / выкл клавиша режима „температура“ дисплей клавиша режима „время нагрева“time Настройка языка на индикаторе На заводе устройство настроено таким образом, что на дисплее появляется показание на немецком...
  • Seite 37: Ввод В Эксплуатацию

    Ввод в эксплуатацию Нажмите выключатель режима резерва. Hello На дисплее устройства появится краткое приветствие, и устройство переходит в р е ж и м р е з е р в а . Н а и н д и к а т о р е будет...
  • Seite 38: Настройка Времени Нагрева

    Настройка времени нагрева YС помощью устройства управления вы можете предварительно установить время нагрева в диапазоне 1-99 минут. Вначале установите устройство в режим set time: 25 m резерва. Затем нажмите клавишу -чтобы войти в режим настройки. При помощи клавиш и выполните set time: 60 m настройку...
  • Seite 39: Индикация Неисправностей

    Индикация неисправностей Если датчик неисправен, на дисплее Неполадка - температурный датчик появится информация, помещенная sensor error рядом. Поручите проверку устройства специалисту. Ориентировочное значение = ок. 2 кОм при 20˚С Короткое замыкание - температурный датчик sensor short error...
  • Seite 40: Адрес Сервисного Центра

    Изготовитель: EOS Saunatechnik GmbH Schneiderstriesch 1 35759 Driedorf Germany / Германия Адрес сервисного центра в РФ: ООО „EOC Премиум-СПА-Технологии“ 108811, Москва, Киевское ш., БП«Румянцево» 928 г Телефоны: +7 (495) 66 55 192, 8 800 1000 539 info@eos-sauna.ru www.eos-sauna.ru Дата покупки: Печать...
  • Seite 41: Гарантия

    Общие условия обслуживания (ASB) на то, что наша упаковка не предназначена для штучной отправки службами доставки. За ущерб, I. Сфера действия возникший во время доставки оборудования из- за его ненадлежащей упаковки, производитель Н а с т о я щ и е у с л о в и я о б с л у ж и в а н и я ответственности...

Inhaltsverzeichnis