Inhaltsverzeichnis
Werbung
Da compilare a cura del rivenditore:
To be completed by the retailer:
Vom Händler auszufüllen:
A remplir par le revendeur:
Modello/Model/Modell/Modèle:
Numero di serie/Serial number/Seriennummer/Nombre de série:
Data/Date/Datum/Date:
Produttore/Producer/Hersteller/Producteur: Techna srl, via Karl Marx 79 - 42124 Roncocesi (RE) Italy
P.IVA IT02174270351 Tel. +39.0522.492490 Fax +39.0522.915072
www.woodline-srl.eu - info@woodline-srl.eu
Manuale uso e manutenzione
Instruction and maintenance manual
Bedienungs- und Wartungshandbuch
instructions d'emploi et d'entretien
SPACCALEGNA IDRAULICO
HYDRAULIC LOG SPLITTER
HYDRAULISCHER HOLZSPALTER
FENDEUSE À BOIS HYDRAULIQUE
WL 13/16/20 C/1000
CONTIENE DICHIARAZIONE DI CONFORMITÀ
CONTAINS CE DECLARATION OF CONFERMITY
ENTHÄLT - KONFORMITÄTSERKLÄRUNG
Ed. 11/11
®
s.r.l.
DÉCLARATION DE CONFORMITÉ CE
I
GB
D
F
Werbung
Inhaltsverzeichnis

Verwandte Anleitungen für WOODLINE WL 13 C/1000 EL

Inhaltszusammenfassung für WOODLINE WL 13 C/1000 EL
- Seite 1 ® s.r.l. Produttore/Producer/Hersteller/Producteur: Techna srl, via Karl Marx 79 - 42124 Roncocesi (RE) Italy P.IVA IT02174270351 Tel. +39.0522.492490 Fax +39.0522.915072 www.woodline-srl.eu - info@woodline-srl.eu Manuale uso e manutenzione Instruction and maintenance manual Bedienungs- und Wartungshandbuch instructions d’emploi et d’entretien SPACCALEGNA IDRAULICO...
-
Seite 2: Inhaltsverzeichnis
INDICE DEL MANUALE : 1) Dichiarazione di Conformità ......................3 2) Sicurezza............................7 3) Marcatura ed identificazione......................8 4) Dati Tecnici ............................10 5) Trasporto e messa in servizio......................10 6) Montaggio della macchina......................13 7) Uso della macchina ........................15 8) Manutenzione e rimessaggio......................17 9) Problemi-Rimedi ..........................18 10) Accessori optional........................19 11) Schemi macchina ........................62 INDEX:... -
Seite 3: Dichiarazione Di Conformità
HYDRAULISCHER SCHALTPLAN - MASCHINE MIT HYDRAULISCHEM ANSCHLUSS AN DEN TRAKTOR Dichiara che lo SPACCALEGNA IDRAULICO di propria costruzione SCHÉMA INSTALLATION HYDRAULIQUE MACHINES AVEC ALIMENTATION GREFFES HYDRAULIQUES WOODLINE WL 13 C/1000 MODELLO : è conforme alle direttive 2006/42/CE, 2006/95/CE, 2004/108/CE e successive modificazioni TRACTEUR Reggio Emilia data: vale quello riportato sulla marcatura. - Seite 4 DIAGRAM OF THE HYDRAULIC CIRCUIT IN COMBINED ELECTRIC AND P.T.O. Dichiara che lo SPACCALEGNA IDRAULICO di propria costruzione POWERED MACHINESHYDRAULISCHER SCHALTPLAN WOODLINE WL 16 C/1000 MODELLO : HYDRAULISCHER SCHALTPLAN - MASCHINE MIT KOMBINIERTEN ANTRIEB: è conforme alle direttive 2006/42/CE, 2006/95/CE, 2004/108/CE e successive modificazioni ELEKTRISCHE SPEISUNG UND ANTRIEB DURCH DIE ZAPFWELLE EINES TRAKTORS Reggio Emilia data: vale quello riportato sulla marcatura.
- Seite 5 DIAGRAM OF THE HYDRAULIC CIRCUIT IN ELECTRIC OR TRACTOR P.T.O.-POWERED Dichiara che lo SPACCALEGNA IDRAULICO di propria costruzione MACHINES WOODLINE WL 20 C/1000 MODELLO : HYDRAULISCHER SCHALTPLAN - MASCHINE MIT ELEKTRISCHER SPEISUNG ODER è conforme alle direttive 2006/42/CE, 2006/95/CE, 2004/108/CE e successive modificazioni ANTRIEB DURCH DIE ZAPFWELLE EINS TRAKTORS Reggio Emilia data: vale quello riportato sulla marcatura.
- Seite 6 Premessa : SCHEMA IMPIANTO ELETTRICO TRIFASE Grazie per avere scelto un prodotto Techna, siamo certi che ne sarete pienamente soddisfatti. DIAGRAM OF THE THREE-PHASE ELECTRICAL SYSTEM I prodotti Techna sono costruiti seguendo rigorosi standard qualitativi. ELEKTRISCHER SCHALTPLAN DREHSTROM Ogni macchina al momento della spedizione viene sottoposta ad una scrupolosa serie di collaudi relativi a SCHÉMA INSTALLATION ÉLECTRIQUE TRIPHASÉE funzionalità...
-
Seite 7: Sicurezza
Garanzia: La GARANZIA è valida per la durata di mesi 24 dalla data di acquisto. Saranno sostituiti i componenti ed eliminati i guasti dovuti a difetti di fabbricazione. La Techna declina ogni responsabilità per danni a persone, cose ed alla macchina stessa causati da un uso improprio. La mano d'opera per gli interventi in garanzia è... -
Seite 8: Accessoires En Option
10) ACCESSOIRES EN OPTION Arrestare la macchina con lo stelo portalama completamente retratto cioè chiuso (vedi "rimessaggio"). Verificare sempre la stabilità della macchina e la presenza delle spine di fissaggio del piano (dove Avant d'installer tout accessoire, lire attentivement chaque partie du manuel, y compris previsto). - Seite 9 8.2) Remplacement de l'huile usagée : 3.2) Pannelli monitori: Remplacer l'huile usée environ chaques 1000 heures de travail. I pannelli monitori applicati sugli spaccalegna idraulici richiamano l’attenzione su alcuni aspetti dei Pour le remplacement de l'huile il faut dévisser le bouchon de pericoli che comporta l’utilizzo della macchina.
-
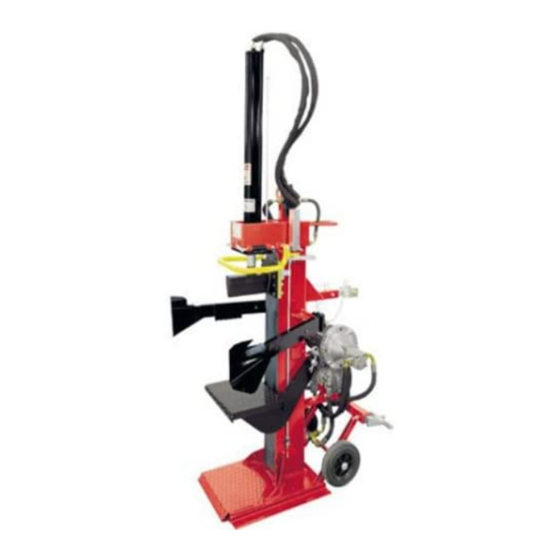
Seite 10: Dati Tecnici
4) DATI TECNICI 7.3) Nouveau cycle: Avant de commencer un nouveau cycle de travail s'assurer que l' embasement soit libre d'éclats et restes de bois. 7.4) Arrêt de la lame en cas d'urgence : Pour toute situation d'urgence, lâcher les leviers de commande pour permettre à... -
Seite 11: Precauzioni Generali
7.2) Séquence de travail La macchina viene consegnata al Cliente già collaudata dal Costruttore. PREFACE: La fendeuse à bois WL 13/16/20 C/1000 a la possibilité de fendre bûches Il riempimento del serbatoio e del circuito idraulico con il liquido necessario al funzionamento e i relativi spurghi de bois de longueur jusqu'à... -
Seite 12: Messa In Servizio Della Macchina
5.4) Messa in servizio della macchina: -Insérer les chevilles de fixation (s) (par. 6.2) présents dans le kit d'assemblage de la machine et leur fixer par les goupilles ( c) (par. 6.2). Posizionare la macchina su un terreno piano, considerando un spazio libero circostante alla -Relâcher la seconde levier de commande de façon à... -
Seite 13: Montaggio Della Macchina
Effectuer cette opération en poussant lentement les leviers de commande Il tipo di albero cardanico utilizzato deve essere provvisto vers le bas en manière que la tige porte-lame sorte peu à la fois. di marchio e munito di relativa protezione e collegamento Contrôler qu'il n’... -
Seite 14: Montage De La Machine
Effettuare questa operazione spingendo lentamente le leve di comando Le type d'arbre de Cardan utilisé doit être pourvu de marque verso il basso in modo che lo stelo portalama fuoriesca poco alla volta. et muni de relative protectionet liaison chaîne pour le bloc. Controllare che non vi siano intralci o impedimenti nella direzione Lire attentivement les instructions reportées sur les instructions di salita. -
Seite 15: Mise En Service De La Machine
5.4) Mise en service de la machine - Inserire le spine di fissaggio (S) (paragrafo 6.2) presenti nel kit della macchina e fissarle mediante le copiglie (C) (paragrafo 6.2). Positionner la machine sur un terrain plat, en lui accordant un rayon d’action de 3 mètres au moins, - Rilasciare la seconda leva di comando in modo da permettere allo stelo portalama di portarsi nella pour permettre chaque manoeuvre en complète sûreté. - Seite 16 5) TRANSPORT EST MISE EN SERVICE 7.2) Sequenze di lavoro: PREMESSA: Gli spaccalegna WL 13/16/20 C/1000 hanno la possibilità di spaccare ceppi di legno di lunghezza fino a 1 metro posizionando il ceppo direttamente sul La machine est remise au client déjà essayée par le Constructeur. basamento della macchina.
-
Seite 17: Données Techniques
4) DONNÉES TECHNIQUES 7.3) Nuovo ciclo: Prima di iniziare un nuovo ciclo di lavoro assicurarsi che il basamento sia libero da schegge e residui di legno. 7.4) Arresto della lama in caso di emergenza: Per una qualsiasi situazione di emergenza rilasciare la leva di comando per arrestare la lama nella posizione in cui si trova. -
Seite 18: Problemi-Rimedi
Panneaux moniteurs 8.2) Sostituzione dell'olio esausto: Sostituire l'olio ogni 1000 ore di lavoro circa. Les panneaux moniteurs appliqués sur les fendeurs de bois hydrauliques éveillent l'attention sur Per la sostituzione dell'olio occorre svitare il tappo di carico (A) e certains aspects dangereux que comporte l'utilisation de la machine. smontare il filtro olio in aspirazione (B). -
Seite 19: Accessori Optional
10) ACCESSORI OPTIONAL Arrêter la machine avec la tige porte-lame complètement rentrée, c'est-à-dire fermée (voir "Remise en état de la machine”). Vérifier toujours la stabilité de la machine et le serrage des cliquets mises sur les supports du châssis Prima di installare qualunque accessorio, leggere attentamente il manuale in ogni sua (oú... -
Seite 20: Safety
INTRODUCTION GARANTIE: Thank you for chosing a Techna product. We are sure that you wire be fully satisfied. La GARANTIE est valide pour la durée de mois 24 de la date d'achat. Ils seront remplacés les Techna products are constructed following rigorous qualitative standards. composants et éliminées les pannes dûes aux défauts de fabrication. - Seite 21 PRÉFACE: GUARANTEE: Merci pour avoir choisi un produit Techna, nous sommes certains que vous en serez satisfaits complètement. The guarantee is valid for 24 months from the date of purchase. Fault parts due to manufacturing Les produits Techna sont construit en suivant standards qualitatifs rigoureux. defects will be exchanges or repaired.
-
Seite 22: Zusatzvorrichtungen
10) ZUSATZVORRICHTUNGEN Stop the machine with the blade holder rod fully retracted, which means closed (see ”Machine storage”). Always check the stability of the machine. Lesen Sie vor der Montage von Zusatzvorrichtungen aufmerksam das gesamte Handbuch Always check the stability of the machine and make sure that the fixing pins for the table (where sowie das Handbuch, das der Zusatzvorrichtung beiliegt. -
Seite 23: Probleme Und Ihre Behebung
8.2) Ölwechsel: 3.2) Warning panels: Das Öl ca. alle 1.000 Betriebsstunden ersetzen. Zur Ersetzung des Öls den Einfüllstopfen (A) herausschrauben und den The warning panels attached to the hydraulic log splitters draw the operator’s Ölansaugfilter (B) abbauen. Das Öl vollständig ablassen und die Menge neues attention to some dangers that can arise during use of the machine. -
Seite 24: Technical Data
4) TECHNICAL DATA 7.3) Neuer Zyklus: Vor Beginn eines neuen Arbeitszyklusses sicherstellen, dass der Unterbau frei von Splittern und Holzresten ist. 7.4) Anhalten des Spaltkeils im Notfall: In alle Notsituationen die Bedienhebel loslassen, damit der Spaltkeil in die Ausgangsstellung zurückkehrt. WL13/16 C/1000 WL 20 C/1000 7.5) Anhalten des Maschine... - Seite 25 7.2) Arbeitssequenzen: The machine is delivered to the customer already tested by the manufacturer. VORBEMERKUNG: Die Holzspalter WL 13/16/20 C/1000 weisen die Möglichkeit The tank and the hydraulic circuit are filled with the liquid necessary for operation and relative bleeding is auf, Holzstücke mit einer Länge von bis zu 1 m zu spalten wobei das Holzstück carried out by the manufacturer at the time of commissioning.
-
Seite 26: Putting The Machine Into Operation
5.4) Putting the machine into operation: - Die Befestigungsbolzen (S) einsetzen, die im Kit der Maschine enthalten sind, und mit den Splinten (C) sichern. - Den zweiten Bedienhebel loslassen, so dass der Schaft der Spaltkeilhalterung die Position der max. Place the machine on flat ground, keeping a free space around the machine of at least 3 metres, Ausfahrung einnehmen kann. -
Seite 27: Assembly Of The Machine
Während dieses Vorgangs die Bedienhebel leicht nach unten drücken, The type of cardan shaft used must possess marking and so dass der Schaft der Spaltkeilhalterung langsam ausfährt. must have the relative protections and chain connection for locking. Read the instructions in the manual relative to the cardan shaft used Sicherstellen, dass keine Hindernisse in Hubrichtung vorhanden carefully. -
Seite 28: Modelle Mit Übersetzungsgetriebe Für Nebenantrieb
Make sure that nothing is in the way to obstruct the upward Der Typ der verwendeten Kardanwelle muss die Kennzeichnung movement. aufweisen und mit entsprechender Schutzvorrichtung sowie - When the holes are aligned, release one control lever to maintain the Kettenanschluss zum Blockieren ausgestattet sein. -
Seite 29: Modelle Mit Elektrischer Speisung
5.4) Inbetriebnahme der Maschine: 6.4) Models with tractor hydraulic clutches: Die Maschine auf einer ebenen Fläche aufstellen und einen Freiraum von zumindest 3 Metern um - Having connected the machine to the tractor mechanically and having connected the pipes to the die Maschine herum einhalten, um ein sicheres Durchführung aller Manöver zu gewährleisten. -
Seite 30: Allgemeine Vorsichtsmaßnahme
5) TRANSPORT UND INBETRIEBNAHME 7.2.1) Positioning the log Die Maschine wird vor der Auslieferung an den Kunden einer Abnahmeprüfung unterzogen. - Position the log to be split on the machine base. Das Füllen des Behälters und des Hydraulikkreislaufs mit der für den Betrieb erforderlichen Flüssigkeit sowie - Before starting the cutting cycle, make sure that the log sits firmly on the das entsprechende Entlüften werden vom Hersteller während der Abnahmeprüfung vorgenommen. -
Seite 31: Technische Daten
4) TECHNISCHE DATEN 7.4) Emergency blade stop: In any emergency situation, release the control levers to make the blade return to the starting position. 7.5) Stop of the Log-splitter 7.5.1) Stopping the motor (electric powered models): To stop the motor, press the red button on the switch. WL13/16 C/1000 WL 20 C/1000 Never stop the motor when it is under pressure. -
Seite 32: Machine Storage
8.2) Replacing used oil: 3.2) Hinweisschilder: Replace the oil after every 1000 hours’ operation. Die auf dem hydraulischen Holzspalter angebrachten Hinweisschilder lenken To replace the oil, unscrew the filling cap (A) and remove the oil suction filter die Aufmerksamkeit auf einige Aspekte der Benutzung der Maschine. (B). -
Seite 33: Optional Accessories
10) OPTIONAL ACCESSORIES Die Maschine mit vollständig eingefahrenem Schaft der Spaltkeilhalterung anhalten (siehe ”Stilllegung der Maschine”). Before installing any accessories, read all parts of the manual carefully Immer die Stabilität der Maschine und das Vorhandensein der Bolzen für die Befestigung des Tisches oder der including the parts concerning the attached ACCESSORIES. -
Seite 34: Zusatzvorrichtungen
Vorbemerkung: Garantie: Wir danken Ihnen für die Wahl eines Produkts von Techna und sind sicher, dass Sie damit voll und ganz zufrieden Die GARANTIE hat eine Gültigkeit von 24 Monaten vom Kaufdatum an. Im Fall von Fertigungsfehlern sein werden. Die Produkte von Techna werden unter Einhaltung ausgesprochen strenger Qualitätsstandards werden die Bauteile ausgewechselt und die Mängel behoben.