Scheppach MTP900 Original Bedienungsanleitung
Vorschau ausblenden
Andere Handbücher für MTP900:
- Original bedienungsanleitung (20 Seiten) ,
- Original bedienungsanleitung (56 Seiten)
Inhaltsverzeichnis
Verfügbare Sprachen
Verfügbare Sprachen
Art.Nr.
5912302903
AusgabeNr.
5912302850
Rev.Nr.
08.03.2016
MTP900
Benzin-Bodenhacke
DE
Originalbedienungsanleitung
Petrol Power Cultivator
GB
Translation of the original operating instructions
Motobineuse à essence
FR
Traduction des instructions d'origine
Nachdrucke, auch auszugsweise, bedürfen der Genehmigung. Technische Änderungen vorbehalten. Abbildungen beispielhaft!
www.scheppach.com service@scheppach.com +(49)-08223-4002-99 +(49)-08223-4002-58
6-16
17-26
27-38
Kapitel
Inhaltsverzeichnis
Fehlerbehebung

Verwandte Anleitungen für Scheppach MTP900


Inhaltszusammenfassung für Scheppach MTP900
- Seite 1 Benzin-Bodenhacke 6-16 Originalbedienungsanleitung Petrol Power Cultivator 17-26 Translation of the original operating instructions Motobineuse à essence 27-38 Traduction des instructions d’origine Nachdrucke, auch auszugsweise, bedürfen der Genehmigung. Technische Änderungen vorbehalten. Abbildungen beispielhaft! www.scheppach.com service@scheppach.com +(49)-08223-4002-99 +(49)-08223-4002-58...
- Seite 2 2 І 40...
- Seite 3 12.1 12.2 12.1 12.2 3 І 40...
- Seite 4 4 І 40...
- Seite 5 5 І 40...
-
Seite 6: Erklärung Der Symbole
Erklärung der Symbole Vor Inbetriebnahme Bedienungsanleitung und Sicherheitshinweise lesen und beachten! Gehörschutz tragen! Schutzbrille tragen! Arbeitshandschuhe tragen! Festes Schuhwerk tragen! Offenes Feuer verboten! Achtung! Drehende Teile nicht berühren. Es besteht schwere Verletzungsgefahr! Es ist verboten, Schutz- und Sicherheitsvorrichtungen zu entfernen oder zu verändern. 6 І... - Seite 7 Erklärung der Symbole Achtung! Heisse Teile - Nicht berühren Gefahr durch fortschleudernde Teile bei laufendem Motor. Unbedingt Sicherheitsabstand einhalten. Halten Sie nichtbeteiligte Personen vom Gerät fern. 7 І 40...
-
Seite 8: Inhaltsverzeichnis
Inhaltsverzeichnis: Seite: Einleitung Gerätebeschreibung Lieferumfang Bestimmungsgemäße Verwendung Sicherheitshinweise Technische Daten Montage Funktion Betrieb Arbeitsanweisungen Wartung Lagerung Fehlerbehebung Konformitätserklärung Garantieurkunde 8 І 40... -
Seite 9: Einleitung
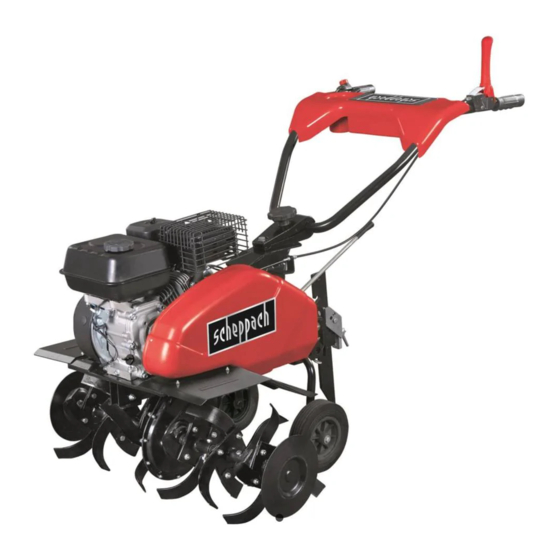
1. Einleitung 2. Gerätebeschreibung (Abb. 1-2) Hersteller: Motor-Stoppschalter 2. Gashebel scheppach Fabrikation von 3. Werkzeugbox Holzbearbeitungsmaschinen GmbH Kupplungssteuerung Günzburger Straße 69 5. Lenker D-89335 Ichenhausen 6. Rändelschraube Lenkerfi xierung Schalthebel 8. Tiefenregulator Verehrter Kunde, Transportvorrichtung 10. Rad Wir wünschen Ihnen viel Freude und Erfolg beim 11. -
Seite 10: Bestimmungsgemäße Verwendung
4. Bestimmungsgemäße Verwendung 3 Schutzausrüstung tragen. Immer Augenschutz tragen. Das Gerät ist geeignet zum Umgraben von Beeten 4 Schutzausrüstung, wie Staubschutzmaske, und Äckern. Beachten Sie unbedingt die Einschrän- Schutzhelm oder Gehörschutz, die bei einschlä- kungen in den zusätzlichen Sicherheitshinweisen. gigen Bedingungen benutzt werden, reduzieren Personenschäden. - Seite 11 4 Den Motor immer ausschalten und vor dem 9 Die Maschine warten. Prüfen, ob Teile in Be- Auffüllen des Tanks abkühlen lassen. Den Deckel wegung falsch ausgerichtet oder blockiert sind. des Tanks auf keinen Fall entfernen oder Kraftstoff Teile auf Bruch prüfen bzw. prüfen, ob ein anderer bei laufendem oder warmen Motor auffüllen.
-
Seite 12: Technische Daten
6. Technische Daten 8 Den Motor vorsichtig nach Vorgabe starten. Da- bei die Füße in einem angemessenen Abstand vom Motor: 4-Takt, 196 ccm Hacksatz positionieren. Motorleistung: 4.1 kW/ 5.6 PS 9 Der Hacksatz bewegt sich nicht, wenn die Arbeitsdrehzahl Motor: 3600 min Kupplung ausgekuppelt ist. -
Seite 13: Motoröl Auffüllen
5. Die Halterung (H) der Transportvorrichtung (9) ist Transportvorrichtung (9) auf dem Rahmen aufgeschweißt. Fixieren Sie die Stellen Sie das Rad nach unten, wenn Sie die Bo- Transportvorrichtung mit den Schrauben (J) M8x60, denhacke transportieren. Kippen Sie die Maschine Buchsen und Muttern wie abgebildet. (Abb. 7) nach hinten, bis die Messer den Boden nicht mehr berühren. -
Seite 14: Warmstart
Kaltstart 9.6 Betriebsgeschwindigkeit Normale Betriebsgeschwindigkeit: 1. Den Gashebel auf die „ “ Position stellen. • Den Gashebel auf „ “ stellen, um beste Ergeb- 2. Das Starterseil mehrmals langsam ziehen, damit nisse zu erzielen. Kraftstoff in den Vergaser des Motors fl ießen Kultivierung: kann. -
Seite 15: 11: Wartung
11. Wartung 1. Den Tank vollkommen entleeren. Gelagerter Kraftstoff enthält Ethanol oder MTBE, und kann innerhalb von 30 Tagen abstehen. Abgestande- Eine regelmäßige Wartung sichert einen optimalen ner Kraftstoff hat einen hohen Kunststoff-Gehalt Zustand Ihrer Bodenhacke, verlängert ihre Lebens- und kann somit den Vergaser verstopfen und den dauer und unterstützt eine optimale Leistung beim Kraftstofffl uss einschränken. -
Seite 16: Fehlerbehebung
13. Fehlerbehebung Problem Ursache Lösung Der Motor startet nicht. 1. Das Zündkabel ist lose. 1. Das Zündkabel richtig an der Zünd- kerze anschließen. 2. Zu wenig Kraftstoff oder abgestanden. 2. Mit neuem Kraftstoff auffüllen. 3. Der Gashebel steht nicht in der richtigen 3. - Seite 38 38 І 40...
-
Seite 39: Konformitätserklärung
Fabrikation von Holzbearbeitungsmaschinen GmbH • Günzburger Str. 69 • D-89335 Ichenhausen Konformitätserklärung erklärt folgende Konformität gemäß EU-Richtline und Normen apliecina šādu saskaņā ar ES direktīvu atbilstības un für den Artikel standarti šādu rakstu hereby declares the following conformity under the EU Direc-... -
Seite 40: Garantieurkunde
Zahteve za spreminjanje in zmanjšanje ter ostale zahteve za nadomesti- na takšen način, da vsak del naprave brezplačno nadomestimo, za katerega bi se v tem roku lo škode so izključene. scheppach Fabrikation von Holzbearbeitungsmaschinen GmbH Günzburger Str. 69 | D-89335 Ichenhausen...